

How a Boat Sails • The Parts of a Sailing Rig • Basic Sail Trim • The Points of Sailing Tacking • Jibing • Docking Under Sail • Anchoring & Mooring Under Sail Sail Handling & Storage • New Sailboat Types
Sailing is an old and complex art—sailors can spend a lifetime at it and still find that there is more to learn. It is also a simple and enjoyable activity. A beginning sailor can have a fine time in a sailboat on his or her first day out, provided a few precautions are observed regarding the weather and safety on the water.
Experienced powerboat people, as well as those new to water sports, are taking up sailing in increasing numbers. While most of the seamanship and piloting chapters in this book apply equally to sailboats and powerboats, there are terms used specifically on sailboats and special equipment used to accomplish many sailing seamanship maneuvers.
HOW A BOAT SAILS
The art of sailing, one of the oldest studies in the world, has been joined by the science of sailing, with its complex laws of physics and the lofty mathematics that describe them. Fortunately, along with the wind tunnels, sensing devices, and computers that confront us with all of sailing’s complexity, there has come technology that has broadened the methods and materials we use to build and sail boats. The improvement in construction and safety of sailboats is obvious—and no less so the ability of modern sailors to take advantage of it—but both the art of sailing and the science of sailing are very much works in progress.
While sailors can take heart that the underlying physical phenomena can be used without being completely understood, it should be noted that sailing has been studied assiduously for centuries. The interaction of the wind, water, hull, sails, and keels—to say nothing of the involvement of sailors—is complex, often simultaneous, and, indeed, at times invisible and even intuitive. But each progression in its understanding has led to easier and faster ways to sail.
Keep in mind that while the following discussion of how and why a boat sails is broken into sections so as to be intelligible, the elements that are discussed in isolation are in fact seldom isolated. On a sailboat, little happens that doesn’t have an effect on everything else.
Bending the Flow
Sails extract energy from a flow of air (the wind) by bending it as it goes by. This is true of every kind of sail, ancient or new, and it is true whether the sail is moving across the wind or being blown along with it. As they create a driving force, or lift, from the wind, sails also create a small amount of drag—the smaller the better.
The underwater surfaces of a boat, meanwhile—whether the carefully shaped hull and highly efficient foils of a racing yacht or the broad and bulky underwater expanses of an old-fashioned cargo hull—bend the flow of water that passes over them. The interesting thing about sails (“airfoils”) and keels and rudders (“hydrofoils”) is that, while they operate in very different fluids, the principles that govern them are the same.
Push Equals Shove
A sailboat hull, driven by aerodynamic forces, accelerates until resistance from various forms of drag, both aero-and hydrodynamic, equals the driving forces. At that moment, the sailboat stops accelerating and travels at a constant speed—constant, that is, until something changes. This equalization of driving and dragging forces may be short-lived as the boat sails into a changing wind, is buffeted by waves, or alters the delicate flow patterns through the actions of its crew. The crew, of course, hopes to alter the equalization in favor of the driving forces, causing the boat to accelerate. When the crew is successful, a larger drive is soon countered by a larger drag and, once again, the boat settles into a “steady state”—but at a higher speed.
Airfoils vs. Hydrofoils
Sailboats and airplanes bear some kinship because both depend on a careful use of fluid motion over curved surfaces. But a sailboat operates within two fluid media—air and water—whereas an aircraft operates in only one. The airplane’s airfoils (wings) pull in one direction—upward.
The sailboat’s foils pull in nearly opposite directions—the sails to leeward and the keel to windward; see Figure 8-01, left. Each depends on the other to make the sailboat work—to make it move. Sails could not extract energy in any useful way without the work of the keel, and the keel could not do its work if the boat were not being pushed; see Figure 8-01, right.
Historically, the airfoils on a sailboat (its sails) have received a lot more attention than the hydrofoils. Designers have developed complicated ways to make them more efficient over a range of wind speeds by changing their shapes and their angles to the hull. On the other hand, hydrofoils have been left pretty much on their own while the boat is underway. But this is changing. Designers are now finding ways to modify the shapes of keels, including the addition of trailing edge flaps like those used on aircraft wings.

Figure 8-01 The sails and underwater surfaces of a boat both act as foils. The sails bend the flow of air over their surfaces, converting some of its energy into forward and lateral motion (lift), and some into drag. At the same time, water flowing past the hull and its appendages produces lift to windward, as well as drag.
Bernoulli’s Discovery
In the early 1700s, the Swiss scientist Daniel Bernoulli established that changing the velocity of flow of a fluid, such as air or water, at a specific point brings about a consequent inverse change in pressure at the same point. Bernoulli’s law led to its application in the venturi effect—such as when the flow of a fluid in a tube is constricted, resulting in increased velocity and decreased pressure—and the development of the curved foil. The most convincing demonstration of the venturi effect is easy to perform in the kitchen. First, run a stream of water from the faucet. Then, dangle a soupspoon by the tip of its handle and move its convex surface slowly toward the stream. Rather than being pushed away, as your intuition might suggest, it is pulled into the stream.
Action of Flow Over Foils
The most familiar practical application of the venturi effect is seen in the behavior of an airfoil, such as an airplane wing. As the aircraft moves along a runway, the induced airflow (from the plane’s motion) separates as it strikes the leading edge of the wing. The velocity of the airflow forced to travel over the airfoil’s convex upper surface increases because it spans a greater distance than the air that travels beneath the wing.
Following Bernoulli’s law, the increased velocity on the upper surface of the wing is accompanied by a decrease in pressure relative to that on the wing’s under surface. Since a region of high pressure will try to push into one of low pressure, a force is produced. Aviators began calling this force LIFT, and we use the same term when talking about boats. (The term “lift” also has another meaning, discussed later in this chapter.) Depending on the shape of the surface, the speed of the flow, the angle at which the foil meets the airflow, and other factors, more or less lift is produced. The faster an aircraft’s forward motion induces airflow across its wings, the greater the pressure differential and the greater the lift. Ultimately, the high-pressure area beneath the wing, in attempting to displace the increasingly lower pressure area above it, lifts the wing—and the aircraft to which it is attached—upward and off the ground.
An asymmetrical airplane wing, curved on the upper surface and almost straight on the lower surface, can produce some of its lift even when it is pushed in a line parallel with the oncoming airflow—that is, with no ANGLE OF ATTACK. The sails on a sailboat, acting as a vertical wing or airfoil, ordinarily don’t have thickness the way an airplane wing does. Lacking thickness and asymmetry (because they have to produce lift alternately on both sides), sails must be presented to the flow of air at an angle; see Figure 8-02, upper. This is why sailboats lose their drive, or end up IN IRONS, when they are steered too close to the wind.
When a sail is set at an efficient angle, air flows across its leeward surface at greater velocity than across its windward surface, and a low-pressure area is created to leeward. The sail tries to move into it, impelled by the relatively higher pressure on its windward side. This driving force created by the sails is transmitted to the hull through the mast, sheets, and sail attachments. The boat begins to move, but not necessarily in the right direction—not yet.

Figure 8-02 A thin foil, such as a sail (upper), must be presented to the wind at an angle of at least 30 degrees (called the “angle of attack”) in order to create a lowpressure area across its leeward surface. The sail tries to move into that low-pressure area, producing forward and lateral movement of the boat. Similarly, a keel or rudder (lower) must be presented to the water flow at an angle in order to create high- and low-pressure areas and lift. This angle of attack should only be 2 or 3 degrees..
Drag
As a sail creates lift, it is also creating unwanted DRAG, an unavoidable byproduct of friction and turbulence along the sail’s surface and at its edges. Boats rely on the flow of the wind—relatively slow compared to the much faster airflow generated by an engine-powered aircraft. They are severely limited in the amount of energy they can exploit. When resources are scarce, skills are challenged even more. Being able to change the sail’s shape and the angle at which air flows over it to suit varying wind strengths and directions is critical to extracting the required lift from the available wind energy and to minimizing the inevitable drag.
If there is no corresponding hydrofoil already at work, the result of this careful sail trimming is just unresisted sideways motion, resulting in slower airflow, resulting in less speed—in other words the boat slides aimlessly. You have probably seen this happen when a sailing dinghy leaves the pier with its centerboard up.
Underwater Foils
The addition of underwater fins—a keel or centerboard, and a rudder—vastly increases lateral resistance. Again, unlike most airplane wings, a sailboat’s foils are symmetrical (because they have to work the same way on both sides). Hydrofoils, like sails, must therefore meet the oncoming flow at an angle, called their angle of attack, before they develop any lift. Since most keels are rigidly attached to their hulls, the whole boat has to be aimed a couple of degrees to windward of the course it travels; see Figure 8-02, lower. This isn’t something the helmsman has to think about; rather, it happens naturally, because all sailboats make a bit of LEEWAY (i.e., they sideslip) when sailing on the wind. A modest amount (2 or 3 degrees) of leeway isn’t a flaw that should be corrected; it’s essential for developing the hydrodynamic lift that allows the boat to sail to windward.
As the dinghy sailor lowers the centerboard, he or she might also allow the sail to aim its effort in a more forward direction by letting it out just a little. Now the airfoil and hydrofoil get down to work—against each other. As each begins to encounter faster flow (we are dealing in less than walking speed here, so “fast” is a relative term) each foil begins to produce lift. The centerboard produces lift to windward as well as drag, while the sail produces lift to leeward and slightly forward. It’s the “slightly forward” that makes things happen.
Creating more lift (and causing less drag) is the ultimate objective of high-performance sail and keel design. (This also explains why there are now designers who specialize in “appendages,” keels and rudders, and others who design hulls—both separate from the people who design sails.) Of course, they have contrived a whole set of labels and rules to talk about it. Two important labels in this discussion are CENTER OF EFFORT (CE) and CENTER OF LATERAL RESISTANCE (CLR). These are really just two sides of the same coin, because both centers involve foils—“effort” for the sails, and “lateral resistance” for the keel and rudder; see Figure 8-03.
Now that computers are able to analyze the contribution of every carefully shaped square inch of foil surface, the center of effort and its twin, the center of resistance, are much easier to find. Both centers are simply the sum of all of the lift and drag forces at work anywhere on the foil. If you had to attach a string somewhere on the sail and another on the underwater surface, and pull the boat along by these two strings—creating the same force and balance as a particular strength and direction of wind—the center of effort is the place where you would attach the sail’s string, and the center of lateral resistance is the place you would have to attach the underwater string.

Figure 8-03 The center of effort (CE) is the position of the sum of all the lift and drag forces produced by the sails. The center of lateral resistance (CLR) is the equivalent position of all forces produced by the hull and its appendages. When the two centers are balanced against each other, the boat travels in a straight line (upper). When they are out of balance, the boat turns. Changing the rudder angle (lower) shifts the combined CLR aft so that the boat turns to leeward.
The Balancing Act
Both centers (CE and CLR) are constantly changing with boat motion and sail adjustment. Unfortunately, the net effect of lift and drag that the CE represents does not pull the boat straight ahead. (Remember that we said the boat would start to move, but not in the desired direction.) The force acting at the CE on the sails pulls partly forward but mostly to leeward, and the forces acting on the CLR of the hull, keel, and rudder act to windward and slightly aft. These forces are in balance when the boat is traveling in a straight line. When they are out of balance, the boat turns; refer to Figure 8-03.
Keeping in mind that a boat sails fastest when its keel and rudder are presented to the water flow at a slight angle, designers place the sails on the hull in such a way that, if no steering force were applied with the rudder, the boat would turn itself gently toward the direction of the wind (WEATHER HELM). When the boat is sailed, a straight course is achieved by the gentle application of 2° or 3° of rudder angle in the opposite direction; see Figure 8-04. In a well-trimmed boat, the keel will have an angle of attack of 2 or 3 degrees by virtue of leeway, and the rudder’s angle of attack might be 4 to 6 degrees by virtue of leeway plus the slight rudder angle required to counteract weather helm. However, you can have too much of a good thing. An excessive imbalance between CE and CLR, one that requires more than a slight rudder correction, causes the rudder to develop drag commensurate with the greater lift it is being forced to create. The boat decelerates—slower speed means less drive from the sails—and things settle back into the drive-drag equilibrium at a slower speed.

Figure 8-04 The keel (or centerboard) must be presented to the water at a slight angle of attack (ideally 2° to 3°) in order to create maximum lift, and the rudder will need 2 or 3 degrees of deflection to counteract weather helm. Thus, the rudder’s overall attack angle will be 4 to 6 degrees.
In moderate wind (up to 10–14 knots), a sailboat that is properly balanced exhibits a weather helm—a tendency to turn into the wind. This is counteracted by pulling the tiller slightly to weather (the direction of the wind) or turning the wheel away from the wind. A sailboat that acts in this way is considered safer because in the event of gear failure or lack of attention to the helm, it will round up (head into the wind) rather than fall off into a possibly dangerous jibe (pronounced with a long “i” as in “ice”). Weather helm should decrease as wind strength abates.
A LEE HELM is the opposite of weather helm, a tendency for the boat to wander off to leeward; many sailboats develop a slight tendency for lee helm in light air. Acceptable in very light winds, lee helm is undesirable in stronger winds. A straight-line course can only be achieved when the rudder is turned to create a force pulling to leeward (so the bow is pushed to windward). This means that no windward lift is being created by the rudder, so all of it has to be created by the keel. The keel then ends up at a more extreme angle of attack to produce this lift, and in the process creates more drag. The boat makes more leeway and slows down.
It should be noted that all of these differences in balance are important to the cruising sailor as well as the racer. Though they are difficult to perceive—3° is hard to see and often difficult to feel in the helm—they produce substantial differences on almost all points of sail. The racing sailor may lose a race, but the cruising sailor may make serious errors in navigation by failing to account for large leeway angles that result from excessive imbalances.
Incidentally, keels and rudders can be a lot smaller in area than sails because they operate in a denser medium. In addition, when they are pushed through the water at greater speeds, they can produce sufficient side forces with less area—that’s why the crews of fast, planing catamarans often reduce drag by pulling up their foils (usually daggerboards) a few inches at high speeds, even though they are sailing upwind.
Conversely, if there is no speed at all, there is no flow and neither the keel nor the rudder can do its job. A boat that has no way on cannot be steered, which is why STEERAGEWAY is so important. Skippers will often do whatever they can to get a boat settled down and underway so as to create some flow past the keel and rudder before they worry about what precise direction they’re going.
Outsailing the Wind
For most novice sailors, the idea that a boat can sail faster than the wind is questionable at best. Even the less ambitious claim—that a boat can receive more power from the wind as the boat picks up speed—seems contrary to common sense. After all, there is no source of power other than the wind.
The Effect of Apparent Wind
But it’s true, and an understanding of APPARENT WIND, the stronger wind partly created by the boat’s own speed, is crucial to sailing. Let’s look at two extreme examples—a very slow boat and a very fast boat.
The slow boat is a Spanish galleon. It has no separate keel and, by modern standards, inefficient sails. It sails most effectively with the wind behind it, and even then it doesn’t sail very fast. If the galleon were just getting underway, and if the wind were exactly on its stern and blowing at 10 knots, the wind felt by someone standing on deck would be 10 knots. As the galleon picked up speed, the wind felt on deck (the apparent wind) would decrease, because the ship would be moving along with it. The effect of the wind on the moving sails would also decrease. At somewhere around 2 knots of vessel speed through the water, the decreasing force created by the sails would exactly balance the increasing resistance of the hull (discussed later), and the galleon would stop accelerating and settle down for a long trip to its destination. Vessel speed would be 2 knots, wind speed 10 knots, apparent wind speed 8 knots.
Now take the fast boat—an iceboat—in a similar situation. With almost no hull resistance to overcome, the iceboat picks up the same 10 knots of wind from directly astern and, within seconds, the skipper is aware of a rapidly decreasing apparent wind. His boat reaches a balance between the decreasing force of the wind and the increasing resistance of the iceboat at, for example, 9 knots (boat speed 9 knots, wind speed 10 knots, apparent wind speed 1 knot).
Now, 9 knots would be pretty exciting in a Spanish galleon, but in an iceboat, it’s not worth chilly feet. So the iceboat skipper turns his boat so that it begins to travel on a line perpendicular to the wind. He does this without losing any speed, so his initial speed, after the turn, is still 9 knots. At that instant, the iceboat skipper feels the full force of the 10-knot wind, because he’s no longer traveling away from it. He also feels the force of a 9-knot wind, just as if he were on a bicycle pedaling at 9 knots. These two vectors, at right angles to each other, can be added (vector addition is discussed in Chapter 17), the result being an apparent wind of about 13.5 knots flowing into the iceboat at an angle of about 47° off the bow.
The Spanish galleon, still traveling at 2 knots, also turns so that it is sailing on a line perpendicular to the wind. The new wind across its decks is also a vector sum of the 10-knot wind and the 2-knot boat speed. The result is a less-than-impressive 10.3 knots at an angle of about 79° off the bow. The galleon responds to this slightly stronger apparent wind (which is still hitting at an angle wide enough for its square sails to make use of) by accelerating. Again, the force on the sails is balanced by the increasing resistance of the hull, and things settle down again—at 2.5 knots.
However, aboard the iceboat, things start to happen. Its highly efficient sail and almost-zero hull resistance respond to the new, stronger wind. It begins to accelerate again. The first one-knot increase in boat speed, to 10 knots, brings a new apparent wind, 14.1 knots, at a new angle of 45 degrees. This angle is still no problem for an iceboat sail, so it responds to the new apparent wind strength by gaining another knot. Now the apparent wind is very close to 15 knots and the angle is still comfortable—producing more acceleration.
Where does it all end? Well, this is not perpetual motion (though, in an iceboat, it can often feel that way!). Things start to level off when the apparent wind goes so far forward that the sail begins to point too directly into the wind. It can no longer achieve a useful angle of attack, and it luffs. At this point the iceboat is probably experiencing an apparent wind of almost 45 knots and is doing almost 40 knots of boat speed—pretty good for a wind strength of 10 knots. In fact, with strong winter winds and cold, dense air, iceboats routinely travel at speeds of more than 50 knots. At that speed, their sails are strapped in tight regardless of what direction the “real” wind is blowing—their apparent wind is far more important, and it’s blowing from almost straight ahead; see Figure 8-05.
The effects of apparent wind on most sailboats are far more dramatic than aboard the galleon and far less than aboard the iceboat. Even a heavy racing sloop might increase its speed by 25 percent as a result of a stronger apparent wind. Sailboats that are less limited by their weight can easily double their speed with careful use of apparent wind.
There are some fundamental rules about apparent wind:
• Except when sailing directly downwind, apparent wind will always come from “farther ahead” than the true wind does.
• Sailing on any angle ranging from perpendicular to the wind to an angle quite close to the wind, apparent wind will always be greater than the true wind.
• As wind strength increases, the angle of the apparent wind moves farther aft; conversely, as wind strength decreases, the apparent wind moves farther forward. A strong gust of wind is usually welcome because it provides more power applied from farther aft.

Figure 8-05 Apparent wind is the direction of the wind as it appears to a person on board. Both boat speed and the boat’s angle to the true wind affect the direction and strength of the apparent wind. In the vector diagram shown here, the yellow arrow is the wind from the boat’s motion, and the white arrow is apparent wind. Apparent wind is greatest when the boat is sailing perpendicular to, or at an angle close to, the actual wind.
Heeling
For the most part, boats sail most efficiently in an upright position so that aerodynamic and hydrodynamic lifts are converted into forward motion. But the same dynamic forces that pull the boat forward also try to push it over.
The sails, which have their CE at about 40 percent of the height of the mast, and the keel with its corresponding CLR well below the water, both act as levers with the hull in the middle as their fulcrum.
In general, there are two ways to counter these forces and prevent them from pushing the boat over and capsizing it. These are weight and width; see Figure 8-06. Both have disadvantages. Energy extracted from the wind is partly absorbed in the work of moving weight, especially if that weight begins to move up and down through waves, so any extra weight robs speed. Width makes a hull harder to push through the water (unless the boat is separated into two hulls, or three, that are spread apart).
Most sailboats use both weight and width to stay upright. The width of the hull is the first line of defense because buoyancy begins to provide substantial righting moment (it pushes back) as soon as the hull begins to heel. Fixed ballast gains in importance as the hull heels farther over.
Different sailboat designs rely more heavily on one or the other method. The classic heavy, narrow “meter boats,” such as the 12-meter class formerly used in America’s Cup competition, were intended to balance at a substantial angle of heel sailing close to the direction of the wind. Designers shaped their hulls in such a way that they would have greater potential speed when heeled than when upright.

Figure 8-06 In these illustrations, B is the center of buoyancy and G is the center of gravity. Sailboats can use either weight (left) or width (right) to remain upright against the force of the wind. A hull stabilized primarily with weight has a very small righting moment as it begins to heel, but that increases steadily as the craft heels farther over. Such boats are initially “tender” and ultimately “stiff.” As the wind increases, a ballasted hull will lean over, increasing the righting moment, but the wide, unballasted hull has already achieved its maximum righting moment and is becoming increasingly unstable as the angle of heel increases.
Most recent racing designs, such as the J-24, rely more on a wide, shallow hull. With this hull type, crew weight becomes even more important, especially because crew weight can begin to provide righting moment even before the hull begins to heel. That’s why the best-sailed dinghies sail through gusts of wind without heeling—their crews move into position in perfect synchronization with the changing aerodynamic forces, converting every increase in power into forward acceleration rather than heeling.
As the boat begins to heel, several factors combine to rob it of forward speed. The force created by the sails is now aimed partly downward (instead of parallel to the water), thereby helping to immerse the hull into the water rather than pulling it forward. Less sail area is exposed to the horizontal movement of the wind. A corresponding deterioration takes place underwater, where the flow of water across the keel and rudder are compromised. The part of the hull that is underwater becomes asymmetrical, creating turning forces that have to be counteracted.
A more subtle change also takes place. The forces created by sails and keel are no longer acting directly above and directly below the hull—they’re both displaced sideways. The effect is similar to what would happen if you were pulling the hull with a towline. When the boat is upright, the towline pulls along the hull’s centerline. As the boat heels, the effect is as if the towline were uncleated and made fast again at the gunwale near the widest point of the beam. In this case, you would expect to fight the boat with its rudder to keep it on a straight course. When the boat heels, its propulsion forces operate away from the hull’s centerline. That’s why boats that are allowed to heel too far under the pull of a spinnaker are so vulnerable to broaching. It also explains why, when a sailboarder leans back into the wind at high speed, he must also move to the tail of his board, holding the sail well aft of the point on which the board pivots when it changes direction.
Achieving Stability
It’s no wonder the Polynesian solution—dividing the hull into two (or three) units and placing them far apart—is attractive. With no penalty in weight, a catamaran or trimaran achieves huge righting moment at the slightest angle of heel.
However, that’s not the whole story. When stability is achieved entirely by righting moment from hull width (or by spreading the hulls farther apart), righting moment is typically very high at small angles of heel—but decreases steadily to nothing as the boat heels farther over. In one sense, when you need it most, it’s all gone; see Figure 8-06,.
Conversely, the righting moment provided by fixed ballast is small as the hull begins to heel, but steadily increases as the hull heels farther; in other words, the boat is initially TENDER and ultimately STIFF. When the heel angle nears 90 degrees, the mast is almost parallel with the surface of the water and the fixed ballast is almost sideways. At this radical heel angle, righting moment is at a maximum and heeling force at a minimum.
Keep in mind that these examples are highly simplified. Many other factors, such as the wave conditions present when such extreme heeling forces are at work, have to be considered by yacht designers. For example, even though the fixed-ballasted boat may not heel beyond this extreme angle, it may be filling itself with water. Even though the powerfully rigged, unballasted multihull may potentially capsize, it is less likely actually to founder (since, being unballasted, it is generally lighter than water).
Boat Speed
Few activities inspire participants to seek the smallest improvement in speed as sailing does. Indeed, it is the potential for almost infinitesimal improvement that is one of the joys—and at times the frustration—of sailing.
Most sailors are not particularly concerned with going faster than any other sailboat—they’re more concerned with getting the most speed out of a sailboat that has been designed with speed-limiting rules. They want to maximize the potential of a boat that has been designed to sail within a class of boats that are all very much the same, if not actually identical in performance characteristics.
This historical limitation of sailboat design has led to a paradox: While sailors have developed the art of boat preparation, sail trim, and steering to a high degree of refinement, and yacht designers have squeezed every last fraction of a knot from conventional hulls, keels, and sails, the vast majority of sailboats have remained within a narrowly defined set of basic configurations. The imaginative application of pure science and engineering has not had much impact on the activities and experience of most sailors. Nevertheless, the principles that determine how fast a sailboat can go are eagerly studied and applied with an increasing degree of subtlety.
One of the chief enemies of speed for a sailboat, as for any vehicle traveling through a fluid—whether water or the atmosphere—is drag. But sailboats encounter two kinds of drag whose relative importance varies with speed. The first and most obvious is the drag caused by the friction of air and water flowing over large surfaces that can never be perfectly smooth. For that reason, yacht designers take great pains to reduce the wetted surface of the hull. For any given volume, the shape with the least wetted surface is a sphere (that’s why soap bubbles are spherical), but a sphere is not very useful for a hull. The next best compromise might be a round tube. Many hulls are developed from that principle and have almost a circular cross section.
Drag is also caused by turbulent flow around the awkward shapes of deck fittings, rigging attachments, through-hull fittings, and even the crew themselves. While attempts are made to streamline these, there are practical and rule-oriented limitations that most sailors happily accept.
Drag from friction and turbulence is most important at low speeds—not because it diminishes at higher speed (it doesn’t) but because on a conventional sailboat another form of drag becomes even more difficult to control. This is FORM DRAG, the process of energy loss through the formation of waves.
Hull Speed
Imagine a sailboat moving through the water at less than a knot. Tiny wavelets stream from the hull at several points along its waterline. They don’t seem to be connected. As speed increases, the wavelets grow into waves and seem to join, the trough of one running up into the crest of the next; see Figure 8-07, upper. At this point, you could measure the boat’s speed by measuring the distance between one wave crest and the next: The speed of a surface wave is strictly related to its length. To measure the relationship, in knots, of waves in water, yacht designers use the square root of the wave length, in feet, multiplied by 1.34.

Figure 8-07 When a hull moves through the water, It produces waves that result in energy loss. The maximum speed of a conventional displacement hull (upper) is a function of the longest wave that it can make, which in turn is determined by hull length. No amount of sail can create enough power for it to go faster. On the other hand, the planing hull (lower), such as a racing dinghy and some multihulls, can carry enough sail to push it over its own bow wave and onto a plane.
Three crests along the side of the boat indicate that it is traveling at about half of its maximum speed. As speed increases, the bow wave grows in height and length, pushing the midships wave aft. As the last fraction of a knot is reached, the stern wave is almost falling behind the hull—but it can’t. As the stern wave pulls aft, the stern settles down into it. Drag increases because the hull is actually inclined upward against the slope of the bow wave. The hull is trapped.
The implication is that you should always have enough propulsion power to climb over the bow wave and convert from a floating or displacement mode of support to a planing mode. That option is available to very light boats that can carry lots of sail (racing dinghies, multihulls, sailboards, and even foil-supported boats), but it’s not available within the realm of ballasted monohulls.
Therefore the implication for conventional boats is that as long as a hull is trapped in its own wave, the vessel will never go faster than the longest wave it can make. That is the reason why longer boats are faster—and why, almost from the beginning of sailboat racing, length has been heavily factored into rating rules.
The challenge, within the limitations of rules and economics, is to make a longer wave, so that the hull has a higher potential speed when the propulsion power (wind) is available, but to do so without seriously compromising the hull’s performance when windpower is scarce.
Designing for Speed
One common strategy is to design a hull that has two “personalities”—a shape that is relatively narrow and fine at the ends of the waterline when upright (at low speed when form resistance is less important), and a heeled, or high-speed, shape that is full at the ends. An overhang at the stern is very useful in this regard; as the stern wave builds, the waterline becomes longer and fuller, delaying the point at which the stern begins to settle down into the wave.
Obviously, this dual personality has limitations. In fact, if the designer has made the bow and stern of the boat especially fine so that they will be easier to push through the water, the waterline will actually seem short to the wave, and the top speed will be lower. This leads to the paradox that hulls meant to travel at or near hull speed most of the time tend to be rather full in the bow and the stern, while hulls expected to travel more slowly, while making more efficient use of lighter winds, might be finer fore and aft.
If heavy winds were always available on demand, and if sailboats always traveled with large apparent winds, yacht design would, of course, be much simpler. However, maximum driving power from a sailboat rig is rarely available, and conventional hulls therefore have to be designed in order to strike the best compromises.
Some very light sailboats, such as racing dinghies, are able to provide lots of propulsion power by having their crews hike out against the power of large sails; see Figure 8-08. Since they are short, these boats reach their wave-resistance limit at a very low speed (just over 5 knots). But they have lots of propulsion power still to absorb. Without much fuss, they rise over their bow waves and plane, just like powerboats, often reaching a significant 17 to 20 knots. Of course, it takes two heavy sailors and perhaps three straining sails to do it, but that’s all part of the attraction.

Figure 8-08 This multihull racing dinghy is moving at high speed on a plane, literally leaping out of the water. Its crew must “hike out” on a trapeze to keep the boat reasonably level.
Multihulls
Catamarans and trimarans, with their unique stability, also have physics on their side when it comes to making waves. Because their hulls can be so much narrower than a monohull, the waves they produce are consequently much smaller. While the relationship between wave length and speed still holds, the “hole in the water” that is created by the passage of a narrow hull is much smaller. The stern of a narrow hull doesn’t have so far to settle, and drag does not increase as much or as suddenly. In one sense, the narrow hull of a catamaran or a trimaran doesn’t have to plane because it has broken the hull-speed rule.
THE PARTS OF A SAILING RIG

Figure 8-09 A mainsail might seem to be a simple cloth triangle, but its construction is based on a complex mix of curves that the sailmaker uses to create the proper camber (i.e., belly, or shape). Commonly made of Dacron, the sail is reinforced at its edges and corners with patches of extra material, and given stiffness in the roach by battens.
Technology has contributed many innovations to the art of sailmaking, mainly in the area of sail material. The woven polyester fiber, usually referred to by the trade name Dacron, that replaced canvas and cotton remains the most common of the new fibers. Nonetheless, in the constant quest for greater strength and less weight and stretch, Dacron has been joined by fabrics made of Mylar, Kevlar, Spectra, carbon fiber, Zylon, Vectran, and nylon for light sails.
With few exceptions (such as the spinnaker, discussed separately later), a conventional triangular shape has emerged as the most popular sail configuration. The luff of a mainsail is attached to the mast, while the foresail’s luff is attached to a forestay. While some mainsails are “loose footed” and attached only at the fore and aft corners (the tack and clew), more often they are attached along the length of the boom either by a boltrope sewn into the sail or by slides. Most foresails are loose footed. See Figure 8-09 for the parts of a sail; see Figure 8-10 for a representative range of sails.

Figure 8-10 A boat may carry sails of different sizes and weights to suit different conditions of wind velocity or points of sail. Shown here are the basic sails that a ketch might have on board. The largest jib, the one whose area extends beyond the triangle formed by the forestay, mast and deck (the foretriangle), is called a genoa. Though it is the largest headsail, the genoa is made of the lightest material to catch the slightest breezes. The storm jib, the smallest sail, is made of the heaviest material to withstand strong winds. The modern trend is to replace several headsails with one roller-furling sail that can be sized to match the wind velocity.
Sails are not flat like paper. They are carefully cut and assembled so as to present a subtle shape, curving both along their horizontal and their vertical lines. The quality of these curves and their ability to be slightly altered underway are what makes sailmaking such a competitive science. Not only must sailmakers design the right curves for each boat and for a variety of wind and wave conditions, they must also design a structure that will maintain its shape despite heavy stress and the effects of violent shaking and sunlight.
The largest stress on most sails, especially mainsails, is along the LEECH from the CLEW to the HEAD. This unsupported edge has to accept the pull of the mainsheet and must also take the pressure of the wind flowing off its windward side. On almost all recent designs, the leech also carries a deep outward curve, a ROACH. To counter these loads, most sailmakers lay out the sail material so that the low-stretch fibers of the weave run parallel to the leech. That design dictates panels of material that slope down from leech to LUFF.
But many other patterns are in use as well. Some place different materials at high-stress areas of the sail, even going so far as to stitch and weld strong fibers in elaborate elliptical curves that radiate out from the foot and luff. At the other extreme are cruising sails that can easily be rolled onto furlers and have straight, soft leeches.
BATTENS provide additional support at the leech of a mainsail. Traditionally, they are flexible slats of wood or plastic that slide into long pockets. But that tradition is changing too. Catamaran sailors discovered that by extending battens from the leech all the way to the luff they could have a sail that would maintain a curve at very narrow angles to the oncoming airflow. Such sails have become popular even among cruising sailors who feel that, although they add extra weight, they are easier to manage and will last longer. Full-batten mains have led to a number of additional items of sail hardware to allow the forward end of the batten to be flexibly attached to the aft face of the mast, and so slide up and down freely despite the pressure.
Most sailors attach ribbons or pieces of wool to both sides of the sail; these TELLTALES, or TICKLERS, indicate the efficiency of airflow over the sail. Often sailmakers sew windows of plastic near the telltales to make the action of a leeward one more visible. Large windows are sometimes sewn into dinghy mainsails and “deck-sweeping” foresails for better leeward visibility when racing or sailing in confined conditions.
Spinnakers, in all their variations, are usually made of nylon. Since spinnakers generate their drive from the push of the wind, they can be allowed to stretch, thereby taking full advantage of the ultimate strength and lightness nylon provides. However, the architecture of spinnakers is just as complicated as it is for other sails. The goal is to produce a very full CAMBER, but one that still stands up to the flow of air from one edge to the other—spinnakers do not simply fill with air like a balloon. Lightness is a requirement to allow the sail to set high and away from the interference of the mainsail, and to present the largest possible area to the wind. The fact that spinnakers are usually colorful is a matter of tradition more than function, but it does mean they are easier to examine against a bright sky for fine-tuning the trim.
Standing Rigging
Standing rigging is the structure designed to support the sails and to help transmit the power they develop to the hull. In most discussions, the mast itself is considered to be the main component of the standing rigging. The idea that the standing rigging is set up permanently and should not move (hence “standing”) has given way to high-performance engineering and tinkering. It is now fairly common to find standing rigging that is substantially altered while underway, and masts that are not only allowed, but forced, to bend. The distinction between standing and running rigging has begun to blur. Figure 8-11 illustrates the major components of standing rigging.
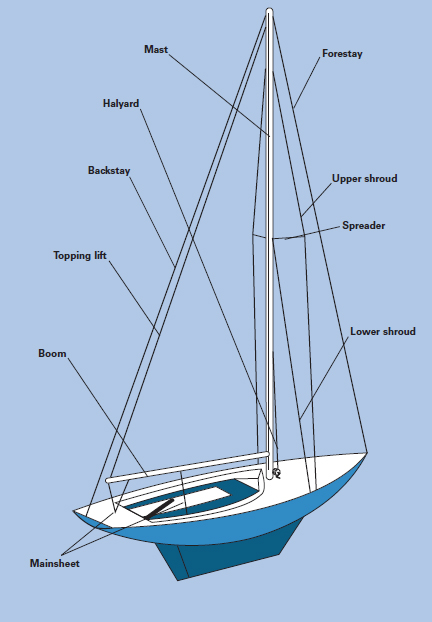
Figure 8-11 Standing rigging supports the sails and transmits to the hull the power that they develop. The most common arrangement is a mast supported by stays and shrouds. Running rigging includes halyards for hoisting the sails and sheets for trimming them.
Masts
The evolution of mast making has focused on attempts to increase strength while reducing weight aloft. The challenge to make the structure lighter and stronger is complicated by the fact that for any given sail area, more power can be extracted with a tall, narrow shape than with a short, wide one. The ASPECT RATIO of sails (the relation between height and width) is limited by the fact that they become harder to trim as they get taller; but for purposes of performance under sail, masts can never be too tall or too thin—and are often extremely expensive.
Traditional wooden masts and booms have given way to extruded aluminum tubes and, more recently, to tubes made of composites of such materials as carbon fiber and epoxy. The simplest mast for a small, single-sail dinghy (such as the Laser) is a round aluminum tube held in a simple socket in the deck. The sail is attached to the mast by means of a sleeve extending the full height of the luff.
Although free-standing masts are sometimes used on larger sailboats (some even have more than one free-standing mast and sail-sleeve attachment), a much more common arrangement uses traditional stays and shrouds as guy wires from the mast to the deck. The mast may pass through the deck to rest on a step at the keel (KEEL-STEPPED) or fit into a step or TABERNACLE on deck (DECK-STEPPED).
Stays & Shrouds
There are almost infinite configurations for stays and shrouds, but at the forward side, there is always a forestay (also known as a headstay) running from the bow (or near it) to the top of the mast (or near it). When the forestay is attached to a point below the top of the mast (called a FRACTIONAL RIG), the top of the mast can be pulled backward to create a slight bow shape. (The reasons for doing this are described in the section on sail trim.) There might also be a second forestay aft of the first, either for more precise control of mast bend or for carrying a smaller inner headsail, or STAYSAIL.
On high-performance rigs there might also be a JUMPER STAY running from the mast, over a strut (JUMPER STRUT or DIAMOND STRUT), and back to the mast at the top. Tension on this stay holds the mast tip against the pull of the mainsail leech, especially in a fractional rig.
A backstay, running from the mast tip (TRUCK) to the stern, may be a single wire for its full length, or it may split into a bridle partway down and attach to the aft deck at both quarters. Splitting the backstay makes it easy to adjust its tension, because the bridle can be pulled together with a simple block and tackle; see Figure 8-12. The configuration also allows easier access to the cockpit over the transom.

Figure 8-12 Many small cruising sailboats adjust their backstay by pulling a choker (see arrow) downward over a Y-shaped bridle. Larger vessels usually use a hydraulic tensioning system.
Additional backstays are sometimes used on high-performance rigs, and are considered part of the running rigging because they can be loosened completely when underway. In fact, one has to be loosened and the other tightened on each tack or jibe; the windward running backstay is tensioned to add to mast stability, while the leeward one is slackened to allow the mainsail to be eased out. Needless to say, the cockpit of such a craft is a noisy, crowed place on each coming about.
Smaller boats may run shrouds directly from TANGS (attachment fittings) on the mast to CHAINPLATES on the hull at or near the deck. Taller masts cannot use this simple arrangement because, to get the required angle between the shrouds and the mast, the attachment at the deck would have to be outboard of the hull. Instead, struts called SPREADERS provide needed support by giving a wider angle between the upper shrouds and the mast. They push the shrouds outward to maintain supporting pressure on the upper mast; see Figure 8-11.
Single spreaders extend athwartships from the mast a little more than halfway to the top. They are either horizontal or have a shallow upward angle. Some are swept back slightly. Smaller rigs get extra control over mast bend by swinging their spreader tips in a fore-and-aft arc. Larger boats often have multiple spreaders with several shrouds, each to a different level of the mast. No matter what their arrangement, shrouds and stays are meant to keep the mast standing against the forces of wind and sails, or when the mast is deliberately bent, to change the shape of the mainsail.
Stays and shrouds on most sailboats are made of 1x19 stainless-steel wire of appropriate diameter for the size of the rig being supported. Stainlesssteel rod, though more expensive, has been growing in popularity because it has less stretch and more resistance to corrosion than wire. Rod diameter required to provide the same tensile strength is smaller than that of stranded wire and so has less windage (surface exposed to the wind).
Integral to the strength of any piece of standing rigging is its attachment point at the deck. Usually, shrouds and stays terminate in turnbuckles that are attached to the eyes of chainplates, which in turn are bolted directly to the hull.
Tuning the standing rigging involves careful tightening of the shroud turnbuckles until the shrouds on both sides of the mast have the same tension, and the mast remains in column vertically with no sideways bends when the boat is sailing. Once the shrouds are tuned, backstay tension is adjusted by means of tackle or hydraulic pumps to increase or relieve forestay tension and to match mast bend or mast rake to sailing conditions—.
Running Rigging
Running rigging includes all the gear used to raise and trim sails—and sometimes there is a bewildering amount of it. Many crews resort to colorcoded lines to distinguish one piece of running rigging from another. Perhaps the easiest way to understand running rigging is to go through the sequence that most crews would follow to get underway. We will assume that the boat is a 25-foot (7.6m) cruising and racing sloop with a centerboard—a fairly common type.
If it’s not already attached to the boom, the first step is to pull the boltrope on the foot of the mainsail into the groove of the boom. The clew is pulled out to the end of the boom by hand and attached to a short wire called an OUTHAUL, which will later be adjusted. (If there are slides attached to the sail, these are slid onto and along a track on the upper side of the boom.) The tack is attached to the GOOSENECK (the articulated fitting that couples boom to mast) by a short pin. Above the tack is another hole (a CRINGLE) where another short adjusting line—the CUNNINGHAM—may be attached. Some items of running rigging are illustrated in Figures 8-09 and 8-11.
Now, presuming the boat is ready to be cast off, or is already underway with engine running, the mainsail can be pulled to the top of the mast. This requires that the main halyard be shackled to the headboard of the main and that the luff boltrope be slid into the groove of the mast (there might be sail slides on a track instead). The halyard runs loosely up to the truck of the mast, over a sheave (a wheel) and back down the mast to the deck. It may simply be cleated to the mast, or it may run through a block (pulley) to a cleat or LINESTOPPER near the cockpit. Part of the halyard’s up-and-down journey may be inside the mast. Before the main is raised, a check is made to ensure that none of the lines attached to it will restrict the main on its way up the mast.
When the helmsman has headed the boat into the wind and gives the word, the halyard is hauled, the head of the main rises to the top of the mast, and the end of the halyard is cleated in place. Later, small adjustments may be made. With the main exposed to the wind, the sail flaps until the mainsheet is trimmed in. The mainsheet attaches near the end of the boom and controls the in-and-out position of the boom the way your arm controls the swing of a door. Now is also the time to make initial adjustments of the outhaul (and cunningham, if used); by tensioning the cloth along the edges, the position of the deepest part of the sail’s curve is controlled. After the tail of the main halyard is coiled and stowed, it might be necessary to ease the TOPPING LIFT—a line or wire that supports the boom in a level position when the boat is at rest. Now the BOOM VANG should be checked. This line, or telescoping pole, runs from the butt of the mast to the underside of the boom and resists the mainsail’s tendency to lift up the aft end of the boom. Of course, the mainsheet has a role to play here, too.
Selecting & Raising the Jib
Now it’s time to raise the headsail. First, the skipper chooses which one to raise. Bigger jibs are used in lighter winds. (Increasingly, especially on cruising sailboats, one or two roller-furling, roller-reefing headsails replace multiple headsails of various sizes.)
The tack of the headsail is attached by a short pin or a shackle to a point close to the bottom of the forestay. Some boats are equipped with a foil on the forestay, which contains a groove to hold the boltrope sewn into the jib’s luff. Otherwise, the foresail is attached to the stay with a series of HANKS—spring-piston hooks. The headsail itself is loosely bundled on the foredeck; it may be necessary to tie it to the lifelines temporarily. The halyard is attached to the head and made ready to haul, then sheets must be attached to the clew. Unlike the mainsheet, these are normally stowed when not in use. The headsail sheets are best tied through the clew cringle and led back, one on each side of the boat, through their sheet blocks, or fairleads, and draped over the coaming of the cockpit. It’s important not to have them catch while the sail is being raised. (Sometimes, one long line is used for both sheets, attached to the clew at its midway point.)
When the word is given, the crew hauls the halyard and the headsail rises up the forestay. It luffs noisily for a few seconds while the halyard is cleated or stopped, then one of the sheets (depending on which tack the boat takes) is hauled in. Now, minor adjustments can be made to halyard tension and position of the jibsheet leads (which are often moveable fore and aft on a track).
Now the boat is fully under sail. The engine is turned off. The centerboard, very likely, is lowered completely, perhaps using a light winch with a crank for a boat this size. Smaller boats employ a block and tackle called a centerboard tackle, and very small boats have a simple pendant. Obviously, sailboats with a keel have no centerboard adjustment to make.
Adjusting the Sails
From this point, most sail adjustments take place from the cockpit, using the mainsail and headsail sheets. The position of the TRAVELER—a car that moves on a track set athwartships on the boat to adjust the angle of pull on the mainsheet—also has to be set. Depending on many variables (refer to “Basic Sail Trim,”), the traveler car is pulled up to windward, let down to leeward, or positioned somewhere between; see Figure 8-13. Once it is fixed in place, frequent small adjustments are made to the mainsheet to account for changes in apparent wind speed and angle. These adjustments both position the boom laterally and release or apply tension to the leech. Racing crews use the traveler tackle to move the boom in or out without altering leech tension while sailing close to the wind.

Figure 8-13 Shown here on a small sailboat, a traveler is a car that slides on an athwartship track to aid in the proper adjustment of the mainsheet.
Likewise, the headsails are frequently adjusted—some crews would say too frequently. Jibsheet adjustments are made with a winch; see Figure 8-14. On boats larger than about 20 feet (6.1 m), even if the extra mechanical advantage of a winch crank is not necessary, the winch helps by snubbing the sheet until another handgrip is taken. When the wind increases, the headsail can hardly be moved without the mechanical advantage provided by the winch’s gear ratio. (Set aside winch handles carefully; they’re expensive and they sink.) Now, many headsail winches are fitted with a self-tailer, a circular jaw that holds enough tension on the sheet to prevent it from slipping against the surface of the winch drum. As the sheet is cranked in, the tail is peeled out of the jaw automatically. This means sail trim can be accomplished by one person instead of two. For cruising, this is progress; for racing, it means less work for the crew.
The sails on a 25-foot (7.6 m) boat are fairly easy to raise without the help of winches, but a larger boat might have a halyard winch, either mounted at the foot of the mast, or, more commonly, on the aft end of the roof of the cabin. Since winches are expensive, they are often shared among halyards and other adjusting lines. To hold one line in place while another is being winched, boats may have LINESTOPPERS—simple levered clutches that clamp onto the line without damaging it. These are arranged, one per line, in front of the shared winch.
In place of linestoppers, lines may be held by CAMCLEATS with spring-loaded jaws that permit line to run in but not out. Mainsheets, with their load-reducing block and tackle to provide mechanical advantage, are almost always held by large camcleats, but camcleats are otherwise more common on small boats or for smaller, lightly loaded adjusting lines on large boats. Line is released by lifting up and out of the jaws.
Ordinary horned cleats are also useful for sheets, although they are less and less common for running rigging. Used properly, cleats can provide perfect holding power and quick release. (Refer to Chapter 23 for more information on cleating.)
So far we have explored all the line and hardware needed to get the sails up, adjust their shape, change their angle in relation to the apparent wind, and pull the centerboard up and down. We’ve pulled on the backstay, moved the traveler car, and positioned the headsail leads. The next step—flying the spinnaker—perplexes and intimidates novices.

Figure 8-14 On all but the smallest sailboats, winches are used to provide mechanical advantage for trimming the headsail sheets. Most modern winches are now equipped with self-tailing devices so that a single crewmember can handle the winch.
Flying the Spinnaker
For this discussion, we will assume a conventional spinnaker because the other styles are simplifications of it. The spinnaker is attached at three points—the head and the clews. (Note that spinnakers have two clews, although some sailors may logically refer to the windward clew as the tack.) The head is attached to the mast by a halyard, just like other headsails. The clews are attached to the deck with sheets, just like all headsails—except that there are always two separate sheets. The uniqueness of a conventional spinnaker is that it is symmetrical, so that one sheet and one luff are on the windward side of the spinnaker on one tack, but on the leeward side on the other tack. As they change sides, they may change names.
The leeward side of the spinnaker is the simplest. A sheet is attached to the clew; it runs aft to a block on the deck and is trimmed with a winch. When the spinnaker luffs, you pull the sheet in. The windward side is more complicated. Here, the clew also attaches to a sheet that runs aft to the deck at the stern. In this position, on the windward side, the sheet is now called the guy—though it’s still the same piece of line. However, it is held away from the mast by a spar—a SPINNAKER POLE—jutting out at right angles and attached to the mast with an articulated coupling. The outboard end of the pole has a piston hook (or a similar device) that the guy runs through. The spinnaker itself is not actually attached to the pole.
That sounds simple, except that the pole has to be held both up and down. This is done with a pole uphaul and downhaul running from the pole (or a bridle on the pole) to the mast. Both up- and downhaul need their own blocks and, sometimes, winches. The loads created by the spinnaker can be heavy and variable.
For the cruising sailor, the chief advantage of the ASYMMETRICAL SPINNAKER is that so much of this spinnaker gear is eliminated. Asymmetry does away with the two clews and the sheets that change names. The cruising spinnaker is really a larger, lighter headsail that is tacked and jibed much the same way as a normal headsail, but is not attached along the forestay. Instead, it flies freely away from the forestay.
The racing approach to asymmetrical spinnakers is a little different. A pole is still used, but it has become a telescoping bowsprit. The spinnaker is typically not flown directly downwind (because these new, light boats sail fastest by tacking downwind), but is flown like a headsail, even though it is as big and almost as round as a conventional reaching spinnaker.
BASIC SAIL TRIM
With practice, and by noting the results during trial and error experimentation, helmsman and crew will develop a feel for a boat’s characteristics in different conditions and take appropriate measures to keep it “in the groove.” Sail trim is a major component of achieving that goal, whether or not you are racing. The following are some elementary aspects of sail trim on each point of sail.
Sail Shape
To some degree, the shape of a sail is restricted to the amount of camber designed into it by the sailmaker. But the depth of the camber (DRAFT) can be controlled, and the position of the deepest part of the draft, with respect to the luff of the sail, can also be controlled; see Figure 8-15. A more familiar, and eminently changeable, element of sail trim is the angle of attack—the angle at which the sail meets the apparent wind.
As discussed in the preceding section on sailboat parts, a host of controls is available for trimming and shaping the sails for the conditions encountered. Be forewarned, however: There are no hard and fast rules for the order or degree with which each is used. Observation of the telltales on the sails and instruments in the cockpit, ability to hold a desired course, and the “feel” of the helm all measure the success of each action or combination of actions. Moreover, actions that produce a positive response on one boat may not produce the same response on another. But if experimentation is the rule of sail trim, there are some fundamentals worth learning.

Figure 8-15 Changing the shape of a sail is accomplished by changing the depth of the draft to produce a flatter or fuller sail. The amount of draft required in different conditions varies with the point of sailing. In general, flatter sails (upper) are more efficient upwind than fuller ones (lower).
Mainsail Trim
Changing the shape of the mainsail involves changing the depth of the draft to produce a flatter or fuller sail. Moving the mainsail’s draft forward or aft is also a factor in improving the balance of the boat. Most of the time, the ideal position for maximum draft is one-third to one-half the way back from the mast. When sailing upwind, the object is to make the sail fuller at the leading edge, to direct total lift force forward and reduce side forces. When reaching, draft position is usually farther aft. Tensioning the clew outhaul to pull the clew aft reduces draft and moves it forward. The same effect is achieved by tensioning the backstay and boom vang to bend the top of the mast aft and bow the middle of the mast forward. As the mast bows forward, it pulls the middle of the mainsail and flattens it out; see Figure 8-16. Increasing halyard tension and taking up on the cunningham are also effective measures to move draft forward.

Figure 8-16 Using the backstay to tension the top of the mast aft will bow the middle of the mast forward, and so flatten a mainsail. The effect is to reduce draft and move it forward.
The mainsheet, combined with the boom vang and traveler, controls the tension on the leech of the mainsail. Leech tension is important for several reasons, but the two principal considerations are twist and trailing-edge shape.
In general, wind flows faster with increasing height above the water. That means that the top of a sail should be trimmed to a different angle than the bottom, with the greater angle at the top—hence sail twist; see Figure 8-17.To achieve a high degree of twist, you would usually ease the mainsheet, allowing the boom to rise. You might have to pull the traveler car to windward to prevent the boom from swinging too far from the boat’s centerline. The boom vang would be slack.

Figure 8-17 Because wind speed is greater aloft than at deck level, sails need to be trimmed to a wider angle at the top than at the bottom. Sail twist is achieved by easing the mainsheet, allowing the boom to rise (far left). To remove twist (near left), trim the mainsheet in, and use the traveler to position the boom slightly farther off the boat’s centerline.
The opposite effect, removing twist, is achieved by trimming harder on the mainsheet, placing more tension up the leech, easing the traveler car to leeward to position the boom somewhat away from the boat’s centerline, and using a tight boom vang. More pressure is carried high and aft by the mainsail, and the leech “closes up”—begins to push airflow away to windward instead of just letting it flow easily aft.
While the coarse setting of leech tension might be matched to the average wind strength and the point of sail, gusts and lulls may require further fine-tuning with the mainsheet. Typically, the mainsheet is tensioned in lulls and eased (or even released) to open the leech and depower the sail in gusts. Upwind, the mainsheet usually provides most of the leech control. Off the wind or on a reach, when the main is eased, the vang controls the leech. Many sails also have a LEECHLINE and a small cleat built into them to provide fine control as an adjunct to the coarse control of the mainsheet and vang. Care must be taken that the leechline is not so tight as to hook the leech to windward.
The traveler, of course, provides a means of balancing the mainsheet’s vertical and horizontal pull on the boom. As the mainsheet is eased and the boom moves to leeward, the angle of pull on the boom becomes more horizontal, removing tension from the leech. When the traveler car is eased to leeward, the pull of the mainsheet becomes more vertical, increasing leech tension.
The traveler car can also be pulled to windward in light air so that the mainsheet tension remains more horizontal when the boom is close to or right over the centerline of the boat. This allows sufficient twist with a smaller angle of attack. However, care must be taken not to overtrim the main. A rule of thumb is to keep the batten second from the top parallel to the boom; no battens—in fact, no part of the sail—should ever point to windward.
THE POINTS OF SAILING
When a boat is sailing as close as it can to the direction from which the wind is blowing, the boat is said to be “close-hauled,” meaning that its sails are hauled in close to the hull. Another name for this is “beating.”
When the angle between heading and wind direction is increased, the boat begins to “close reach,” and when the angle is about 90°, the wind is on the beam, so the boat is “beam reaching.”
Further increases in angle bring the boat to a “broad reach”; with the wind almost directly aft, the boat is “running.”
The term “running” sounds fast, and in square-riggers, it may well have been. But the fastest point of sail for most modern boats is a close reach, and running is slow by comparison.
Remember that this diagram shows the relation between a boat and the true wind, while the more important factor, especially for today’s faster boats, is the relationship between a boat and its apparent wind—the wind that the sails feel. Very fast boats, like catamarans and racing dinghies, might seem to be swinging from a close reach right through to a broad reach in terms of the true wind, when they are in fact close reaching the apparent wind. Sails are trimmed to the apparent wind, not the true wind.

A sailboat cannot sail directly into the eye of the wind, but modern sailboats can sail to within 45° of the wind, or closer, when close-hauled. A reach is the fastest point of sail, with the sails eased partway out. A run is aerodynamically simpler but can be the most dangerous point of sail. The sails are extended as far out over the sides of the boat as possible and can swing across with tremendous force.
Headsail Trim
The headsail, or jib, of many boats supplies as much drive as the main, or more. Not only are headsails often as large as the main, especially in masthead rigs with genoas, but the sail is presented to a clean airflow that is undisturbed by mast windage.
The tension on the forestay is the second most important control of the headsail shape after sheet position and tension.
A loose forestay (created by loosening the backstay) creates sag, which in turn creates a full (deep draft) headsail. Sailmakers build a degree of allowance for forestay sag into the sail shape, but increasing tension in the forestay has the same effect as straightening the mast: The sail is pulled tighter across the middle and becomes flatter.
Upwind, particularly in brisk winds, the jib halyard should be tensioned in order to keep the position of the deepest part of the draft as far forward as possible.
Key to trimming the jib, however, is the position of the clew. As the leeward sheet is eased, the clew will tend to move outboard and upward. The effect is a fuller sail. Tensioning the sheet pulls the clew aft, down, and inboard, flattening the sail and decreasing the angle of attack with the airflow.
Twist in the headsail is controlled by the position of the sheet lead (also known as the fairlead). As the lead is moved forward, the sheet pulls more on the leech—more downward. But as the lead is moved aft, the sheet pulls more on the foot—more backward.
In practice, it is often difficult to see the angle of the jibsheet accurately. But if the leech is fluttering, it indicates that the fairlead is too far aft, creating too much twist at the top of the sail; if the foot of the sail is fluttering or bellied out too far, the fairlead is too far forward, flattening the top of the sail too much.
Telltales
The most effective sail trim is often elusive, even for experienced sailors. Yet while no one can actually see the wind, there remains a relatively simple solution: Place pieces of ribbon or yarn about eight or nine inches long—telltales—at or near the luff on both sides of the headsail, and sometimes also on the mainsail. Their movement will reveal the action of the wind; see Figure 8-18. Jib telltales can serve to fine-tune sheet lead position and sheet tension. Although telltale positions will vary with preference, in general three telltales are placed on the jib about a foot behind the luff so that they divide the luff into four roughly equal sections. (It’s a good idea to avoid placing telltales too close to seams. It can be frustrating when they become caught on stitching in light air.)
Some sailors also favor telltales at the point of maximum draft on their mainsail, and one at each batten pocket along the leech, in addition to three telltales at the luff positioned as for the jib. Headsail luff telltales are uniquely useful because they “read” undisturbed airflow.
In general, the object when trimming a sail or steering close-hauled is to have all the telltales streaming aft at the same time, indicating that the airflow across the two sides of the sail is even and smooth. If the leeward jib telltales are lifting or fluttering, they indicate that the boat can be steered closer to the apparent wind because the airflow is hitting the edge of the sail and tipping over it, resulting in a curl. If it is not necessary or even desirable to steer closer to the wind—if the boat is not sailing upwind, but reaching—the same corrective effect can be achieved by letting the sail out. The leading edge of the sail thus meets the airflow more smoothly, and as a consequence the telltales stream aft.
Conversely, if a windward jib telltale lifts and flutters, the boat is too close to the apparent wind and must be LAID OFF, or steered at a wider angle to the apparent wind. If a course change is not desirable, the airflow can be corrected by pulling the sheet tighter and the sail closer to the boat’s centerline.
If the telltales nearer the foot of the sail (usually the headsail) are acting differently from the telltales nearer the head, then there is something wrong with the amount of twist. The sheet lead position should be changed until the telltales all react in a similar manner to changes in steering angle or sheet tension. For example, if the upper windward telltales are lifting while the lower ones are streaming, this is an indication that the sail has too much twist and the leads should be moved forward.
Fluttering or drooping telltales on the leech of the mainsail indicate that the air leaving the after edge is curling, creating drag; this is created by loosening of the leech tension, known as OPENING UP THE LEECH. This drag can be reduced or eliminated by tightening the leech.
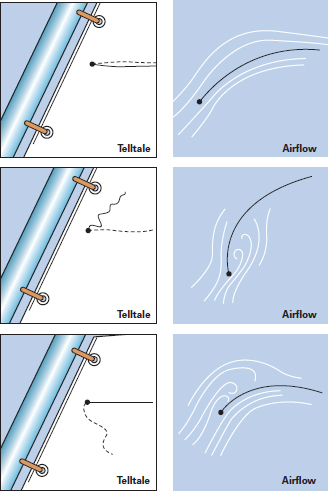
Figure 8-18 Telltales on a sail’s luff stream aft on both sides of the sail (dashed line is to leeward) when airflow is even and smooth (upper). A lifting windward telltale when you’re sailing close-hauled (middle) indicates that you’re pinching (heading too close to the wind). A stalled or fluttering leeward telltale (lower) indicates that you’re not heading high enough.
The Slot
The mainsail and the headsail work very closely together to shape the air that flows between them. This area between the sails is called the SLOT. The headsail accelerates the air across the leeward surface of the main, helping it produce lift and substantially enhancing the low-pressure venturi effect.
If the jibsheet is eased, it permits the clew to rise and go too far outboard. The slot may become too open, so that there is no accelerated flow. If the jib is sheeted too tightly, the slot closes and the jib forces airflow to curl into the back of the main—BACKWINDING the main and destroying the low pressure that is the whole object of the trimming. (Sometimes this backwinding is acceptable if there is too much airflow and sufficient power is being taken from the headsail while the main acts to balance the pressures fore and aft to control steering.)
The jib should generally be trimmed for course and conditions first, then the main trimmed so that the twist of its leech matches that of the jib, making the slot effective. On an upwind course, jib and main are usually trimmed as close to the centerline as wind force will permit. On some boats, a second fairlead track, or BARBER-HAUL system, permits the headsail sheet lead to be positioned closer to or farther from the centerline, as well as fore and aft, with much the same effect as adjusting the mainsheet traveler.
Other Rigs
When measured against the relatively complex rigging of conventional sailboats, the popularity of wishbone cat rigs is easy to understand; see Figure 8-19, far right. One sail does all the work and is controlled, for the most part, by one line—the mainsheet. The wishbone boom is suspended at its forward end by a choker line that attaches to a block on the mast and leads down to the foot of the mast and back to the cockpit. At its aft end, it is suspended, like a conventional boom, by the sail. The tightness or looseness of the choker line determines the depth or shallowness of the curve of the main in somewhat the same way that a conventional outhaul does.
Very small sailboats may have a variety of rigs, as shown in Figure 8-19.

Figure 8-19 Very small sailboats may have a variety of rigs as shown here. Most commonly seen is the lateen rig, used on board boats such as the Sunfish, and the wishbone rig used on board sailers. The rigs shown above are in addition to the common Marconi and gaff rigs.
Upwind Techniques
The closer to the wind a boat sails, the less distance it must travel to reach an upwind destination. But it also sails slower. Conversely, the farther off the wind it sails, the faster the boat moves. But it must sail a greater distance; see Figure 8-20.
The objective of sailing upwind (variously called POINTING, BEATING, or SAILING CLOSE-HAULED or TO WEATHER) is to reach a specific point as quickly as possible by sailing a course that strikes the best compromise between higher speed and longer distance on the one hand, and lower speed but shorter distance on the other. The exact best compromise changes with wind speed and wave conditions.
In general, flatter sails are more efficient upwind than are full ones; refer to Figure 8-15. They also should be sheeted as close to the centerline as the wind strength will allow. The crew should be prepared to depower sails during gusts—either by easing the traveler car to leeward or by easing the mainsheet—so that excessive heeling doesn’t contribute to leeway. Positioning crew to windward and even asking them to hike over the side will also help to counter heeling, thus allowing the keel to produce more lift and less leeway.
Constant adjustment of sails is called for in alternating gusts and lulls when close-hauled. Alternatively, the helmsman can PINCH UP in puffs and gusts, temporarily depowering the sails and keeping the boat ON ITS FEET (albeit at a temporary loss of speed), and BEAR OFF in lulls to accelerate.
Sailing close-hauled, the helmsman must determine how well the boat is balanced. If too much weather helm is required to keep the boat sailing a straight course, the center of effort has moved too far aft or the boat has heeled too much. To balance the boat, the sails can be depowered (flattened), the mainsail leech can be opened up, the boom can be eased out away from the centerline, or all three.
To sail a windward course well, a crew must deal with several trade-offs. Factors such as wind strength, the possibility of a wind shift, sea conditions, strain on the boat, and crew comfort (and in a race, how the competition is doing) must be weighed in order to set a course that efficiently and economically moves the boat toward the target.

Figure 8-20 Sailing upwind requires consideration of several factors, including wind speed, wave conditions, and desired level of comfort. In the example above, any of the three routes shown will lead to the same destination, but with probable different times of arrival.
Reaching Technique
Bearing away from a close-hauled course onto a reach puts most boats onto their fastest point of sailing. But caution must be taken whenever this maneuver is put into practice—continued care is required in order to maintain the boat’s balance. Weather helm, as the boat tries to round up into the wind, is usually strongest on a close reach, because an over-trimmed main will tend to keep the center of effort back and to twist the boat into the wind.
Moving the main traveler to leeward will change the mainsail’s angle of attack and ease heeling. But while main and jib should be trimmed for the course and wind strength, care must be taken that the main isn’t eased so far that wind strikes its lee side too directly and stalls the boat. In centerboard boats, it helps to raise the board slightly to move the center of lateral resistance aft and more in line with the center of effort. A skilled crew might wish to cope with gusts by alternately easing and sheeting sails. But the helmsman should bear in mind that the rule that applied when close-hauled is now the opposite: When reaching, bear off in gusts and head up in lulls. It is essential to bear off because, as boat speed increases, the apparent wind moves forward. In a light boat, a quick jab to leeward will also help to “put the hull under the sails” and stabilize it momentarily.
In order to keep the rudder “biting” when reaching in heavy weather, crew weight should be aft and to windward. This is especially important in a following or quartering sea, because waves moving under the hull from behind can lift the stern and rudder out of the water, causing the boat to yaw with a momentary loss of steerage. But a helmsman who learns to STEER THE WAVES can often surf down them and exceed theoretical hull speed, one of the most exhilarating experiences in sailing. The boom vang should be used to adjust the curve of the leech and control the boom.
Reaching in very light conditions calls for different tactics. Moving crew weight forward and to leeward induces heel, making the sails “fall” to leeward and giving them a better airfoil shape to utilize what little airflow exists.
TACKING
Since a boat cannot set a direct course to a destination to windward, it must tack upwind. Each new tack will be more or less perpendicular to the previous one, so the helmsman can calculate ahead of time what the compass heading of the new tack is likely to be.
A well-crewed boat should be able to tack smoothly. In preparation, the helmsman announces “Ready about,” and bears off the wind a few degrees to add speed. The windward headsail sheet, which is not yet in use, is prepared with a clockwise turn or two around the windward winch, while the leeward sheet, which is under load, is uncleated but kept on the winch, ready to free. The winch handle should be at hand. If the traveler car is to windward, the crew member assigned to the mainsheet readies the car to be moved.
Once the boat and crew are readied, the helmsman announces, “Helms a’lee” or “Coming about” and smoothly turns up into the wind, ensuring that the rudder is not cranked over so hard as to stall the boat.
When the headsail begins to luff, the leeward sheet is cast off. As the bow turns through the eye of the wind, the headsail trimmer keeps the slack out of the new working sheet but does not trim it too hard or too much while the headsail is still luffing across the foredeck. As the turn continues and the bow falls off toward the new tack, the new leeward sheet is hauled in by hand until taut, then wrapped two more times around the winch. The winch handle is inserted for final trimming. The helmsman stops the turn about 95 or 100° from the previous heading, then lets the boat gather speed as the mainsheet trimmer moves the traveler and trims the main to complement the trim of the headsail. The baseline heading on the new tack will be about 90° from the previous one, and 45° to the true wind on the new windward bow. But the helmsman should allow the boat to accelerate slightly off the wind before sails are trimmed perfectly and the boat is steered up to the desired heading.

The boat begins to tack at the bottom figure. Sails begin to luff as the bow heads into the wind. Momentum carries the boat onto the new tack (in this case, the starboard tack), and the sails are then trimmed.
Offwind Technique
Sailing off the wind can be a pleasant respite after a long beat or reach. More sail may be carried because the apparent wind is not as strong. On the other hand, downwind sailing is not usually as fast as other points of sail, and unless caution is taken it can be the most dangerous point of sail; see sidebar, “Jibing,”.
Bearing off a reach onto a straight downwind course, ease the main as far out as possible. If possible, ease tension on the backstay (and the leeward running backstay, if so equipped) for a fuller shape in the headsail. Sufficient tension on the upwind running backstay may be applied to give extra support to the mast. Most sailors prefer to broad reach downwind, jibing toward the target rather than sailing dead downwind. This is usually preferable for a light, fast boat. But even broad reaching, the narrowest angle toward the target may be best. And unless the wind comes slightly over one quarter, a jib will become blanketed by the main’s wind shadow. To put the headsail in clear air, it can be jibed across to the other tack so the boat is sailed GOOSEWINGED (WING-Basic AND-WING), with the lee side of both sails 90 degrees to the wind.
Maintaining steady wind on a boomless headsail when goosewinged is often a problem. The remedy is a WHISKER POLE extended from a fitting on the mast to the clew of the headsail—the precursor of the spinnaker pole. Some longdistance sailors, if sure that the wind won’t shift, and reluctant to deal with the extra care a spinnaker requires, go so far as to fly two boomed headsails at once, one on each side, often with the main reefed or furled altogether.
Whenever the boom is outboard of the boat (sometimes when reaching and always when running), the mainsheet has less downward pull. In heavier weather downwind, waves may cause the boom to rise and fall as the boat rolls. Tightening the boom vang will help steady the boat. The mainsail may be at right angles to the centerline of the boat, but if the boom is allowed to move too far forward, the boat will be SAILING BY THE LEE.
The Dangers of Jibing
If there is a danger that the wind might catch the leech of the main and cause a FLYING JIBE (uncontrolled), a PREVENTER can be rigged. The mast attachment of a tackle type of boom vang can be moved farther outboard, toward the toerail. In heavy seas, however, care must be taken that the boom, which is held down by the vang, doesn’t dip into the water as the boat rolls. Furthermore, too much tension on the vang may result in overflattening the mainsail. To maintain sail shape, the topping lift and vang can always be adjusted in concert.
While a vang attached to the toerail will partially prevent the main from filling on its leeward side and jibing accidentally, it may also cause damage to the rigging if you do jibe uncontrollably. A better, perhaps safer, preventer can be rigged from the clew of the main to a block on the foredeck and led to the cockpit, where it can be eased if necessary.
In general, crew weight when sailing off the wind should be amidships fore and aft, and as far outboard as possible on both sides. In fresh conditions (17-21 knots) when a following sea is lifting the stern of the boat, moving weight aft is a measure that will help maintain steerage.
When sailing downwind, it is important to remember that wind strength is greater than it seems. Before HARDENING UP to a reach, sails should be tended accordingly, perhaps even changed or reefed if the boat will be overcanvassed for the new point of sail.
JIBING
Uncontrolled jibes are to be avoided, as they are hard on gear and a fast-moving boom is potentially dangerous to personnel on deck. A controlled jibe, however, should be a normal part of sailing and is not something to be feared. When ready to jibe, the helmsman announces “Prepare to jibe” and steers slightly off the wind. The mainsheet trimmer hauls the sheet in and cleats it as other crew release the leeward headsail sheet and haul in the windward sheet.
The helmsman then resumes the turn until the boom swings across the boat and is held by the cleated mainsheet. The mainsheet is then eased to the new windward side as the headsail is trimmed for the new course.

In the diagram at right, the boat is already sailing goosewinged (also called wing-and-wing), with the mainsail on the port side and the jib to starboard. The helmsman prepares to jibe the mainsail, turning the stern into the wind (bottom). The wind then catches the mainsail and whips it across the boat (middle), under control of the mainsheet. The boat can continue with the jib still to starboard (top), or the jib can be winged-out to port.
Spinnakers
Sailors who wish to achieve maximum speed when sailing off the wind most often turn to a spinnaker. Perhaps no sail has as many variations as the spinnaker (often called “chute” or “kite”). Sails that fall into the category are often called FLYING SAILS, as they are attached to the boat only at their three corners and do not have the stabilizing support at the luff that other headsails do; refer to Figure 8-21.
The chute is constructed of lightweight material (usually nylon) that fills easily, packs in a small launching bag or box, and is cut to billow with a full shape and curved luff and leech. Contrary to popular view, a spinnaker does not merely catch wind from behind to “push” the boat. Rather, air passing over its leeward side from luff to leech creates a mini low-pressure area into which the sail moves.
For the most part, spinnakers fall into one of two categories: conventional and asymmetrical. A conventional symmetrical spinnaker (luff and leech are of equal lengths and interchangeable) is more efficient directly downwind than asymmetrical models.
Before it is launched, care must be taken that the spinnaker has been properly packed with no twists, and that the head and two corners of the foot of the sail are accessible, preferably color-coded for port (red) and starboard (green).
Assuming that the spinnaker is being launched on the port side, clip the inboard end of the spinnaker pole to the mast eye, with the pole sticking out the starboard (windward) side. Adjust the mast end to the height at which it is anticipated that the pole will be held when the sail is set.
The guy is run forward from its turning block near the cockpit, outside the starboard shrouds, through the pole end (still on deck or lower than the pole end attached to the mast) and around the forestay, then clipped to the green-patched (starboard) spinnaker clew. The sheet is attached to the red-patched port clew, then led outside the port shrouds and aft to its turning block on the port quarter. The halyard is attached to the head of the sail by means of a swiveling shackle. The spinnaker should be flown from a mast block that is above and ahead of the forestay.
Raise the spinnaker pole using the pole uphaul lift until it is at right angles to the mast. Take up the pole downhaul and cleat it, leaving just a little slack.
Before raising the sail, ensure that the pole is a few feet from the forestay and pay out some of the sail so that the tack is allowed to reach the end of the pole as the guy is tensioned and cleated.
Finally, hoist the spinnaker and cleat the halyard. If the headsail is still flying, it is now lowered and secured on deck (or roller-furled). As the spinnaker fills, trim the sheet and guy, first positioning the guy (and the pole with it) according to the apparent wind angle. The pole should be (very roughly) at a right angle (90°) to the apparent wind; see Figure 8-21.
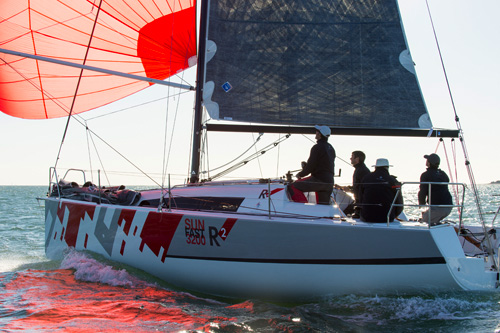
Figure 8-21 “Flying” a spinnaker off the wind can be a breathtaking experience. This powerful sail demands skill and constant attention.
Sailing the Chute
The primary rule of spinnaker sailing is to keep the luff from curling and the pole as square as possible to the wind. The closer the course is to dead downwind, the farther aft the pole is pulled and the more the sheet is eased to add to sail fullness. In some cases, the halyard may be eased slightly as well to permit the spinnaker to move forward, out of the disturbance from the main.
To reach, allow the pole to move forward, and trim the sheet. Care must be taken that the pole doesn’t rest on the forestay; the power of a spinnaker is such that forestay damage is possible. A spinnaker is also capable of heeling the boat dramatically. The helmsman must bear off in gusts and “sail under the chute.”
To jibe the chute, begin by swinging the main boom across the centerline. Next, unclip the pole at the mast and, using the remote line to open the pole-end fitting, clip the former mast end over the sheet, which is to become the new guy. The final maneuver consists in attaching the former outboard pole end to the mast eye and trimming the former guy, which at this point becomes the sheet.
An alternative “dip-pole” jibe requires either a pole that fits inside the forestay or one that can be retracted in such a way that allows it to do so. Throughout, the mast end remains attached to the mast. During the jibe, the guy is released by the remote trip line, the pole is retracted if necessary, and the pole topping lift is released in order to permit the pole to be dipped below and behind the forestay. Finally, the pole end is then clipped onto the former sheet, which now becomes the new guy, and the new sheet (which formerly was the guy) is hauled in and trimmed.
Dousing the Chute
The surest way of bringing down (DOUSING) the spinnaker is first to depower by steering so that the spinnaker is blanketed by the main when the guy is eased forward. The foredeck crew unclips the guy from the pole using the remote trip line, and the guy is eased. The sail, now held by the halyard and sheet, essentially becomes a large flag. Taking care not to let the sheet or guy fall into the water, one crewmember eases the halyard while another gathers the sail by the leech, under the main boom. With practice, it is possible to gather it directly into the storage “turtle,” leaving the two lower corners and head exposed and ready for rehoisting.
Cruising Spinnakers
From the foregoing, it isn’t hard to see why conventional spinnakers are often eschewed by cruising sailors who sail short-handed. But all sailors seek to improve downwind performance, and the asymmetrical spinnaker, often called a CRUISING CHUTE, is viewed by many as the cruiser’s answer. For reaching in particular, asymmetrical spinnakers, distinguished by a luff that is shorter than the leech, are also gaining favor with racers.
In the cruising form, a line at the tack is led through a block at the stemhead and run back to the cockpit cleat or stopper. The sheets are usually run outside the forestay. Sailing under a cruising chute is much like reaching, though easing the sheets by easing the tack line, and perhaps the halyard, brings the sail forward and free of the main’s shadow.
Jibing a cruising chute inside the forestay as one would a conventional foresail risks wrapping the halyard around the forestay as well as damaging the large sail on foredeck fittings. Consequently, a cruising chute is usually jibed by letting the sheet go as the stern comes through the wind. The clew of the sail is allowed to fly free around the front of the headstay, and the new sheet on the opposite side is taken up so that (unlike a conventional spinnaker) the reverse side of the chute is now the leeward side.
The asymmetrical chute’s effectiveness decreases as the boat sails more downwind. Only in very light conditions should it be poled out like a genoa. However, it is often better than a symmetrical spinnaker for close reaching. A growing trend among larger racing yachts, including those in the America’s Cup competition, has been adapted from racing dinghies such as the International 14 class. This system features a permanently mounted pole that can be extended forward through the hull at the bow to become a long sprit (like a bowsprit). Attaching the asymmetrical chute to the pole end means effective exposure to the wind when reaching.
Yet another variation on the spinnaker theme is the so-called gun-mount spinnaker system, which features a pole mounted at its middle on the fitting of a reinforced pulpit. The sail is tacked at both ends of the pole and the pole acts as a boom. Sheets to each end of the pole are used to trim the sail according to the course.
BOAT HANDLING UNDER SAIL
In most, but not all, situations a sailboat will be under auxiliary engine power when maneuvering in close quarters, such as leaving a berth and coming back in, anchoring, or picking up a mooring. But if for any reason mechanical power is not available, a skipper must be able to carry out the required maneuver under sail power alone.
The wind that propels a sailboat can also be used to put on the brakes. That’s why a skipper who wants to slow down or stop will begin by spilling the wind from the boat’s sails (letting them out), then will point the bow of the craft into the direction from which the wind is coming. The whole rig, acting as windage, will slow the boat down, stop it, and eventually force it backward.
Docking & Undocking Under Sail
In most instances a day’s sail will begin and end at a pier or wharf, or perhaps from a berth in a slip. The first situations are not too great a problem; departing from a slip can be more difficult.
Departing a Pier Under Sail
Frequently, the wind and current will permit a straightforward departure from a pier even under sail. When everyone is on board and all gear is stowed, sails should be readied for hoisting, with the halyards attached.
If the wind will help move the boat from the pier, it is a simple matter to take in the dock lines and raise the first sail. This is usually the mainsail. The boat will be maneuverable as soon as the sail is hoisted and sheeted properly, provided there is sufficient wind; steerageway may be gained by a shove-off or along the pier. Other sails may be raised later, when clear of the pier; see Figure 8-22.
If the wind or current is pushing the boat onto the pier, departure may be more difficult. In extreme conditions, when it is rough or windy and therefore impossible to position the boat for a safe departure from the end of a pier, then either another boat or an anchor set to windward will be needed to pull the boat away from the pier.

Figure 8-22 Leaving a pier under sail power alone must be done with due caution. Here the crew is about to unfurl and then sheet in the jib, and the boat should gather way and begin to sail. Care should be taken that the boat does not drift back into the pier.
Coming into a Pier Under Sail
Using the wind to slow down and eventually stop a sailboat is a technique that is useful for landing at a pier or wharf; see Figure 8-23. Providing that you can choose an “approach path” that heads the boat into the wind, you can sail across the wind, round up, and, as the boat slows, guide it gently into position for docking.

Figure 8-23 Arriving at a pier under sail requires practice to prevent crash landings. In the light breeze shown here, the mainsail can be left up and allowed to luff completely. Usually, however, it is wiser to douse all sails just before reaching the pier, in case an unexpected puff of wind comes up to fill the sails.
In stronger winds, everything is noisier and more exciting, but the braking action is also greater. It can be further strengthened if the crew pushes the boom outward against the wind as the boat is headed up. This is called BACKING THE MAIN.
Careful crew work and a little practice will allow a skipper to judge just how far the boat will carry on as the braking force of the wind is applied. Some skippers claim that they can even back down into a slip but, in a marina, this maneuver should be reserved for emergencies.
When approaching a pier or wharf for a landing under sail, the jib may be dropped some distance away, according to the skipper’s judgment. This will slow the boat’s speed but keep maneuverability. Lines and fenders should be prepared and ready to use, just as they would be for a landing under power.
The skipper must have an idea of how far the boat will coast after the last sail is lowered or allowed to luff and before the boat loses maneu-verability. This can be learned in open water by heading the boat up into the wind and allowing the sails to luff, observing how far she carries her way. A lightweight centerboard boat will stop in the water almost immediately, while a heavy keelboat may travel for several boat lengths before stopping, depending on wind and sea conditions; see Figure 8-24.
When the boat is judged to be the right distance from the dock, she is brought into the wind with the sheets freed, sails luffing. The boat coasts in, still with maneuverability. The right distance will vary with each boat and in each set of wind and sea conditions.
Ideally, the boat should lose way and come to a stop of her own accord within arm’s reach of the pier, then lines can be neatly placed ashore and the boat secured.
Don’t Be Embarrassed to Try Again
If the landing looks bad, the skipper should not hesitate to use the last of his maneuverability to turn away from the pier. This allows the boat to get away and make a fresh approach.
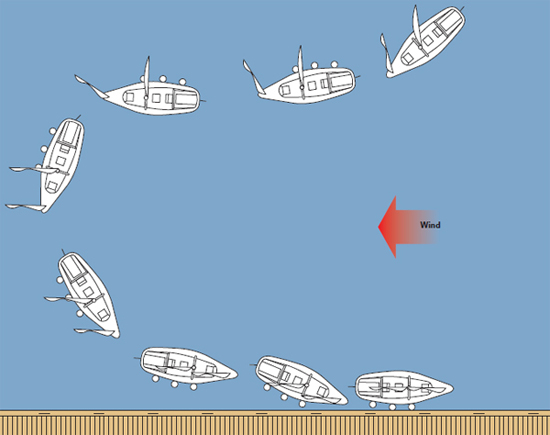
Figure 8-24 As the boat approaches the wharf, the helmsman steers off the wind, and the main and jib sheets are eased way out. The helmsman then steers across the wind with sails luffing and uses the boat’s remaining momentum to round up into the wind at the desired berth. The distance that the boat will coast under such conditions must be gauged by experience; additional braking force, if needed, can be supplied by backing the main against the wind.The jib is often doused at the beginning of this maneuver to clear the foredeck for handling dock lines and to prevent the jib from backwinding and forcing the bow away from the dock.
Anchoring Under Sail
When anchoring a sailboat, the skipper must, of course, remember that most sailboats require more water than most powerboats, and he must be mindful of his draft when selecting an anchorage. Furthermore, it is important to remember that because of their keels and their lofty rigging, sailboats are affected differently by wind and current than are powerboats. When anchored too close together, a sailboat and a powerboat will swing differently, and may collide. For this reason, and because of their greater draft, sailboats tend to anchor together in deeper water (see Chapter 9).
The procedures for setting and retrieving an anchor from a boat with only sail power are generally similar to those for setting and retrieving an anchor under engine power. However, it can be difficult to set the anchor properly without using an engine in reverse to back down on it and dig it into the bottom.
Setting an Anchor Under Sail
Approach the chosen anchorage under reduced sail, perhaps under mainsail alone. Experiment with your boat and find out what is best.
Follow the recommendations given in Chapter 9, Anchoring. Instead of backing down in reverse gear while paying out scope, however, it is necessary to back down under sail (see “Scope” in Chapter 9).
Backing down is best done by backwinding the mainsail firmly and allowing the wind to catch it and back the boat down. If the boat spins and will not back down in a straight line, straighten it up by pushing the boom out to the other side. This can be a tricky maneuver because the boat will start to sail away and may not back down properly. It may be necessary to drop all sail, settle back to full scope, and then raise sail again, briefly, to apply pressure on the anchor to set it.
Raising an Anchor Under Sail
To raise the anchor without the use of power in a small boat is as simple as pulling up the anchor line, then pulling up the anchor hand over hand. The sail should be already up and luffing, or ready to raise as soon as the anchor is up; see Figure 8-25.
In larger craft that might be too heavy to pull upwind while bringing in the anchor line, other measures will be necessary. The anchor line can be brought in on a windlass, or the boat can be sailed in short tacks up to the anchor, with the crew bringing in the rode by hand as the boat travels over it until the anchor is at short scope. Then the crew must cleat the anchor line promptly, and the momentum of the boat will beak out the anchor. It can then be raised by hand.
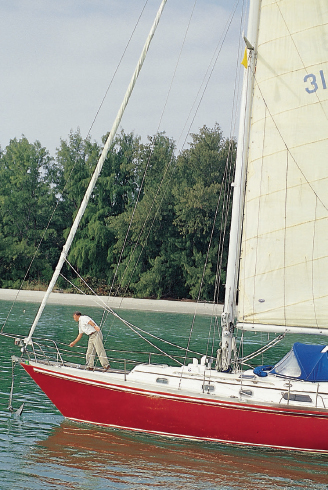
Figure 8-25 This anchor is being raised while the mainsail is already raised and allowed to luff. When the anchor has been secured in place, the boat will drift backward in irons, and must be skillfully handled to get off on the proper tack. Take care not to drift back onto other boats while getting underway.
Using a Mooring Under Sail
The use of a mooring by a sailboat without mechanical power is much like the process of anchoring. The primary difference is that when picking up a mooring, the point of action is more precisely defined; boat handling in the final moments must be much more carefully done.
Departing a Mooring
Leaving a mooring under sail is just as simple as leaving under power, perhaps simpler because there is less worry of fouling the mooring in the propeller. The mainsail may be hoisted before casting off the mooring pennant, but the jib is often hoisted later, to keep the foredeck clear for the person throwing off the pennant.
Getting Off on the Right Tack
By waiting for the natural swing of the boat, by backwinding a sail as discussed on the previously, or by holding the pennant far out to one side (and perhaps moving aft a bit while holding the pennant out), the person releasing the mooring can send the bow of the boat off in a chosen direction, to port or to starboard, allowing the mainsail to fill on one side and the boat to pick up speed.
Caution must be taken that the pennant is not released when the boat is exactly head to wind, because it is then “in irons” and may drift backward “in irons” without steerageway. It may continue to drift without any wind in the mainsail until she fetches up on a boat moored astern or in the shallows near shore.
Picking Up a Mooring Under Sail
When picking up a mooring under sail, the skipper’s knowledge of the particular boat is called upon. Again, wind, current, and sea conditions must be considered, and practice will pay off.
As the boat nears the mooring, station a crewman forward to pick up the pennant, or be prepared to go forward quickly yourself if you are alone. Turn the boat directly into the wind, and let the sails luff while the boat is still a few boat lengths away from the mooring buoy. It should have sufficient momentum to keep going ahead and stop with her bow just at the pennant, but this takes practice; see Figure 8-26. Just how many boat lengths to allow is part of the skill involved, and the distance will change from day to day, depending on the wind and current, and from boat to boat.
As with coming into a pier for a landing, if the maneuver isn’t working right—just head the boat around, trim the sails, and try again.

Figure 8-26 To pick up a mooring under sail, a slow approach is made with a crewmember stationed forward. The boat must not approach too fast, but must have enough speed to maintain steerage. When the mooring pennant has been picked up and secured, the sails should be dropped promptly. Practice is required, and a good sailor makes it look much easier than it is.
SAIL HANDLING & STOWAGE
Sails are expensive—ask any sailboat skipper/owner! The proper handling and stowage of sails will do much to extend their life and reduce overall costs. Some variations may be necessary on different craft, but the general procedures that follow will cover most situations.
Headsails
Roller furling for headsails is one of many innovations that promote simplified, convenient handling of sails; not surprisingly the system has been growing steadily in popularity. The furling mechanism typically consists of a headfoil that is fitted over the forestay. The headsail halyard is attached to a swivel that can slide up and down the foil as well as swivel around on it. A furling line is wound around a reel-like drum fixed to the base of the foil, with the line led back to the cockpit to a point convenient to the crew. Some models feature a continuous line around the reel that is led aft on blocks; see Figure 8-27.
To raise the sail, the head is attached to the swivel and the boltrope fed into the groove of the foil. The tack is attached to the drum. The halyard on the swivel pulls up both the swivel and sail. When the furling line is hauled aft, the drum and foil turn around the forestay, rolling the sail around it as well. The furling line is cleated to store the sail furled on the forestay. To protect the sail from ultraviolet deterioration, a sacrificial protective strip is often sewn along the leech and foot. To set the sail, the furling line is released. Tension on a sheet unrolls the headsail, assisted by the wind once the aft part of the sail begins to fill.
A roller-furled headsail can be reefed by furling it partway, thus enabling two or three headsails of different sizes to be replaced by one roller-furling one. To maintain proper angle of the sheets when the sail is reefed, jib fairleads must be moved forward on their tracks.

Figure 8-27 A typical sailboat roller furling system for a headsail uses a reel-like drum to contain the furling line. The furling line can be controlled from the helm position.
Mainsails
Roller furling systems exist in a number of variations for mainsails as well. Some feature an inmast or behind-the-mast furler that begins by winding the luff of the sail, pulling the clew forward. The disadvantage of such systems is that they preclude the use of battens, often require a loose-footed main, and add weight aloft.
In-boom furling systems that furl the foot of the sail on an internal roller are actually a refinement of older roller reefing systems that worked by wrapping the sail around the boom itself. In practice, the boom is usually supported by the topping lift or a solid vang while the halyard is released and a handle winds the roller in the boom. The customary difficulty of getting a proper sail set, which used to affect older systems, has been eliminated on many modern versions.
A more commonly employed (and distinctly less expensive) means of reefing is a JIFFY, or SLAB, system that makes use of cringles at two or three reef points on the luff and leech. Reefing lines are fastened to the boom, led up through the cringles on the leech and down to a sheave at the boom end, and then forward to the gooseneck. To reef, the boat is taken head to wind, and the topping lift is tensioned in order to take the weight of the boom. The halyard and outhaul are then eased off, and the reef cringle at the luff is hooked onto a tack hook. As the halyard is tensioned, the appropriate reefline is taken up to pull the new clew down and aft, and the topping lift is eased. The new foot of the sail is then secured, either by means of permanent lines on the sail or with sail ties led through cringles spaced between the leech and luff reefing points.
As unwieldy as all this sounds, with a certain amount of planning, a reef using a jiffy reefing system can usually be taken in or let out in less than a minute, and the resulting shortened sail can be set well.
Spinnakers
The lack of luff support makes spinnakers more unstable and more difficult to launch, jibe, and douse (take down). Some new designs are equipped with a reinforced patch and a cringle in the center to which a “retriever,” or “take down,” line is attached to assist in dousing the sail, and sometimes for pulling the sail through a tubular launcher incorporated into the hull with a funnellike outlet on deck. The retriever is then led through the tube to the cockpit. The doused sail, which is now stored in the tube, is ready to be redeployed whenever it is needed.
Another technique for hoisting the spinnaker entails careful packing beforehand. The sail is pulled through a funnel-like device equipped with elastic bands stored on its narrow end. As the head of the sail is pulled out the narrow end, bands are placed around it at intervals. The spinnaker is rigged and hoisted with the bands in place. When the sheet and guy are trimmed, the bands break and let the sail fills.
A tubular sleeve with rings at each end (variously called a SOCK, SALLY, or CHUTE SCOOP, etc.) may also be used. The spinnaker is stored inside the sleeve and attached to it. The sleeve is hoisted on the spinnaker halyard.
A line running the length of the sleeve is threaded through a block at the halyard end, and from there is attached to the ring at the bottom. The sock is hoisted fully with the sail inside, and then the line is pulled in such a way that it will slip the sleeve upward. Wind filling the bottom of the sail usually helps to move the bottom ring and sock toward the halyard until the spinnaker billows and fills. The sleeve, meanwhile, remains at the head of the spinnaker while it is flying, and the line from the sleeve is cleated on deck. To douse the spinnaker, the sheet and guy are eased and the line attached to the sock’s bottom ring is hauled in so as to pull the sock down over the sail. In addition to being useful in dousing, a sock also can be used to control the sail while jibing whenever the boater is sailing shorthanded. The sock is merely pulled down over the sail, set up on the opposite tack, and pulled again to set the sail.
Storing Sails
Headsails not stored on a roller system should be dry and FLAKED—folded accordion-style—before being bagged. Though not always the easiest thing to do in rough weather, the crew can control a hanked-on sail as it comes down on the side deck by moving forward and pulling aft on the leech, securing the sail to the rail as they go. Ideally, another crewmember, sitting back-to-bow in the bow pulpit, can control the luff to assist with flaking. If the flaked sail is to be bagged, the sheets are untied, and it is rolled neatly from the clew forward, ready to fit in the bag opening.
Hanks can be left on the headstay until the sail is stored. Sails that fit into a headfoil present a difficulty, since they are controlled only by the halyard and tack when dropped. Care must always be taken to ensure that the sail does not fill on deck and then blow overboard.
An elongated bag—aptly referred to as a SAUSAGE BAG—is often used in place of a conventional sail bag whenever using headsails constructed from new sail materials, such as Mylar or Kevlar, which can be damaged if they are folded too tightly. The zipper on the bag is opened lengthwise and clipped to the lifelines before the sail is dropped to the deck. Then, once the sail is dropped and flaked in the open bag, the full-length zipper is closed to enclose the sail.
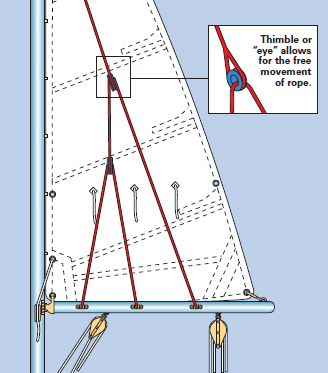
Figure 8-29 Lazy jacks, shown here, are designed to help control the mainsail as it is dropped by cradling it on the boom.
A number of systems exist to help control the mainsail. LAZY JACKS—ropes or wires running from mid-mast to the boom—keep the sail on the boom when it is dropped; see Figure 8-29.
Another system, called a DUTCHMAN, features vertical lines running from the topping lift (or a similar line), through cringles on the sail and down to the boom. When the halyard is released, the vertical lines hold the sail in line with the boom.
To store the lowered mainsail on the boom, begin at the leech and pull the sail aft, flaking it on alternating sides of the boom; see Figure 8-28. Ties can be used at intervals to lash the sail to the boom. As soon as possible, the sail should be covered to prevent ultraviolet deterioration. Lazy jacks or a Dutchman may require a special sail cover.
Figure 8-28 To store a lowered mainsail, pull the sail aft from the leech, flaking it on opposite sides of the boom as you go.
NEW SAILBOAT TYPES
Sailing is undergoing another major step in its evolution. Techniques explored by sailboarders, multihull sailors, and racing dinghy sailors have found their way into the mainstream of sailing. In addition, techniques rooted in pure science and aircraft speed engineering—such as rigid wings and hydrofoils—are finding practical, if not widespread, application.
Several factors are making sailing a faster and more exciting sport. One is the simple fact that most North Americans enjoy speed. Yet the cost of moving across the water at speed is very high. Many recreational boaters just can’t afford to run a fast powerboat. For them, the thrill of a catamaran or sailboard at high speed, not to mention the challenge of handling it, is an affordable choice.
Another factor is the availability of strong and light materials. In fact, many of the designs we consider recent and new have been around in slightly different forms for most of the last 100 years or so. For example, extremely light, flathulled racers with lots of sail area and asymmetrical spinnakers are very like the “sandbaggers” that were raced in New York Harbor late in the nineteenth century.
What’s different now is that light, highly stressed designs can be built of strong materials, making ownership by mainstream sailors possible. Sandbagger sailing, on the other hand, was semi-professional and certainly not for the family man—just as America’s Cup sailing today is very distant from family-oriented racing.
Multihulls
The most obvious “new” sailboat type is the catamaran or trimaran. In fact, the idea is ancient and was tried out as a racing design also in the nineteeth century.
Multihulls first gained acceptance in the 1960s as light and fast recreational boats, but began to be seen as a practical (and even potentially safer) solution to long-distance cruising. Their high construction cost (at least in a production setting) and the general conservatism of the North American market kept them in the background through the 1960s and ’70s. However, in the ’80s, European and some exceptional North American sailors successfully sailed multihulls in the open transoceanic competition offered by such races as the Single-Handed Transatlantic Race.
There are now many successful builders of production multihulls in Europe and North America, and their superiority for delivering flat-out speed has been well demonstrated in various professional-level ocean races as well as Dennis Conner’s famous defense of the America’s Cup in 1988. Multihulls also hold many of the world’s offshore speed records, including the round-the-world speed record, which was lowered to just over 45 days by the maxi trimaran Banque Populaire V in 2012, then lowered again in 2017 to just under 41 days by the maxi trimaran IDEC 3.
Along with the huge stability provided by two or three separate hulls, multihull designers have introduced such innovations as the rotating mast and the full-batten sail. By allowing the mast to rotate on a vertical peg at the step, catamaran sailors are able to point the mast into the airflow and to induce the least amount of drag. By “overrotating,” they can more precisely control the shape of the full-batten sail. A rotating mast can also be built with a lighter and stronger section, because its wider surface can be regarded as sail area rather than parasitic drag.
Rigid-Wing Sails
The wide rotating mast and very stiff, full-batten sails of catamaran competition eventually led to the rigid-wing sail. Arguably the most famous wing of all—and certainly the largest—was the 220-foot wing on the 113-foot trimaran USA 17, which won the 2010 America’s Cup. Wing sails have since become an integral part of Cup competition. Wings have also long been integral to C Class catamaran racing and are making inroads in other cutting-edge classes, such as the Moth 11-foot dinghy class.

Figure 8-31 The maxi-trimaran USA 17 flies a conventional jib and 20-story-tall rigid-wing main during the thirty-third America’s Cup series in 2010. Note how the wing is hinged midway fore and aft to control camber. Note also the curved daggerboard in the windward hull, or ama, which provides vertical lift in addition to controlling leeway, and the narrow “wave piercing” bows on the amas.
Although rigid-wing sails still belong almost exclusively to the realm of extreme catamaran competition, a number of forward-thinking designers are developing wing designs appropriate for more general use. A company called Harbor Wing Technologies, for example, has teamed up with the West Coast design firm of Morrelli & Melvin to create a wing that rotates 360 degrees and includes “tails” that control the amount of lift generated. A single sailor can control the wing using a joystick and sail-by-wire computer technology. Possible applications include those aboard everything from cruising boats to unmanned defense and marine research vessels.
Planing Hulls
Sailboats have been planing since the early 1900s, but it is only in the last 30 years that light, high-powered sailboats have become extremely popular. Boats with wide, light hulls are common, and many of these are equipped with trapezes that allow their crew (sometimes both skipper and forward hand) to suspend themselves horizontally over the surface of the water on the windward side.
The enormous increase in stability that trapezing allows is exploited by very large sail areas in relation to the weight of the boat and crew. Planing a boat of this type is possible even in gentle winds of only 12 or 13 knots.
Trapezing is only practical on boats no longer than about 20 feet (6.1 m). At this size, the complexity of crew work and the number of trapeze artists required takes such boats out of the realm of recreation and into the realm of pure sport.
However, even without trapezes, there are many light, but ballasted, keelboats that are capable of planing in heavy winds. While such planing episodes can be brief (and are often assisted by a following sea that induces surfing), these light, flat-keel boats nevertheless achieve speeds well beyond the normal limit of the speed of a wave length equal to their displacement waterline.

Figure 8-30 By canting its keel dramatically to windward, the VOR 70 Groupama creates additional righting moment, which allows it to carry a far greater press of sail than would otherwise be possible.
Keels & Ballast
One of the refinements that has made it possible for a ballasted boat to sail beyond displacement hull speed is the use of very deep, and consequently narrower, fin keels.
A given volume of lead ballast, if stretched downward, acts on the hull with a longer lever arm and can, therefore, provide more righting moment for the same weight. There are practical limits to the extent of draft, however, that have to do with the mechanical stresses placed on a lifting surface like a fin keel, especially when it is swung violently by wave action at the surface (not to mention shallow water).
To further increase the righting moment for a given keel depth, or “span,” many grand-prix racers now employ swing keels with heavy lead bulbs on their tips. Pivoting the bulb to windward dramatically increases the lateral distance between a boat’s center of gravity and center of buoyancy, increasing the amount of sail it can carry. Some boats can even rotate their keels entirely up and out of the water, in which case daggerboards are used to keep the boat from drifting to leeward. The downsides to these kinds of systems are their expense, complexity, and vulnerability to breakage. In a number of cases, racing boats have had to withdraw from competition because the hydraulic rams controlling their keels have failed.
The quest for greater righting moment without the penalty of weight has also found expression in the use of movable and expendable water ballast. There are two common approaches. In the most obvious method, water is taken on board and held in tanks at the extreme beam of the hull. If the boat is working to windward on starboard tack, for example, its water ballast is pumped into the starboard tank, where its weight provides the best righting moment. As or before the boat tacks, water is transferred by pump or gravity to the port tank, ready for the new tack. Of course, great care must be taken that the boat is not completely disabled should the ballast end up on the wrong side in heavy winds. The amount of water ballast carried relative to the boat’s fixed stability has to be carefully calculated by the designer. Obviously, racing boats, especially single-handed ocean racers with the most to gain, take greater calculated risks.
Another type of water ballast has nothing to do with racing or risk-taking. Several small, trailerable cruising sailboats have a different kind of water ballast, which allows them to be light enough to tow behind a car but heavy enough to achieve good stability. A long, internal water tank is built into the hull at the lowest part of the bilge. A hole allows water to flow freely into and out of the tank. When the dry boat is launched, the tank fills up, adding a couple of hundred pounds at the lowest and therefore most advantageous part of the hull.
When it’s time to go home, the (heavy) boat is pulled onto the trailer and, as it begins to rise above its load waterline, the ballast tanks begin to empty. By the time the boat is at the top of the ramp, it’s losing weight rapidly.
Sailboards, Kiteboards, and Hydrofoils
Currently, the fastest sailboat in the world is hardly a boat at all—it is a kiteboard. An offshoot of the sailboards that came to prominence in the 1970s, a kiteboard is a very sophisticated device with a lightweight planing hull and a large “sail” that flies high above the water, where the winds are stronger than at sea level.
Another technology at the cutting edge of sailboat design is hydroplanes. At the smaller end of the scale are “foiling” Moths, the latest incarnation of the developmental Moth dinghy class. The key to winning in these hyper-competitive boats is keeping the entire hull clear of the water so that it is supported by a pair of hydrofoils, one at the bottom of the rudder and another at the bottom of the keel—even during tacks and jibes. These diminutive vessels regularly reach speeds in the high 20s.
On a much larger scale is the French trimaran Hydroptère, which broke the 50-knot barrier in 2009 and briefly held the overall sailing speed record until it was eclipsed by the radical foiled trimaran Sailrocket 2 (55.32 knots) in 2012 and by French kitesurfer Alexandre Caizergues (56.62 knots) in 2013.