

Types of Anchors • Anchor Lines • Anchoring Techniques • Special Anchoring Situations • Permanent Moorings
Of all the skills involved in seamanship, the art of anchoring is one the boater must master if he is to cruise with an easy mind. Perhaps you have been getting by with inadequate gear and bad practices acquired in home waters. Sooner or later, carelessness and lack of technical know-how will lead to difficulty—probably inconvenience, possibly danger.
The essence of successful anchoring is to “stay put,” without dragging, whenever the anchor is set. And don’t forget the need to respect the rights of nearby boats that could be fouled or damaged if your anchor drags.
Though anchoring skill may not be learned from printed pages alone, this chapter should help the beginning skipper to get off to a good start and the seasoned boater to verify or update his technique.
In quiet anchorages and familiar surroundings, GROUND TACKLE (the gear used) and the methods employed are seldom put to a test. But strange waters, inadequate shelter in an exposed anchorage during a hard blow, and unexpected variations in wind and current will surely take the measure of both tackle and technique.
Successful anchoring requires having the right gear on board and knowing how to use it.
GROUND TACKLE
Anchors have evolved over centuries from a simple stone fastened to a crude rope to modern designs that have been carefully engineered to achieve the greatest holding power with the least weight. It did not take long for mariners to realize that what was needed was an anchor that would dig in and hook the bottom, rather than merely a weight that might drag across it. Simple wooden hooks were first added, later changing to iron. Still later a STOCK was installed perpendicular to the plane of the hooks so as to put them in a better position to get a bite of the bottom. Holding power in softer bottoms was improved by adding broad FLUKES to the hooks. Now, anchors have highly engineered designs that enable them to quickly and deeply bury themselves in the bottom, thus achieving the maximum holding power for the least weight.
Some Terms & Definitions
To prevent confusion in the use of terms, refer to the labeled illustration of the parts of an anchor, Figure 9-01, and the definitions in Anchoring Terminology (also refer to Appendix F for further definitions). A popular version of the classic anchor was chosen to illustrate the parts. Subsequently we shall see how the proportioning and placement of parts have varied with the introduction of later designs.
The ANCHORING SYSTEM is all the gear used in conjunction with the anchor, including the line, chain, shackles, and swivels. The anchor line, including any chain, is often called the RODE.

Figure 9-01 Anchor parts are identified here on a traditional kedge anchor, but many of the terms are the same for most modern types. The kedge (described in “Kedge Anchors” later in this chapter) is perhaps better known as a Fisherman or Yachtsman anchor, these being two familiar kedge designs.
Types of Anchors
Scan a marine hardware catalog and, without experience, you may be confused by the diversity of anchor designs. What you should be buying, essentially, is holding power; sheer weight is no index of that. On the contrary, scientific design is the key to efficiency, and a modern patented anchor, if properly manufactured, stands at the top of the list on a holding-power-to-weight basis.
ANCHORING TERMINOLOGY
• Anchor Device designed to engage the sea bed, lake bed, or river bed, and through its resistance to movement, to maintain a vessel within a given radius.
• Anchor chocks Fittings on the deck of a vessel used to stow an anchor when it is not in use.
• Anchor rode Line or chain, or a combination of both, connecting an anchor to a vessel.
• Bow chocks Fittings on a vessel’s rail, at or near the bow, having jaws that serve as fair-leads for an anchor rode or other lines.
• Breaking out the anchor Unsetting it by pulling up on the rode when above it.
• Changing the nip on an anchor rode Preventing wear from occurring at the same place over an extended period of time by pulling in or letting out a short length of the anchor rode.
• Ground tackle An overall term for anchors, anchor rode, fittings, etc., used for securing a vessel at anchor.
• Hawsepipe A cylindrical or elliptical pipe or casing in a vessel’s hull through which an anchor rode runs.
• Horizontal load The horizontal force that is placed on an anchoring device by the vessel to which it is attached.
• Mooring bitt A post through or attached to the deck of a vessel that is used to secure an anchor rode or other line to the vessel. A samson post is one form of a mooring bitt.
• Scope The ratio of the length of the anchor rode currently in use to the vertical distance from the bow chocks to the bottom of the water (depth of water plus the height of the chocks above the water).
• Tripping an anchor Using a line attached to the crown or head of an anchor fouled in the bottom to pull it out backward, releasing it from the bottom.
• Vertical load The downward force placed on the bow of the vessel by its anchor rode.
Lightweight-type Anchors
The LIGHTWEIGHT-TYPE of burying anchor introduced just prior to World War II was developed by R.S. Danforth. Its efficiency in service was so high that it permitted the retraction of deliberately grounded amphibious vessels during assaults on enemy-held beachheads. After that war, models were developed specifically for small craft, and these are now widely used. The term “Danforth,” although the trade name belonging to one manufacturer, is often used generically for all anchors of this general design.
Although refinements by a number of subsequent manufacturers have led to minor changes, the Danforth design remains generally the same as the original. The lightweight anchor’s high holding-power-to-weight ratio (the ultimate measure of an anchor’s desirability) makes it a standard piece of equipment on many recreational vessels.

Figure 9-02 Lightweight-type anchors made of steel were originated by Danforth, but are now also made, with minor variations, by several other companies. Note the angled plates on the crown (red arrow).
In this type of anchor, pivoting flukes are long and sharp so that heavy strains bury the anchor completely; see Figure 9-02. It tends to work down through soft bottoms to firmer holding ground beneath, often burying part of the line as well; see Figure 9-03. On some designs, the angle between the flukes and stock can be varied for improved performance on soft or hard bottoms. In place of a stock through the head, the lightweight type has a round rod at the crown end to prevent the anchor from rolling. This placement of the stock does not interfere with the shank being drawn into the hawsepipes of larger craft for stowage. (Many skippers place protective rubber tips over the stock ends to prevent scarring the boat’s topsides and the bringing up of mud and sand from the bottom if the stock is a hollow rod.)
In use, a lightweight-type anchor at first rests flat on the bottom. A forward pull with a slight upward angle on the shank turns its broad, pivoted flukes downward so that their sharp points dig into the bottom. The stock at the crown prevents the anchor from rolling and disengaging one or both flukes. A key element in the high performance of lightweight-type anchors is the design of the crown. The two flat, inward-sloping surfaces force the thin, sharp flukes to dig into the bottom and penetrate deeply. The surfaces of the crown are well separated from the flukes to help reduce clogging with mud, grass, or bottom debris that might otherwise interfere with the penetration of the anchor and its holding power.
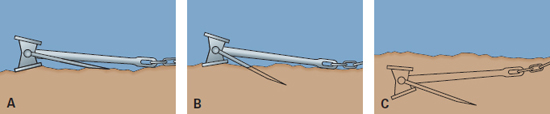
Figure 9-03 A lightweight-type anchor lands with its flukes flat against the bottom (A). A strain on the anchor line causes the flukes to penetrate the bottom (B). Further strain on the rode causes the flukes, and sometimes the entire anchor and part of the rode, to be buried (C).
After the initial strain placed on the line, and thus on the shank, has buried the flukes into the bottom, subsequent pull on the line continues to bury the anchor until the force of the pull and the resistance of the anchor’s broad flukes are balanced against each other; refer to Figure 9-03.
Compared to other anchors, this popular type is easy to handle and stow. Its holding power is most effective in favorable bottoms such as sand, mud, or clay; on a rocky bottom, the flukes may or may not catch. Where there are weeds or grass, this type of anchor will often skip across the bottom without digging in; if it does set, it may be in grass or weeds that will then pull out with a complete loss of holding power.
A number of manufacturers produce anchors of the lightweight, burying type. In selecting an anchor, remember that all manufacturers have their own design variations, and “look-alikes” do not necessarily hold similarly. Be sure to check both design and construction integrity. Variations in the fluke-to-shank angle from one anchor of a given size and model to the next may indicate that the manufacturer has failed to exercise adequate quality control. Pay special attention to hinges or pivot pins. Carefully inspect all welds—if the anchor breaks in use, its holding-power-to-weight ratio becomes meaningless.
Lightweight-type anchors are also made of aluminum under the trade names of Fortress and Guardian. As a result of careful engineering, these anchors have shown even greater holding power than steel anchors of comparable size, plus increased ease in handling from their significantly lighter weight. These anchors can be disassembled and stowed as a flat package. Another desirable feature of Fortress anchors is their ability to be assembled in either of two ways for different fluke angles in order to maximize holding power in normal or soft mud bottoms; see Figure 9-04. One drawback is that these anchors have a tendency to plane or fly off in the water as they are lowered.

Figure 9-04 The Fortress anchor, made of aluminum alloy, has high holding power per pound of weight. It does best in softer bottoms and performs poorly in grass and weeds. The shank angle can be adjusted to the type of bottom.
Plow Anchors
The PLOW anchor is quite different from the lightweight type. It was invented in England by Professor G.I. Taylor of Cambridge University; he called it the CQR (which stands for coastal, quick release). Its most distinctive feature is a shank that pivots longitudinally on a hinge; this reduces its tendency to break out from the bottom when the boat swings and the direction of pull changes; see Figure 9-05. Similar models have since been developed and manufactured in the United States and other countries. It has found wide acceptance because of its demonstrated efficiency in a variety of bottoms. Opinions vary as to its effectiveness in heavy grass or weed, which is not surprising in that many weed growths resist penetration by any anchor.

Figure 9-05 The plow anchor gets its name from the shape of its single deep-burying fluke pivoted at the end of the shank.
When a plow anchor is lowered, it first lies on its side on the bottom; see Figure 9-06. Then when a pull is put on the line, it rights itself after moving a short distance, driving the point of the plow into the bottom and finally burying the anchor completely if the bottom is soft. Suggested weights for CQR anchors may vary from 15 pounds (6.8 kg) for a 25-foot (7.6 m) boat to 60 pounds (27.2 kg) for a 60-foot (18.3 m) craft, with heavier sizes available for larger vessels. For best performance, the manufacturer recommends a minimum of 18 feet (5.5 m) of chain between the anchor and a fiber line.
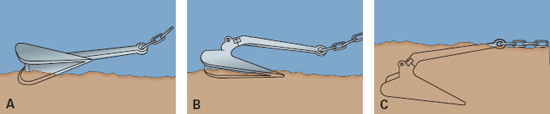
Figure 9-06 A plow or similar burying anchor normally lands on the bottom on its side (A). A strain on the anchor rode causes it to turn more upright and quickly bite into the bottom (B). Further strain on the line results in the anchor burying itself in the bottom (C).
Because of the pivoting feature of its shank, the plow anchor tends to remain buried over moderate changes in direction of pull on the line caused by wind or current shifts. There is no projecting fluke to foul the anchor line, and the plow breaks out easily when the pull is vertical for raising the anchor. Plow anchors do not stow well on deck and are usually hoisted to a bow roller fitting, where they are secured.
As with lightweight types, plow anchors are produced by a number of manufacturers, and their effectiveness may vary. Forged models are stronger than cast versions. A variation of the plow, the Delta anchor, has a solid, nonpivoting shank, but otherwise the same basic design; see Figure 9-07. It is weighted so that the pointed fluke is ready to dig in as soon as it reaches the bottom. This anchor design is also somewhat easier to stow on a bow roller, as it does not have the bulky hinge.
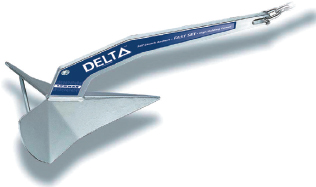
Figure 9-07 The Delta anchor is similar to the CQR plow, except that it is one piece, eliminating the swivel joint between the shank and fluke. Its holding power is said to be slightly superior to other plow types.
The Simpson Lawrence Horizon Claw Anchor
Another anchor from the United Kingdom is the Horizon Claw. The anchor is similar to the Bruce anchor, originally developed for use with offshore oil- and gas-well drilling rigs; see Figure 9-08. The Simpson is a single piece of high-grade steel casting and is available in sizes ranging from 2 to 66 pounds.

Figure 9-08 The Bruce anchor is shaped so that once it has been set, should it pull out from a wide change in direction of pull, it will reset almost immediately. Intentional breakout, however, is easy on a vertical pull. The anchor is said to work well in sand and mud, and is strong enough to be used in rocks.
A burying-type anchor, the Simpson is designed to right itself no matter how it lands on the bottom while digging in within two shank lengths; it breaks out easily with a vertical pull. The design is particularly focused on quick resetting should the anchor disengage from the bottom after a change in direction of pull. The anchor is available in mirror-polished, precision-cast 316 stainless steel.
The SuperMax is a similar design that has a larger fluke area; see Figure 9-09. Recommended sizes for these anchors are roughly the same as for plow anchors.
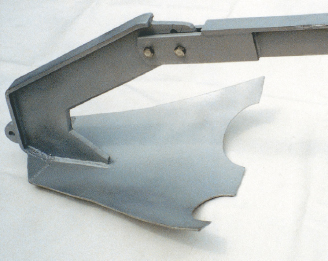
Figure 9-09 The SuperMax anchor’s greater holding power seems to come from the extra-large fluke. The adjustability of the shank allows the angle to be set for use in varying types of bottoms.
Kedge Anchors
In discussing KEDGE anchors it is important to distinguish between the more massive, ancient types and the later versions designed for small boats. In glossaries, “kedge anchors” are often defined as light anchors (of any design) carried out from a vessel aground to free her by winching in on the rode. Here, however, we refer to the kedge as an anchor with the more traditional type of arms, flukes, and stock, as distinguished from newer, lighter types.
Kedge anchors are not widely used on modern recreational boats, but they do have their place in special applications. Some models have relatively sharp bills and small flukes to bite better into hard sand bottoms; see Figure 9-01. Others have broader flukes on heavier arms for greater holding power in softer bottoms and greater strength when hooking into rocks or coral heads. A kedge anchor is normally an excellent choice for bottoms with heavy growths of grass or weeds—one arm will penetrate the vegetation and dig into the bottom beneath. Typical designs are the Herreshoff, Fisherman, and Yachtsman, all varying in small details.
Kedge anchors are not of the “burying” type, as the shank lies on the bottom and one arm remains exposed. On the other hand, a kedge’s “hook” design recommends it, probably above all other types, on rocky bottoms where one fluke can find a crevice. Retrieval, with proper precautions, is not too difficult. (More about this later) Modern kedge designs have a diamond-shaped fluke to lessen the risk of the anchor line fouling the exposed arm, but this possibility must be considered if a change in direction of pull of a half-circle or more occurs.
Stock & Stockless Types The plow and Bruce anchors are of the STOCKLESS type. Others are classified as being of the STOCK type, although the stock, as we have seen, may be at either the ring or crown end. Those with the stock at the crown end, such as the lightweight type, have a fixed stock. On nearly all designs where the stock is at the ring end, such as the various kedge anchors, the stock is loose and can be folded for better stowage. Frequently, a key is required to pin the stock of a kedge in its open position when set up ready for use; the key is lashed in its slot to hold it in place.
Anchors of Special Design
The NORTHILL is an anchor with a unique design. At its crown end, two arms with sharpened flukes extend at right angles to the shank and two arms without flukes act as a stock. In some versions, all four arms can be folded flat against the shank for stowage.
Several manufacturers around the world sell anchors with proprietary designs and unique names. Among these new anchor patterns are the Barnacle, Bullwagga, Hans C-Anchor, Spade, Vetus, Rocna, and Manson Supreme. Some of these may disappear from the market, and new ones, promising technological breakthroughs, undoubtedly will be developed. Some, particularly the Rocna and the Manson Supreme (see Figure 9-10), have performed well in independent tests. Both of these new patterns differ from more traditional anchors in their prominent roll bars, which are designed to make the anchors self-righting and thus able to set in the proper attitude in a variety of seabeds. Both anchors set quickly and hold firmly in mud, grass, and rock and coral bottoms. They also hold after a significant wind shift. Another advantage of the roll bar is that it results in a larger blade area for each anchor. These anchors and others, including the Spade and the SuperMax, are sometimes called scoop anchors due to their concave upper blade surface (which distinguishes them from plows) and their single large blade (which distinguishes them from a claw type like the Bruce).The Manson Supreme is unique in that it has twin slots in the shank so it can be set in a variety of sea bottoms; you would use the longer one for anchoring in rock and coral; the shorter one for grass and mud. The idea is that if the anchor is fouled in a rocky bed, for example, the shackle will slide and lift forward so that you don’t have to set a trip line. The Manson Supreme is approved by Lloyds Register of Shipping, a significant endorsement. Although both the Rocna and Manson Supreme offer superior performance, the roll bar can make them difficult to stow. Before buying one of these anchors, be sure it will fit on your bow roller.

Figure 9-10 The Manson Supreme anchor’s roll bar is designed to right it when capsized, ensuring that the blade is properly oriented to dig into the seabed. Holding power derives from blade area, not weight, enabling a light anchor. Stowage is inconvenient in the absence of a properly sized bow roller.
Other Anchor Types
Another design of anchor is frequently referred to as NAVY TYPE. Inexperienced boaters, when seeing them on large ships, sometimes conclude that they are best for all vessels, including small boats—this is simply not so. Ships use them because such stockless anchors can be hauled up into hawsepipes. The ratio of holding power to weight for these anchors is so small that, if weight is held within reason for a small boat, holding power is far below safe limits.
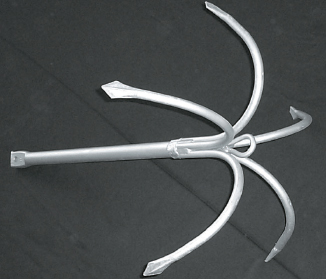
Figure 9-11 This grapnel might be used to recover a mooring chain. With a trip line rigged to its crown end, it can be used to anchor a boat on a rocky bottom.
GRAPNELS, though used by some commercial fishermen, are not recommended for general anchoring service aboard recreational boats. These are also stockless models with, as a rule, five curved, sharp-billed, claw-like prongs symmetrically arranged around the crown end of the shank. Eyes may be cast in both ends of the shank—at the head in lieu of a ring for attachment of a rode (if used as an anchor) and at the crown end for a buoyed trip line. By dragging a small grapnel back and forth, a boater may GRAPPLE for a piece of equipment lost on the bottom; see Figure 9-11.
FOLDING anchors are those which allow all parts to fold against the shank into the smallest possible space for the most convenient stowage—at some sacrifice of holding power and strength. In one stockless type, there are two pairs of flukes at right angles to each other, almost in the manner of a grapnel. In rocky bottoms they hook readily and may be rigged to pull out easily, crown first. Such anchors are often excellent in bottoms with heavy growths of grass or weeds, as one or two arms penetrate the vegetation to get a bite into the bottom. They typically have less than desirable holding power in loose sand or soft mud due to small fluke area.
MUSHROOM anchors are principally used in conjunction with permanent moorings, and are discussed in more detail under that heading. Modified versions of the mushroom are sold for small craft such as canoes and rowboats, but their holding power is so slight as to be almost nonexistent.
Sea Anchors
All the anchors under discussion in this chapter are designed to keep a boat from drifting by engagement with the bottom; SEA ANCHORS do not fall in this category. These are intended to float at or just below the surface, serving merely as a drag to hold a boat’s bow (or stern) up toward the oncoming seas so as to prevent her from lying in the trough. Sea anchors are primarily used on seagoing sailboats, and then only in the heaviest weather offshore, where there is room to drift to leeward.
The Anchor Line
All of the gear, taken collectively, that lies between a boat and her anchor is called the RODE—whether it is synthetic fiber (like nylon), chain, or a combination of the two.
Twisted Nylon
Nylon, in three-strand twist or double-braid form, is by far the most widely used material for anchor lines; other synthetics, such as Dacron, polypropylene, and polyethylene, have less desirable characteristics. Chain makes a good anchor rode, but its weight, while desirable for anchoring, may necessitate your having a winch or other mechanical assistance on board to hoist it. On a small boat, the weight of an adequate length of chain, stowed in the bow, may be too great for proper trim.
For anchoring, nylon’s greatest asset is its characteristic of stretching under load; it has a working elasticity of 15 to 25 percent. When a boat surges at anchor in steep seas, there is a heavy shock load on fittings and ground tackle—unless provision is made to absorb it gradually. Nylon’s elasticity does exactly that.
Some boaters unwittingly lose part or most of the advantage inherent in nylon by using too large a line. Within the limits of safe working loads, the smaller the diameter the greater the elasticity for given conditions. A practical limit is reached when small diameters, though rated high enough for breaking strength, are inconvenient to handle. Some experienced boaters use nylon as light as ⅜ inch (10 mm) in diameter on the working anchors of their 30- to 40-foot (9–12 m) craft. Nylon line—as also discussed in Chapter 23 on marlinespike seamanship—is highly resistant to rot, decay, and mildew but can be damaged by rust from iron fittings or a rusty chain. Nylon line should be stored out of direct sunlight to prevent a gradual deterioration from ultraviolet rays.
Braided Synthetic Line
Most nylon used for anchor lines is laid up by twisting three strands. Synthetics can, however, be laid up by BRAIDING. For anchoring (as well as mooring or towing), a braided outer cover of nylon surrounds a braided inner synthetic core—this is commonly called “double-braided” or “braid-on-braid” line. The result is a line of exceptional stability with no inherent tendency to twist because of the nature of its lay. Consequently, it can be fed down into an anchor locker without fear of kinking.
When braided nylon is handled on deck, it is advisable to fake (or flake) it down in a figure-eight pattern, rather than the conventional clockwise coil used with twisted fibers. Because of the relatively smoother surface of braid, with more fibers to take the wear, chafing is less of a problem than it is with a twisted three-strand lay. Braided nylon retains an adequate degree of elasticity (14 percent at working loads, as against 25 percent for twisted nylon).
Chain
As the size of the vessel increases, so does the required diameter of nylon anchor line. For yachts 65 feet (20 m) or more, nylon would run to diameters up to ¾ inch or larger. This is getting to a size that is difficult to handle; the alternative is CHAIN.
It should not be inferred from this that chain is unsuitable for use on smaller craft. Boats that cruise extensively and have occasion to anchor on sharp rock or coral often have chain; in some cases it is regarded as indispensable—it stands chafing where fiber won’t.
In larger diameters, the weight of chain makes a sag in the rode (called a CATENARY) that cushions shock loads due to surging from wave action on the boat. Once the slack has been taken up, however, the shock on both boat and anchor is very much greater than with nylon. You must thus be sure to use adequate scope with chain, as discussed below. Shock loads can be further mitigated by using a SNUBBER—a short length of nylon line. After the anchor is set, one end of several feet of nylon line is hooked into a link in the chain between the boat’s deck and the water surface; the other end is made fast on deck. Then the tension on the chain is slacked off so that the load is carried by this short length of stretchable nylon line.
The three kinds of chain most used as anchor rode are “BBB,” “Proof Coil,” and “High Test.” Chain is designated by the diameter of material in the link, but the various types have links differing slightly in length. It is necessary to match the chain to the pockets of the WILDCAT (a pulley designed for use with chain, also called a GYPSY) of the anchor windlass. The differences in link length are slight, but they are enough to cause trouble if there is a mismatch. (Most windlasses have a capstan for line and a gypsy for chain, but special models are available where the gypsy can handle both.)
Any type of chain may be used for anchoring—BBB is slightly stronger than Proof Coil; High Test is significantly stronger than either. The selection of a chain type and size for your boat involves several factors, the first of which is adequate strength. A safe standard to use is a WORKING LOAD—figured from the size of the boat and the conditions to be encountered—at 20 percent of the chain’s breaking strength when new. But you must also consider weight. The chain must be heavy enough to provide a proper sag to cushion shock loads, but the length required for normal anchoring depths must not be so heavy, when stored on board, that it affects the boat’s handling characteristics or even its safety. The weight factor may dictate a combination of chain and line. Refer to Table 9-1.
Nylon & Chain
In current practice, the consensus appears to be that for most craft in average conditions, the ideal rode is a combination of nylon line with a short length of chain between the line and the anchor. The chain length should be at least 1/2 foot per foot of boat length; longer is desirable.
One effect of chain in this combination rode is to lower the angle of pull, because chain tends to lie on the bottom. Of equal or perhaps greater significance is that modern lightweight anchors often bury completely, taking part of the rode with them. Chain tolerates the chafe, and sand has less chance to penetrate strands of the fiber line higher up. Sand doesn’t stick to chain, and mud is easily washed off. Without chain, nylon gets very dirty in mud.
Chain used in this manner varies from ¼ inch (6 mm) in diameter for 20-foot (6 m) boats up to 7/16 inch (11 mm) for 50-foot (16 m) craft; see also Table 9-1. It should be galvanized to protect against rust. Neoprene-coated chain is an added refinement, as it will not mar the boat, but such coating has a limited life in active use; corrosion may occur under the coating.
Securing the Rode
The complete ANCHOR SYSTEM consists of the anchor and the rode, usually made up of a length of line plus a length of chain. Each element of the system must be connected to its neighbor in a strong and dependable manner.

Figure 9-12 A shackle and an eye splice with thimble (arrow) are commonly used to secure the anchor line to the anchor ring, or better, to a short length of chain between the line and the anchor. The shackle in this photo has not yet been inserted through the thimbled eye splice.
Eye Splice, Thimble & Shackle
There are various methods for securing the rode to the anchor ring. With fiber line, the preferred practice is to work an EYE SPLICE around a THIMBLE and use a SHACKLE to join the thimble and ring; see Figure 9-12. With nylon line you can use a plastic thimble, one of galvanized metal, or one of stainless steel; be sure to keep the thimble in the eye of the line. A tight, snug splice will help, and seizings around the line and the legs of the thimble, near the V, will keep the thimble in the eye splice when the line comes under loads that stretch the eye. Some plastic thimbles have the throat partially filled in so as to keep the shackle in place; see Figure 9-13.
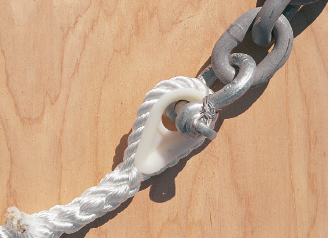
Figure 9-13 Some plastic thimbles may have a web partially closing the throat near the pointed end. This is helpful in keeping the pin of the shackle at the far end of the thimble.
Where a shackle is used, it is a good idea to put a bit of silicone spray or waterproof grease on the threads of the shackle pin to keep it from seizing up over a period of time; a good practice is to turn the pin all the way in tight, and then back it out a quarter- or half-turn. Be sure to safety the pin to prevent its working out accidentally; stainless steel wire can be used, but a nylon cable tie is easier to work with (use a black one, they better withstand prolonged sunlight exposure); see Figure 9-14. Watch for corrosion if different metals are used in thimbles, shackles, and rings. Also beware of rust stains on nylon; cut out and resplice in a new thimble if the line becomes rust-stained.

Figure 9-14 This shackle, used to attach a short length of chain to another shackle on the anchor, is secured by running a nylon cable tie through the eye of the pin and around the side of the shackle. Stainless-steel wire can also be used for this.
A thimble and shackle provide a ready means for including, if desired, a length of chain in your rode, shackling the chain in turn to the anchor ring. Shackles should be large enough not to bind against the ring, and at least as strong as the chain itself. It is good practice to make the shackle one size larger than the chain (e.g., a 5/16-inch shackle for ¼-inch chain).
Anchor Bends & Bowlines
Some skippers would rather fasten their line directly to the ring using an anchor bend, seizing the free end to the rode. Others use a bowline with an extra turn around the ring, see Figure 9-16. In either case, these procedures make it easy to turn the line end-for-end occasionally, or to remove the line from the anchor for easy handling when stowing.

Figure 9-16 An anchor bowline, above, with its extra turn around the ring, is a secure way to attach the rode to the anchor, or to a mooring buoy as shown here. The loose end (arrow) can be seized to the adjacent line (see Figure 23-11).
Turning a line end-for-end greatly extends its useful life. The lower portion of the line that has carried the load for each anchoring, and the lower end that has chafed on the bottom, becomes the inboard portion seldom used with normal scope. Eye splices may be placed in both ends of the rode initially, or added as necessary when the rode is turned.
Even if the working anchor is kept made-up with line and chain, you should know how to bend a line directly to an anchor. This is often the handiest way to drop a light anchor for a brief stop or to make up a second anchor when a bridle or stern anchor is needed.
Use shackles to secure chain rode to the anchor; stout swivels are a desirable refinement. As swivels are a weak point, they must be large. On an all-chain rode they are essential. Swivels, however, should not be used with twisted soft-laid synthetic lines; a HOCKLE (kink) may result. Double-braided synthetic lines will not hockle even when subjected to very heavy strains.

Figure 9-15 This vertical windlass has a smooth drum on top for line plus a gypsy for chain beneath it; they can be operated independently. The anchor chain passes around the gypsy and through a deck opening to the chain locker below. The smooth drum can be used with a dock line to warp the boat into a berth.
At the Bitter End
To guard against accidental loss of the anchor system, the inboard end of the rode—often called the BITTER END—should be made fast to some part of the boat. You may do this by leading the line below, perhaps through a deck pipe, and securing it to a builtin eye or an eyebolt through a strong structural part. On sailboats you can secure it to the foot of a mast. On small boats where the entire length of rode is carried on deck, you can have an eye splice in the bitter end to attach to a securely fastened ring or eyebolt. In any case, make sure the bitter end is fastened, but always have handy some means of quickly cutting the anchor line in an emergency.

Table 9-1 The sizes above are suggested for use under moderate conditions of wind and waves, with good holding ground and a scope of 5:1. For less favorable conditions, increase anchor size by one bracket and increase scope. For a “lunch hook” under good conditions with a person remaining on board, one bracket smaller can be used.
How Many & How Heavy?
The number of anchors you should carry depends upon several things: the size of your boat, whether it is used only in sheltered waters or cruises extensively to many harbors, and, to some extent, the type of anchor.
Some small boats like runabouts and utilities have only a single anchor, but this cannot be considered adequate. Even discounting the possibility of fouling one anchor so badly that it cannot be retrieved, there are occasions when it is desirable to use two. Further, one anchor heavy enough for extreme conditions could be a nuisance in ordinary weather.
Many boats carry two anchors, with the weight of the heavier one about 1.5 times the weight of the lighter one. For cruising boats, three are undoubtedly better. This allows two to be carried on deck—a light LUNCH HOOK for brief stops while someone is aboard, and a WORKING ANCHOR capable of holding the boat securely overnight. The third, a STORM ANCHOR, chosen for its ability to hold securely in severe wind, current, and sea conditions, may be stowed below, accessible and ready to be attached to its rode under extreme conditions of wind and weather.
Anchor Size & Holding Power
Down through the years there have been repeated attempts to reduce anchor weights to a simple formula or table based on boat length or tonnage. Recommendations have varied widely, gradually becoming lighter as more modern designs replaced old-fashioned kedge anchors. With the development of patented designs, however, came the problem of minor variations between manufacturers of anchors of the same general type. Thus any table of anchor size vs. boat size, such as Table 9-1 can only be a broad recommendation, to be modified for individual craft and local situations.
Stowage
A boater’s seamanship skills can be evaluated by the attention he gives to stowing his craft’s ground tackle. Exactly how he goes about it depends to some extent on the kind of boating he does, the size of his boat, and the way it is equipped. In any case, unless his deck is uncluttered—with gear ready for immediate use, yet secured so that it cannot shift—he will never rate high as a seaman.

Figure 9-17 Anchors are normally stowed in fitted chocks on the foredeck, but working space can be gained if they are hung from the rail as shown above.
Ordinarily a cruising boat will carry one, sometimes two, anchors on deck, made up and ready for use. On some small boats, where it is not feasible to leave anchors on deck at all times, or in cases where lines are stowed below at the home berth, at least one anchor and line should be prepared and made ready before getting underway from your slip or mooring. If your boat lowers its anchor from a windlass, power to that device should be on. Engines and steering systems do fail, and when they do it’s likely to be at an embarrassing moment, with wind or current setting you down on a shoal or reef. It’s too late then to think about breaking out gear that should have been ready at hand.
An anchor lying loose on deck is a potential hazard. If the boat happens to roll or pitch, it may slide across the deck, leaving scars in its wake and damaging equipment. Conceivably it could go over the side, taking the rode with it and fouling the propeller. Every anchor on deck should be stowed in chocks (available at marine stores to fit most anchors). Lashings hold the anchors in the chocks. Hardwood blocks, properly notched, can be used in lieu of metal chock fittings.
As an alternative to chocking, anchors carried aboard sailboats may be lashed to bow rails or shrouds, off the deck, where there is no risk of their getting underfoot and less risk of their fouling running rigging; see Figure 9-17. Many boats with bowsprits or pulpits have a roller at the outboard end, providing convenient and secure stowage for the working anchor; see Figure 9-18. Some larger yachts have provision for hauling the anchor into a hawsepipe fitted into the topsides forward.

Figure 9-18 Many boats, both power and sail, have short bowsprits that have a roller at the outer end. The anchor line passes over this roller, and the anchor can be drawn up tight against it.
Stowing the Storm Anchor
As the big spare storm anchor is used only on rare occasions, you can carry it in some convenient location below, or in a lazarette or stowage space below a cockpit deck, accessible through a hatch. Chocks here should be arranged to ensure that the anchor is held in place securely. If the big anchor gets adrift, it could easily cause substantial, even critical, damage. Some anchors, such as the Fortress, can be disassembled and stowed in a box or fitted bag; they can be assembled in only a few minutes with two ordinary wrenches.
While it’s desirable to stow the storm anchor in a secure, out of the way location, it must always be immediately accessible without having to move other stores. The anchor’s value will be determined not only by how well it can hold in a blow but also by how quickly it can be attached to its stored, previously prepared rode and deployed over the bow.
Lunch hooks are small and seldom needed without warning, so there’s justification for stowing them in some convenient locker. Keep them away from the compass, however, as they can be a potent cause of deviation (except, of course, for aluminum anchors).
Rope & Chain Lockers
Although small craft often carry their lines coiled on a forward deck or in an open cockpit, many cruising boats have a rope locker in the forepeak that can be used. Nylon dries quickly and can be fed down into lockers almost as soon as it comes aboard. Lockers must be well ventilated and arranged to assure good air circulation at all times.
Dark, damp lockers are an invitation to rot and mildew. A vented hatch over the rope locker will permit exposure to a good flow of air.
The rode should always be ready to run without fouling. Line is often passed below through a deck pipe whose aft-facing slot permits it to be capped when needed to minimize the amount of water that finds its way below. Some cast mooring bitts are made with an opening on the after face through which line can be passed.
Chain won’t soak up moisture and is easy to stow in lockers. Where weight of chain in the bow of a small offshore cruising boat is objectionable, it can be overcome by splitting a long rode into two or three shorter lengths, stowed where convenient, and shackled together as necessary. An all-chain rode should be shackled to a length of nylon rope secured to a holdfast in the chain locker and long enough to be accessible on deck so that in an emergency the rope can be cut to jettison the chain and anchor.
Scope
Once you have chosen an anchor of suitable design and size to provide adequate holding power, you must consider SCOPE. It is a major factor that determines whether your anchor will, in fact, hold or drag. Too short a scope can destroy the efficiency of the best anchor.
Although some books use the term “scope” to refer to the length of anchor rode in use, most often it is recognized as the ratio of the length of the anchor rode to the height of the bow above the bottom of the body of water, as shown in Figure 9-19. Note two important factors: the height of the bow chocks above the surface, and the range of the tide.
Let’s assume you anchor in 10 feet of water with 60 feet of rode paid out. At first glance, this is a reasonable scope of 6:1. But if your bow chock is 5 feet above the surface, the ratio is immediately cut to 4:1 (60:15). Six hours later the tide has risen another 5 feet and now you have an actual scope of 3:1 (60:20), exactly half the planned ratio and much too slight for safety.

Figure 9-19 Scope, the ratio of rode length L to the distance D, from the bow to the bottom (1), is critically important to safe anchoring. At (2) the rode length is twice the distance D, but the angle of pull tends to pull the anchor free. At (4), with L four times D, the anchor can dig in, but there is still too much upward pull on the rode. At (8), scope 8:1, the short length of chain at the anchor lies flat on the bottom, and any pull acts to pull the anchor in deeper.
What Is a Proper Scope?
Under favorable conditions using nylon line, 5:1 might be considered a minimum; under average conditions, 7 or 8:1 is regarded as satisfactory. Tests show that proper scope ratios range between 5:1 and 10:1, the latter for heavy weather. Even in a very hard blow in an exposed anchorage, you will probably never need a scope of more than 15:1 with an anchor of suitable holding power. Effective scope for given conditions varies with the type of anchor. In our hypothetical example above, allowing for the range of tide, the length of rode paid out should have been 140 (7:1) to 160 (8:1) feet; 100 feet (5:1) might be regarded as a minimum.
With all-chain rodes, a scope from 3:1 to 5:1 is adequate for all normal conditions.
For maximum efficiency, all anchors require a low angle of pull—preferably less than 8° from the horizontal. With short scope, holding power is reduced because the angle of pull is too high, tending to break out the anchor. As the pull is brought down more nearly parallel with the bottom, flukes dig in deeper with heavier strains on the line. Surging, as a boat pitches in a sea, throws a great load on the anchor, particularly on a short scope. With long scope, the angle of pull is not only more horizontal at the anchor, but the elasticity of a long nylon line cushions the shock loads significantly.
Marking a Line for Scope
Granting that we know how much scope is required, how do we know when we have paid out enough? Estimates are risky. Plastic cable markers (see Figure 9-20), come in sets to mark various lengths, such as 25, 50, 75, 100, 125, 150, and 200 feet (or corresponding metric lengths), and are attached by inserting them under a strand or two of the line. In daylight such markers are fine, but in the dark, the traditional markers of strips of leather, bits of cotton or flannel cloth, and pieces of marline with knots are easier to “read” by feel. Plastic markers have the further disadvantage of being rapidly chewed up by anchor windlasses.
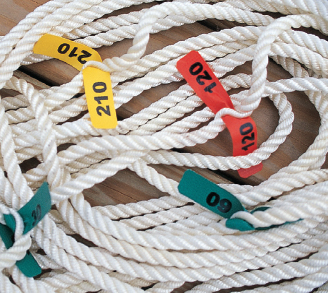
Figure 9-20 Numbered plastic markers can be inserted in laid line to indicate the amount of rode let out. Alternatively, colored rings can be painted on the rode.
For all practical purposes, five or six marks at intervals of 20 feet (6 m) (say from 60–140 feet; 18–42.6 m) should be adequate. One practical method is to paint wide and narrow bands of a red vinyl liquid called Whip-End Dip at significant points, calling wide bands 50 feet (15.2 m), narrow ones 10 (3 m). On chain rodes, as a measure of scope, some boaters paint links white at intervals.
If you anchor frequently in the same harbor areas, you may want to put a whipping—wrapping the line with twine or thread—to prevent chafe at two or three predetermined places on the rode.
ANCHORING TECHNIQUES
Thus far we have discussed equipment and ground tackle. Let’s now consider technique—the art of anchoring. Before you can think about how to anchor, however, you must decide where you will anchor, and here, as in all phases of seamanship, a little foresight pays off handsomely.
Selecting an Anchorage
There will be times when you will stop briefly in open water, for lunch, for a swim, to fish, or perhaps to watch a race—but more often the challenge in finding an anchorage comes down to choosing a spot where you will feel comfortable anchoring for the night when no one will be on watch. You will want a spot where there’s good holding bottom, with protection from the current and forecast wind and waves, in water of suitable depth.
Types of bottoms vary widely, and there are good (though perhaps not “best”) types of anchors for each bottom. Since it is impractical to carry the optimum anchor for every type of bottom, it is necessary to select an area that best fits one of the anchors that you do have on board.
Using a Chart
A chart is the best guide in selecting a suitable location. Alternatively, cruising guides for many boating areas often name anchorages that have been used and found suitable. Sometimes you will be able to find a harbor protected on all sides, regardless of wind shifts. If not, the next best choice would be a cove offering protection at least from the existing direction of the wind or the quarter from which it is expected to come. As a last resort, anchorage may be found under a windward bank or shore—that is, where the wind blows from the land toward the boat. In these latter two cases, watch for wind shifts, which could leave you in a dangerous berth on a lee shore.
Anchorages are sometimes designated on charts with an anchor symbol. Areas delineated on the chart by solid magenta lines, perhaps with the water area marked with yellow buoys, may be designated (U.S. inland waters only) as special anchorage areas, where anchor lights are not required on vessels less than 65.6 feet (20 m) in length; see Figure 9-21. Never anchor in cable or pipeline areas (indicated on charts by broken magenta lines) or in channels.

Figure 9-21 There are “special anchorage areas” in U.S. inland waters where anchor lights and shapes are not required on vessels less than 65.6 feet (20 m) in length. These are shown on charts; the boundaries may or may not be marked by buoys.
Adequate but shallow depths are preferred for an anchorage, because a given amount of rode will then provide a greater scope for better holding. A depression or slope in the bottom will allow the anchor to be set so it is an uphill pull, increasing the holding power. You must consider the range of tide, however, so that a falling level does not leave you aground or bottled up behind a shoal with insufficient depth to get out at low water. You also must be alert to the special problems of reversing tidal currents, if such exist where you are anchoring.
Characteristics of the Bottom
The character of the bottom is of prime importance. While the type and design of anchor flukes have a direct bearing on its ability to penetrate, it may be stated broadly that mixtures of mud and clay, or sandy mud, make an excellent holding bottom for most anchors. Firm sand is good if your anchor will bite deeply into it; loose sand is undesirable. Soft mud should be avoided if possible. Rocks prevent an anchor from getting a bite except when a fluke is lodged in a crevice. Grassy bottoms, while they provide good holding for the anchor that can get through to firm bottom, often prevent a fluke from taking a hold on anything but the grass, which then pulls out by its roots.
Sometimes bottoms that would otherwise provide reasonably good holding are covered with a thick growth of vegetation that positively destroys the holding power of any anchor. Even if you happen to carry one of the fisherman’s sand-anchor types, with its thin spidery arm and small flukes, expect it to pick up half a bushel of this growth. All you can do is clean it off and try elsewhere.
Characteristics of the bottom are normally shown on charts; see Figure 9-22. Abbreviations for some bottom characteristics are shown in Table 9-2.
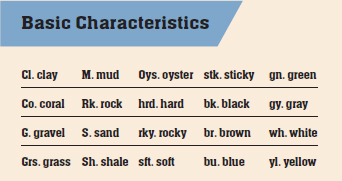
Table 9-2 Knowledge of the character of the bottom is important in anchoring. Charts provide this information by the use of abbreviations, some of which are shown above.
How to Anchor
Having selected a suitable spot, run in slowly, preferably on some range ashore selected from marks identified on the chart, or referring your position to visible buoys and landmarks to aid you in locating the chosen spot. Use of two ranges will give you the most precise positioning; refer to Figure 9-22. Later these aids will also be helpful in determining whether you are holding or dragging, especially if the marks are visible at night and it begins to blow after dark.
If there are rocks, shoals, reefs, or other boats to consider, give them all as wide a berth as possible, keeping in mind a possible swing of 360° about the anchor with wind shifts or current changes.
Remember, too, that large yachts nearby may swing to a much longer scope than you deploy—and, conversely, that you may swing much farther than a smaller craft nearby lying on shorter rode. A vessel anchored by chain will normally have a lesser scope and thus a smaller swinging circle. A boat on a permanent mooring will have the smallest movement of all. Observe how the boats that will be your neighbors are anchored or moored, visualize how you will swing with your intended scope, and don’t get into a situation of overlapping swinging circles.
The risk of fouling a neighboring boat is aggravated when, in a current, a deep-draft vessel holds her position while a light-draft boat swings to a shift of wind not strong enough to influence the other. Keel sailboats may lie one way in a light current, powerboats in another way.
A boat that has already established her location in an anchorage has a prior claim to the spot and can’t be expected to move if you later find yourself in an embarrassing position. Consequently, allow room enough so that you can pay out more scope if necessary in case of a blow, without being forced, perhaps at night, to change your anchor spot.
The way other boats lie, together with the set of nearby buoys, will help to determine how you should round up to the chosen spot. Estimate the relative effects of wind and current on your own boat and come up slowly, against the stronger of these forces—in other words, heading as you expect to lie after dropping back on the anchor. Running through the anchorage, take care that your speed is reduced to a point where your wake will not disturb other boats.

Figure 9-22 Aids to navigation, preferably fixed, not buoys, or any pair of charted objects that form a range are useful in selecting an anchorage spot and as a means of checking to make sure that the anchor is not dragging. An ideal anchoring spot is at the intersection of the two improvised ranges shown above.
Letting the Anchor Go
These preliminaries disposed of, you are ready to let go the anchor. Unless you are boating single-handed, station one person on the forward deck. (Never anchor a small boat by the stern—the freeboard is less and swamping is much more likely to happen.) Enough line should be hauled out of the locker and coiled down so as to run freely without kinking or fouling. If previously detached, the line must be shackled to the ring, and the stock set up (if of the stock type) and keyed. Many an anchor has been lost for failure to attach the rode properly. Rodes, too, have gone with the anchor when not secured at the bitter end. Most modern anchors are always ready for use and do not have to be set up, but always check to see that the shackle is properly fastened.
Despite what may be seen all too often, an anchor should not be lowered when your boat has any headway at all. In a motorboat or a sailboat under power, the bow should be brought slowly up to the spot where the anchor is to lie, and headway checked with reverse power. Then, just as the boat begins to gather sternway slowly in reverse, the anchor is lowered easily over the side until it hits bottom, crown first.
Never stand in the coils of line on deck, and don’t attempt to “heave” the anchor by casting it as far as possible from the side of the boat. Occasionally, with judgment, a light anchor in a small boat can be carefully thrown a short distance if such action is required—taking care that it lands in its holding position—but the best all-round rule is to lower it as described. That way the possibility of fouling is minimized.
Setting the Anchor
An anchor must be “set” properly if it is to provide its full holding power. The best techniques for setting an anchor will vary from type to type; only general guidelines can be given here, and you should experiment to determine the best procedures for your boat, your anchors, and your cruising waters.
With the anchor on the bottom and the boat backing down slowly, pay out line (sometimes spoken of as VEERING) as the boat takes it, preferably with a turn of line around the bitt. When the predetermined length has been paid out, snub the line promptly and the anchor will probably get a quick bite into the bottom. A lightweight, burial type like a Danforth or Fortress is frequently set with a scope as short as 3:1 or 4:1, especially in a soft bottom. Anchors such as a kedge or plow or Bruce seem to set better with a scope of 5:1 to 8:1.
Sometimes the anchor may become shod with a clump of mud or bottom grass adhering to the flukes; in these cases, it is best to lift it, wash it off by dunking at the surface, and try again.
After the anchor is set, you can pay out or take in rode to the proper length for the anchorage, and for the prevailing and expected weather conditions. Scope must be adequate for holding, but in a crowded anchorage you must also consider the other boats.
When you must work single-handed, get your ground tackle ready to let go long before you arrive at the anchorage. Bring the boat up to the chosen spot and then lower the anchor as the boat settles back with wind and current, paying out line as she takes it.
Regardless of the type of anchor, after you have paid out full scope, reverse your engine to apply a back-down load in excess of any anticipated strains. This is particularly important if your boat is to be left unattended.
You must make a positive check that the anchor is holding, and not dragging. There are several ways to do this. If the water is clear enough that you can see bottom, you can detect any movement easily. If you cannot see bottom (which is generally the case) select two objects on the beam that form a natural range and watch for any change in their relationship—if none occurs, your anchor is holding. An even simpler method is possible if you are using a buoyed trip line from the crown of your anchor. When you are applying reverse power to test the anchor’s holding, the float on this line should continue to bob up and down in one spot unaffected by the pull on the anchor rode. If you see the float making a path through the water, you can be sure that your anchor is dragging. In warm, clear tropical waters, it is an excellent practice to put on a mask and fins and “swim to the anchor,” checking visually how well it is buried.
Making Fast
After the anchor has gotten a good bite, with proper scope paid out, make the line fast and shut off the motor.
On boats with a forward bitt (or samson post), an excellent way to secure the anchor line is to make two to four full turns around the bitt, and then finish off with a half-hitch around each end of the pin through the bitt. The bitt takes the load and the pin secures the line; this way, the line is more easily taken off the bitt than with a clove hitch or any other hitch. Do not depend on the brake of a windlass to carry the load of an anchor rode.
Where a stout cleat is used to make fast, take a turn around the base, one turn over each horn crossing diagonally over the center of the cleat, and finish with a half-hitch around one horn; see Chapter 23.
The fundamental idea in making fast is to secure in such a manner that the line can neither slip nor jam. If the strain comes on top of a series of turns on a cleat, then you will find it nearly impossible to free the line if you want to change the scope; you must first take the strain off it.
If you must shorten the anchor line, first clear the bitt or cleat of old turns and hitches. Do not place new turns over old ones.
A trick worth using when the sea is so rough that it is difficult to go forward on deck—especially if you are single-handed—is to set up the anchor in the aft cockpit, and lead the line forward on deck through a closed chock and then back aft to the cockpit. (If there are stanchions for lifelines, the lead of the rode from chock to anchor must obviously be outside them.) When you’re ready to let go, the anchor can be dropped on the weather side from the cockpit, with the line running through the bow chock and secured on a cleat at the cockpit.
Hand Signals
For anchoring, as for docking, it’s a great help to have another hand on board. Communication between the person on the foredeck and the skipper at the helm can be a challenge, however. With engine and exhaust noise or a howling wind, it’s difficult for the skipper to hear, even though the man on deck can. A helmsman handling the boat from a flying bridge can usually hear better and, from his higher position, can see the trend of the anchor line.
In any case, it helps to have a prearranged set of hand signals. There is no need for standardization on this, as long as the helmsman clearly understands the crew’s instructions. Keep the signals as simple as possible. Motion of the hands, calling for the helmsman to come ahead a little or back down, can take the most obvious form; pointing ahead or aft will do it. Simply holding up a hand palm out—a traffic policeman’s signal—may be used to indicate a “stop” to whatever action is then taking place.
When the Anchor Drags
Let’s assume that you have anchored with a scope of 7:1, have inspected the rode, and have taken bearings, if possible, as a check on your position. Though the wind has picked up, you turn in, only to be awakened near midnight by the boat rolling. Before you reach the deck you know what has happened: the anchor is dragging, and the bow no longer heads up into the wind.
This calls for instant action, not panic. A quick check on bearings confirms what the roll indicated: You’re dragging, with the wind abeam. Sizing up the situation swiftly, you note that danger is not imminent; there is still plenty of room to leeward and no boats downwind to be fouled. Otherwise you would have to get underway immediately or be prepared to fend off.
The first step in trying to get the anchor to hold is to let out more scope. Don’t just throw over several more fathoms of line; pay it out smoothly, with an occasional sharp pull to try to give it a new bite. If you’re dragging badly and can’t handle the rode with your hands, take a turn around the bitt and snub the line from time to time. If this doesn’t work, start the engine and hold the bow up into the wind with just enough power to take the strain off the rode. This gives the anchor a chance to lie on the bottom and perhaps get a new bite as you ease the throttle and let the boat drift back slowly. If you haven’t held when the scope is 10:1, get the anchor back aboard and try again with your larger storm anchor or in another spot.
Sentinel or Buoy?
Suppose, now, that you have no spare storm anchor to fall back on. Can anything be done to increase your holding power? Here we enter an area of controversy with something to be said for two quite different techniques. One has the objective of lowering the angle of pull on the anchor line, and the other the lessening of shock loads on the anchor or on the boat itself. We’ll consider both procedures in turn.
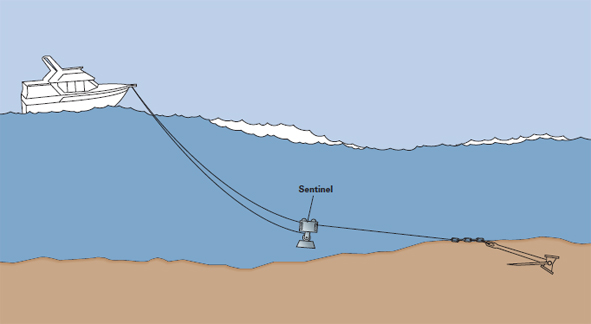
Figure 9-23 A sentinel (kellet) is a weight, typically about 25 pounds (11.3 kg), suspended from the rode to help keep the pull on the anchor as horizontal as possible to prevent dragging in rough weather.
For generations, cruising boaters have used a device known as a SENTINEL (sometimes called a KELLET); see Figure 9-23. In principle, the sentinel is nothing more than a weight sent approximately halfway down the rode to lower the angle of pull on the anchor and put a greater sag (i.e., catenary) in the line that must be straightened out before a load is thrown on the anchor. Working with what comes readily to hand, boaters have shackled or snapped their light anchor to the main anchor line and sent it down the rode with a line attached to its ring, to be stopped at a suitable distance. A pig of ballast or other weight would do as well, provided it could be readily attached. Commercially made devices are available that do this easily and neatly. On the other side of the picture, if a sentinel is to be used, it should be done with ample scope, and every precaution taken to avoid chafing the main rode.
The other school of thought would use a buoy, see Figure 9-24, rather than a weight, claiming that, properly used, the buoy can carry most of the vertical load in an anchoring or mooring system, limiting the baseline load on the boat to the horizontal force required to maintain the boat’s position. The argument is advanced that the buoy permits the boat’s bow to ride up easily over wave crests, rather than be pulled down into them with excessive loads on both rode and anchor.
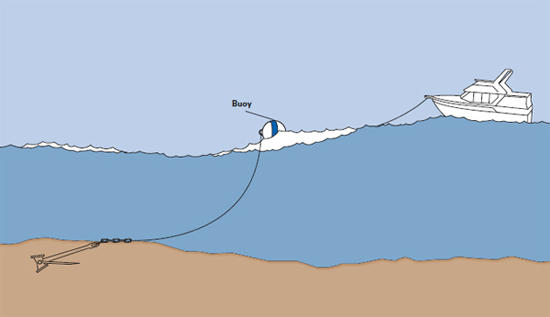
Figure 9-24 A buoy on the rode helps to act as a shock absorber as it allows the boat’s bow to easily ride up wave crests without excessive strain being transmitted to the anchor.
If a buoy is used, it should be of the type found in a permanent mooring system; see Figure 9-25. Its connection into the anchoring system should be as for a permanent mooring, with all strain carried by the rode—this ensures that there is no “weak link.” A proper buoy should be carried on board rather than trusting to a makeshift device improvised under the stress of severe weather.

Figure 9-25 A plastic foam buoy usually transmits the strain through the buoy by a solid rod. There are some models that have the two connecting rings at the same end of the buoy.
An Alternate System
The chain and sentinel techniques can be combined. Carry a boat-length of substantial chain and a 25-pound (11.3-kg) pig of lead with a ring bolt cast in it. Stow them away somewhere in lieu of ballast. When the chips are down, with breakers to leeward, shackle the chain to your biggest and best anchor, and the chain in turn to your best and longest nylon rode, with the ring of the pig lead shackled in where chain and nylon join. It cannot be anything but an improvement over the same long scope of nylon without benefit of the extra length of chain and added weight. This would seem to eliminate the twin problems of chafe (at the sentinel) and any tendency to hold the boat’s bow down in the surge of pitching seas.
Getting Underway
When you are ready to WEIGH ANCHOR and get underway, run up to the anchor slowly under power, so that the line can be taken in easily without hauling the boat up to it. Ordinarily the anchor will break out readily when the line stands vertically. If your craft is equipped with an anchor windlass, do not use it to pull the boat forward, use it only to take in anchor rode as it becomes slack.
As the line comes in, you can whip it up and down to free it of any grass or weeds before it comes on deck. If the anchor is not too heavy, wash off mud by swinging it back and forth and dunking it up and down near the surface as it leaves the water. With care, the line can be snubbed around a bitt and the anchor allowed to wash off as the boat gathers way, preferably sternway. Two things must be watched: don’t allow the flukes to hit the topsides, and be careful that water flowing past the anchor doesn’t get too good a hold and take it out of your hands.
Although nylon anchor line will not be harmed by stowing without drying, it is undesirable to carry this additional moisture below decks. Coil the line loosely on deck and allow it to dry, but expose it to sunlight no longer than necessary.
In all anchor handling, try to avoid letting the anchor hit the hull at any time. Whether your boat is made of fiberglass, metal, or wood, some gouges, dents, or nicks may result. Guests are often eager to “help” by getting the anchor up, but unless they have had some experience, it’s better to handle this part of the job yourself. Handle and stow lines carefully. If a bight or end of line slips over the side it is certain to run back under the bottom and get fouled in the propeller.
In a boat under sail alone, have your mainsail up before you break the anchor loose. Proceed as above. There is no motor to help, but it is possible to use your sails to assist.
If you have been anchored for a day or two in a brisk wind, the anchor may be dug in deeply. Don’t wait until you’re ready to get underway; 20 minutes or so before departure, shorten the scope—but keep a sharp watch. The boat’s motion will tend to loosen the anchor’s hold and save a lot of work when you finally go to break it out and raise it.
Clearing a Fouled Anchor
If an anchor refuses to break out when you haul vertically on the line, snub it around the bitt and go ahead with the engine a few feet. If the anchor doesn’t respond to this treatment, it may have fouled under some obstruction. First try pulling on the line from the opposite direction with moderate scope, about 2:1 or 3:1; see Figure 9-26. If this doesn’t free it, try making fast to the bitt and running slowly in a wide circle on a taut line. Changing the angle of pull may free it, or a turn of line may foul an exposed end of the stock or a fluke (if it’s a kedge) and draw it out.

Figure 9-26 If your anchor fouls on a rocky bottom, your first attempt to free it should be by reversing the original direction of pull (left) with moderate scope, to draw it out (right).
Probably the best way to break out of a fouled anchor is with a BUOYED TRIP LINE—if you have been wise enough to rig one beforehand. Use a light line, but one that is strong enough to stand the pull of a snagged anchor—⅜-inch (10-mm) polypropylene (which floats) is a typical choice. Attach this line to the crown of the anchor (in some models an eye is provided for this; a hole can be drilled in one of the crown plates of a Danforth or similar anchor). The trip line should be just long enough to reach the surface in waters in which you normally anchor, with allowance for tidal changes. Pass the line through a wooden or foam float (you can even use a plastic disposable bottle if it has a handle) and end the line in a small eye-splice that can be caught with a boathook. If the anchor doesn’t TRIP in a normal manner, pick up the trip line and haul the anchor up crown first.
If you haven’t rigged a trip line, sometimes you can run a length of chain down the anchor line, rigged so that another boat can use her power to haul in a direction opposite that in which the anchor line tends, thus changing the angle of pull 180°. With kedges, if one fluke is exposed, a chain handled between dinghies can usually be worked down the rode to catch the upper arm and draw the anchor out crown first.
If the anchor is not fouled in something immovable but merely set deeply in heavy clay, you can generally break it out by securing the line at low water and allowing a rising tide to exert a steady strain. Or, if there is a considerable ground swell, snub the line when the bow pitches low in a trough. There’s some risk of parting the line this way, in case the fluke is fouled worse than you think.
There is a type of anchor in which the ring is free to slide the full length of shank. Properly rigged, it is claimed to be virtually snag-proof; see Figure 9-27. If the anchor should snag, the theory is that when the boat is brought back over the anchor, the sliding ring can slip down the shank so the anchor will be drawn backward. There is, however, some risk; if there should be a near-180° shift of wind or current, the anchor might pull out when you wanted it to hold. Some models have an eye at the end of the shank separate from the slot; if the anchor line is attached there, the anchor functions in the normal manner.
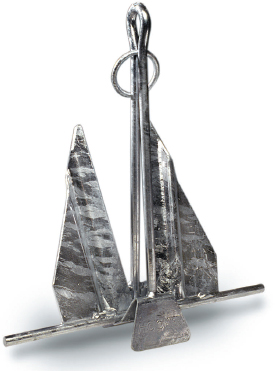
Figure 9-27 On the Hooker Quik-Set anchor, the rode is attached to a ring that slides in a slot in the shank, allowing the anchor to be drawn out backward if necessary. For use when snagging is unlikely, the rode can be shackled directly to the eye at the end of the shank.
Using Two Anchors
For increased holding power in a blow, two anchors are sometimes set. If your working anchor drags, you can run out your spare storm anchor without picking up the working anchor. The important thing to remember is to lay them out at an angle, not in line, to reduce the risk of having one dragging anchor cut a trough in the bottom for the other to follow; see Figure 9-28.
Special care is necessary for a boat with two anchors out if she is subject to extreme wind shifts, as might occur with the passage of a squall line. A change of pull on the anchor lines of 180°, more or less, can bring the two rodes into contact with each other in such a way that neither anchor will hold or reset if pulled out. In some situations, one anchor is actually safer than two!
When setting two anchors, make the rodes fast separately to two bitts or cleats. Do not put one rode on top of the other, in case you have to make adjustments later.

Figure 9-28 If two anchors are set out ahead of a boat, it is best to have the rodes at a wider angle, as at A, rather than nearly in a line, as at B, to reduce the possibility of their fouling each other as the boat swings to wind or current.
To Reduce Yawing
Deep-draft sailboats usually lie reasonably well head to the wind, but many motorboats and some fin-keel sailboats “tack” back and forth at anchor, which is called YAWING. Skiffs, with high freeboard and little draft forward, are among the worst offenders in this respect.
You can lessen yawing by laying two anchors, lines leading out from either bow, making an angle of about 45° between them. To do this, let one anchor down first and have a crewman tend the line carefully as you maneuver the bow off to one side before letting the other go. Then you can settle back on both lines, adjusting scope as necessary.
With skillful handling, you can get two anchors down single-handed. The easiest way is to settle back on one anchor, making fast when the proper scope has been paid out. Then power ahead slowly, with the rudder over enough to hold the line out taut so you can keep an eye on it at all times. When the line stands out abeam, stop your headway, go to the foredeck and let the other anchor go, then drop back, snub the line to set the anchor, and finally, adjust the lines to equal scope.
If a dinghy is available, the second anchor can be carried out in it; the coiled anchor line should be in the stern of the dinghy so that it pays out freely as you move away from your boat. If an attempt were made to pay out the line from the deck of the boat, the dinghy might well become unmanageable when conditions include a wind or strong current. Both rodes should be adjusted as required after the two anchors are set.
Guard Against Wind or Current Shifts
Sometimes you will need to anchor where the tidal current reverses, or wide wind shifts are likely. Here it is wise to set two anchors as security against an anchor breaking out and failing to set itself again.
The anchors are set 180° apart with the bow of the boat at the midpoint between them; see Figure 9-29. With both lines drawn up tight, the bow remains over essentially the same spot, and swinging is limited to the boat’s length. This “Bahamian moor” works best for a reversing tidal current with the wind blowing across the current so as to keep the boat always on one side of the line between the two anchors. When setting a second anchor for such a mooring, set the up-current anchor in the conventional way and then back down until double the normal scope is out. After the down-current anchor is set, adjust the scope at the bow chocks by powering forward until both are equal. When going ahead with a rode tending aft, take care not to foul the propeller.
If the two-anchor technique is used in a crowded anchorage to limit your swinging radius, remember that other nearby boats may lie to one anchor only. Since your swing will not be in sync with theirs, the risk of having their swinging circles overlap your limited swing is increased.

Figure 9-29 When anchoring in a narrow waterway with reversing tidal current, two anchors should be set from the bow in a “Bahamian moor,” as shown. Adequate scope should be used on each anchor, with the rodes adjusted so that there is no slack in one when the other is taut.
Stern Anchors
In some anchorages, boats lie to anchors bow and stern. The easiest way to get these down is to let the bow anchor go first, and then drop back with wind or current on an extra long scope, drop the stern anchor, and then adjust the scope on both as necessary, taking in line forward. In tidal waters, just as with a single anchor, make allowance for increasing depth as the tide rises. The value of this arrangement is generally restricted to areas where permanent moorings are set explicitly for this purpose, as in narrow streams, or on occasions where there is no risk of getting a strong wind or current abeam. Under such conditions, the strain on a vessel’s ground tackle could be excessive.
Sometimes a stern anchor will be useful if you seek shelter under a windward bank. Let the stern anchor go from aft, carefully estimating scope as it is dropped, and pay out more scope as you run up toward the bank or beach. Bed a second anchor securely in the bank, or take a line to a structure or tree ashore. The stern anchor will keep the stern off and prevent the boat from ranging ahead. But, again, watch that stern line while the propeller is turning!
At Piers & Wharves
Docking on the windward side of a pier or wharf is undesirable, as considerable damage can be done to a boat pounding heavily against piles, even with fenders in place. Anchors can help to ease the situation in a case where such a berth is unavoidable. Keeping well up to windward, angling into the wind as much as is practicable, have someone drop an anchor on a long scope off the quarter (the port quarter if you’ll lie starboard side to the pier). As this line is paid out, run ahead and get another anchor off the port bow, judging positions of both so you can drop down to leeward toward the pier on equal scope, with lines tending off at a 45° angle. Properly executed, this maneuver will prevent your vessel from hitting the pier, and the lines you then carry ashore will be needed only to prevent the boat from moving ahead or astern. Have your fenders out well in advance and be alert to relocate them as required.
Rafting
At a rendezvous, several boats frequently lie to a single anchor. Sometimes as many as ten or more boats RAFT together (rather too many for safety even in a quiet cove). After one boat is anchored, the second pulls alongside with plenty of fenders out on both. Stay six to ten feet away from the anchored boat and heave bow and stern lines. If this can’t be done, run up to the anchored boat’s bow at an angle of about 45° and pass a bow line first, then your stern line. Make sure you have no headway when lines are passed. As soon as the bow line is across to the anchored boat, stop your engine so that there will be no chance of going ahead, breaking the anchor out.
For a powerboat—but not a sailboat—you would allow your boat to drift astern until transoms align. Because of the dangers of spreaders tangling in a rocking situation, it’s best to line up rafting sailboats so that the rigging is clear at all points aloft. Then let the bow swing off and pull the sterns in close so it will be easier to step from one boat to another. To keep the boats in line and fenders in position, run a spring line from the stern of the arriving boat to a point well forward on the anchored boat. A second spring line in the opposite direction is useful.
If a third boat makes fast, the anchored boat should be in the middle; if more tie up, always alternate them port and starboard of the anchored boat. Each succeeding boat should use the same technique, always with a spring from the stern of the outboard boat forward to the one next inboard. Keels of all boats in the group should be nearly parallel. For safety, boats should raft only when there is little wind and a relatively smooth surface. When four or more are tied together, it is a good precaution for the outboard boats to carry additional anchors out at a 45° angle.
Before darkness sets in, the raft should break up and each boat anchor separately.
Figure 9-30 In rafting, only one boat should be anchored. The other boats are made fast to it so that all will move as a unit. Raft only in light breezes and in calm water.
Special Situations
Although the foregoing sections have covered nearly all the problems in anchoring, there are still a few that might be termed “special situations.”
Anchoring at Night
When anchoring after daylight has passed, if you have no ranges to check your position (or if those you have are unlighted), you can rig a DRIFT LEAD (the lead line will do). Lower it to the bottom, leave some slack for swinging, and make fast. If it comes taut, you’ve dragged. Don’t forget to pick it up before getting underway. Many electronic navigation systems include an “anchor alarm” that will sound if your boat moves from the designated location by more than an amount that you have preset.
In general, vessels anchored at night must show an anchor light, two lights if the vessel is over 50 meters (164 ft) in length. Anchor lights are not required, however, for vessels under 20 meters (65.6 ft) in a “special anchorage area,” or for craft less than 7 meters (23 ft) when not in a channel, fairway, or where other vessels normally navigate.
Requirements for “Anchor Ball”
With the same exceptions as noted above for anchor lights, a vessel anchored during daylight hours must hoist a black ball shape where it can best be seen. This shape must be not less than 0.6 meter (23.6 in) in diameter for ships, but may be of lesser size for small craft.
Rocky Bottoms
Earlier, certain steps that could be taken to clear a fouled anchor were discussed. Avoid rocky bottoms or those with coral heads; they are hazardous at best, regardless of the type of anchor used. Before leaving a boat unattended, apply a test load to the anchor well in excess of any expected load.
If you normally anchor in rocky bottoms or suspect that the bottom is foul in the area where you must anchor, it is better to forestall trouble. One time-tested device is the buoyed trip line described on later in this chapter.
An alternate scheme is to SCOW the anchor by attaching the rode to the crown, leading it back along the shank, and stopping it to the ring with a light lashing of marline; see Figure 9-31. With sufficient scope, the strain is on the rode and not on the lashing. When hove up short, the strain is on the lashing. When this parts, the anchor comes up crown first.

Figure 9-31 When “scowing” an anchor, the rode is attached to the anchor crown, led back along the shank, and lashed at the ring. If the anchor becomes snagged (A), an upward pull (B) breaks the lashing and the anchor can be drawn out crown first (C).
Kedging off a Shoal
The term KEDGING is applied to the use of a light anchor (not necessarily a kedge-type) carried out to deep water in a dinghy to haul a stranded boat off a shoal. If you ever have to resort to this, make sure the line is in the dinghy rather than on deck. See also Chapter 10.
Anchoring for a Sailboat
The procedures used for selecting and approaching an anchorage are the same for a sailboat skipper as for the operator of a powerboat. There are some differences in lowering and setting the anchor; these are covered in Chapter 8.
Some Cautions
Take great care to avoid chafe on fiber lines. Wherever the line comes in contact with chocks or rails and rubs back and forth under continuous strain, outer fibers may be worn to such an extent as to seriously weaken the line. Mooring pennants are particularly susceptible to this, as are dock lines.
When lying at anchor, you can “freshen the nip” by paying out a little more scope from time to time, or protect the line at the point of chafe with strips of canvas wrapped around it.

Figure 9-32 Split plastic tubing can be used to cover a line where it passes through chocks to protect it against abrasion.
Modern chafing gear is available in the form of plastic or rubber sleeves that can be snapped over the line, centered in a chock, and seized with thongs on either side to prevent shifting; see Figure 9-32. Chafing gear also comes in the form of lacing line or a white waterproof tape, to be applied around the line at bitts, chocks, and other points of contact.
The increasing use of relatively light anchor rodes of small diameter (as small as ⅜ inch) points up the necessity of preventing chafe. The chafe that a ¾-inch line could tolerate might render a ⅜-inch line unsafe.
Chocks, Bitts, Cleats & Other Fittings
Chafe is aggravated wherever a fitting has a rough surface to accelerate abrasion of the fibers. Even small nicks and scratches in a chock can damage a line by cutting fibers progressively, one at a time. Serious weakening of a line develops when it is forced to pass around any fitting with relatively sharp corners, such as a square bitt with only a minimum rounding of the edges, especially when the bitts are too small for their job. Theoretically, the ideal bitt or samson post is round and of generous diameter. The best chocks are those of special design with the largest possible radius at the arc where the line passes over it.
Mooring bitts especially must be fastened securely. The best bitt is the old-fashioned wooden bitt, long enough to have its heel fastened solidly to the boat’s keel. If a cast fitting is used on deck, it must be through-bolted and the deck below reinforced with a husky backing plate; see Figure 9-33.
Protection from Ultraviolet Ray Damage
The outer layers of all types of rope are subject to some degree of damage from ultraviolet rays that are part of the normal spectrum of sunlight. With nylon line of relatively large diameter (upward of ¾ inch), such damage is probably negligible. As the diameter decreases, the problem becomes proportionately more serious; in ⅜-inch nylon it is an important factor because so much of the line is in the outer fibers. Take special care to shield such lines from unnecessary exposure to direct sunlight. Often the rode can be fed down into a locker. If it must be carried on deck, shade it or periodically replace it and assign the old line to less critical uses.
PERMANENT MOORINGS
PERMANENT MOORINGS, as distinguished from ordinary ground tackle, consist of the gear used when boats are to be left unattended for long periods, such as at yacht clubs or municipal anchorages. The traditional system often consists of a mushroom anchor, chain from the anchor to a buoy, and a pennant of stainless steel or nylon from the buoy to a light pick-up float at the pennant’s end; see Figure 9-34.
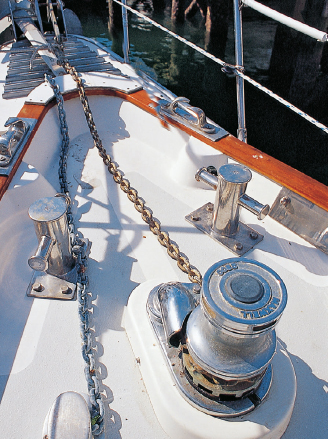
Figure 9-33 Two substantial, well-rounded samson posts are shown on either side of the deck forward of an electric windlass. Note the horizontal norman pin that keeps the line from slipping up and off.
Mushroom anchors, especially the type with a heavy bulb cast in the shank, can, through suction, develop great holding power under ideal conditions if they have enough time to bury deeply into bottoms that permit such burying; see Figure 9-35. Unfortunately, ideal bottom conditions are not always present. Often large cast-concrete blocks, similar to those used by the Coast Guard to moor buoys, are put down in lieu of mushroom anchors.

Figure 9-34 In this diagram of mooring practice recommended by the Lake Michigan Yachting Association, total scope is the combined length of heavy chain, light chain, and pennant. Minimum space between adjacent moorings should be 1.25 times the total scope plus the length of any boat likely to use the mooring. Be sure the chain or rod running through the buoy is of sufficient strength. Otherwise, connect the pennant directly to the light chain below the buoy.
Complicating the problem is the fact that anchorages are becoming increasingly crowded so that boats cannot have adequate scope because of overlapping swinging circles. Add to this the threat of abnormally high hurricane tides, which reduce scope to a ratio allowing no safety factor, and you have contributing factors to the devastation wrought by several hurricanes along the Atlantic Coast.

Figure 9-35 Mushroom anchors can develop great holding power under ideal conditions if they have enough time to bury deeply.
Typical Mooring Systems
The problem faced by the Manhasset Bay Yacht Club at Port Washington, NY, was typical. Here about 200 boats were to be moored in a limited space. If each boat could use a length of chain equal to 5 to 7 times the depth of water (maximum 20 feet), safety would be assured, but this would require a swinging radius of several hundred feet for each boat, which was not feasible. After exhaustive study, the Manhasset boaters prepared a set of recommended standards, given in Table 9-3. A generally similar system was adopted by the Lake Michigan Yachting Association; refer to Figure 9-34.

Table 9-3 Specifications for mooring system used at the Manhasset Bay Yacht Club.
Guest Moorings
Often a cruising skipper will find guest moorings available at yacht clubs and municipal anchorages and at some marinas. The dock-master or launch operator will know which of those not in use for the night are heavy enough to hold your boat. As a rule, it’s easier and safer to pick up such a mooring rather than anchoring. In most places, a charge will be made for the use of the mooring, and for launch service if desired.
Mooring Buoys
To comply with U.S. Coast Guard regulations, mooring buoys should be white with a horizontal blue band. Buoys used in any mooring system should be of a type that transmits strain directly through the buoy, using chain or rod of acceptable strength; refer to Figure 9-25. Buoys perform a useful function in removing much of the vertical load; the pennant is under a more nearly horizontal load, and the boat’s bow is freer to lift to heavy seas.
Stainless-steel pennants are often preferred because of failures traceable to the chafing of fiber pennants. When fiber is used for the pennant, protect it with chafing gear, especially if there is a bobstay against which it can saw; refer to Figure 9-32.
Annual Inspection Necessary
Because ordinary moorings often need a period of time for silting-in before achieving their full holding power, annual inspection of chain, links, shackles, and pins should be made early in the season—never pick up for checking just about the time storm warnings are issued. On the other hand, it is also wise to give the pennant from buoy to boat a double-check in midseason, just before the August-September months when hurricanes most often strike along the East Coast.
Screw-in Moorings
Recent technology has been developed for permanent moorings, promising greater security for craft exposed to the forces of hurricanes and other major storms. In lieu of a heavy anchor or sinker on the bottom, a HELICAL ANCHOR is literally screwed into the bottom much as a cork-puller is screwed into the cork of a wine bottle. Tests have shown that a helical anchor provides three to five times the holding power of a typical mushroom anchor or concrete block. They are particularly useful in situations where the bottom is rocky or too hard to let a mushroom anchor bury itself, or where the bottom is too soft for a mushroom anchor to develop enough holding power.
Typical helical anchors are made of 1¾-inch galvanized steel rod fashioned into helices of 8, 10-, 12-, or 14-inch diameter. These anchors are installed using special machinery mounted on a barge, and both skill and experience is required for proper installation. Measurements of the force required to screw the anchor into the bottom can be used to predict the holding power; additional sections can be added if it is necessary to force the anchor down deeper. Smaller helical anchors for small boats can be installed by a diver.
Picking Up & Leaving a Mooring
Approach a mooring buoy in the same manner as you would an anchorage spot, as previously described in this chapter—slowly and into the prevailing wind or current, whichever has the stronger effect on your craft. A person on the bow will need a boathook with which to pick up the pennant streaming from the buoy. Typically, this line will have an eye that can be placed over the forward bitt or samson post. Often, however, the pennant is a polypropylene line (so that it will float on the surface) that has accumulated considerable marine growth—this can be quite messy on the crew’s hands and on the foredeck. A solution is to use a short length of braided nylon line with an eye in one end. Place the eye of this line on the bitt, and, when the pennant is hauled up to deck level on the boat hook, pass the other end of the braided line through the eye of the pennant and then back to a bitt or forward cleat—this allows the fouled pennant to drop back down clear of your boat.
Departing a mooring should be no problem; just keep clear of the mooring buoy that you are leaving and other nearby craft. The person on the bow can lift the eye of the pennant off the bitt and drop it overboard; if an additional line has been used as suggested above, the free end can be uncleated and pulled back, dropping the pennant. It is best to just let the wind or current carry you away from the buoy, but a touch of reverse engine power may be used if necessary; the person on the bow can signal the helmsman as to the location of the mooring buoy until it can be seen from the helm.
A Multiple-Anchor System
One hurricane that ravaged the North Atlantic Coast swept through an anchorage in the New York area and tore almost every boat from her moorings. Only two survived. What these two had in common was an “unconventional” mooring system—multiple (3) anchors bridled to a common center, with chain and pennant leading from that point to the boat.

Figure 9-36 A modern permanent mooring system designed to be an improvement over the single mushroom anchor uses three lightweight-type anchors bridled 120° apart. A relatively short rode limits swinging.
The obvious advantages of the system are shown in Figure 9-36. Regardless of how the wind shifts, the boat swings through a small circle, despite the advantage of a relatively long total scope from the boat to the anchor. The short rode up from the three-way bridle minimizes any “tacking” tendency. Always there will be one or two anchors to windward, the strain tending in the same direction. Using modern lightweight anchors instead of mushrooms, the greater the load, the deeper they bury. Mushrooms often need a relatively long period to bed-in securely, but lightweight anchors will dig in almost immediately. Next to each anchor, use a heavy chain with a length one and a half times the maximum depth of the water—the objective is to have a three-anchor system with a holding power equal to the design holding power of a permanent mooring for the same size craft.
GROUND TACKLE MAINTENANCE
A boat’s ground tackle includes all the anchors, anchor rodes (nylon line or chain), and shackles that are used to connect components together into an anchor system. Adequate ground tackle is essential to the safety of a vessel of any size. Unfortunately, time and use take their toll. Proper inspection and care are required to get the greatest possible life out of any component of an anchoring system.
At least once a year, every set of ground tackle should be hosed clean, and the chain and rode should be checked for any deterioration. All shackles (and swivels, if used) should be closely examined. All pins should be safetied with stainless wire or nylon cable ties to keep them from working loose; replace each safety tie once a year.
The rope/chain locker should be cleaned out. Ensure that the bitter end of each working anchor rode is securely fastened to prevent the accidental loss of the anchor and rode.
Fiber Lines
Keep fiber lines free from sand and grit. Use a low-pressure hose to wash off grit, or slosh the line overboard, tied in a loose coil. Don’t use a high-pressure nozzle—it may force grit deeper into the line.
Make sure that lines are straight before any load is applied. Placing a strain on a kinked line can damage or break the fibers. To a lesser degree, sharp bends are harmful; blocks should always have sheaves of adequate diameter.
Inspect all lines regularly. Check the effect of abrasion, cuts, rust on nylon, broken or frayed yarns, variations in strand size or shape, burns, rot and/or acid stains, and fiber “life.” Nylon line may fuzz on the surface although the yarns are not broken. This seems to act as a cushion, reducing further outside abrasion.
Compare the line to new rope. Untwist and examine the buried strands; they should be clean and bright as in new rope. If powder or broken fibers appear, the line has been overloaded or subject to excessive bending. Nylon may be fused or melted, either inside or out, from overloads.
Check any splices. All splices should have absolute integrity. (For complete safety, the only splice in an anchor rode should be the eye splice connecting the rode to the chain near the anchor.)
Most chafe and wear comes on the anchor end. Periodically, lines in regular use should be turned end-for-end. If you use one size for all anchor and mooring lines, you can put a new spare anchor line aboard each spring, put the former spare into regular use, and make the oldest anchor line into dock lines after cutting out any damaged sections.
Become familiar with the special techniques that are required in working with nylon line, as when making up eye splices or even unreeling it from a coil. These techniques are covered in detail in Chapter 23.
Anchors & Chain
Consider the appearance of your anchors. Galvanized anchors are usually coated by the hot-dip process that leaves a tough protective finish, and normally require no care except washing off mud. You can buy a spray coating that is heavy in zinc, a “cold galvanize.” This coating will temporarily improve the appearance of anchor and chain that are starting to rust, but it has poor wearing qualities when compared to hot-dip galvanizing.
Don’t store a dirty anchor chain. If it comes up fouled with mud, give it a thorough cleaning. Some larger yachts have a faucet and hose near the bow connected to a fresh- or salt-water pressure system for this purpose. You will find a long-handled brush helpful for this procedure.
Periodic Inspection
Check the entire length of each rode for signs of deterioration. Does the galvanizing on the chain need to be renewed? A chain pitted by rust can become unsafe. Check all thimbles, shackles, and especially swivels for security. If necessary, replace the safety wiring. Be sure the bitter end of the anchor rode is securely fastened to a strong point in the anchor locker. If the rode is chain, use a length of rope long enough to reach the deck so it can be cut in an emergency.