

Ropes & Lines • How They Are Made & Used • Knots & Splices Care & Maintenance of Lines • Blocks & Tackle
From anchor rodes to sheets, vangs, and whippings, anyone concerned with the work of a boat becomes involved with lines, knots, and splices—and their proper use. This knowledge and the related hand skills are as important to a powerboat skipper as they are to the owner of a sailboat. They comprise a subject recognized for its fascinating lore, for the beautiful artifacts that are a part of it, and for its sheer practicality. Working with CORDAGE—the collective name for ropes, lines, and “small stuff”—is an ancient skill that now takes in new technologies.
The information that follows is intended to give you a picture of:
• The construction, materials, and characteristics of various kinds of modern cordage
• The tools, techniques, and special words used in working with cordage
• The procedures for making and using knots, bends, hitches, and splices
• The coiling and storage of lines, as well as their care and inspection
The nautical name for this special information and skill is MARLINESPIKE SEAMANSHIP. Once used extensively with rigging, MARLINE is a twostrand twine; a MARLINESPIKE, often one blade of a sailor’s rigging knife, is used for separating the strands of laid rope or wire for splicing, as covered later in this chapter.
ROPES & LINES
Purchased as “rope,” once it is in use on board a boat rope is called LINE, or by name of the rigging part it has become. Sailors will tell you that there aren’t many ropes aboard a ship or boat. There is the bolt rope at the foot or luff of a sail, or a tiller rope, or a foot rope attached to the lower border of a sail, or a bell rope, or a few other rare ones. Everything else is a line.
Rope Materials
Like a sailor’s knife, rope goes back thousands of years. For centuries rope was made from natural fibers, including jute, sisal, and manila (from the wild banana plant) and especially flax and hemp. Most rope was LAID, usually three STRANDS twisted together. Each strand is composed of three YARNS, each of which is composed of multiple FIBERS; see Figure 23-01. Boaters work with knots and splices that have been in use for centuries, based on the standard way rope was made by twisting fibers.
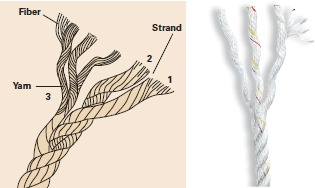
Figure 23-01 “Three-stranded rope” is made up of three strands that are laid or twisted together, usually with a right-hand lay. Each strand has a left-hand lay, and each yarn’s fibers have a right-hand twist.
Since the mid-20th century, there have been more technological changes in rope than in the preceding thousand years. New synthetic fibers have altered the form of rope and even the way particular splices or knots are made and used. The new kinds of cordage are so superior that a boater has little reason to pay any attention to most of the old materials, although he may have difficulty in making the right choice among the new forms.
The most obvious change is in the form of rope itself—probably more than half the rope used in recreational boating in the U.S. is PLAITED, BRAIDED, or DOUBLE-BRAIDED (a core inside a cover), compared to the traditional, three-strand laid rope. Small stuff, used for whippings and seizings, is also greatly changed. Shock cord and even monofilament line have special uses, all made possible by new materials.
Synthetic Materials
The first important synthetic fiber to appear was polyamide (nylon). Nylon rope is strong (more than twice as strong as the best yacht manila for the same size), has useful qualities of elasticity or controlled stretch, and has gone through successive improvements. This rope can be given various degrees of softness or hardness, some variation in surface textures, and can be obtained in various colors to fit its intended uses. With its shockabsorbing elasticity it is particularly well suited for dock lines and anchor lines.
High-intensity polyester fiber (Dacron, Terylene, Duron, Fortrel, A.C.E., and Kodel are trade names) is made into rope that is virtually as strong as nylon but has one important difference: the rope can be made to have very little stretch. This property makes polyester fiber superior for special purposes like the running rigging on sailboats, where elasticity is undesirable. In manufacturing, polyester rope can be given varied finishes as required by the intended application: woolly, smooth, or textured to make it easy to grip. It can also be colored.
Polypropylene rope is least expensive among the synthetics; it is as strong as nylon or polyester but tends to deteriorate rapidly from exposure to the ultraviolet component of sunlight. Its main advantage is that it floats, which the others do not do, so it is suited to some commercial fishing applications as well as to tow ropes for waterskiing and dinghy painters. It is quite slippery, and many knots will not hold in a “poly” line. For appropriate special purposes, it should be a larger size (compared to nylon) and renewed frequently.
Many other synthetic fibers have found their way into the marine rope market in recent years. Kevlar and Technora—both aramid fibers—are stronger, pound for pound, than steel and have less than 1% stretch. Their disadvantages include their poor internal abrasion resistance, which gives them low tolerance for smallradius bends (as in knots and halyard sheaves). They are also susceptible to degradation from UV rays and are thus best used in rope cores, where they are surrounded and protected by covers of a different material (see below). They are also increasingly blended with other fibers to capitalize on their strength and resistance to stretch while counteracting their weaknesses. Their final disadvantage—high cost—remains perhaps their most serious, limiting their use primarily to large sailing yachts and competitive racing sailboats.
High-modulus poyethylene (HMPE) fibers are sold under the brand names Dyneema and Spectra. These are similar to aramid fibers in strength and resistance to stretch and are more resistant to abrasion. They also float. Dyneema and Spectra are slippery, however, and do not hold knots well, and they tend to “creep” (elongate) under prolonged loads. Like the aramids, they are very expensive and are usually found in combination with polyester in specialized ropes.
Another new synthetic is a liquid-crystal polymer (LCP) sold under the trade names names Vectran and Ticona, which is extremely strong, both stretch- and creepresistant, and extremely expensive. It too is more frequently blended with other fibers than used in pure form.
The great majority of boats are still best served by nylon anchor lines, nylon or polyester docklines, and polyester running rigging. Various constructions of these well-proven, moderately priced synthetics have evolved for different purposes. We’ll look at those next.
Rope Construction
The construction of three-strand laid rope has changed little in thousands of years except for varying surface textures. New materials and new types of rope-making machines have caused one particularly significant development in rope construction, however: braided and double braided ropes.
The various kinds of rope “geometry” are worth looking at in some detail, starting with the oldest.
Three-strand Rope
Some knowledge of the anatomy of three-strand rope makes it easier to work with, especially in splicing and in finishing off the ends (a subject discussed at the end of this chapter).
If you hold the rope so that the end is away from your body, the strands will seem to have a twist that is clockwise. This is called “right-hand lay.” Most rope has a right-land lay, and has since the pyramids were built. If you look at the yarns in just one of the three strands, you will see that they have a left-hand twist. Finally, in all but the smallest ropes, the fibers that comprise each yarn have a righthand lay; refer to Figure 23-01.
Because some tension is put on the rope in manufacturing, these opposing twists of fiber, yarn, and strand tend to keep the rope from UNLAYING, or untwisting.
When you splice you will be working with these twists, sometimes retwisting a short length of strand with your fingers and SPLICING (interweaving) the strands back into the normal lay of the rope. Since virtually all laid rope is right-handed, your fingers should learn to work with the twist, whether you are tying knots, splicing, or coiling.
Laid rope comes in several degrees of hardness or stiffness. The technical terms are SOFT LAY, MEDIUM LAY, and HARD LAY. For boating purposes you will probably use only medium lay. (SAIL-MAKER’S LAY is another variation, but unless you’re making sails you won’t need it.) Very soft lay is sometimes on sale, and is superficially attractive—silky soft, like milkweed seedpods. It’s of little use on a boat, however, because it kinks easily. Hardlaid rope, used commercially, may be too difficult to work with to be of any value on small craft.
You may read about, but seldom see, FOUR-STRAND ROPE and LEFT-HAND LAY ROPE; both are for special purposes. And there is one more “twist” about rope—to make very large cables, such as those that tugs or large ships use, three right-hand-lay ropes can be twisted together with a left-hand lay; this is called CABLE LAY.
Most wire rope is made the same way, by twisting strands. The more intricate strandings, with 7 x 7 and 1 x 19 strands, are seen most often. In 7 x 7, seven strands, each in turn consisting of seven wires, are twisted together; in 1 x 19, 19 single strands make up the rope. This 1 x 19 wire rope is stronger but less flexible than the 7 x 7 type, and is used primarily for standing rigging; see Figure 23-02.

Figure 23-02 Wire rope is stranded in 7 x 7 format, left, which is often used for running rigging, or in 1 x 19 format, right, the type used for sailboat standing rigging.
Braided Line
When strands are interwoven rather than twisted together, what results is braided rather than laid rope. In SINGLE-BRAID (sometimes called “solid braid”), the braiding is continued through the rope’s interior to create a uniform cross section. Small-diameter (½-inch and smaller) single-braid is used for flag halyards, to tie the ends of sail-bags, and for special purposes such as awnings; see Figure 23-03. Larger-diameter single-braided nylon is sometimes used for docklines, and single-braided polyester of 1/2 inch and larger is popular for mainsheets, often with a spun-polyester fiber for ease of handling. Most single-braid line can’t be spliced unless it’s a hollow braid—i.e., unless the braided cover surrounds a hollow core. Hollow-braided polypropylene is used for swimming lane lines and waterski tow ropes, but hollow-braid is otherwise rare.

Figure 23-03 Single-braid (lower) in small diameters (1.4-inch and smaller) is used for flag halyards, sail bag ties, and similar purposes.Plaited line (upper) is a variation of braided line. Shown here is eight-plait rope.
Double-braided In DOUBLE-BRAIDED rope, a braided core is surrounded by a braided cover; see Figure 23-04. Double-braid is very flexible because both the cover and the core are composed of small strands. Its resistance to abrasion is excellent because the wear is distributed over many strands. Braided line tends to coil evenly and, unlike laid line, is virtually kink free (does not hockle). It requires special techniques for splicing, covered later in this chapter.

Figure 23-04 Braided line may be either single-braid (top) or double-braid (above). Double-braid, sometimes called braid-on-braid, is used for many purposes on boats of all types and sizes. It has some stretch, but less than three-strand twisted line.
On both sailboats and powerboats you will often see double-braid nylon used for dock lines because of its smooth running and easy-on-thehands characteristics; occasionally it will be used for anchor lines. You’ll see double-braid polyester used for sheets, halyards, and other running rigging on sailboats because it stretches less than polyester three-strand or single-braid (and much less than nylon line of any construction).
PLAITED line is an inexpensive variation on braided line that resists hockling and finds favor on commercial vessels. Eight-plait rope, also called square braid, is shown in Figure 23-03. Twelveplait rope is seen in towing hawsers.
Other constructions have joined laid and braided line in recent years, just as other synthetics have joined nylon and polyester. In PARALLEL-CORE rope, a braided cover (usually polyester) surrounds a core of straight, bundled fibers, which might be polyester, Kevlar, Spectra, Vectran, Technora, or some blend of these to achieve varying degrees of strength and resistance to stretch; see Figure 23-05. A parallel polyester core within a polyester braided cover is more resistant to stretch than double-braid and is finding increasing use in sailboat halyards.

Figure 23-05 A core comprised of parallel fibers, as here, yields as much as 20% more strength and 20% less stretch than a braided core of similar diameter. The gauze wrapper visible in this photo contains the core fibers during the rope manufacturing process.
Other Types of Rope
In addition to stranded and braided rope, several other forms of flexible materials have special uses aboard boats. These materials are not traditional cordage, but they do some of the same things rope or small lines will do.
Shock cord is multistrand rubber with a synthetic cover. It can stretch twice its length. The uses of shock cord are endless: to hold topping lifts out of the way, to make quick lash-ups for furling sails, to hold halyards away from the mast, and to hold a pair of oars on a cabin top or books in a book rack. Shock cord is not as strong as rope; its extreme elasticity makes it unsuitable for many purposes, and it cannot be spliced. Its ends can be made up with shrink tubing or plastic or metal clips to prevent fraying; eyes (actually looped ends in the shape of eye splices) are made the same way. A loop at one end of a short piece of shock cord and a toggle inset at the other end makes a good tie to keep a coil of line in place.
Webbing is made of woven nylon or polyester, and is used for sail stops (replacing the traditional sewn strips of doubled sailcloth) and for dinghy tie-downs as well as hold-downs for boats on trailers. Webbing is very strong, and when used for sail ties it holds well with a square knot or a slippery reef knot. Webbing is either single or hollow flat (double).
Monofilament is another kind of line found on boats. Its main use is for fishing lines, and a heavier piece makes a good lanyard for a pocket stopwatch or cell-phone case. Monofilament fish line must be knotted only in specific ways or it will invariably come untied.
Small stuff is a term used by the typical old salt, sitting on a hatch cover making up whippings, servings, and seizings. Waxed nylon line and flat braid (also called parachute cord) is used for whippings and to prevent chafe. MARLINE, a tan-colored two-strand string used for servings, is now scarce. COD-LINE, a similar three-strand material, is useful if you can get it.

Figure 23-06 These ropes from New England Ropes are made from polyester fiber and optimized for specific purposes. Top to bottom: (1) A three-strand rope in which spun polyester, which yields a softer “hand,” is blended with filament polyester for strength; popular for sheets and halyards on classic sailboats. (2) Three-strand line made entirely of filament polyester. (3) Regatta Braid is a single-braid line made from a blend of spun and filament polyester and used for main- and jibsheets on a variety of sailing yachts. (4) Sta-Set double braid is an all-purpose rope for cruising sailors and can be used for sheets, halyards, guys, control lines, reef lines, and furling lines. (5) Sta-Set X has a parallel core for use as halyards, where less stretch is desirable.
Selecting the Correct Rope
In the course of boat ownership, you will need to make decisions about what size and type of rope to buy for new dock and anchor lines, or how to improve the rigging when replacing a sheet, vang, or halyard. In addition to the factors already reviewed concerning elasticity and the form of rope, you need to consider other points, including size.
Sizes
The size of rope, in the United States, is customarily given as its diameter in inches, particularly in the recreational-boat sizes. But since most of the rest of the world measures rope by its circumference and in millimeters, you will see more and more line described by “nominal” size with metric comparison tables. In addition, manufacturers and sellers of rope know very well that a piece of braided rope, held loosely, is thicker than one stretched out. Because of this, they market such rope by its weight, which is a more accurate measure of the amount of material. At some marine stores, however, you will find all types of rope sold by length, often in prepackaged kits.
Strength Ratings
Experts, concerned with safety and dependability, say that the working load for laid line should not exceed 11 percent of its TENSILE STRENGTH—the load, in pounds of “pull,” at which the rope would break (part). Braided rope is normally specified for use at or under 20 percent of its tensile strength. As rope ages, it inevitably suffers from abrasion and sunlight. Braided rope has the advantage that the core, providing a major part of the strength, is protected. All parts of laid rope suffer from wear. See Table 23-1 for data on the weight and breaking strength of various types of rope in a range of typical sizes.
In practice, a commonsense approach is often the determining factor. A small size of rope might be strong enough for a jib sheet, but a larger size will be easier to grasp with the hands.

Table 23-1 When buying rope, keep these points in mind: A soft, compliant rope may be stronger and easier to splice, but it will not wear as well and is more apt to hockle or unlay than a well “locked-up” rope. Blended ropes, part polyolefins and part other fibers, may be found. Multifilament (fine filament) polypropylene looks like nylon, but don’t expect it to be as strong—it floats, nylon doesn’t. Spun, or stapled, nylon and high-intensity polyester (such as Dacron) are not as strong as ropes made of continuous filaments but are easier to grasp; these are sometimes used for sheets on sailboats.
Varieties Available
There are dozens of brands, configurations, and combinations of materials, particularly in braided rope. Sometimes one characteristic—reduced stretch, for example—changes another, such as ease of splicing.
The surface textures of braided polyester ropes vary. Those made with continuous filaments are shiny, smooth, and strong. Those made with spun yarn (short filaments) are softer, fuzzier, and not quite as strong. Select the shiny ones for halyards and the fuzzier ones for sheets, where being easier on the hands and better gripping of the drums of winches are important qualities.
Some skippers who do a lot of night sailing use lines of different surface texture, with different feel for different purposes, such as sheets and guys.
Color Coding
The use of color coding for racing and cruising sailboats is common. The lines may have a solid color, or be white with a colored “tracer.” A recommended standard is:
• Mainsail sheet and halyard—white
• Jib/genoa sheets and halyards—blue
• Spinnaker sheets and halyard—red
• Topping lifts—green
• Vangs and travelers—orange
Matching Size with Use
For most uses, the appropriate size of rope is one that is large enough to be comfortable in the hands under normal working situations. A flag halyard, which has very little strain on it, can be thin to reduce wind resistance.
Sail halyards must be strong enough to take the tremendous strain of the sail filled with wind, with minimum stretch, be resistant to abrasion at the sheaves, and still offer the least possible wind resistance.
The proper size of a line may be determined by still another factor: chafing. A dock line or anchor line, for instance, is used many times, sometimes chafes seriously and sometimes not at all, and yet should always be strong enough to hold under extreme storm conditions. A mooring pennant needs to be many times stronger than is required for the worst possible storm conditions, partly because the big fall storm may come at the end of the season, when the line has already been weakened by various small chafings. (See Chapter 9 for more details on anchor and mooring lines.)
Matching Line Size and Blocks If a line is a bit too large for a block or other type of fairlead, or a chock, you run the risk of binding, jamming, or chafing; see Figure 23-07. Sometimes the solution is not a smaller line but a larger fitting.
If a line is too small for a particular block, it can get caught between the sheave and the shell—another kind of jam. (Refer to Figure 23-17 for the parts of a block.) If a wire sheave is adapted for rope, the sheave must be dressed down for a proper groove. (Be aware that for comparable sizes, rope will have only a fraction of the strength of wire.)
The diameter of the sheave in a block can also be important. If a line makes a 180° change of direction over a very small sheave, the stress on the line is obvious. Sometimes naval architects use two small blocks at the top of the mast to reduce the stress within the rope—each block gives the halyard a 90° turn. Similarly, a fairlead that makes a change in direction in a line results in a certain amount of friction; if the line goes through the fairlead at an extreme angle, the friction is greater. In such a situation a block might well be better than a simpler fairlead, to make the line handling easier as well as to minimize abrasion.

Figure 23-07 Blocks should be matched to the lines used. Otherwise, you run the risk of lines binding, jamming, or chafing.
Use Good Rope
The problems of cheap rope may be hidden, but they are real. Some polypropylene rope, at the bottom of the cost scale, is made from largediameter filaments. Rope with finer filaments costs more but lasts longer and is much stronger. Hard-lay nylon, which may be old, is so difficult to work with that it may not be worth its low price.
As you work with the variety of lines aboard a boat, you will form the habit of constantly checking for chafe and other problems: a splice that is beginning to fray, a chock with a rough corner that will weaken a dock line by chafing, a block whose sheave tends to be stiff and needs cleaning and lubricating. Frequent inspection of gear and rigging, and replacement, lubrication, or other suitable repair is an important part of good seamanship.
Information on inspection details and procedures is given near the end of this chapter under “Care & Maintenance of Lines”.
Availability
The retail availability of special kinds of rope can be a problem for some boaters. An inland hardware store may stock several kinds and sizes of rope—suitable mainly for farmers and homeowners. Preferences and needs also vary among commercial fishermen, recreational powerboat owners, and sailors.
Sometimes there are special solutions. If you can’t find waxed flat braid for whippings at a marine dealer, talk to a sailmaker. If all you need at the moment is a small size, waxed nylon dental tape is roughly similar. If you plan on making up a polypropylene dinghy painter that will float, and thus stay out of the way of propeller blades, try a source that supplies commercial fishing boats; and get the black rope—it’s the most resistant to sunlight.
MARLINESPIKE TOOLS
For most everyday work with rope you need only your fingers and a good knife. But many marlinespike jobs need special tools, a few professional techniques, and some standard materials.

Figure 23-10 A typical ditty bag includes a number of marlinespike tools, from a sailmaker’s palm to an electric hot knife. Keep all tools and materials protected from moisture, which can render scissors and other tools useless. A canvas ditty bag with plastic wraps for the metal tools will do, as will a tight-closing plastic box.
Here is what you would find in an experienced sailor’s “ditty bag,” plus some of the extras that might be in the tool locker or perhaps on a home workbench for most kinds of marlinespike seamanship:
A good knife, preferably the type called a rigging knife, with a built-in marlinespike and probably a hasp that is used for opening and closing shackles; see Figure 23-08. The blade should be sharp; often a keen but slightly jagged edge works well on synthetic rope. If you don’t have a sharpening stone, a file from the engine toolbox will keep the blade sharp.

Figure 23-08 The combination knife and marlinespike is the tool most often used in marlinespike work. The tool seen below the knife blade is a hasp, used for opening shackles.
A large fid or marlinespike, for separating the strands of laid rope when splicing. You can usually splice small sizes of laid line, if it’s fairly soft, using only your fingers. But a fid (usually of wood or plastic) or metal spike, used to separate the strands and to get the strand you are working with through quickly and easily, makes any splicing easier and is usually a necessity for larger sizes of rope.
Special fids will be needed for splicing doublebraided rope, different sizes matched to the diameter of the rope. Several types of hollow fids and other special tools are on the market.
Sailmaker’s needles (keep them in a small plastic bottle) for making whippings and repairing sail slide attachments and jib hank fastenings. Keep several sizes of needles on hand.
A sailmaker’s palm (left or right handed) to push the needles through the rope; see Figure 23-09. Even if you don’t expect to repair sails, a palm is a good handtool. Keep the leather soft by applying neatsfoot oil twice a year.

Figure 23-09 A traditional sailmaker’s palm is needed to push needles through heavy sailcloth when making repairs. Strong waxed thread is used in this work.
A pair of scissors.
A pair of pliers. Simple sharp-nosed are best.
Waxed sail twine (tape and/or cord) and perhaps some old-fashioned brown marline for a traditional-looking project. As you’ll see at the end of this chapter, waxed nylon twine or lacing tape is used to make whippings on the ends of lines. Lacing tape, which is flat and plaited, is also used for sail fittings; even if you never sew a sail you’ll need twine or tape for lashings. Many people also keep a piece of beeswax in their ditty bags for waxing twine.
A source of heat is needed to melt and seal the ends of synthetic rope. A candle and matches or the flame in a galley stove will do if you follow a careful safety procedure of heating an old knife blade and then applying it to the rope to melt it. On shore (or if your boat has 120-volt AC power) an electric hot knife is best; see below.
An electric rope cutter. Not everyone needs this professional tool, which plugs into an electrical outlet and uses a hot wire or blade to melt the rope (quickly, smoothly, and sealing the ends). However, many amateur sailors who like to work with rope own one. Perhaps the handiest tool for the boat owner is an electric soldering gun, with a special cutting head obtainable from hardware stores. This knife-like head is also useful for melting and smoothing the fine strands of rope that are left after a splice is made. Electric rope cutters or hot knives require 120-volt AC power.
Plastic tape for temporary whippings. White tape with some stretch to it, black electrical tape, waterproof sail repair tape, or first-aid tape will do. These are all adhesive tapes, unlike the nylon lacing tapes referred to earlier.
Liquid, quick-drying plastic for dipping rope ends into as a substitute for a twine whipping or other end finish for a line. They are called Whip-It, Whip End Dip, or similar names.
Keep all the tools and materials well enclosed against moisture, which can make scissors and knives useless. A canvas ditty bag with plastic wraps for the metal tools will do, as will a tightclosed plastic box; see Figure 23-10.
DEFINING MARLINESPIKE TERMS
Many of the special terms used in marlinespike seamanship are best understood by handling line or by looking at illustrations. The STANDING PART is the long end of a piece of line. If you loop the working part back on itself, you form a BIGHT. If the bight is around an object or the rope itself, it’s a TURN; if it’s a complete circle, it’s a ROUND TURN. The extreme other end of the line is the BITTER END; see the illustration. All BENDS, HITCHES, KNOTS, and even SPLICES are technically KNOTS, but to the purist there are differences. A splice was only a form of interweaving of the strands—until braided rope came along with a new form.
A WHIPPING is small twine or tape wrapped tightly around and sometimes through the end of a rope to keep it from unraveling. A SEIZING is a similar wrap-around, but for other purposes, such as binding two parts of a line together in a piece of rigging; binding a rope end to the standing part to prevent a knot from capsizing or loosening, as in Figure 23-11; cinching and binding the throat of a thimbled eye splice; or binding a sail hank to a sail. PARCELING is a more complex wraparound, combining twine and tape, to take wear or prevent chafe. The illustrations allow you to compare these somewhat similar methods. Another term is LOCKING, which means sewing through the throat of a braided line eye splice to hold it in place.

Whipping, left, prevents the end of the line from unlaying. Seizing, center, is used to bind two lines together. Worming, parceling, and serving, right, are used to protect a line against severe chafing.
USE OF ROPES & LINES
So far we have been looking at rope and line primarily as the raw materials of marlinespike seamanship. Now we turn our attention to their use, and you will notice the additional special language that is used aboard boats.
Use of Lines on Boats
Various lines find common use on powerboats and sailboats—dock lines, anchor rodes, lines for towing, and others. Sailing craft, of course, have many other lines specifically for their mode of propulsion. These numerous applications are covered in other chapters in this book.
COILING & STOWING LINES
When you handle lines on board any boat, you soon learn some basic techniques; one of these is how to coil a line, and another is how to stow it.
Coiling a Line
Laid line, having its natural twist built in, should always be coiled clockwise so it won’t hockle (kink) or tangle. If it’s an unused dock line, either end can be used to start a coil. Otherwise, always start at the secured end—where the halyard or sheet is cleated, for example—and work toward the free end. Never start at the free end—you’ll end up with a twisted, awkward coil that’s anything but docile. If the line to be coiled is loose and untangled, it’s easy. If it looks the least bit tangled, “overhaul” it by running it through your hands from one end to the other, so it’s ready to be coiled.
Now, start by holding the line in your left hand. With an easy sweeping motion, using your right hand, bring each coil to your left hand and take it in with your fingers. Remember that the coils are always clockwise. An even sweep of your arm, the same distance each time, will result in coils of the same size. Sometimes your thumb is used to add or control a twist—it takes practice.
Don’t try to wind up the line over your elbow, unless you’re a landlubber in the backyard doing clothesline. (If you are left-handed, you may want to reverse the “left” and “right” instructions above.)
When working with braided line, you may wish to coil it as you would a hose, alternating the direction in which each coil is gathered to prevent an accumulation of torque in the line. The loops of rope gathered in this way will pay out freely and smoothly, avoiding the creation of the kinks that can foul when the line runs through a block. Conventional laid line can also be coiled in this manner once it has been in use long enough to reduce its initial stiffness.

A flemish coil is an attractive way to deal with the free end of a line in use, but don’t leave it in place too long.
Stowing a Coiled Line
What you do next with the coil or figure eight depends on circumstances. If the line is the end of a jib sheet that will be used again in a few minutes, or the unused part of a dock line that you need to keep ready, just turn the coil so the free end is down and lay it on the deck, in the corner of the cockpit, or wherever is convenient.
If the coil is to be hung up, which it will be in most cases, there are several ways to do it. A completely free coil of line, such as a fairly heavy spare anchor line that is to be stowed for a while, can be tied up—using shock cord or rope straps made up for the purpose, or small pieces of spare line. A newer, convenient method is to use cinch straps of Velcro selfadhering tape. If it is a very heavy and long line, you would do best to lay it on the deck in figure eights when coiling—you couldn’t hold the coil in your hand anyway. On a ship this is called FAKING (sometimes FLAKING) DOWN.
A free coil, such as an unused dock line that you may use again soon, is often handled as follows: take a short arm’s length of the end of the line and wrap the coil with three, four, or five turns. Then reach through the coil above the wraps you just made, pull a bight of the remaining free end through the coil, loop that bight up and over the top of the coil, and cinch up with the free end. Hang the coil up on a cleat or hook using the free end. This is known as a GASKET COIL. When you want to use the line, the loop comes out quickly and the whole coil is readily available.
A halyard is handled somewhat similarly, except that:
1. Don’t wrap the coil. Leave it free, for quickest availability when the sail is to be dropped.
2. Use the standing part of the line, not the free end, to make the pass-through loop, and to keep it from slipping loose give it a turn or two as you hang it on the cleat.
There is another way to deal with the free end of a line that is somewhat more decorative: a FLEMISH COIL. This is easy to do on deck or pier, and it looks “yachtlike,” but if you leave it there for an extended period of time, it will attract dirt and moisture and leave a soiled mark behind when it is picked up.
Of course, an eye splice is very useful in one end of a dock line; it makes a good loop with which to hang up the line.

After wrapping a coil, pull a bight of the free end through the coil and then pass it over the top. Pull on the free end to cinch.

To hang a halyard coil, use the standing line to make a pass through the loop that goes on the cleat.

The term “faking a coil,” or “flaking,” means, simply, to lay the rope in the form of a figure eight.
KNOTS, BENDS & HITCHES
The first principle in dealing with laid rope is that it has a twist, and you must work with it, not against it. This applies to splicing and knotting as well as to coiling.
You will also feel how a little friction of one part of the rope against another holds it fast. That’s the second principle for any kind of rope: in knots, splices, bends, or hitches, the pressure of the rope against itself, as it tightens, is what does the holding.
The third principle is a rule, a definition: a good knot is one that can be made almost automatically (your fingers learn to do it, just as they learn to write your name), that holds securely in the usage it is meant for, and that can be unfastened or untied readily. With practice, you will be able to tie knots in the dark or in more than one position.
Some knots are adjustable; others are not. At times, the choice of which knot to use depends on the size or character of the line involved—there are variations in the way line works, as will be mentioned in this chapter.
Most of the following information about specific knots concerns their efficient use. The illustrations in the Most Used Knots insert, in the sidebar “Most-Used Knots on Board Recreational Boats,” will help you tie them.
Cleat Hitches
One of the simplest knots, certainly the most used aboard a boat, involves nothing more than turns around a cleat. You may not have even thought of this as a knot—but it is. When fastening a line to a cleat, as with many things at sea, a small error at the start can cause problems later.

Figure 23-11 Twine seizing, left, can be used to give extra security to an anchor bend. A variation, center, is to pass the free end through a strand of the standing part. A clove hitch, right, is better secured if it is finished with a half-hitch (or two) around the standing part of the line.
Look closely at the illustrations, in the Most Used Knots insert, and see how the dock line at the far left comes in at an angle to the base of the cleat. It then goes around the base of the cleat so that it passes under each horn once. This keeps the strain low on the cleat. The cleat should be mounted so that it is at a slight angle to the expected direction of strain.
Even half a turn, plus a firm hold on the line, usually creates enough friction to hold a boat at a dock until the whole turn can be completed. In fact, you should always take a half turn around a cleat when a load is coming on the line; this is an essential part of good line handling called SNUBBING. Never try to hold a load-bearing line in your bare hands—it can slip and seriously burn your fingers and palm. You will see that in the illustration the snubbing is nearly a whole turn; notice also that the crossover that will make the figure eight should be made after the line goes around both horns of the cleat.
One and a half or two figure eights are enough; more would add no security and just take time to undo later.
There are two ways to complete the hitches on a cleat: you can leave the last turn free, perhaps keeping it under your eye if it is a jib sheet, for example. In this way the line can be instantly thrown off if necessary.
For more security you can turn the last hitch over so it is tightened to bind against itself. This might be best for a dock line or halyard but is not safe if instant release may be necessary. In a small sailboat in puffy winds, you probably wouldn’t cleat the main sheet all the way—you’d take one turn and hold it tight in your hand.
Similar figure-eight turns are sometimes used on mooring bitts.
Using the Right Knot
The knots described and shown in detail on pages in the Most Used Knots insert, in the sidebar “Most-Used Knots on Board Recreational Boats,” can be divided into two groups: basic knots used generally on boats, and a few specialized knots that come in handy at certain times.
You have seen that some knots are echoes of others and that more than one knot is sometimes used for the same purpose. Here are some reasons: A knot may work well with rough-textured rope but tend to slip when tied with slippery synthetic line. One knot may work well with small line, while another works out better with heavier and stiffer line. The sheet bend can be tied in a hurry; it takes more time to make two bowlines when tying two lines of the same diameter together. The advantage of one bowline with half the sheet bend tied into it (a double becket bend) is that it can be unfastened quickly.
Some potential problems are most easily solved by alternate methods. An anchor bend, for example, is customarily given some extra security with a short seizing or a constrictor knot made with sail twine; see Figure 23-11, left. On other occasions, where the knot won’t be in use for as long a time as an anchor line might be, the free end can be passed through a strand of laid line (see Figure 23-11, center), or an extra half hitch can be used; see Figure 23-11, right—a clove hitch with an extra half hitch or two half hitches.

Table 23-2 The use of knots and splices reduces the overall strength of lines in which they are used.
Effect on Strength
The use of knots (and splices) reduces the overall strength of any line—be aware of this, and select a size of line that provides adequate strength for the use to which it is put. Factors that are to be applied to the basic working load of a line to account for the use of knots and splices are listed in Table 23-2.
MOST-USED KNOTS ON BOARD RECREATIONAL BOATS
OVERHAND KNOT
Shown here chiefly because it’s simple, and helps explain the figure-eight knot shown below. Use it sparingly; it’s almost impossible to untie after it is tightened. (It is useful to hold the end of a winch line on a trailer hitch.)

FIGURE-EIGHT KNOT
One more turn into the overhand knot gives you an effective stopper knot to keep the end of a line from running through a block or small grommet. Easy to untie.

BOWLINE (BOW-LINE)
This is the most useful of all knots on board a boat. Once learned (and practice is necessary), it is easy to make, never slips or jams, and can always be untied. Two bowlines, one on each line, make an excellent combination when you need to tie two lines together.

TWO HALF HITCHES
For fastening a line to something else, such as a grommet in the corner of an awning. Quick and easy, but for many special purposes there are better knots you will prefer. A single half hitch also has some special uses.

REEF KNOT OR SQUARE KNOT
Note that the two bitter ends are on the same side of the standing parts. If the line is under constant pressure and if both ends are the same diameter, the knot will hold and can be untied even when wet. It is used to tie the ends of canvas or webbing strips around canvas or webbing strips around a furled sail and to tie reef points around the bunt of a reefed sail. Use the reef knot sparingly, however, as it is liable to capsize and slip. A sheet bend is a better choice for tying two lines together.

GRANNY KNOT
This is a knot that too many people tie automatically when they are trying to tie a square knot. They should teach their fingers to go the other way, because the granny is a useless knot. Sometimes it slips, and sometimes it jams. It has no value at all on a boat.

COW HITCH OR LARK’S HEAD
A small existing loop (usually an eye splice, not shown here) turned inside itself when you want to fasten a line to a large piling. It is also useful to fasten such a loop to a ring, provided the other end of the line is free. Many people use this hitch to fasten a jib sheet to the clew of a jib on a small sailboat.

SLIPPED REEF KNOT
A square knot with the end of one line reversed to make it easy to untie. Good for furling a sail. This is always easier to untie than a square knot.

SHEET BEND
This is an excellent way to tie two lines together, especially if they are of different sizes or textures. As you will realize when you practice tying knots, some are just variations on a theme. You can use part of a sheet bend to fasten onto a loop.

BECKET HITCH
This is really a sheet bend in which one line has a loop, such as an eye splice (near left) or bowline. If an extra round turn is taken (right), this is called a double becket hitch. This version is especially useful when the added-on line is smaller than the one with the loop.

BUNTLINE HITCH
This is excellent for fastening a halyard to a shackle. It is its own stopper knot and won’t jam in a block as an eye splice might. Sometimes called the inside clove hitch or the studding sail tack bend, this is easy to tie and untie. Another use is on a trailer winch snap shackle—a modern use for a hitch from squarerigger days.

CARRICK BEND
This is one of the traditional ways to fasten two lines of the same size together. It looks beautiful in a drawing, but under strain it changes appearance. The carrick bend is probably best for fairly heavy, stiff lines of the same size.

ROLLING HITCH
To tie a small line to the standing part of a larger one, so it won’t slip, use the rolling hitch. You can use this hitch to hold a jib sheet while riding turns are removed from a winch, to haul on any line, or to make an adjustable loop for an awning tie-down. The rolling hitch is also used to attach a line to a round wooden or metal object with the least possibility of slipping sideways. It will hold best when a second rolling hitch is made with the free end. It is also very useful for making a fender line fast to a lifeline or rail.

ANCHOR BEND
Also called a fisherman’s bend. This is a standard way to fasten an anchor line to the ring of an anchor. It is excellent for making up a spare anchor, and it may be used in many other situations. The double loop reduces possible chafe and makes the half hitches more secure. Of course there are other ways to make an anchor line fast, including a bowline or an eye splice over a thimble, plus a shackle. Seizing the free end to the standing end provides extra security; see Figure 23-11.

SURGEON’S KNOT
Tying the ordinary square or reef knot, even around a parcel, often requires a helper— someone to hold a finger on the half-formed knot until it is completed. If you take the extra turn of a surgeon’s knot, the friction/ tension holds it while you complete the knot. Surgeons, of course, call it a suture knot.

MARLINESPIKE HITCH
This is used to take up on a whipping or serving while it’s being made—a good way to get it very tight. Withdraw the spike, and the hitch vanishes.

ASHLEY’S STOPPER KNOT
This makes a hefty stopper for the end of a line, looks seaman-like, and is easily undone. It takes a little longer to tie than the figure eight, and should be drawn up with some care.

CLOVE HITCH
Commonly used to tie a line to a piling. This is often a mistake. Although very adjustable, it tends to slip, especially with slippery nylon line. It is best to take an extra half hitch (or two half hitches) to make it half hitches) to make it secure. If you use the same line from the bow to a piling, and then to the stern, the clove hitch is ideal. Both ends are taut and you have the adjustable feature.

REVERSE SURGEON’S KNOT
Aboard a sailboat there is one special purpose for a version of the surgeon’s knot; tying the strings at the end of the older type of batten pocket. While the square knot will usually shake loose, perhaps leading to the loss of the batten, there is a cure. If you tie a reverse surgeon’s knot—the extra twist in the second half of the knot is what’s important —it will hold tightly no matter how the wind shakes it.

MONKEY FIST
Used to make a ball at the end of a heaving line. Make three loops around your hand, some 4 feet from the end of the line. Take the working end to make three more loops around, at right angles to the first three. The final set of loops is made around the inner group. Seize or splice the end to the standing part.

CLEAT HITCH—CLEATING A LINE
Start with a turn around the cleat, then go around the cleat so that the line passes under each horn once. Finish with a half hitch over one horn. More wrappings and hitches are not needed, and they only slow the process of casting off.

SPLICES & SPLICING
Most stock sailboats are delivered with all the rigging supplied; it is not until something new is added or something old is replaced that a splice is even thought about. Power and sailing craft may have a made-up anchor line (usually not as long as it should be) but probably will not have enough dock lines. Marine dealers often sell dock lines of various lengths already made up, or you may want to make your own. A sailmaker will often be a good source for new jib sheets, other lines, or small stuff. But in spite of the fact that many boat owners do not need to do much splicing, it is a good idea to know the basics. You can be a wise customer, and you can make the occasional emergency repair if you know the rudiments of splicing.
Splicing, like knotting, is a finger art. In small to moderate sizes of laid ropes you can make splices without tools, although a knife and fid are extremely helpful. If you are splicing heavier line or braided line, simple tools are necessary—a fid or marlinespike for laid line, and a special fid for braided line.

To start a short splice, unlay the strands of both rope ends for a short distance, about ten turns of the lay. Tape or fuse the six strands, or whip them, to prevent unlaying. A seizing is often made around each of the ropes, or each is wrapped with a piece of tape, to prevent strands from unlaying too far. These seizings or tape will be cut as the splice is completed.

Next, “marry” the ends so that the strands of each rope lie alternately between strands of the other as shown. Now tie all three strands of one rope temporarily to the other—this is desirable, but not essential.

Working with the three free strands, remove temporary seizing from around the other rope and splice the strands into it by tucking the loose strands over and under successive strands against the lay of the rope. When first tucks have been made, snug down all three strands. Then tuck two or three more times on that side.

Next cut the temporary seizing of the other strands and the rope and repeat, splicing these three remaining strands into the opposite rope.

This shows how the short splice would appear if not tapered, after trimming off the ends of strands. Never cut the ends too close; otherwise, when a heavy strain is put on the rope, the last tuck tends to work out.

An alternative to the short splice technique shown in Steps A through E, which some find easier, is to start as in Step A and tie pairs of strands from opposite ends in an overhand knot. This, in effect, makes the first tuck.
Figure 23-12 The five steps of a short splice are shown above, A through E. An alternative beginning is shown at F.

Figure 23-13 An eye splice forms a permanent loop in the end of a line. It may be made around a thimble to guard against chafe (as occurs on an anchor line), or as a larger eye without a thimble for use as a dock line. See text for step-by-step instructions.
Splicing Principles
As you can easily see in the illustrations of Figure 23-12, or by looking at a splice that is already made in laid line, the principle is simple: Three strands are tucked over and under so that they interweave with three other strands. If you are splicing the ends of two lines together in a SHORT SPLICE, the result is obviously thicker. A short splice, therefore, won’t go through a block of the correct size for the diameter of the line. A LONG SPLICE is the solution—part of each strand is taken out and the tapered result makes a thin splice (with less strength). Most boat owners, however, would replace a broken line rather than splice it.
Short Splice
The best way to learn how to make a short splice is to start to make one! The sequence of actions is shown and described in Figure 23-12, A through E. A slightly modified beginning is shown in Figure 23-12, F.
Eye Splice
Although the short splice is the easiest to learn, an EYE SPLICE is much more often needed. An eye splice is most useful in one end, sometimes both ends, of a dock line. A good practice is to make the eye about three times larger than the size of any piling or bollard that is likely to be used. The reason: a too-small eye splice, under strain, tends to pull apart at its throat.
The same principle as in a short splice—interweaving—applies; see Figure 23-13. But there is one point where an error is easily made; note Figure 23-13, B, very carefully.
Start the eye splice by unlaying the strands of the free end six to ten turns of lay. Now tape or heatseal the end of each strand to prevent its unlaying while being handled; whipping can be applied to the strand ends, but this action is rarely done as this is only a temporary intermediate action if the ends are to be tapered. It is sometimes helpful to place tape around the unlaid strands every 4 to 6 inches to maintain the “turn” in the strand.
Next form a loop in the line by laying the end back along the standing part. Hold the standing part away from you in the left hand, loop toward you. The unlaid end can be worked with the right hand.
The size of loop is determined by the point X (Figure 23-13, A) where the opened strands are first tucked under the standing part of the line. If the splice is being made around a thimble, the line is laid snugly in the thimble groove and point X will be at the tapered end of the thimble. The line may be temporarily taped or tied into the thimble until the job is finished.
Now lay the three opened strands across the standing part as shown in Figure 23-13, A, so that the center strand b lies over and directly along the standing part. Left-hand strand a leads off to the left, right-hand strand c to the right of the standing part.
Tucking of strand ends, a, b, and c under the three strands of the standing part is the next step. Get this right and the rest is easy.
Always start with the center strand b. Select the topmost strand 2 of the standing part near point X and tuck b under it. Pull it up snug, but not so tight as to distort the natural lay of all strands. Note that the tuck is made against the lay of the standing part.
Now take left-hand strand a and pass it over strand 2 and then tuck it under strand 1. Similarly, take strand c and tuck under strand 3, which lies to the right of strand 2. Be sure to tuck from right to left in every case.
The greatest risk of starting wrong is in the first tuck of strand c. It should go under 3, from right to left and look like the drawing in Figure 23-13, B. The way you do it is to flop the whole thing over in your hands before making the tuck of strand c. You’ll notice only one free strand (that’s c) untucked, and only one of the original strands in the standing part that doesn’t have a strand under it. Be sure you make the third tuck in the right direction; see Figure 23-13, B.
If the first tuck of each of strands, a, b, and c is correctly made, the splice at this point will look as shown in Figure 23-13, C.
The splice is completed by making at least three additional tucks with each of strands a, b, and c. As each added tuck is made be sure it passes over one strand of the standing part, then under the strand next above it, and so on, the tucked strand running against the lay of the strands of the standing part. This is clearly shown in Figure 23-13, D, after the first three tucks have been made. Note that c, c1, and c2, are the same strand as it appears after each of the three successive tucks.
Suggestions The splice can be made neater by tapering. This is done by cutting out part of the yarns from the tucking strands before the finishing tucks. In any case, the first four tucks in synthetic line are made with full strands. (Four tucks are necessary, as synthetics are often slippery.) After that, some experienced skippers prefer to cut out about a third of each strand and make one last tuck. This produces an even taper. After the splice is finished, roll it on deck under foot to smooth it up. Then put a strain on it and finally cut off the projecting ends of the strands. Do not cut off the “tails” too short. If desired, a seizing can be applied at the throat of the splice.
The loose fibers at the end of each strand can be fused with a rope-cutting tool such as a soldering gun, or with a flame, but be careful not to melt or set fire to the rope.
• The eye splice is often made on a metal or plastic thimble. When used this way it is necessary to work the splice very tightly, and it is almost always desirable to add a seizing, using a needle and waxed nylon twine or tape.
• Another way to make a synthetic rope splice tight is to place it in boiling water so that the rope shrinks.
• In all splicing, carefully relaying the rope—so that every strand is under the same even tension—is important.
• It is important to insert the thimble or other captive fitting into your splice before finalizing it. This is often forgotten when making an eye splice, even by experts.
Back Splice
One other splice is seen occasionally on boats: the BACK SPLICE at the end of a line. This makes a good, neat finish to a line, but it has a major disadvantage: If you want to unreeve the line at the end of the season, or to replace it, the back splice probably won’t go through the blocks; see Figure 23-14. A well-made whipping makes an equally neat finish (refer to Figures 23-20 and 23-21). You can tie a figure eight or Ashley stopper knot to keep the end from going through a block when you don’t want it to.

Figure 23-14 A back splice is started by bringing each strand over the one to its left, and under the next one, as in A. The strands are then tucked as shown in B and C for at least three tucks each. Longer strands can be used and trimmed in thirds (after the basic tucks) to provide a tapered finish.
Splicing Double-Braided Line
An eye splice in double braid looks difficult—but is relatively simple to learn. The technique has almost nothing to do with other kinds of splicing—it is just a logical way to use the cover and core of the braided line. A thimble can be inserted during the splicing process. The eight steps of the procedure are described, with explanatory illustrations that show how special tools are used, in Figures 23-15a through 23-15h,.

Figure 23-15A Tightly tape end with one layer of tape. Mark a big dot one fid length from end of line, and from this dot form a loop the size of the eye you want. Mark an X where the loop meets the dot.

Figure 23-15B Bend the line sharply at X and spread the strands apart firmly to make an opening so the center can be pried out. Mark one big line on the center where it comes out (this is Mark #1) and use your fingers to pull all the center out of the cover from X to the end. Pull on the paper tape inside the cover until it breaks back at the slip knot and pull it out. Put a layer of tape on center end.

Figure 23-15C Pull out more of the center. From Mark #1 measure a distance equal to the short section of the fid, and mark two heavy lines (this is Mark #2). Mark #3 is three heavy lines at a distance of one fid length plus one short section of the fid from Mark #2.

Figure 23-15D Insert fid into center at Mark #2, and slide it lengthwise through “tunnel” until point comes out at Mark #3.

Figure 23-15E Cut across taped end of cover to form a point, and retape tightly with one layer of tape. Jam this point into open end of the fid; jam pusher into fid behind the tape. Hold center gently at Mark #3 and push both fid and cover through center until dot almost disappears at Mark #2.

Figure 23-15F Note how center tail must travel through the cover. It must go in close to dot, and come out through the opening at X. On large eyes several passes may be needed for fid to reach X. When this occurs, simply reinsert fid at the point it came out and continue to X. To start, insert fid in cover at dot and slide it through tunnel to X. Form a tapered point on center tail, jam it into the open end of fid, and push fid and center through the cover. After fid comes out at X, pull all center tail through cover until tight, then pull cover tail tight.

Figure 23-15G Unravel cover tail braid all the way to Mark #3, and cut off groups of strands at staggered intervals to form a tapered end. Hold loop at crossover in one hand, and firmly smooth both sides of loop away from crossover. Do this until the tapered tail disappears inside Mark #3.

Figure 23-15H Hold rope at slipknot, and gently begin to “milk,” or slide, the cover slack toward the loop. You’ll see the center begin to disappear into the cover. Go back to the knot, and continue sliding more cover firmly until all center and the crossover are buried.
Splicing Line to Wire Rope & Chain
Splices in wire rope, best left to professionals, and wire-to-rope, surely left to professionals, use techniques somewhat similar to laid rope splices, but differing in details.
Anchor lines (rodes) that use a combination of three-strand nylon line and chain are common (see Chapter 9). These can join an eye splice in the line to a link of the chain by use of a shackle, but only if a windlass is not used. If a windlass is used, the line must be spliced to the chain in order that the junction will pass smoothly over the drum. This is frequently left to a professional, but should be within the capability of a boater who has some splicing experience. The technique used is much like a combination of an eye splice and a back splice. Two strands of the line are passed through the end link of the chain in one direction, and the other strand is passed through the same link in the opposite direction. Strands are then interwoven in a manner common to all splices, taking care that they are pulled up snuggly and are tapered off at the finish of the splice.
CARE & MAINTENANCE OF LINES
The many lines on your craft not only represent a significant financial investment, they are also important safety equipment. Taking the proper care of them will lengthen their lives and postpone the day when they have to be replaced. Proper care will also ensure that they have their full rated strength when they are used; see Figure 23-16.
Routine Care for Lines
The various lines on your boat will serve you better and last longer if they are used properly and are given continuing attention.

Figure 23-16 The way that lines are handled and stowed is an indication of the way that a boat is cared for generally.
Keep Lines Clean. Dirt, sand, oil, and acids are destructive to synthetic rope. To wash rope, put it in a mesh bag or pillowcase—that way it won’t foul up your washing machine. Mild washing power should be used, and a bit of fabric softener may be added.
Don’t Let It Kink. Kinking (hockling) of a line is not only annoying, but it can also result in problems that lead to breakage. Sometimes coiling new three-strand rope first against the lay (counterclockwise), and then with the lay (clockwise) helps to get it so it will coil and run smoothly. Rope, including braided rope, should be taken off its original spool in a direct unwinding pull—not looped off over the top of the spool. As mentioned earlier, larger, stiffer ropes may need different handling from small, flexible lines. Double-braid and laid line can develop a twist when run in and out on winches. This can lead to kinking. Overhaul the line and take out the twist as needed.
Guard against Chafing & Abrasion. You can use a leather or plastic chafe guard, which is preferable, or, if your line is small enough, one of the kind made from split garden hose. You can whip or serve (by wrapping line of a smaller size around the line to take the wear) a place in a dock line that goes over a gunwale or through a chock. Using small braided tape or cord is good for such a whipping, because if it wears through it breaks and you can see it. Special chafing tape is also available.
Some skippers prewhip dock lines and anchor lines at a number of convenient places and then adjust the lines so the whippings will be in the chocks.
When at anchor, you should “change the nip” on the rode periodically, letting out or taking in a short length; don’t let the wear come on the same place over an extended time.
Avoid Friction Damage. Slipping on a power winch or windlass can result in friction heat that will damage a line.
Use the Right Size Line in a Proper Manner. A line that jams in a block can tear itself apart. Heavy strains that do not break a rope can nevertheless weaken it. Both continual stretching and sudden shocks are damaging.
Maintenance for Lines
Maintenance of the lines on board a boat should be an ongoing procedure, but such action should be supplemented by a complete annual or semiannual inspection of all lines, those in use and those merely waiting to be used
Make Small Repairs Promptly. If an eye splice is coming undone or a whipping breaks, fix it with care before relying on that line again. An incomplete eye splice can be dangerous, and an unwhipped line end will keep right on coming apart until it is fixed.
Inspect Your Lines & Rigging. Inspection of rope means unlaying a number of strands, looking for broken fibers. Frayed strands, powdered fibers inside the rope, and stiffness are the signs of serious deterioration. In addition, you should go over the entire length of line, looking for cuts and nicks, exterior signs of abrasion, and burns.
A slight abrasion fuzz on synthetic line, laid or braided, acts as a protective cushion. Pulled or cut strands in braided line are more serious; they can affect 2 percent or more of the line strength for each strand involved.
Eye splices should be inspected inside and out for distortion of the thimbles as well as a tendency for the splice to come undone. Whipping and servings, of course, should be inspected regularly for excessive wear, so they can be renewed. Several times a season, halyards should get a special inspection where they run through the block at the masthead when in use: The small motion, always in the same place around the block, plus sharp bends in the line, can lead to breakdowns. Because of this, anyone who has had a sail drop suddenly in a strong wind knows the wisdom of checking halyards.
Any three-strand lines that have had severe kinks, or hockles, can be assumed to have lost 30 percent of their strength. Never use force to straighten a kink. Instead, turn the line in your hands or trail it astern.
An old-fashioned cure for wear on a line is still useful with synthetic rope: reversing the line end for end. In other cases a small repair, a whipping to take the chafing, or a slight shortening of the line to make a new eye splice may be the cure.
BLOCKS & TACKLE
The use of a BLOCK AND TACKLE (sometimes pronounced “tay-kle”)—or, to use a highersounding name, mechanical appliance—on board small craft is most often found on sailboats. On powerboats, such gear is generally limited to the lowering and hoisting aboard of dinghies and tenders. Nonetheless, any boater should have a basic knowledge of it, as its use enables one man to do the work of many.
Blocks and tackle are used where hoisting sails, as well as setting them, requires some means for one or two people to provide the strength of many. No matter how small the sailboat, the sheets usually run through one or more blocks, meaning there is a mechanical appliance providing a mechanical advantage. To see how beneficial this is, go sailing in a 20-foot boat in a moderate breeze, and bend a line to the boom. While underway, attempt to trim in the sail with your improvised sheet. It will come in, but it will be a struggle; repeat the exercise with the regular system of blocks and tackle, and you will see with what ease the sail comes in.
ROPE & BLOCK SIZES
| Size of Block (Length of Shell) (Inches) |
Diameter of Rope (Inches) |
| 3 | 3/8 |
| 4 | 1/2 |
| 5 | 9/16-5/8 |
| 6 | 3/4 |
| 7 | 13/16 |
| 8 | 7/8-1 |
Table 23-3 Matching rope and block sizes.
Terminology
A BLOCK consists of a frame of wood or metal inside of which is fitted one or more SHEAVES (pulleys)—the word is pronounced “shiv”—and is designated according to the number of sheaves it contains, such as single, double, or triple; see Figure 23-17. The size of the block to be used is determined by the size of the rope that will run through it. If a fiber rope is being used, the size of the block should be about three times the circumference of the rope and the sheave diameter about twice the circumference. Therefore, for ⅝-inch diameter rope (about 2 inches in circumference), the block could be 6 inches (three times the circumference) and the sheave diameter 4 inches (twice the circumference). This is an approximation; see Table 23-3 for recommended block sizes and rope diameters. Today, blocks are designed for a narrow range of line sizes. Choosing the maximum possible diameter of sheave will help to reduce friction, thereby extending the life of lines and equipment.

Figure 23-17 The various component parts of a double-sheave block are identified in the above sketch.
Wire rope is also used for running rigging, but usually only as halyard leads on sailboats. This should be stainless steel and sheaves should be as large as possible for long rope life. Make sure the rope cannot be squeezed between the sheave and the sideplate (also called the cheek or shell) of the block, or your line may become jammed.
The term TACKLE is used for an assemblage of FALLS (lines) and BLOCKS. When you pass a rope through the blocks, you REEVE it, and the part of the fall made fast to one of the blocks, or to the load, as the case may be, is known as the STANDING PART, while the end upon which the force is to be applied is called the HAULING PART. To OVERHAUL the falls is to separate the blocks; to ROUND IN is to bring them together; and CHOCK-A-BLOCK or TWO-BLOCKED means they are positioned tight together.
Types of Tackle
Tackles are named in several ways: according to the number of sheaves in the blocks that are used (single, two-fold, three-fold PURCHASES); according to the purpose for which the tackle is used; or by names handed down from the past (luff tackles, watch tackles, gun tackles, Spanish burtons, etc.); see Figure 23-18. The tackles that may be found aboard cruising boats are now generally classified by ratio, as below:
Ratio 1 to 1. Traditionally called a single whip, this is a single fixed block and fall. There is no gain in power—the gain is only in height of lift or change in direction of pull.
Ratio 2 to 1 or 3 to 1. Traditionally called a gun tackle, this consists of two single blocks. If lower block is movable, double force is gained. If upper block is movable, triple force is gained.
Ratio 3 to 1 or 4 to 1. Traditionally called a luff tackle, this consists of a double block and a single block. The force gained is three if the single block is movable, four if the double block is movable.
Ratio 4 to 1 or 5 to 1. Traditionally called a twofold or double tackle, this consists of two double sheave blocks. Force gained is four or five, depending upon block movement.

Figure 23-18 These are some of the various tackles that are used on boats and ships.
Calculating the Power of a Tackle
The force gained in all these tackle combinations is theoretical only, as the friction of the blocks is ignored. The usual method of compensating for this friction, and calculating the actual force required, is to add 5 percent to the weight of the object (W) for each sheave in the tackle before dividing by the number of falls (with modern gear, this may be a bit on the conservative side). For example: in the two-fold purchase of Figure 23-18, if the weight of the drum is 500 pounds, 5 percent is 25 pounds; 4 sheaves x 25 pounds = 100 pounds. Thus the total W to be considered is 500 + 100 = 600 pounds. With four falls, the force needed to lift the drum would be 600 ÷ 4 or 150 pounds, rather than the theoretical 125 pounds if friction was disregarded—a significant difference. The actual friction will vary with the type of bearings and pins, state of lubrication, and sheave diameter.
There are a number of other purchases, the heaviest commonly used aboard ship being a three-fold purchase, which consists of two triple blocks.
It must be remembered that the hauling part on a three-part block should be reeved around the center sheave. If this is not done, the block will cant, causing it to bind, and in extreme cases to break.
BLOCK MAINTENANCE
Maintenance for a block relates closely to its construction. Older blocks needed grease to ease friction. Today’s use of synthetics and precision machining provides a product that is almost maintenance free. Maintenance is now reduced to the following: Inspect periodically for fatigue, in particular for cracked or elongated shackles. Rinse often with fresh water to keep clean, and if lubrication is needed, a dry lubricant will usually suffice.
Avoid leaving heavy tools on blocks when not in use. This may slightly deform the bearings.
Sheaves are now designed to accommodate the following: wire only, wire-rope combination (halyards), Kevlar and Spectra line with a special configuration that allows the line to flatten to avoid stress concentration, and ratchet sheaves with their many-sided design that grips sheets tenaciously but allows line to be eased smoothly.
Large boats’ sheaves and blocks generally come in three types of bearing systems:
• Ball bearings for the freest running system; they have the lowest load-carrying ability.
• Roller bearings can carry more load, but they have more friction at low loads. Combinations of ball and roller bearing give a free rolling system for loads that are moderate to high.
• Bushings impregnated with Teflon, combined with side-load balls, are used for loads too high even for roller bearings. These produce more friction than balls or rollers at low loads. Good examples are: masthead sheaves, runner block sheaves, wire sheaves, and steering cable sheaves. Most blocks previously had a friction load of approximately 5 percent per sheave. Today’s technology has brought it down to as low as 2 percent per sheave.
AT THE BITTER END
If a piece of rope is cut, it will start to fray and unravel at the end—sometimes in seconds; see Figure 23-19, A and B. If it is taped before cutting, or if the cutting is done with an electric cutter that melts the fibers, the end won’t fray, at least not immediately.

Figure 23-19 The ends of three-strand or braided line can be taped, dipped, or whipped to prevent unlaying. Also shown is the wall-and-crown, a good-looking finish that combines two separate knots, and the manrope knot, a doubled wall-andcrown.
Taping or Dipping
But the end of a line still needs protection for almost any use. There are a variety of ways that a line can be protected; some are good if you’re in a hurry, some fit one situation relating to line handling, others are right for different purposes.
A careful taping of the end of a line is useful but hardly looks seamanlike; one might say it’s a good way to handle a coil of spare rope that you’re storing in a locker before putting it to use; see Figure 23-19, C. A rope end with adhesive tape is at least ready for a more sophisticated finish later.
The air-drying liquid plastics mentioned earlier can also be used for rope ends and may make color coding possible; see Figure 23-19, D.
Whipping
Braided and double-braided line is more difficult to finish with a traditional yet functional end. An eye splice on a braided dock line is an obviously correct solution for one end—this end is protected and the eye splice is ready to use. On the other end, a whipping, Figure 23-19, E, preferably one made very tight with a sailmaker’s needle, results in a usable finish.
With laid line, however, the marlinespike arts of the sailor provide more opportunity. A variety of whippings, knots, or a back splice are among the choices.
To make a plain whipping, you need the right size of waxed nylon twine or lacing and your hands; see Figure 23-20.
A far better whipping, called a sailmaker’s whipping, requires a palm and sailmaker’s needle, as well as the cord or lacing twine; see Figure 23-21 for instructions. This whipping will last longer as well as look better.

Figure 23-20 To make a plain whipping, begin at least 1 inch from the bitter end. Lay a loop of cord across the line, leaving a tail of 5 or 6 inches on the bitter end, A. Then with the working piece of cord, wrap around the line from the trail end toward the apex of the loop, B. To finish off the whipping, insert the working end of the cord through the loop. Pull on the bitter end of the cord until the loop slides completely out of sight, then clip the ends closely, C.

Figure 23-21 A sailmaker’s whipping is started by stitching the cord through the line, A. Wind six or more turns around the line, B, and stitch back through it. Then bring the cord back over the turns along a groove between the strands. Stitch through a strand to the next groove, and bring the cord back along this. Stitch through the next strand to the final groove, C, and finish with a square knot in the cord.
Ending with a Splice or Knot
A standard way to make a good-looking end for a line—provided it doesn’t have to go through a block—is a back splice. Properly tapered, perhaps polished off with a little extra whipping, it will last a long time; refer to Figure 23-14.
Two fancier rope ends, from many that are available, are illustrated here without instructions. You can learn to make them—as you can learn other ornamental and useful knots and rope work—in any of several advanced books on marlinespike seamanship.
• The wall-and-crown (see Figure 23-19, F) is a good-looking finish that combines two simple knots.
• The manrope knot is really a doubled wall-and-crown (see Figure 23-19, G). Finished with a back splice, it looks good on the end of a bucket rope—and helps you hold the bucket.