

Electricity is a shock that can kill, and provide the spark for a fire. Don't unleash it. Follow the electrical codes, and always be careful.
The main switch on your electrical panel controls the electric current passing into your home. The current's rate of flow (“amp”) depends on the application, be it lighting, appliances or the stove. Each of these applications has a circuit in your electrical panel. If something goes wrong, a circuit breaker disables or trips the affected circuit by releasing a switch or a button. In electrical panel s without circuit breakers, a fuse for the affected circuit burns out or “blows.” Many fuses are protected by porcelain fuse carriers.
The power used by individual electrical fixtures and appliances is measured in “watts” (that is, volts multiplied by amps). Some electrical appliances overload a circuit because they have too many watts, leading to repeated circuit failure. For a permanent fix, get an electrician to add an extra circuit.
Never replace a fuse with one of higher amperage, or any other type of wire or object, as it could cause an electrical fire or inflict a potentially fatal electric shock.
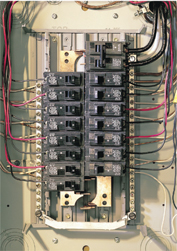
Check which switch has flicked to “off,” or which button has popped out, and make a note of the affected circuit. Flick the affected breaker off, then on again to restore power. Then switch on all the appliances in turn.
Consider replacing your old fuses with circuit breakers. If a circuit fails, you can restore it instantly with the flick of a switch or the press of a button. Make sure you buy breakers with the correct amp rating for the circuit.

Household voltage can deliver a fatal shock. Never attempt any electrical work unless you know exactly what you are doing. The power supply must always be disconnected before starting any work, and a licensed electrician must carry out any installations.
After you have reset a tripped circuit breaker, disconnect and then re-connect each item on that circuit. If one is faulty or overloading the circuit, the breaker will trip again.
Most modern electrical appliances and equipment—particularly computers—are easily damaged by power surges, especially those caused by lightning strikes. To prevent your expensive electronic equipment from being instantly reduced to junk, put surge protectors between your equipment and the wall plug. But check before you buy, as some protectors will handle lightning strikes, while some of the cheaper models will not.
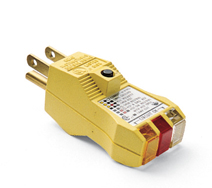
Check the safety of outlets with an inexpensive tester available at any hardware store. Lights come on in various combinations to alert you to any problems with polarity, grounding or incorrect wiring.
Some extension cords come with built-in on-off switches. These are recommended for use with portable power tools operated outside with an extension cord. It is also best to opt for power strips or surge protectors that have on-off switches, as flipping the switch can be an added level of safety, especially near windows, where a stray gust on a rainy day can wet the floor.
Babies and toddlers are fascinated by electrical sockets which, to their innocent eyes, are custom-made for the insertion of tiny objects. Sockets at floor level are an obvious hazard. Keep your little ones safe with childproof safety plugs. This is especially recommended if you don't have circuit breakers on your electrical panel. Look for plugs with smooth rather than hard edges, as they are much harder for little fingers to grasp and pull out.
Before your electrician begins an installation, discuss where the wires are to go and how he or she intends to hide them, such as running cables to outbuildings in a deep trench and “running” wires through a masonry wall. Offer to help with the unskilled labor, such as digging ditches, lifting floorboards, drilling holes or removing plaster. This will save the electrician time and effort just as it will save you some money. As long as you carry out the work to the electrician's specifications, there is unlikely to be any objection.
Never leave an electrical cord coiled up when it is in use, as it may heat up and cause a power failure or, even worse, a fire.
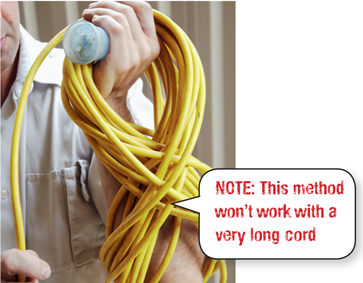
Here's an improvement over the elbow-and-thumb method most people use when winding up an extension cord. Coil the cord in a figure-eight motion and it will unwind without tangling.

If you receive a minor shock from an electrical light or appliance or an associated cord, plug or other electrical accessory, stop using it immed-iately. Don't use it again until an electrician has checked it for safety, and any unsafe items have been repaired or replaced.

Up to a fifth of the energy used by televisions, stereo equipment, computers and printers is consumed while they're in standby mode. To save power, turn them off when they're not in use.
The best lighting has four simple attributes: it is energy efficient, reliable, appropriate for the purpose and simple to manage.
You can simulate natural light by choosing bulbs according to their “color temperature,” which is measured in degrees Kelvin (K). High-temperature bulbs (4000°K and above) contain a lot of blue light, which looks hard and cool. Lower-temperature bulbs (3000°K and below) contain more red light and are considered soft or warm. A 3500°K bulb will produce a neutral “white” light suited to most situations.
Avoid touching halogen bulbs except at the base, as they can become extremely hot while they're in use, and the oil from your fingers can cause hot spots that will weaken the glass and cause the bulb to fail prematurely.
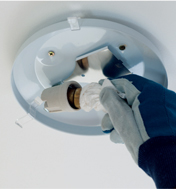
Is a broken bulb stuck? Shut off the power, force a wad of newspaper into the broken socket, and twist counterclockwise. Wear thick gloves and goggles, especially when the light is overhead.
The solution to flickering bulbs may be a quick clean. Shut off the power, remove the bulbs and sand the surfaces with fine sand-paper or steel wool until they shine. Blow away the sanding dust and wipe all surfaces with a soft cloth. Finally, reinstall the bulb and restore the power.
Before buying low-voltage lights that you plan to dim, consult an electrician or specialized lighting retailer to check on compatibility. The correct choice will avoid buzzing noises from the lights and possible premature failure of either the dimmer or the transformer.
Table lamps should be positioned so that the bottom of the shade is just below eye level.

Get a grip on track or recessed bulbs with a duct tape “handle.” Wrap your thumb and first two fingers in tape, with the sticky side out, then grip the bulb and turn it counter-clockwise. Rubber gloves may also do the trick.
Kitchen wall cabinets are great for storage, but tend to shadow the workspace below. Fluorescent tubes or a series of spotlights provide enough light to read cookbooks. Install lamps toward the front edge of the cabinets so the entire countertop is lit. Use frosted bulbs if the walls are tiled or counters are reflective, to reduce glare.
If you are fitting lights in a ceiling with a floor above, make sure there is at least 6 in. (15 cm) clearance between the ceiling and floor to prevent overheating. If you are fitting lights in a ceiling space, ensure adequate separation between roof insulation and the transformer or fixture. H alogen lights, because of their heat require extra separation. If the insulation is the loose-fill type, fire-resistant barriers must be installed.

As soon as you move to a new home, locate the water meter and the main supply valve. Work out how to operate the main shutoff and check that it is not jammed shut. Being able to shut off the water in an emergency could save you a fortune.
Most plumbing tasks associated with water pipes require a plumbing permit, but you can fix the valves and faucets on your own.
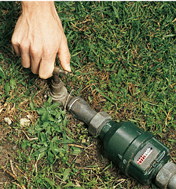
The supply valve for household water is usually at the front or side of a house or in the basement, beside the water meter. The valve is operated by a main shutoff. Turn the valve clockwise as far as it will go, using pliers if it is stiff.
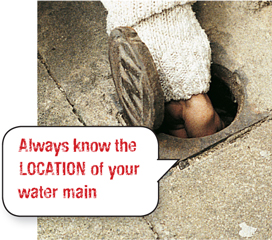
In old houses the water shutoff valve valve may be somewhere at the front of the house, under a hinged inspection plate or even in the ground. If the water meter is not there, try tracing back the inlet pipes until you find the main shutoff valve.
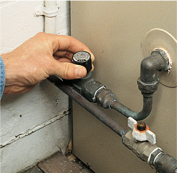
Some domestic appliances, such as hot-water systems, dishwashers and toilet tanks, are fitted with their own supply valves. If these valves are turned off, it's generally unnecessary to turn off the household water as well.
Some supply valves are in deep holes and have T-bar shutoffs. To close, hire a plumber to fit a V-shaped slot sawn into one end of a piece of wood over the tap. The other end is turned with a handle, made by fastening another piece of wood crosswise.
Plumbing emergencies in the home usually involve flooding, freezing, foul smells—and potentially fatal electric shocks.
To stop water flooding out of a broken pipe, shut off the main water valve.
Water and electricity are a deadly combination. Stay away from leaking or flooded water if there is any likelihood that it has come into contact with an electrical circuit. If you can reach the breakers without touching the water, turn off the power and disable the circuits.
There is usually a valve under the toilet tank. Turn it clockwise until the flow of water stops.
If you need to pump out water, use an electrical pump plugged into a dry socket in another room. Don't use a gas- or diesel-driven pump inside, as it will build up hazardous fumes.
Wear rubber boots and gloves if the leak is in a drain line or has been contaminated with sewage. Thoroughly disinfect an area after it has been cleaned and allowed to dry.
Knowing what to turn, pull or shut off can be a home saver and a life saver when an emergency strikes.
When a washing machine or dish-washer overflows, build a dam around the spill with beach towels or other large absorbent materials. This will confine the water, making it easier to mop up.
A strong smell of sewage from a fixture in a bathroom, kitchen or laundry may indicate that water in the trap in the waste pipe has dried up. Pour some water into the floor drain and wait to see if the smell goes away. If it doesn't, you may have more serious problems. Call in a licensed plumber.
If very low temperatures threaten to freeze pipes, leave the faucets trickling a little bit until the weather warms up. Take the wind-chill factor into account when deciding if the temperature will fall below freezing.
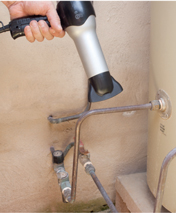
Frozen pipes are best thawed gently. A hair dryer set on High will do the trick. Don't use a hot air gun or, worse, a propane torch. They will melt the ice quickly but, just as quickly, they will convert the water to steam and blow the pipe apart.
Start thawing the ice in a frozen pipe from the side closest to a faucet, so the ice melt will have somewhere to drain. (Make sure you open the faucet first, of course.) Gradually work from the faucet side back into the frozen area.
Flowing water with a simple turn of the wrist—clever plumbing, daily miracle.
To keep repair bills to a minimum, look beyond the styling of the faucet and consider the materials used to make it and the mechanism inside, to determine its reliability. Most top-quality faucets are made from cast brass, which is often plated—chromium plating is the most durable. Hard-wearing ceramic discs have now largely replaced rubber washers, which decay over time.
Hold a hot air gun over a stuck valve cover. The warm air should make the metal expand and break the grip of the threads. If this doesn't work, squirt a little silicone lubricating fluid into the thread. You may need to repeat the process once or twice until the thread is freed. Don't try this on faucets fitted to an acrylic basin or bath, as the heat could damage it.
Wrap wrench jaws with thick duct tape or masking tape to prevent scratching a brass or plated faucet. Or use the cut-off fingertips of an old pair of leather gloves.
Some faucet handles can be pulled off, but most have a small screw. On a traditional faucet with a cross handle, the screw is on the side. On faucets with one piece cover handles, it is usually underneath the hot/cold indicator disc, and includes a small washer.
TRADE TALK

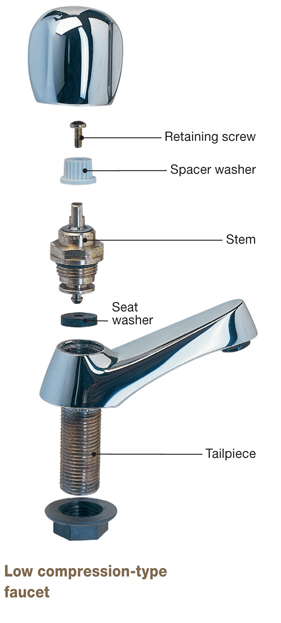

When removing faucet or fixture parts, line them up in the exact order of their removal. Put any replacements for faulty parts in the same position on the line. Then reassemble the faucet by picking up the parts in reverse order.
If you don't have a replacement seat washer, remove the old one, turn it over and refit it. It will last a little longer, so you'll have a chance to get a new one.
Avoid losing lots of small parts down the drain when taking apart a faucet or sink fixture by using the plug. If it is missing, place a saucer upside down over the drain opening or plug up the hole with a thick dish cloth.
If a new washer will not stop a faucet from dripping, you may need to grind smooth the valve seat. The seat is the ring of metal that the washer presses against to close off the water supply. Over time, the seat can become corroded, allowing water to escape. Buy a seat wrench from a hardware store and remove the old seat ring. Install an exact replacement.
A worn valve seat may still be workable, although the seal created by a standard washer may not be fully watertight. Try fitting a domed washer instead. This sits inside the seat, creating a seal at an unworn point. Warning! For a fast flow, you'll need to open the faucet fully by turning it further than usual.
If you have lever-handled mixer faucets with ceramic cartridges, call a plumber. Don’t try to fix them yourself.
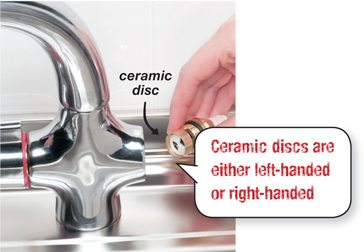
Turn off the water supply. Remove the faucet handles and use a wrench to unscrew the stem. Remove the ceramic discs, keeping hot and cold separate. Check discs for dirt and wear. If they are worn, replace with identical ones. If they are dirty, clean them with a damp cloth. Replace the rubber seal, if it is worn.
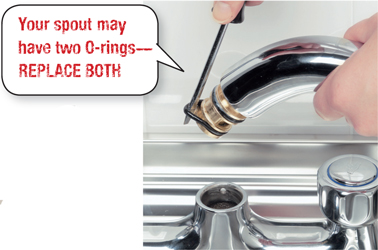
Turn off both the faucets. Align the spout with the body of the faucets. Unscrew the small set screw, if there is one, behind the unit in the faucet body. Pull the spout upward to remove it from the body of the faucet. Make a note of the position of the O-ring and pry it off using a flat-head screwdriver. Smear the replacement O-ring with silicone grease before fitting, and reassemble the faucet.
Take old faucet parts with you when searching for replacements. There are hundreds of different types available, so it can be hard to find exactly what you want. For faucets made overseas, the importer is probably the only source.
Abandon repairing an old faucet if you can't find suitable replacement parts easily. You'll save time and usually get a better faucet if you replace an obsolete model with a new one, many of which are quite affordable. It will look better, too.
For top faucet repairs, invest in the right tools and equipment. Avoid multi-grip pliers unless they have padded jaws, and also poorly fitting wrenches—they will damage your fixtures, making them harder to grip the next time.
In hard-water areas, lime scale is the most common cause of jammed stems in faucets. After removing the stem, soak the threaded (ridged) parts in vinegar, lemon juice or a proprietary scale remover. Wipe dry and smear with silicone grease to lubricate and protect before reassembling the faucet.
If the cross handle won't come off an old faucet, use the cover to give it a push. Unscrew and remove the retaining screw securing the handle to the stem and turn the faucet fully on. Loosen the cover and insert a thin wrench underneath the cover as a spacer. Hold the wrench tightly while you turn the handle off. This action should jack the handle off the stem.
Faucet washers are very cheap, so keep a supply in your tool kit. It's a good idea to remove all the washers from your faucet (and label them to keep them straight), then buy a few to match each.
If a leaky faucet keeps you awake at night, stuff a piece of rag in the spout to carry water silently to the drain, then fix the leak the next morning.
If you live in a hard-water area, you should check your faucets for damage once a year.

Pour white vinegar into a plastic sandwich bag until it's half full. Pull the bag over the shower-head until the head is fully submerged. Tape the bag to the showerhead and leave overnight. Scrub out any remaining lime scale with an old toothbrush and your showerhead will be as good as new.
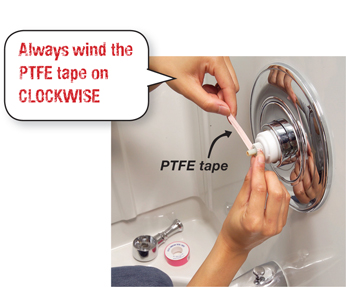
If the valve handle on a shower, bathroom or kitchen faucet is loose, pry off the metal button or indicator disc at the center of the handle and tighten the retaining screw underneath. Some handles have a setscrew near the base that may require a hex (or Allen) key. If tightening doesn't work, the stem inside the handle may be worn, especially if it's made of plastic. Remove the handle and wrap the stem tightly with PTFE (Teflon) tape. A single wrap will usually create a snug fit. Then put the handle back on.
Don’t use poorly fitting wrenches on a plumbing job-they will damage your fixtures, making them harder to grip next time.
If you cannot remove your faucet's aerator, you can still clean it. Pour white vinegar into a plastic sandwich bag and secure it around the spout with a rubber band. Make sure the aerator is completely immersed in the vinegar, and keep the bag in place overnight.
If you have an old single-lever valve in the shower, ensure the ideal water temperature every time by pressing a self-adhesive colored dot on the tiles to mark the position. You may prefer a slightly warmer setting in the colder months.

If your water usage is higher than usual for no obvious reason, it could be a hidden leak. Check the water meter reading last thing at night and first thing in the morning. If the reading indicates use, call in a plumber to track down the leak and fix it.
Pipes are out of sight and out of mind until they leak or groan, but there are various things you can try fixing yourself before calling the plumber.
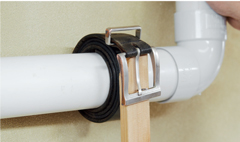
Make a strap wrench by wrapping a belt around a pipe, as shown, and pulling it tight. Hook the belt buckle on a nail driven into a 1 x 2 in. or a 2 x 3 in. block of wood, then exert leverage with the wood.
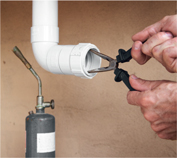
The threads or spiral ridges on a plastic pipe may stick while the pipe is being unscrewed, causing the pipe to break off. Use a propane torch to heat the jaws of a pair of long-nose pliers. Insert the pliers into the threaded section and slowly push the handles apart until the jaws make grooves in the plastic. Remove the pliers and let the plastic harden; insert the pliers and twist to unscrew the broken pipe.
“Water hammer” is the loud noise you sometimes hear throughout the house every time you turn off a faucet. It's usually caused by a valve closing very quickly, loose pipework or a combination of both. Trace the pipework and secure any loose sections with J-hooks.
If water hammer is affecting pipe-lines concealed within walls, try turning down the water pressure slightly at the main shutoff. If the problem persists, have a plumber fit a water hammer arrestor in the line closest to the problem valve.
To stop a loose pipe inside a shower wall from moving around and banging, remove the decorative escutcheon from the wall and tape the pipe into position. Then spray aerosol foam insulation into the wall cavity. Once the foam is dry, it should be hard enough to hold the pipe firmly in position, and the banging noise should stop.
If water seeps out from under your shower base, the water could be escaping from the shower valve body situated within the wall. To check, carefully remove the dress ring and check for leaks beneath. If there is a leak, ask a plumber to tighten the faucet body or replace the sealing ring. Make sure the decorative escutcheon is properly fitted afterward so that water cannot enter the wall.
If the problem cannot be traced to the shoer valve, check the grouting in the shower base and, if necessary, renew it. Alternatively, you can buy a silicone-based liquid that can be spread over the entire shower base to seal it against water seepage.
Keep your drains and traps clean and healthy. They help keep your home free of disease and the air fresh and sweet.
Among the most common causes of sewer blockages are tree roots, which can infiltrate older pipes (with the poplar being a particularly common offender). You may solve the problem temporarily with a drain snake, but the only permanent solution is to re-lay the pipes—a job for a licensed plumber. You may also have to remove the trees, roots and all.
Sinks, toilets and floor drains are fitted with a trap containing a small amount of water to seal off any unpleasant smells. If the water freezes or evaporates, you could be in for a smelly time. To stop water from freezing in cold weather, add a little salt. If you are going away for a while, keep water in floor drains from evaporating by pouring a little vegetable oil into the trap.
Whenever you are carrying out any construction work around the house—even planting trees and shrubs—first obtain a copy of your house's sewer diagram from your water utility or city hall. This will show where all the sewer drainage lines, branches and fixtures are, so you can avoid dam-aging them or planting trees too close.
Sink drains often become blocked with grease, food scraps or other solid waste. Clear your drains with a mixture of salt, baking soda and cream of tartar. Don't use lye-based drain cleaner, as it can not only make the blockage worse but also burn your skin.
Bail out water in a blocked sink or bath into a bucket. Pour a cupful of washing soda down the drain, and follow it with boiling water. Repeat if necessary.

Never use a plunger after you have added chemical cleaner to drain pipes. If the water splashes onto your skin and eyes, you could be severely burned or injured, even blinded.
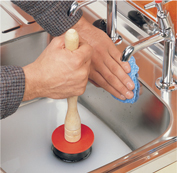
A plunger will clear most blockages in drain pipes. The plunging action pushes and pulls the blockage apart, rather than compacts it. For a plunger to work, its cup must be covered with water and any overflow inlet must be sealed. Holding a wet cloth over it will help. The handle of the plunger should be perpendicular to the base of the toilet or sink. To make the plunger even more efficient, smear petroleum jelly around the edge of the cup to create a seal where the cup and surface meet.
Push a garden hose into the pipe as far as possible. Pack rags around the opening and hold them in place while a helper turns the water on full force and then off. Repeat several times until the blockage starts to break up, then flush the drain with water for at least 15 seconds.
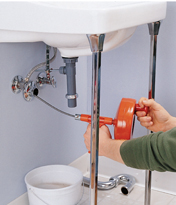
For blockages that cannot be cleared with a plunger, it is worth trying a device called a plumber's snake. You can buy or rent one. Disconnect the blocked pipe from its trap and feed the end of the wire into the pipe. Then turn the handle to rotate the spiral. This drives the cutting head into the blockage and breaks it up.
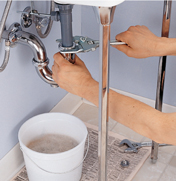
You can't dislodge a blockage in a P-trap with a plunger. Bail the water out of the sink, place a bucket under the P-trap, and unscrew the access plug with a wrench or multi-grip pliers. If water trickles out, stick the end of a wire coathanger into the opening to snare the blockage and haul it out. If water gushes out, the blockage is probably beyond the P-trap. Time to call a plumber.
Once you have cleared a blockage, replace any damaged components, such as washers that are worn or have been stretched out of shape. Correctly position the new washers inside the slip nuts, otherwise the joints will leak. Create a firm seal by applying a small amount of silicone lubricating grease to the washers inside the slip nuts.

If you don't have a toilet plunger to deal with a blockage, improvise by wrapping a plastic bag around a mop head. Tie the bag securely to the handle of the mop so it can't work free.
Follow these tips for common problems with toilets, but be aware that some tanks can be complicated so you may need to call a plumber.
Does your tank make a blood-curdling wailing noise after each flush? The noise is generated as water rushes in to refill the tank. An excessively loud noise could be due to high water pressure. You can regulate the flow of water by adjusting the control valve, which you will find on the inlet pipe that carries water to the tank. First, turn the valve off. Flush the toilet, then slowly turn the valve back on until it makes the noise again. Turn the valve back a little bit until the sound stops. If this fails to correct the problem, ask a plumber to install a special low-noise inlet valve inside the tank.
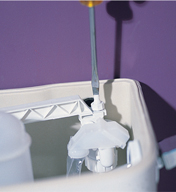
If your toilet won't flush, check that the water level in the tank is up to the “full” mark. If it is too low, you can adjust the float arm. How you do this depends on the type of valve you have. With a plastic valve (below), you alter the angle of an arm by turning its adjustment screw with a screwdriver. With a brass valve, you can bend the float arm up a little, or loosen the securing nut on a moveable float and slide the clip up the arm slightly.
Sometimes it can be difficult to know exactly where a leak is coming from. An easy way to find out is to pour enough food coloring into the tank to change the color of the water. If the water in the toilet bowl then changes color, you know the flush valve at the base of the tank is leaking. If colored water collects outside the toilet, the tank itself or the inlet seal is leaking.

A major source of toilet leaks is the rubber inlet seal that connects the tank to the toilet bowl. Over the years the rubber degrades, allowing water to escape through fine cracks. The deterioration is not always obvious, so examine the seal closely if damp patches appear on the floor. Replacement seals are readily available from home reno centers and hardware stores.
Try clearing a blocked toilet by pouring a bucket of hot water down it. If it seems to be draining more quickly after one bucket, follow up immediately with two or three more.
Toilet tanks are usually fitted with their own shutoff valve, which turns the incoming water on and off. Because these valves are rarely used, they can seize up altogether and become impossible to operate in an emergency. Prevent this from happening by turning the valve on and off at least once a year. A squirt of penetrating oil will help to free up any stiffness.
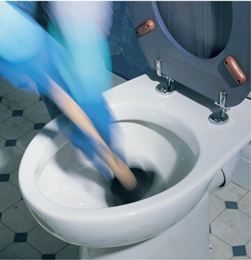
To unblock a clogged toilet, use a large plunger with a funnel cup. Place the tool so it seals completely over the drain opening, making sure the cup is covered with water. Then pump up and down as hard as you can several times. Remove the plunger. If the water has gone, fill a bucket with water and pour it into the bowl to clear the pipes.
Because they're slightly elastic, plastic bolts sometimes allow the toilet seat to slide from side to side. To prevent this, some manufacturers add a plastic sleeve to the seat hinge. If your toilet seat doesn't have these, buy a roll of two-sided carpet tape and stick a small piece to the underside of each hinge.

Insulate exposed hot-water pipes with preformed segments of pipe insulation. For a tight fit around corners and bends, cut segments with a sharp knife. Butt segments tightly, leaving no gaps. Tape joints with PVC tape. Paint insulation that's exposed to sunlight to stop deterioration.
Hot water on tap is easy to take for granted, but keeping your hot-water system in good shape ensures supply and saves money.
Electric heaters use one, or more often two, heating elements. If an electric heater has two elements, the upper element acts as a supplemental heater that only operates during heavy demand; consequently, it rarely fails. Electric heaters take longer to heat the water, tend to be larger and cost more to operate. However, not requiring a venting system makes them significantly easier to install.
If a faucet is a long way from the hot-water tank, a lot of cold water has to flow to the faucet before the hot water catches up. To overcome this, get your plumber to fit a device that diverts water back into the tank until it becomes hot, thus avoiding waste. Alternatively, install a separate system such as an instant hot-water heater to supply the remote faucet.
If you have a water heater in your garage, make sure you insulate the outlet pipes to save both energy and money.
Most domestic hot-water systems are the same pressure as the water main, so that the pressure inside the hot water tank is consistent with the pressure inside the water pipes in the street. However, if the pressure in the tank builds up, it could explode. To prevent this, a relief valve is fitted to the tank. To keep the valve working properly, operate the small lever on the outside of the tank every few months.
Gas water heaters produce hot water more quickly than electric models, so they tend to be smaller. They work away so quietly and efficiently that their maintenance is often overlooked. Make sure that every so often you check the flue pipe for leaks or blockages, and the combustion chamber for accumulated rust. Also check the pilot light to see that it is clean and free of ash.

A water heater thermostat set at 140°F (60°C) or higher can easily scald and costs more to operate. Lower the temperature to 120°F (50°C) for safer, more economical operation. A lower water temperature will also ensure that your heater lasts longer.