

Yes, it's true: you can do your own brickwork repairs! Just be sure to approach the work calmly and confidently. These tips will show you how.
A white powdery deposit, called efflorescence, is common on new brick walls. It's produced when salts in the brick leach to the surface as the brick dries after rain. If you try to wash it off, the problem will only last longer. Instead, brush the affected area with a dry bristle brush until it stops recurring.
Think long and hard before you have the outside of your home sandblasted or cleaned with acidic chemicals, particularly if it's a home with some period character. In the process of cleaning the grime from the walls, both methods remove the surface layer of the bricks. Your brickwork may look fresh and new, but you stand to lose some of the charm of the old house's exterior. You may even damage the bricks to the point where they need to be coated with a sealant.
Remove years of grime from bricks with nothing more than a stiff-bristled brush and a running hose. Work in horizontal bands from the top to the bottom of each wall, checking the mortatr joints as you go. On really dirty areas use a solution of about ½ cup (120 mL) of household ammonia in one bucket of water. Wear goggles and rubber gloves for protection.
When removing clinging vines from brickwork, make sure you get it all off or the leftover vegetation will oxidize, leaving ugly marks. Pull off as much of the vine as you can, wait a week or two for the remainder to dry, then scrub the bricks with strong detergent and a stiff brush.

Remove stubborn stains like tar and oil with a paste made from fuller's earth or ground chalk, mixed with paraffin or mineral spirits. First, wipe over the stain using a little of whichever solvent you used to make the paste. Next, spread the paste over the stain. Finally, tape a plastic bag or a piece of aluminum foil over the top to stop the paste drying out. Over a few days the paste will draw out the stain, and then you can wash the bricks clean.
Mold and mildew thrive in shaded areas. In most cases they don't harm the brickwork, but they do cause discoloration. To remove mold, scrub clean with a solution of equal parts household bleach and water. Use a stiff-bristled brush and lots of elbow grease. After an hour, rinse with clean water.
In damp, shady areas moss can become a recurrent problem on brickwork. If you want to be free of moss, try a dose of weed killer, applied according to the manufacturer's directions.
Mortar is softer and more porous than the bricks around it. If you're restoring period brickwork, get some advice from a heritage expert to find the right mortar for the job. Modern mortar mixes are very hard and can crumble the edges of softer period bricks.
Scrub specks of paint and mortar from brick surfaces with a fragment of broken brick that's the same color as the brick you're scrubbing. Always rub with the rough, broken interior (the smooth face of a brick is hard and can scratch).
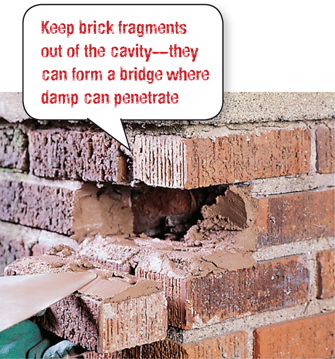
To replace a damaged brick, first remove the mortar around it with a cold chisel, being careful not to chip the surrounding bricks. Next, use the cold chisel to break up the brick. Pull out all the pieces. Dampen the opening. Spread mortar on the base of the cavity and on the topside and ends of a dampened new brick. Insert the new brick and tidy up the mortar as necessary.
Sandblasting can damage period brickwork-clean with a stiff bristled brush and water instead.
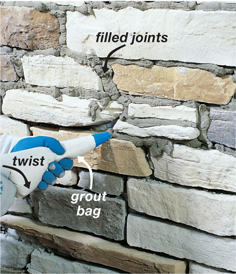
You can cut your work time substantially on big re-pointing jobs by using a grout bag instead of a pointing trowel to fill mortar joints. Just add a little more liquid than usual to the mortar to make it flow more easily, and control the flow by twisting the bag.
To match the concave profile of a mortar joint, run a store-bought convex jointing tool across the stiffened mortar. Alternatively, make your own tool with a piece of metal tubing or the end of a spoon handle.
Wiping off messy splashes of still-soft mortar will smear the surface of the brickwork. Instead, let the mortar splashes dry until they're completely hard, then strike them with a sharp blow from a trowel.
A metal dustpan makes an excellent tool for carrying mortar around with you when you're re-pointing. It has sides to keep the mortar from spilling and a long, flat edge you can push up against the joints. You can also buy professional versions of this sort of equipment: they're usually called “mortar hawks.”
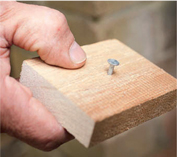
A large-headed nail driven into a block of wood makes a useful mortar-raking tool. Work out what depth you're raking to, then fix the nail in the wood to match. Run the wood across the surface and let the nail do the raking.

The fine dust generated when you're re-pointing mortar or replacing bricks can irritate the skin and the eyes. Protective goggles are essential, as are sturdy work gloves. It's also a good idea to dress in old clothes that you can just take off and throw away at the end of the job.
If the existing mortar is brown, yellow, black, red, gray or charcoal, use common gray cement in your mortar mix and color it with the appropriate pigment or oxide. The mix will lighten considerably as it dries so do a small test batch first. If the existing mortar is white or close to white, then use off-white, not gray, cement.
Mortar must be kept damp as it cures. Organize your job so that you're never working in direct sun. Keep it damp as it cures; spray it with water several times a day.
Some vines are bad for mortar joints, causing them to crumble. Grow vines on trellises instead.

Before you tear off the old siding, check the price of its replacement. Wood can be very expensive so it may be worth your while to work slowly, saving as many of the old boards as possible.
If you're comfortable using basic woodworking tools such as saws, hammers and nails, then you'll be able to make repairs to lap siding.
Stroll around the perimeter of your home periodically to look for pockets of rotten wood. If you find any, insert a screwdriver or awl to determine the depth of the decay, then make the necessary repairs quickly, before small problems turn into big ones.
Treat every surface of a new board with preservative or wood primer before nailing it in place. This will delay the onset of rot in the future.
Rotten siding near the base of a wall is often caused by rain running off the roof onto the ground and splashing back onto the siding. Before replacing the siding, fix blocked or leaky gutters so that water is caught and channeled away from vulnerable wood.
Matching a particular siding profile can be difficult. One option is to replace all the boards on one side with a non-matching profile. Save any good boards you remove as they can be used to patch the other sides, if necessary.
Always use galvanized nails to anchor the boards in place. They won't corrode and cause rust stains as ungalvanized steel nails do. Punch the nail heads in slightly and fill the dimple with exterior filler for a neat and watertight finish.
If you discover areas of rot in your siding, don't waste time trying to patch the damage. Rot is a type of fungal attack that will ultimately destroy the wood. By the time the wood has gone soft, the rot is already well advanced. The best approach is to remove and replace the affected boards or sections of boards. It will save time and effort in the long run.

Rainwater tends to cling to vegetation and brings moisture into contact with the wood siding. Keep plants and shrubs away from walls so that boards are less susceptible to rot. Trim back existing plants and position all new plants at least 20 in. (50 cm) away from the house.
The part of a board most likely to rot or decay is the end grain. As it dries, it acts like a sponge, soaking up moisture. When replacing boards, always be sure to give the end grains a generous extra coat of primer or oil stain before fixing in place. Do this and your walls will last much longer.

To stop splits when nailing wood siding, blunt the sharp end of the nail with a hammer. This won't work at the ends of boards so always drill pilot holes first.
If a nail doesn't hold securely when hammered, it could be because the wood behind the clapboard is rotten or damaged by insects. Correct the underlying problem before repairing the siding.
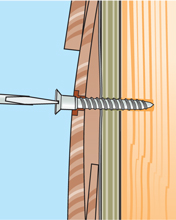
Flatten out warped boards by fixing them to the studs with long screws. Drill and countersink pilot holes to avoid splitting the boards. Use exterior-grade putty to conceal the screw heads.
Knots in wood siding can present a problem if not properly prepared before painting, as the resin they contain can bleed through to the surface, causing an unsightly patch of discoloration. To avoid this, seal all knots with a solution of shellac and denatured alcohol, or a commercial “stain sealer,” before applying the final finish.
If you want an exterior surface that's tough, attractive and affordable, go for vinyl or aluminum siding. It's also easy to repair and maintain.
Shallow cracks in vinyl siding are easily repaired. Gently lever up one side of the crack with a toothpick, apply a special vinyl adhesive and then press the crack closed.
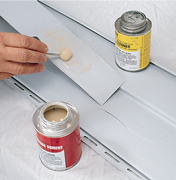
To fix cracked vinyl siding, remove the section and glue a piece of scrap siding to the rear. Prepare the area with PVC cleaner, apply PVC cement and press the patch in, finished side down.
For a subtle repair, replace damaged siding with a patch of weathered siding cut from an inconspicuous spot around the back of the house. Use brand-new siding to fill the gap.
You can cover up small scratches on aluminum siding using a dab of acrylic paint. Sand the scratched area gently with fine steel wool first and prime with an oil-based metal primer before applying a finishing coat of paint.
For smooth edges when trimming vinyl with tin or aviation snips, cut with the first two-thirds of the blades only. Closing the snips fully will produce ragged edges.
A fresh coat of paint every couple of years will ensure that ageing aluminum siding stays in good condition.
It is possible to refresh vinyl siding with a coat of paint. Sand it lightly first to improve paint adhesion, and use an acrylic paint with a high solids content.
When painting vinyl siding, choose a color that is at least as light as the original, if not lighter. Darker shades absorb more heat, which can cause the siding to overheat and warp.
The powdery white residue on aluminum siding, called “chalking,” is caused by the natural self-cleaning action of the finish. Rain will wash it away eventually, but to get rid of it sooner rub with a soft rag and a solution of about ⅓ cup (80 mL) of household dishwashing detergent in 4 qt. (4 L) of water.
Use liquid car wax to give areas of dull aluminum a sheen (but only after the warranty has expired). First, wash the siding with a mild solution of dishwashing liquid and water, then rinse off. When it's completely dry, apply the wax with a damp sponge then buff it to a gloss with a very soft cloth.
Modern fiber-cement siding is safe and easy to work with, but any jobs involving old-style asbestos cement should be left to the experts.

If you suspect an old roof or outbuilding might contain asbestos, do your research before attempting to dismantle and dispose of it. There are laws governing its safe disposal. If you can remove whole panels, it may be safe to do the job if you wear protective clothing and a dusk mask. But it is safer to arrange for a professional to remove it.
It has been many years since some fiber-cement contained asbestos fibers. When concerns were raised about asbestos-related illnesses, the use of asbestos was discontinued. Do not cut, saw, sand or otherwise disturb fiber-cement if there is a chance it may contain asbestos. These days the product contains synthetic or cellulose fibers rather than asbestos. Fiber-cement poses no health risks. Nonetheless, you should avoid inhaling the dust by wearing a dust mask and ensuring the work area is well ventilated.

The simplest way to cut fiber-cement is by the “score and snap” method. Repeatedly score the surface of the sheet to a depth of about one-third its total thickness using a stout blade and a straightedge. Press down on the straightedge and pull the outer edge of the sheet upward to snap it along the scored line. Fiber-cement manufacturers make a special tungsten-tipped tool for this job.
Small holes in fiber-cement can be patched using an exterior-grade filler, fiberglass filler or car body filler. These commercial fillers are unlikely to shrink and, provided the original siding is sound and there are no crumbling edges to the hole, the patch should stick well. Don't bother filling the hole if it lies on a crack as the movement in the siding would most likely dislodge your patch. In that situation, the better solution would be to remove the siding entirely and replace it with a new siding.
Making repairs to stucco walls usually means filling and patching. Hairline cracks can often be left but anything else needs prompt attention.
A close inspection with a magnifying glass can reveal the cause of cracked or flaking stucco. Salt crystals in the stucco are an indication that moisture on the inside of the house is migrating outward. If there are no crystals in the stucco, then the damage has come from outside.
Narrow cracks are best filled with pre-mixed mortar or a masonry sealant, both of which will maintain a flexible bond. Clean out the crack, chisel an undercut along the edges of the crack for good adhesion, then pack the gap with either mortar or sealant. If using mortar, smooth the repair with a clean putty knife for a neat finish.
Hairline cracks in stucco may be unattractive but they are usually harmless and can be ignored. If you try to patch them you'll probably find that your repair is more unsightly than the original blemish.
A long crack in the stucco can be an indication that the foundation supporting the wall is settling. To check, fix duct tape across the crack with epoxy adhesive and inspect it every two months. If the tape splits or twists, it means the masonry is moving and it's time to call in the experts.
To avoid serious damage, repair major cracks in stucco as soon as you notice them. Once a surface has started to break up, rain, insects and plants will get into the spaces and speed up the process of deterioration. If you're not careful, you'll end up having to refinish the entire exterior—and that's expensive.

In cold climates, the bond between stucco and the wall can fail when moisture seeps between the two and freezes. To map the damage, tap the wall with the handle of a screwdriver. Wherever it sounds hollow you'll need to strip and replace the stucco.
New stucco will bond better if the underlying surface has a key. Before you begin, coat the wall with a mixture made up of one part cement to one part sharp sand mixed into PVA sealer, diluted with two parts water. Apply the mixture by “stabbing” it onto the masonry with a stiff brush. When it dries, the surface of the wall should feel like coarse sandpaper.
For a good stucco, mix one part cement and one part hydrated lime, then blend in four parts plastering sand (also called “stucco sand” or “fine sharp sand”). Dilute with water to get the right consistency. A liquid plasticizer is an alternative to the lime; add it according to the manufacturer's directions.
Don't let the weather ruin your stucco job. If you're repairing in hot weather, add a drying retardant to extend your working time. If there's a risk of freezing, add a frost-proofing additive to the mix. The stucco has to dry slowly to be strong. In hot weather, regularly mist the patch with water for a couple of days after application.
Painting the outside of a house is a huge task. Make a good job of it and it will be years before you have to paint again.
The secret to a successful house-painting job is proper preparation. First, check for peeling paint, cracked paint and mold, and treat as required, referring to the chart below. Next, wash the house with TSP and water. For a thorough job, rent a pressure washer to remove dirt and blast off any loose or flaking paint. If the walls are in good condition, or if the surface of your house consists of soft brickwork, then stick with a garden hose.
To avoid damaging wood siding when working with a pressure washer, keep the wand moving continuously and always keep the nozzle about 24 in. (60 cm) away from the wood's surface. Point the nozzle down so you don't force any water up between the boards.
When using a pressure washer, try to work on the shady side of the house. If you're washing in bright sunlight, the dirty suds can dry onto the siding before you've had a chance to rinse them away.
Work from the bottom up when washing with a pressure washer. If you work from the top you'll streak the walls below. When rinsing, reverse directions.
Test the condition of existing paint on an outside wall by rubbing it down with a dry, dark-colored rag. If the rag collects a chalky deposit, scrub the wall with a stiff dry brush to remove the loose material, then apply a primer.
Spring and autumn, when air temperatures are neither too hot nor too cold, are the best times of year to paint your house.
Scraping or sanding wet wood can leave tears and gouges. Instead, let the wood dry out before you proceed. Protruding rusty nails can either be knocked in or extracted. If extracting old nails, replace with new, galvanized nails driven in ½ in. (1 cm) away from the old holes.
A sharp paint scraper produces a mellow cutting sound during use, while a dull one gives a shrill screech. Carbide-tipped scrapers are the best choice: they stay sharper longer and you can buy replacement blades.
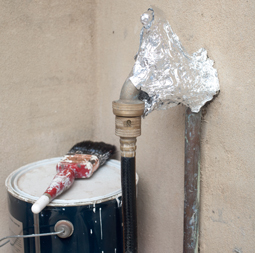
Use heavy-duty aluminum foil to protect exterior hardware when painting. The foil will mold itself around irregular shapes, providing good cover, and will stay in place even when you accidentally knock it with a brush or roller.
A sharpened garden hoe will make short work of large areas of peeling paint and give you extended reach without having to grab a ladder. Remember to wear safety goggles while scraping.
To clean and collect the sticky scrapings from a paint scraper, run the blade through a vertical slit cut in the side of an old coffee container. The scrapings will drop neatly into the can, and the blade will come out as clean as a whistle.
If the ornamental brick surrounds of doors, windows or chimney stacks have started to deteriorate and you want to protect them, coat them with a clear water-repellent silicone sealer. Resist the temptation to paint them as the paint will be almost impossible to remove later.
Who says you have to paint an entire house all at the same time? The job will seem much more manageable if you plan to paint just one side every year.
Structure your painting job so that you're always working in the shade. Direct sunlight makes the paint dry faster. Fast-drying paint is harder to work with and tends to blister, creating a soft paint surface that is easily damaged. You'll also find that sunlight reflects off the surface of the wet paint. If you work in the shade, you'll avoid the eyestrain caused by that glare.
Spring and autumn, when air temperatures are neither too hot nor too cold, are the best times of year to paint the outside of your house. Not only will you be able to complete the job more comfortably, but the paint will stay wet longer, too. If you live in an area that has a defined wet season, then that time of year is definitely best avoided.
Paint won't take to a damp surface, so the ideal time to paint is at the end of a dry spell. Avoid painting on windy days, as dust and grit will blow onto the new paint. You should never paint in frosty conditions or when it is raining. If it starts to rain, stop work and wait until the surface has completely dried out before resuming the work.
The best tools for applying a coat of masonry paint are a long-nap roller with a tough nylon pile, a large, synthetic-fiber brush or a medium-bristle dustpan brush with a comfortable handle. Apply the paint to the wall in vertical zigzags and fill in the gaps with vertical strokes.
Paint windows and exterior doors early in the day so the paint is dry enough for them to be closed in the evening. The surfaces where openings and frames meet should be the first ones you paint. Wedge doors open so they can't blow shut or be closed by mistake. Smear a little petroleum jelly onto the stops before shutting up for the night; it will stop doors and windows from sticking and will wipe off easily in the morning.
When painting exterior masonry, work from a small paint container rather than directly from the can. It will help prevent transferring grit from the wall into your can.
No two cans of paint are exactly the same color, but there is a way to minimize the difference. When the open can starts to get low, top it up with paint from the new can and mix well. This “transition” paint will average out the color difference.
PVC gutters and downspouts can be left unpainted; just wash them down with diluted bleach. If you do want to paint them, don't feel you have to use an undercoat. PVC pipes that are brand new will need to be etch-primed to give the paint something to stick to. Otherwise, let the pipes weather for a year to take the shine off the surface, and then paint.
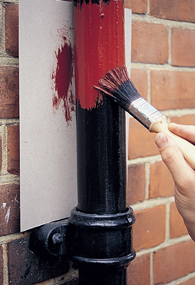
If you want to paint the back of a downpipe without getting paint on the wall, you can use a special brush with an angled head. Alternatively, use an ordinary paintbrush and mask the masonry with a piece of cardboard.

Keep insects from ruining new paintwork: stir several drops of citronella oil into a 1 gal. (4 L) can of paint. It won't affect the paint—just the insects.
Search for gaps and cracks around the house and seal them to stop drafts and water damage.
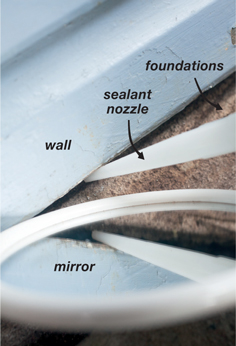
The gap between the foundations and the bottom edge of the wall siding is a significant source of drafts. Save your back when sealing the gap by using an old mirror so you can see what you're doing.
Test old sealant by poking it with a screwdriver. If it cracks, scrape it out and squeeze in a fresh bead.
For a tight seal around aluminum, bronze or galvanized steel, wipe with a solvent such as acetone first to remove the coatings and oily deposits that could keep the sealant from adhering well.
In hot weather, refrigerate your sealant cartridge for 20 minutes before you start. On a cold day, wrap it in a hot pad for a while first.

Sealant tends not to adhere well to very cold surfaces. For maximum adhesion on a cold day, prepare the surface by warming it up with hot air from a hair dryer before you apply the sealant.
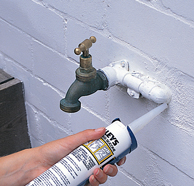
To seal around an external faucet, first loosen any screws holding the faucet in place. Scrape out the old sealant with a putty knife. Squeeze a bead of silicone sealant behind the mounting plate, and screw the plate back in place. Smooth the sealant with a putty knife.
Always check the cartridge label to see if the sealant will accept paint. Some silicone sealants have exceptional adhesion and elasticity but will resist a coat of paint.
Polyurethane foam expands by up to 30 percent once it leaves the can so it’s ideal for filling tricky gaps.
Pieces of potato cut to just the right shape are a smart way to smooth sealant around a joint. The juices will prevent the sealant from sticking to the potato. Keep the pieces moist in a plastic bag until you need them.
When sealing the outside of a brick house, don't fill the small, regularly spaced holes or mortarless joints located above the foundations, doors and windows. These are “weep holes” that allow moisture to escape from the wall.
Use polyurethane foam instead of sealant for any cracks that are wider than ½ in. (1 cm). Foam expands by up to 30 percent so it's ideal for filling trouble-some gaps. Use it to silence squeaky stairs and cushion pipes that rattle against the house framing. Once dry, it can be trimmed to neaten it up.
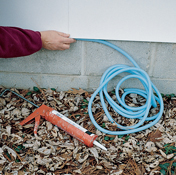
If the gap between the house's siding and foundation is more than ½ in. (1 cm) wide or ½ in. (1 cm) deep, insert a strip of open-cell polyethylene foam into the gap first. Top it with butyl rubber sealant.
Ladders make easy work of otherwise tricky jobs, but learn to use them safely and sensibly so you can avoid accidents.
Hold the rungs, not the rails, when going up or down a ladder. If you slip while holding the rails of a metal ladder you'll get skin burns; from a wooden ladder you'll get splinters. If you're holding onto the rungs when you lose your footing, you won't slide at all. Make sure the ladder is properly set up and supported.
It's a safety hazard to have power cables hanging from a ladder as you work; use cordless power tools whenever you can.
Use the top four rungs of a ladder as hand holds only. If you try to stand on those top rungs using something such as a gutter or windowsill for support, you're all too likely to have a nasty fall.
If the ground is soft, set the feet on a piece of plywood. The plywood should be ¾ in. (2 cm) thick and about 8 in. (20 cm) wider and deeper than the ladder's base. Stake the plywood on four sides so it doesn't shift.

When working on high windows, lash a length of wood measuring longer than the width of the window right across the top of your ladder. The wood will rest on the wall at either side of the window and hold the ladder away from the glass.
After a few years of use, ladder-ends can get very rough and may even scar the paintwork or siding they're resting against. To prevent scratches, tie old socks, gloves or mittens around the tops of the rails.
Working near power lines with a metal ladder or a damp wooden ladder is dangerous, since both can conduct an electrical current. If you must do it, use a ladder made from non-conductive fiberglass.
The modular nature of a tiled roof means most repair jobs are quite manageable. The tricky part is working with tiles that are brittle with age.
If your tile or slate roof is old, but sound and free of leaks, resist the temptation to mess with it. Old tiles and slates become brittle with age and are very easily cracked or broken, so even a simple spring cleaning can end up causing more problems than it solves.
Modern terracotta tiles can withstand a small amount of foot traffic, but older tiles can be extremely fragile. If you must walk across the roof, take care to walk on the strongest part, which is the front edge of each tile, where the tiles overlap. Wear soft-soled shoes. Do not wear thongs (flip-flops) as they can easily trip you up.
Lichens and mosses grow naturally on tiled roofs, particularly parts that are in permanent shade. Some homeowners like the look, but others prefer their roofs to be free of vegetation. Lichen is harmless but moss can trap moisture so is best removed. To remove it, wash the tiles with a solution of 4.5 lbs. (1 kg) of copper sulphate in 6 gal. (22 L) of water. The solution can damage gutters and downpipes, so rinse thoroughly when you are finished.
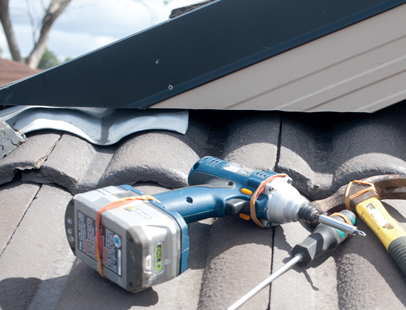
Wrap rubber bands around the handles of tools to stop them from sliding down the roof as you work. The rubber will grip on roof pitches of up to 45°.
If you'd rather not use copper sulphate to get the lichen and moss off your tiles, consider using a pressure washer instead. Work from the top of the roof down, otherwise water will be forced up under the tiles. Walking on a wet roof is dangerous; don't do it unless you're wearing a safety harness.
New tiles can stand out among existing tiles. To tone them down and give them a more aged look, apply some boot polish. The polish will dull the tiles and make them a better match to the originals. Remember, this is not a permanent fix and the tiles may have to be touched up from time to time. After a while the new tiles will weather to match the older ones.
The styles of terracotta tiles have varied enormously over the years and finding replacement tiles to patch up an existing roof can be a challenge. The best idea is to find a roof restoration specialist trading in second-hand tiles salvaged from demolition sites. (Most major cities will have one or two.) These businesses also tend to stock hard-to-find slates and concrete tiles.
From time to time it is worth taking a look at the underside of your terracotta tiles to check for a sort of crumbling that occurs when salt from the atmosphere crystallizes under a tile's surface, gradually wearing off the top layer. The exposed side of the tile is rarely affected, probably because rain washes off any salt and keeps the tile's surface clean. This is most common near the ocean, but can also occur inland. Badly affected tiles must be replaced before they fail completely.
Sheet metal roofs are relatively easy to maintain. Just keep an eye on their weak points: the flashings and the edges where rain can penetrate.
If using more than one type of metal on the roof, put those that are more prone to oxidization (the less “noble” metals) above those that are less prone to oxidization (the more “noble” metals). The ideal order from the top down is zinc, aluminum, iron and steel, lead, copper, then stainless steel.
Don’t let your tools scratch the sheet metal; if the protective surface is compromised, the roof will be vulnerable to rust.
The light-gauge metal used on most domestic roofs can be permanently dented or crimped by your body weight. When walking across a metal roof, follow the line of the rafters, where the roof has maximum support. Sheets with a high profile don't dent as easily as those with a low profile, but still follow the rafters.
The sound of light rain falling on a metal roof can be delightful, but a deluge is deafening. When putting on a new roof, install a fiberglass or similar material insulation blanket underneath. It will deaden the sound, reduce condensation in the attic and provide thermal insulation, too.
When a roof corrodes to the point where holes start to appear, it's time to replace it. If you need a temporary solution, try filling the holes with sealant or covering them with pop-rivetted patches—but make replacement a priority.
Constant expansion and contraction of the sheet metal can cause roofing screws and nails to work loose. Check regularly, and tighten loose ones as soon as you spot them.
Temperature changes cause sheet metal to expand and contract, resulting in creaks and groans. Aluminum and zinc expand twice as much as steel, so they tend to be the noisiest roofs.
Many metal sheet roofs are installed at a shallow angle, so there is always a danger that rainwater may flow back underneath by surface tension. Turning down the edge of the sheet where it discharges into the gutter can reduce the likelihood of leaks in your attic.

The lwashers sometimes used under galvanized roofing screws may become cup-shaped over time, allowing water to flow underneath them and into the roof. To solve the problem, apply a dab of sealant to the undersides of affected washers. Alternatively, replace the washers.
Asphalt shingles are the most common residential roofing material used in North America. Color and style choices are plentiful and some of the better, heavier grades are rated to last 40 to 50 years when properly installed. It's not uncommon, however, for these roofs to need spot repairs throughout their life span. Falling tree branches, roof-mounted hardware and uneven weathering can result in damage to individual shingles or small sections. Fortunately, such localized repairs are often easy to make, but before you haul out the ladder and tools, take a few minutes to assess the roof's overall condition.
Chimneys and vents break the surface of the roof, so they're always potential trouble spots.
Make regular inspections of the roof surface and chimney stacks so that faults can be fixed before any significant damage occurs. Only work on a roof if you feel competent; otherwise call in an expert.
When inspecting chimney stacks, first check the flues and caps, then make sure the mortar holding them in place is intact. Next, inspect brickwork and pointing, making note of damaged bricks and missing mortar. Consider capping unused flues.
Galvanized steel or aluminum flashing makes the joint between the chimney stack and the roof surface waterproof. Make sure the upper edge is held securely in the mortar and the lower edges lie flat on the roof; otherwise rain can leak into the attic.
The internal angle where two roof slopes meet is usually lined with a special metal valley flashing. Keep it clear of wind-blown debris so it doesn't overflow. Check regularly for corrosion holes, too—any you find can be waterproofed temporarily with self-adhesive flashing tape.
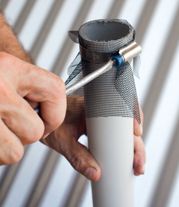
If you live in a warmer climate, check that your roof vents are capped, otherwise pests and airborne debris could get in. Nylon screening secured with a hose clamp can be an effective substitute when a regular fitting is unavailable.
Gutter maintenance is crucial to the health of the house. If water is leaking here, it can cause damage to the walls and foundations.
The gutter system must be able to cope with the volume of water coming off the roof. If you're ordering new materials, remember that a big roof area will need deep gutters and broad downspouts.
When assembling sections of gutters, remember to overlap each joint by about 4 in. (10 cm) in the direction of the water flow. If the overlaps are set against the flow, water may leak through the joint.
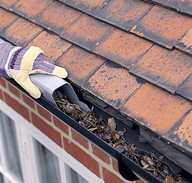
Make a gutter scoop by cutting the bottom out of a plastic motor-oil container and using the spout as a handle. Your scoop will hold much more than a garden trowel. Empty debris into a bucket hanging from the ladder.
If there’s bubbling paint or watermarks on the underside of the gutter, it’s likely there’s a leak that needs fixing.
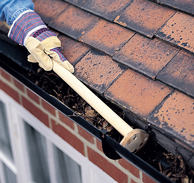
To avoid having to move the ladder frequently, make a gutter rake. Cut a small piece of plywood or solid wood to match the shape of the gutter. Screw this to the end of a length of broom handle about 4 ft. (1.2 m) long, then attach a loop of cord to the other end to secure it to your wrist.

For minor repairs to a leaking gutter, plug the trouble spot with a squirt of silicone. Clean the rusty area before applying the product. If the damage is more extensive, you should have the gutter replaced.
Turn an inexpensive plastic bucket into a handy gutter-cleaning aid. Snip the wire handle in half, bend the ends of the wires to form hooks, and hang the bucket on the gutter as you clean. Each time your gutter scoop fills up, just drop the debris into your bucket.
To pinpoint a sag, pour a bucket of water into the high end of the gutter and watch where the puddle forms, then adjust the slope as necessary.
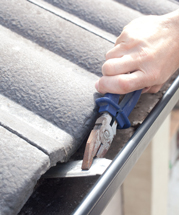
Correct a sagging gutter simply by adjusting the metal brackets. If the gutter is held on with suspension brackets, as in the picture above, use pliers to bend the metal. If it has support brackets, reattach those that are too low or too high to produce the right slope.
When cleaning out your gutters, plug the top of the downpipe with a rag. This will prevent leaves and debris from falling into the drain and blocking it. (Remember to remove the rag later.) You can also buy mesh gutterguards that sit in the tops of downpipes to keep out windblown leaves and debris.
Outdoor living spaces such as decks are vulnerable to weather damage. Stay on top of little problems as they arise and you'll save time in the long run.
Tighten loose deck boards by driving in a new screw next to each old nail. First use a nail punch to drive existing nails deeper into the joists, then drive in coarse-threaded, galvanized or stainless-steel decking screws alongside. Stand, or kneel, on the boards so they're in tight contact with the joists as you drive in the new screws.
Heavy rains seep through the spaces between deck boards and can wash away the soil beneath—especially on a slope. To minimize erosion, cover the soil with a thick layer of gravel.
A popped nail can be hammered back in, but it will soon work its way out again. Instead, remove the old nail and hammer in a new, longer nail at a slight angle so that it passes through fresh wood. Alternatively, replace the popped nail with a galvanized decking screw.

Decks that rest on tall posts of 4 ft. (1.2 m) or more above the ground can sometimes sway as you walk across them. One way to stop the movement is to angle-brace the joists. Cut a length of 2 x 4 in. (5 x 10 cm) wood and fix it diagonally from corner to corner underneath the deck. At each joist, drive in two 3 ½ in. (100 mm) galvanized nails. These will secure the brace and stop the swaying.
Tighten loose deck boards by driving in a new screw next to each old nail.
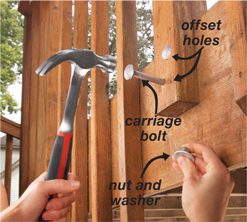
Wobbly railing posts can be strengthened with the addition of a couple of bolts. Measure the thickness of the post and framing assembly, then add ¾ in. (2 cm), and purchase ½ in. (1 cm)diameter galvanized carriage bolts in that length, plus a nut and washer for each. On each post, drill a couple of ½ in. (1 cm) holes roughly 1 ½ in. (4 cm) from the top of the framing, the other about 1 ½ in. (4 cm) from the bottom of the post. Tap in the bolts, slip on the washers and nuts, and then tighten until the bolt heads are set flush to the post.
Splash a glass of water onto the deck boards. If beads form, the wood is still water-repellent. If the water is absorbed, you'll need to apply a new coat of sealant.
Get into a regular maintenance routine with your deck and you’ll save on costly repairs in the long run.
For a low-maintenance deck, leave the wood untreated and simply clean it with a pressure washer each spring. If the wood is dirty, scrub it with dish soap.
If weathered decking wood isn't to your taste, give the surface some bold color with a coat of solid color deck stain.
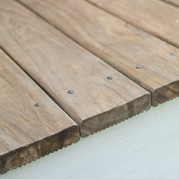
Moisture evaporates from the end grain of the wood, so never cover the ends of the boards with trim or nosing. If you do, you'll be encouraging rot and pests.
Whether it's homemade or store-bought, a roller with an extension handle is the ideal tool for painting a deck. It's quick, and there are no drips or overspray.
Spring-clean paving and decking by scrubbing the surfaces with a pressure washer, or simply with a bucket of water and a stiff outdoor broom. From then until the end of summer, a daily sweep with a broom is all that's needed.
If you find rot or pest infestation in a piece of wood, chances are that nearby wood is also affected. Before launching into repairs, inspect every support post, joist and board for damage.
If you find some rot in a joist, dig it out, let the remaining wood dry off, then brush on two coats of deck preservative. If the hole is deep, you will need to fill it with a suitable external wood filler. You can buy fillers containing fungicides.
Don't let pots and planters sit in one place for too long. Moisture is bound to persist under any permanent fixture, and the water will lead to rot in the deck boards below. Instead, move them around on a regular basis.
If you prefer to have a finish on a wood deck, choose a semi-transparent deck stain. Check the label to be sure the product is made to withstand foot traffic. One coat is usually enough; a second coat may create a film on the surface that will crack and wear.
New wood must be completely dry before the finish is applied; if it isn't, the finish won't take properly. To test, apply a small amount in an inconspicuous area. After about 15 to 20 minutes, most of the stain should be absorbed. If the stain beads up, wait and repeat the test a few days later.

The regular recoating of an oiled deck is a back-breaking job. To simplify the task, pour the oil into a cheap bucket and apply it with a household sponge mop. Your back will be saved, the job will take less time and the sponge attachment can be thrown away afterward.

Always brush an extra coat of deck sealer onto the rough ends of deck boards, since they absorb more than the tops and bottoms.
The installation of concrete and asphalt is best left to the experts, but maintenance and repairs are easy to carry out yourself.
If your concrete driveway is spoiled by unsightly oil stains, consider this unusual treatment. Pour a bottle of cola over the stain, leave it to soak in overnight, then rinse off the next morning using soapy water. The oil will have disappeared.
To keep asphalt driveways and pathways in good condition, wash them thoroughly once a year. First sweep away leaves and dirt with a broom. Next, mix one scoop of laundry detergent into a bucket containing 1 gal. (4 L) of water. For spot-cleaning, splash some onto the asphalt and scrub with a stiff broom. Then, working as quickly as possible so as not to waste water unnecessarily, give the whole surface a good rinse with the hose.
Use oven cleaner to lift tough stains off a concrete surface. Spray it on, let it settle for 5 to 10 minutes, scrub with a stiff brush, then rinse off with your hose running at full blast. Severe stains may require a second application.
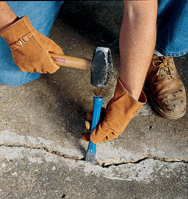
Concrete dust is an irritant, so make sure you wear goggles, dust mask and gloves. Shallow cracks can be filled with a cement-based sealant. To fill larger cracks, chip out loose edges with a narrow cold chisel, then trowel in some bonding agent and patching concrete, and smooth with a steel trowel or a wooden float.
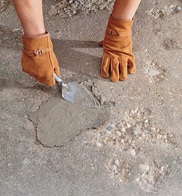
For areas of flaking concrete, first break up the surface with some light swings from a sledgehammer. (The weakened areas will sound hollow when tapped.) Scrub the exposed surface with a wire brush and rinse with water. When dry, apply a bonding agent and patching concrete, and smooth with a steel trowel or a wooden float.
Mortar or concrete that has set hard on your shovel can be difficult to remove. Don't risk damaging the blade by striking the edge of the shovel on a hard surface. Instead, give the back of the blade a sharp blow with a heavy hammer: the concrete should fall away cleanly.
Excavating an old concrete slab and installing a new one is expensive. A cheaper option is to cover the existing surface with a decorative layer of concrete. Search “concrete resurfacing” to find a professional who can liven up your old slab.
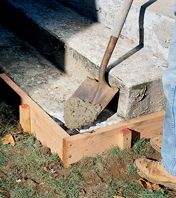
Use a cold chisel and sledge-hammer to break away loose concrete and square up rough edges. Set up some wood formwork to contain the patch. Dampen the area, then brush on a bonding agent. Fill with patching concrete and smooth. Run a stiff broom over the surface to roughen it before it sets.
A concrete slab with a slightly powdery surface can be fixed with the application of a chemical sealer. First, clean the concrete using a wire brush, scrubbing brush, pressure washer or vacuum cleaner. Leave to dry. Next, apply a coat of chemical sealer with a large brush.
Hairline cracks in concrete can be ignored. They usually follow the lines of the contraction joints between sections. For bigger cracks use a concrete sealant or filler.
Metal railings and fasteners expand as they rust, causing the concrete surrounding them to chip or flake off. To reduce the problem, periodically seal the joint with a cement-based sealant where metal meets concrete.
Locate gas and water pipes before you start breaking up an old concrete slab. Rent a jackhammer to make the job easier—one with vibration damping will be less tiring to use. Wear ear and eye protection, work gloves and steel-toed footware.
To prevent buckling and cracking of concrete slabs, sever tree and plant roots along the slab's edges each summer. Drive a spade 6 to 8 in. (15 to 20 cm) below the slab, withdraw it, then drive it in again, making sure to overlap the previous cut.
Use oven cleaner to shift tough stains off concrete. Severe stains may need more than one application.
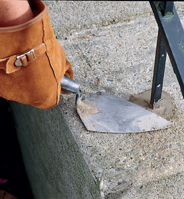
To secure a loose railing that's set into the concrete, first chip out the existing concrete to a depth of 2 in. (5 cm) and a radius of 1 ¼ in. (3 cm) around the post. Vacuum the hole, then dampen the surface. Fill the hole with a bonding agent and patching concrete, and smooth it with a steel trowel or wooden float.