Milk & Milk Products
Among foods, milk has a unique distinction. In itself it can provide the entire diet for young mammals. Naturally, the composition of each animal’s milk is especially suited to the best nourishment of its species, but all the milks are interchangeable as a satisfying food or beverage. Cow’s milk and its products—cream, yogurt, cheese—are the most popular dairy foods in the United States, with goat’s milk products ranking second.
Milk lends its distinctive flavor and pleasing, smooth texture to a range wide enough to include hot chocolate drinks that warm body and soul on chilly mornings and ice cream desserts that take the heat out of a hot summer’s night. The taste of milk products runs the gamut from tangy fermented yogurt to rich fresh cheese.
An excellent buy in terms of nutrition, milk is just about the most concentrated food source of calcium known. It is also an excellent source of B vitamins and protein. In addition, almost all milk sold commercially in this country is fortified with vitamins A and D.
Types of Milk
Organic: The United States Department of Agriculture (USDA) organic seal indicates that the milk has come from cows fed and raised without the use of pesticides, synthetic fertilizers, antibiotics, and hormones.
Whole milk: contains 3.25% milk fat by weight, which translates to about 50 percent of its calories from fat
Reduced-fat milk (2%): about 35 percent of its calories from fat
Low-fat milk (1%, light): about 23 percent of its calories from fat
Fat-free milk (skim, nonfat): under 0.5% milk fat by weight and just 5 percent of its calories from milk fat
Lactose-free/lactose-reduced milk: treated with the enzyme lactase to make milk that can be consumed by those with lactose intolerance.
Dried Milk
Powdered milk comes in full-fat and nonfat versions, as well as buttermilk. You can cook with it in either its reconstituted or its dried form. For the fullest flavor of reconstituted milk, mix with water at least 2 hours before using, and refrigerate. If you are substituting reconstituted nonfat milk for fresh whole milk and want to retain richness, add 2 teaspoons of butter for each cup of reconstituted milk.
Adding nonfat dry milk to baked goods will boost their protein levels. Add when you add the other dry ingredients. For each cup of flour, replace up to ¼ cup of the flour with powdered milk. The added milk will contribute to nicely browned crusts. And you can add nonfat dried milk to liquid fat-free milk to give it a calcium boost.
Cultured Milks
For centuries European and Asian peoples have enjoyed the zing of cultured milks, including yogurt, kefir, piima, skyr, and buttermilk. The live cultures in these fermented milks are purported to have special healthful properties, such as establishing a balance of beneficial bacteria in the intestines. Because fermentation results in a small, tender curd, and because lactose is transformed into lactic acid, many people who have problems with fresh milk are able to digest cultured milks easily. Cultured milks give sauces and soups a luscious smoothness. And, when used in breads, cakes, and biscuits, the acid in cultured milks interacts with the protein in flour to all but guarantee a tender crumb.
Buttermilk: Traditional buttermilk, thick and mildly acidic with flecks of butter, was originally the liquid residue of butter making. Today it is a cultured (soured) milk made from either low-fat or fat-free milk. Confusingly, buttermilk labeled “low-fat” actually has more fat than regular buttermilk, which is made with fat-free milk. Baked goods made with buttermilk have an exceptionally tender crumb and pleasing brown crust.
Yogurt: Yogurt, a tangy, custard-like fermented milk, has long been a popular dietary staple in the Middle East and Russia. Though America was introduced to yogurt in the 1930s, it was not until the 1960s that it gained real acceptance. Yogurt comes in whole-milk, 1%, and fat-free versions (see “Calories, Fat & Calcium in Dairy Products,” opposite page).
Greek yogurt: This creamy yogurt is regular yogurt that has been drained to remove much of the water. The resulting product is extremely dense and about the consistency of thick sour cream. It comes in whole-milk, 5%, 2%, 1%, and 0% versions (see “Calories, Fat & Calcium in Dairy Products,” opposite page). It makes a great substitute for sour cream: Cup for cup, full-fat Greek yogurt has fewer calories and less fat than the same amount of reduced-fat sour cream.
Kefir: Popular in the Middle East, Eastern Europe, and Russia, kefir is one of the oldest-known fermented milks, yet it is a rarity in the United States. In many ways kefir resembles yogurt, but its flavor is somewhat milder and sweeter.
Piima: In the Scandinavian countries, piima is a favored cultured milk. It is milder tasting than either yogurt or kefir.
Skyr: From Iceland, skyr is technically a soft cheese but it closely resembles Greek yogurt. It is made from pasteurized nonfat milk and is coagulated with rennet, as cheese would be. It is then strained through a fine-mesh fabric, which gives it a yogurt-like consistency. It is somewhat tarter than yogurt.
CALORIES, FAT & CALCIUM IN DAIRY PRODUCTS
| DAIRY PRODUCT | 5 SERVING | CALORIES | FAT (G) | CALCIUM (MG) |
| MILK, WHOLE | 1 cup | 150 | 8.2 | 290 |
| MILK, 2% | 1 cup | 121 | 4.7 | 298 |
| MILK, 1% | 1 cup | 102 | 2.6 | 300 |
| MILK, FAT-FREE | 1 cup | 86 | 0.4 | 301 |
| BUTTERMILK | 1 cup | 99 | 2.2 | 284 |
| CREAM, HEAVY | 1 tablespoon | 51 | 5.5 | 9 |
| CREAM, LIGHT | 1 tablespoon | 29 | 2.9 | 10 |
| HALF-AND-HALF | 1 tablespoon | 20 | 1.7 | 15 |
| YOGURT, WHOLE-MILK | 1 cup | 149 | 8 | 296 |
| YOGURT, LOW-FAT | 1 cup | 154 | 4 | 448 |
| YOGURT, FAT-FREE | 1 cup | 137 | 0 | 488 |
| YOGURT, GREEK, WHOLE-MILK | ½ cup | 150 | 12 | 100 |
| YOGURT, GREEK, 5% | ½ cup | 120 | 6.8 | 102 |
| YOGURT, GREEK, 2% | ½ cup | 75 | 2.3 | 110 |
| YOGURT, GREEK, 0% | ½ cup | 60 | 0 | 125 |
| SOUR CREAM, FULL-FAT | 2 tablespoons | 46 | 4.7 | 26 |
| SOUR CREAM, REDUCED-FAT | 2 tablespoons | 40 | 3.6 | 31 |
| SOUR CREAM, LIGHT (LOW-FAT) | 2 tablespoons | 40 | 2.5 | 36 |
| SOUR CREAM, FAT-FREE | 2 tablespoons | 22 | 0 | 38 |
| CREAM CHEESE, FULL-FAT | 2 tablespoons | 99 | 9.9 | 28 |
| CREAM CHEESE, REDUCED-FAT (NEUFCHÂTEL ) | 2 tablespoons | 72 | 6.5 | 33 |
| CREAM CHEESE, LOW-FAT (LIGHT) | 2 tablespoons | 60 | 4.6 | 44 |
| CREAM CHEESE, FAT-FREE | 2 tablespoons | 29 | 0.3 | 98 |
| COTTAGE CHEESE, CREAMED | ½ cup | 110 | 4.8 | 93 |
| COTTAGE CHEESE, 2% | ½ cup | 97 | 2.8 | 103 |
| COTTAGE CHEESE, 1% | ½ cup | 81 | 1.2 | 69 |
| COTTAGE CHEESE, NONFAT | ½ cup | 81 | 0.3 | 97 |
| RICOTTA CHEESE, WHOLE-MILK | ½ cup | 216 | 16 | 257 |
| RICOTTA CHEESE, PART-SKIM | ½ cup | 171 | 9.8 | 337 |
Nondairy Milks
There are many people who have eliminated milk (and other dairy products) from their diets, including those following a vegan regime, those with lactose intolerance, and those who find that milk gives them respiratory congestion. Luckily, there are numerous nondairy alternatives available. Manufacturers often enrich the nondairy milks with vitamin D and calcium, the key bone-building nutrients found in dairy milk. The amounts differ with the brand, so be sure to check the label.
Almond milk: This beverage is made by soaking crushed almonds in water, then pressing them to extract the nut “milk.” Almonds are a good source of vitamin E and also have a bit of calcium. Check the labels to see if other nutrients have been added.
Rice milk: Made from brown rice and often other ingredients to give it thickness. Check the label for additives and nutrients.
Soymilk: See “Soyfoods,” page 84.
Coconut milk: Made by steeping shredded coconut meat in water, then pressing it to get out the milk. The first pressing is very high in fat and is often labeled coconut cream. It is not suitable for drinking. Subsequent pressings yield coconut milk that is lower in fat. However, it is not really sold as a substitute for dairy milk and does not have nutrients added.
Hemp milk: High in proteins and essential fatty acids, with some calcium. Check the label for nutrients added.
Homemade nut or seed milk: Any nut or seed can be made into a milk-like beverage. See “Making Nut or Seed Meal, Milk & Butter,” page 94. Though the resulting milk will be nutritious and tasty, it won’t have the nutrients necessary to bone health.
Storing Milk
Store milk in the refrigerator. Do not freeze milk unless necessary—it may separate and develop an off-flavor. Store milk in opaque containers to protect it from bright light, which causes a loss of B vitamins. Keeping the containers tightly closed will prevent absorption of flavors from other foods in the refrigerator.
Always return milk to the refrigerator immediately after pouring. Exposure to temperatures above 40°F for even a few minutes quickly reduces milk’s shelf life. Never return a small portion of unused milk to the original container. Store it separately.
Cooking with Milk
Milk is exceptionally sensitive to heat. When warmed, it coats the bottom of the pan with a type of gel that can easily scorch and leave the milk with a light brownish color and unpleasant, burnt taste. You can avoid scorching milk by heating it over very low heat for a short time. Better yet, heat milk in a double boiler or in a heavy-bottomed saucepan.
Even the most carefully warmed milk usually evaporates a little to form a “skin” on the top. Frequent stirring helps prevent its appearance on delicate white sauces, thick cream soups, and creamy puddings. (Constant stirring keeps those mixtures from lumping, too.) Cover puddings and cream pies with waxed paper as they cool to eliminate this skin that spoils the appearance and texture of silky, rich, chilled desserts.
Curdling often occurs in casseroles and soups made with milk. To avoid this, use a low temperature and wait until just before serving to blend tomatoes, lemon juice, or other acidic foods into dishes that contain milk. Slowly add the acid foods to the milk, rather than the reverse order. You will find that evaporated milk, which is thick and rich, is more stable than homogenized milk when heated and mixed with vegetables and fruits. Salted, cured foods such as ham added to scalloped potatoes can also cause curdling.
Cooking with Buttermilk
You can use buttermilk in place of sweet milk in baked goods, but you must remember to adjust the recipe to accommodate the acidity of the buttermilk. Add ½ teaspoon of baking soda (which is alkaline) for each cup of buttermilk. Conversely, if a recipe calls for buttermilk and you only have sweet milk, you can sour the milk with a little lemon juice or white vinegar. Place 1 or 2 teaspoons of the acid in a glass measuring cup, and pour milk to come up to the level of the amount called for in the recipe. Let the milk sit at room temperature for about 5 minutes to curdle.
SCALDING MILK
Scalding milk was originally used to kill bacteria in unpasteurized milk. Since this is not a problem for most people, the only reasons for scalding will be specific to a recipe. For example, some recipes call for scalding to improve texture or to hasten fermentation.
To scald milk, first rinse a saucepan with cold water to lessen sticking. Then, heat the milk over very low direct heat, or in the top of a double boiler, until tiny bubbles form around the edge of the pan. Do not let the milk boil up. Cool the milk slightly before adding it to other ingredients.
Cooking with Yogurt
Cooking with yogurt can be somewhat tricky. Always heat it over low heat. And to reduce the chance of it separating or curdling, do not add it to hot foods until shortly before they are finished cooking. If lengthy cooking should be required, stabilize the yogurt by stirring in 1 tablespoon of flour, cornstarch, or arrowroot for every 1 quart of yogurt. The thickener will help bind the yogurt’s proteins and whey together.
HOMEMADE DAIRY PRODUCTS
The cultures for each of these products are available online or in natural foods stores.
Yogurt
It takes only two ingredients to make yogurt: milk and a starter. Just about any milk—cow, goat, sheep, water buffalo, and even soybean—will produce a tasty yogurt, though the texture and flavor will vary with each. Whole cow’s milk (the one most commonly used in the United States) makes a smooth, cus-tardlike, tart yogurt; fat-free milk makes a fairly thin one; and a combination of half milk and half light cream yields a rich, thick, sweet product. Adding ⅓ cup of powdered nonfat milk to 1 quart of fat-free milk will produce a firmer, more nutritious yogurt.
The starter can be a packet of freeze-dried culture (bacteria) that is available in natural foods stores, or yogurt from a previous homemade batch (or commercial yogurt). Though the freeze-dried culture is the most reliable, a reserved tablespoon or two of yogurt will give excellent results most of the time. The specific bacteria that turn milk into yogurt are Lacto-bacillus bulgaricus and Strepto-coccus thermophilus.
If you use a commercial yogurt as a starter, be absolutely certain it contains a live culture. Today, many commercial yogurts have been pasteurized to increase their shelf life, but, unfortunately, the heat treatment inactivates the bacteria. Freshness of the yogurt is also important: Old cultures tend to be weak. Select a yogurt without added gelatins, flavors, or sweeteners. The extras interfere with the growth of the bacteria.
The equipment needed for making yogurt is relatively simple. Use an enameled, stainless steel, or glass vessel for heating the milk, since none of those materials will taint the taste. A glass bowl or jar works best for the incubation period.
To make yogurt, slowly heat 1 quart of milk until it just reaches the boiling point. Do not let it actually boil and foam. (Pasteurize the milk if it is raw. Bacteria in raw milk will interfere with the yogurt culture.) Cool the milk to between 105° and 110°F. At that temperature a drop of milk on your wrist should feel lukewarm, and you should be able to keep your little finger in the milk for a slow count of ten. Stir in one packet of freeze-dried culture, or 1 or 2 tablespoons of yogurt from a previous batch. Incubate the mixture—do not jiggle it during incubation—in a covered container at 105° to 110°F for 5 to 10 hours. (See “Heat Sources for Incubating Yogurt,” opposite.) The longer the incubation, the tarter the yogurt.
Chill the thickened yogurt in a covered container at 40°F for at least 12 hours before serving. Yogurt will stay fresh for 4 to 5 days, though it will taste tarter on the fifth day than on the first. If a watery,
yellowish liquid (whey) accumulates on the top, drain it off if you like a thick consistency, or stir it in if you prefer a thin one.
Flavorings should be added to yogurt right before serving. If you want to retain a thick yogurt consistency, gently fold instead of stirring. Pureed fruits, homemade preserves, honey, maple syrup vanilla, and cinnamon combine deliciously with yogurt for light desserts and snacks.
Heat Sources for Incubating Yogurt
Insulated picnic cooler: Place filled jars in the cooler and surround them with warm water (105° to 110°F). If possible, the water should be up to the midpoint of the jars. However, too much water will make the cooler unwieldy. Check the temperature every hour and add or subtract water as needed.
Oven: An electric oven set on very low heat will do the job. So will a gas oven with only a pilot light. In both cases use a thermometer, and set the jars in a pot of water to be sure the temperature remains constant.
Warming tray: A thermostatically controlled tray used for keeping food warm works well. A thermometer and a jar of water will help you find the right temperature setting.
Thermos: This is a good method if you are making only 1 quart of yogurt. Pour the inoculated milk into a prewarmed, wide-mouthed thermos, cap it, and let it sit undisturbed.
Electric yogurt maker: Pour the heated, inoculated milk into the jars that come with the unit and follow the manufacturer’s directions.
Buttermilk
You can make 1 quart of cultured buttermilk at home by simply adding a packet of freeze-dried culture or ½ cup of buttermilk to fresh fat-free milk. Let the mixture ferment at room temperature for 16 to 18 hours. Store it in the refrigerator as you would fresh milk.
Kefir
To make kefir, scald milk, then let it cool to room temperature. Add the culture and put the mixture in containers to incubate at room temperature for 12 to 24 hours. Successive batches of kefir can be made with small amounts of kefir set aside from each previous batch.
Piima
As for yogurt and kefir, once you have made piima from a freeze-dried culture, you can go on indefinitely, making new batches with a few spoonfuls from a previous batch. To make piima, simply stir the culture into milk at room temperature (about 70°F). Use only milk—piima bacteria grow best when they have no competition. Let the mixture incubate for 8 to 24 hours. The piima will ferment more slowly in a cool room (one below 70°F).
Cheese
Hundreds of types of cheese with individual flavors and textures are made all over the world, and they adapt readily to countless uses, from simple main dishes to salad dressings to creamy rich desserts, not to mention being savored on their own.
Though no two types of cheese are alike, all cheese makers start the cheese-making process in the same way. First, they add a culture (bacteria) or rennet (an enzyme from the lining of a calf’s stomach) to coagulate (curdle) the protein in milk. Then they cut or break up the resulting solid (curd) and drain off the liquid (whey). After a brief draining, soft, fresh cheeses such as cottage cheese are ready for eating. Firmer cheeses require additional steps such as pressing and ripening (curing).
The unique flavor and texture of each cheese depend on many factors including: 1) the amount of whey drained and pressed from the curd, 2) the seasonings used, 3) the type of bacteria added during curing, and 4) the ripening conditions—temperature, humidity, and length of time.
Though cheese finds a very welcome place on our tables, its fat content can be a bit of a concern. Likewise, people who are limiting their intake of sodium should avoid certain cheeses. To begin with, milk has a naturally high amount of sodium, and in the cheesemaking process, liberal quantities of salt are often added during curing to flavor, to inhibit unwanted mold growth, and to draw out excess moisture.
Buying Cheese
Specialty shops and well-stocked supermarkets carry a large assortment of imported and domestic cheeses. For top-notch cheese, shop in a market where the turnover is high, select only wrapped cheese kept in chilled cases, and read labels carefully to check contents. Some cheese, however, will also contain ingredients that are not always listed on the label:
Bleaching agents: Benzoyl peroxide is sometimes used to bleach the milk in blue cheese, provolone, Parmesan, and Romano.
Water-binding agents: A gum or gelatin is often used in cream cheese and spreads to help bind moisture to the curd.
Preservatives: Sorbic acid, potassium sorbate, or sodium sorbate is often added to cheese sold in slices to inhibit mold growth.
Determine freshness, too, by sampling cheese whenever possible. In specialty stores where cheese is cut from large wheels and blocks, customers are usually permitted to sample the cheese. Take advantage of the opportunity to be sure the cheese you are considering is of peak quality.
Storing Cheese
Since hard cheese is fairly low in moisture, it stores well for several months. Soft, fresh cheese, on the other hand, has a high moisture content and keeps for only 3 to 5 days.
Before you store cheese in the refrigerator, the general rule is to wrap it snugly in foil or plastic wrap to keep it from drying out and from picking up unwanted moisture. Blue cheese should be loosely wrapped or placed in a covered container because it keeps best when surrounded by a small amount of air. Always store a strong cheese like Limburger in a tightly closed container; otherwise, the contents of your refrigerator will pick up Limburger’s distinctive aroma.
For extended keeping you can seal the cut surfaces of cheese with hot paraffin. An alternative is freezing, but the texture of any cheese that has been frozen tends to be crumbly and either mealy or pebbly. The cheeses most successfully frozen are brick, cheddar, Edam, Gouda, mozzarella, Muenster, Port du Salut, and provolone. Freeze the cheese in 1-inch-thick pieces for no longer than 6 months, and use frozen cheese quickly after thawing.
If cheese becomes hard and dry during storage, all is not lost. Simply grate the cheese and use as a topping for pasta, vegetables, and soups. If mold grows on cheese you are keeping, however, it maybe a matter for concern, since some molds contain dangerous aflatoxins. To be on the safe side, discard any cheese that grows moldy spots.
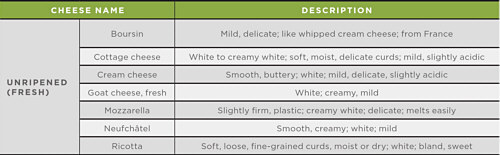
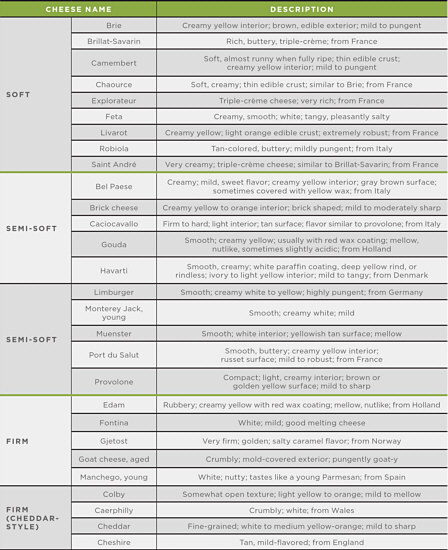
A GUIDE TO CHEESE
This country now makes just about every type of cheese there is. Sometimes the cheeses are made in the style of a European classic (such as Camembert or Cheddar), and sometimes it’s a cheese unique to this country (Maytag blue). And cheese stores are filled with more and more interesting imported cheeses every day. This makes it impossible to do a comprehensive cheese chart. Instead, this chart is organized to give you a sense of the category of cheeses. This way, if you’ve tasted Cheddar, then chances are you’ll have a good idea what another one in the same category will taste like.
As a general guideline to the categories in the chart: unripened cheeses are used primarily for cooking; the soft cheeses are used primarily for serving on their own; the semi-soft, firm, and blue cheeses are used for both cooking and serving; and the hard, grating cheeses are used just for cooking.

Making Cheese at Home
Tasty soft cheese is easy to make at home. Hard cheese, on the other hand, requires quite a bit of equipment and time. It takes approximately 10 pounds (or about 5 quarts) of milk to make 1 pound of cheese. You also need these seven items:
- earthenware crock, glass baking dish, or stainless steel or enameled pot
- dairy thermometer
- long-handled spoon (preferably made from glass, wood, stainless steel, or enamel)
- spatula or wide knife
- large pan or shallow pot that is larger than your crock
- cheesecloth
- colander
All equipment must be scrupulously clean. Unwanted bacteria will interfere with the curdling process and produce off-flavors and strange textures. Wash the equipment with soapy water and rinse it thoroughly with very hot water.
For more detailed instructions for making your own soft cheese, see “Basic Steps for Making Soft Cheese,” on page 64.
To give you a taste of cheesemaking, try “Homemade Cottage Cheese,” page 66. It’s the perfect cheese for beginners.
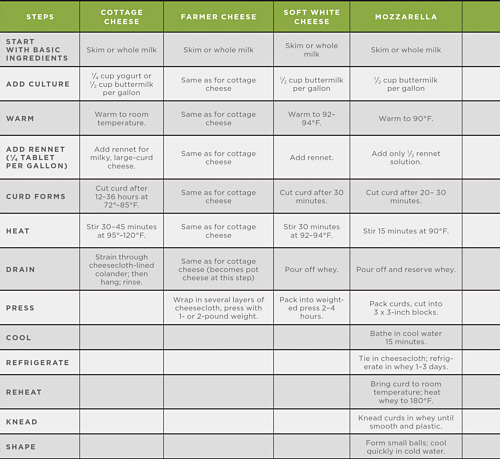
BASIC STEPS FOR MAKING SOFT CHEESE
Salt is added to most cheeses after the curds have formed and the whey has been drained off. The amount needed is really a matter of taste, and you can make any of these cheeses with no salt at all if you’d prefer. As a very rough guideline, use a generous ¼ teaspoon for every quart of milk. It’s better to undersalt than oversalt, especially for cheeses that get pressed.
*Traditional ricotta is made from whey. It was originally produced in Italy and is still commonly found in many European countries.
**New World ricotta is made from a combination of milk and whey. This type is generally more popular in the United States.

HOMEMADE COTTAGE CHEESE
This is the cheese for beginners to try. The time element is a consideration, but it is not “work” time, and it does not require the cook’s presence as the mixture sets. Only a minimum of skill is required. After the first batch, most cooks will feel confident about the procedure. This cheese can be made in 16 to 36 hours.
1 gallon fat-free or whole milk
¼ cup yogurt or ½ cup cultured buttermilk
Pour the milk into a very clean, large, stainless steel or enameled pot. Set the pot on a rack inside a larger pot. Fill the outside pot with hot water. Warm on the stove over low heat until the milk reaches 85°F.
Turn off the heat. Stir the yogurt or buttermilk into the milk with a wire whisk. Cover with a towel. Incubate the milk without disturbing it, at a temperature of 72° to 85°F until the milk becomes firm and yogurt-like; this will take between 12 and 36 hours. Temperature may fluctuate during this time but milk may not be jiggled. It’s ready when the curd pulls away from the side of the pot and a clear liquid is visible around the edges of pot.
It is now time to separate the whey, a clear liquid, from the curds, which are white and made of coagulated proteins. With a long thin stainless steel knife, cut the curd into squares while still in the pot. Next, hold the knife at a 45-degree angle and slice diagonally through the lines that are already made. These cuts will allow whey to seep out of curds and will facilitate even heating in the next step. Place fresh hot water in the outside pot, and heat the curds over low heat until they reach 90°F, checking the temperature near the edge of the pot. At no time allow the water in the outside pot to get hotter than 170°F. Slowly stir the curds from the outside edges into the center and bring the curd from the bottom to the top, using a rubber spatula or a large metal spoon. The curds are still soft at this point and easily broken. Continue to raise the temperature of the curds to 120°F, stirring gently every 10 minutes. Do not rush this process: The time needed to raise the temperature to 120°F from room temperature should be regulated to take about 45 minutes.
Hold the curds at 120°F until they feel firm, 10 to 20 minutes longer. When the curds show resistance to being squeezed and feel slightly springy but still a long way from being rubbery, they are ready to drain. The whey will be very clear with a golden tinge. Rinse a cheesecloth and line a colander with it. Gently ladle the curds into the colander. Pour the whey through the curds. Rinse gently with cool water. If water drains too slowly, shift the curds about in the cheesecloth. Rinse again to finish cooling the curds. Tie the ends of the cheesecloth together and hang to drain for another 30 minutes.
At this point, you should add a small amount of salt to the drained curds. Start with 1 teaspoon and mix well. Taste the cheese and add more if you’d like. Or for a very low sodium cheese, do not add any salt at all. Refrigerate. Makes 4 cups