Milk Chocolate-Peanut Butter Fudge
Caramel-Dark Chocolate Truffles with Fleur de Sel
Dark Chocolate Truffles with Honey and Lime
Chocolate-Orange Truffles with Almonds
Chocolate Truffle Croquembouche
Layered Peppermint Crunch Bark
Dried Fruit and Nut Chocolate Bark
Macadamia Brittle with Fleur de Sel
Cranberry and Tart Apple Gelées
Chocolate-Dipped Brown Sugar-Maple Creams
Mixed Berry Chocolate-Toffee Bites
 Espresso-Chocolate Fudge
This fudge has the silky texture of a no-beat fudge (and is almost as easy to make) and the rich taste of an old-fashioned, hand-beaten fudge. The secret is its mix of creamy ingredients—marshmallow creme, sweetened condensed milk, and whipping cream. Espresso intensifies the flavor of bittersweet chocolate. Makes 30 pieces
6 ounces bittersweet or semisweet chocolate (do not exceed
61% cacao), chopped
¼ cup marshmallow creme
1 ounce unsweetened chocolate, chopped
1 teaspoon vanilla extract
½ cup water
2 tablespoons instant espresso powder or instant coffee powder
1½ cups sugar
¾ cup canned sweetened condensed milk
⅓ cup heavy whipping cream
¼ cup (½ stick) unsalted butter
2 ounces high-quality white chocolate (such as Lindt or Perugina)
30 espresso beans
30 paper candy cups
Line 8×8×2-inch glass baking dish with aluminum foil, leaving overhang. Combine bittersweet chocolate, marshmallow creme, unsweetened chocolate, and vanilla in medium bowl. Mix ½ cup water and espresso powder in heavy large saucepan until espresso powder dissolves. Add sugar, milk, cream, and butter and stir over medium heat until sugar dissolves, occasionally brushing down sides of pan with wet pastry brush. Attach clip-on candy thermometer to side of pan. Increase heat to high and bring mixture to boil. Reduce heat to medium-high and stir constantly but slowly with wooden spoon until candy thermometer registers 234°F, about 12 minutes.
Immediately pour mixture over ingredients in bowl (do not scrape pan). Stir vigorously with wooden spoon until all chocolate melts and fudge thickens slightly, about 3 minutes (mixture will still be glossy). Transfer fudge mixture to prepared baking dish. Smooth top of fudge with rubber spatula. Refrigerate fudge uncovered until firm enough to cut, about 2 hours.
Using foil as aid, lift fudge from pan. Trim edges of fudge. Cut into 30 pieces. Melt white chocolate in top of double boiler over simmering water. Using fork, drizzle white chocolate decoratively over fudge. Press 1 espresso bean onto top of each piece of fudge. Place fudge in paper candy cups. Refrigerate fudge until white chocolate sets, about 20 minutes.
DO AHEAD: Can be made 1 week ahead. Refrigerate in airtight container. Bring to room temperature before serving.
Technique Tip: Don’t Scrape
When a candy recipe involves boiling, the instructions often specify “do not scrape pan” when the boiled mixture is poured into another container. This is important, as you don’t want to scrape in any sugar crystals that might be clinging to the sides of the pan. The crystals could ruin the texture of the candy.

Milk Chocolate-Peanut Butter FudgeYou don’t need a big slab of marble and an audience of tourists to make great fudge. All it takes is a loaf pan, a metal bowl, a heavy saucepan, and most importantly, a candy thermometer. Makes 24 pieces
3 ounces high-quality milk chocolate (such as Lindt or Perugina), chopped
½ ounce unsweetened chocolate, chopped
½ teaspoon vanilla extract
¾ cup sugar
⅓ cup canned sweetened condensed milk
⅓ cup water
¼ cup heavy whipping cream
2 tablespoons (¼ stick) unsalted butter, cut into pieces
⅓ cup super-chunky peanut butter (do not use old-fashioned style or freshly ground)
¾ cup sugar
⅓ cup canned sweetened condensed milk
⅓ cup water
¼ cup heavy whipping cream
1 ounce high-quality milk chocolate (such as Lindt or Perugina), chopped, melted
2 tablespoons very coarsely chopped roasted unsalted peanuts
24 paper candy cups
MILK CHOCOLATE FUDGE: Line 9×5×3-inch loaf pan with aluminum foil, leaving overhang. Place both chocolates and vanilla in medium metal bowl. Combine sugar, milk, ⅓ cup water, cream, and butter in heavy 2-quart saucepan. Stir over medium-low heat until sugar dissolves. Brush down sides of pan with wet pastry brush. Attach clip-on candy thermometer to side of pan. Increase heat to high and bring to rolling boil. Reduce heat to medium-high and stir constantly but slowly with wooden spoon until candy thermometer registers 230°F, about 10 minutes.
Immediately pour mixture over ingredients in bowl (do not scrape pan). Stir vigorously with wooden spoon until chocolate melts and fudge thickens slightly, about 1 minute (mixture will still be glossy). Transfer fudge mixture to prepared pan. Smooth top of fudge with rubber spatula. Cover with plastic wrap. Using hand, press gently into even layer. Remove plastic. Refrigerate mixture uncovered while preparing peanut butter fudge.
PEANUT BUTTER FUDGE: Place peanut butter in medium metal bowl. Stir sugar, milk, ⅓ cup water, and cream in heavy 2-quart saucepan over medium-low heat until sugar dissolves. Brush down sides of pan with wet pastry brush. Attach clip-on candy thermometer to side of pan. Increase heat to high and bring to rolling boil. Reduce heat to medium-high and stir constantly until candy thermometer registers 230°F, about 8 minutes.
Pour mixture over peanut butter in bowl (do not scrape pan). Stir vigorously with wooden spoon until fudge thickens slightly, about 3 minutes (mixture will begin to lose gloss).
Spoon peanut butter fudge over chocolate fudge in pan. Smooth top with rubber spatula. Cover with plastic wrap. Using hand, press gently into even layer. Remove plastic. Drizzle melted milk chocolate over fudge. Sprinkle nuts over. Refrigerate until firm enough to cut, about 2 hours.
Using foil as aid, lift fudge from pan. Fold down foil sides. Trim ends of fudge. Cut into 24 pieces. Transfer fudge to paper candy cups.
DO AHEAD: Can be made 1 week ahead. Refrigerate in airtight container. Bring to room temperature before serving.
Caramel-Pecan FudgeEven people who don’t love chocolate can find something to love here. This fudge is also known as penuche or brown sugar fudge. Its flavor is reminiscent of the very best pecan praline, but the texture is not grainy at all—it’s smooth and creamy. Makes 24 pieces
1¼ cups sugar
1 cup (lightly packed) golden brown sugar
1 cup heavy whipping cream
⅔ cup canned sweetened condensed milk
¼ cup (½ stick) unsalted butter, cut into pieces
⅓ cup water
2 tablespoons light corn syrup
¾ cup very coarsely chopped toasted pecans
24 pecan halves, toasted
24 paper candy cups
Line 9×5×3-inch loaf pan with aluminum foil, leaving overhang. Mix both sugars in heavy 3-quart saucepan, breaking up any lumps with fingertips. Add cream, milk, butter, ⅓ cup water, and corn syrup. Stir over medium-low heat until sugar dissolves. Brush down sides of pan with wet pastry brush. Attach clip-on candy thermometer to side of pan. Increase heat to high and bring to rolling boil. Reduce heat to medium-high and cook until candy thermometer registers 232°F, stirring frequently, about 15 minutes. Pour onto rimmed baking sheet (do not scrape pan). Cool 10 minutes.
Using rubber spatula, scrape mixture into medium metal bowl. Using handheld electric mixer, beat fudge at high speed until thick and creamy, about 5 minutes. Beat with wooden spoon until fudge begins to lose its gloss and thickens even more, about 2 minutes. (To test for proper consistency, mound fudge mixture on spoon; turn upside down. If mixture falls off spoon, beat fudge again and repeat test.) Mix in chopped nuts. Transfer fudge to prepared loaf pan. Using rubber spatula, spread into smooth, even layer. Arrange pecan halves lengthwise in 3 rows atop fudge, spacing evenly. Press to adhere. Refrigerate uncovered until firm enough to cut, about 2 hours.
Using foil as aid, lift fudge from pan. Fold down foil sides. Trim ends of fudge. Cut between pecan halves into 24 pieces. Transfer fudge to paper candy cups.
DO AHEAD: Can be made 1 week ahead. Refrigerate in airtight container. Bring to room temperature before serving.
Melting Chocolate
Tempering is a technique that involves melting and cooling chocolate to specific temperatures in order to create good cocoa crystal structure. This produces chocolate that is glossy with a crisp, clean snap. Because the process can be time-consuming and difficult to master without a machine, our recipes use a simplified alternative technique: The chocolate is melted to specific temperatures, then chilled to set the chocolate quickly (this helps prevent bloom—streaks of cocoa butter that affect the appearance of the chocolate). The finished chocolates should be stored in the refrigerator, but for the best texture, allow them to stand at room temperature for about 15 minutes before serving.
When melting chocolate for dipping truffles and other candy centers, moisture is the enemy. Be careful not to let any steam or water come in contact with the chocolate or it will seize, or become lumpy, making it unsuitable for dipping. For the same reason, never cover chocolate when melting.
Leftover melted chocolate that remains in the pan after dipping truffles or other centers can be used several ways:
1. Add nuts and drop by spoonfuls onto foil-lined sheets and chill to form nut clusters.
2. Dip whole fresh strawberries into the chocolate; place on a foil-lined baking sheet and chill until firm.
3. Add enough cream to thin the chocolate to a pourable consistency. Use as a fondue for fresh fruits, cubes of angel food cake, and cookies.
4. Spoon chocolate into small disks on a foil-lined sheet and chill until set. Store disks in resealable plastic bags in the freezer for future use. You can also add them to milk and heat them to make rich hot chocolate.
Pine Nut and Orange FudgeThis sophisticated fudge is subtly flavored with finely grated orange peel and studded with tiny, delicate pine nuts instead of the usual walnuts or almonds. Makes 24 pieces
2¼ cups sugar
¾ cup heavy whipping cream
⅔ cup canned sweetened condensed milk
½ cup sour cream
⅓ cup water
2 tablespoons (¼ stick) unsalted butter, cut into pieces, room temperature
2 tablespoons light corn syrup
1 tablespoon finely grated orange peel
¾ cup pine nuts, toasted
24 paper candy cups
Line 9×5×3-inch loaf pan with aluminum foil, leaving overhang. Combine sugar, cream, milk, sour cream, ⅓ cup water, butter, corn syrup, and orange peel in heavy 3-quart saucepan. Stir over medium-low heat until sugar dissolves, about 15 minutes. Brush down sides of pan with wet pastry brush. Attach clip-on candy thermometer to side of pan. Increase heat to high and bring to boil. Reduce heat to medium-high and cook until candy thermometer registers 234°F, stirring frequently, about 12 minutes. Pour mixture onto rimmed baking sheet (do not scrape pan). Cool 15 minutes.
Using rubber spatula, scrape mixture into medium metal bowl. Using electric mixer, beat fudge until thick and creamy and no longer glossy, about 5 minutes. (To test for proper consistency, mound fudge mixture on spoon; turn upside down. If mixture falls off spoon, beat fudge again and repeat test.) Mix in pine nuts and immediately transfer fudge to prepared pan. Cover with plastic wrap and press to flatten fudge into even layer. Refrigerate until firm enough to cut, about 1 hour.
Using foil as aid, lift fudge from pan. Fold down foil sides. Trim ends of fudge. Cut into 24 pieces. Transfer fudge to paper candy cups.
DO AHEAD: Can be made 1 week ahead. Refrigerate in airtight container. Bring to room temperature before serving.
Ingredient Tip: Pine Nuts
Pine nuts—which do, in fact, come from pine cones—are very high in fat, so they can go rancid rather quickly. For this reason, they should be stored in an airtight container in the refrigerator or freezer.
Tools of the Trade
When making candy, which can be more demanding than preparing other kinds of desserts, it’s important to have the appropriate equipment.
CANDY THERMOMETERS: If a recipe calls for a candy thermometer, it’s essential to use one for the most accurate results. Don’t be tempted to merely follow the cooking time provided in a recipe. Candymaking is very precise; being even a few degrees off can make a big difference in the texture of your candy.
Select a candy thermometer with a bulb attached to a metal backing that’s set low enough to measure the heat of the candy mixture, but that won’t touch the bottom of the pan. The ideal thermometer has easy-to-read numbers in 2-degree increments and a clip that will easily attach to the side of the pan. This allows you the freedom to constantly stir the candy mixtures without having to hold a thermometer in place.
Always check the thermometer’s accuracy before you get started. Place the thermometer in a saucepan of boiling water for a few minutes. It should read 212°F. If it registers above or below, add or subtract the same number from the temperature in the recipe.
When reading a thermometer, do it at eye level for accuracy.
SAUCEPANS: Use high-quality, heavy-duty pans with evenly thick bottoms and sides. Thin, flimsy pans won’t work, as the candy mixtures will cook unevenly and may even burn at the sides of the pan. If a recipe calls for a specific size saucepan, use it, as candy mixtures can rise considerably as they boil.
WOODEN SPOONS: A long-handled, sturdy wooden spoon is best for candymaking; it won’t conduct heat and the temperature of the candy mixture will be more accurate. Wood also allows you to stir comfortably, because it never gets hot.
PASTRY BRUSHES: You’ll use these to brush down the sides of the pan when dissolving sugar in the candy mixture, as well as for a host of other dessert-making uses.
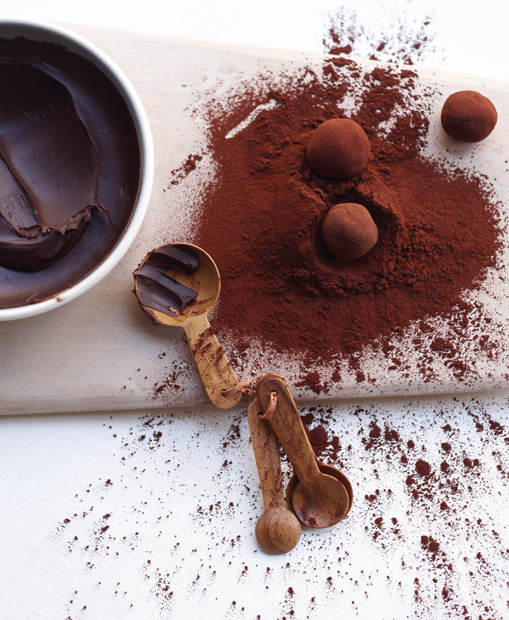
 Caramel-Dark Chocolate Truffles with Fleur de Sel
Salted caramels meet truffles in these indulgent treats. They get their slight saltiness from fleur de sel, a fine French sea salt that’s becoming more widely available. If you can find Maldon sea salt—an English salt that comes in larger flakes—sprinkle the chocolate-coated truffles with it at the end for a very attractive finished look. Look for both fleur de sel and Maldon sea salt in well-stocked supermarkets and specialty foods stores, or order online from amazon.com. Start this recipe at least a day ahead as the truffles need to chill overnight. Makes about 32
20 ounces bittersweet or semisweet chocolate (do not exceed 61% cacao), finely chopped, divided
⅓ cup sugar
2 tablespoons water
⅔ cup heavy whipping cream
¼ teaspoon fleur de sel plus additional for sprinkling
½ cup natural unsweetened cocoa powder
Stir 8 ounces chocolate in metal bowl set over saucepan of barely simmering water (do not allow bowl to touch water) until chocolate is melted and smooth. Remove bowl from over water.
Combine sugar and 2 tablespoons water in heavy small saucepan. Stir over medium heat until sugar dissolves, occasionally brushing down sides of pan with wet pastry brush. Increase heat; boil until syrup is deep amber color, occasionally brushing down pan sides and swirling pan, about 4 minutes. Add cream (mixture will bubble vigorously). Stir over very low heat until caramel is smooth. Mix caramel and ¼ teaspoon fleur de sel into melted chocolate. Chill until truffle filling is firm, at least 3 hours.
Place cocoa in bowl. Using 1 tablespoon truffle filling for each truffle, roll into balls, then roll in cocoa. Arrange on baking sheet. Cover; chill overnight.
Line rimmed baking sheet with aluminum foil. Stir remaining 12 ounces chocolate in medium metal bowl set over saucepan of barely simmering water (do not allow bowl to touch water) until chocolate is melted and smooth and thermometer inserted into chocolate registers 115°F. Remove bowl from over water. Working quickly, submerge 1 truffle in melted chocolate. Using dinner fork, lift out truffle and tap fork against side of bowl, allowing excess chocolate to drip back into bowl. Using small knife, push truffle off fork and onto prepared sheet. Repeat with remaining truffles. Sprinkle truffles lightly with additional fleur de sel. Refrigerate until coating sets, at least 1 hour.
DO AHEAD: Can be made 1 week ahead. Refrigerate in airtight container. Bring to room temperature before serving.
That’s a Wrap
The candies in this chapter are even more impressive when they’re cleverly packaged and presented. Discount and import stores are a terrific source for unusual and decorative containers, including tins, boxes, and baskets. For candies that can be stacked (bark and brittle, for example), a box or container with 5-inch-high sides is fine. But for the more delicate candies (such as truffles, or anything inside a paper cup), keep them in a single layer in a box no more than 2 inches deep.
Create a tiered tower of decorative holiday tins in graduated sizes. Wrap the whole tower in colored cellophane and tie it with a French silk ribbon. Decorate the ribbon with anything you like: a Christmas ornament, a sprig of pine or eucalyptus, silk flowers. This is a great way to deliver several different types of candies—truffles, toffees, caramels—each in its own tin. Holiday tins are often sold in nesting sets at stores.
Package the candies using an item of kitchen equipment that itself makes a great gift. Use a fluted tart pan, baking dish, or decorative platter, for example. Stroll through a house-wares store and let your imagination go. If possible, link the type of candy to the gift in some way—presenting the Layered Peppermint Crunch Bark (page 621) on a large baking sheet, or enclosing the Asian-influenced New-Wave Rocky Road (page 622) with crystallized ginger inside a Chinese bamboo steamer.
Think beyond traditional candy boxes—way beyond. Use ceramic containers, papier-mâché or fabric-covered boxes, wicker baskets, star-shaped metal mesh containers (often available in silver or gold at import stores during the holidays), Shaker birch boxes. Line them with waxed paper, or put the candies inside a clear cellophane bag inside the container.
Recipe Tip: Truffles
Chocolate truffles are a decadent treat—rich mixtures of melted chocolate and cream and/or butter, plus other ingredients that may include fruit, nuts, spices, or liqueurs. The chocolate mixture is chilled and rolled into balls, then usually coated with cocoa powder or melted chocolate. Present them in paper candy cups, available at baking or candymaking supply stores (or see Online and Mail-Order Sources on page 632).
 Fig and Walnut Truffles
Cognac gives a heady flavor to these easy-to-make truffles. When rolling the truffles in your hands to shape, be sure to work quickly so that the ganache doesn’t melt. Makes 36
¾ cup heavy whipping cream
6 tablespoons (¾ stick) unsalted butter
3 tablespoons light corn syrup
12 ounces bittersweet or semisweet chocolate (do not exceed 61% cacao), chopped
1 tablespoon Cognac or other brandy
⅔ cup chopped dried Calimyrna figs
⅔ cup chopped toasted walnuts
Natural unsweetened cocoa powder
Line 8×8×2-inch metal baking pan with aluminum foil, leaving overhang. Heat cream, butter, and corn syrup in heavy medium saucepan over medium heat until just boiling, stirring occasionally. Remove saucepan from heat. Add chocolate and stir until chocolate melts and mixture is smooth. Mix in Cognac, then figs and walnuts. Pour into prepared pan; refrigerate just until firm enough to handle, about 1 hour.
Using foil as aid, lift chocolate block from pan; place on work surface. Flatten foil at edges.
Cut chocolate mixture into 36 squares. Roll each square by hand to form ball. Dust lightly with cocoa. Cover and chill until firm, at least 4 hours.
DO AHEAD: Can be made 4 days ahead. Refrigerate in airtight container. Bring to room temperature before serving.
Dark Chocolate Truffles with Honey and LimeLime flavors the bittersweet chocolate three ways: It’s infused into the cream that melts the chocolate, it’s stirred into the melted honey that sweetens the ganache, and it’s combined with the cocoa powder that coats the truffles. Make the cocoa-lime truffle coating a day ahead; it needs to dry overnight. Makes about 55
1½ teaspoons finely grated lime peel, divided
⅔ cup sugar
1 cup natural unsweetened cocoa powder
15 ounces bittersweet or semisweet chocolate (do not exceed 61% cacao), finely chopped
1 cup heavy whipping cream
¼ cup fresh lime juice
¼ cup honey
6 tablespoons (¾ stick) unsalted butter, room temperature
Place 1 teaspoon lime peel on work surface. Chop very finely; transfer to medium bowl. Add sugar and rub together with fingertips until mixture is slightly moist. Mix in cocoa. Spread on rimmed baking sheet. Let dry uncovered at room temperature 1 day.
Place chocolate in medium bowl. Finely chop remaining ½ teaspoon lime peel; transfer to medium saucepan. Add cream to pan and bring just to boil over medium heat. Cover and set aside 10 minutes. Uncover cream mixture, return to boil, and pour over chocolate. Let stand 30 seconds. Stir until chocolate is smooth.
Meanwhile, combine lime juice and honey in small saucepan. Stir over low heat until honey melts and mixture is warm. Gradually stir warm honey mixture into chocolate mixture. Add butter 2 tablespoons at a time, stirring until ganache is smooth. Cover; chill until firm, at least 4 hours or overnight.
Line 2 rimmed baking sheets with aluminum foil. Drop cold ganache by heaping teaspoonfuls onto prepared sheets. Refrigerate 30 minutes. Working quickly, roll ganache between palms into balls and return to baking sheets, briefly freezing ganache on sheets if becoming too soft to shape. Chill truffles until firm, about 45 minutes.
Roll truffles in cocoa mixture to coat; shake off excess.
DO AHEAD: Can be made 2 weeks ahead. Refrigerate in airtight container.
Chocolate-Orange Truffles with AlmondsThese truffles are flavored with Grand Marnier and covered in a crunchy almond coating—not the usual cocoa powder or melted chocolate. If you don’t have orange liqueur, try a berry variety like Chambord or crème de cassis. Makes 25
¾ cup heavy whipping cream
12 ounces bittersweet or semisweet chocolate (do not exceed 61% cacao), finely chopped
2 tablespoons Grand Marnier or other orange liqueur
1½ teaspoons finely grated orange peel
1¼ cups almonds, toasted, finely chopped
Line 8×8×2-inch metal baking pan with aluminum foil, leaving overhang. Bring cream to boil in heavy medium saucepan. Remove from heat. Add chocolate and whisk until melted and smooth. Whisk in Grand Marnier and orange peel. Pour into prepared pan; freeze just until firm, about 30 minutes.
Using foil as aid, lift chocolate block from pan; place on work surface. Fold down foil sides. Cut chocolate mixture into 25 squares. Place nuts in small bowl. Press 1 chocolate square into nuts, coating completely. Roll truffle between palms into ball. Place on small baking sheet. Repeat with remaining chocolate and nuts. Cover; refrigerate until very firm, about 2 hours. Serve cold.
Truffle Techniques
You might not guess it by looking at them, but truffles are among the easiest candies to make once you learn the right techniques. When rolling the chocolate base, it’s important to handle it as little as possible (so it doesn’t start to melt). We recommend scooping out the well-chilled ganache with a mini ice-cream scoop with a release. If you don’t have the right-size scoop, form spheres of chocolate with a teaspoon-size measuring spoon, then use your hands to smooth out the spheres (work quickly so that the chocolate doesn’t melt). There are two primary techniques for coating truffles in chocolate:
For a hand-coated chocolate with a thin coating, start by scooping a little bit of melted chocolate into your palm. Next, roll a chilled truffle in your palm until it’s evenly coated, then drop it onto a waxed paper-lined baking sheet or roll it in a bowl of chopped nuts. It’s a bit messy (your kids will love it), but it’s also easy and effective.
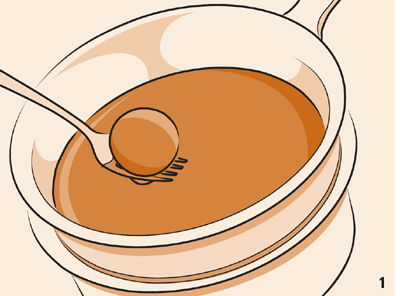
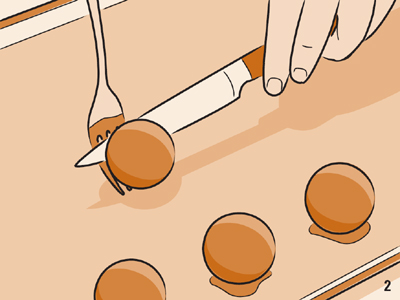
For a dipped chocolate with a thicker chocolate shell, submerge a truffle in melted chocolate. Using a fork, remove the dipped truffle and tap the fork on the side of the pan to allow the excess chocolate to drip back into the pan [1]. Next, run a small knife under the base of the truffle, gently pushing it onto a foil-lined sheet [2].
 Chocolate Truffle Croquembouche
A traditional croquembouche (customarily served at French weddings) is a stunning tower of custard-filled cream puffs glued together with caramelized sugar. This twist on a classic croquembouche is made with chocolate truffles instead of cream puffs, and is decorated with candied violet petals and fresh flowers. You’ll find candied violet petals at some supermarkets, at cake decorating stores and specialty foods stores, and online at cheftools.com. Styrofoam cones are available at most floral and party supply stores. Makes 76 truffles
1 cup plus 2 tablespoons heavy whipping cream
¾ cup (1½ sticks) unsalted butter, cut into 12 pieces
2¼ pounds bittersweet or semisweet chocolate (do not exceed 61% cacao), chopped
¾ cup sour cream
6 tablespoons Grand Marnier or other orange liqueur
1½ tablespoons finely grated orange peel
1½ cups powdered sugar
1½ cups natural unsweetened cocoa powder
1¾ pounds high-quality white chocolate (such as Lindt or Perugina), chopped
1½ pounds bittersweet or semisweet chocolate, chopped
38 candied violet petals (optional)
1 12-inch-tall Styrofoam cone
Rose leaves and miniature white roses or other small flowers
TRUFFLES: Bring cream and butter to simmer in heavy large saucepan. Reduce heat to medium; stir until butter melts. Add chocolate; whisk until melted and smooth. Remove from heat. Whisk in sour cream, liqueur, and orange peel. Pour into 13×9×2-inch baking dish. Chill mixture until firm enough to hold shape, about 1 hour.
Line 4 large baking sheets with foil; sift sugar over 2 sheets and cocoa over 2 sheets. Using ¾-ounce ice-cream scoop (1½ tablespoons), scoop truffle mixture, mounding slightly, and release onto sugar-dusted sheet. Repeat to form total of 28 large truffles on sugar-dusted sheets and 28 on cocoa-dusted sheets. Using ¼-ounce ice-cream scoop (1½ teaspoons), scoop truffle mixture and release onto sugar-dusted sheet. Repeat to form total of 10 small truffles on sugar-dusted sheets and 10 on cocoa-dusted sheets. Freeze truffles 10 minutes.
Roll each truffle on sugar-dusted sheets in sugar; roll between palms of hands into smooth round and place on clean baking sheet. Roll each truffle on cocoa-dusted sheets in cocoa; roll between palms of hands into smooth round and place on same baking sheet as sugar-dusted truffles. Freeze 1 hour.
DIPPING: Line 2 baking sheets with foil. Melt white chocolate in top of double boiler over simmering water, stirring until candy thermometer registers 115°F. Remove from over water. Submerge 1 large sugar-dusted truffle in white chocolate, tilting pan if necessary. Using long fork, lift truffle from chocolate. Tap fork gently against side of pan (if necessary) to remove excess chocolate. Using knife as aid, slide truffle off fork and onto clean prepared baking sheet. Wipe fork clean. Repeat process with all remaining sugar-dusted truffles. Freeze truffles 15 minutes.
Reheat remaining white chocolate to 115°F over simmering water. Repeat dipping process to give truffles a double coating of white chocolate.
Melt bittersweet chocolate in top of clean double boiler over simmering water, stirring until candy thermometer registers 115°F. Dip spoon into bittersweet chocolate and wave quickly over white chocolate-coated truffles, creating zigzag lines. Chill truffles.
Whether it’s white roses tucked between these chocolate truffles or ruby red petals strewn across a single layer cake, using flowers as decoration is a simple way to make desserts look beautiful and elegant (and hide occasional flaws). Since not all fresh flowers are safe to eat, be sure what you buy is edible and chemical-free (and grown without pesticides). Which blooms are edible? Roses, gardenias, carnations, nasturtiums, pansies, violets, marigolds, Johnny-jump-ups, snapdragons, and blossoms from citrus and herbs like rosemary. You may have some of these flowers in your own garden, but supermarkets, farmers’ markets, and florists are other good sources. When using fresh flowers, apply them just before serving, or use small flower holders to keep them fresh.
Line 2 more baking sheets with foil. Using same dipping process, dip cocoa-dusted truffles into bittersweet chocolate, dipping each truffle only once. Immediately top each with candied violet petal, if desired. Chill truffles 1 hour.
DO AHEAD: Can be made 3 weeks ahead. Cover truffles and remaining melted bittersweet chocolate separately and chill.
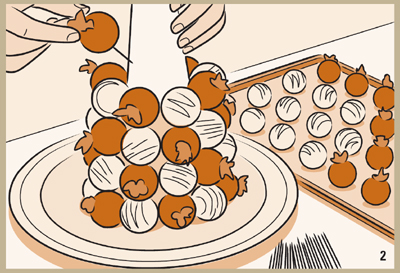
ASSEMBLY: Remelt remaining bittersweet chocolate. Brush melted bittersweet chocolate in 2-inch-wide strip down length of Styrofoam cone. Wrap waxed paper around cone, covering completely and pressing against chocolate to adhere [1]. Place cone on platter. Holding toothpick at sharp angle, press ⅔ of toothpick into cone near base. Press 1 large truffle onto toothpick [2]. Repeat with more toothpicks and remaining large truffles, alternating dark and white truffles and attaching in spiral design toward top of cone. Begin attaching small truffles 4 inches from top of cone and continue to cover completely.

DO AHEAD: Can be made 1 day ahead. Cover and chill.
Press rose leaves between truffles on cone, covering any spaces [3]. Press toothpicks into roses and attach to leaves between truffles.

DO AHEAD: Can be made 3 hours ahead. Chill.
Technique Tip: Dipping Truffles
Before dipping the truffles in the melted chocolate, brush off any excess powdered sugar or cocoa powder to prevent it from affecting the sheen of the chocolate. Keep the melted chocolate at 115°F—at this temperature, the chocolate is the perfect consistency for dipping. Use high-quality chocolates and make enough room in the freezer to fit all the truffles.
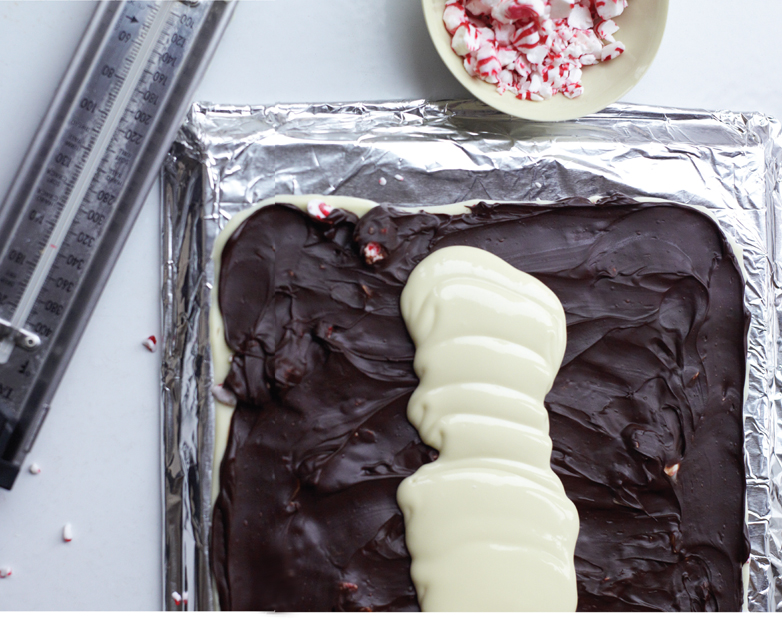
Layered Peppermint Crunch BarkThis bark features white chocolate, bittersweet chocolate, and peppermint candies—perfect for the holidays. To crush the candies, place them in a resealable plastic bag and tap them firmly with a rolling pin. Makes 36 pieces
17 ounces high-quality white chocolate (such as Lindt or Perugina), chopped
30 red-and-white-striped hard peppermint candies, coarsely crushed (about 6 ounces), divided
7 ounces bittersweet or semisweet chocolate (do not exceed 61% cacao), chopped
6 tablespoons heavy whipping cream
¾ teaspoon peppermint extract
Turn large baking sheet bottom side up. Cover tightly with aluminum foil. Mark 12×9-inch rectangle on foil. Stir white chocolate in medium metal bowl set over saucepan of barely simmering water until chocolate is melted and smooth and candy thermometer registers 110°F (chocolate will feel warm). Remove bowl from over water. Pour ⅔ cup melted white chocolate onto rectangle on foil. Using icing spatula, spread chocolate to fill rectangle. Sprinkle with ¼ cup crushed candies. Chill until set, about 15 minutes.
Stir bittersweet chocolate, cream, and peppermint extract in heavy medium saucepan over medium-low heat until just melted and smooth. Cool to barely lukewarm, about 5 minutes. Pour bittersweet chocolate mixture in long lines over white chocolate rectangle. Using offset spatula, spread bittersweet chocolate in even layer. Refrigerate until very cold and firm, about 25 minutes.
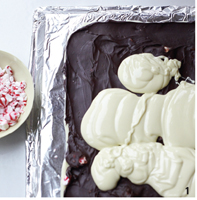
Rewarm remaining white chocolate in bowl set over barely simmering water to 110°F. Working quickly, pour white chocolate over firm bittersweet chocolate layer [1]; spread to cover [2]. Immediately sprinkle with remaining crushed candies [3]. Chill just until firm, about 20 minutes.

Lift foil with bark onto work surface; trim edges. Cut bark crosswise into 2-inchwide strips. Using metal spatula, slide bark off foil and onto work surface. Cut each strip crosswise into 3 sections and each section diagonally into 2 triangles.
DO AHEAD: Can be made 2 weeks ahead. Refrigerate in airtight container. Let stand 15 minutes at room temperature before serving.
Technique Tip: Spreading the Chocolate
To keep the white chocolate layer from remelting when you add the bittersweet chocolate, pour out the bittersweet chocolate mixture in three thick lines down the length of the baking sheet. This speeds up the spreading so that there isn’t time for the white chocolate to melt.
Dried Fruit and Nut Chocolate BarkHere’s an incredibly versatile bark recipe: Just use whatever dried fruits and nuts you happen to have on hand. For a sweeter version, substitute semisweet chocolate chips for the bittersweet. Makes about 1 pound
1 11½-ounce bag bittersweet chocolate chips (about 2 cups)
⅔ cup mixed nuts (such as walnuts, pistachios, pecans, and almonds), toasted
⅔ cup mixed dried fruit (such as raisins, cranberries, cherries, quartered figs, and quartered apricots)
6 quarter-size rounds crystallized ginger, thinly sliced
⅛ teaspoon fleur de sel or coarse kosher salt (optional)
Line small baking sheet with aluminum foil. Melt chocolate chips in medium bowl over saucepan of simmering water, stirring until melted and smooth. Pour melted chocolate onto foil, spreading with offset spatula to scant ¼-inch thickness. Scatter nuts and dried fruit over chocolate. Sprinkle with ginger. Sprinkle with fleur de sel, if desired. Chill until chocolate is firm, about 30 minutes. Peel off foil. Cut chocolate into irregular pieces. Serve bark slightly chilled.
DO AHEAD: Can be made 1 week ahead. Refrigerate in airtight container.
New-Wave Rocky RoadTraditional rocky road candy (chocolate, nuts, and marshmallows) is amped up with orange peel, spicy crystallized ginger, and tart dried cherries. If you like, use your own Homemade Marshmallows (page 626). Makes 40 pieces
26 ounces bittersweet or semisweet chocolate, coarsely chopped
2 teaspoons finely grated orange peel
¾ cup walnut halves
¾ cup chopped dried tart cherries or dried cranberries
3 tablespoons finely chopped crystallized ginger
22 large marshmallows
40 paper or foil candy cups
Line 11×7×2-inch metal baking pan with aluminum foil, leaving overhang. Stir chocolate in medium metal bowl set over saucepan of simmering water (do not allow bowl to touch water) until melted and smooth and candy thermometer registers 115°F. Remove bowl from over water. Mix in orange peel, then walnuts, cherries, and ginger. Fold in marshmallows. Pour into prepared pan, spreading evenly. Chill until chocolate is just firm enough to cut, about 1 hour.
Using foil as aid, lift candy from pan. Fold down foil sides. Cut candy crosswise into 8 strips, then cut each strip lengthwise into 5 pieces. Transfer rocky road squares to paper or foil candy cups.
DO AHEAD: Can be made 2 weeks ahead. Keep rocky road squares refrigerated in airtight container. Let stand at room temperature at least 30 minutes and up to 1 hour before serving.
Chocolate Panforte CandiesTraditional panforte is a confection from Siena, Italy, that combines cocoa, spices, nuts, honey, and citrus with just enough flour to hold it all together. Here, those same flavors (minus the flour) become the topping for rich chocolate patties. Makes 14
½ cup quartered dried black Mission figs
¼ cup orange juice
2 tablespoons honey
½ teaspoon ground nutmeg
¼ teaspoon ground cloves
1¼ teaspoons finely grated orange peel, divided
½ teaspoon ground cinnamon
⅔ cup (scant) hazelnuts, toasted
1 cup bittersweet or semisweet chocolate chips
14 standard (⅓-cup) paper muffin baking cup liners
Cook figs, orange juice, honey, nutmeg, cloves, and 1 teaspoon orange peel in heavy small saucepan over medium-high heat until liquid forms thick syrup that coats figs, stirring occasionally, about 6 minutes. Remove from heat. Mix in cinnamon, remaining ¼ teaspoon orange peel, and nuts.
Melt chocolate in microwave-safe bowl on medium setting until melted and warm, stopping once to stir, about 1½ minutes. Arrange paper cups on rimmed baking sheet. Spoon 1 mounded teaspoon chocolate into each paper cup. Tap baking sheet on work surface to spread chocolate over bottoms of cups. Top center of each with about 1 mounded teaspoon fig mixture. Refrigerate until firm, about 1 hour. Peel off paper.
DO AHEAD: Can be made 3 days ahead. Refrigerate in airtight container. Let stand at room temperature at least 15 minutes before serving.
Mixed Nut Spiced ToffeeTraditional English toffee gets a hit of allspice and a blend of nuts. Instead of taking the time to melt chocolate and dip the toffee into it, this recipe efficiently utilizes the residual heat from the candy to melt bittersweet chocolate into a sweet and easy topping. Makes about 2 pounds
1¼ cups (2½ sticks) unsalted butter
1 cup sugar
½ cup (packed) golden brown sugar
⅓ cup water
1 tablespoon mild-flavored (light) molasses
½ teaspoon salt
¼ teaspoon ground allspice
2 cups coarsely chopped toasted mixed nuts (such as cashews, almonds, and pistachios), divided
5 ounces bittersweet or semisweet chocolate, coarsely chopped
Butter small rimmed baking sheet. Melt butter in heavy medium saucepan over low heat. Add both sugars, ⅓ cup water, molasses, salt, and allspice; stir until sugar dissolves. Attach clip-on candy thermometer to side of pan. Increase heat to medium; boil until thermometer registers 290°F, stirring constantly but slowly and scraping bottom of pan with wooden spatula, about 20 minutes. Remove pan from heat. Mix in 1½ cups nuts. Immediately pour candy onto prepared sheet. Spread toffee to ¼-inch thickness. Immediately sprinkle chocolate over toffee. Let stand 1 minute. Using back of spoon, spread chocolate over toffee. Sprinkle with remaining ½ cup nuts. Chill 1 hour. Break toffee into pieces.
DO AHEAD: Can be made 2 weeks ahead. Refrigerate in airtight container. Let stand at room temperature at least 30 minutes and up to 1 hour before serving.
Storage Tip: Why Airtight?
Even if you’re presenting the toffee as a gift, it’s important to keep the candy in an airtight container or bag. Otherwise, the toffee will draw moisture from the air—and extra moisture makes candy turn unappealingly soft. The toffee should be kept refrigerated until 30 minutes to 1 hour before serving.
Macadamia Brittle with Fleur de SelBrittle is essentially caramelized sugar that is stirred together with nuts and baking soda (which aerates the candy) and then spread out on a large sheet of aluminum foil. In this brittle, the decadent sweetness is balanced by a sprinkling of sea salt. Cut the brittle into large pieces to enjoy on its own, or chop it into smaller pieces to sprinkle over ice cream. Makes about ¾ pound
1 cup unsalted macadamia nuts, toasted, chopped, cooled
1 tablespoon chilled butter, diced
1 teaspoon baking soda
½ teaspoon fleur de sel or other coarse sea salt
1 cup sugar
½ cup water
2 tablespoons light corn syrup
Place large sheet of aluminum foil on work surface; butter foil. Combine nuts, butter, baking soda, and fleur de sel in medium bowl.
Stir sugar, ½ cup water, and corn syrup in medium saucepan over medium heat until sugar dissolves. Boil without stirring until syrup is deep amber color, occasionally brushing down sides of pan with wet pastry brush and swirling pan, about 10 minutes. Remove caramel from heat. Immediately stir in nut mixture (caramel will bubble vigorously). Pour caramel onto prepared foil; spread thinly. Cool brittle until hard; cut into pieces.
DO AHEAD: Can be made 1 week ahead. Store brittle in airtight container at room temperature.
Pecan PralinesA southern delicacy dating back to the mid-1700s, pralines (pronounced prah-leens) are an addictive mix of pecans, brown sugar, butter, and milk. Unlike other candies, their texture is meant to be somewhat grainy and sugary. For less molasses and more caramel flavor, use golden brown sugar in place of the dark brown. Makes about 24
1½ cups sugar
¾ cup (packed) dark brown sugar
½ cup plus 2 tablespoons (or more) canned evaporated milk
¼ cup (½ stick) unsalted butter
1 teaspoon vanilla extract
1½ cups pecan halves, toasted
Line 2 baking sheets with waxed paper. Butter paper. Stir both sugars and ½ cup plus 2 tablespoons evaporated milk in heavy medium saucepan over medium heat until sugar dissolves. Attach clip-on candy thermometer to side of pan. Continue cooking over medium heat until thermometer registers 240°F, stirring constantly but slowly, about 5 minutes. Add butter and vanilla; stir until thermometer registers 240°F, about 2 minutes. Remove from heat. Add nuts and stir until mixture is creamy, about 1 minute.
Working quickly, drop mixture by rounded tablespoonfuls onto prepared sheets (if candy mixture begins to set in saucepan, add 2 tablespoons evaporated milk and stir over medium heat until softened). Let candies stand until firm, about 30 minutes. Peel candies off waxed paper.
DO AHEAD: Can be made 2 weeks ahead. Store pralines in airtight container at room temperature.
More to Try
Pralines are so great on their own that it might not occur to you to eat them any other way. But if you happen to have some left over, coarsely chop them and sprinkle over vanilla ice cream or a pan of chocolate-glazed brownies.
Coffee-Spice CaramelsBefore the cream becomes caramel, it’s steeped in a fragrant mix of coffee, cloves, cinnamon, and nutmeg. The caramels are great on their own—but they’re even better with a chocolate coating. Makes about 42
2 cups (about) heavy whipping cream, divided
⅓ cup (packed) freshly ground (medium-grind) coffee
20 whole cloves
1 cinnamon stick, cut into small pieces
¼ teaspoon freshly grated nutmeg
1½ cups sugar
¼ cup light corn syrup
2 tablespoons (¼ stick) unsalted butter
1 pound bittersweet or semisweet chocolate, chopped
3 ounces high-quality milk chocolate (such as Lindt or Perugina), chopped
42 (about) paper candy cups
Line 8×8×2-inch metal baking pan with aluminum foil, leaving overhang. Generously butter foil. Bring 1¼ cups cream, coffee, cloves, cinnamon, and nutmeg to boil in heavy 2½-quart saucepan. Remove pan from heat. Cover and let steep 30 minutes.
Return mixture to boil, stirring constantly. Strain through fine sieve into measuring cup, pressing with back of spoon to extract all liquid. Add enough additional cream to measure 1½ cups. Return mixture to same saucepan. Add sugar, corn syrup, and butter. Stir over medium-low heat until sugar dissolves. Attach clip-on candy thermometer to side of pan. Increase heat to medium and bring to boil, brushing down sides of pan with wet pastry brush. Boil over medium heat until candy thermometer registers 242°F, stirring occasionally, about 20 minutes. Pour into prepared baking pan (do not scrape saucepan). Cool caramel mixture until firm enough to cut, about 2 hours.
Line baking sheet with waxed paper. Using foil as aid, lift caramel from pan. Fold down foil sides. Using buttered heavy large knife, cut caramel into 1×1¼-inch rectangles. Transfer to prepared sheet, reshaping caramel into rectangles if necessary. Refrigerate until firm, about 30 minutes.
Line 2 baking sheets with waxed paper. Melt bittersweet chocolate in top of double boiler over barely simmering water, stirring occasionally, until candy thermometer registers 115°F. Remove from over water. Working quickly, submerge 1 caramel in chocolate. Using dinner fork, lift out caramel. Tap bottom of fork on sides of pan, allowing excess chocolate to drip back into pan. Using small knife, push caramel off fork and onto prepared sheet. Repeat with remaining caramels, setting double boiler over hot water occasionally to rewarm chocolate as needed. Refrigerate candies until chocolate is firm, about 30 minutes.
Stir milk chocolate in top of double boiler over barely simmering water until melted and smooth. Immediately transfer to parchment cone or small resealable plastic bag; cut off tip. Pipe chocolate in diagonal spiral pattern on surface of each caramel. Refrigerate until firm. Transfer to paper candy cups.
DO AHEAD: Can be made 4 days ahead. Refrigerate in airtight container. Let caramels come to room temperature before serving.
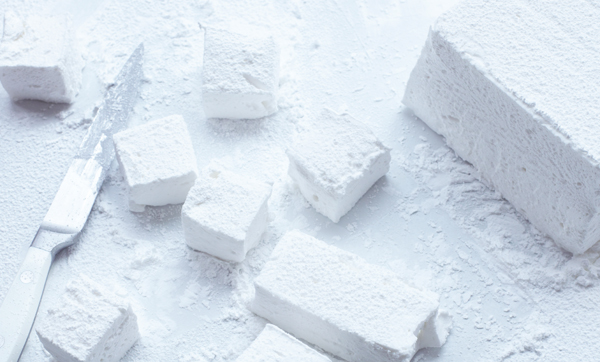
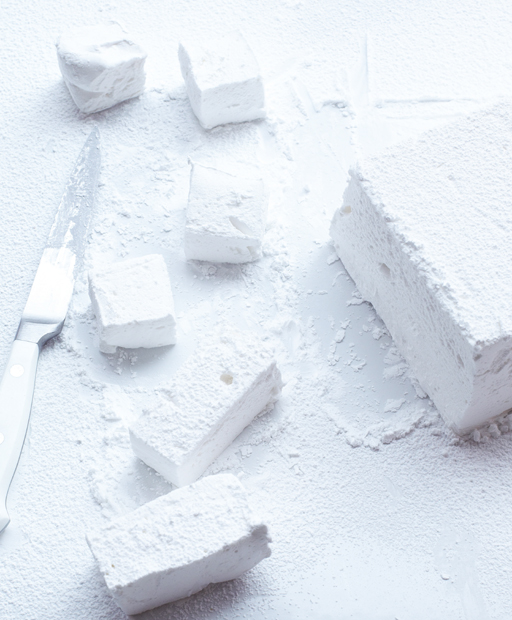
Homemade MarshmallowsOriginally, marshmallows were thickened with the extract from the root of the marshmallow plant. Gelatin replaces the extract in modern recipes. These are sweet, creamy, almost delicate—a world away from stiff supermarket marshmallows. Float them in a cup of hot chocolate, use them as the centerpiece for s’mores, or stir them into homemade rocky road (like the one on page 622). You can also make them in crazy colors and shapes. Just add a few drops of food coloring along with the vanilla, and cut the marshmallows with lightly oiled cookie cutters. This recipe calls for potato starch (sometimes called potato starch flour), a thickener made from the starch of potatoes but with no discernible flavor. It can be found at most supermarkets, often in the kosher section. Makes about 24
Nonstick vegetable oil spray
1 cup cold water, divided
3 ¼-ounce envelopes unflavored gelatin
2 cups sugar
⅔ cup light corn syrup
¼ teaspoon salt
2 teaspoons vanilla extract
½ cup potato starch
½ cup powdered sugar
Line 13×9×2-inch metal baking pan with aluminum foil. Coat foil lightly with nonstick spray.
Pour ½ cup cold water into bowl of heavy-duty mixer fitted with whisk attachment. Sprinkle gelatin over water. Let stand until gelatin softens and absorbs water, at least 15 minutes.
Combine sugar, corn syrup, salt, and remaining ½ cup cold water in heavy medium saucepan. Stir over medium-low heat until sugar dissolves, brushing down sides of pan with wet pastry brush. Attach clip-on candy thermometer to side of pan. Increase heat and bring syrup to boil. Boil without stirring until thermometer registers 240°F, about 8 minutes.
With mixer running at low speed, slowly pour hot syrup into gelatin mixture in thin stream down side of bowl (avoid pouring syrup onto whisk, as it may splash). Gradually increase speed to high and beat until mixture is very thick and stiff, about 15 minutes. Add vanilla and beat to blend, about 30 seconds longer.
Scrape marshmallow mixture into prepared pan. Smooth top with wet spatula. Let stand uncovered at room temperature until firm, about 4 hours.
Stir potato starch and powdered sugar in small bowl to blend. Sift generous dusting of starch-sugar mixture onto work surface, forming rectangle slightly larger than 13×9 inches. Turn marshmallow slab out onto starch-sugar mixture; peel off foil. Sift more starch-sugar mixture over marshmallow slab. Coat large sharp knife with nonstick spray. Cut marshmallows into squares. Toss each in remaining starch-sugar mixture to coat. Transfer marshmallows to rack, shaking off excess mixture.
DO AHEAD: Can be made 2 weeks ahead. Store marshmallows in airtight container at room temperature.
Technique Tip: Checking for Doneness
The recipe tells you to beat the hot syrup into the gelatin until the mixture is “very thick and stiff.” Another clue that the mixture is ready is the temperature: It should be lukewarm.
Cranberry and Tart Apple GeléesGelées are jellied candies flavored with fruit (in this case, cranberries and Granny Smith apples). Together, the deep red and bright green candies make a gorgeous homemade gift for Christmas. In France these popular sugar-coated gems are known as pâte de fruits, or fruit pastes. Because pan sizes vary widely, you may get as many as 128 gelées from this recipe. Makes about 100
1 12-ounce bag fresh or frozen cranberries
2½ cups sugar
2 cups coarsely chopped cored unpeeled Granny Smith apples
1 cup fresh orange juice
2 tablespoons (¼ stick) unsalted butter
1 tablespoon finely grated orange peel
12 whole cloves
2 3-ounce packages liquid pectin
¼ teaspoon ground cloves
5 cups coarsely chopped cored unpeeled Granny Smith apples
2½ cups sugar
1 cup fresh apple juice
3 tablespoons fresh lemon juice
2 tablespoons (¼ stick) unsalted butter
1½ teaspoons finely grated lemon peel
2 3-ounce packages liquid pectin
Green and yellow food coloring
1 cup coarse white sparkling sugar or regular sugar
CRANBERRY GELÉES: Wipe 8×8×2-inch glass baking dish with damp cloth. Line dish with plastic wrap, pressing to adhere. Place small plate in freezer.
Mix cranberries, sugar, apples, orange juice, butter, orange peel, and whole cloves in heavy large saucepan; bring to boil. Reduce heat to medium and simmer uncovered until fruit is very tender, stirring often, about 15 minutes. Cool slightly. Working in batches, puree mixture in blender until smooth.
Transfer puree to heavy medium saucepan. Stir in pectin and ground cloves. Bring to boil, reduce heat to medium, and simmer uncovered until puree is very thick (like applesauce), stirring frequently, about 50 minutes. (Gelée is done when ½ teaspoon puree placed on plate in freezer gels after 1 minute.)
Transfer puree to prepared dish; smooth top. Let stand 2 hours at room temperature. Cover; chill gelée until firm, about 3 hours longer.
TART APPLE GELÉES: Wipe 8×8×2-inch glass baking dish with damp cloth. Line dish with plastic wrap, pressing to adhere. Place small plate in freezer.
Combine apples, sugar, apple juice, lemon juice, butter, and lemon peel in heavy large saucepan; bring to boil. Reduce heat to medium and simmer uncovered until fruit is very tender, stirring often, about 15 minutes. Cool slightly. Working in batches, puree mixture in blender until smooth.
Transfer puree to heavy medium saucepan. Stir in pectin. Bring to boil, reduce heat to medium, and simmer uncovered until puree is very thick (like applesauce), stirring frequently, about 50 minutes. (Gelée is done when ½ teaspoon puree placed on plate in freezer gels after 1 minute.) Stir in enough food coloring to obtain appealing green color (about 20 drops of green and 5 drops of yellow).
Transfer puree to prepared dish; smooth top. Let stand 2 hours at room temperature. Cover; chill gelée until firm, about 3 hours longer.
Invert both gelées onto work surface. Peel off plastic. Cut into 1-inch squares. Roll squares in sparkling sugar to coat.
DO AHEAD: Can be made 1 week ahead. Store gelées in airtight container at room temperature.
Ingredient Tips: For Gelées
You’ll need a few special ingredients to make the gelées; luckily, most (if not all) can be found at a well-stocked supermarket. Look for liquid pectin (typically an apple-based thickener) in the produce department or baking aisle. Fresh apple juice can be found, chilled, in the produce section or at a farmers’ market. Food coloring is available in the baking aisle—as is coarse white sparkling sugar. If you don’t find the sugar there, go to a specialty foods store or order it online from kingarthurflour.com.
Chocolate-Dipped Brown Sugar-Maple CreamsThese creamy maple and brown sugar candies covered in rich milk chocolate are perfect with coffee after a holiday meal. Makes about 30
1½ cups (packed) golden brown sugar
1 cup heavy whipping cream
2 tablespoons pure maple syrup
2 teaspoons unsalted butter
Powdered sugar
12 ounces high-quality milk chocolate (such as Lindt or Perugina), chopped
Semisweet or milk chocolate shavings or chocolate sprinkles
30 (about) paper candy cups
Generously butter small metal bowl. Stir brown sugar, cream, and maple syrup in heavy 2-quart saucepan over medium heat until sugar dissolves, about 5 minutes. Attach clip-on candy thermometer to side of pan. Increase heat to medium-high and stir until candy thermometer registers 234°F, about 10 minutes. Pour into prepared bowl (do not scrape pan). Add 2 teaspoons butter to bowl (do not stir). Set bowl over larger bowl filled with ice water. Let stand 5 minutes. Fold firm outside edges of mixture into center; do not stir. Let sugar mixture cool to lukewarm.
Transfer sugar mixture to processor. Blend until creamy and no longer glossy, 3 to 5 minutes. Transfer to medium bowl. Freeze mixture just until firm enough to shape, about 1 hour.
Line 2 baking sheets with waxed paper. Roll 2 teaspoons sugar mixture into ball, dusting hands with powdered sugar if necessary. Place on 1 prepared sheet. Repeat with remaining mixture, freezing briefly if too soft to form. Freeze until firm, about 1 hour.
Stir milk chocolate in top of double boiler over barely simmering water until melted and smooth and candy thermometer registers 115°F. Remove from over water. Working quickly, submerge 1 candy in chocolate, tilting pan if necessary. Using dinner fork, lift out candy. Tap bottom of fork on sides of pan, allowing excess chocolate to drip back into pan. Using small sharp knife, push candy off fork onto second prepared sheet. Sprinkle with chocolate shavings. Repeat with remaining candies, setting double boiler over hot water occasionally to rewarm chocolate to 115°F as needed. Refrigerate until chocolate is set. Transfer candies to paper candy cups. Serve chilled.
DO AHEAD: Can be made 3 days ahead. Keep chilled in airtight container.
Fresh Raspberry CreamsThe chocolate-coated, raspberry-flavored fondant (a soft candy mixture that can be rolled or sculpted) hides a sweet surprise: one fresh, ripe raspberry. Framboise is a potent, clear brandy distilled from fermented raspberries. Look for it at premium liquor stores and some specialty foods stores. Makes 18
1 cup sugar
¾ cup heavy whipping cream
1 tablespoon light corn syrup
1 teaspoon unsalted butter
1 tablespoon framboise (clear raspberry brandy)
36 raspberries, divided
Powdered sugar
12 ounces bittersweet or semisweet chocolate, chopped
18 paper candy cups
Generously butter small metal bowl. Stir sugar, cream, and corn syrup in heavy 2-quart saucepan over medium heat until sugar dissolves. Attach clip-on candy thermometer to side of pan. Increase heat to medium-high and stir until candy thermometer registers 234°F, about 10 minutes. Pour mixture into prepared bowl (do not scrape pan). Add 1 teaspoon butter to bowl (do not stir). Set bowl over larger bowl filled with ice water. Let stand 5 minutes. Fold firm outside edges of mixture into center (do not stir). Cool to lukewarm.
Transfer mixture to processor. Add framboise and blend until mixture is creamy and no longer glossy, 3 to 5 minutes. Freeze until firm enough to shape, about 30 minutes.
Line 2 baking sheets with waxed paper. Spoon cream mixture by teaspoonfuls onto 1 prepared sheet, forming 18 mounds. Set 1 raspberry atop each. Cover each with another teaspoon of cream mixture. Using fingers, seal raspberries completely with cream mixture. Freeze until almost firm, about 20 minutes.
Using hands dusted with powdered sugar to prevent sticking, gently roll each mound into ball. Return candies to same sheet. Freeze until firm, about 4 hours.
Melt chocolate in top of double boiler over barely simmering water, stirring frequently, until candy thermometer registers 115°F. Remove from over water. Working quickly, submerge 1 cream ball in chocolate, tilting pan if necessary. Using dinner fork, lift out ball. Tap bottom of fork on sides of pan, allowing excess chocolate to drip back into pan. Using small sharp knife, push ball off fork and onto second prepared sheet. Top with 1 raspberry. Repeat with remaining cream balls, setting double boiler over hot water occasionally to rewarm chocolate to 115°F as needed. Refrigerate until chocolate is set, about 1 hour. Transfer candies to paper candy cups.
DO AHEAD: Can be made 2 days ahead. Refrigerate in airtight container. Let stand 20 minutes at room temperature before serving.
Peanut Butter DreamsInspired by the popular peanut butter cup, these are given extra appeal with a glistening coating of ground peanut praline. The peanut butter centers are incredibly easy to make: Just stir, freeze, and roll into balls. Makes about 18
¾ cup powdered sugar plus additional for dusting hands
⅓ cup super-chunky peanut butter (do not use old-fashioned style or freshly ground)
2 ounces Philadelphia-brand cream cheese, room temperature
2 ounces high-quality white chocolate (such as Lindt or Perugina), melted, cooled
2 tablespoons (¼ stick) unsalted butter, room temperature
12 ounces high-quality milk chocolate (such as Lindt or Perugina), chopped
Peanut Praline (see recipe)
18 (about) paper candy cups
Blend ¾ cup powdered sugar, peanut butter, cream cheese, melted white chocolate, and butter in medium bowl. Freeze until firm enough to shape, about 20 minutes.
Line 2 baking sheets with waxed paper. Using hands dusted with powdered sugar, roll 1 tablespoon peanut butter mixture into ball. Place on 1 prepared sheet. Repeat with remaining mixture. Freeze until very firm, about 3 hours.
Stir milk chocolate in top of double boiler over barely simmering water until melted and smooth. Remove from over water. Working quickly, submerge 1 peanut butter ball in chocolate, tilting pan if necessary. Using dinner fork, lift out candy. Tap bottom of fork on sides of pan, allowing excess chocolate to drip back into pan. Using small knife, push candy off fork and onto second prepared sheet. Repeat with remaining balls, setting double boiler over hot water occasionally to rewarm chocolate to 115°F as needed. Refrigerate candies until chocolate is set, about 1 hour. (Reserve remaining chocolate in pan.)
Line another baking sheet with waxed paper. Rewarm remaining chocolate over barely simmering water. Remove from over water. Place praline in large shallow dish. Dip half of 1 candy into chocolate. Roll around in palm to cover candy with a light coating of chocolate. Set in praline and roll gently, covering completely. Transfer to prepared sheet. Repeat with remaining candies. Refrigerate until firm. Transfer candies to paper candy cups.
DO AHEAD: Can be made 1 week ahead. Refrigerate in airtight container. Let stand 20 minutes at room temperature before serving.
Peanut PralineDon’t confuse this praline with the brown sugar confections that abound in the South. This is a brittle candy made from caramelized sugar and nuts, and it can be eaten on its own or finely ground and used as an ingredient in other candies. Hazelnuts or almonds are usually the nuts of choice; this recipe (to pair with the Peanut Butter Dreams) calls for peanuts instead. Makes about 2 cups
1 cup sugar
¼ cup water
1 cup roasted salted peanuts
Butter baking sheet. Cook sugar and ¼ cup water in heavy small saucepan over low heat, stirring until sugar dissolves. Increase heat to medium and boil without stirring until syrup is deep golden brown. Mix in peanuts. Immediately pour mixture onto prepared sheet. Cool completely. Break into 2-inch pieces. Using on/off turns, grind finely in processor.
DO AHEAD: Can be made 2 months ahead. Cover and refrigerate in airtight container.
Smooth and Delicious
One of the first steps in candymaking is to thoroughly dissolve the sugar in the candy mixture before it boils. Take your time with this step. Undissolved sugar crystals can ultimately turn toffee, brittle, caramel, and other candies into a grainy mess. A simple test ensures that the sugar has dissolved: Rub a drop of the warm mixture between your fingertips—it should feel smooth, with no trace of granules. If it feels sandy, return it to the heat and continue warming and stirring until the mixture is smooth. Occasionally brushing down the sides of the pan with a pastry brush dipped in water will also help prevent sugar crystals from forming.
Mixed Berry Chocolate-Toffee BitesLittle “puddles” of melted chocolate are topped with fresh berries and tiny pieces of toffee. You can make these sweet bites ahead, keep them refrigerated, and then serve them with coffee after dinner. Makes about 20
6 ounces bittersweet or semisweet chocolate or high-quality milk chocolate (such as Lindt or Perugina), chopped
2 cups mixed berries (such as blackberries, raspberries, and blueberries)
2 1.4-ounce English toffee candy bars (such as Skor or Heath), cut into ¼-inch pieces
Line large baking sheet with aluminum foil. Stir chocolate in small metal bowl set over saucepan of simmering water until melted, smooth, and warm to touch. Remove bowl from over water. Spoon melted chocolate by teaspoonfuls onto foil, spacing about 1½ inches apart (do not spread). Top with berries and toffee, making sure toppings touch melted chocolate. Chill until chocolate sets, about 15 minutes. Remove from foil.
DO AHEAD: Can be made 8 hours ahead. Refrigerate in airtight container. Let stand at room temperature 15 minutes before serving.
Gianduja Gold CupsReminiscent of Baci, the well-known dome-shaped Italian chocolates, these cups also have a rich gianduja (chocolate-hazelnut) filling; make sure to use high-quality milk chocolate for the best flavor and texture. The chocolates start with a candy shell that’s made by brushing melted chocolate inside foil candy cups. Once the shells have firmed up in the fridge, they’re filled with the gianduja mixture and covered with a thin layer of melted bittersweet chocolate. If you can’t find foil candy cups, use paper, but double them up to make a sturdier form. Makes 32
4 ounces high-quality milk chocolate (such as Lindt or Perugina), chopped
1 cup chocolate-hazelnut spread (such as Nutella)
6 tablespoons coarsely chopped toasted hazelnuts
18 ounces bittersweet or semisweet chocolate, chopped
32 1-inch-diameter gold foil candy cups
32 whole hazelnuts, toasted, husked
Stir milk chocolate in medium metal bowl set over saucepan of barely simmering water (do not allow bowl to touch water) until melted and smooth. Remove bowl from over water. Whisk in chocolate-hazelnut spread and chopped nuts.
Stir bittersweet chocolate in another medium metal bowl set over saucepan of barely simmering water (do not allow bowl to touch water) until melted and smooth and candy thermometer registers 110°F (chocolate will feel warm). Remove bowl from over water. Using 1-inch-wide pastry brush, coat insides of candy cups with just enough chocolate to cover. Rewarm chocolate as needed to maintain temperature. Place cups on baking sheet. Chill until chocolate is firm, about 15 minutes.
Spoon enough hazelnut mixture into center of each chocolate cup to fill to within ⅛ inch of top (about 1 heaping teaspoonful in each cup). Refrigerate until filling sets, about 15 minutes.
Rewarm remaining melted bittersweet chocolate in bowl set over barely simmering water to 110°F. Spoon enough chocolate over filling to cover and to fill cups completely. Immediately top each with 1 hazelnut. Refrigerate cups until firm, about 20 minutes.
DO AHEAD: Can be made 2 weeks ahead. Refrigerate in single layer in airtight container. Let stand 20 minutes at room temperature before serving.