Preparing the Site
Carving Your Homestead From the Wilderness
A small cabin on a minimal foundation normally needs little site preparation. For a larger home, however, the work of clearing the land, leveling a building site, developing an access road, excavating, and laying a foundation sometimes requires as much labor, time, and expense as erecting the house itself. Pioneer settlers, lacking power machinery, searched for building sites that required a minimum of preparation. Though such sites are scarce today, the loss is more than offset by modern techniques and equipment that permit the development of lands that the pioneers would have been forced to pass up.
Planning and Preparation
The job of site development starts in the winter, when trees are bare and the features of the terrain are clearly visible. This is the time of year to lay out your plans in detail. It is also the time to cut and haul away any trees that have value as lumber or firewood.
Start actual clearing as soon as possible after the spring thaw, when the ground is firm and dry: land cleared later in the year seldom develops enough ground cover to prevent erosion. The initial stages require only hand tools—a chain saw, an ax, and a brush hook. Later, heavy equipment must be brought in for grading and excavation. A rented gasoline-powered chipper is useful for shredding brush; the chips make excellent mulch for gardening, landscaping, and erosion control. If you have the time and energy, hand clearing has advantages over machinery: far greater numbers of trees and shrubs can be left undisturbed, and there will be less damage to the natural features of the surrounding area. Hand clearing also saves money and gives you additional time to plan the final construction.

It takes two to survey. The assistant (right) will point to a spot. When that spot is in line with the surveyor’s scope, the assistant will measure its height above ground. That height, minus the height of the scope, will give the ground elevation where the pole stands.
The Four Stages of Site Development
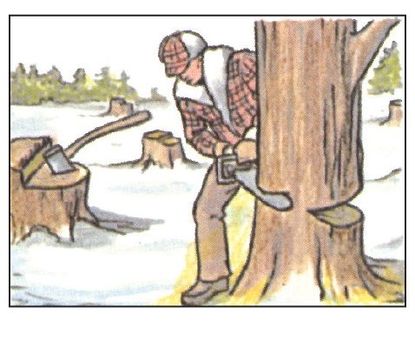
1. start clearing in winter by cutting down trees that are on the building site. Winter is the best season for logging, since wood is driest and snow on the ground eases the job of hauling. Leave 3-ft. stumps to ease the job of removing them later.
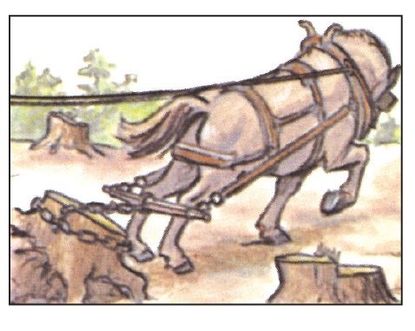
2. Wait until spring, when the ground is fully thawed, to pull stumps. Use animals or a mechanical aid, such as a winch, unless they are to be removed by bulldozer. Ordinary cars and trucks do not have enough traction for the job.
Surveying the site, grading the land, and excavating the foundation and drainage field are jobs for professionals unless you happen to have experience in this type of work. A home is too important to risk the consequences of trial-and-error learning, so assess your abilities fairly before you begin.
Clearing the Land and Building an Access Road
The job of site development starts with clearing the land and constructing an access road. There was a time when this work was accomplished with the sweat and muscle of animals and men, but today the fastest and cheapest method is to hire a bulldozer run by an experienced operator. Prepare in advance for the job of clearing by marking features that might affect the grading of the site and access road on your development map. Also rent a builder’s level and measuring rod; you will need them to make sure that the building site and access road are graded to the proper angles.
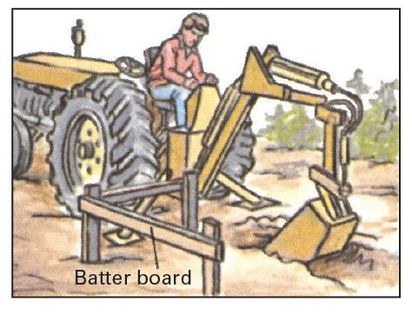
3. Erect batter boards to mark building lines and excavation boundaries. simple foundation trenches can be dug by hand, but a powered backhoe with an experienced operator is usually more economical in the long run.

4. Pouring a foundation is the last step before construction begins.
You will need plenty of assistance, since the job is long and difficult even if you hire a cement mixer. For maximum strength the entire footing should be poured at one time.
Tree removal should be thought out carefully. Generally speaking, stands of native hardwoods are more valuable than evergreens and should receive priority if a choice has to be made to cut one type or the other. An exception would be a case where dense evergreens can serve as a windbreak or where diseased hardwoods may eventually fall and damage the house. Trees less than 4 inches in diameter, along with brush and undergrowth, usually can be cleared away with little worry. Consult a forester, however, before removing large numbers of bigger trees; he can help you work out a plan for gradual removal that will allow the remaining growth to adjust to altered water-table characteristics. Use paint or plastic ribbon to distinguish trees that are to be removed; mark trees that are to be saved with paint or ribbon of another color. Trees that are cut should be carried away as lumber or sawed into firewood and left to season. Stack firewood nearby, between standing trees; it will be easier to haul after it is seasoned.
Access roads should be 10 feet wide or more—a wide road will last longer than a narrow one because wear and tear is spread over a larger surface. Grade all curves to an inside radius of 30 feet for a car, 45 feet if large vehicles, such as oil trucks, will use the road. A turnaround at a garage or dead end should be a minimum of 30 feet by 40 feet. Drivers must have at least one car length of unobstructed vision at all points along the road, so foliage should be kept low along curves. Similarly, trim trees and shrubs far enough back from the shoulders to prevent them from interfering with traffic. Try, however, to leave a screen of foliage for soil control, privacy, and encouragement of wildlife.
Homemade tools for grading

Fresno scraper, for moving loose dirt and gravel, is made from 55-gal. drum cut in half with ends left intact. Bolt or weld a blade of 1/2-in.-thick steel along bottom edge, and add braced handle made of 2 × 4 s or thick poles.

Buck scraper smooths high spots left by fresno. Use sturdy 2 × 12 s for buckboard, 1/4-in.-thick steel for blade, strap iron for bracing. Handle is bent iron pipe. Operator stands on trailer board, applies pressure to handle to regulate blade.
Taking elevations with a builder’s level

1. Mount builder’s level on tripod and adjust until bubble is stable throughout 360° rotation of telescope. Measure height of scope above the ground.
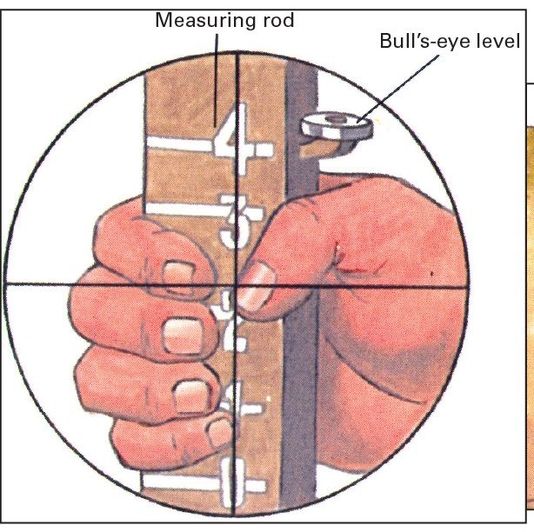
2. Have assistant hold measuring rod at point where elevation reading is desired, then sight rod through scope. Rod marking, minus scope height, is elevation.
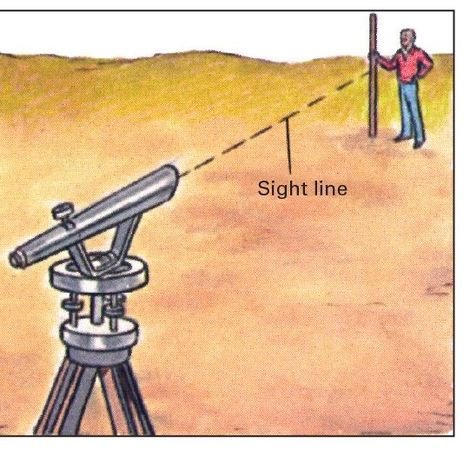
3. Take elevations of surrounding points by rotating telescope; tripod must remain fixed. in each case, subtract scope height from rod reading to obtain result.
If a road is being put in on a steep slope, do not cut it directly uphill. Instead, traverse the slope by following the contour lines. Slope gradients should be no more than 10 percent (a 1-foot rise for every 10 feet in length) to minimize vehicle strain and road damage from braking and wheel spinning. In order to prevent landslides, embankments should be smoothed back to their angles of repose–the point at which a given material ceases to slide downhill of its own accord. Incorporate gutters, ditches, and culverts into the roadway to minimize erosion, mud formation, and frost heaving.
Road surfaces of dirt, gravel, or crushed rock are adequate in most parts of the country although occasional routine maintenance will be necessary. Regrading and smoothing require little more than hard work and often can be accomplished with the simple homemade equipment shown below.
Laying the Groundwork Gets You Started
After the building site has been cleared and leveled, actual construction can begin. The first step is to set up accurate building lines to mark the structure’s perimeter. Once that is accomplished, the area can be excavated for the foundation. Start by setting the corner stakes, which identify the exact locations of each corner of the proposed building. Make these stakes of 2 × 2 lumber, 2 to 3 feet in length, and sharpen their ends symmetrically to keep them from twisting when driven into the ground. Drive the first stake so that it is centered over the spot selected for the first corner of the building. Locate the second corner by measuring from the first, then drive another stake into the ground at that spot. The two stakes define the corners, length, and position of one side of the building. The other corners and sides can now be found by measuring out from the established corners according to the ground plan of the building. Each time a new corner is established, drive a stake into the ground to mark it. Square or rectangular structures require only four corner stakes. If the building is L-shaped or has additional projections, stake out a central rectangle, then lay out the extensions.
Precise right angles are essential throughout. One method of achieving them, explained in Step 1 on following page, is to use the Pythagorean theorem. Another way is to build an oversize try square in the shape of a right triangle; construct it from a metal angle iron or from lumber carefully selected for straightness. Place the square at a known corner of the site so that one arm lies along the established straight line and the other arm extends at right angles to it in the direction of the corner location you wish to find. Measure along this arm to establish the new corner.
The corner stakes are usually removed during excavation, since their locations normally place them in the path of any foundation trenches that must be dug. In order to keep a permanent record of their location, horizontal boards known as batter boards are set up on stakes several feet outside the site at each corner. The boards are then notched with saw cuts so that strings stretched between them will intersect directly over the corner stakes. Batter boards are used to record other information as well, such as excavation boundaries and footing widths, and are generally left in place throughout most of the building process.
Setting Corner Stakes and Batter Boards
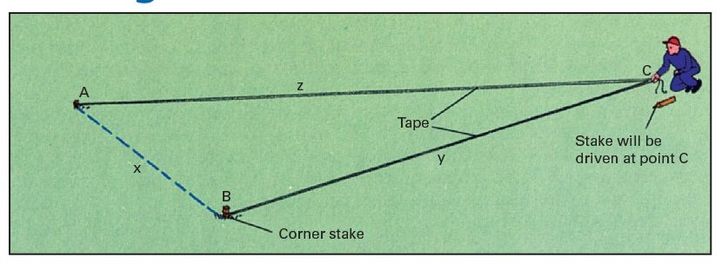
1. Locate corner stakes at right angles to known building lines with help of Pythagorean formula. stakes A and B mark corners of known line x. Length of side y is specified in plans. Compute length of z by adding together square of side x and square of side y; z equals the square root of sum (z =  . Now attach tape equal in length to z to stake A and another tape equal in length to y to stake B. The point on the ground where both tapes are stretched tight when held together is correct spot for C.

2. Complete corner stake layout by using methods described in step 1 to locate remaining stake. Check final rectangle by stretching tape between diagonally opposite stakes: both diagonals should be equal. Next step is to erect batter boards. set central batter board stakes 6 ft. behind corner stakes along extended diagonals. Use homemade oversize try square built of metal or lumber to locate the remaining batter board stakes, and drive them about 6 ft. from each central stake, making sure they are parallel to the building lines.
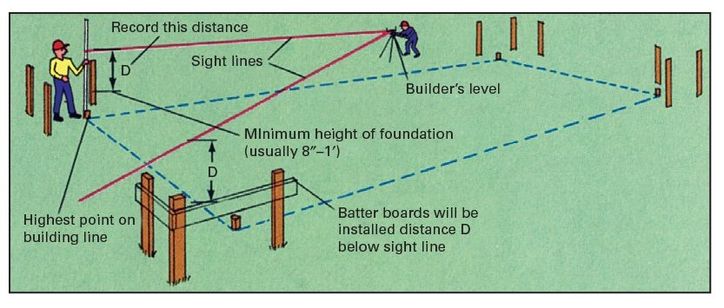
3. Horizontal 1 × 6s complete the batter board assemblies. set up a builder’s level, and have an assistant hold a measuring rod at the highest corner stake. sight to the rod, and record the difference (D) between the rod reading and the minimum height of the foundation above grade. Next, have the assistant hold the rod alongside each batter board stake in turn. in each case sight to the rod, subtract the distance D, and mark the stake at that point. Nail on the 1 × 6s with their top edges touching the marks.
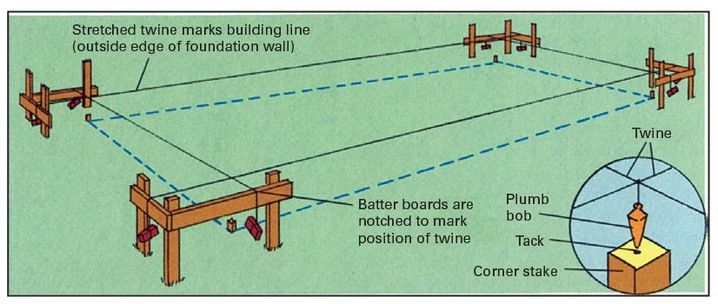
4. Record location of building corners by stretching twine between batter boards so that their intersections fall directly over the centers of the corner stakes. Achieve precise alignment by hanging plumb bob from intersections as shown. (Use thumbtacks to mark centers of stakes.) Make saw cuts in batter boards to establish twine locations permanently, and note on boards which corner each cut represents. stretch twine and make cuts to record other information, such as excavation boundaries.
Excavating for a Firm Foundation
Excavation for the foundation can begin as soon as the building lines are established. Be sure to dig deep enough so that the base, called the footing, will be safely below the level of frost penetration. Freezing ground expands and can crack an improperly laid foundation. Local building authorities can provide you with precise specifications for building safe foundations in your area. You should also consult a government soil engineer who will analyze the type of ground upon which your site is located and determine its weight-bearing ability, drainage characteristics, and other factors that influence the kind of foundation best suited to that spot.
Power shovels and backhoes are the most efficient and economical tools, for excavation unless the amount of digging is very small. Try to hire equipment and operators by the job rather than by the day or hour so that you do not have to pay for wasted time due to problems and delays that are not your fault. Be sure that the plans for digging are fully understood by the excavator beforehand, and be there yourself when the work is performed. To lessen the chance of cave-ins, which are not only potentially dangerous but also time-consuming to repair, have the scooped-out earth placed at least 2 feet from the rim of the excavation. Topsoil should be stripped from the site and piled in a separate area to prevent it from becoming mixed with the subsoil. (Mixing would change the vitally important drainage and weight-bearing characteristics of the subsoil. The topsoil can be used later for landscaping.) The excavation itself should extend at least 3 feet beyond the building lines to give space for such work as manipulating building forms and laying concrete block. Do not backfill the excavation until the entire foundation is laid and the floor of the building has been attached; only then will the foundation walls be well enough braced to eliminate any danger of collapse. It is also important that the excavation be no deeper than called for in the plans, since refilling to the correct level does not restore the weight-bearing capacity of the original undisturbed soil upon which the foundation rests.
There is always plenty of trimming to be done with hand shovels, so be safety conscious. Do not let debris collect in and around excavations. Use a ladder to avoid jumping in and out of trenches, and do not work so near a partner that you risk injuring each other with your tools. Brace all trenches more than 4 feet deep with boards placed vertically along the banks. For added strength, especially if heavy equipment is used nearby, install crosspieces that span the width of the trench between the vertical boards. If possible, slope the sides of the excavations back to their angles of repose. Watch for cave-in signals: cracks developing nearby or earth trickling down the sides. And check the site carefully after heavy rains or a weekend break.
Bracing for trenches

Light bracing (above) consists of vertical planks placed at 3- to 5-ft. intervals, held apart by cross-pieces. For heavy bracing (right) set planks almost side by side. Horizontal walers tie planks together and distribute pressure. Nailing is not necessary; wedging holds boards tight.

Common types of foundations
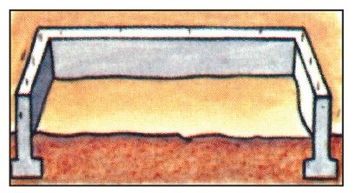
Perimeter foundation made of poured reinforced concrete, masonry block, or stone is strong, provides basement or crawl space, and conforms to most codes. Excavation and formwork are often necessary, usually requiring heavy equipment.

Wooden pole foundation made of logs, ties, or telephone poles leaves underside of building exposed but requires little excavation and is good for steep sites and remote areas. Pole foundations are not suitable on soft ground.

Concrete slab foundation of reinforced concrete also serves as basement or ground floor and is especially suited to passive heat storage in solar designed buildings. steep site or high water table may preclude use.

Concrete pier foundation is inexpensive and needs little excavation. Piers are suitable on steep sites but do not provide the anchoring strength of perimeter or slab foundations. Piers can be either precast or poured.
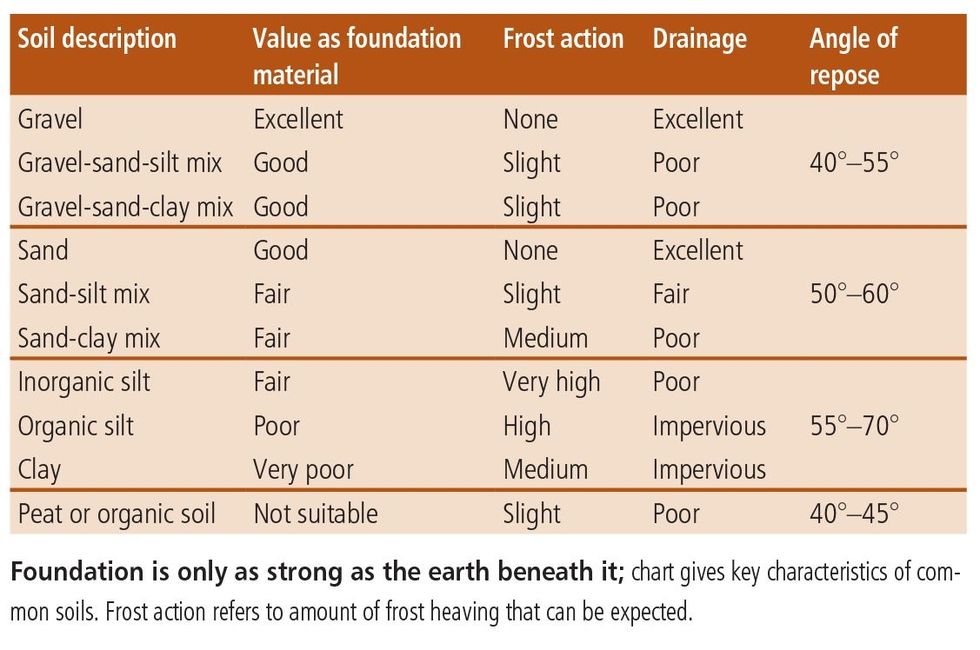
Suitability of various soils for building
Sources and resources
Books
Bureau of Naval Personnel. Basic Construction Techniques for Houses and Small Buildings Simply Explained. New York: Dover, 1972.
Church, Horace K. Excavation Handbook. New York: McGraw-Hill, 1980.
DiDonno, Lupe, and Phyllis Sperling. How to Design and Build Your Own House. New York: Knopf, 1987.
Nichols, Herbert L. Moving the Earth: The Workbook of Excavation. New York: McGraw-Hill, 1988.