Basketry
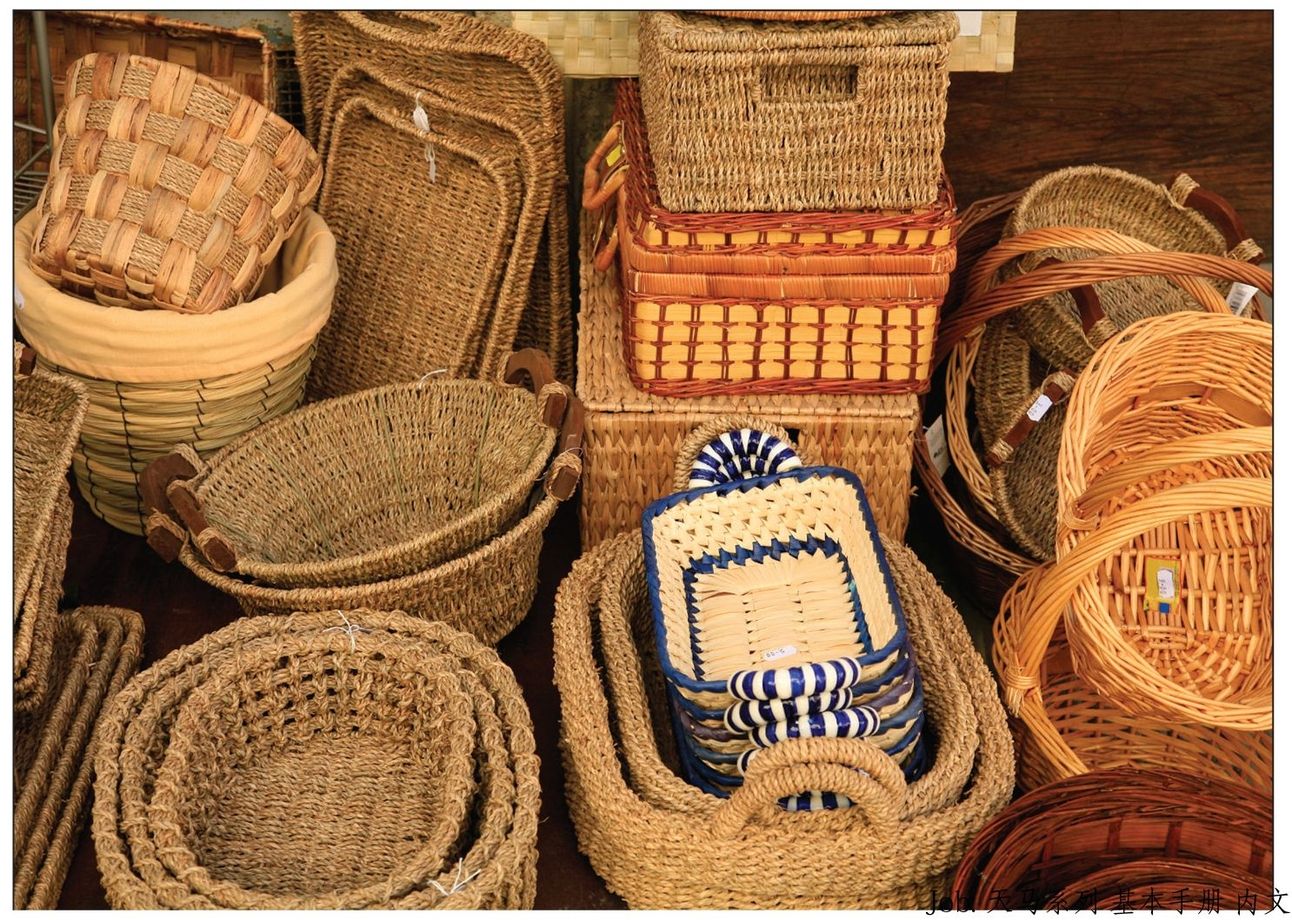
Beautiful and Versatile: There Is a Basket Style For Almost Every Job
Basketmaking has proven itself an invaluable skill to Americans from pioneer times to the present. Few tools besides a sharp knife are needed to make a basket, the basic techniques can be easily adapted to whatever materials are locally available, and an endless variety of basket shapes and sizes can be created to fill almost any need that may arise. A soft, lightweight willow basket can serve for gathering eggs or one of sturdy splintwork for apples. A big, flat-sided basket can be strapped onto a horse to carry major loads, while a large, lidded basket—designed to let in air but keep out sunlight—will store dried fruits and vegetables all winter long. An open weave makes a good strainer; a tightly wrapped coil can be virtually watertight.
Old-time basketmakers often specialized in just one technique and handed down its secrets from one generation to the next. Modern practitioners see basketry as an art form. They explore a variety of approaches and strive for imaginative combinations of colors, textures, and forms. They also take advantage of the wide availability of basketry materials, combining everything from wire, string, and feathers with the traditional splints and grasses. Craft stores supply an abundance of imported and machinemilled splints and reeds, whose uniform size and flexibility make them easy to manipulate. There is also a nearly limitless supply of free basketmaking materials growing in the countryside. Tall grasses and weeds alongside a highway, honeysuckle that has overgrown its boundaries, and thin shoots pruned from a tree or bush all make beautiful, serviceable baskets.
How to Use Easy-to-Find Materials
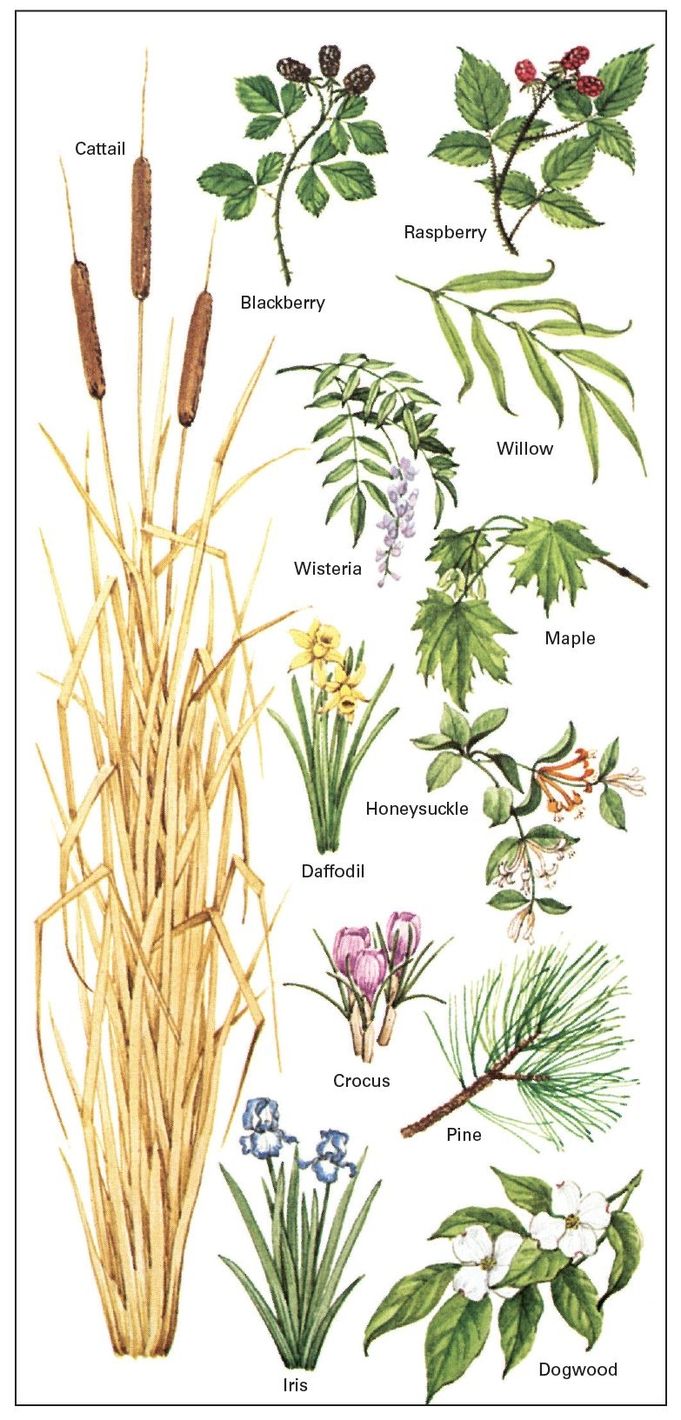
Some of the most useful and widely available natural basketry materials are listed in the chart on the opposite page, but these represent only a few of the many possibilities for making beautiful baskets. Experiment with whatever vines, grasses, and leaves are available to you and try all the different methods of preparing them.
Brand-new or centuries old, all baskets are handmade because no way has yet been found to weave them by machine. While many modern baskets are primarily decorative, the old ones were absolute necessities. settlers in isolated areas, working with homegrown or locally gathered materials, used baskets in place of scarce metalware and pottery.
Gathering and Preparing Natural Basketry Materials
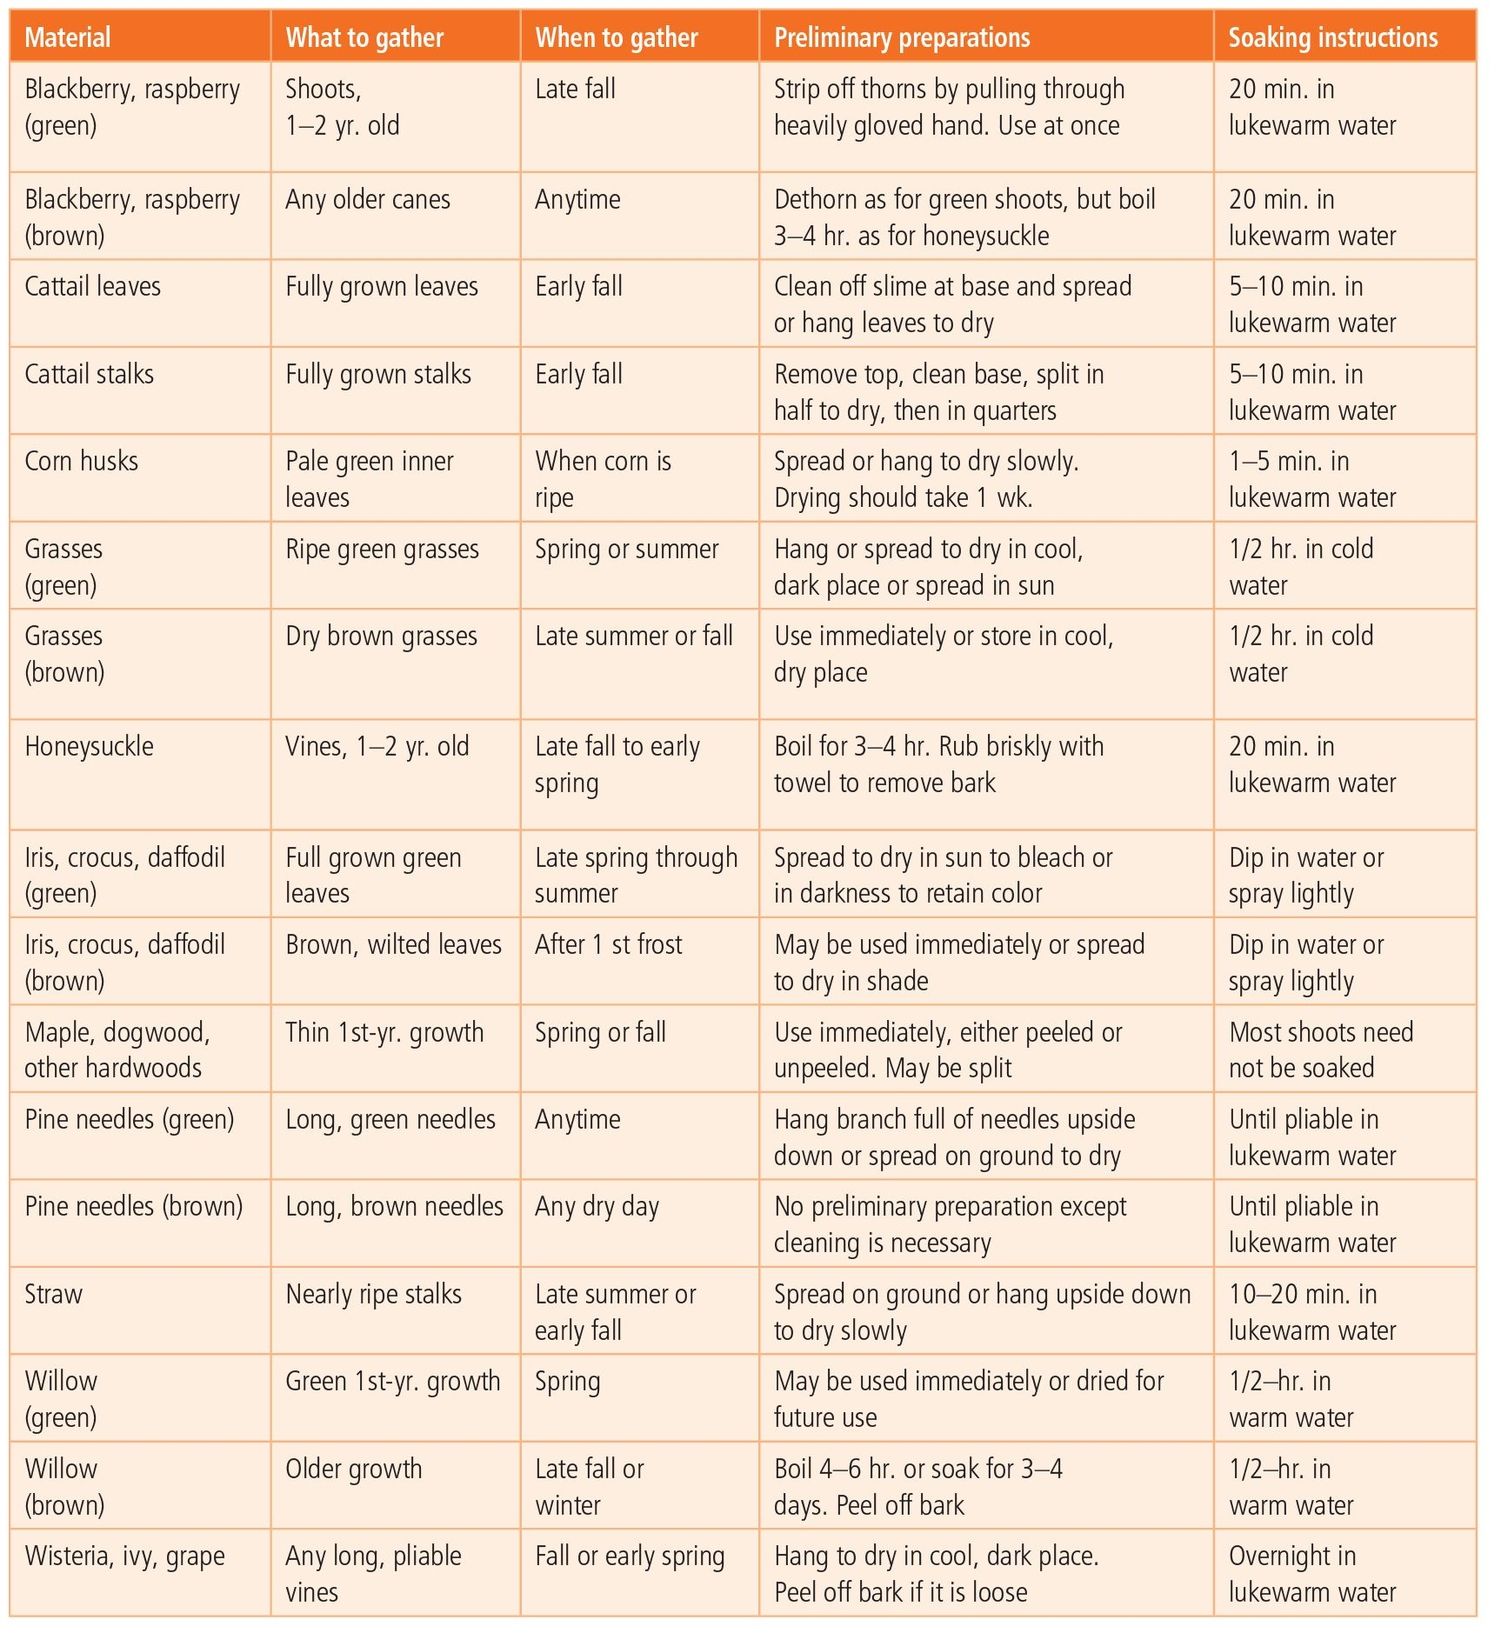
The easiest materials to work with are ones that are long and pliable: grasses and leaves that are mature but have not yet started to brown off, first-year branches and saplings, and spring or fall vines in which the sap is running. However, the rich colors of hard-to-handle dried grasses, leaves, and vines make them well worth learning to use too. The chart gives special instructions for preparing plants gathered after they are dry.
Most of the materials you collect will need some preliminary preparation to strengthen and preshrink them, since any shrinkage after a basket is finished tends to loosen the construction. Once the preparatory steps are completed, materials can either be used immediately or dried and stored. Dry the plants slowly in a cool, dark place unless you want to achieve the bleached effect of drying in full sun. To prevent mildew and general deterioration, store dried material in a location that is cool, airy, and free of moisture. Brown paper bags are good for storing small leaves and grasses. Vines can be coiled. Long grasses should be tied into loose bundles and hung.
When you are ready to make a basket, soak the dried material in water until it is pliable. Soaking time varies greatly. In general, the thicker and harder the plant is, the more soaking it will require. To avoid oversoaking, wrap the soaked material in a damp towel rather than letting it sit in water as you work.
Constructing a Basket From Coils of Straw
Even a weak and brittle material, such as straw or grass, can be made into a strong basket when it is coiled. Gather 1 to 2 pounds of straw and 75 to 100 willow branches to use as wrapper for the straw. Choose long, straight first-year willow shoots with no side branches. Weeping willow is good if gathered in winter, or gather shoots from a basket willow anytime.
When you are ready to make a basket, soak the willow in water overnight and split it as shown below. Prepare the straw by removing short, broken pieces. The easiest way to do this is to take a small handful at a time (a bunch about 1 1/2 inches in diameter is easy to handle), slap it against your knee, and comb your fingers through so that the broken pieces fall out. Soak the straw for 10 minutes to make it pliable enough to coil. Keep it wrapped in a damp towel as you work so it does not dry out. As you coil the basket, strive for evenly spaced willow stitches and straw bundles of uniform thickness.
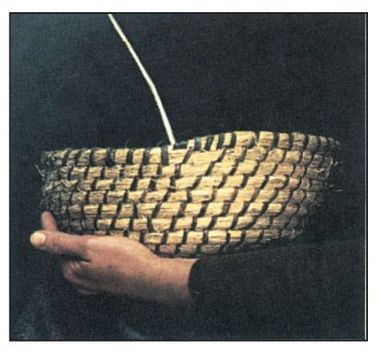
Bread basket is made of bundles of broom straw that were wrapped with strips of willow as they were coiled into a spiral. Grass or pine needles could be used instead of straw. The coils are 1/2 in. thick and the willow turns are 1/2 in. apart.

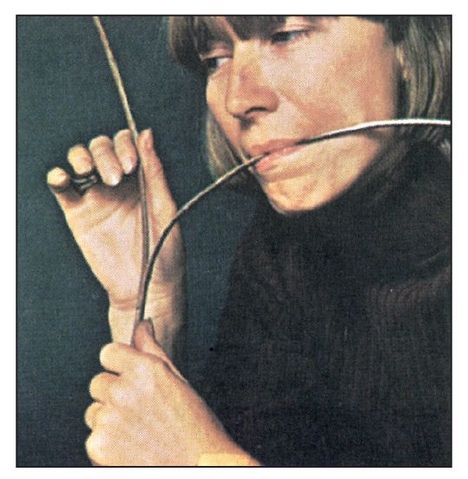
To split willow, cut with a sharp knife 2 in. into end of branch and pull halves apart with exactly equal force. Pull one side with teeth; use free hand to help control force. it takes practice to keep split centered so that one of the halves does not tear off in a short piece. After splitting, shave any lumps off split side of each half, and cut small end to a point.
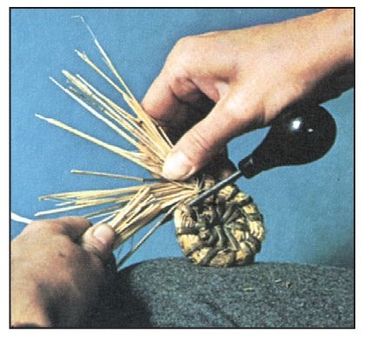
Basic Coiling Techniques
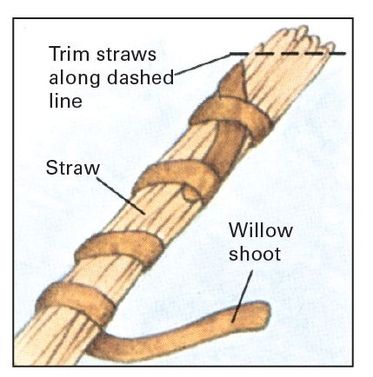
1. Wrap a willow strip around its own end to anchor it to top of straw bundle. Trim off ends of the straws close to willow.
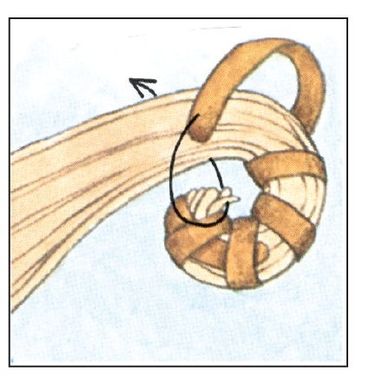
2. After four wraps, curl straw bundle into spiral, draw willow through center, and pull tight. Repeat five times.
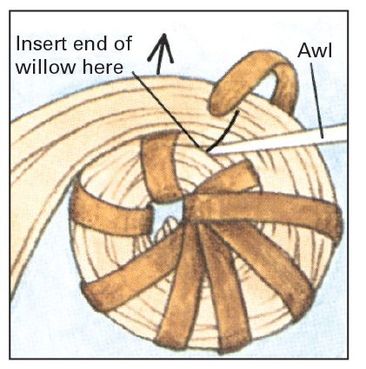
3. Open a hole with the help of an awl, then stitch willow through straw under a wrap made in step 1. Pull tight.
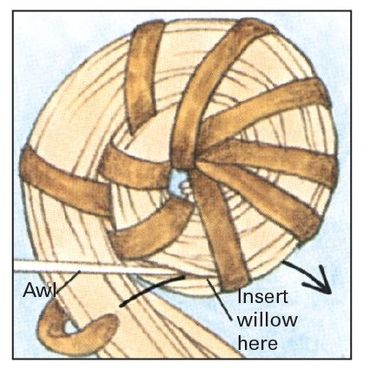
4. Continue wrapping willow strip around straw and stitching through straw bundle to make a continuous coil.
Making the Basket
1. As basket grows, add more straw by interweaving new ends among old.
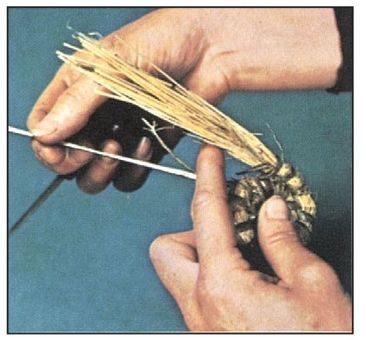
2. To add more willow, draw new strand through, then hide ends between coils.
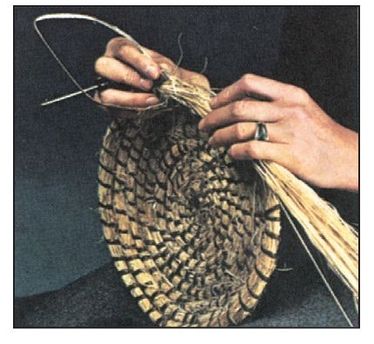
3. When base measures 6 in., gradually curve spiral upward to form bowl.
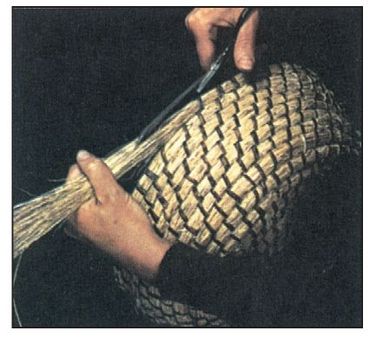
4. When sides of bowl reach a heightof 5 in., cut off ends of straw at an angle.
5. Wrap tapered ends of straw with closely spaced willow stitches.

6. Reinforce rim by overstitching in direction opposite to first round of stitches.
Use Corn-Husk Braids To Make a Place Mat
To make a corn-husk mat, you will need husks, raffia or other stitching material, a blunt needle, and a place to anchor the braid. For a good anchor, hammer a nail at one end of a plank, hook your braid over the nail, sit on the plank’s other end, and pull the braid tight.
Dry the corn husks according to directions in the chart on page 261. A screen makes an excellent drying rack, or spread the leaves on a tabletop or board. Drying will take two to four days, depending on the weather. Prepare the husks by clipping off the ends to make them straight and even. Then soak them for five minutes. Finish the mat with a row of fringed braid.
Weaving Strong Baskets Out of Wood Splints
Black, or basket, ash is the ideal tree for making splints because it has tough annual growth rings separated from one another by relatively soft, spongy layers. The tough rings are torn apart into long, thin strips to make splints. Red maple, white maple, hickory, elm, poplar, and sassafras are other sources of splints, but they are more difficult to process than ash.
Whatever tree you choose, it should be 4 to 6 inches in diameter with at least 6 feet of straight, branch-free trunk. (Branches produce knots, which interfere with splintmaking.) One processing method is to soak the whole log in water for a month or longer and then pound it with a club to break up the spongy layers so that the tough rings will separate from one another naturally. In another method the log is first split into eighths using hardwood wedges and a froe, an old-fashioned home-steading and carpentry tool that was used to make shakes, shingles, and clapboards. The eighths are then cleaved into splints. Froes can still be purchased from specialty-tool mail-order houses. A sharp ax or cleaver makes a good substitute for starting the split in the log. Splints made by either method are fairly rough. They can be used as is or smoothed with sandpaper or by scraping with a sharp knife.
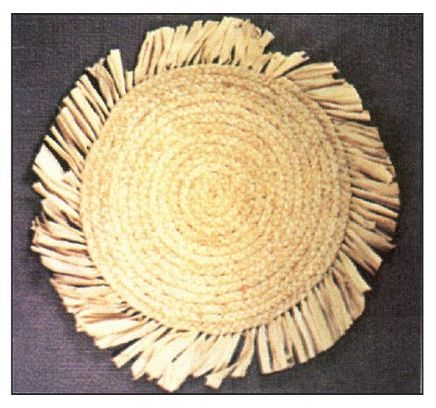
Corn husks, braided into a long rope and sewn into a spiral, make a sturdy, heat-resistant place mat. Use the husk’s soft inner leaves or buy packaged husks at a Mexican grocery. sew with raffia (available at craft shops), cotton thread, or narrow strips of leather.
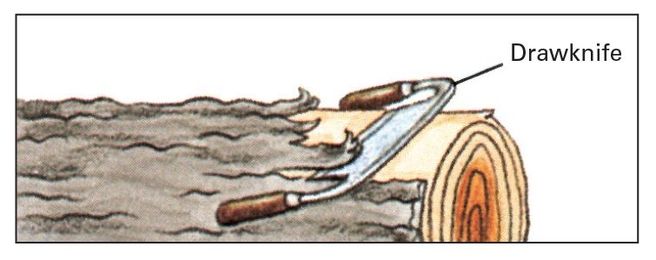
Drawknife is used to peel bark from whole log or from sections of a log that have been split into eighths.
Making the Mat
1. To start spiral, curve braid around and stitch through knot in end with raffia.
2. secure center by stitching downward through section of braid opposite knot.
3. Continue sewing braid into a spiral. stop as necessary to make more braid.

4. Add new raffia by joining ends of new and old strands with square knot.
5. When mat measures 12 in., braid the fringe using technique shown below.

6. sew fringe to mat, cut end, bind with raffia, and sew bound end in place.
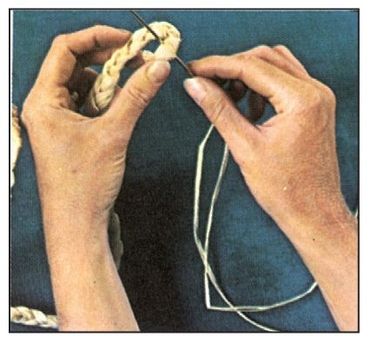
Braiding the husks

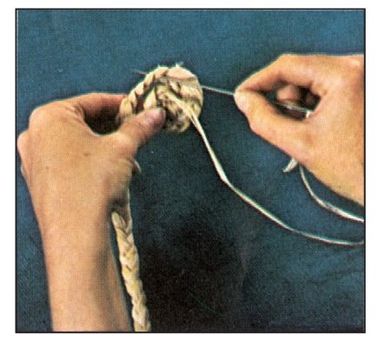
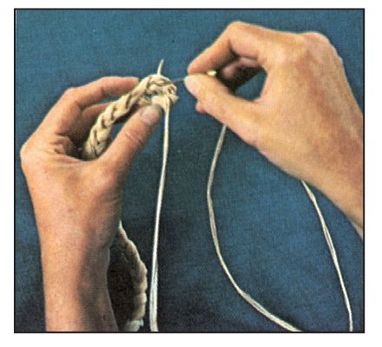
To start the braid, tie together narrow ends of three husks. Hook knot over nail and pull husks taut as you braid. Add new husk by laying its narrow end inside wide end of braided husk.
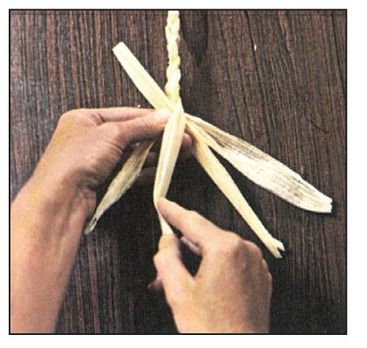
How to make the fringe on the final row
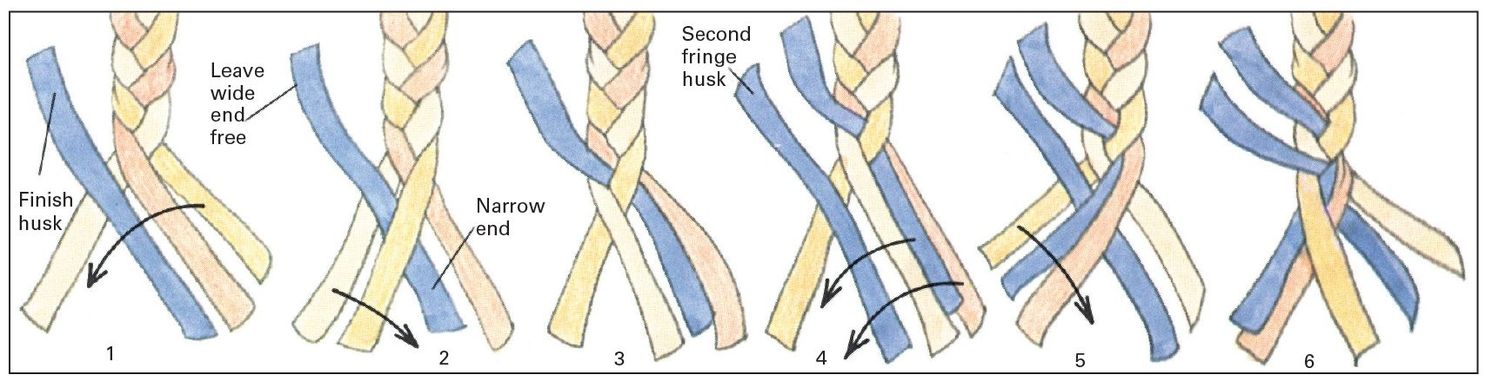
Finish mat with a decorative fringe. Add husks one at a time to the braid. incorporate the narrow end of each husk you add into the braid; let the wide end stay free to form the fringe. Husks are shown in color to aid in identification.
Splints From a Whole Log

1. score parallel lines along trunk of log that has first been soaked for one month and then stripped of bark.
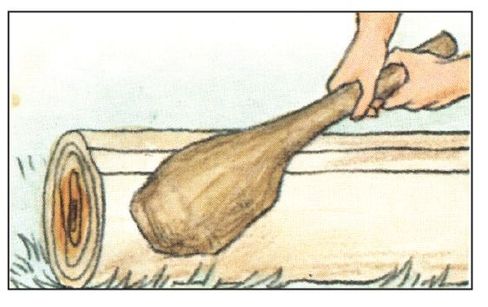
2. Pound log end vigorously with wooden club until strip ends separate, then pound between score lines all along log.
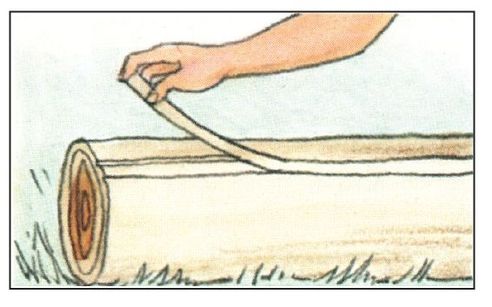
3. Pull up strips. When necessary, repeat pounding at any spots where strips fail to separate easily from trunk.
Splints From a Split Log
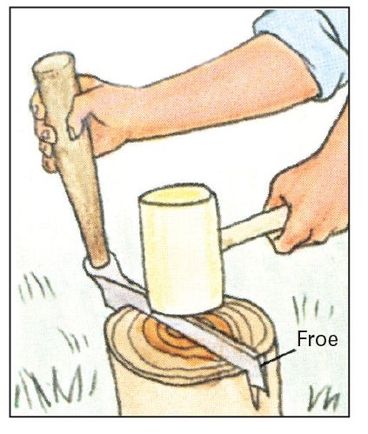
1. stand 6-ft. log on end, and place froe or other blade so that it cuts directly across centermost growth ring. Pound froe into log.

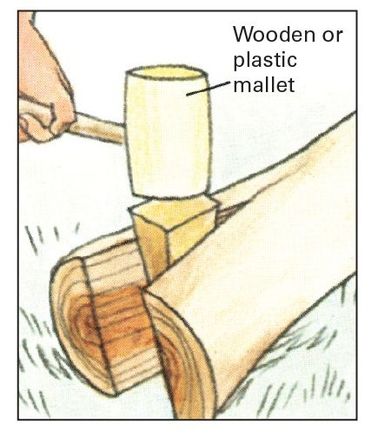
2. Pull handle of froe toward you to pivot blade and split trunk, then work froe down; repeat until froe is worked several inches into log.
3. Remove froe and lay log on ground. insert tip of wedge into split opened up by froe. Pound wedge all the way into the tree trunk.

4. Pound in second wedge. Work wedge over wedge down log, then repeat process to split halves into quarters and then eighths.
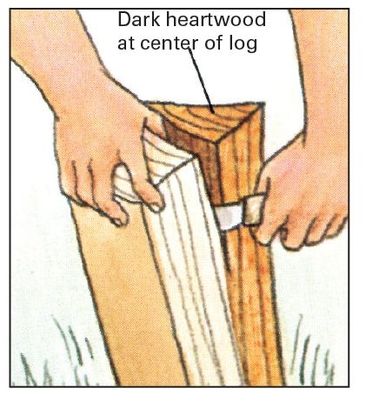
5. Remove dark heartwood. First cut partway down line where dark wood meets light, then pull sides apart with hands. Peel off bark.
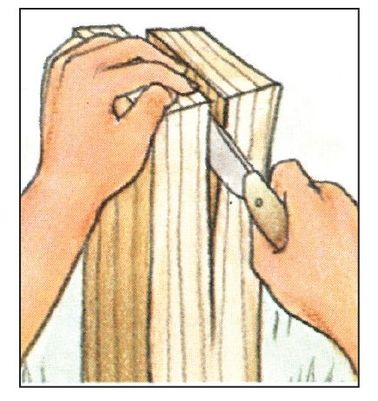
6. Remaining light outer wood must be split exactly in half, repeatedly, to make splints. start split by cutting into center of end.

7. Complete the split by pulling halves apart with equal force. if split drifts off center, recenter by pulling down harder on thinner half.
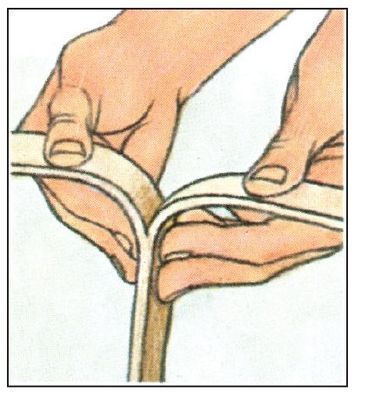
8. Resplit halves again and again to make successively thinner splints. For very thin splints control force with thumb and fingers.
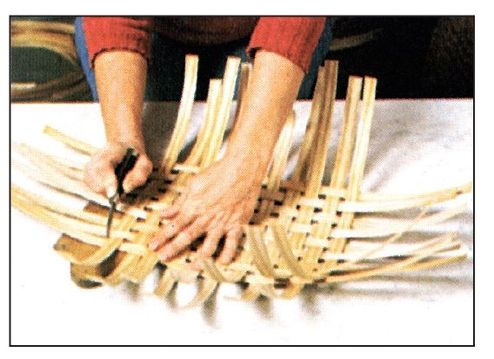
Weaving Splints to Form the Basket Body
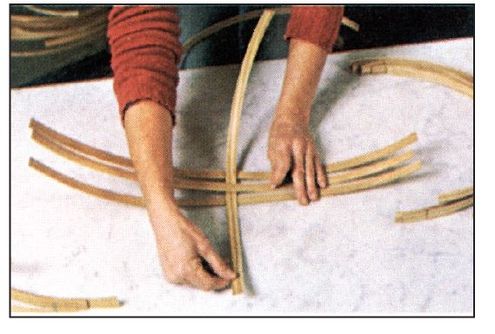
1. With smooth sides up weave a 20-in splint through three 22-in.-long splints.

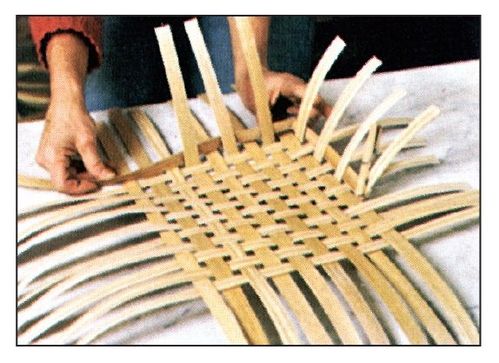
2. Weaving on right and left sides alternately, add ten 20-in. splints.

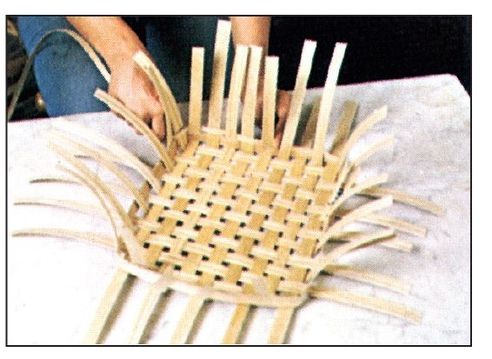
3. Weaving on near and far sides alternately, add six 22-in. splints.
4. With a sharp knife score splints lightly along edge of woven portions.
5. Turn basket over, bend up splints, and weave circumference with 6-ft. splint.
6. Weave half-width splints for next five rounds, then finish with a wide splint.

7. Cut off ends of all splints that are on the inside of the top round.
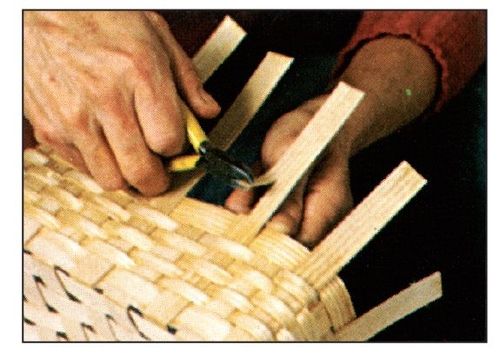
8. Cut half the width from each splint that comes up on outside of top round.
9. Cut half-width splints to a point, fold over, and tuck point into weaving.
Steps for making a hickory handle

1. Tie 10-in.-long soaked shoots into U-shape. Let dry.
2. Mark width of splint on each side of hickory handle.

3. Cut notches between lines marked on handle.
4. sharpen handle ends and insert into side of basket.
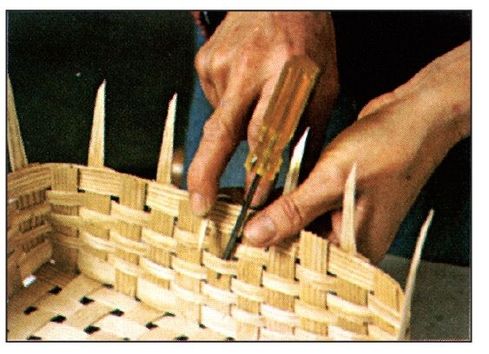
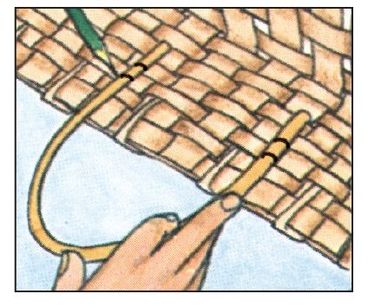
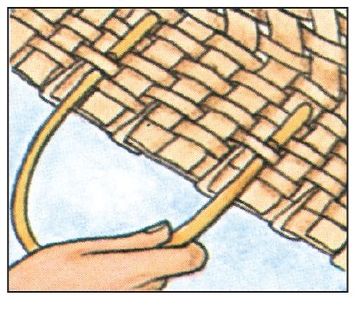
Finishing the edge
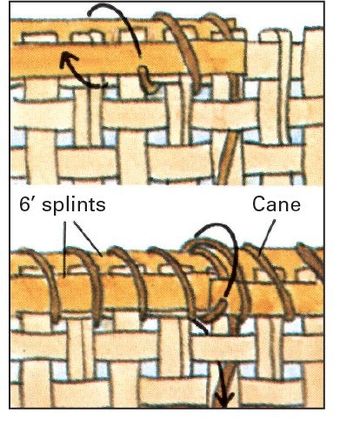
Reinforce rim with two 6-ft.-long splints lashed in place with cane. On inside of basket insert cane end through weaving. Then lay a 6-ft.-long splint against each side of upper edge (top left), and lash with cane all the way around rim. (Long splints can be held in place temporarily with clothespins.) When you reach handles, lash around them and continue. Where splint ends meet, double-wrap with cane (bottom left).

Ash splints make a lightweight basket that is excellent for storing balls of yarn. You can make your own splints or buy machine-made ones from a craft shop.
A Square Basket Made From Ash Splints
To make a 10-inch by 12-inch yarn basket, you will need 1-inch-wide ash splints cut to the following lengths: 9 splints that are 22 inches long, 11 that are 20 inches long, and 7 that are 6 feet long. You will also need cane to reinforce the rim and two 1/4- to 1/2-inch-diameter hickory shoots for handles. Prepare the handles in advance by soaking the shoots overnight, then bend them into U-shapes. Finish the basket body, then fit the handles.
Before starting to weave, cut three 6-foot-long splints in half lengthwise. The halves will be used to create varied texture in the basket sides. Next, find the rough sides of the splints by bending them first one way, then the other. Splinters will be raised on the rough side when you bend a splint with its rough side facing out. The rough side will form the basket interior. Finally, soak the splints for 20 minutes in room-temperature water.
Sources and resources
Books
Allen, Laura G. Basket Weavers: Artisans of the Southwest. Flagstaff, Ariz.: Museum of Northern Arizona, 1993.
Hart, Carol, and Dan Hart. Natural Basketry. New York: Watson-Guptill, 1978.
Harvey, Virginia I. The Techniques of Basketry. Seattle, Wash.: University of Washington Press, 1986.
Hoppe, Flo. Wicker Basketry. Loveland, Colo.: Interweave Press, 1989.
Mason, Tufton O. American Indian Basketry. New York: Dover, 1988.
Pollock, Polly. Start a Craft: Basket Making. Edison, N.J.: Book Sales Inc., 1994.
Tod, Osma G. Earth Basketry. West Chester, Pa.: Schiffer Publishing, 1986.
Tod, Osma G., and Oscar H. Benson. Weaving With Reeds and Fibers. New York: Dover, 1975.