Chapter 14: Accessing Data with VBA Code
Data access and data management are at the core of any database application. Although you can do a fine job building applications with bound forms, using VBA code to access and manipulate data directly provides far greater flexibility than a bound application can. Anything that can be done with bound forms and controls can be done with a bit of VBA code using ADO (ActiveX Data Objects) to retrieve and work with data.
The Visual Basic for Applications (VBA) language offers a full array of powerful commands for manipulating records in a table, providing data for controls on a form, or just about anything else. This chapter provides some in-depth examples of working with procedures that use SQL and ADO to manipulate database data.

In the Chapter14.accdb database, you will find a number of forms to use as a starting point and other completed forms to compare to the forms you change in this example. All of the examples in this chapter use modified versions of the frmProducts form and tblProducts.
Understanding SQL
Many of the VBA procedures that you write for working with Access data utilize Structured Query Language (SQL, usually pronounced “sequel” or “ess-que-ell”) statements to retrieve data from a database, add new data to a database, or update records in a database. When you use the Access Query Designer to create a query, Access converts the query’s design into a SQL statement. The SQL statement is what Access actually executes when the query runs.
SQL is a standardized language for querying and updating database tables, and it is used by many relational databases. Although Access SQL does not comply with ANSI SQL-92 (the generally-accepted specification for SQL language implementations), Access SQL shares many similarities with all SQL implementations. Your Access SQL statements run with very few changes in SQL Server or many other database systems.
Although forms and reports do have the ability to work with queries that are stored in an Access database, many times you’ll find that creating a query on the fly in your code is quicker and easier than working with Access queries. SQL is relatively easy to understand and work with. This is a quick overview of SQL statements and how to create them in Access 2007.
Viewing SQL statements in queries
To view the SQL statement that Access creates while building a query, select View⇒SQL View from the Access ribbon. Figure 14-1 shows a typical SQL statement that returns the product description, company name, and state for products purchased by contacts in Connecticut or New York.
Figure 14-1
A SQL statement in the SQL view window for an Access query

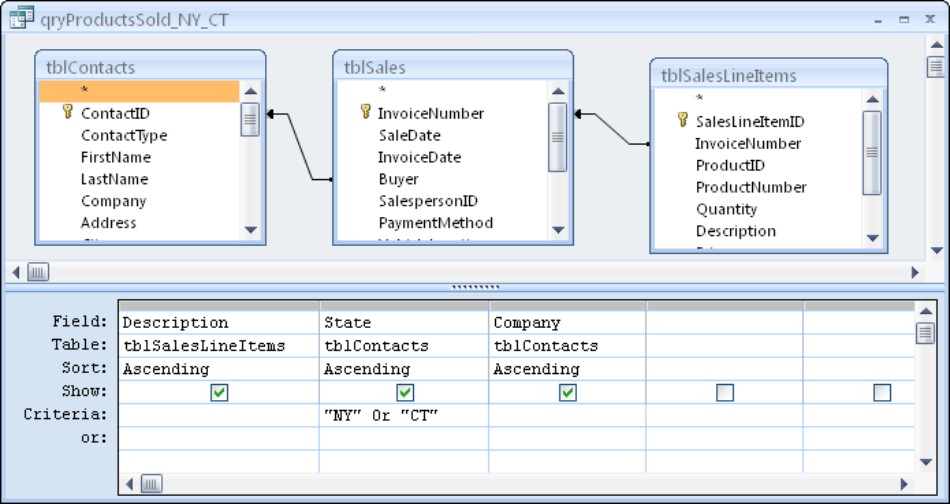
Don’t be put off by the apparent complexity of the SQL statement in Figure 14-1. The same query in Design view is shown in Figure 14-2. As you can easily see, the Access Query Designer hides much of the complexity of the underlying SQL statement.
Behind the scenes, as you add tables and choose fields in the Access Query Designer, Access composes a SQL statement that is stored within the database file. Anything you can do in the Query Designer can be expressed using the Access SQL syntax. Opening a query actually instructs Access to retrieve the SQL statement and compose the query view you see in the Query Designer.
You can make changes to the query using either the Design window or the SQL window. As you work with the query, you can alternate between view modes using the View drop-down in the Access ribbon. The changes you make in either view are immediately reflected in the alternative view.
Figure 14-2
The same query in Design view
If you are proficient in creating SQL queries on your own, you can even create a new query directly in the SQL window. To add new lines to the SQL statement, simply press Enter, or add additional SQL text to the existing statement, while working in the SQL View window.
An SQL primer
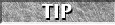
As you can see, one way to learn SQL syntax is to build a query in Design view; then view the corresponding SQL statement in the SQL view window. The example in Figure 14-1 utilizes the four most common SQL commands. Table 14-1 shows each command and explains its purpose.
Using these four basic keywords, you can build very powerful SQL statements to use in your Access forms and reports. By convention, SQL keywords are entered in all uppercase. This is not a requirement because Jet, the database engine built into Microsoft Access, is case-insensitive by default.
SQL statements may span many, many lines. The Jet database engine doesn’t care how long a SQL statement is, or whether it spans multiple lines, as long as the SQL syntax (spaces, commas, and so on) is correct.
The SELECT keyword
The SELECT keyword is the first keyword used in two query types: in a select query or a make-table query. SELECT specifies the field(s) you want displayed in the result data.
After specifying the keyword SELECT, specify the fields you want included and displayed by the query. The general syntax is:
SELECT Field_one, Field_two, Field_three [,...]
where Field_one, Field_two, and so on, are replaced with the names of the table fields. Virtually any number of fields may be included in the SELECT statement.
Notice that commas separate each field in the list from the others. For instance use the following SELECT clause to specify Company Name and City fields in the Contacts table:
SELECT [Company Name], City
The last field name in the list is not followed by a comma.

The field name Company Name needs square brackets around it because it has a space in the name (see sidebar).
If you need to view fields from more than one table, specify the name of the tables in which to find the fields. The SELECT statement would, for example, look like this to select fields from both the Contacts and Sales tables:
SELECT tblContacts.Company, tblContacts.City,
tblSales.SaleDate, tblSales.InvoiceNumber
You’ll recall that the “dot” between tblContacts and Company is an operator that indicates that Company is contained within tblContacts. In this context, the dot does not mean that Company is a property or method of tblContacts. This is an example of how context determines how Access interprets operators.
When you build a query using the Query Designer, Access automatically includes the table’s name before the field name. Actually, the table name is optional. You only specify the table name if more than one table in the SQL statement has fields with exactly the same name. For instance, a field named Invoice Number may appear in both the Sales table and SalesLineItems tables. If you want to SELECT an invoice number field in your SQL statement, you must specify which of these to use—the one in Sales or the one in SalesLineItems.
The following SQL SELECT statement illustrates the syntax:
SELECT tblContacts.Company, tblContacts.City, _
tblSales.SaleDate, tblSales.InvoiceNumber
Although table names are not required for non-duplicate fields in an SQL statement, it’s a good idea to use them for clarity. Anyone viewing your SQL statements will immediately know where each field is found in the database.
You can use the asterisk wildcard (*) to specify that all fields in a table should be selected. If you’re going to select all fields from more than one table, specify the table, a period (.), and the asterisk for each table:
SELECT tblContacts.*, tblContacts.*,
tblSales.*, tblSales.*
Generally speaking, it is not a good idea to use the asterisk to select all fields within a table. Your queries are guaranteed to run more slowly than necessary if you routinely extract more data than needed in your queries. By all means, select all of the fields that are necessary to satisfy the user’s requirements, but do not make a habit of selecting all columns from all tables. Keep in mind that your queries pull everything specified by the SQL statement, whether or not the data is displayed on the form or report using the query.
Using the Brackets around Field Names
A field name that contains spaces requires the use of brackets. The brackets ([ ]) serve as delimiters to let the SQL parser know you are referring to a specific field. If the field name does not contain spaces, you do not need to use brackets. Access may insert brackets around field names, but they are generally unnecessary unless the field name contains spaces.
The square brackets surround just the field name (tblMyTable.[My Field Name]), not the table and field name ([tblMyTable.My Field Name]). Think of the square brackets as marking the beginning and end of an identifier.
Specifying SELECT predicates
When you create an SQL SELECT statement, several predicates are available for the SELECT clause:
• ALL
• DISTINCT
• DISTINCTROW
• TOP
A predicate restricts or modifies the number of records returned. A predicate works in conjunction with the WHERE clause (actually, in SQL terminology, the WHERE condition) of an SQL statement.
The ALL predicate selects all records that meet the WHERE condition specified in the SQL statement. The ALL predicate is included by default. If you do not specify the keyword ALL, all records indicated by the SQL statement are returned by the query.
Use the DISTINCT predicate when you want to omit records that contain duplicate data in the fields specified in the SELECT statement. For instance, if you create a query and want to look at both the company name and the products the customer purchased, without considering the number of products of a single category, the SELECT statement for the query (qryCompaniesCategoriesDistinct) would be as follows:
SELECT DISTINCT tblContacts.Company, tblProducts.Category
FROM (tblContacts
INNER JOIN tblSales
ON tblContacts.ContactID = tblSales.Buyer)
INNER JOIN (tblProducts
INNER JOIN tblSalesLineItems
ON tblProducts.ProductID = tblSalesLineItems.ProductID)
ON tblSales.InvoiceNumber = tblSalesLineItems.InvoiceNumber
ORDER BY tblContacts.Company;
We’ll ignore everything past the first line of this query for the meantime. Notice the DISTINCT clause that follows the SELECT keyword. The addition of the DISTINCT keyword has a profound effect on the records returned by this query.
If a customer (Paul’s Best Autos) purchased two minivans—that is, has two minivan records (one 2002 Ford Mini Van and one 1992 Ford Conversion Van) in tblSalesLineItems—only one record with “Minivan” as the category appears in the resultset. Without the DISTINCT keyword, two records with “Minivan” as the category appear in the result set for Paul’s Best Autos (see qryCompaniesCategoriesNotDistinct in Chapter14.accdb).
The DISTINCT predicate tells Access to show only one record if the values in the selected fields are duplicates (that is, same company name and same product category)—other fields in the underlying records may be different. Even though two different records are in tblSalesLineItems for the customer, only one is shown. DISTINCT eliminates duplicates based on the fields selected by the query.
The DISTINCT predicate is added to an Access query’s SQL statement by setting the query’s Unique Values property. Right-click in the upper portion of the Access Query Designer, and select Properties. Then, set the Unique Values property to Yes. Access adds the DISTINCT predicate to the SQL statement underlying the query for you.
Records returned by a query that includes the DISTINCT predicate are not updateable. Each record in the result set represents one or more records in the underlying tables, and there is no way for Access to know which records to update. Therefore, the data returned by a DISTINCT query are read-only.
The DISTINCTROW predicate is unique to Access. It works much like DISTINCT, with one big difference: It looks for duplicates on the basis of all fields in the table(s) underlying the query, not just the fields selected by the query.
For instance, if a customer has purchased two different product records in tblSalesLineItems, use the predicate DISTINCTROW in this SQL statement:
SELECT DISTINCTROW tblContacts.Company, tblProducts.Category
FROM (tblContacts
INNER JOIN tblSales
ON tblContacts.ContactID = tblSales.Buyer)
INNER JOIN (tblProducts
INNER JOIN tblSalesLineItems
ON tblProducts.ProductID = tblSalesLineItems.ProductID)
ON tblSales.InvoiceNumber = tblSalesLineItems.InvoiceNumber
ORDER BY tblContacts.Company;
In this example, both product records are displayed. DISTINCTROW looks for duplicates across all of the fields in the tables underlying the query, even if the field is not selected by the query. If any field in the underlying tables is different (in this case, the description field in the products table is different for the Minivan category), both records are displayed in the result set.
Generally speaking, Access queries behave as if DISTINCTROW is always included in the SQL statement. The only time you’ll see a query with DISTINCTROW returns different records than a query without DISTINCTROW is when all of the tables underlying the query contain exactly the same records. Because all of the tables in a normalized database includes a primary key that uniquely identifies each row, it is unlikely a DISTINCTROW query will find identical records in tables joined by a query.
The DISTINCTROW predicate is added to a query’s SQL statement by setting the query’s Unique Records property to Yes. Unique Values (DISTINCT) and Unique Records (DISTINCTROW) are mutually exclusive and both cannot be set to Yes at the same time.
The TOP predicate enables you to restrict the number of records returned to the TOP <number> of values. For instance, the following SELECT statement displays the first five contact records (see qryCustomersTop5Sales in Chapter14.accdb):
SELECT TOP 5
Sum(tblSalesLineItems.Quantity*tblSalesLineItems.Price)
AS SaleAmount, tblContacts.Company
FROM (tblContacts
RIGHT JOIN tblSales ON tblContacts.ContactID=tblSales.Buyer)
RIGHT JOIN tblSalesLineItems
ON tblSales.InvoiceNumber=tblSalesLineItems.InvoiceNumber
GROUP BY tblContacts.Company
ORDER BY
Sum(tblSalesLineItems.Quantity*tblSalesLineItems.Price) DESC;
You can use the TOP predicate in conjunction with the ORDER BY clause to answer some practical business questions. This example (qryCustomersMostRecentSales) uses the TOP predicate with the ORDER BY clause:
SELECT TOP 5 Company FROM tblContacts
ORDER BY LastSalesDate DESC
This example returns a list of companies with the five most recent sales dates. In other words, the query lists all the companies and orders them by their last sales date in descending order (so that the most recent sales are at the top of the list), and then picks the first five companies in the ordered list.
The TOP predicate has an optional keyword, PERCENT, that displays the top number of records on the basis of a percentage rather than a number. To see the top two percent of your contacts, you use a SELECT statement like this example ((qryCustomersTop10PercentSales) :
SELECT TOP 10 PERCENT Company FROM tblContacts
ORDER BY LastSalesDate DESC
The FROM clause of an SQL statement
As the name suggests, the FROM clause specifies the tables (or queries) that contain the fields named in the SELECT statement. The FROM clause is required for SELECT queries. The FROM clause tells SQL where to find the records. If you fail to include a FROM clause in a SELECT statement, you will receive an error. Due to the required use of the FROM clause, some people refer to the SELECT statement as the SELECT ... FROM statement.
When you’re working with one table, the FROM clause simply specifies the table name:
SELECT Company, City
FROM tblContacts
When you are working with more than one table, you can supply a table expression to the FROM clause to specify how to retrieve data from the multiple tables. The FROM clause is where you set the relationship between two or more tables for the SELECT statement. The table expression can be one of three types:
• INNER JOIN ... ON
• RIGHT JOIN ... ON
• LEFT JOIN ... ON
Use INNER JOIN ... ON to specify the Access default inner or equijoin. To join two tables, you link them using a field that both tables have in common. For instance, the Contacts and Sales tables have a common field that identifies the buyer. To join the sales and contacts tables, the table expression syntax is (see qryInvoicesAndBuyers in Chapter14.accdb):
SELECT tblSales.InvoiceDate, tblSales.InvoiceNumber,
tblContacts.Company
FROM tblContacts
INNER JOIN tblSales
ON tblContacts.ContactID = tblSales.Buyer;
Notice that the FROM clause specifies the tables to use (tblContacts). Then the INNER JOIN portion of the FROM clause specifies the second table to use (tblSales). Finally, the ON portion of the FROM clause specifies which fields (ContactID in tblContacts and Buyer in tblSales) are used to join the table.
In the case of an inner join, it really makes no difference which table is specified in the FROM clause. Because records are selected only when values exist in both sides of the join (for instance, when ContactID 13 in tblContacts is joined to Buyer 13 in tblSales), Access gets data from both tables, regardless of which table is specified in the FROM clause.
The LEFT JOIN and RIGHT JOIN work exactly the same, except that they specify an outer join instead of an inner join. You use outer joins when you want to return records from a parent table even if the dependent table does not contain any records with matching values specified in the ON clause. The following example (qryContactsAndInoviceNumbers) shows a query coded as an outer join:
SELECT tblContacts.Company, tblSales.InvoiceNumber
FROM tblContacts
LEFT JOIN tblSales
ON tblContacts.ContactID = tblSales.Buyer;
In this example, the query includes contacts and the invoice numbers associated with sales placed by the contact.. If the query does not find a match in the Sales table, the Company is still shown in the resultset even if the Sales table contains no records matching the ContactID in the Contacts table. The InvoiceNumber field is blank when the contact has not yet placed a sale.
If you’d like to see all contacts who haven’t placed a sale, add a simple filter to the query’s design. In this case (qryContactsWithNoInoviceNumbers), the query selects records where the InvoiceNumber is Null:
SELECT tblContacts.Company, tblSales.InvoiceNumber
FROM tblContacts
LEFT JOIN tblSales
ON tblContacts.ContactID = tblSales.Buyer
WHERE tblSales.InvoiceNumber IS NULL;
In this particular example, there is no reason to include the InvoiceNumber as part of the SELECT clause because it will be blank (Null) in every record returned by the query. However, InvoiceNumber is included to clarify the query’s intent.
The WHERE clause of an SQL statement
Use the WHERE clause of the SQL statement only when you want to specify a condition. This clause is optional, unlike SELECT and FROM.
The SQL statement in Figure 14-1 specifies the following WHERE clause:
WHERE (tblContacts.State=”NY”) Or (tblContacts.State=”CT”)
The WHERE condition can be any valid Boolean (True or False) expression. It can be an evaluation on a single field, as in the previous example, or a complex expression based on several criteria.
If you use the WHERE condition, it must follow the FROM clause of the SQL statement.
The ORDER BY clause
Use the ORDER BY clause to specify a sort order. It sorts the displayed data by the field(s) you specify after the clause, in ascending or descending order. Using the example in Figure 14-1, the query was sorted by all three of the fields in the SELECT clause:
ORDER BY tblSalesLineItems.Description, tblContacts.State,
tblContacts.Company;
The fields specified in the ORDER BY clause do not have to be the same fields specified in the SELECT clause. You can sort by any of the fields included in the tables you specify in the FROM clause.
Specifying the end of an SQL statement
Because an SQL statement can be as long as 64,000 characters, a way is needed to tell the database language that you’ve finished creating the statement. End an SQL statement with a semicolon (;).
Access is very forgiving about the ending semicolon. If you forget to place one at the end of an SQL statement, Access assumes that it should be there and runs the SQL statement. On the other hand, if you accidentally place a semicolon inside an SQL statement, Access reports an error and attempts to tell you where it occurred.
When you become proficient at creating SQL statements, you can begin using them to create very powerful programs that retrieve and manipulate data in your applications.
Creating Programs to Update a Table
Updating data in a table by using a form is easy. You simply place controls on the form for the fields of the table that you want to update. For example, Figure 14-3 shows frmSales. The controls on the form update data in tblSales, tblSalesLineitems, and tblSalesPayments.
Figure 14-3
Using a form to update data in tables

Sometimes, however, you want to update a field in a table that you do not want displayed on the form. When information is entered in the Sales form, for example, the field for the last sales date (LastSalesDate) in tblContacts should be updated to reflect the most recent date on which the contact purchased a product. When you enter a new sale, the value for the LastSalesDate field is the value of the txtSaleDate control on the Sales form.
Because the contact’s last sales date refers to the control labeled Sale Date on the Sales form, you do not want the user to have to enter it in two places. Theoretically, you could place the LastSalesDate field as a calculated field that is updated after the user enters the Sale Date. Displaying this field, however, could be confusing and is irrelevant to the items for the current sale.
The best way to handle updating the LastSalesDate field is to use a VBA (Visual Basic for Applications) procedure. You can use VBA procedures to update individual fields in a record, add new records, or delete records.
Updating fields in a record using ADO
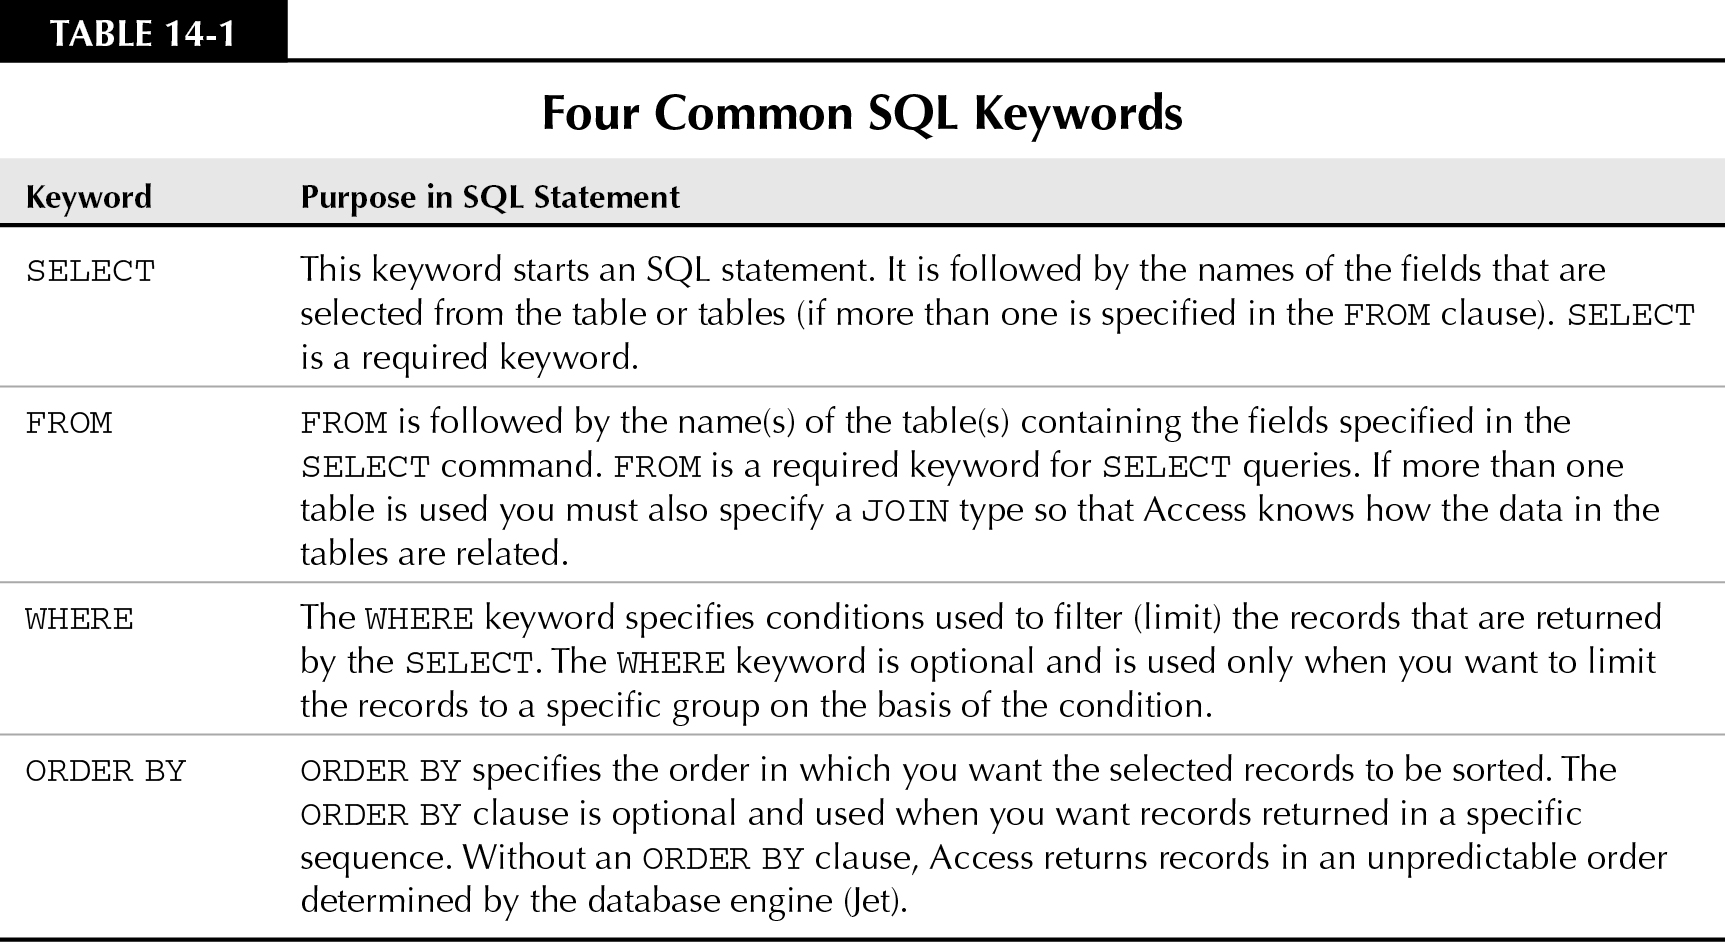
To update the LastSalesDate field in tblContacts by using a VBA procedure, you use the After Update event for the Sales form. The procedure is shown in Figure 14-4.
The Form_AfterUpdate procedure for the Sales form updates the LastSalesDate field in tblContacts. This procedure uses a special programming language to operate directly on a table in the Access Auto Auctions database.
Figure 14-4
Using ADO to update a table.
The programming syntax used to access and manipulate the data in an Access database is called ActiveX Data Objects, or ADO. ADO is a number of different objects, each with a set of properties and methods that enable you to perform a wide variety of data-oriented operations.
ADO is a versatile means of accessing data from various locations. The Access Auto Auctions examples you have seen so far show you how to use Access to update data in a local Access database. That is, all tables, queries, forms, and reports are stored in one Access database located either in a folder on your desktop or on a server. But Access, as a generic database development tool, can interact with all kinds of databases. You can develop forms and reports in one Access database that get their data from another Access database that may be on your local desktop or on a remote file server. You can even link to non-Access server databases like Oracle and SQL Server just as easily as linking to an Access database.
As a data access interface, ADO allows you to write programs to manipulate data in local or remote databases. Using ADO, you can perform database functions including querying, updating, data-type conversion, indexing, locking, validation, and transaction management.
Earlier versions of Access included the Data Access Objects (or DAO) data access interface. Improvements in data access technology have taken Access to new levels as a client-server development tool. ADO represents these improvements and provides a simpler, more powerful array of data access tools.

VBA currently supports DAO. However, Microsoft does not plan to provide any future DAO enhancements. All new features will be incorporated only into ADO. You should use ADO for any new development projects. However, because DAO has been used for so long, you will frequently encounter DAO in existing Access applications. Therefore, this book includes examples of both the ADO and DAO syntaxes.
To use ADO properties and methods, you first declare an ADO object variable, instantiate it (create an instance of it), set its properties, and invoke its methods. When you are done with the variable, you should always set it to Nothing to remove it from memory. You’ll see many examples of these steps throughout this book.
DAO and ADO share some object names. Because both ADO and DAO have a Recordset type, you must precede the variable name with the appropriate class. When you are referring to a DAO recordset, you use the DAO.Recordset data type. ADO recordsets are referred to as type ADODB.Recordset.
Here is a fragment of a procedure showing how to use the ADO Recordset object to open a table:
Dim rs As ADODB.Recordset
Set rs = New ADODB.Recordset
rs.ActiveConnection = CurrentProject.Connection
rs.Source = “tblContacts”
rs.CursorType = adOpenDynamic
rs.LockType = adLockOptimistic
rs.Open
The ADO Recordset object provides the Open method to retrieve data from a table or query. A recordset is simply a set of records from a database table or the set of records that result from running a query.
The Open method has four parameters:
• Source: The data source to open. Source can be the name of a table (as in this example), the name of a query, or a SQL statement that retrieves records. When referencing a table, the table can be a local or linked table.
• ActiveConnection: Refers to a connection to a database. A connection is a communication line into the database. You use CurrentProject.Connection to refer to the current Access database.
• CursorType: ADO supports a number of different cursor types. A cursor is a pointer, or set of pointers, to records. Think of a cursor the way ADO keeps track of records. Depending on the property settings used to retrieve data, ADO cursors can move only forward through records (adOpenForwardOnly), or permit forward and backward movement (adOpenDynamic). A dynamic cursor (adOpenDynamic) allows movement in both directions, while adOpenForwardOnly permits only forward movement. The CursorType is explained in detail in Table 14-2.
• LockType: Determines how ADO locks records when updating. adLockOptimistic allows other users to work with a record that is locked by the ADO code, while adLockPessimistic completely locks other users out of the record while changes are made to the record’s data.
This same ADO statement can be rewritten in a somewhat more condensed fashion:
Dim rs As ADODB.Recordset
Set rs = New ADODB.Recordset
rs.Open “tblContacts”, CurrentProject.Connection, _
adOpenDynamic, adLockOptimistic
In this example, the recordset properties are set as part of the Open statement. Either syntax is correct, and is completely the choice of the developer.
Here is another simple example extracting a single record, based on a ContactID:
Dim rs As ADODB.Recordset
Set rs = New ADODB.Recordset
rs.ActiveConnection = CurrentProject.Connection
rs.Source = _
“SELECT * FROM tblContacts WHERE ContactID = 17”
rs.CursorType = adOpenDynamic
rs.LockType = adLockOptimistic
rs.Open
The SQL statement used to extract records returns a single record, based on the ContactID. In this case, because the LockType property is set to adLockOptimistic, the data in the record can be changed by the user.
Table 14-2 describes the permissible values for the CursorType property.
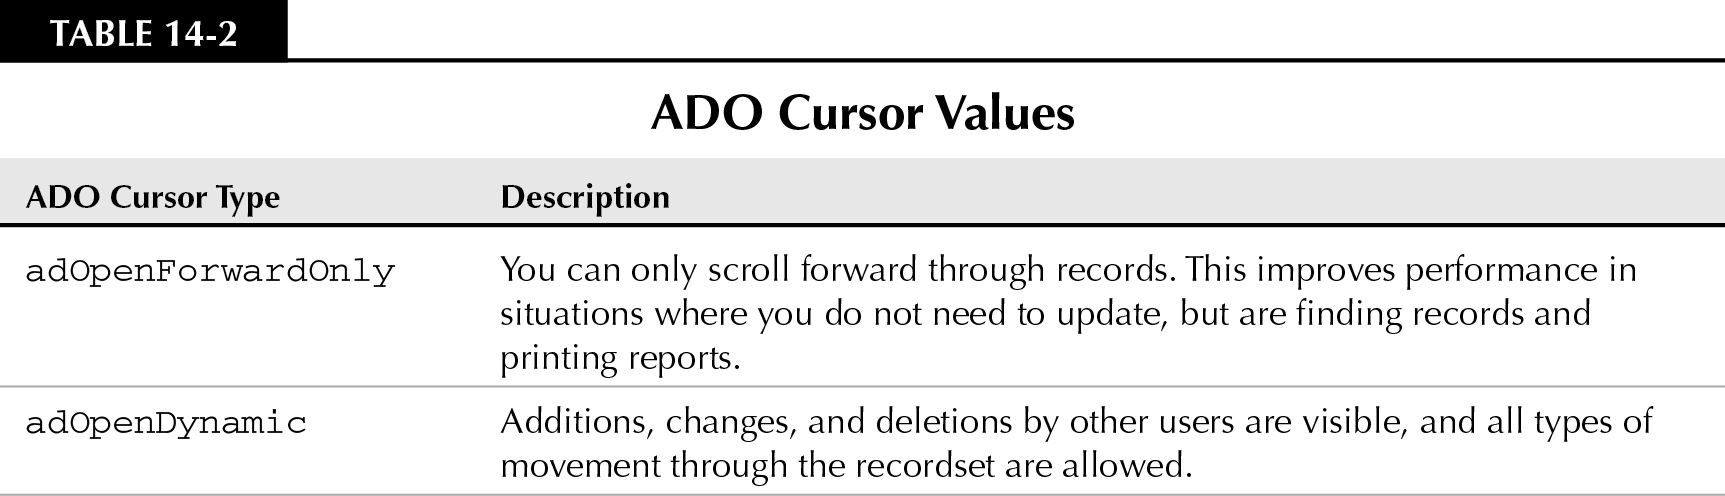

If you don’t specify a CursorType or LockType, ADO creates the recordset as an adOpenForwardOnly/adLockReadOnly type recordset by default. This type of recordset is not updatable. If you need to make changes to the data in the recordset, you need an understanding of the various CursorType and LockType combinations and how they affect the capabilities of a recordset.
When you use ActiveX Data objects, you interact with data almost entirely through Recordset objects. Recordsets are composed of rows and columns, just like database tables. Once a recordset has been opened, you can begin working with the values in its rows and columns.
You’ve seen recordsets many times in this book. The records returned by a query are delivered as a recordset. Actually, when you open an Access table, Access arranges the table’s records as a recordset, and presents it in Datasheet view. You never really “see” an Access table—you see only a representation of the table’s data as a recordset displayed in Datasheet view.
Opening an updatable recordset—that is, by using the adOpenDynamic or adOpenKeySet cursor type, and specifying the adLockOptimistic lock type—the recordset opens in edit mode.
Before you change data in any of the recordset’s fields, however, you need to make sure that you are in the record you want to edit. When a recordset opens, the current record is the first record. If the recordset contains no records, the recordset’s EOF property is True.
A runtime error occurs if you attempt to manipulate data in a recordset that contains no records.
To update a field in the current record of the recordset, you simply assign a new value to the field. In Form_AfterUpdate procedure in Figure 14-4, you assign the value of txtSaleDate on the frmSales form to the recordset’s LastSaleDate field.
After you change the record, use the recordset’s Update method to commit the record to the database. The Update method copies the data from the memory buffer to the recordset, overwriting the original record. The entire record is replaced, not just the updated field(s).
Changes to an ADO recordset are automatically saved when you move to another record or close the recordset. In addition, the edited record is also saved if you close a recordset or end the procedure that declares the recordset or the parent database. However, you should use the Update method for better code readability and maintainability.
To cancel pending changes to a recordset in either ADO, use the record’s CancelUpdate method. If it is important to undo changes to a record, you must issue the CancelUpdate method before moving to another record in an ADO recordset.
The Close statement at the end of the Form_AfterUpdate procedure closes the recordset. Closing recordsets when you finish using them is good practice. In Figure 14-4 notice also that the Recordset object is explicitly set to nothing (Set rsContacts = Nothing) to clear the recordset from memory. Omitting this important step can lead to “memory leaks” because ADO objects tend to persist in memory unless they are explicitly set to Nothing and discarded.
Updating a calculated field for a record
In the Sales form example, the txtTaxAmount control displays the tax that must be collected at the time of the sale. The tax amount’s value is not a simple calculation. The tax amount is determined by the following items:
• The sum of the item amounts purchased that are taxable
• The customer’s tax rate that is in effect on the sale date
• The value in txtOtherAmount and whether or not the txtOtherAmount is a taxable item
When the user changes information for the current sale, any one or all three of these factors can change the tax amount. The tax amount must be recalculated whenever any of the following events occur in the form:
• Adding or updating a line item
• Deleting a line item
• Changing the buyer to another customer
• Changing txtTaxLocation
• Changing txtOtherAmount
You use VBA procedures to recalculate the tax amount when any of these events occur.
Recalculating a field when updating or adding a record
Figure 14-5 shows the code for adding or updating a line item on the Sales form.
A single event can handle recalculating the tax amount when new line items are added or when a line item is changed—when an item’s price is changed, for example. For both of these events, you can use the subform’s AfterUpdate event. AfterUpdate occurs when a new record is entered or when any value is changed for an existing record.
The Form_AfterUpdate procedure for fsubSalesLineItems executes when a line item is added to the subform, or when any information is changed in a line item. The Form_AfterUpdate procedure recalculates the tax amount field on the Sales form. The dblTaxRate variable holds the customer’s tax rate (the value of txtTaxRate on frmSales) and curTaxAmount stores the value returned by the CalcTax() function. CalcTax() calculates the actual tax amount. When the After_Update procedure calls CalcTax(), it passes two parameters: the value of dblTaxRate and the current line item’s invoice number (Me.InvoiceNumber). Figure 14-6 shows the CalcTax() function.
Figure 14-5
Recalculating a field after a form is updated

Figure 14-6
Using ADO to recalculate a total field

CalcTax uses ADO to create a recordset that sums the quantities and prices for the taxable items in tblSalesLineItems for the current sale. The function receives two parameters: the tax rate (dblTaxPercent) and the invoice number (lngInvoiceNum). The function’s return value is initially set to 0 (zero) at the top of the function. The ADO code checks to see if the recordset returned a record. If the recordset is at the end of the field (EOF), the recordset did not find any line items for the current sale—and CalcTax remains set to 0. If the recordset does contain a record, the return value for CalcTax is set to the recordset’s TaxableAmount field times the tax rate (dblTaxPercent).
When the Form_AfterUpdate procedure receives the result of the CalcTax() function, it continues to the next statement in the procedure. The next statement in Form_AfterUpdate checks to see if the Sales form’s other taxable control (chkOtherTaxable) is True. If chkOtherTaxable is True, the procedure must also calculate tax on the Other Amount control. The calculation for the tax on Other Amount simply multiplies the value txtOtherAmount) by the tax rate (dblTaxRate) and adds this result to the curTaxAmount value returned by CalcTax().
At the end of the procedure, the txtTaxAmount is set to the curTaxAmount value.
When the Buyer, Tax Location, or Tax Rate controls are changed in the Sales form, you use the AfterUpdate event for the individual control to recalculate the tax amount. Figure 14-7 shows the code for the txtTaxRate_AfterUpdate event.
Figure 14-7
Recalculating a control after a control is updated

The logic implemented in txtTaxRate_AfterUpdate is identical to the logic in fsubSalesLineItems_AfterUpdate. In fact, you can use the same code for the Buyer and Tax Location controls as well. The only difference between the code in Figures 14-5 and 14-7 is that the procedure in Figure 14-5 runs whenever a change occurs in the sales line items subform, while the code in Figure 14-7 runs whenever a change is made to txtTaxRate on the main form.
Checking the status of a record deletion
Use the form’s AfterDelConfirm event to recalculate the txtTaxAmount control when deleting a line item. The form’s AfterDelConfirm event (shown in Figure 14-8) is similar to the code for the subform’s AfterUpdate event.
Figure 14-8
Recalculating a control after a record is deleted
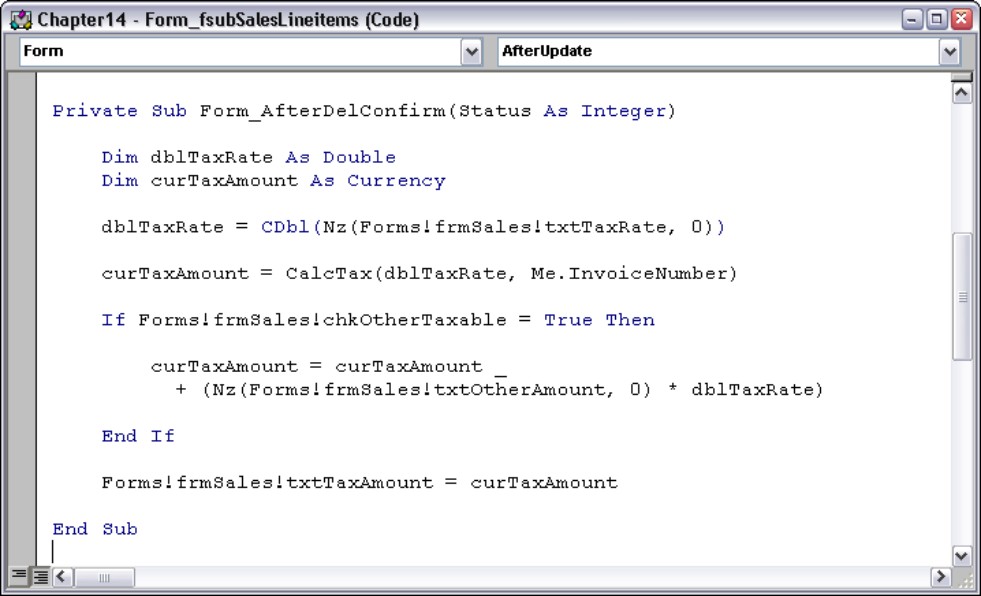
Access always confirms deletions initiated by the user. Access displays a message box asking the user to confirm the deletion. If the user affirms the deletion, the current record is removed from the form’s recordset and temporarily stored in memory so that the deletion can be undone if necessary. The AfterDelConfirm event occurs after the user confirms or cancels the deletion. If the BeforeDelConfirm event isn’t canceled, the AfterDelConfirm event occurs after the delete confirmation dialog box is displayed. The AfterDelConfirm event occurs even if the BeforeDelConfirm event is canceled.
The AfterDelConfirm event procedure returns status information about the deletion. Table 14-3 describes the deletion status values.
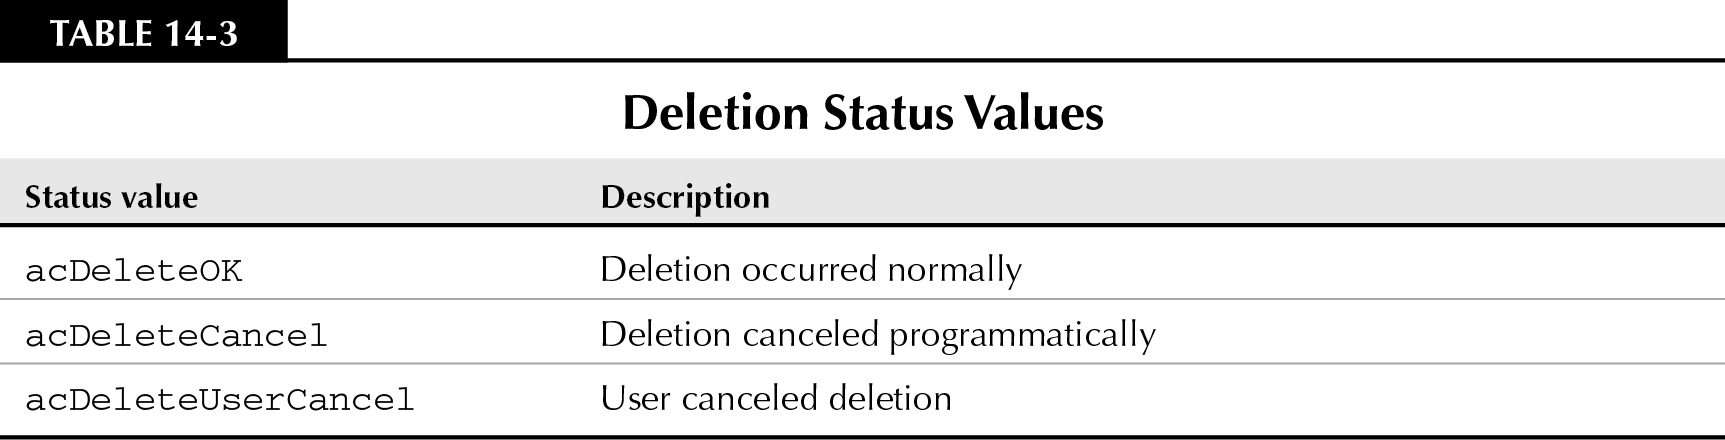
The Status argument for the AfterDelConfirm event procedure can be set to any of these values within the procedure. For instance, if the code in the AfterDelConfirm event procedure determines that deleting the record may cause problems elsewhere in the application, the Status argument should be set to acDeleteCancel:
If <Condition Indicates a Problem Elsewhere> Then
Status = acDeleteCancel
Exit Sub
Else
Status = acDeleteOK
End If
The Status argument is provided to enable your VBA code to override the user’s decision to delete a record if conditions warrant such an override. In the case that Status is set to acDeleteCancel, the copy of the record stored in the temporary buffer is restored to the recordset, and the delete process is aborted. If, on the other hand, Status is set to acDeleteOK, the deletion proceeds and the temporary buffer is cleared after the user moves to another record in the recordset.
Adding a new record
You can use ADO to add a record to a table just as easily as you can to update a record. Use the AddNew method to add a new record to a table. The following shows the ADO procedure for adding a new customer to the Customer table:
Private Sub New_Contact_Click()
Dim rs As ADODB.Recordset
On Error GoTo HandleError
Set rs = New ADODB.Recordset
rs.Open “tblContacts”, CurrentProject.Connection, _
adOpenDynamic, adLockOptimistic
With rs
‘Add new record to end of Recordset:
.AddNew
‘Add data:
![LastName] = “Townshend”
![LastName] = “Charles”
‘Commit the changes:
.Update
End With
rs.Close
Set rs = Nothing
ExitHere:
Exit Sub
HandleError:
MsgBox Err.Description
Resume ExitHere
End Sub
As you see in this example, using the AddNew method is similar to using ADO to edit recordset data. The AddNew method creates a buffer for a new record. After entering the AddNew command, you simply assign values to fields in the recordset. The recordset object’s Update method adds the new record buffer to the end of the recordset, and to the underlying table.
Deleting a record
To remove a record from a table, you use the ADO method Delete. The following code shows the ADO procedure for deleting a record from tblContacts.
Private Sub Delete_Contact_Click()
Dim rs As ADODB.Recordset
Dim strSQL as string
On Error GoTo HandleError
Set rs = New ADODB.Recordset
strSQL = “SELECT * FROM tblContacts “ _
& “WHERE [ContactID] = “ _
& Me![txtContactID]
rs.Open strSQL, CurrentProject.Connection, _
adOpenDynamic, & adLockOptimistic
With rs
If not .EOF Then
‘Delete the record:
.Delete
End If
End With
ExitHere:
rs.Close
Set rs = Nothing
Exit Sub
HandleError:
MsgBox Err.Description
Resume ExitHere
End Sub
Notice that you do not follow the Delete method with Update. As soon as the Delete method executes, the record is removed from the recordset permanently.
Deleting records using ADO does not trigger the deletion confirmation dialog box. Generally speaking, changes made to data with ADO code are not confirmed because confirmation would interrupt the user’s workflow.
Deleting related records in multiple tables
When you write ADO code to delete records, you need to be aware of the application’s relationships. The table containing the record you are deleting may be participating in a one-to-many relationship with another table.
Take a look at the relationships diagram (see Figure 14-9) for the tables used in the Sales form example. tblSales has two dependent tables associated with it: tblSalesLineItems and tblSalesPayments.
Figure 14-9
Examining the tables of a one-to-many relationship

The Edit Relationships dialog box shows how the relationship is set up between the tables tblSales and tblSalesLineItems. The relationship type is a one-to-many (1:M) and referential integrity is enforced. A one-to-many relationship means that the parent table (tblSales), has a dependent table (tblSalesLineItems); whereas tblSales can contain only unique instances of the values in its primary key (InvoiceNumber), tblSalesLineItems may contain several records in the corresponding foreign key fields (InvoiceNumber) with the same value. This simply means that each InvoiceNumber may have many different sales line items associated with it.
When you enforce referential integrity on a one-to-many relationship, you are telling Access that a record in tblSales cannot be deleted if records with the same invoice number value exist in tblSalesLineItems. If Access encounters a delete request that violates referential integrity, Access displays an error message and the delete will be cancelled.
When you write ADO code to delete a record, you need to first check to see if there are any one-to-many relationships between the table containing the record to delete and any other tables in the database. If there are dependent tables, the records in the dependent tables need to be deleted before Access allows you to delete the record in the parent table.
Fortunately, you can write a single procedure using ADO code to delete records in both the dependent table or tables and the parent table. Figure 14-10 shows the code for the cmdDelete command button in the frmSales form.
Figure 14-10
Using ADO code to delete multiple records

The cmdDelete_Click event procedure deletes records in tblSalesPayments, tblSalesLineItems, and tblSales that have an invoice number matching the current invoice number.
The first statement in cmdDelete_Click uses the NewRecord property to check to see if the current Sales form record is new. If the record is a new record, Me.Undo rolls back changes to the record. If the current record is not new, the procedure displays a message box to confirm that the user really wants to delete the record. If the user clicks the Yes button, the procedure deletes the records from the tables.
strSQL holds a SQL statement for locating and deleting records in tblSalesPayments with an invoice number that matches the invoice number on the Sales form. strSQL is passed as a parameter to the Execute method of the current project’s (CurrentProject) connection. You can pass either the name of a query or an SQL statement as a parameter to the Execute method. The Execute method simply runs the specified query or SQL statement.
If the query or SQL statement contains a WHERE clause and the Execute method does not find any records that meet the WHERE condition, no error occurs. If the query or SQL statement contains invalid syntax or an invalid field or table name, however, the Execute method fails and an error is raised.
The same process is used to delete records in tblSalesLineItems.
After the tblSalesLineItems records are deleted, the tblSales record can then be deleted. The following listing shows the cmdDelete_Click procedure from frmSales in Chapter14.accdb:
Private Sub cmdDelete_Click()
Dim intAnswer As Integer
Dim strSQL As String
If Me.NewRecord Then
Me.Undo
Exit Sub
End If
intAnswer = MsgBox(“Are you sure you want to “ _
& “ delete this invoice?”, vbQuestion + vbYesNo, _
“Delete Invoice”)
If intAnswer = vbNo Then
Exit Sub
End If
‘Delete payments for this invoice:
strSQL = “DELETE * FROM tblSalesPayments “ _
& “WHERE InvoiceNumber = “ & Me.InvoiceNumber
CurrentProject.Connection.Execute strSQL
‘Delete line items:
strSQL = “DELETE * FROM tblSalesLineItems “ _
& “WHERE InvoiceNumber = “ & Me.InvoiceNumber
CurrentProject.Connection.Execute strSQL
‘Delete invoice record:
RunCommand acCmdSelectRecord
RunCommand acCmdDeleteRecord
End Sub
Notice that this procedure includes two different Exit Sub statements. The first is executed if the current record happens to be a new record. Presumably, there is no reason to delete a new record, and, in fact, an attempt to delete a new record raises an error.
The second Exit Sub executes if the user chooses not to delete the record (the MsgBox function returns vbNo, in this case) after clicking the Delete button. If the user confirms the deletion (the value of MsgBox, in this case, is vbYes) , the code proceeds to delete the invoice records matching the current InvoiceNumber, then deletes the current record displayed on frmSales.
Summary
In the previous few chapters, you learned the basics of programming, reviewed some of the built-in functions, and experienced the various logical constructs. You learned about ADO and how to access data in tables and queries through SQL recordsets. You also learned a lot about forms and queries in previous chapters. In this chapter, you use all of this knowledge and learn how to display selected data in forms or reports using a combination of techniques involving forms, VBA code, and queries.
You’ll see many other examples that use ADO (and DAO) to manipulate data in Access tables and recordsets throughout this book. A little bit of VBA code, coupled with either the ADO or DAO syntax, is able to perform complex operations without the use of queries or other database objects. Whenever possible the examples in this book are written in a generic fashion that is easily modified to fit other situations by replacing the names of fields, tables, and other objects. You should use VBA code whenever complex data management tasks are required by your applications, or in situations where users require more flexibility than provided by queries and forms alone.