Chapter 19: Advanced Access Form Techniques
User interface is a term you hear frequently in discussions about personal computer software. In virtually all applications built with Microsoft Access, the user interface consists of a series of Access forms. If you intend to develop successful Access applications, you need to understand Access forms inside out.
This chapter helps you improve your understanding of forms. You first take a look at how to programmatically manipulate the many controls that constitute the building blocks out of which forms are constructed. You examine, also, some powerful ways to take advantage of subforms. A section of the chapter is then devoted to presenting a grab-bag of forms-related programming techniques that will help you create forms that wring the best performance from Access and your computer. Then, we discuss the Query By Form feature that enables you to build an intuitive form-based interface between users and Access queries.
Setting Control Properties
The building blocks of Access forms are known as controls. The form design toolbox contains 16 types of controls from which you can build forms: labels, text boxes, option groups, toggle buttons, option buttons, check boxes, combo boxes, list boxes, command buttons, images, unbound (OLE) object frames, bound (OLE) object frames, page breaks, subforms, lines, and rectangles.
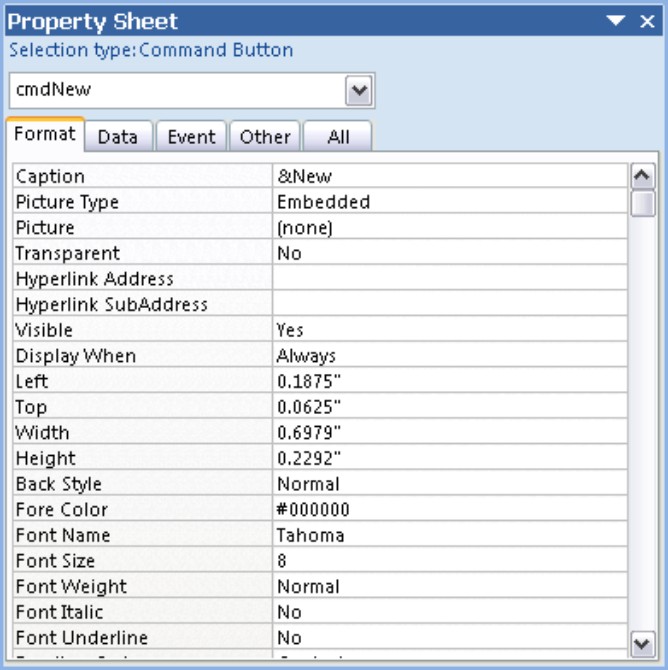
Each control on an Access form has a set of properties that determines how it looks and acts. In Design View, you can determine property settings for any object by selecting the object and displaying its property sheet. To display the property sheet, right-click the object and click Properties in the pop-up menu or select the object and click the Properties button on the ribbon. Once the property sheet is open, just click any other control in the form to display the control’s property settings. Figure 19-1 shows the property sheet for the Next command button on the Contacts form in the Chapter19.accdb application. As you are designing a form, you set control properties by changing the values stored in each control’s property sheet.
Figure 19-1
The property sheet for the New command button
The form itself also has its own set of properties. If you display the property sheet in Design View before selecting a specific control, Access lists the form’s properties in the property sheet, as indicated by the caption “Form” in the property sheet’s title bar (see Figure 19-2). To display the form’s properties in the property sheet after first displaying a control’s properties, click a completely blank area in the form design window (outside the form’s defined border).
Figure 19-2
The property sheet for the Contacts form

Customizing default properties
Whenever you use a tool in the form Design View toolbox to create a control, the control is created with a default set of property values. While this may seem obvious, what you may not know is that you can set these default values yourself. For example, if you want all list boxes in your form to be flat rather than sunken, it is more time-efficient to change the default SpecialEffect property to Flat before you design the form, rather than changing the SpecialEffect property of every list box individually.
In addition to saving you time while designing a form, customizing default properties can speed the saving and loading of forms. When you save the form design, Access saves the default control properties as well as those property values that differ from the default property settings for that type of control. If most controls on the form use the default property settings, the saved form takes less space, saves faster, and subsequently loads faster when your application uses it (but doesn’t save memory).
To set control defaults, select a tool in the toolbox and then set properties in the property sheet. Notice that the title in the property sheet is Selection type: Default <ControlType>. As you set the control’s properties, you are actually setting the default properties for this type of control. Rather than adding the control to the form, select another control (such as the Select control in the upper-right corner of the Controls group) to “lock down” the default settings. Then, when you reselect the control, the control’s default properties have been set the way you want.
Manipulating controls at runtime
The form design capabilities of Access are so robust that you can sometimes get so engrossed in designing beautiful forms that you lose site of the fact that all Access form controls are programmatically accessible at runtime. It can sometimes turn out to be very convenient to change the design of a form on the fly, based on input from the user. For example, a list box that contains information that is relevant only some of the time doesn’t have to be displayed all the time. A well-designed form hides irrelevant choices whenever possible. You can achieve this and similar functionality by assigning values to control and form properties at runtime.
Following are a few properties that are often good candidates for dynamic assignment at runtime:
• Enabled property: If you want a control to be visible but grayed-out, set the Enabled property to False. Clicking the grayed-out control has no effect. This technique enables you to maintain a consistent form design, and helps the user get familiar with the location of the various controls on the form but prevents the user from selecting a control that is irrelevant to the current operation.
• Visible property: You can easily toggle the display of any control by assigning Yes or No to the control’s Visible property. While the control is invisible, it is also inactive and cannot receive the focus. An invisible control cannot respond to events as well. Making a control invisible is sometimes more appropriate than simply disabling the control, especially in the case of irrelevant text, combo, or list boxes.
• Caption property: By dynamically assigning values to a control’s Caption property, you can get the control to serve double- or triple-duty. This technique is especially useful when two command buttons serve mutually exclusive functions and don’t need to appear on the form at the same time. For example, you might place a command button with the caption &New Patient Data on your application’s main switchboard form. This button opens a form for adding a new record to your Patient database. After the new patient data has been entered, but before the full transaction has been committed to the database, you could change the command button’s caption to &Edit Patient Data using the button’s Caption property.
You can also use the active form’s Caption property creatively to display information about the current record. Each time the current event occurs, assign a new value to the Caption property that contains pertinent information from the current record.
• RowSource property: Use the RowSource property of a combo or list box control to synchronize the list contents with values in other controls in the active form. For example, if the txtDepartment control contains the value Sales you can use the cboPhoneList combo box’s RowSource property to cause only members of the sales department to be listed in the combo box.
• BackColor and ForeColor properties: Judicious use of color can be very effective in accenting important information. Access enables you to dynamically change the color of controls as they receive/lose the focus or to reflect a characteristic of the data by assigning values to the ForeColor and/or BackColor properties.
• Left, Top, Width, and Height properties: Using these properties, you can control the position and dimensions of a control on the form.
• MenuBar, ShortcutMenu, ShortcutMenuBar: If you have defined custom menu bars, shortcut menus, and/or shortcut menu bars, you can use these form properties to change the menu bar, shortcut menu, and/or shortcut menu bar that the form displays.
• Custom Ribbon ID: If the current application includes custom ribbons, the ribbon IDs appear in this property’s drop-down list. Access shows and hides the assigned ribbon as the form is opened and closed.
The SetProperty function included in the following procedure can be used to set the value of any property of any open form or any property of any control in an open form:
Function SetProperty( _
ByVal strFormName As String, _
ByVal strCtrlName As String, _
ByVal strPropName As String, _
ByVal strNewValue As Variant) As Boolean
Dim frmName As Form
Dim strMsg As String
Dim strFunction As String
Dim strObjName As String
On Error GoTo HandleError
SetProperty = False
strFunction = “SetProperty”
‘If no control name is passed, must be a form:
If strCtrlName = “” Then
GoTo SetFormProperty
End IF
SetControlProperty:
‘Assign new control property value:
strObjName = strCtrlName
Set frmName = Forms(strFormName)
frmName(strCtrlName).Properties( _
strPropName) = strNewValue
SetProperty = True
GoTo ExitHere
SetFormProperty:
‘Assign new form property value:
strObjName = strFormName
Set frmName = Forms(strFormName)
frmName.Properties(strPropName) = strNewValue
SetProperty = True
GoTo ExitHere
ExitHere:
Exit Function
HandleError:
Select Case Err
Case 2450
strMsg = “‘“ & strFormName & “‘ is not an open form”
Case conNotControl
strMsg = “‘“ & strCtrlName _
& “‘ is not a control on ‘“ & strFormName & “‘“
Case 2465
strMsg = “‘“ & strPropName _
& “‘ is not a property of ‘“ & strObjName & “‘“
Case Else
strMsg = “Error#” & Err & “: “ & Err.Description
End Select
MsgBox strMsg, vbExclamation + vbOKOnly, _
“Error in Procedure “ & strFunction
SetProperty = False
Resume ExitHere
End Function
This function takes four arguments, the name of the form, the name of the control (if any), the name of the property, and the new value of the property. It returns a value of True if the operation is successful and False if it is not. For example, to disable the GoToNew button in the Employees form, you could use the following statement:
intRetVal = SetProperty(“Employees”, “GoToNew”, “Enabled”, 0)
To set the value of a form property, pass a blank string (“”) as the control name. For example, to set the frmEmployees form’s caption (in the Chapter19.accdb database) to Sales Department, you can use the following statement:
intRetVal = SetProperty(“frmEmployees”, “”, _
“Caption”, “Sales Department”)
Hiding and shown controls is easily done by adjusting the control’s Visible property. You may want to hide certain controls (such as command buttons or text boxes) when they are irrelevant to the user’s current task. You may also want to hide controls if the user is not permitted to perform the operation (such as deleting an existing record). Rather than simply disabling the control (by setting its Enabled property to False), hiding the control makes it invisible on the form’s surface. Invisible controls are less likely to confuse users than controls that are visible, but cannot be accessed or used. The following statement hides a command button named cmdDeleteRecord on the employees form:
intRetVal = SetProperty(“frmEmployees”, “cmdDeleteRecord”, _
“Visible”, “False”)
Reading control properties
If your application manipulates the control properties, at various times you will need to read the value of a control’s property. The following GetProperty function returns the value of any property of any open form or any property of any control in an open form. If the function encounters an error, it returns the value ERROR.
Function GetProperty( _
ByVal strFormName As String, _
ByVal strCtrlName As String, _
ByVal strPropName As String) As Variant
Dim frmName As Form
Dim strMsg As String
Dim strFunction As String
Dim strObjName As String
On Error GoTo HandleError
GetProperty = “ERROR”
strFunction = “SetProperty”
‘If no control name is passed, must be a form:
If strCtrlName = “” Then
GoTo GetFormProperty
End If
GetControlProperty:
‘Get control property value:
strObjName = strCtrlName
Set frmName = Forms(strFormName)
GetProperty = _
frmName(strCtrlName).Properties(strPropName)
GoTo ExitHere
GetFormProperty:
‘Get form property value:
strObjName = strFormName
Set frmName = Forms(strFormName)
GetProperty = frmName.Properties(strPropName)
GoTo ExitHere
ExitHere:
Exit Function
HandleError:
Select Case Err
Case 2450
strMsg = “‘“ & strFormName & “‘ is not an open form”
Case 2465
strMsg = “‘“ & strCtrlName _
& “‘ is not a control on ‘“ & strFormName & “‘“
Case 2455
strMsg = “‘“ & strPropName _
& “‘ is not a property of ‘“ & strObjName & “‘“
Case Else
strMsg = “Error# “ & Err & “: “ & Err.Description
End Select
MsgBox strMsg, vbExclamation + vbOKOnly, _
“Error in Procedure “ & strFunction
Resume ExitHere
End Function
Notice that the GetProperty function returns a variant data type value. A variant is returned because the function may return a property object, or—in the event of a problem accessing the property—a string containing the word “ERROR”. If a runtime error is triggered by the GetProperty function, a string containing the error number and message is returned.
Working with Subforms
Subforms are an indispensable tool for displaying information from two different tables or queries on the screen together. Typically, subforms are used where the main form’s record source has a one-to-many relationship with the subform’s record source. Many records in the subform are associated with one record in the main form.
Access uses the LinkMasterFields and LinkChildFields properties of the subform control to choose the records in the subform that are related to each record in the main form. Whenever a value in the main form’s link field changes, Access automatically re-queries the subform.
When creating a subform, you may want to display subform aggregate information in the master form. For example, you may want to display the count of the records in the subform somewhere on your main form. For an example of this technique, see the txtItemCount control in frmCustomerSales in Chapter19.accdb. In this case the ControlSource expression in the txtItemCount control is:
=”(“ & [subfPurchases].[Form]![txtItemCount] & “ items)”
The result of this expression is shown in Figure 19-3.
Figure 19-3
Aggregate data from a subform can be displayed on the main form.

Before you can put aggregate data in the master form, its value must be found in the subform. Place a text box wherever you want in the subform, and set its Visible property to No (False) so that it is hidden. Put an aggregate expression, such as = Count([ProductID]), into its ControlSource property.
In the main form, insert a new text box with ControlSource set to the following value:
=[Subform1].Form![Aggregate Control]
where Subform1 is the name of the control on the main form that contains the embedded subform and Aggregate Control is the name of the control on the subform that contains the aggregate data.
The control on the main form updates every time you change its value in the subform.
Access treats a subform control in the same manner as other controls on the main form. You can set a subform control’s properties, and refer to it with a GoToControl command, and use code to set and read the values of controls on the subform. Use the following syntax versions to refer to subform properties, subform controls, and subform control properties, respectively:
Forms![FormName]![SubformName].Form.SubFormProperty
Forms![FormName]![SubformName].Form![ControlName]
Forms![FormName]![SubformName].Form![ControlName] _
.ControlProperty
where SubformName refers to the name you’ve given the subform control, which is not necessarily the same as the name of the form as it appears in the Navigation pane.
When using subforms within subforms, use the following syntax:
Forms![FormName]![SubformName].Form![SubSubformName] _
.Form.SubSubFormProperty
Forms![FormName]![SubformName].Form![SubSubformName] _
.Form.[ControlName]
Forms![FormName]![SubformName].Form![SubSubformName] _
.Form.[ControlName].ControlProperty
Form Design Techniques
Following is a grab bag of form design tips that you may find handy; they have been gathered from numerous sources. Hopefully they will inspire you to come up with many more on your own.
Using the Tab Stop property
From time to time you may place a control on a form that is intended to trigger a fairly drastic result, such as deleting a record, or printing a long report. If you want to reduce the risk that the user might activate this control by accident, you may want to make use of the Tab Stop property.
For example, suppose you have placed a command button named cmdDelete on a form that deletes the current record. You don’t want the user to click this button by mistake. Modify the Tab Stop property of the cmdDelete button to No to remove the button from the form’s tab order (the default is Yes). A user will have to explicitly click on the button to activate it and will not be able to accidentally choose it while entering data.
Tallying check boxes
If you ever need to count the number of True values in a check box field, consider using the following expression:
Sum(Abs([CheckBoxField]))
Abs converts all the -1’s to 1’s and the Sum function adds them up. To count False values, use the following expression:
Sum([CheckBoxField] + 1)
True values (-1’s) are converted to 0 and False values (0’s) are converted to 1 before being summed.
Adding animation
Using the Timer event, it is pretty simple to add animation to Access forms. You can move a control on the form at quick intervals or rapidly change the appearance of the control. To create the appearance of animation:
1. Embed a picture on the form.
2. Set the TimerInterval property of the form to around 100 (milliseconds).
3. Assign the following event procedure to the Timer event:
Private Sub Form_Timer()
‘Move the image down and to the right.
ctlImage.Left = ctlImage.Left + 200
ctlImage.Top = ctlImage.Top + 100
End Sub
Screen positions in VBA are given in twips—1/1440 of an inch. This event procedure moves the image in the ctlImage control down and to the right on the form every 1/10th of a second.
The frmAnimation form in Chapter19.accdb uses the technique described here to move an airplane bitmap across the form. A couple of other techniques are used to create a bit of animation. The following event procedure, associated with the Timer event, causes a bitmap of a pencil eraser to move back and forth by manipulating the Image control’s PictureAlignment property. The procedure also causes a globe to spin by using the Visible property of three different bitmaps that are positioned one on top of the other:
Private Sub Form_Timer()
On Error GoTo HandleError
‘Wiggle the eraser:
If Eraser.PictureAlignment = 2 Then
Eraser.PictureAlignment = 3
ElseIf Eraser.PictureAlignment = 3 Then
Eraser.PictureAlignment = 4
ElseIf Eraser.PictureAlignment = 4 Then
Eraser.PictureAlignment = 3
End If
‘“Spin” the globe:
If World1.Visible = -1 Then
World1.Visible = 0
World2.Visible = -1
ElseIf World2.Visible = -1 Then
World2.Visible = 0
World3.Visible = -1
ElseIf World3.Visible = -1 Then
World3.Visible = 0
World1.Visible = -1
End If
‘Now, move the plane:
Plane.Left = Plane.Left + 200
Plane.Top = Plane.Top + 100
ExitHere:
Exit Sub
HandleError:
Plane.Left = 0
Plane.Top = 800
Resume ExitHere
End Sub
The TimerInterval property is set to 200. Set it to a longer interval to slow down the animation.
Notice that the Error event is used to start the plane over again. Otherwise the plane “crashes” off the edge of the form.
Using SQL for a faster refresh
You can generate faster combo box refreshes on a form by making the control’s row source a SQL statement instead of a query name. Complete the following steps:
1. Generate the query using the standard procedure.
2. Make the query the control’s RowSource property and make sure the combo box is correctly populated.
3. When everything works correctly, display the query in Design View and select SQL from the View menu.
4. Cut and paste the SQL statement into the combo box’s RowSource property.
Selecting data for overtyping
When users edit existing data in a form, they usually prefer to type over existing data without having to first select the existing data. The following function when triggered by each control’s GoFocus event has this effect:
Function SelectAll()
SendKeys “{Home}” ‘Moves the cursor to first position
SendKeys “+{End}” ‘Selects all positions up to the last
‘and as a reversed image easy to see
‘and overtype.
End Function
Toggling properties with Not
A handy way to toggle properties that take Boolean values, such as the Visible property, is to use the Not operator. For example, the following VB statement toggles the object’s Visible property, regardless of the actual value of the property:
Object.Visible = Not Object.Visible
For example, if Visible is True, its value is set to False, hiding the object. By using the Not operator, you don’t have to test for the current value of the property.
Chapter19.accdb contains a simple form demonstrating this capability. frmFlashingLabel contains two label controls (lblRed and lblBlue) placed on top of one another. lblRed’s Visible property is initially set to No, making it invisible. Then the following code runs every time the form’s Timer event fires:
Private Sub Form_Timer()
lblRed.Visible = Not lblRed.Visible
lblBlue.Visible = Not lblBlue.Visible
End Sub
This code simply alternates the Visible property of each of the label controls. Since lblRed was initially invisible, it is made visible in the first pass, and so on. Although there are many other ways to implement this form trick, this example adequately demonstrates the value of the Not operator when dealing with property values.
Creating an auto-closing form
If you want a form to close automatically as soon as the user moves to another form, do the following:
1. Create an event procedure for the Deactivate event that includes the following statement:
Me.TimerInterval = 1
2. Create an event procedure for the Timer event that includes the following statement:
DoCmd.Close
Your form automatically closes as soon as you go to any other form.
Combo box techniques
Combo boxes and list boxes are powerful tools in your form-building toolbox, but they can be complicated to set up. When you build combo boxes and list boxes it is important to keep in mind the distinction between ControlSource, which is the table or query field to and from which the control saves and loads data, and RowSource, which is the source of the data displayed in the list. Because combo and list boxes support multiple columns, they allow you to easily related data from another table without basing your form on a query that joins the tables. This technique, which involves a bound combo or list box control that stores an ID number but displays names in a list, is used in the Organization combo box in the Contacts_Northwind form in Chapter19.accdb as well as in several of the forms found in the Northwind sample database.
For example, suppose you’re creating a form to display information about your clients and customers (your “contacts”), and you want to identify the organization with which these contacts are associated. In a well-designed database, you store only an organization ID number with each contact record, while you store the organization’s name and other information in a separate table. You want your form to include a combo box that displays organization names and addresses in the list but stores organization ID numbers in the field. (For an example of this technique, see frmContacts_Northwind in Chapter19.accdb.)
To accomplish your design goal, create a multiple-column combo box. Set the ControlSource to the OrgID field (the field in the Contacts table that contains the organization ID number for each contact person). Set the RowSourceType property of the combo box to Table/Query. You could base the list on a table, but you want the list of names to be sorted; instead, set the RowSource property to a query that includes OrgID numbers in the first field, and organization names sorted ascending in the second field. The best way to do this is using the Query Builder for the RowSource property to create a SQL statement; alternatively, you can create and save a query to provide the list. In frmContacts_Northwind example (the Organization combo box), the RowSource query is as follows:
SELECT Organizations.OrgID, Organizations.Name,
Organizations.AddressLine1, Organizations.AddressLine2,
Organizations.City, Organizations.State,
Organizations.ZipCode, Organizations.Country
FROM Organizations ORDER BY Organizations.Name
Because you are interested in seeing all this data listed in the combo box, set the ColumnCount property to 8. You hide the OrgID column in a minute, but you need it in the combo box RowSource because it contains the data that is saved by the control when a row is selected by the user. This column is identified by the combo box’s BoundColumn property (set to 1 by default). The bound column containing ID numbers doesn’t have to be visible to the user. The ColumnWidths property contains a semicolon-separated list of visible column widths for the columns in the drop-down menu. Access uses default algorithms to determine the widths of any columns for which you do not explicitly choose a width. If you choose a width of 0 for any column, that column is effectively hidden from the user on the screen, but it is not hidden from the rest of your forms, VBA code, or macros. In this case you set the property to the following:
0”;1.4”;1.2”;0.7”;0.7”;0.3;0.5”;0.3”
This indicates to Access that you want the first column to be invisible and sets explicit column widths for the other columns.
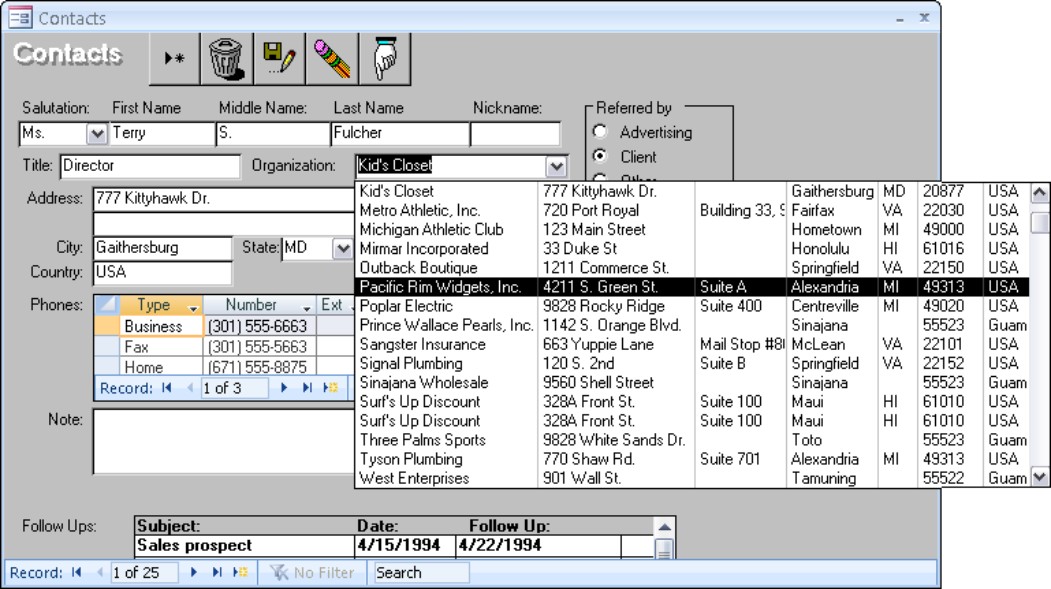
The second column, in this case the organization name, is the one the user’s text input is matched against. The first visible column in the combo box is always used for this purpose. Figure 19-4 shows the resulting drop-down list. Although this is a rather extreme example of loading a combo box with data, it effectively illustrates the power of the Access combo box control.
Figure 19-4
The drop-down list for the Organizations combo box
When working with combo boxes, if you set the Limit to List property to Yes, the user is required to choose only from the entries in the drop-down list. You can then construct an event procedure for the control’s NotOnList event to handle what should happen if a user enters a value not in the list. You may want to open a form into which the user can enter new information; or perhaps you want to display a message box that instructs the user what procedure to follow to add data.
Determining whether a form is open
The following code shows a function that reports whether the form passed in as strFName is currently open. It simply enumerates all members of the Forms collection, looking to see if strFName matches the name of any open form.
Function IsFormOpen(strFName As String) As Integer
‘This function returns true if a form is open:
Dim i As Integer
‘Assume False:
IsFormOpen = False
For i = 0 To Forms.Count - 1
If Forms(i).Name = strFName Then
IsFormOpen = True
Exit Function
End If
Next
End Function
Advanced Forms Techniques
Access 2007 contains many powerful and exciting features in its forms design and user interface capabilities. As you well know, the forms in your applications are the main component of the user interface. To a large extent a user’s perception of an application’s ease of use and strength is determined by the attractiveness and effectiveness of its user interface. You’ll be pleased to know that Microsoft has provided Access 2007 forms with significant capabilities to control the user interface. Many of these features have been in Access for a very long time, but haven’t been discovered by many developers.
Page Number and Date/Time controls
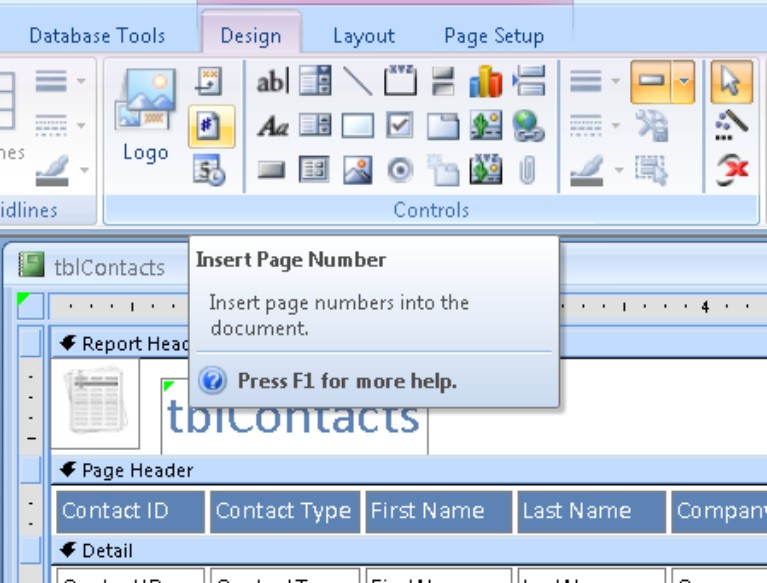
Most Access reports and many forms contain more than one page, and very often forms and reports include the current date and time. Many developers add this information to a form or report with an unbound text box, and use the Page property or Date( ) function to return this information to the unbound text box. Access simplifies this process with the Page Numbers and Date and Time commands on the Insert menu (see Figure 19-5).
Figure 19-5
These commands simplify adding the page number or date to forms and reports.
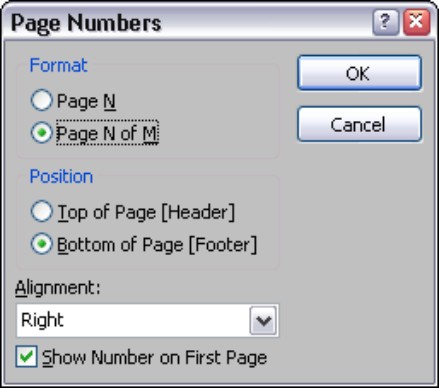
When these commands are selected Access first asks you how you want the data displayed (see Figure 19-6). Then it inserts an unbound text box onto the form or report.
Figure 19-6
Tell Access how you want the page numbers or date to appear.
If you’ve asked for the page number to appear in the header or footer area, Access automatically adds these objects to your form and pops the unbound page number text box where you’ve indicated (see Figure 19-7). You are free to reposition the unbound text boxes anywhere you wish, of course. Adding page numbers and dates to forms and reports takes only a few seconds and is completely foolproof in Access 2007.
Figure 19-7
Access intelligently places the unbound controls on the form for you.
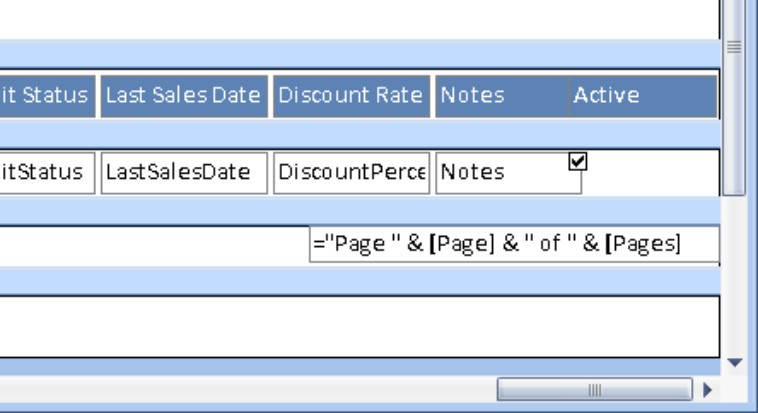
Image control
A subtle and often overlooked performance issue in Access applications occurs when static images are added to forms. Images are often added to Access forms as OLE objects, which means that a certain amount of memory and disk space is required to maintain the image’s connection to its parent application. This overhead is used even when the image is a company logo or other graphic that will not be changed or edited at runtime.
Access 2007 simplifies this process and provides a great deal more flexibility with the Image control. The Image control places an image frame onto a form or report, but does not burden the image object with the overhead associated with OLE objects. The Image control accepts virtually any type of image data type recognized by Windows (.bmp, .pcx, .ico, .dib, .gif, .wmf, and so on), and enables you to specify the path to the image file at runtime in its Picture property. The Image control also accepts image data stored in an Access table, although it does not provide the flexibility of in-place editing.
Control “morphing”
Surely one of the most frustrating problems when building Access forms is the need to specify the control type as a control is added to a form. For instance, consider the issues involved when you add a list box to an Access form, specify the ControlSource, RowSourceType, RowSource, and other properties and then discover there’s not enough room on the form for the list box. In this case, it seems the only solution is to remove the list box, add a combo box and reset all of the properties, even though the properties for the combo box are identical for the list box you just removed.
In Access 2007 you are able to change a control to any other compatible type (a process sometimes called morphing the control). For instance, a text box can be changed to a label, list box, or combo box. Simply right-click the control and select the Change To command from the shortcut menu to see the options. Figure 19-8 shows the options for changing a text box control.
Figure 19-8
Access 2007 lets you change the type of a control without losing the properties you’ve already set.
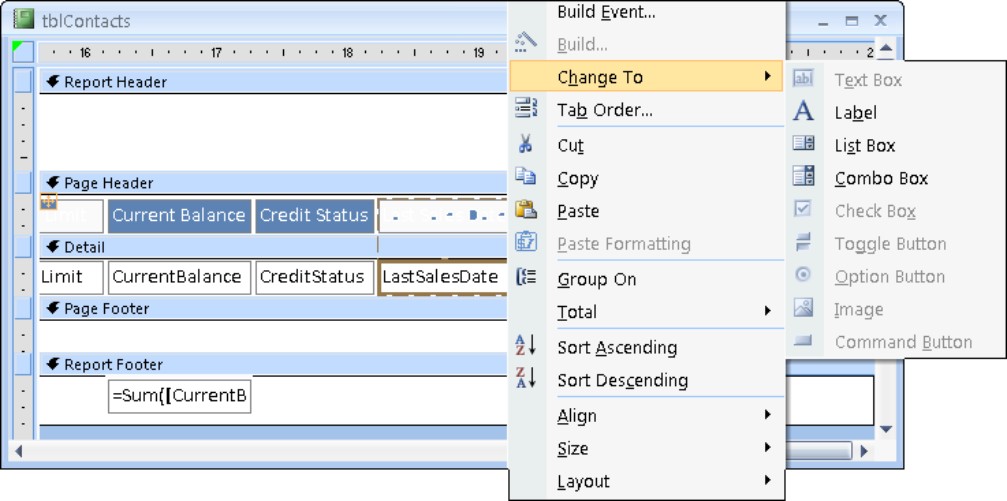
The choices you see in the shortcut menu make sense for the type of control you’re changing. For instance, an option button can be changed to a check box or toggle button, but not to a text box.
Format Painter
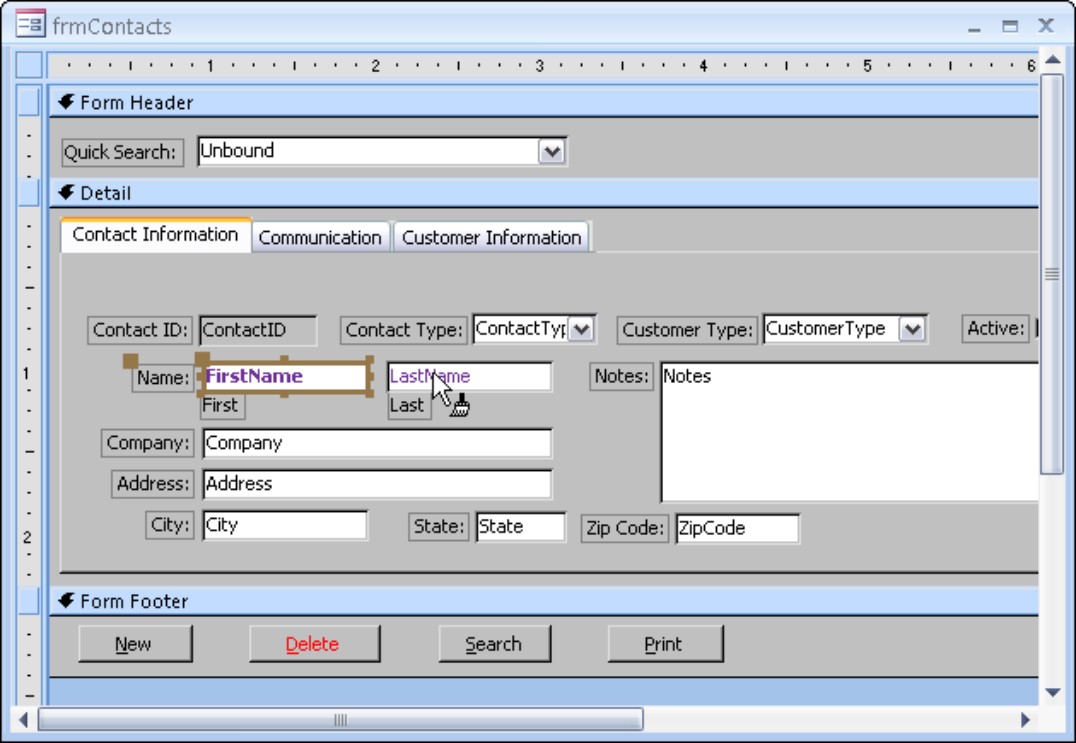
Access 2007 includes a format painter that functions much like the same feature in Word. When creating a form, you set the appearance of a control (its border, font, special effects like sunken or raised) then click the Format Painter button from the Font group on the ribbon’s Design tab to copy the properties to a special internal buffer. When you click another control of the same type, the appearance characteristics of the selected control are transferred to the second control. In Figure 19-9 the format properties of the First Name text box are about to be “painted” onto the Last Name text box (notice the little paintbrush adjacent to the mouse pointer to tell you you’re in “paint” mode).
Figure 19-9
The Format Painter makes it easy to “paint” the appearance of a control onto other controls on a form.
The Format Painter can be locked by double-clicking its button on the Access ribbon. It is important to note that not all properties are painted onto the second control. The size, position, and data properties of the control are not affected by the Format Painter. Only the most basic text properties are influenced by the Format Painter.
Offering more end-user help
Beginning with Office 4.x all Microsoft products have featured ToolTip help—those little yellow “post-it notes” that appear when you hold the mouse cursor over a control or button. (Microsoft calls these prompts “control tip help.”)
You add ToolTips to Access 2007 forms by adding the help text to the control’s ControlTip Text property (see Figure 19-10). By default the text in a ToolTip does not wrap, but you can add a new line character by pressing Ctrl+Enter in the ControlTip text wherever you want the break to appear.
Figure 19-10
ToolTip help makes your applications easier to use.

In general, you should consistently use ToolTips throughout an application. After your users become accustomed to ToolTips they expect them on all but the most obvious controls.
Adding background pictures
Attractive forms are always a valuable addition to Access applications. It’s difficult to add color or graphics to forms without obscuring the data contained on the form. Access 2007 makes it easy to add a graphic to the background of a form much as a “watermark” may appear on expensive bond paper. The picture can contain a company logo, text, or any other graphic element. The picture is specified by the form’s Picture property and can be embedded in the form or linked to an external file. If the picture is linked, the graphic displayed on the form changes any time the external file is edited.
The picture can also be positioned at any of the form’s four corners or centered in the middle of the form. Although the picture can be clipped, stretched, or zoomed to fit the dimensions of the form, you cannot modify the picture to make it smaller (other than editing the image file, of course). Figure 19-11 shows a small background picture positioned in the upper-right corner of frmContacts.
Figure 19-11
A small .bmp file has been added to frmContacts as the Picture property.
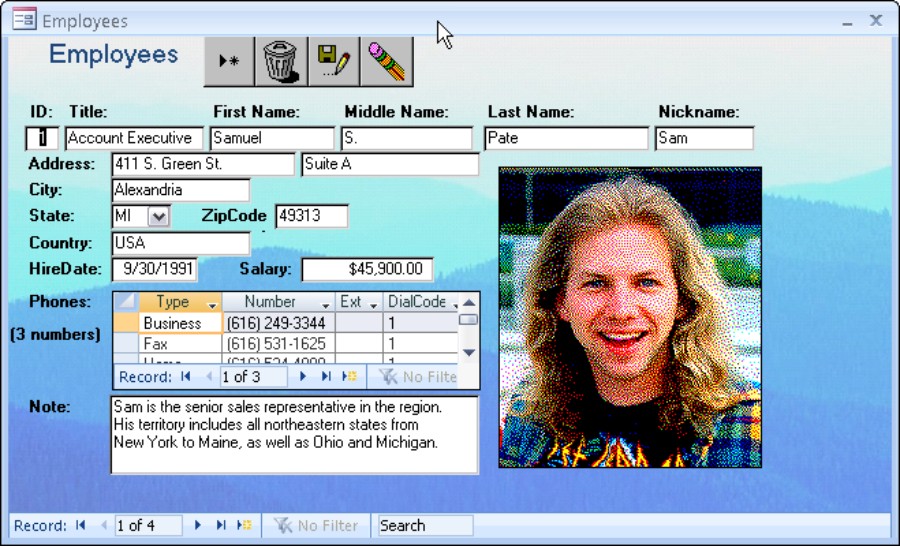
You can even make controls on a form transparent so that the form’s background picture shows through the controls (see Figure 19-12). In this case (frmEmployees_Background), the background of each label control is set to Transparent, letting the form’s background picture show through.
Figure 19-12
Transparent controls allow the background picture to show through.
Obviously, it’s easy to overdo the background picture added to Access forms, but, when carefully used, background pictures can make forms easier for users to understand.
Be forewarned, however, that background pictures added to a form noticeably slow down the form’s appearance on the screen. Generally speaking, you should use a background picture when the benefit provided by the picture outweighs the unavoidable performance degradation caused by the picture’s presence.
Form events
The Access 2007 form events allow you to fine-tune your form’s behavior when filters are applied or removed from the form’s underlying data source.
ApplyFilter
The ApplyFilter event fires whenever the user applies a filter by clicking one of the filter buttons (Ascending, Filter, Selection, and so on) in the Sort & Filter ribbon group. You can use the ApplyFilter event to test the user’s filtering criteria to make sure the filter makes sense. Use the form’s Filter property to determine whether the filter being applied contains valid criteria, or to modify the Filter property in code.
You can also use the ApplyFilter event to hide certain fields that should not be viewed by all users, or to pop up a dialog requesting additional identification information such as an “extra” password or username.
Finally, because ApplyFilter is triggered when you click Remove Filter button in the Sort & Filter group, you can use this event to reveal hidden fields, reset the Filter property to its former value, and so on.
Filter event
The Filter event is similar to the ApplyFilter in that it is triggered whenever the user invokes one of the built-in forms filtering options. The Filter event triggers before the ApplyFilter event and is useful for displaying your own filtering form, removing controls that should not be used in a filter by form session, and so on. Together the Filter and ApplyFilter events give you a great deal of control over user access to the built-in filtering capabilities in Access 2007.
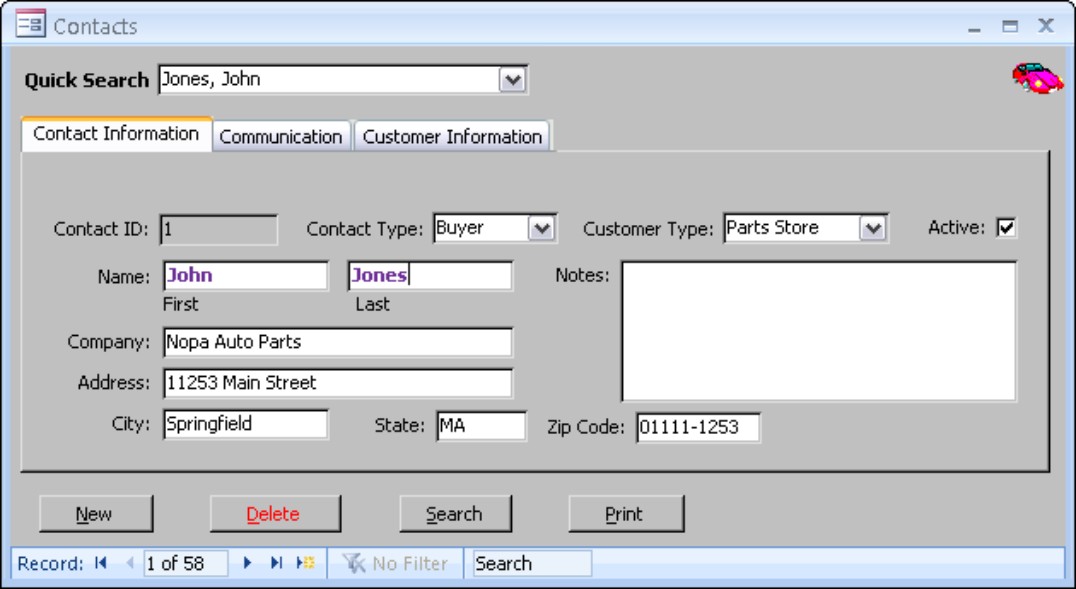
Using the Tab Control
A tab control, of course, provides a several pages, each accessed through a tab at the top, bottom, or side of the dialog. Figure 19-13 shows frmContacts, a perfect example of a tabbed Access form. frmContacts contains three tabs, allowing the form to contain many more controls than possible without the tab control. Each of the tabs along the top of the form reveals a different page of the form’s data. Each page contains many controls. Figure 19-13 shows buttons, labels, and text boxes. Each control on the page behaves independently of all other controls on the form and can be accessed through Access VBA code as an independent unit.
As you might guess, the tab control is fairly complex. The tab control includes its own properties, events, methods, and object collections. You have to know and understand these items before effectively using the tab control in your applications.
Figure 19-13
The tab control allows a form to host a large amount of data.

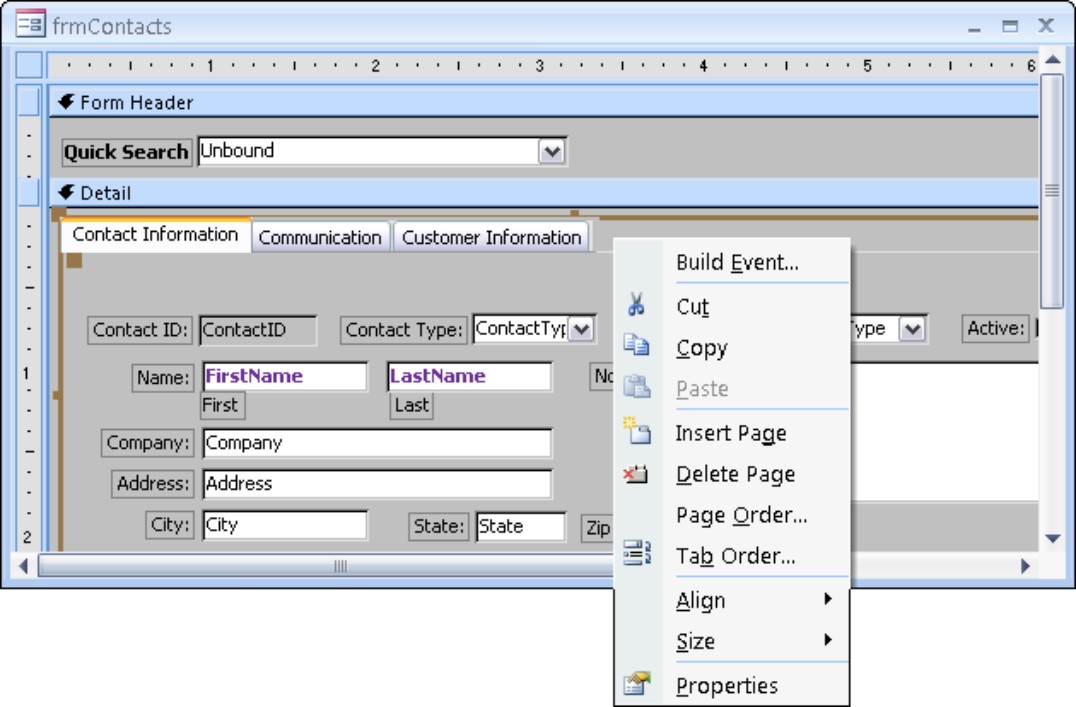
A tab control consists of a number of Page objects, each a member of the control’s Pages collection. Developers often use the expression tab when referring to the pages of a tabbed dialog box. In this chapter the expressions Page and tab are used interchangeably. Each page includes a Controls collection consisting of the controls that have been added to that page. A page is added to the Pages collection with the Add method of the Pages object; whereas a page is removed from the dialog with the Pages object’s Remove method. From the user interface, the quickest and easiest way to add or delete a page is to right-click the control and select the appropriate command from the shortcut menu (see Figure 19-14).
Figure 19-14
The tab control’s shortcut menu contains relevant commands.
Using the Add and Remove methods to add new pages or delete existing pages from a tab control is not very practical for a number of reasons. First of all, both methods require the form to be in Design View before they are able to modify the tab control. The Add method does not return a handle to the new tab. Therefore, it is difficult if not impossible to manipulate the properties of the new tab. Furthermore, the Delete method acts on the tab with the highest index and does not accept an index or page name as an argument. Therefore, you have to be very careful to make sure you are actually removing the tab you think you are.
In addition to these methods, the tab control contains the relevant properties shown in Table 19-1. Use these properties to tailor the tab controls in your applications to suit the needs of your users.

The tab control itself has a Value property that tells you which tab is selected. Value changes each time a tab is selected. Figure 19-15 shows frmTabControl2, a form included in Chapter19.accdb on this book’s companion CD-ROM. This form demonstrates some of the properties of the tab control and its pages.
Figure 19-15
frmTabControl2 in the Chapter19.accdb example database demonstrates important tab control properties.
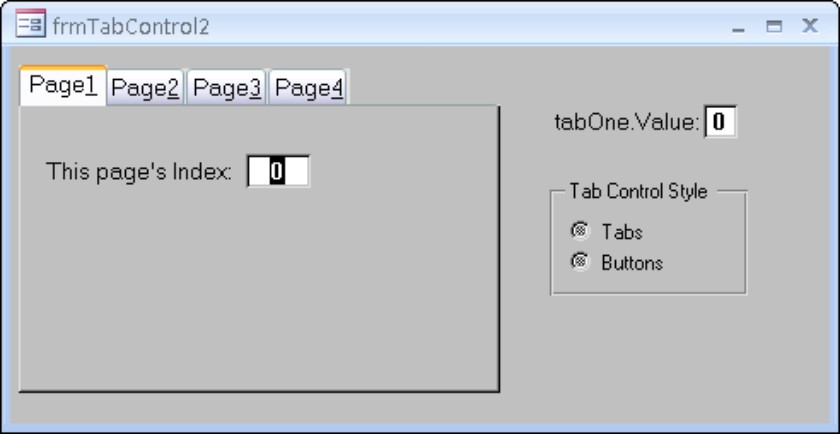
The Value property of a tab control indicates which page is currently selected. It returns an integer that indicates the position of the selected page in the Pages collection. For example, if the first page in a tab control is selected, the Value property returns 0, the index number of the first page in the Pages collection. If the second page is selected, the Value property returns 1, and so on. The page’s position within the collection corresponds to the value of the PageIndex property for that page.
A tab control can contain virtually any type of control, including text boxes, combo and list boxes, option buttons and check boxes, and OLE objects. A tab control can even include other tab controls! Although a form can contain multiple tab controls, it is probably not a good idea to overload the user by putting more than one tab control on a form. After all, the reason you use tab controls in an application is to simplify the form by fitting multiple pages of controls within a single control. In most cases, there is no point in challenging the user with more than one tab control on a form.
Using Dialog Boxes to Collect Information
The dialog box is one of the most valuable user interface components in Windows applications. When properly implemented, dialog boxes provide a way to extend the available screen space on the computer. Rather than having to place every text box, option button, and other user input control on the main form, dialog boxes provide a handy way to move some of these controls to a convenient pop-up device that is on the screen only when needed.
Dialog boxes usually collect a certain type of information, such as font attributes or hard-copy parameters. Dialog boxes are a valuable way to prefilter or qualify user input without cluttering the main form. Or use a dialog box to allow the user to enter query criteria before running a query that populates a form or report, or to gather information that is added to a report’s header or footer area.
Although they are forms, dialog boxes should not look like or behave as other forms in the application do. Dialog boxes often pop up over the user’s work. When properly implemented, dialog boxes also provide a means to simply cancel the query without breaking anything on the user’s workspace.
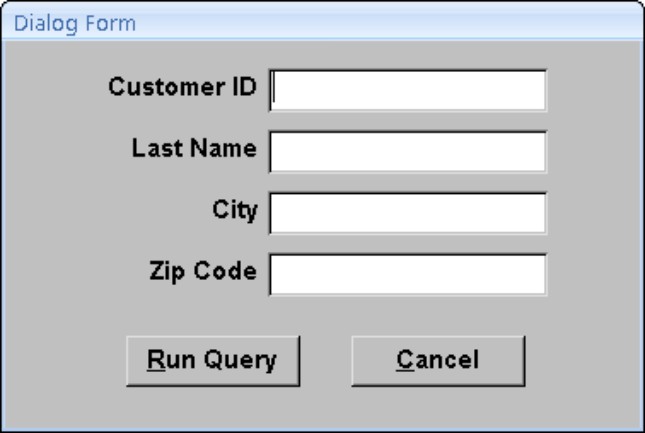
A typical query form implemented as a dialog box is shown in Figure 19-16. This simple form gathers information that is used to query the database for order information.
Figure 19-16
A dialog box used to collect data for an ad-hoc query.
The relevant properties of this dialog box include those listed in Table 19-2.
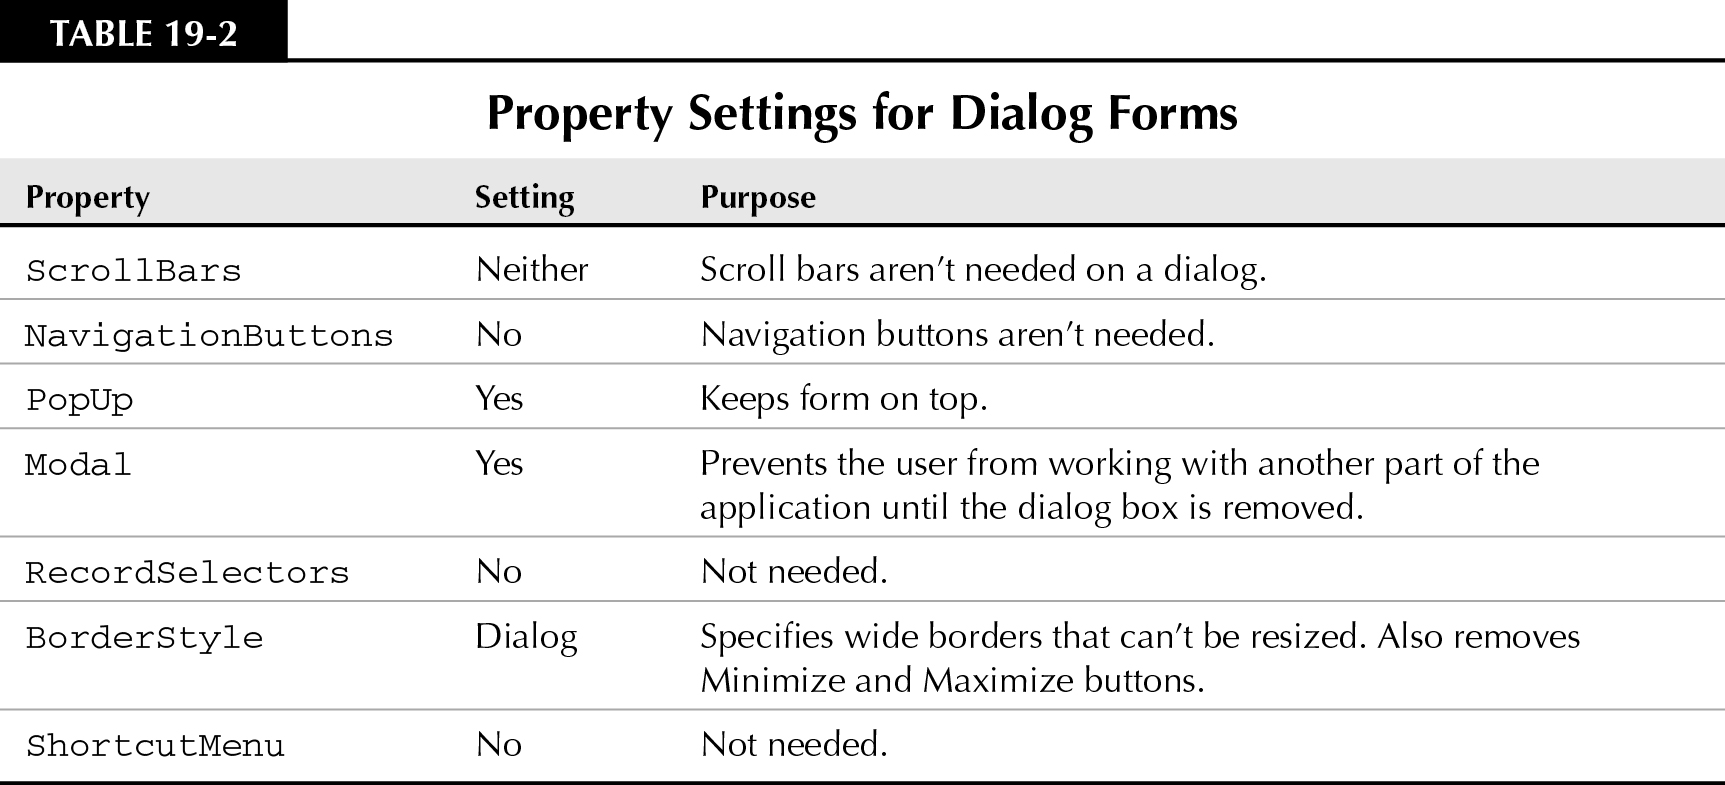
After these changes have been made, you have a form that is always on top of the user’s work and won’t leave the screen until the user clicks the Run Query or Cancel button.
There are a couple of rules you should follow when constructing dialog boxes. These rules ensure that your dialog boxes conform to the generally accepted behavior for Windows dialog boxes.
Composing the SQL statement
A temporary querydef object is created when the user clicks the Run Query button. Although you are simply opening the query on the screen, the temporary query could just as easily serve as the RecordSource of a form or report.
Private Sub cmdRunQuery_Click()
Dim db As DAO.Database
Dim QD As DAO.QueryDef
Dim where As Variant
Set db = CurrentDb
‘Delete existing dynamic query, trap error if it does not exist.
On Error Resume Next
db.QueryDefs.Delete (“MyQuery”)
On Error GoTo 0
‘Note Single quotes surrounding text fields [Ship Country]
‘and [Customer ID]
‘Note NO Single quotes surrounding Numeric field [Employee ID]
where = Null
If Not IsNull(txtContactID.Value) Then
where = where _
& (“ [ContactID]= “ & Me![txtContactID] & “ “)
End If
If Not IsNull(txtLastName.Value) Then
If Len(where) > 0 Then
where = where _
& (“ AND [LastName]= ‘“ & Me![txtLastName] & “‘ “)
Else
where = where _
& (“ [LastName]= ‘“ & Me![txtLastName] & “‘ “)
End If
End If
If Not IsNull(txtCity.Value) Then
If Len(where) > 0 Then
where = where _
& (“ AND [City]= ‘“ & Me![txtCity] & “‘ “)
Else
where = where _
& (“ [City]= ‘“ & Me![txtCity] & “‘ “)
End If
End If
If Not IsNull(txtZipCode.Value) Then
If Len(where) > 0 Then
where = where _
& (“ AND [ZipCode]= ‘“ & Me![txtZipCode] & “‘ “)
Else
where = where _
& (“ [ZipCode]= ‘“ & Me![txtZipCode] & “‘ “)
End If
End If
Set QD = db.CreateQueryDef(“MyQuery”, _
“SELECT * FROM Contacts WHERE “ & where & “;”)
DoCmd.OpenQuery “MyQuery”
‘Me.Visible = False
DoCmd.Close acForm, Me.Name
End Sub
Notice that the SQL statement is built up with the contents of the text boxes on the form. Each text box’s value is added only when the text box is not null. Also, the length of the query string is evaluated before adding to the SELECT clause. The AND is added only when the SELECT clause already contains a value so that the resulting SQL string looks something like this:
SELECT * FROM Contacts
WHERE ContactID = 17 AND City = ‘New York’;
Adding a default button
There should be a button on the form that is automatically selected if the user presses the Enter key while the dialog is open. The default button does not have to be selected by the user to be triggered; Access does this automatically as the user presses the Enter key.
For instance, the user enters 17 in the Customer ID text box and presses the Enter key. Unless a default button is specified, the input cursor simply drops down to the Ship City text box. If you’ve designated the Run Query button as the dialog’s default, Access interprets the Enter key press as a Click event for the Run Query button.
Set the Run Query’s Default property to Yes to make it the default for this dialog. Only one button on a form can have its Default property set to Yes—if you move to the Cancel button and set its Default property to Yes, Access silently changes the Run Query’s Default property to No.
Normally, the designated default button is on the left of the form. If you’ve arranged the command buttons vertically on a form, the top button should be the default.
You should select a button that won’t cause trouble if accidentally triggered as the default for a form. For instance, to avoid the risk of losing data, it’s probably not a good idea to set a button that performs a delete action query as the default. In this case, you may decide to make the Cancel button the default.
Setting a Cancel button
The Cancel button on a form is automatically selected if the user presses the Esc key while the form is open. In most cases, you simply want the dialog box to disappear if the user hits the Esc key while the dialog is open.
Set a button’s Cancel property to designate it as the form’s Cancel button. In our example, cmdCancel has been designated the dialog’s Cancel button. As with the default button, only one button on a form can be the Cancel button. Access triggers the Cancel button’s On Click event whenever the user presses the Esc key.
Removing the control menu
After you’ve designated default and Cancel buttons, you have no need for the control menu button in the upper-left corner of the form. Set the form’s Control Box property to No to hide the control menu button. Once the control menu box is removed, the user will have to use the Cancel or Run Query buttons to remove the form from the screen.
Closing the form
The dialog form remains on the screen on top of the query results. The following line was added to the Click event of the Run Query button to remove the form from the Access desktop:
DoCmd Close acForm, Me.Name
In some cases, however, you’ll want to continue to reference information in the dialog box after the user is “done” with it. In these cases you should hide the dialog form, rather than close it. Use the following statement at the bottom of the Click event to hide the dialog form as the query opens:
Me.Visible = False
As with any user interface component, always completely test any dialog box. Because it “takes over” the user’s desktop, you want to make sure the dialog behaves as expected and does not impede or annoy the user in any way.
Summary
This chapter has assisted you in understanding Access 2007 forms. You now have a better grasp on the workings of the Access event model, and you know how to programmatically manipulate the many controls that constitute the building blocks out of which forms are constructed. You also have a larger bag of tricks from which to draw when you are building Access forms.
The advanced forms features in Access 2007 boggle the mind. It is unlikely you will use all of the new forms design tricks in your first Access 2007 application, but it’s nice to know what you can do with this truly remarkable development platform.