Chapter 27: Advanced Data Access with VBA
In the previous few chapters, you learned the basics of programming, reviewed some built-in VBA functions, and experienced the various VBA logical constructs. You learned about ADO and how to access data in tables and queries through SQL recordsets. You also learned a lot about forms and queries in previous chapters. In this chapter, you use all this knowledge and learn how to display selected data in forms or reports using a combination of techniques involving forms, Visual Basic code, and queries.

In the Chapter27.accdb database, you will find several forms to use as a starting point and other completed forms to compare to the forms you change in this example. All of the examples use a modified version of the frmProducts form and tblProducts.
Adding an Unbound Combo Box
When viewing a form, you often have to page through hundreds or even thousands of records to find the record or set of records you want to work with. You can teach your user how to use the Access “find” features and wildcards, what to do to see other records, and so on, but this defeats the purpose of a programmed application. If you build an application, you want to make it easier for your users to become productive with your system, not teach them Microsoft Access.
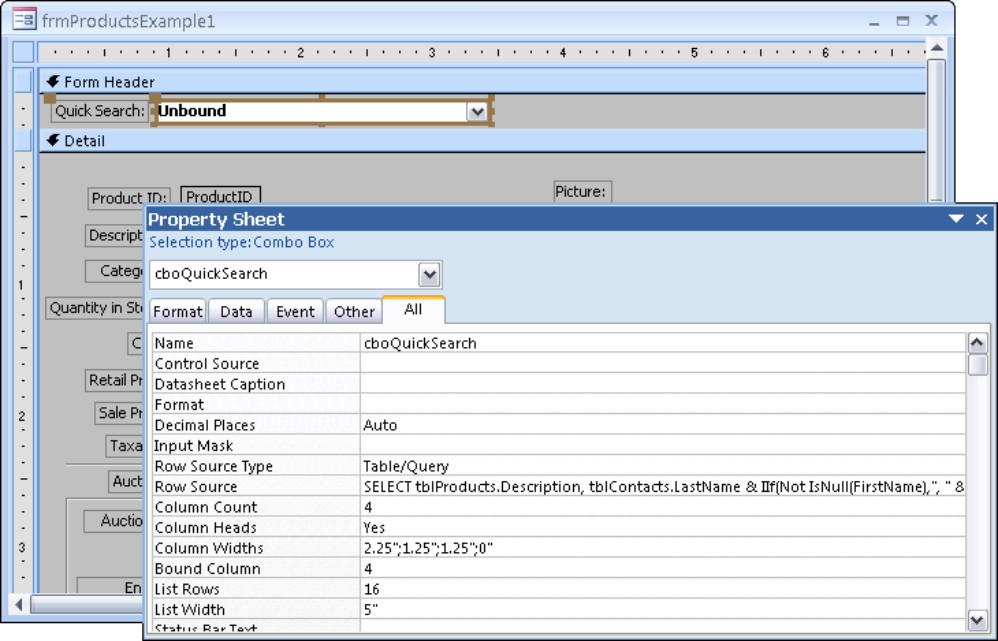
Figure 27-1 shows the frmProducts form with an additional control at the top—a combo box that is not bound to any control source in the form. The unbound combo box is used to look up a record in tblProducts and then display the record in the form using a bit of code. You see several ways to do this in the chapter.
Figure 27-1
The frmProductsExample1 form with an unbound combo box

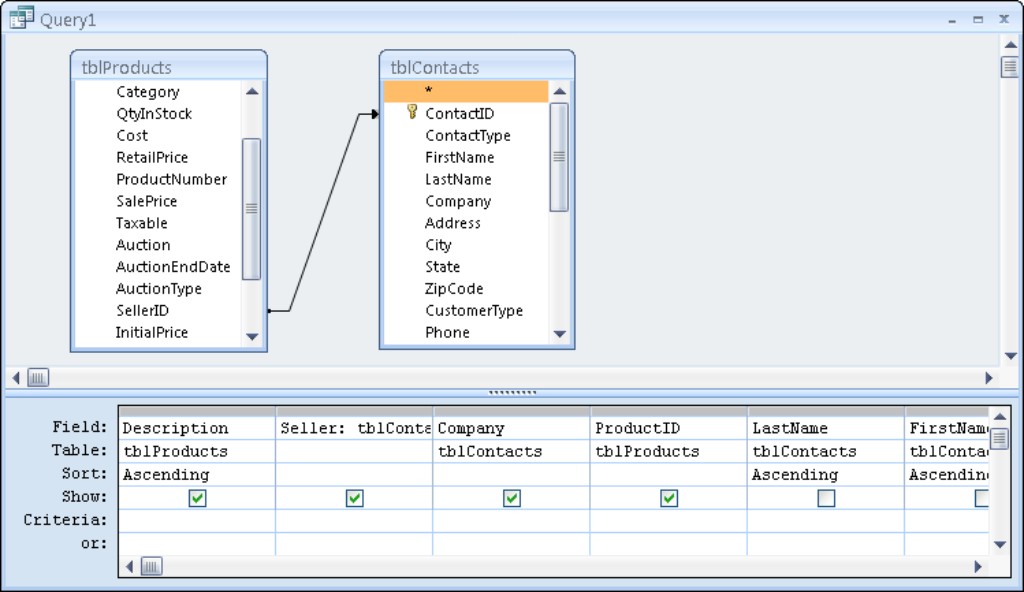
The design for the combo box is shown in Figure 27-2. Notice that the Control Source property is empty. This combo box is not bound to any field in a table. It is used only by the form. There are four columns that can be viewed in the query for the Row Source, as shown in Figure 27-3. The first is the Description from tblProducts. The second and third columns are taken from tblContacts. The second column is the seller from an auction’s Last Name and First Name together. The third column is the seller’s company. The last column is not displayed and is the ProductID field in tblProducts.
Figure 27-2
The Property window for the unbound combo box control
This column is also the bound column for the combo box and is the value the combo box will equal when a description record is selected in the combo box. Notice that the fourth column width is 0, which hides the displayed value when the combo box is pulled down.
The Column Heads property is set to Yes because whenever there are three or more displayed columns, you should display column heads as well.
Figure 27-3
The query behind the Row Source property of cboQuickSearch
This combo box will be used for all the examples in this chapter. Next you see how to find records in a variety of ways using the combo box and the code behind it.
Using the FindRecord Method
The first form to look at is frmProductsExample1. You enhance the code behind the form and the combo box that selects a specific record.
When a user selects a record using a combo box, it triggers the AfterUpdate event. This example uses the AfterUpdate event procedure to find the record selected in the combo box.
The FindRecord method locates a record in any field by specifying a value passed to it as a parameter. This is equivalent to using the binoculars in the Access ribbon to find a record.
To create an event procedure behind the combo box, follow these steps:
1. Display the frmProductsExample1 form in Design view, click cboQuickSearch, and display the Property window (press F4).
2. Select the Event tab and click the AfterUpdate event.
3. Click the combo box arrow in the AfterUpdate event property and select Event Procedure.
4. Click the Builder button that appears in the right side of the property.
The procedure appears in a separate VBA code window. The shell of the event procedure (Private Sub cboQuickSearch_AfterUpdate()...End Sub) is automatically created. As you have learned, whenever you create an event procedure, the name of the control and event are part of the subprocedure.
5. Enter the four lines of code exactly as shown in Figure 27-4.
Figure 27-4
Using the FindRecord method to find a record
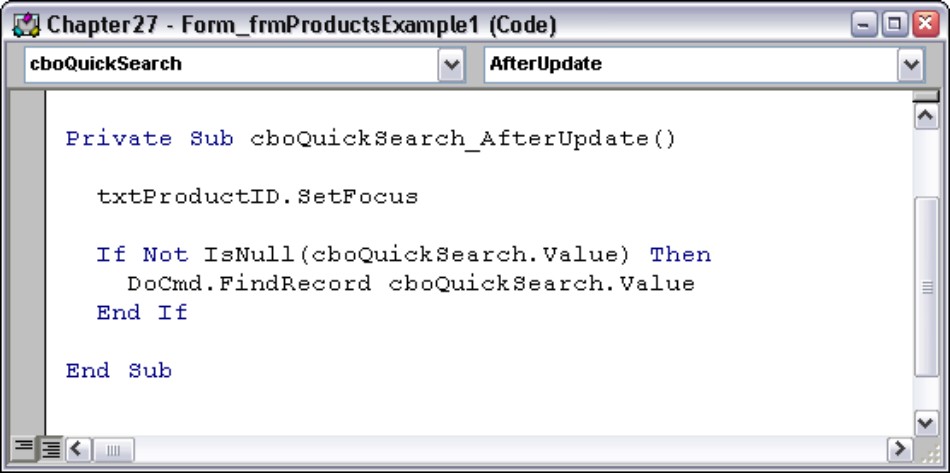
The first line is:
txtProductID.SetFocus
This statement moves the cursor to the txtProductID control. Just as you need to manually move the cursor to a control in order to use the Find icon in the Access ribbon, you must place the cursor in the control. In this case, you’re moving the cursor to the control containing the ProductID value because the search will look for a particular ProductID.
The next block of code is:
If Not IsNull(cboQuickSearch.Value) Then
DoCmd.FindRecord cboQuickSearch.Value
End If
This block of code first checks to make sure that cboQuickSearch contains a value (is not null) before using the FindRecord method. If a value is found in the combo box, the FindRecord method uses the combo box’s value (which happens to be the selected item’s ProductID) to search for the selected vehicle’s record.
The first value found by the FindRecord method is determined by a series of parameters, including whether the case is matched and whether the search is forward, backward, or the first record found. Enter DoCmd.FindRecord in the code window and press the spacebar to see all available options. The FindRecord method finds only one record at a time while allowing all other records to be viewed.
Using the Bookmark to Locate a Record
The FindRecord method is a good way to search when the control you want to use to find a record is displayed on the form. It is also a good way if the value being searched for is a single value. However, many times multiple values are used as look-up criteria. A bookmark is another way of finding a record.
You can use the form named frmProductsExample2 to follow this example.
Figure 27-5 shows code to use a bookmark that is added behind the AfterUpdate event of the combo box.
Figure 27-5
Bookmark code used to find a record

The first three lines are:
Dim rs As Recordset
Dim strCriteria As String
Set rs = Me.RecordsetClone
The first two lines declare a recordset named rs and a string named Criteria. These will be used later in the code. The next line sets the recordset to a copy of the form’s bound recordset (the RecordsetClone).
The Recordset object’s FindFirst method requires a search string containing criteria to look up in the recordset (yes, that is correct—you’re actually asking the recordset to search itself for a particular record, based on some criteria).
The criteria string can be as complicated as needed. The following statement concatenates the field name ProductID with the value of cboQuickSearch:
strCriteria = “[ProductID] = “ & cboQuickSearch.Value
Notice the parts of the criteria string that are concatenated.
The first part is a double quote, then the field name followed by an equal sign:
[ProductID] =
The value of Me. cboQuickSearch is then added to the string. Assuming the value of cboQuickSearch is 17, the string is now:
[ProductID] = 17
Creating criteria in code is sometimes complicated. Remember that the objective is to build a string that could be copied into a query SQL window and run as is. Often, the best way to create a criteria string is to create a query design, switch to SQL view, and then copy the SQL to a code window. Then, break up the code’s WHERE clause into field names and control values, inserting concatenation symbols and delimiters. In this example, there is no WHERE clause but the idea is the same.
After the criteria string is completed, you use the recordset’s FindFirst method to search for the record. The following line uses the FindFirst method of the recordset, passing the criteria string like the WHERE clause of a SQL statement:
rs.FindFirst strCriteria
The FindFirst method looks for a record matching the criteria property’s value.
You don’t have to create a Criteria variable and then set the criteria string to it. You can simply place the criteria after the rs,FindFirst method, like this:
rs.FindFirst “ProductID = “ & cboQuickSearch.Value
However, when you have complex criteria, it may be easier to create the criteria separately from the command that uses the criteria string so you can debug the string separately.
The next lines are used to determine whether the record pointer in the form should be moved. Notice the Bookmark property referenced in the following code block. A bookmark is nothing more than a pointer to a record in a recordset. The FindFirst method positions the recordset’s bookmark on the found record.
If Not rs.NoMatch = True Then
Me.Bookmark = rs.Bookmark
End If
If no record was found, the NoMatch property is True. Because you want to set the bookmark if a record is found, you need the computer equivalent of a double negative. Essentially, it says if there is “not no record found” then the bookmark is valid. Why Microsoft chose NoMatch instead of Match (which would reduce the logic to If rs.Match Then...) is a mystery to everyone.
An alternative way to write the logic for checking the NoMatch property is:
If rs.NoMatch = False Then
Me.Bookmark = rs.Bookmark
End If
If a matching record is found, the form’s bookmark (Me.Bookmark) is set to the found recordset’s bookmark (rs.Bookmark) and the form repositions itself to the bookmarked record. This does not filter the records but merely positions the form’s bookmark on the first record matching the criteria. All other records are still visible in the form.
The last lines of code simply close and discard the recordset.
Criteria can be as complex as you need them to be, even involving multiple fields of different data types. Remember that strings must be delimited by single quotes (not double quotes, because double quotes surround the entire string), dates are delimited by pound signs (#), and numeric values are not delimited.
The FindFirst/bookmark method is preferable to using FindRecord because it allows for more complex criteria and doesn’t require the control being searched to be visible. You don’t have to preposition the cursor on a control to use the recordset’s FindFirst method.
Filtering a Form Using Code
Although using the FindRecord or FindFirst methods allow you to quickly locate a record meeting the criteria you want, it still shows all the other records in a table or query recordset and doesn’t necessarily keep all the records together. Filtering a form lets you view only the record or set of records you want, hiding all non-matching records.
Filters are good when you have large recordsets and want to view only the subset of records matching your needs.
Figure 27-6 shows the two lines of code necessary to create and apply a filter to a form’s recordset. Each form contains a Filter property that specifies how the bound records are filtered. Usually the Filter property is blank and means the form is unfiltered (all of the records are displayed).
Figure 27-6
Code for filtering and clearing a filter behind a form
The first line of code sets form’s Filter property:
Me.Filter = “ProductID = “ & cboQuickSearch.Value
Notice that this is exactly the same string used as the criteria passed to the recordset’s FindFirst property.
The second line of code (Me.FilterOn = True) turns on the filter. You can put all the criteria that you want in a filter property, but unless you explicitly set the FilterOn property to True, the filter is never applied to the form’s recordset. The filter hides all the records that do not meet the criteria, showing only the records meeting the filter’s value.
Me.FilterOn = True

If you create a form filter and then save the form design with the filter set, the filter is saved with the form. The next time the form is opened, the filter is active. Always clear the filter manually from the form’s Filter property before saving the form.
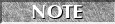
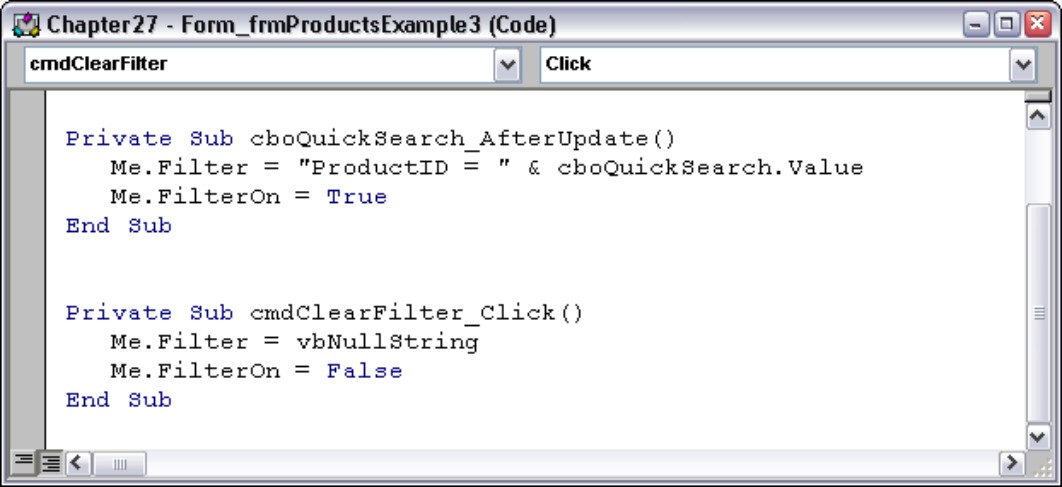
Whenever you turn on a filter, you must create a way to turn it off. If you look at the top of Figure 27-7, you can see a small button (cmdClearFilter) next to the combo box. This button turns off the filter and sets the form’s Filter property to an empty string (vbNullString). The second procedure shown in Figure 27-6 is the button’s Click event procedure:
Private Sub cmdClearFilter_Click()
Me.Filter = vbNullString
Me.FilterOn = False
End Sub
Figure 27-7
frmProductsExample3 uses the form’s Filter and FilterOn properties.
Using a Query to Filter a Form Interactively
At times you want to have one form control another. There may be times when you want a recordset to display selected data based on instant user decisions. For example, each time a report is run, a dialog box is displayed and the user enters a set of dates or selects a product or customer. One way to do this is to use a parameter query.
Creating a parameter query
A parameter query is any query that contains criteria based on a reference to a variable, a function, or a control on a form. Normally, you enter a value such as “SMITH”, 26, or 6/15/04 in a criteria entry area. You can also enter a variable such as [Enter the Last Name] or a reference to a control on a form such as Forms!frmProducts![cboQuickFind].
The Chapter27.accdb database contains a parameter query named qryProductParameterQuery.
The simplest way to create a parameter query is to create a select query, specify the query’s criteria, and run the query to make sure it works. Then change the criteria to the following:
Like [<some prompt>] & “*”
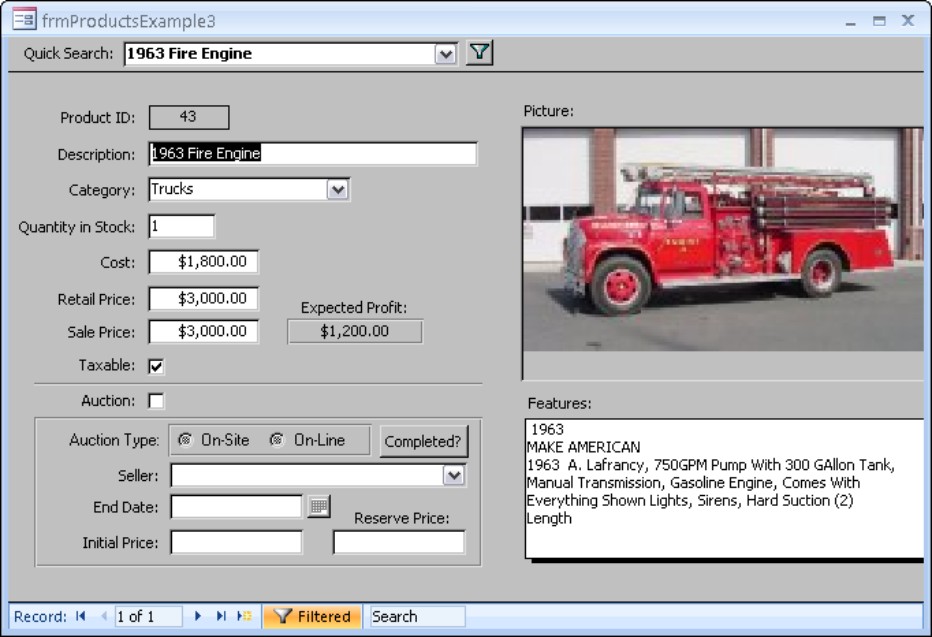
where some prompt is the question you want to ask the user. Figure 27-8 shows a parameter query that prompts the user whenever the query is run to enter the Product Category.
Figure 27-8
Creating a simple parameter query

Any time the query is run, even if it is used as the record source for a form or report or the row source for a list or combo box, the parameter is displayed—and depending on what is entered, the query criteria filters the query results. Figure 27-9 shows the Parameter dialog box open, asking for the product category value required by the query.
Figure 27-9
Running the parameter query

You may remember learning that the Like operator allows for wildcard searches. For example, if you want to filter the query records for any product category that starts with “car” (or “CAR”), you enter CAR when the parameter dialog box displays the question Enter the Product Category. Without the parameter, you would have to enter Like “CAR*” in the criteria area of the query. Also, because the wildcard “*) is included as part of the parameter, users don’t have to include the wildcard when they respond to the parameter dialog.
The wildcards * (anything after this position) and ? (one character in this position) can be used with a Like operator in any query or SQL string.
Figure 27-10 shows the Query Parameters dialog (opened by right-clicking the query’s upper area and selecting Parameters from the shortcut menu). You use the Query Parameters dialog to specify parameters that require special formatting, such as date/time entries or specially formatted numbers. One text entry has been entered in the Query Parameters dialog to show how it works. You enter the name of the parameter text and then choose the data type.
Figure 27-10
The Query Parameters dialog
If you want to add more complex parameters, such as a range of dates, use an expression such as Between [Enter the Start Date] and [Enter the End Date] as a criteria in a date field. This would display two separate parameter dialog boxes and then filter the date value appropriately.
Creating an interactive dialog box
The problem with parameter queries is that they are suitable for only simple parameters. It is fairly difficult to use parameter queries for entering complex criteria. A better technique is to create a simple form and place controls in the form that are used by a query as criteria.
Figure 27-11 shows frmFilterProducts, which contains a combo box for selecting a record. On the left side of Figure 27-11 the combo box is closed while the right side shows the combo box open.
Figure 27-11
Creating a dialog box for selecting records
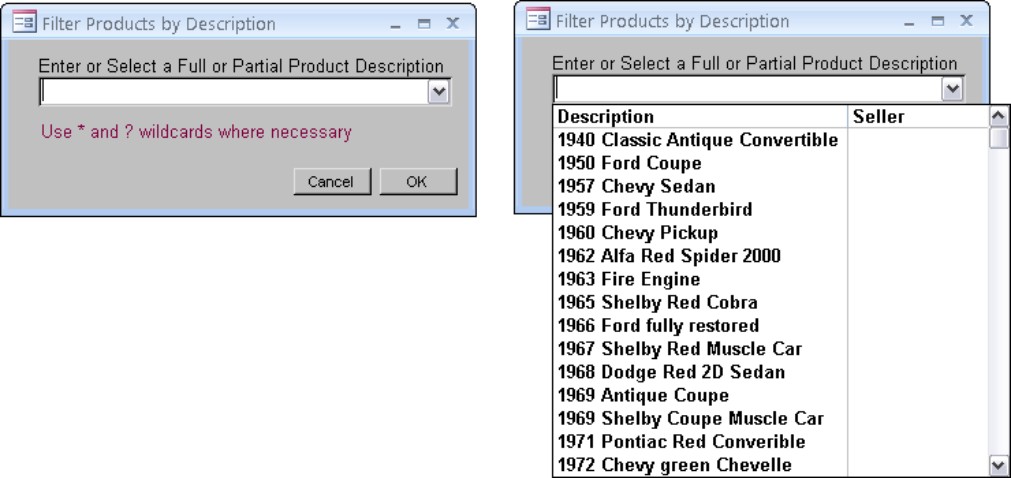
A combo box gives the user the choice of selecting a single record from a set of records or entering a wildcard (if the combo box’s Limit to List property is False). The combo box (cboDescription) shown in Figure 27-11 contains two columns—Description and Seller. The Description is the bound column and makes the selected description available to a query that references the combo box, as shown in Figure 27-12.
Figure 27-12 shows qryProductFormReference. This query selects all the fields in tblProducts based on the description retrieved from the combo box on frmFilterProducts. Notice the expression in the query criteria area:
Like [Forms]![frmFilterProducts]![cboDescription] & “*”
This expression references cboDescription in frmFilterProducts. cboDescription returns the value of the selected description or a selection like 1992, which would show all of the vehicles with descriptions beginning with 1992.
Figure 27-12
Creating a query that references a form control

Linking the dialog box to another form
The frmFilterProducts dialog box (you saw this back in Figure 27-11) does more than just create a value that can be referenced from a query. It actually contains code to open frmProductsExample4. The RecordSource property of frmProductsExample4 is set to qryProductFormReference.
Figure 27-13 shows the cmdCancel_Click and cmdOK_Click event procedures behind the Cancel and OK buttons found on frmFilterProducts.
Figure 27-13
Creating a dialog box that opens a form
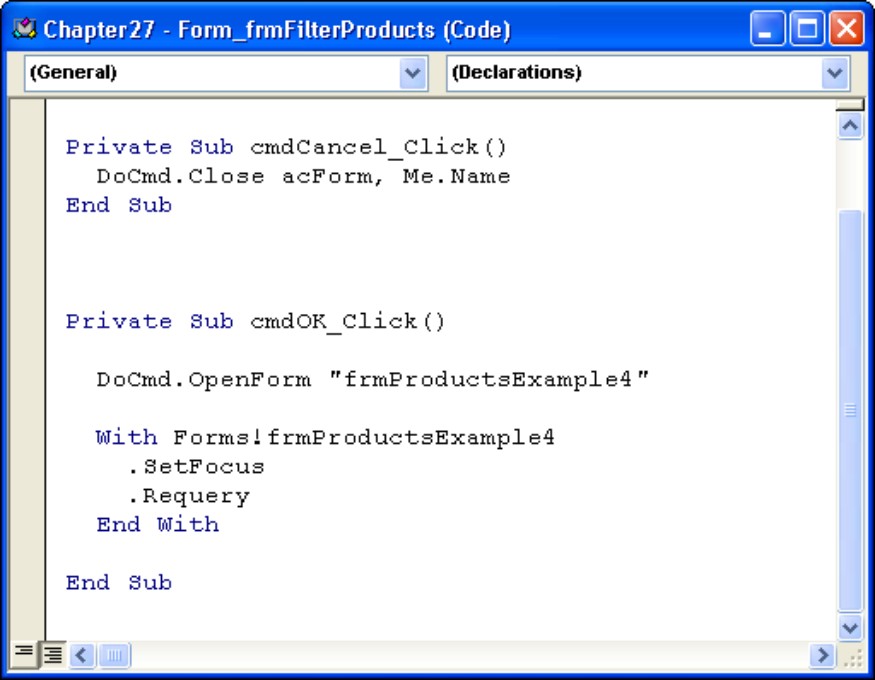
The cmdOK_Click event procedure code opens frmProductsExample4, sets the focus on it, and then requeries the form to make sure the latest selection is used on the form. The SetFocus method is necessary to move focus to the form that is opened. The Requery method isn’t strictly required because a form automatically requeries its record source the first time it is opened. However, if the form is already opened—for example, if you use the dialog box a second time to search for another record—the Requery method ensures the form displays fresh data.
Using the With Keyword
The With keyword is used to save time by not referencing the controls on the form explicitly (which means directly): for example, Forms!frmProductsExample4.SetFocus. This requires Access to search alphabetically through the list of forms in the database container. If there are 500 forms (and some large systems have this many or more) and the form name started with z, this would take a measurable amount of time. Because there is more than one reference to the form, this would have to take place multiple times. The With command sets up an internal pointer to the form so that all subsequent references to the form control or property or to use a form method (like Requery or SetFocus) are much faster.
When you use the With keyword and reference the form name, you simply use a dot (.) or a ! to reference a control, property, or method just like the Forms!FormName was first. You can see this in Figure 27-13.
For each With, you must have an End With.
Summary
This chapter examines several fairly advanced techniques for working with data on Access forms. In each case, a few lines of VBA code are all you need to make a form more efficient and effective for users.
We looked at several different filtering and searching techniques for bound Access forms. Each bound Access form includes a RecordsetClone property that references the set of records bound to the form. You saw how a recordset’s FindFirst method and Bookmark property work together to locate and display data selected by the user.
You also reviewed the process of building parameter queries that include the parameter as part of the query’s design, and another example where the parameter references a control on a dialog form.
The techniques described in this chapter greatly extend the utility of Access forms and empower users to quickly look up data without having to learn the built-in filtering and searching features of Access forms.