Chapter 35: Distributing Access Applications
You’re lucky if you have the luxury of developing only single-user, in-house applications and you never have to worry about distributing an application within a company or across the country. Most developers have to worry about application distribution sooner or later. You don’t even have to develop commercial software to be concerned with distribution; for example, when you develop an application to be run on a dozen workstations in one organization, you need to distribute your application in some form or other.
This chapter covers all the preceding points to some degree. However, because some of the listed items, such as error handling and splitting tables, are covered in detail in other chapters, this chapter focuses primarily on setting database options when preparing your application for distribution.
You need to be concerned with many issues when preparing an Access application for distribution. Distributing your application properly not only makes installing and using the application easier for the end user, but it also makes updating and maintaining the application easier for you. In addition, the support required for an application is greatly decreased by properly preparing and packaging the database and associated files for distribution.

This chapter uses the database named Chapter35.accdb. If you haven’t already copied it onto your machine from the CD, you’ll need to do so now.
Defining the Current Database Options
An Access database has a number of options that can greatly simplify the process of distributing your database (see Figure 35-1). You can access these options for a database by selecting clicking the Microsoft Office Button, selecting Access Options, and clicking the Current Database tab. You can still use an Autoexec macro to execute initialization code, but the Current Database options enable you to set up certain aspects of your application, thus reducing the amount of startup code that you have to write. It is extremely important to correctly structure these options before distributing your Access application.
Figure 35-1
The Current Database options enable you to take control of your application from the moment a user starts it.
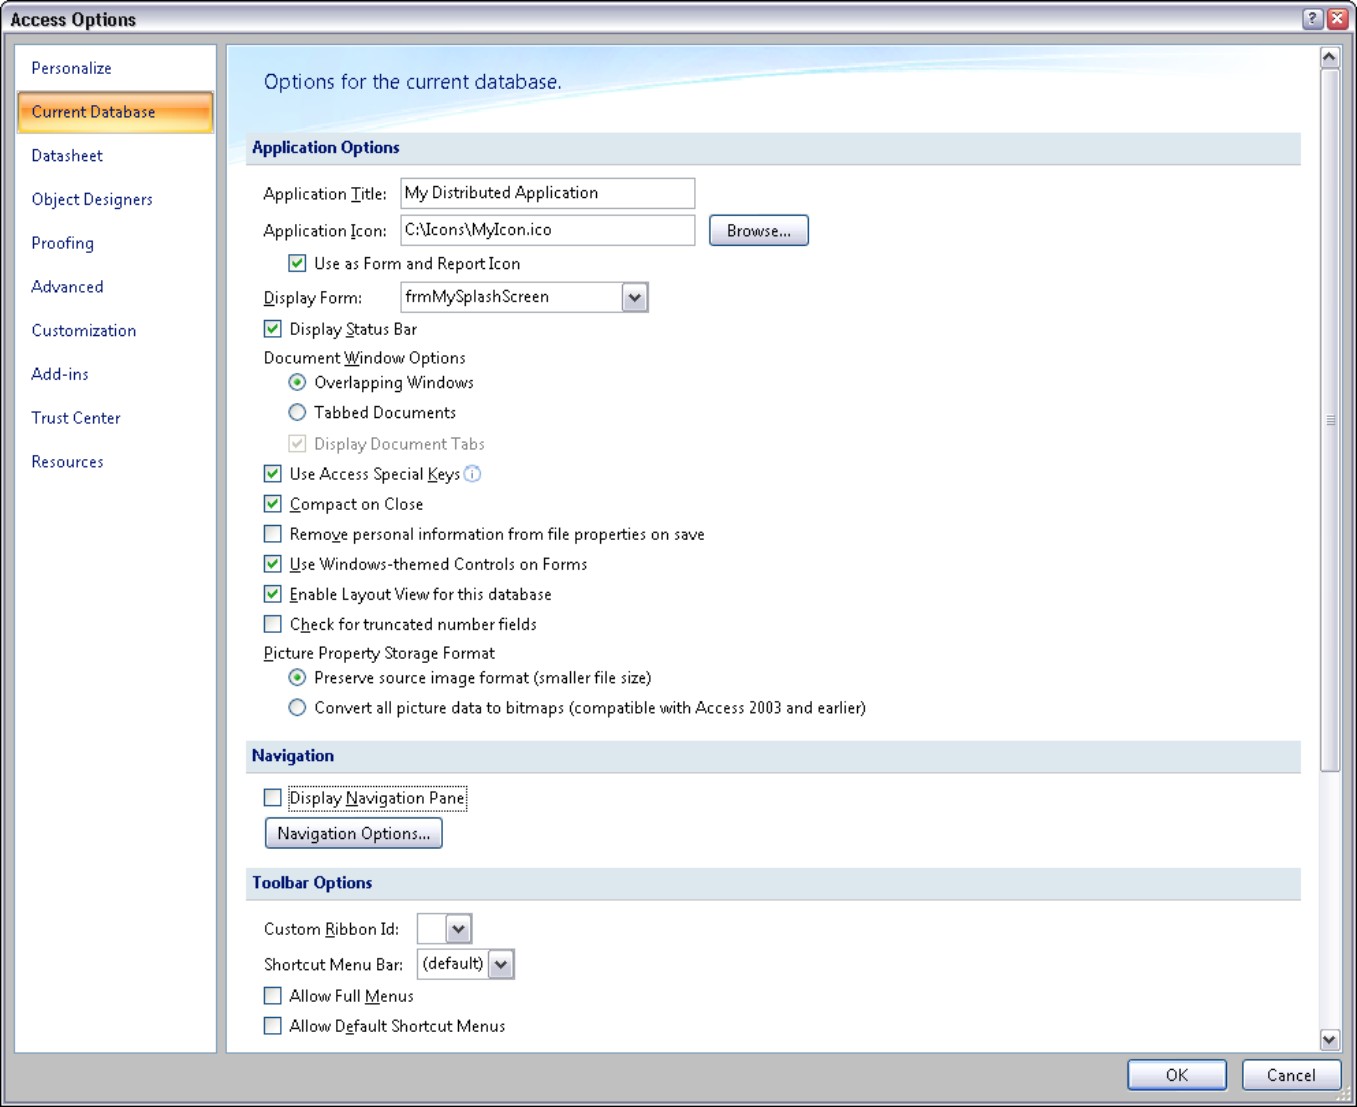

The Current Database options replace the Startup dialog box from previous versions of Access.
Application Options
The settings in the Application Options section let you define parameters for your database as an application:
• Application Title: The text that you provide in the Application Title field displays on the main Access window’s title bar. You should always specify an application title for your distributed applications. If you don’t, the database name and Access 2007 appear on the title bar of your application. The Application Title is also the text that is displayed in the Windows task bar when the application is open and running.
• Application Icon: The icon that you specify in the Application Icon field displays on the title bar of your application and in the task switcher (Alt+Tab) of Windows. Checking the box “Use as Form and Report Icon” also displays this icon when a form or report is minimized. If you don’t specify your own icon, Access displays the default Access icon; therefore, you may want to provide an application-specific icon for your application. Using special program icons helps your users distinguish between different Access applications. You can create small bitmaps in Windows Paint and use available conversion tools to convert a .bmp file to an .ico file format. You can also create icons using other graphics programs or search for application icons in your favorite search engine.
• Display Form: The form you select in the Display Form field automatically displays when the application opens in Access. When the form loads, the Form Load event of the Display form fires (if it contains any code), eliminating the need to use an Autoexec macro. You should consider using a splash screen (which is discussed later in this chapter) as your startup Display Form.
• Display Status Bar: Deselect the Display Status Bar option to completely remove the status bar from the screen (this option is selected by default). Keep in mind that the status bar is an incredibly informative and easy-to-use tool because it automatically displays various key-states (such as Caps Lock and Scroll Lock), as well as the Status Bar Text property for the active control. Instead of hiding the status bar, you should make full use of it and disable only it if you have a very good reason to do so.
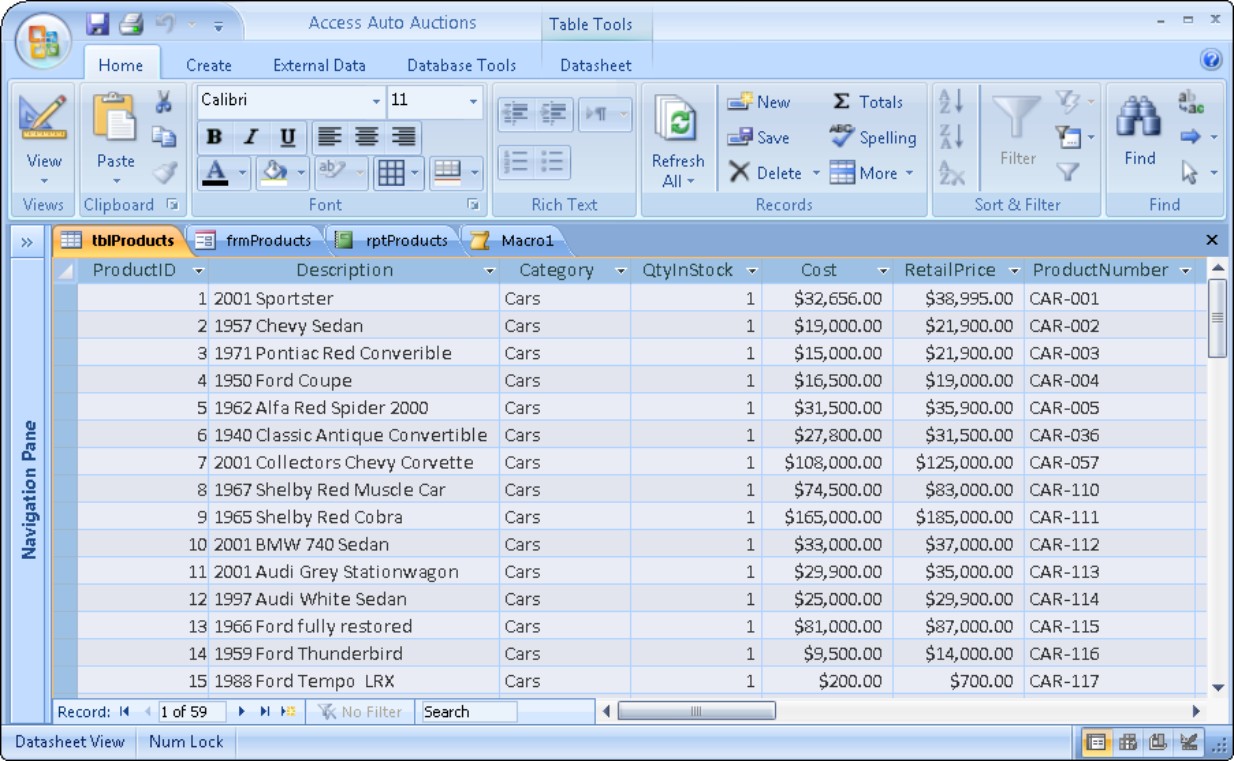
• Document Window Options: Choose Overlapping Windows or Tabbed Documents to display how the forms and reports look in your distributed application. Overlapping Windows retains the look of previous versions of Access, letting you look at multiple screens at once, while Tabbed Documents uses a single-document interface, which is new to Access 2007 (shown in Figure 35-2). You must close and reopen the current database for the changes to take effect.
The Display Document Tabs option is only available when you select Tabbed Documents; it turns on or off the tabs that appear at the top of any open database object. This setting turns off only the tabs and does not close tabbed objects themselves.
Figure 35-2
A database with the Tabbed Documents option selected. The tabs let you select which Access object to work with.
• Use Access Special Keys: If you select this option, users of your application can use accelerator keys that are specific to the Access environment in order to circumvent some security measures, such as unhiding the Navigation Pane. If you deselect this option, the following keys are disabled:
• F11: Use this key to show the Navigation Pane (if hidden).
• Ctrl+G: Use this key to display the Immediate window in the Visual Basic Editor.
• Ctrl+Break: In Access projects, use this key to stop Access from retrieving records from the server database.
• Alt+F11: Use this key to start the VBA Editor.
You should probably deselect this option when distributing the application to prevent users from circumventing the options you select. Otherwise, users may inadvertently reveal the Navigation Pane or VBA code edition, leading to confusion and other problems.
• Compact on Close: Checking the Compact on Close option tells Access to automatically compact and repair your database when you close it. You must close and reopen the current database in order for this change to take effect.

For more information on the benefits of compacting and repairing a database, see Chapter 26.
Keep in mind that compacting a large database may take a considerable amount of time. Furthermore, Compact on Close only affects the front-end database. Unless your application uses the front end for temporary tables or other operations that cause the front end to bloat, the Compact and Repair option may be of minimal benefit to users.
• Remove Personal Information from File Properties on Save: Checking this option automatically removes the personal information from the file properties when you save the file. You must close and reopen the current database for this change to take effect.
• Use Windows-Themed Controls on Forms: Checking this option uses your system’s Windows theme on the form/report controls. This setting only applies when you use a Windows theme other than the standard theme.
• Enable Layout View for This Database: The Enable Layout View option shows or hides the Layout View button on the Access status bar and in the shortcut menus that appear when you right-click on an object tab. Remember that you can disable the Layout View for individual objects, so even when you enable this option, it might not always be available.
• Check for truncated number fields: Checking this option makes numbers appear as “#####” when the column is too narrow to display the entire value. Unchecking this option truncates values that are too wide to be displayed in the datasheet. This means that users see only a part of the column’s values when the column is too narrow.
• Picture Property Storage Format: This option lets you choose how graphic files are stored in the database. Choose Preserve Source Image Format (Smaller File Size) to store the image in the original format, which also reduces the database size. Choose Convert All Picture Data to Bitmaps to store all images as bitmaps, which increases the database size but keeps it compatible with previous versions of Access (Access 2003 and earlier).
Earlier versions of Access always stored images twice within the database. The first copy was the original format (such as .jpg) of the image file, while the second copy was a bitmap used only to display the image on Access forms and reports. Because images were stored twice, Access databases before 2007 were prone to severe bloating when a lot of image data was stored in the MDB.
Beginning with Access 2007, you have the option to Preserve Source Image Format to conserve disk space by reducing the database file’s size (this option is only available in the .accdb file format). When using this option, Access only stores one copy of an image (in its original format) and dynamically generates a bitmap when the image is displayed on a form or report.
Navigation Options
The settings in the Navigation Options section let you define parameters when navigating your database as an application.
• Display Navigation Pane: With most distributed applications, you may never want your users to have direct access to any of your tables, queries, forms, or other database objects. It’s far too tempting for a user to try to “improve” a form or report, or to make some minor modification to a table or query. Rarely are users really qualified to make such changes to an Access database. Deselecting the Display Navigation Pane option hides the Navigation Pane from the user at startup.
But unless you also deselect the Use Access Special Keys option (described earlier in this chapter), users can press F11 to unhide the Navigation Pane. You must close and reopen the current database for this change to take effect.
• Navigation Options: One nice addition to Access 2007 is the ability to select which database options are exposed to users when the Navigation Pane is visible at startup. The Navigation Options button displays the Navigation Options dialog box (shown in Figure 35-3), which you use to change the categories and groups that appear in the Navigation Pane.
Figure 35-3
The Navigation Options dialog box

In the Grouping Options, click on a Category on the left side of the dialog box to change the category display order or to add groups to the right side of the dialog box. Click on the Object Type category to disable viewing of certain Access objects (Tables, Queries, Forms, Reports, Macros, and Modules).
Check the Display Options to Show Hidden Objects, Show System Objects, and Show Search Bar. It’s usually a good idea to hide the hidden and system objects, which you normally don’t want to modify (they’re hidden for a reason!).
The Search Bar (see Figure 35-4) is useful in the Navigation Pane when you have a lot of objects and want to narrow the list to avoid excessive scrolling. For example, if you wanted to see the forms that had the word Customer in them, you’d type Customer in the Search Bar to limit the tables shown in the Navigation Pane.
Figure 35-4
The Search Bar appears at the top of the Navigation Pane.

In the Open Objects With section, select Single-Click or Double-Click to choose how you open a database object. Double-Click is the default option and is most likely familiar to all of your users.
Toolbar Options
The settings in the Toolbar Options section let you define custom ribbons and toolbars when using your database as an application. Custom ribbon creation is explained in Chapter 34.
• Custom Ribbon Id: The Custom Ribbon Id option lets you specify a customized (usually trimmed-down) version of the Access ribbon. If you don’t supply a Custom Ribbon Id, Access uses its built-in ribbon, which may be inappropriate for your application. The default ribbon contains many controls for modifying database objects, which may lead to problems with your users.
You must close and reopen the current database for this change to take effect.
• Shortcut Menu Bar: Setting the Shortcut Menu Bar changes the default menu for shortcut menus (right-click menus) to a menu bar that you specify. Using custom shortcut menus that have functionality specific to your application is always preferable. You must close and reopen the current database for this change to take effect.
• Allow Full Menus: Checking the Allow Full Menus option determines whether Access displays all the commands in its menus or just the frequently used commands. If you supply custom menus for all of your forms and reports and set the Menu Bar property to a custom menu bar, this setting has no effect. You must close and reopen the current database for this change to take effect.
• Allow Default Shortcut Menus: The Allow Default Shortcut Menus setting determines whether Access displays its own default shortcut menus when a user right-clicks an object in the Navigation Pane or a control on a form or report. You must close and reopen the current database for this change to take effect.
• Name AutoCorrect Options: Several chapters in this book have mentioned the problems associated with changing the names of fundamental database objects such as tables and fields within tables. For example, if you change the name of a table, everywhere you refer to that table (a query, a control’s ControlSource property, VBA code, a macro, and so on) becomes invalid, causing the application to function improperly.
Microsoft added the Name AutoCorrect feature to Access 2000 as a way of mitigating the problems that inevitably occur when database objects are renamed. Unfortunately, this feature has never worked quite as well as Microsoft had hoped. Primarily, Name AutoCorrect is a major drag on performance. Because Access must constantly monitor activity while Access is used, a database with this option selected runs noticeably slower than when the option is turned off. Secondly, there are far too many places where an object’s name may appear for an AutoCorrect feature to effectively capture every instance when the object is renamed. This is especially true of object names appearing in VBA code. Many applications contain hundreds of thousands of lines of VBA code, making it virtually impossible to find and update every object reference.
The Name AutoCorrect option is turned on by default in Access 2007 applications. Unless you find this option useful in your projects, you should consider turning it off, as it has been in the Chapter35.accdb example accompanying this chapter.
Setting the Current Database options saves you many lines of code that you would ordinarily need in order to perform the same functions and enables you to control your application’s interface from the moment the user starts it. Always verify the Current Database options before distributing your application.
Testing the Application before Distribution
After you finish adding features and have everything in place within your application, you should take some time to thoroughly test the application. Testing may seem obvious, but this step is often overlooked by many developers, evidenced by the amount of buggy software appearing on the shelves of your local software stores. If you don’t believe this to be true, check out the software support forums on the Internet—almost every major commercial software application has some patch available or known bugs that need to be addressed.
Distributing an application that is 100-percent bug-free is almost impossible. The nature of the software development beast is that, if you write a program, someone can—and will—find an unanticipated way to break it. Certain individuals seem to have a black cloud above their heads and can break an application (in other words, hit a critical bug) within minutes of using it. If you know of such people, hire them, if you can! They can be a great asset when you’re testing an application.
While working through the debugging process of an application, categorize your bugs into one of three categories:
• Category 1: Major ship-sinking bugs: These bugs are absolutely unacceptable—for example, numbers in an accounting application that don’t add up the way they should or a routine that consistently causes the application to terminate unexpectedly. If you ship an application with known Category 1 bugs, prepare for a lynching party organized by your users!
• Category 2: Major bugs that have a workaround: Category 2 bugs are fairly major bugs, but they don’t stop users from performing their tasks because some workaround exists in the application. For example, a button that doesn’t call a procedure correctly is a bug. If the button is the only way to run the procedure, this bug is a Category 1 bug. If, however, a corresponding ribbon command calls the procedure correctly, the bug is a Category 2 bug. Shipping an application with a Category 2 bug is sometimes necessary. Although shipping a bug is officially a no-no, deadlines sometimes dictate that exceptions need to be made. Category 2 bugs will annoy users but shouldn’t send them into fits.
If you ship an application with known Category 2 bugs, document them! Some developers have a don’t-say-anything-and-act-surprised attitude regarding Category 2 bugs. This attitude can frustrate users and waste considerable amounts of their time by forcing them to discover not only the problem but also the solution. For example, if you were to ship an application with the Category 2 bug just described, you should include a statement in your application’s README file that reads something like this: “The button on the XYZ form does not correctly call feature such-and-such. Please use the corresponding command such-and-such found on the ribbon. A patch will be made available as soon as possible.”
• Category 3: Small bugs and minor nits: Category 3 bugs are small issues that don’t affect the operation of your application. They may be caption or label misspellings or incorrect text box colors. Category 3 bugs should be fixed soon, but should not take precedence over Category 1 bugs. They should take precedence over Category 2 bugs only when they’re so extreme that the application looks completely unacceptable or when they cause enough trouble for users that a fix is quickly needed.
Categorizing bugs and approaching them systematically, helps you create a program that looks and behaves the way its users think it should. Sometimes you may feel like you’ll never finish your Category 1 list, but you will. You’ll be smiling the day you check your bug sheet and realize that you’re down to a few Category 2s and a dozen or so Category 3s! Although you may be tempted to skip this beta-testing phase of development, don’t. You’ll only pay for it in the long run.

Not all Access features are available when an application is run within the Access runtime environment You can operate in the runtime environment and use the full version of Access to test for problems with your code and with the runtime environment by using the /Runtime command line option when starting your Access application. Click Run on the Windows Start menu or create a shortcut. The following command-line example starts Access and opens the Invoices database (if it is located at D:\MYAPPS\) in the runtime environment (all of this text appears as a single line in a shortcut’s Target property):
D:\OFFICE2007\ACCESS\MSACCESS.EXE /RUNTIME
D:\MYAPPS\INVOICES.ACCDB
You should always test and debug your application in the runtime environment if you plan to distribute the application.
Access contains a new extension—.accdr—that automatically puts your database in the runtime environment when it’s opened. Change your database file’s extension from .accdb to .accdr to create a “locked-down” version of your Access 2007 database. Change the extension back to .accdb to restore full functionality.
Polishing Your Application
When your application has been thoroughly tested and appears ready for distribution, spend some time polishing your application. Polishing your application consists of the following:
• Giving your application a consistent look and feel
• Adding common, professional components
• Adding clear and concise pictures to buttons
• Using common, understandable field labels and button captions
Giving your application a consistent look and feel
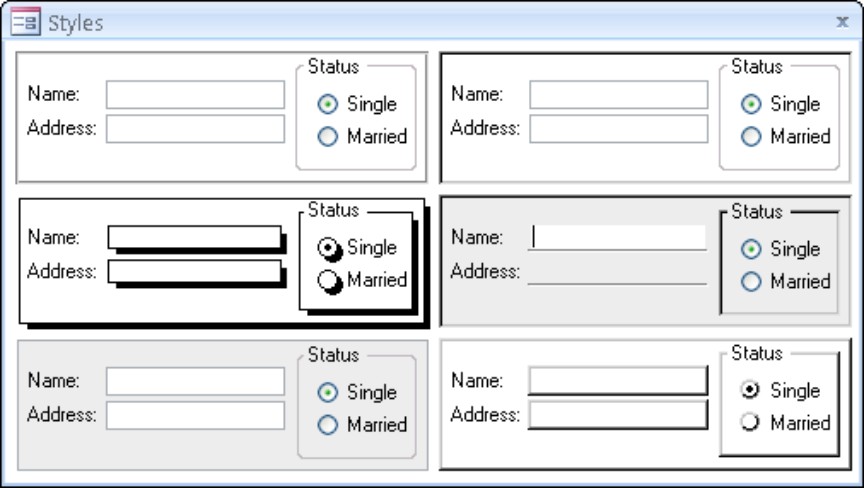
First and foremost, you should decide on some design standards and apply them to your application. This is incredibly important if you want a professional “look and feel” to your applications. Figure 35-5 shows a form with samples of different styles of controls.
Figure 35-5
You can decide on any interface style that you like for your application. However, after you decide on a style, use it consistently.
Your design decisions may include the following:
• Will text boxes be sunken, flat with a border, flat without a border, chiseled, or raised?
• What back color should text boxes be?
• What color will the forms be?
• Will you use chiseled borders to separate related items or select a sunken or raised border?
• What size will buttons on forms be?
• For forms that have similar buttons, such as Close and Help, in what order will the buttons appear?
• Which accelerator keys will you use on commonly used buttons, such as Close and Help?
Making your application look and work in a consistent manner is the single most important way to make it appear professional. For ideas on design standards to implement in your applications, spend some time working with some of your favorite programs and see what standards they use. In the area of look and feel, copying from another developer is generally not considered plagiarism but is instead often looked upon as a compliment. Copying does not extend, however, to making use of another application’s icons or directly copying the look and feel of a competitor’s product; this is a very bad practice. For an example of a good look-and-feel environment, see the Microsoft Office Compatible program.
An application may be certified Office Compatible by meeting certain user-interface requirements specified by Microsoft. An Office-Compatible application uses the same menu structures as all the Office applications. In addition, ribbons are similar and, where applicable, have the same button image that Microsoft uses. Making an application look like an Office application saves the developer time by giving clear and concise guidelines for interface features, and it helps end users by reducing the learning curve of the application.
Although you may not want to have your application independently tested and certified Office Compatible, you may want to check out the specifications and use some of the ideas presented to help you get started designing your own consistent application interfaces.
Adding common professional components
Most commercial/professional applications have some similar components. The most common components are the splash screen, About box, and switchboard. Be aware that the splash screen (see Figure 35-6 for a good example) not only aids in increasing perceived speed of an application but also gives the application a polished, professional appearance from the moment a user runs the program. Figure 35-7 shows a skeleton splash screen that can be used with any system. You simply change the content to what you want.
Figure 35-6
A splash screen not only increases perceived speed of your application, but it also gives your application a professional appearance.
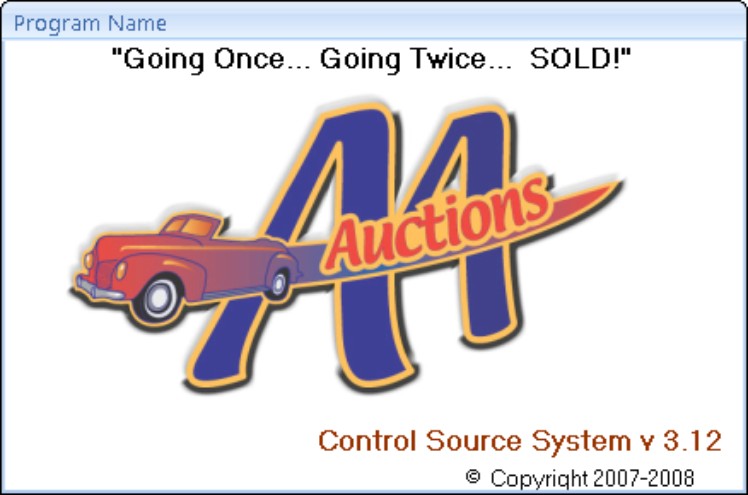

Figure 35-7 shows the design window for a splash screen template that you can use when building your own applications. This form is included in the Chapter35.accdb database. It is named SplashScreenTemplateSimple. Import this form into your application and use it as a template for creating your own splash screen.
Figure 35-7
Use this form as a template to create your own splash screens for your applications.
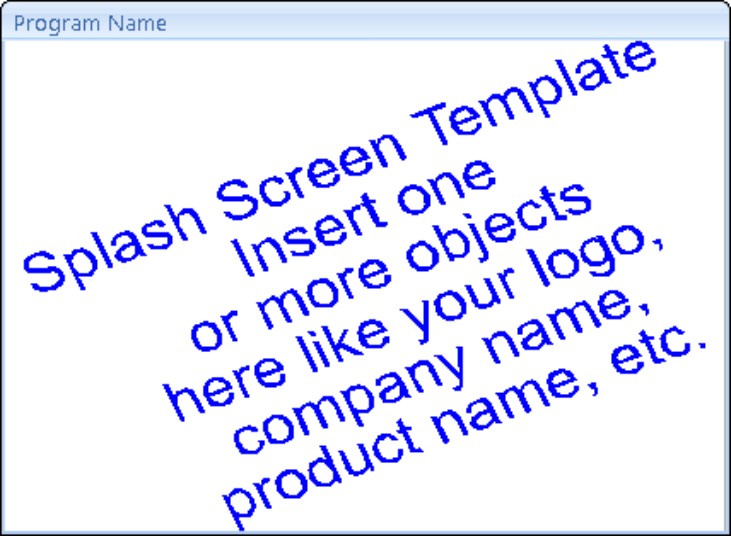
Your splash screen should contain the following items:
• The application’s title
• The application’s version number
• Your company information
• A copyright notice (© Copyright)
In addition, you may want to include the licensee information and/or a picture on the splash screen. If you use a picture on your splash screen, make it relevant to your application’s function. For example, some coins and an image of a check could be used for a check-writing application. If you want, you can also use clipart for your splash screen—just be sure that the picture is clear and concise and doesn’t interfere with the text information presented on your splash screen.
To implement the splash screen, have your application load the splash form before it does anything else (consider making your splash screen the Display Form in the Application Options, described earlier in this chapter). When your application finishes all of its initialization procedures, close the form. Make the splash form a light form and be sure to convert any bitmaps that you place on your splash screen to pictures in order to decrease the splash form’s load time.
The second component that you should implement is an application switchboard. The switchboard is essentially a steering wheel for users to find their way through the functions and forms that are available in the application. Use the switchboard itself as a navigation form, using buttons to display other forms, as shown in the switchboard example in Figure 35-8. This is the switchboard named frmSwitchboard created for the Access Auto Auctions systems in this book.
Figure 35-8
The switchboard provides a handy way to navigate throughout the application.
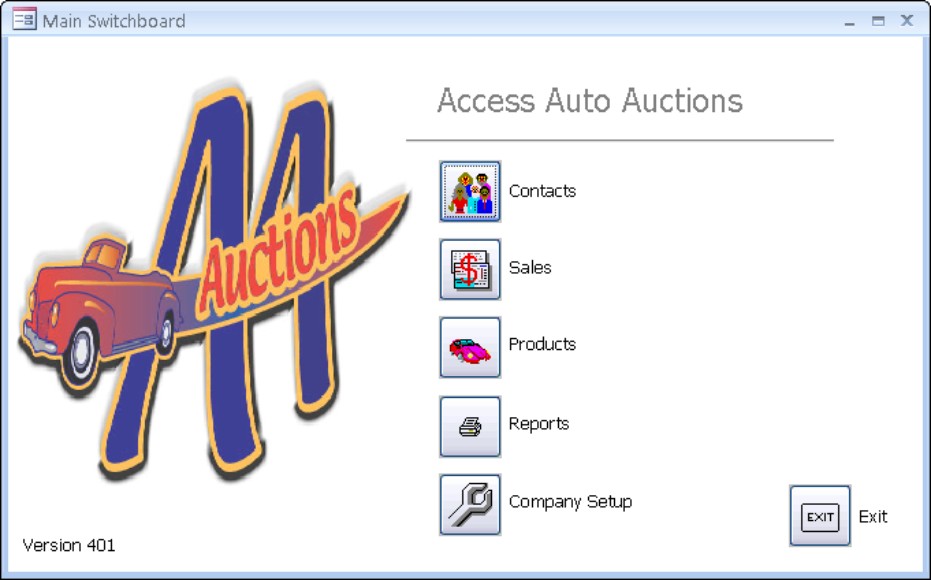
Make sure that the switchboard redisplays whenever the user closes a form. The switchboard provides a familiar place where users can be assured that they won’t get lost in the application.
The third component that you should implement is an About box (see Figure 35-9). The About box contains your company and copyright information, as well as the application name and current version. Including your application’s licensee information (if you keep such information) in the About box is also a good idea. The About box serves as legal notice of ownership and makes your application easier to support by giving your users easy access to the version information. Some advanced About boxes call other forms that display system information (Figure 35-9 has an additional button—System Info). You can make the About box as fancy as you want, but usually a simple one works just fine.
Figure 35-9
The implementation of an About box is a polishing technique that also provides useful information to the user and protects your legal interests.
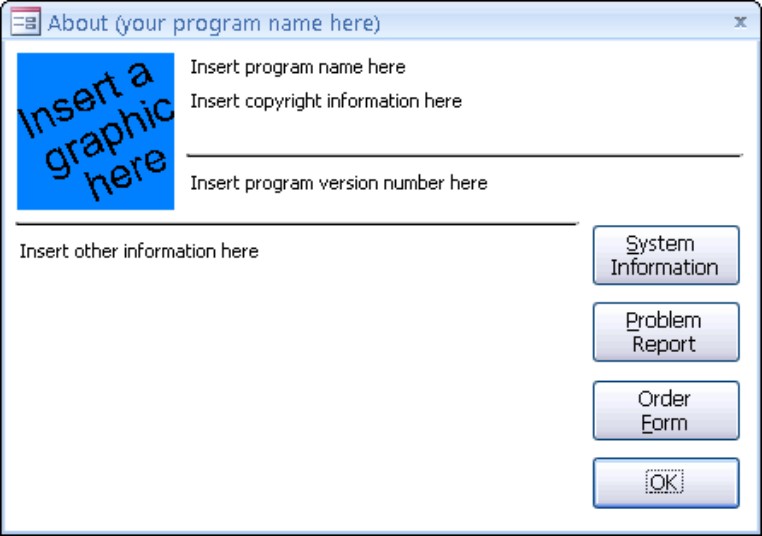
Figure 35-9 shows an About box template form that you can use when building your own applications. This form is included in the Chapter35.accdb database. It is named AboutTemplateA. Import this form into your application and use it as a template for creating your own About box.
Most users love pictures, and most developers love to use pictures on buttons. Studies have shown that clear and concise pictures are more intuitive and are more easily recognized than textual captions. Most developers, however, are not graphic artists and usually slap together buttons made from any clipart images that are handy. These ugly buttons make an application look clumsy and unprofessional. In addition, pictures that don’t clearly show the function of the button make the application harder to use.
Select or create pictures that end users will easily recognize. Avoid abstract pictures or pictures that require specific knowledge to understand them. If your budget permits, consider hiring a professional design firm to create your button pictures. A number of professional image galleries and tools to create and edit buttons are available.
Picture buttons that are well thought out can really make your application look outstanding, as well as make it easier to use.
The About box should be accessible from a Help menu or from a button on your switchboard form. The submenu title should be About My Application. Of course, substitute Your program name here with your application’s actual name.
The splash screen, About box, and switchboard may seem like trivial features, but they can greatly enhance your application’s appeal. They take little time to implement and should be included in all of your distributed applications.
Bulletproofing an Application
Bulletproofing an application is the process of making the application idiot-proof. It involves trapping errors that can be caused by users, such as invalid data entry, attempting to run a function when the application is not ready to run the function, and allowing users to click a Calculate button before all necessary data has been entered. Bulletproofing your application is an additional stage that should be completed in parallel with debugging, and should be performed again after the application is working and debugged.
Chapter 28 discusses many bulletproofing techniques in addition to those discussed here.
Using error trapping on all Visual Basic procedures
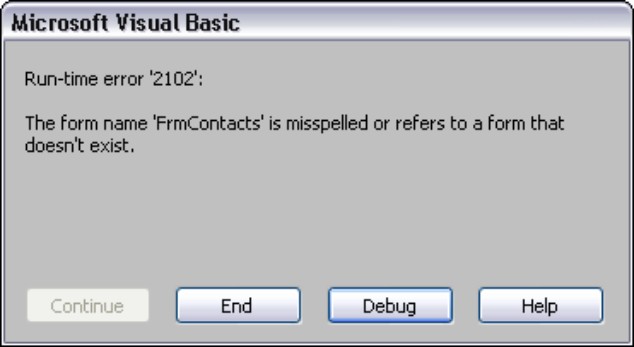
An error-handling routine gives you a chance to display a friendly message to the user, rather than some unintuitive default message box; Figure 35-10 shows a message box with a runtime error “2102,” which is unintuitive; however, it also shows a more-detailed message of a form missing or misspelled. The user will not know the name of the form or if it’s misspelled or missing. An error-handling routine is needed to provide the user with a more informative and meaningful error message than what is shown in Figure 35-10.
Figure 35-10
An error message resulting from a procedure with no error-handling routine
One of the most important elements of bulletproofing an application is making sure that the application never crashes—that is, never ceases operation completely and unexpectedly. Although Access provides built-in error processing for most data-entry errors (for example, characters entered into a currency field), automatic processing doesn’t exist for VBA code errors. You should include error-handling routines in every VBA procedure, even if you use just the following error line in your code:
On Error Resume Next
When running an application at runtime, any untrapped error encountered in your code causes the program to terminate completely. Your users can’t recover from such a crash, and serious data loss may occur. Your users have to restart the application after such an application error.
For more information on error handling and bulletproofing an application, see Chapter 25 and Chapter 28.
Separating the tables from the rest of the application
You should separate your code objects (forms, reports, queries, modules, and macros) from your table objects. Many benefits are gained from distributing these objects in separate .accdb files:
• Network users benefit from speed increases by running the code .accdb (the database containing the queries, forms, macros, reports, and modules) locally and accessing only the shared data on the network.
• Updates can easily be distributed to users.
• Data can be backed up more efficiently because only one file is needed, and disk space and time aren’t used to continuously back up the code objects.
All professionally distributed applications—especially those intended for network use—should have separate code and data database (.accdb) files.
Documenting the application
Most developers don’t like to write documentation; it’s simply no fun and can be quite frustrating and time-consuming. Also, every time a change is made to the application, the application’s documentation needs updating. Taking the time and effort now to prepare thorough documentation, however, can save hours of technical support time down the road. Even if you don’t plan to distribute a full user’s manual, take time to document how to perform the most common functions in your application. If you’ve created shortcuts, make sure to share them with the users.
Creating a Help system
Although documentation is extremely important for getting users started on your application, a Help system that is well-written, thorough, and context-sensitive is just as important. A Help system puts pertinent information at users’ disposal with just a click of the mouse or a push of a button.
Implementing a security structure
The final item that you need to consider before distributing your application is the level at which you want to secure your application. You can secure specific individual objects, or you can secure your entire application. If it’s important to you to secure design permissions for all of your objects in order to protect your source code, you need to be aware that you can’t rely solely on Microsoft’s word that the security in Access works. For example, Microsoft touted the security model of Access 2.0 as being the most secure available. It was discovered, however, that an average Access developer can unsecure an Access 2.0 database in about five minutes, with only minimum coding! Although no method for unsecuring a secured Access 2007 application has yet been discovered, a method may be uncovered in the future. You must understand and accept this risk when you distribute a secured Access application.
For more information on securing Access applications, see Chapter 29.
Summary
In this chapter, you learned how to set up the Current Database options, which make your application professional looking and more difficult for the nosey user to poke around in. You learned how to restrict components users can interact with as well as how to simulate the runtime environment with the /runtime switch or the .accdr extension.
You also reviewed testing and polishing procedures that make your application less likely to break after you distribute it. You revisited error handling and bulletproofing as additional methods to make a solid application. Preparing your database for distribution may take a bit more time, but you’ll be thankful after the deployment goes smoothly.