Chapter 2
Planning Your Own Eden
In This Chapter
![]() Working with what you already have
Working with what you already have
![]() Deciding on your garden style
Deciding on your garden style
![]() Staying within your budget
Staying within your budget
![]() Setting up your garden plans
Setting up your garden plans
![]() Hiring a professional
Hiring a professional
Consider your ideal garden. Perhaps you know you want a handsome woodland shade garden, but what’ll it look like? Or maybe you know you want a sunny cottage garden, but what’s your vision? Getting to this point in your garden planning is a bit like shopping for a blue shirt. You know you want a shirt and you know you want it to be blue, but you still have plenty of options. Now’s the time to narrow in on your target.
By assessing your gardening wants, your gardening needs, and what you already have available for your garden, you can come up with the best garden for you. In this chapter, I lead you through the processes that can help you clarify your vision, and I explain how you can start making your dream garden a reality.
Taking Stock: Evaluating What You Already Have
Observation! That’s the very first step. Forget for a moment what’s growing in your neighbors’ yards or other home landscapes around town that you see and may covet. It’s time to take a broader view — it’s all part of the assessing process, a process that can lead you to a gorgeous, successful garden of your own. And don’t forget that the garden is part of your yard in general. If you incorporate your garden plans into an overall plan for your yard, the yard itself can become a beautiful extension of the garden.
Identifying and spending some time analyzing what you already have is an important step in planning. After all, every yard is different and therefore presents a gardening challenge. You may be surprised, as you ponder, to discover that you can work quite well with what you already have, making seemingly minor changes to major effect.
Start by looking at the big picture. Here are the basic things to look for that affect your overall gardening plans. The following issues directly influence your planting decisions:
 Local climate: Over the course of a calendar year, is your area’s climate dry or damp? Generally sunny or generally rainy? Do your winters (or summers) slow everything down or bring plant growth to a temporary halt? The answers to these questions can tell you which plants are likely to grow easily and which ones may require some extra help. See Chapter 3 for info about plant hardiness zones and how they affect your growing space.
Type of soil in your yard: Consider the natural soil in your area. Is it rather sandy? Clay? Loamy (rich, crumbly, and dark)? Acidic? Alkaline? Does it drain rainwater away quickly, or does moisture puddle and linger for days? The answers can help you understand which plants will thrive and which ones will need soil improvements. (If you really don’t have any idea, a simple soil test is a good idea — see Chapter 4.)
Plants native to your area
(or already growing in your yard): I’m not asking that you make a garden out of entirely native plants — after all, you may want to distinguish your yard from the surrounding natural landscape. But finding out which plants (trees, shrubs, grasses, flowers) are native or perform well in your general area, either by observing or by asking around, can further fill you in on what kind of growing conditions you’ve been dealt.

When looking at plants, make sure you don’t choose invasive exotics, which are aggressive nonnative plants that can escape your yard and run rampant. Your state may also find some native plants harmful. For information and details on what to watch out for, visit plants.usda.gov/java/noxiousDriver.
And here are some structural considerations for your garden:
Permanence of big structures: Okay, the house stays. The garage and shed, too, although maybe you can move or replace the shed. What about shade trees? Can and should you cut any of them down, or at least prune them? Big branches may be a hazard, and letting more light into a garden is often welcome.
Walkways: It’s hard, but not impossible, to change the path of foot traffic if it’s currently in the way of your garden space. So take a hard look and be honest. If you add or replace a walking surface, the yard can look immediately nicer and your garden spot may be neatly outlined.
Options for installing a path include gravel, brick, flagstone, and other paving materials. Wandering paths look nicer and slow down footsteps, but pathways should actually lead somewhere if you want people to use them. Wider paths also slow people down and encourage them to enjoy their surroundings — your beautiful garden.
Desire for privacy or shelter: Good fences can make good neighbors, and materials make all the difference. Big, substantial wooden fences do block street noise and unsightly views but may also create shade and look unfriendly. A lighter or more open design may be better, perhaps softened with a flowering, climbing plant. An alternative is living fences of hedges or an informal line of bushes (evergreen or deciduous, with or without fruit and flowers — turn to Chapter 11 for information). Work with what you have to improve your fence’s look, or vow to install or replace it with something nicer.

After evaluating these items and the impact they’ll have on your future garden, you may find that you have the start of a good plan for forming the boundaries and overall design of your garden.

Identifying problems and restrictions
There are certain classic gardening “problems” and, thankfully, myriad solutions. Please don’t ever feel overwhelmed — picking out an area to work on and improve and concentrating your efforts can buoy your spirits, and then you can move on to another concern. My advice is to start first with an area you have the time and money to fix up — preferably an area you’d like to start enjoying sooner rather than later.
The main point is to take action. Address the big issues now, and you’ll definitely feel well on your way to a more beautiful, enjoyable garden. Read on for some basic problems.
You have too much shade
A yard or garden space with a lot of shade is often lamented as forcing too many limitations on gardeners. Never fear! This problem is often much easier to remedy than you may think, usually just by pruning some trees and bushes:
1. Go out with clippers and/or a small pruning saw to remove all “nonnegotiable” branches and twigs — anything obviously dead or diseased, particularly the lower branches of thick trees.
2. Go on to thinning — taking out growth that’s rubbing against other branches or crowding the interior of a plant.
3. For anything you can’t handle, call in a certified arborist or a tree company.
You need the services of a tree company if you decide to take out an entire tree. Check with local authorities; in some areas you need permission to cut down trees. In the end? More sun, more light, and more air — a whole new yard!
If a more permanent structure, such as a house or fence, causes your shade problem, you may still have more planting options available than you think. Review the chapters in Parts II, III, and IV for a variety of ideas on how to grow in the shade.
You have too much sun
If your garden space is sunnier than you’d like, the quick solution is to add human-made items — try an umbrella or two, a pergola (arbor), or an outdoor tent. For the long term, you can make a planting plan with shade trees (see Chapter 11) and vines that cover trellises and other structures (see Chapter 12).
Your yard is too big
Here are three good ways to reduce that maintenance-demanding, water- hogging lawn and create ideal spaces for gardening:
Create garden beds around the sides of the yard, widening or extending them as you can. Alternatively, create what landscapers call island beds, which are flat or mounded beds (in any shape and size you like) in the middle of a lawn.
Add large, sprawling structures that take up a lot of yard space, such as
• Pathways
• A terrace, patio, or deck
• A pool (swimming or ornamental)
• A potting shed or gazebo
Adding garden beds around these structures really spruces things up.
Fence in or otherwise enclose individual “garden rooms” within spaces around your yard. The fence can be an artificial fence made of wood or metal, or it can be made of hedges, ornamental grasses, or trellises overhung with vines. Use your imagination!
Your yard is too little
A small yard can seem bigger, more welcoming, and a lot more charming when you employ a few basic gardening techniques. With these methods, you can transform your cozy little yard into the garden of your dreams:
Soften the edges of your lawn so they don’t seem so imposing. If you have a fence, you can
• Paint the fence a bright color (dark colors heighten the sense of constriction).
• Add lush vines or climbing roses.
• Adorn the fence with potted plants.
Create a varied layering effect — that is, position different plant types and textures above and behind one another, stepping up to the edges of your yard. Some gardeners literally display a combination of in-ground and potted plants on and around a rack or stepladder.
Add a focal point — a statue, a small fountain, or one spectacular pot or urn with a big, dramatic plant or showy combination of plants; this move draws attention away from the close boundaries.
The soil isn’t the type or quality you want
More often than you may think, poor soil thwarts gardening plans. People just forget or underestimate the importance of having organically rich, well-draining ground to plant in.
To tackle this problem, try growing only those types of plants proven to work in your soil. See what the neighbors are growing in their gardens, or check with the local nursery for the best plants to grow in your area.
You can also dig into the soil and mix in the materials you want (sort of like making cake batter, only more work). A rototiller is a handy tool to use for this purpose (see Chapter 5). Remember to work down to a depth of 6 to 8 inches for most garden plants — less for shallow-rooted grass, more for trees and shrubs.
Reclaiming the good garden hiding in your yard
Improving on what you already have in your yard is a quick and easy way to start enjoying a good garden. Timing is often key; that is, make your move at the right time and the project will be less work and will yield faster results. If the project seems overwhelming, by all means, find or hire help.
To improve a flowerbed, rake out all debris, remove all weeds, and add soil amendments in late fall or early spring. Plan what will go in, and remember to avoid overcrowding and to allow for each plant’s mature size. Last but not least, mulch the bed to retain moisture and thwart weeds so the bed will hopefully never get out of hand again.
You can reclaim a vegetable garden, even if it’s full of weeds — chances are that the garden still has fairly good soil. Get weeds and debris out of there in fall or early spring, repair or install edging and/or fencing, and then dig in some organic matter for good measure (this step’s easier now, before you add plants). Then cover the entire area with black plastic or a thick layer of mulch until you’re ready to plant to keep out digging critters and thwart a resurgence of weeds.
Too many weeds!
You can attack these unwelcome plants any time of the year, but you’ll make faster progress if you start in late fall or early spring and thwart them before or just as they’re sprouting. Use a hoe, smother weeds with plastic or mulch, or carefully use an herbicide (or some combination of these tactics). Then, in midsummer, make sure you don’t let weeds go to seed. Pull them, mow them down, and discard them outside your garden to keep them from coming back.
Taking advantage of your yard’s assets
Every garden space has its strengths and its good spots, if only you look, and some of the “problems” I mention in earlier sections can actually be benefits if you see them that way. You can save yourself a lot of time, effort, and grief by identifying these types of spots and working with what you have rather than knocking yourself out to impose an ambitious plan upon your garden space. Go with the flow, in other words! Here are a few examples of conditions you may find within your garden space and how to handle them:
Sunny days: Bright sunshine is beloved by many plants, especially those with colorful flowers. Rejoice and be glad you have it; then go shopping for a wide range of bright and lively plants. Have fun with color combinations. Full sun also affords you the opportunity to grow many vegetables, herbs, fruits, and waterlilies. See the chapters ahead for details on choosing and growing the types that interest you.
The dark side: If your lot in life is shade, don’t fret. Consider it a gift, a chance to create a cool, soothing, even enchanting oasis. Without direct blasts from the hot sun, plants in a shady area look fresher and crisper for far longer. Wilting and withering in the heat aren’t issues, colors don’t get washed out, and not only do flowers last longer, but they also add sparkle and definition. For ideas, read the shade-gardening parts of Chapters 6 and 7.
Dry conditions: Instead of knocking yourself out trying to provide water for thirsty plants, seek out ones that prosper in drier growing conditions. A nursery that offers native plants (and good-looking cultivars of the same) is a good place to start. You don’t have to grow only cacti and succulents, though you should check out the amazingly wide range of colors and shapes before you decide not to; lots of exciting dry-ground, drought-tolerant plants are available to gardeners these days.
Water: If your yard’s soggy or boggy, stop neglecting the area to weeds or trying to dry it out. Instead, grow plants that relish damp ground. Loads of good-looking choices — large and small, tall and ground-covering, flowering and foliage — are available. Try red twig dogwood, red maples, skunk cabbage, or Japanese primroses.
Getting Ideas for Your Garden Space
After you take inventory of your garden space and yard in general, consider what sort of garden you want. Before you get bogged down in choosing plants and deciding where to plant them, think in broad terms once again. How do you want to use your garden? What are your needs and expectations? Naming your goals can help you further clarify the details of your plans.
Gardening with the kids in mind
If you have young children of your own, or if kids are always visiting, plan for them and their antics. A flower border of precious perennials, some of them delicately supported by stakes, will be in constant danger of being trampled if kids ride bikes or play rousing games of soccer nearby. Although placing your raised-bed vegetable garden right in the center of a sunny lawn may be logical, figure out whether the kids’ fun and games work can around it or whether the kids will be running through it.
As parents everywhere know, the key to lowering your frustration level is being flexible. Site the perennials way at the back of the lawn area if you must; shield flowers with a fence or picnic table or living barrier, such as a line of shrubs or berry bushes; locate that vegetable garden more off to the side; and so on. You get the idea.
With kids’ short attention spans and wish for quick gratification, it’s unlikely that you’ll be able to get the children to help you dig up a new planting area, nor would it be safe or advisable to have them help with pruning projects. But you have plenty of other ways to build your kids’ interest in gardening:
Raise some easy-to-grow plants for kids. Favorites include green beans (pole beans, on a teepee, so kids can have a fort inside), nasturtiums, morning glories, mini pumpkins, and sunflowers.
Plant things kids love to harvest, whether vegetables or flowers for bouquets. Just make sure you supervise children, especially if they’re using clippers or scissors.
Encourage help by putting money in the till. Don’t forget the time- honored tradition of paying your budding entrepreneurs for pulling weeds — though the going rate is probably no longer a penny a dandelion!
Flip to Chapter 20 for some fun gardening projects for kids.
Establishing a good garden for pets
Contrary to popular belief, pets and gardens are compatible. All you need is some creativity to accommodate both of them. However, because the animal is part of your life, you have to consider meeting his or her needs a given when setting out to lay out your yard and garden.
Your biggest concern may be where your pets “do their business.” Dog and cat urine can create brown spots in lawns (because it’s too high in nitrogen), especially when the pet is a creature of habit and returns to the same spot over and over again. Just water the area to dilute, and the problem should go away. Dusting the area with gypsum can also help.
.jpg)
Dogs seem to have two basic outdoor needs:
Water to drink: Place a large bowl of fresh water in a spot where your dog can get direct access to it without trampling through valued plants and where no humans will step on it. Replenish the water often, as it may collect debris, dry up, or get too warm if in the sun.
Shade to rest in: Your dog may have his or her own ideas about which shrubs or trees to rest under, but you can influence your pooch’s decision by trimming away lower branches so scooting into the spot is easier. You can also create and fill in a “sand beach” area, which also allows unfettered and non-destructive digging, if your pooch is a digging sort.
If you want to have a fenced-in “dog run” area, make sure it has sheltering shade throughout the day in some part and that the run is in a spot where you can see and/or hear your pet (so you don’t forget about your four-legged friend!). Dogs don’t like to “do their business” in the same place where they rest or play, so the run needs to big enough to allow for both activities.
Outdoor cats need clean, cool water, too, and they also like the sanctuary of a safe, shady spot where they can observe undetected or undisturbed. Watch where they go and improve it for them if you can with extra protection (like their own small, simple cat house) and more space. Note: The sand beach idea is not for cats; they’ll think it’s an outdoor litter box!
Sometimes cats use tree trunks as scratching posts; little trees can’t tolerate this abuse of their outer bark, so rig a collar of tape or wire to prevent the damage.
Creating space for entertainment
A popular trend these days is outdoor rooms or outdoor living, and it’s easy to see why. When good weather comes, who can resist hanging out or dining in the fresh air?
Patio gardens, decks, and terraces adjacent to the house (front, side, or back) continue to be popular because you and your guests have easy access to the house. People can easily pop inside for additional food, drink, or supplies; to use the restroom; or to dispose of trash. Screened-in spots may be necessary if you have a mosquito or other bug problem and still want to be comfortable outside. (For ideas on container gardens for patios, see Chapter 16.)
We’ve witnessed a recent boom in outdoor furniture options — styles as well as materials. From rust-resistant tables, chairs, and benches, to mildew- resistant cushions in bright colors, to handsome but practical umbrellas, you can have a set that looks great even when left out in the sun and rain. Just feast your eyes on the choices at your local home-supply store, big-box retail store, or mail-order gardening supplier. The outdoor lifestyle has never offered so many excellent and attractive choices. Choose stuff that meets your needs, is durable, and has style and color that match or enhance or set the tone for the surrounding garden. (You may also invest in attractive, fitted covers for everything to protect items from the elements when not in use.)
Outdoor entertainment areas ought to connect to the garden so that although people are enjoying indoor-style comforts and amenities, people are still able to savor the unique joys of being outside. You can incorporate potted plants (both colorful flowers and practical herbs or veggies), set out vases of flowers cut from the garden, add hanging baskets, and plant right up to the perimeters. To create a transition from the outdoor entertainment area and the garden proper (and thus gracefully blend them), repeat elements in both places — use the same or similar plants, or incorporate the same or complementary colors (complementary colors — red and green, blue and orange, and purple and yellow — are across from each other on the color wheel).
Add flair and beauty to your outdoor entertaining area with wind chimes, candles, citronella torches, lanterns, or windsocks.
Designing a sanctuary: The quiet garden retreat
A garden retreat needs to be outside and away from the busy world, where you can relax and gather your thoughts in peace, quiet, and solitude. In a sense, any garden can provide retreat for the world-weary, nerve-jangled gardener. But some backyard retreats are more soothing than others. Having a simple and undemanding landscaping and décor can encourage you to relax, not jump up to attend to garden chores or errant weeds.
You needn’t turn your entire garden to a Zen-like space. A special corner or tucked-away nook will do. Privacy, protection, and isolation are key elements of a good retreat. Think about adding a fence or wall to block out sights and, equally importantly, sounds. Less-solid screens in the shape of trellises or tall and dense plantings of trees and shrubs or even a gathering of potted plants can also enclose a space. The idea is to make a garden room accessible yet insulated. For summertime relaxation, consider a shady retreat.
Within the walls of your retreat, make a comfortable place to sit or even recline. A full table-and-chairs set is appropriate if you plan to share the space and enjoy meals or quiet cups of tea here. A hammock or a chaise lounge invites reading and relaxing.
Now consider the furnishings — namely, plants and décor:
The plants that you choose should be easygoing selections that don’t require fussing — for shade, try impatiens; for sun, marigolds or zinnias are good choices. Stick to a simple or even monochromatic color scheme, one that’s soothing to the eye.
Consider a water element, such as a small, tubbed water garden or fountain. The inherently soothing sight and sound of water can help block out distracting noises (see Chapter 17 for water garden ideas).
A judiciously employed ornament, such as a hummingbird feeder, a large clay urn, a garden statue of St. Fiacre (the patron saint of gardeners), or Buddha, can further the mood. Use simple ornaments that have meaning to you and are in keeping with your theme.
Cooking up an edible garden: Gardening for your kitchen
If you love to cook and enjoy gardening, it’s only a matter of time before you long to grow your own produce. A so-called kitchen garden can be modest in size, easy to manage, and produce all the fresh vegetables and herbs you desire. It doesn’t need to be extensive or as ambitious as a back-forty vegetable garden. (For help with such a large garden, flip to Chapter 13, remembering that it may require more space and it will require full sun.)
Because a kitchen garden exists for one reason — to generate good things to eat — planting it near your house is best. That way, you can pop out the door, snip the herbs you need or grab a few sun-warmed cherry tomatoes, and put them to immediate use. Ideally, a kitchen or dining-room window overlooks your patch so you aren’t likely to forget what’s ripe for the taking.
If your goal is to serve healthier and fresher food to your family, go for a variety of classic vegetables and herbs. Even salad skeptics may be won over after they taste a wondrous array of colorful lettuces accompanied by fresh ripe tomatoes. And kids who don’t normally enjoy vegetables can discover the joys of fresh, sweet homegrown peas and carrots.
For more on raising vegetables, consult Chapter 13; I cover herbs in Chapter 14.
Setting up your garden for international cuisine
Consider what kinds of cuisine you like to cook, and you can prepare yourself for an international feast with some of the freshest possible ingredients:
Asian: Opt for various herbs and leafy greens, plus certain kinds of eggplant and onions.
Italian: Be sure to include tomatoes, oregano, and basil, at the least.
Mexican: The easy herb cilantro is a must, as is epazote, and of course, a salsa medley of tomatoes, onions, garlic, and various peppers, hot and mild.
The easiest, most successful kitchen gardens are small and simple. You can always expand later. To get started, I recommend
Keeping it sunny: At least six hours of full sun per day is essential for good growth and ripening of almost all vegetables, herbs, and edible flowers. Morning light is preferable to afternoon because it dries the dew (reducing the risk of disease) and is less stressful than the blazing heat of midafternoon.
Setting the boundaries: Stake out a spot using string rigged between wooden sticks, or try a simpler approach: Use your garden hose as a guide. After you establish the garden, you can edge the bed with bricks or stones or commercial plastic edging. Or dig a roughly 4-inch-deep trench all around the edges. The idea is to keep any lawn grass from encroaching on your kitchen garden.
Building raised beds: If the soil in the appointed spot isn’t very good, erect a raised bed from planks standing on edge. Be sure to use untreated lumber, because some wood preservatives may be harmful to edible plants. (Unless you use the more expensive cedar, these wooden sides will eventually rot and need replacing. By then, you may be ready to expand your kitchen garden, anyway.) See Chapter 13 for info on raised beds.
Installing protective barriers: If you garden in deer, woodchuck, or rabbit territory (just to name some of the worst pests), or if you host backyard soccer games, a protective fence around your kitchen garden may be in order. Use poultry wire or wood and sink it into the ground to discourage digging invaders. If the fence doesn’t look very attractive, plant fast-growing, lightweight plants to cover it, such as morning glories.
Planting a few containers that are literally at the kitchen door: Try a small tomato plant surrounded by ‘Spicy Globe’ basil, a cut-and-come-again mix of lettuces and salad greens, and another container of your favorite herbs.
Zeroing In on Your Ideal Garden Style
After you’ve determined your basic wants and needs for your garden space, you’re ready to decide on its overall style. Gardens come in many types, themes, and moods. Yours can be informal, with less strict boundaries, a more casual look, and a wide variety of plants; or it can be formal, with symmetrical lines, crisp edges, and a limited plant palette. Or it can be one of many variations in between.
Select a style based on the architecture of your house, the lay of the land, or even an idea you saw in a magazine. Your choice also ought to take into consideration the advantages and disadvantages already inherent in your yard and gardening space, as I outline in the first half of the chapter.
Gardening around a theme
Garden design often goes beyond the types of plants you want to grow and the type of function you want your garden to have. Thematic elements can also influence the look of a garden. Do you have a soft spot for old-fashioned English rose gardens? Or Japanese Zen gardens? Or even sandy deserts filled with cacti and succulents? In the following sections, I list some popular style elements to help you continue clarifying what you may want and need.
Formal gardens
Keep formal gardens simple (see Figure 2-1). Aim for balance and symmetry so the garden has an air of calm elegance. Here are some tips:
Use strong lines and boundaries, such as groomed hedges, walkways, perhaps even a reflecting pool.
Employ single-color plantings, aiming to match or complement your house color, fence, or another element.
Add stylish pots, urns, gazing balls, or statuary. Keep everything in moderation so it doesn’t look cluttered.
Asian gardens
Asian gardens (Figure 2-2) are usually based on a garden floor, or a broad area of raked sand or stones. Choose fine-textured traditional plants, in pots or in the ground. Try bamboo, dwarf conifers, Japanese maples, iris, azalea, and flowering fruit trees. Then include Oriental-style accessories such as stone lanterns, bamboo fencing, a water basin, or even a small “tea house.”
|
Figure 2-1: A complete garden plan for a classy, formal garden. Common names are presented for plants you might want to consider using. |
|
|
Figure 2-2: A garden plan featuring an Asian-inspired design. |

|
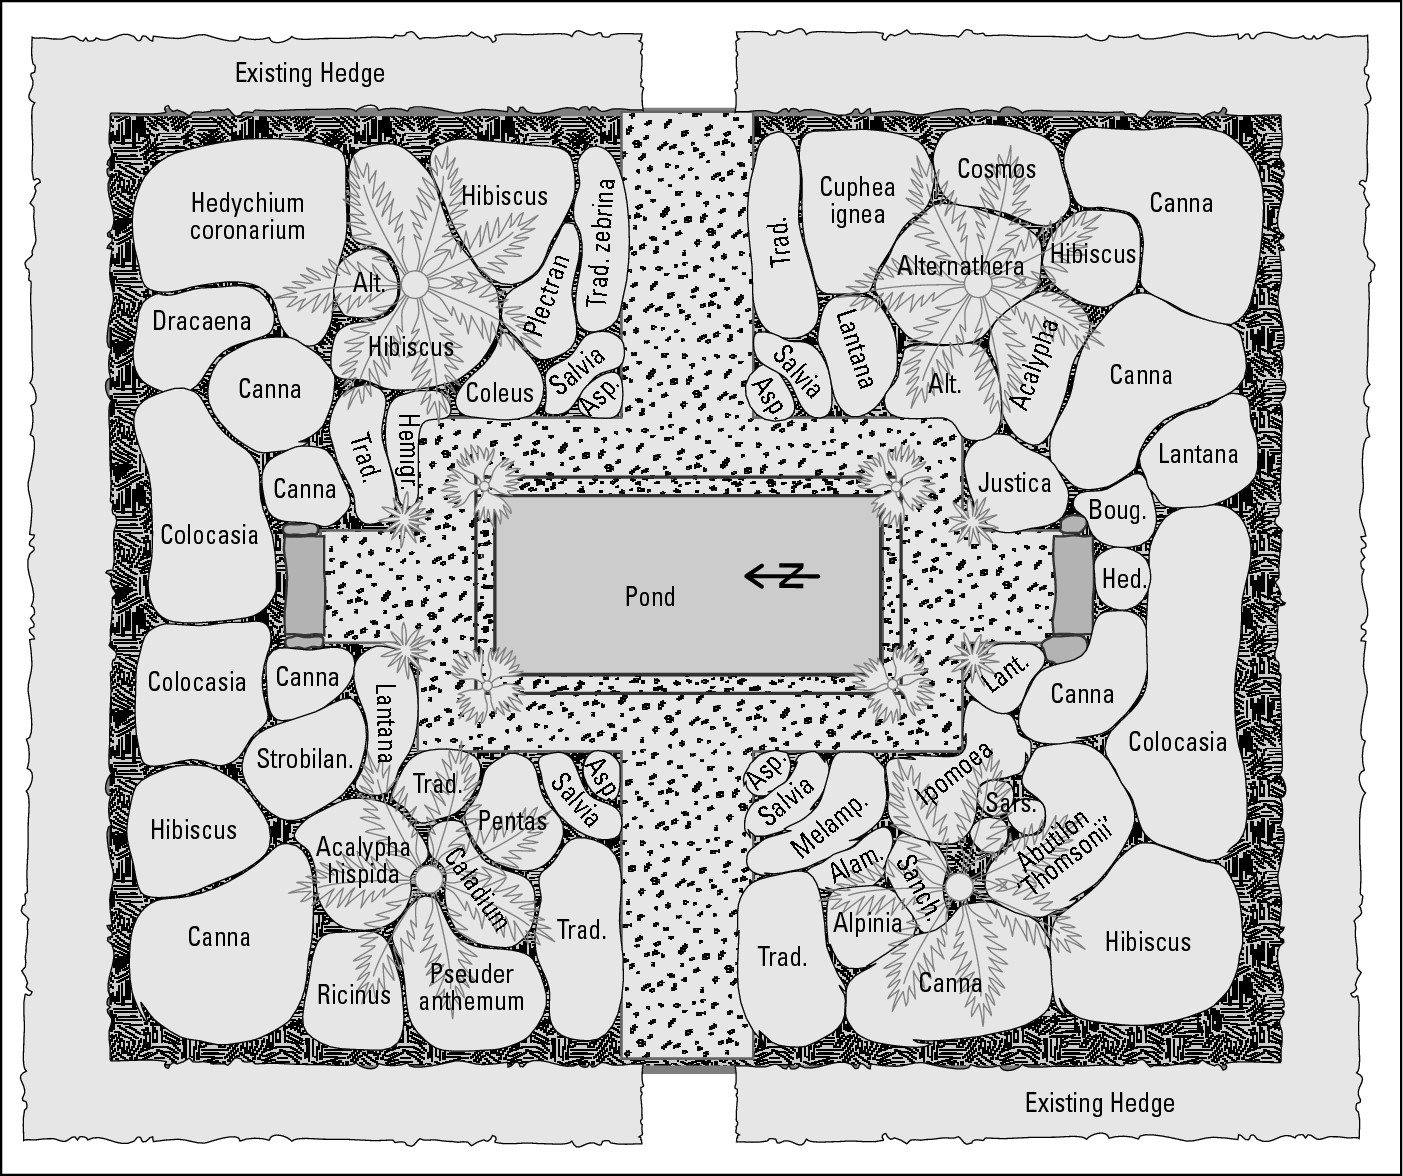
Tropical gardens
Put a piece of paradise in your own backyard. Tropical gardens (Figure 2-3) emphasize lots of big, bold, leafy foliage plants (such as cannas, coleus, hibiscus, and taro) in the ground or in large containers. Use bright flowers in hot colors: yellow, red, and orange, as well as bicolors. Then include a water feature, such as a pool, fountain, or stream. You can add drama with extras: birdhouses or cages, colorful pots, gazing balls, and playful or handcrafted décor and statuary.
|
Figure 2-3: A garden plan featuring a planting with a tropical feel. |

|
Cottage gardens
Cottage gardens should be overflowing with colorful blooms, so plant these inviting, informal gardens with a generous hand. Include lots of roses and other fragrant plants (including herbs). Keep the plants well-tended (remove spent flowers and stems) but allow them to express their natural exuberance. Finally, add some charming touches — a picket fence, an arbor, whimsical birdhouses, or wind chimes.
Dry climate gardens
If your area is a little on the parched side, you may want to opt for a dry climate garden. Employ a naturalistic layout, perhaps with a dry streambed or stone pathways, and choose plants that thrive in hot sun, including but not limited to cacti and succulents. Then strategically place accents of colorful or more water-needy plants in pots or in groups.
Woodland gardens
Woodland gardens, which are often shady, include groundcovers that flower as well as bulbs (for lots of spring color). For fall color, you can plant some native asters.
This garden is most practical if you already have a well-treed lot. Tall deciduous hardwoods like oaks, beeches, and maples are ideal because they provide a high canopy with diffused shade. Seek out diverse forms and colors for the larger plants, from bold hostas to lacy ferns. You can then tuck in non-plant items for color and interest, such as ornaments and garden furniture.
An inspired idea: Perusing books, magazines, and local gardens
As part of your narrowing-down process, have fun as you gather inspiration. Thumb through back issues of gardening magazines, flagging beautiful photographs and helpful articles. Grab a few of those arguably fluffy gardening magazines you often see at the checkout stand at the grocery store (technically, they’re called SIPs, or Special Interest Publications). These publications tend to be heavily photo-driven, lighter on the actual how-to information, but that’s the dreamy stuff you want right now.
Also check the gardening books you already own, both practical ones and coffee-table books, and do the same. Visit a well-stocked bookstore or the book section at a garden center and do some more prospecting. Buy a few titles if you find something wonderful and useful.
And don’t forget the gardens that aren’t too far beyond your front door. Bring your camera as you visit your local botanical garden or arboretum, and take advantage of local garden tours. Walk around surrounding neighborhoods and take pictures of gardens or vignettes that pique your interest.
The object of this exercise is to fill your mind with enticing images of what’s possible. You also get to see how other gardeners — in various regions, with different types of yards — have pulled off their woodland garden or cottage garden or whatever you’re aiming for. Study their creativity and their solutions; they can help you clarify your vision.
Tackling the paste-and-ponder method
Some people find their ideas jell best given a little time. If you have an available wall or large bulletin board, try this: Rip out inspirational photos from magazines, gather your photos, and tack them up. Make the display orderly or make it a collage. Then leave it there and walk by every now and then, pausing to admire and study it. Add to it, shift things around, and take pieces away.
This admittedly informal method can really help clarify your thinking and consolidate your planning, especially if you’re a visually oriented person. The paste-and-ponder method also helps you keep your eye on the prize, so leave the board up for a while.
Making Sure Costs Don’t Outgrow Your Budget
Having a good garden, or a series of smaller gardens on your property, does cost money. Fencing materials and paving stones aren’t cheap. Garden furnishings and décor aren’t cheap. Big plants, special small plants, and pots aren’t cheap. Potting soil and loam aren’t cheap. Fertilizer and pesticides aren’t cheap. It all adds up. And, frankly, budgeting is hard when you’re dealing with an ongoing project whose look is likely to evolve.
So here’s my main advice: Relax. Rome wasn’t built in a day. Take small bites, if need be. Tackle one project at a time and see it through, and then move on to the next one. Or divide a large project into sections and allow yourself time — even several seasons or years — to complete it.
One place where you can save money is labor — use yourself, involve your partner or your kids, bribe friends with dinner, or hire neighborhood kids. And remember that, fortunately, gardening is one of those experiences in life whose journey can be as satisfying as the destination.
Grow plants from seed.
Divide perennials and shrubs and move the pieces to other parts of your yard. (See Chapter 7 for info on how to divide perennials.)
Get plants from other gardeners — some people may simply give you their unwanted surplus; others will be happy to swap. Join a local garden club, and you may be assured of these transactions!
Make your own compost (see Chapter 4 for tips). And always compost your fall leaves instead of bagging them and sending them off to the local landfill.
Buy from the source, whether it’s a special daylily nursery nearby or a local brickyard.
Browse yard sales, junkyards, and antique shops. You may happen across real bargains in garden ornaments as well as pots, gates, trellises, fencing, and so on.
Last but not least, take care of your investments. It’s a sad waste to let good, costly plants or garden areas languish or die. The more you know about soil, about planting, about plant care — and this book is chock-full of useful advice — the easier it’ll be to do right by your garden. A thriving garden can repay you many times over.
Bringing Your Garden Ideas to Reality
Now’s the time to start getting real. Armed with your ideas and goals and wishes, step outside and bring your plans to life. Some gardeners find that the best time to do this step is fall or winter, when you have fewer distractions from overgrown plants and seasonal clutter. The outline and the “bones” of a yard are more evident then. But whenever you do this step, look beyond what’s present. Visualize what will change and what will go in.
When you’re ready to sketch out your garden plan, you can do it yourself or, if it seems daunting or is simply not your cup of tea, you can hire a licensed professional (see “Getting Professional Help for Your Garden Plans,” later in this chapter). Your overall garden plan doesn’t have to be precise or perfect. It just has to do what you need it to do — show you your yard so you can plan what you want to put into it.
Computer-aided design: Embracing your inner (garden) architect
Once the province of professionals, garden planning software is now available to the general public. Computer programs can take you through entire planning processes and generate detailed plans, alternate plans, and close-up plans. Some come with extensive plant databases. Others offer impressive show-and-grow features to help you visualize what your yard will look like next year, five years from now, and so on.
To use one of these programs, you need
Time and patience: You have to study and decipher these programs to understand what they can do, especially if you have no landscaping training. The journey should be as intriguing to you as the destination, or else you’ll get frustrated.
Money: These programs vary a great deal in their cost. The ones designed for amateurs aren’t that expensive and have many of the features you need. If you want a full-blown design program like the professionals use, you’re talking about a sizable chunk of change, but they’re still cheaper than hiring someone.
Good equipment: An old Mac or PC will choke on today’s gardening software; you need a powerful machine with plenty of available memory and speed. If the computer runs your kids’ video games well (or yours, for that matter), it’ll do a decent job with most design programs.
You don’t need a fancy large-format or color printer, though — just burn a disc of your plan, take it down to a good copy shop, and have someone else whip up the visuals.
To find software that suits your skill level and needs, do an Internet search, examine advertisements, order brochures, and of course, talk with anyone you know who’s used one. Some community colleges, Cooperative Extension Services, and adult-education programs offer classes in using this software — they’re worth looking into!
Sketching out the yard you have now
Using graph paper and the tools necessary to draft out your garden (see Figure 2-4), draw a plan of your site to scale, say 1/4" for each foot. Plot every feature you find on your site, both natural and those you or your predecessors have put in place. Use a measuring tape to get at least approximate measurements. You may want to indicate areas of sun and shade.
If you’d like, you can also use photography to help sketch out your plans, Photograph panoramic sequences of every part of your property, as well as external features (such as views) you may want to enhance or hide. Paste them together to form a wide-angle shot.
Making your drawing match your dream garden
After you’ve completed the initial drawing of your yard or garden plot to your satisfaction, you can move forward and add the elements for your garden plan. Here are some recommendations:
1. Gather any pictures you’re using for inspiration, and prepare a list of your main goals, assets, and limitations.
Go to the earlier section titled “Taking Stock: Evaluating What You Already Have” for advice on looking at your yard’s challenges and advantages. “Getting Ideas for Your Garden Space” can help you focus on your gardening goals.
2. Study your current plan carefully.
Decide which features you want to incorporate into your final plan, which ones you want to highlight, and which ones you want to downplay or remove.
3. Place a piece of tracing paper over your plan.
4. Use a pencil and sketch in or leave out various features and designs.
Try hard to stick to your theme or overall vision, and attempt to be organized (see “Zeroing In on Your Ideal Garden Style” for details on themes).
When designing your garden plan, you don’t have to get bogged down in details, listing every plant by name. Instead, “sun-loving perennials,” “blue and yellow bed,” or “pots of annuals” may suffice.
|
Figure 2-4: There are many ways to draft out your garden plan, but here are the tools you need to get started. |

|
After all the elements you’ve planned for are in place, take a good look at them to make sure the overall drawing matches the initial image of the dream garden you had in your head. If something looks awkward or looks like it needs to be moved or changed in any way, do so! Keep changing that drawing (and redrawing it if necessary) until you have a final plan that satisfies you. Only when your final plan is in your hands should you prepare yourself to move on to the next step.
Defining key areas so you know where to start
With your sketched yard in hand, your next step is to decide which area you want to start with and to roll up your sleeves. As I repeatedly advise, tackling everything at once isn’t easy and often isn’t realistic or affordable. Break big projects down into manageable pieces, and do them one at a time.
Like rooms in a house, a garden area has four major elements. And as in building a house, going from the ground up is best. Tackle the four major elements in this order:
1. Floor
Lawn grass, a groundcover, paving materials, or good, plantable soil
2. Walls
Supplied literally by a wall of your house; by a fence, hedge, or trellis; or by backdrop of evergreens or shrubs of some kind
3. Ceiling
Can certainly be open sky but may also involve an umbrella, awnings, overarching tree or large-shrub branches, or a pergola with or without a cloak of plants
4. Furniture
Literally tables and chairs and benches and the like, but also major containers or garden ornaments and décor
Don’t go overboard with garden gnomes and pink flamingos. Limit yourself to one or two ornaments and keep the focus on the sense of space and the living parts of your garden.
A word in defense of boundary materials
Call me fussy, but I like enclosures and edgings in a garden, which in the context of the key areas in this chapter, can be walls or floors or portions thereof. I mean bricks, stones, plastic materials, wood, iron, and of course, also living plants.
Enclosures and boundaries distinguish the cultivated area from the wild or neglected areas beyond. They embrace the plants and the people enjoying them. They create a sense of order and intimacy so you can focus on and savor what the garden contains and has to offer your senses.
Boundary materials also set the tone for a garden, making it feel formal or informal, elegant or casual. Wisely chosen, they connect a yard to a house or a yard to the surrounding landscape. They enhance the scene and flatter your plants without stealing the spotlight. Good-quality materials endure for years and look like they belong.
Getting Professional Help for Your Garden Plans
Getting a garden plot ready, especially a large one, isn’t easy, and I don’t pretend that it is (I have better uses for my creative energy, such as pretending I’m in Hawaii). If starting the process makes your head reel, or if you don’t have confidence in your design sense, don’t worry. Others can do it for you. They can do everything, in fact, from planning on paper to purchasing to digging the holes and planting the plants. You can confer with or hover over them, or wind them up and let them go. You can even stop them at the point where you want to take over.
Also, be honest with yourself when a project is beyond your ability, unsafe for you, or too time-consuming to undertake on your own. Under such circumstances, go ahead and hire a contractor.
Before you check the yellow pages, ask around. Word-of-mouth is an ideal way to get started.
Find a minimum of three possible contractors. They should be willing to make an initial appointment that involves assessing and estimating only; be sure to ask whether they charge for this step (and whether, if you go with them, the fee can be credited to the job).
When the professionals arrive, have some copies of your plans to show and, if need be, hand them over.
Ask for a bid in writing. Materials and labor estimates. With a clause for addressing unexpected expenses and overruns. To figure out what a reasonable cost would be, ask friends and neighbors what they paid, and get estimates from multiple sources.
Check references. Also confirm that the contractor is both licensed and insured.
Pick someone you like and, more importantly, can communicate with.
Discuss concerns every step of the way — the more communication, the better. If changes come up, be smart and get the revised plans and charges in writing.
Pay in installments — give a deposit, then perhaps pay a second installment or more, and finally pay the last one when all parties agree the work is complete and satisfactory. Such an arrangement gives the contractor security and a commitment from you but also prevents you from being taken for a large fee if something goes awry.
Overall, just be clear with one another. Have a budget. Get written estimates. Get your agreement (plan, expectations, and timetable) in writing. Call or visit references. Check and/or supervise the work.
Landscape architects, landscape designers, and garden designers
Landscapes versus gardens, architects versus designers — confusing isn’t it? Various names apply to this group of professionals. Although they each perform a service, you may find quite bit of overlap.
Landscape architects, landscape designers, and garden designers are all professionals, trained in every facet of planning and realizing an outdoor plan. Their scope goes beyond regular backyard gardens or even the landscaping of an estate; many of these folks are capable of laying out a resort, college campus, public park, and so on. They can cope with topography and know how to analyze a site completely, down to its soil and light and existing vegetation. They can design walkways and decks and such in savvy and attractive ways. They can then draw up a design or several alternatives.

All concerns about cost aside, hiring someone like this to do your yard is a marvelous investment. These professionals tend to notice and address elements and problems you may not have thought of; they propose appropriate and attractive solutions; and they have wide knowledge of both plant material and hardscape components. They’re the full planning package.
To find one of these experts, you can consult ads, the Internet, or the yellow pages. Word of mouth may work. If you know of someone who’s used one in your neighborhood or town, try to visit and ask the owners how the process went, whether they’re happy, and perhaps — if asking doesn’t seem too tacky — what it all cost. Garden tours in your area may feature professionally done properties, too, which can also lead you to the person who designed a beautiful garden.
Landscape or general contractors
If you’re daring (or foolish), maybe you’ll try to take down a massive shade tree or regrade a slope or install an in-ground irrigation system or lay out and install a flagstone terrace. Before taking this step, think whether the money you’re saving will be enough to pay for the chiropractor you may need afterwards!
But seriously, if you’re not used to this work, you can do a lot of damage to you and your landscape. Don’t be afraid to ask someone for help to create your vision: somebody strong enough, experienced, and knowledgeable; somebody certified, bonded, and insured as well. A reputable contractor has no problem demonstrating his or her qualifications. Getting help isn’t wimpy; it’s only good sense.
In short, let someone else do the hard jobs and do them safely and correctly the first time. These folks can install all your residential hardscape needs like walks and walls. Save the fun and creative parts for yourself.
To find a landscape or general contractor, check the yellow pages; ask neighbors; ask at a garden center; check ads in the local newspaper; or copy the number or Web site off a truck parked at another home.
Master gardeners
Certification follows only after the student has completed additional classes and a certain number of hours volunteering in the community. The volunteering can involve anything from manning the phone help line to assisting with community plantings (including school gardens), working with 4-H, holding plant clinics at garden centers, staffing county and state fair booths, assisting with horticulture therapy projects, or helping with workshops that educate the public about gardening.
The hours and courses required for certification varies from office to office, state to state. Getting certified doesn’t make a person an expert; it just shows that he or she has made a commitment to learning more about and serving in the local horticultural scene.
To find a master gardener, call the nearest office of the Cooperative Extension Service. You can also run an Internet search or go to www.ahs.org/master_gardeners/index.htm.