Basic Techniques
These are techniques that are used throughout this book. Check the instructions for the project you are doing to determine if it incorporates any of these and, if so, take a few minutes to learn the steps.
INTEGRAL EMBELLISHING: BEAD CROCHET
While embellishing is usually reserved for the “finishing” section of a pattern, crocheting beads into a garment is really a separate technique from embellishing that often uses beads as applied accents.
There are many types of bead crochet stitches, ranging from at what point a bead is placed into the stitch to the type of stitch into which a bead is placed, and how frequently the beads are added. Bead crochet is usually worked on a wrong-side row, so that the bead will be on the right side of the fabric when the row is completed.
There are five different types of bead crochet used throughout this book:
- bead chain
- bead single crochet
- bead half-double crochet
- bead double crochet
- bead slip stitch
Each of these techniques is described below, and will be referred to in the pattern instructions. While there are several different ways to execute each of these techniques, usually at what point in executing the stitch the bead is slid down to the hook, we wanted to keep this book as easy-to-follow as possible, so only those techniques used in the pattern instructions are described here.
BEAD CHAIN (BC)
Note: There may be a bead on every chain or every other chain or whatever spacing the designer calls for in the pattern instructions.
- Thread the yarn with the appropriate number of beads.
- Begin by making a slip knot on hook; yarn over hook and pull up a loop (first chain).
- Slide down a bead as close to the hook as it can go.
- Yarn over and pull through a loop one; chain worked after the bead.
- Continue in this manner, working the number of chains indicated in the instructions between each bead.
BEAD SINGLE CROCHET (BSC)
Note: There may be a beaded stitch for every stitch, every other stitch or however many beads the designer calls for on a single row. This is also true for bead double crochet and bead slip st.
- Thread the yarn with the appropriate number of beads.
- Work the foundation chain as indicated.
- Work in stitch pattern until you reach the first row using beads.
- Insert hook in next stitch, yarn over and pull up a loop.
- Slide a bead down as close to the hook as it can go.
- Yarn over and draw through both loops on hook (bsc) or all 3 loops on hook (bhdc); one stitch has been worked, with the bead enclosed in the stitch.
- Continue in this manner, working the number of stitches indicated in the instructions between each bead.
BEAD HALF-DOUBLE CROCHET (BHDC)
- Thread the yarn with the appropriate number of beads.
- Work the foundation chain as indicated.
- Work in stitch pattern until you reach the first row using beads.
- Yarn over hook.
- Insert hook in next stitch, yarn over and pull up a loop.
- Slide a bead down as close to the hook as it can go.
- Yarn over and draw through both loops on hook all 3 loops on hook; one stitch has been worked, with the bead enclosed in the stitch.
- Continue in this manner, working the number of stitches indicated in the instructions between each bead.
BEAD DOUBLE CROCHET (BDC)
- Thread the yarn with the appropriate number of beads.
- Work the foundation chain as indicated.
- Work in stitch pattern until you reach the first row using beads.
- Yarn over hook.
- Insert hook in next stitch, yarn over and pull up a loop.
- Slide a bead down, as close to the hook as it can go.
- (Yarn over and draw through two loops) twice; one bdc has been worked, with the bead enclosed in the stitch.
- Continue in this manner, working the number of stitches indicated in the instructions between each bead.
BEAD SLIP STITCH (BSS)
- Thread the yarn with the appropriate number of beads.
- Work the foundation chain as indicated.
- Work in stitch pattern until you reach the first row using beads.
- Insert hook into next stitch.
- Slide a bead down, as close to the hook as it can go.
- Yarn over and draw through the stitch and the loop on hook; one slip stitch has been worked, with the bead enclosed in the stitch.
- Continue in this manner, working the number of slip stitches indicated in the instructions between each bead.
Beads come in an almost mind-numbing variety of shapes and sizes, but what, to me, seems to be more important for both bead crochet and bead embellishing is the size of the bead’s hole. This determines whether or not you can thread yarn or sewing thread through the bead and what tool you will need to do so. Since beads come in such a variety, I felt it best not to display any here but to focus on the tools you’ll need for various projects in this book.
Beads’ outer dimensions are sized in millimeters (mm), but the holes are not sized, so it’s important to know if the bead you’d like to use can be worked using the technique the pattern calls for. Mostly, it’s just a matter of “eyeballing” the bead’s hole, but if you’re ordering beads by mail, be sure the catalog company shows a side view of the bead’s hole before you order. In cases where there are lots of the same bead used or where I felt the bead may be hard to find, I’ve listed the name and item number of the bead and the bead manufacturer and listed its Web site (see “Resources” at the back of this book). With the increasing popularity of using beads in knitting and crochet, there are more and more beads with ample-sized holes that are quite suitable for bead crochet.
Obviously you’ll need a crochet hook for the basic construction of the garment. But when it comes to beads, the only size hook suggested in this book (other than for bead crochet) is a size 11 steel hook.
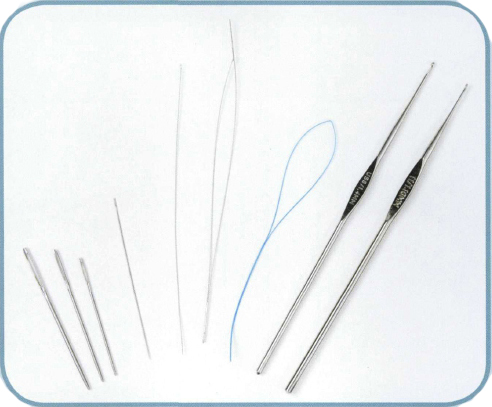
FROM LEFT TO RIGHT IN THE ABOVE PHOTO ARE:
- Three sizes of tapestry needles, from size 16–22 (the higher the number, the smaller the needle). These are also used for the embroidery found in this book.
- A traditional small-eye beading needle.
- A large-eye beading needle made from two small wires twisted together (not good for sewing through crocheted fabric, but helpful for making beaded fringes, etc.).
- A “large eye” beading needle (made from two pieces of wire soldered together, leaving a very long “eye.” ) This needle can be used to sew through crocheted fabric as long as it’s not too densely crocheted.
- A dental floss threader. This is one of my favorite tools to use—not only is it widely available and very cheap, but it threads beads onto yarn quite well.
- Steel crochet hooks used to insert into beads and hook a loop of sewing thread that is pulled through a small-holed bead.
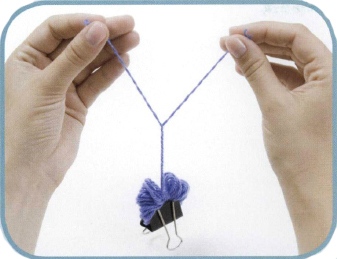
A number of patterns in this book call for splitting 4-ply yarn into two 2-plies—even four single plies, primarily used for embroidery and beading.
This is quite simple, as you can see in the photo above.
- Wind off the length of 4-ply yarn called for in the pattern.
- Leaving approximately 1 yard free, wind the remaining yarn into a loose ball.
- Secure the ball with a yarn needle to hold the ball intact, or attach a clip to the ball for weight, as shown above.
- Separate the unsecured yarn end into two 2-ply strands, allowing the ball to spin freely.
- Wind each 2-ply strand onto an embroidery floss bobbin.
- Release another yard of yarn from the ball, secure it again with the yarn needle or clip.
- Repeat Steps 4–6 until the entire length of yarn has been separated into 2-ply strands.
- If the pattern calls for a single ply, you can repeat the above process with a 2-ply strand to get two single-ply strands, but be aware that these are fragile and can pull apart easily, so treat them gently.
IMPORTANT NOTES TO PATTERNS
- Patterns are written with suggested crochet hook sizes. Be sure to check your gauge before beginning a project, using the hook size that achieves the gauge.
- Difficulty ratings are for the difficulty level of crochet, not for embellishing. Some projects will be easy to crochet and easy to embellish, others easy to crochet but more challenging to embellish. Be sure to read through the pattern ahead of time to note the embellishing required.
- Schematics given are for the actual size of the crocheted pieces before they are assembled. They are not finished measurements, which will differ from schematics measurements.
- While all of our readers have heard this many times, I cannot emphasize the importance of testing for gauge. It may not matter for wraps, purses, scarves and shawls, but to achieve not only a good fit but the right look for your project, be sure to check the gauge.
- Also, if you are using yarns with a dye lot printed on the label, be sure to purchase enough yarn of the same dye lot to complete your garment.
IMPORTANT NOTES ABOUT THE CARE OF YOUR EMBELLISHED PROJECT
Most, but not all, of the yarns used in Embellished Crochet are machine washable and dryable. Be sure to check the label on the yarn before you wash or dry your garment. However, if you have used glass beads that could break or get scratched in a washing machine and dryer, consider hand washing the garment and rolling it in a towel to get out most of the moisture, then laying flat to dry. Some beads can also snag yarn, so also take care when washing these garments—and try to choose beads without uneven or irregular edges.
So now you’re well-armed to begin your journey through Embellished Crochet ! Have fun!