This forgotten gem, against a minor Argentine master, shows how Fischer used optimism as an asset. Facing serious threats while still in the opening, he repeatedly rejects safe moves in favor of complex alternatives which hold out the prospect of a quick win. Fischer is the first to err – but his opponent immediately returns the favor and quickly loses.
Osvaldo Bazan – Fischer
Mar del Plata 1960
Queen’s Gambit Declined, Ragozin Variation (D38)
1 |
♘f3 |
♘f6 |
2 |
c4 |
e6 |
3 |
♘c3 |
d5 |
4 |
d4 |
♗b4 |
5 |
cxd5 |
exd5 |
6 |
♗g5 |
h6 |
7 |
♗h4 |
c5 |
8 |
e3 |
♘c6 |
9 |
♗e2 |
|
This opening was highly controversial around 1958-62 because of Black’s ability to grab pawns. At Bled 1961, Fischer grabbed and won against Portisch after 9 ♗b5 ♕a5! 10 ♗xc6+ bxc6 11 ♗xf6 ♗xc3+ 12 bxc3 ♕xc3+ 13 ♘d2 gxf6 14 ♖c1 ♕d3 15 ♖xc5 ♖g8!.
9 |
... |
g5 |
10 |
♗g3 |
♘e4 |
11 |
♖c1 |
♕a5 |
12 |
0-0! |
|
White will obtain excellent compensation.
12 |
... |
♗xc3 |
13 |
bxc3 |
♘xc3 |
14 |
♕e1 |
♘xe2+ |
Only White has serious winning chances in the 14...♘e4 15 ♕xa5 ♘xa5 16 dxc5 endgame.
15 |
♕xe2 |
c4 |
16 |
e4 |
|
In the post-mortem Bronstein recommended 16 ♘e5! followed by f2-f4 or ♕h5 and this was borne out by later games that went 16...♘xe5 17 ♗xe5 ♖g8 18 f4 with advantage.
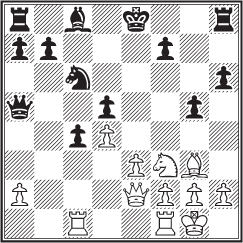
16 |
... |
♗e6 |
Did Fischer know he was accepting a challenge? Or did he instinctively reject 16...dxe4 17 ♕xe4+ ♗e6 18 ♖xc4 ♕d5 and 16...0-0 17 exd5 ♕xd5 18 ♕xc4 ♗e6 as being too hard for Black to win because of the bishops of opposite color?
17 |
♗c7?! |
|
Objectively a bad, almost losing move – but this is not known for another 11 moves.
17 |
... |
♕xc7 |
Black should avoid 17...♕b5 18 a4 ♕xa4 19 exd5, which distinctly favors White. But he could have ducked the challenge with 17...b6, after which 18 ♖fd1 is unclear.
18 |
exd5 |
g4! |
White has the upper hand after 18...♕d7 19 dxe6 ♕xe6 20 ♖fe1. And he has better chances than in the game after 18...0-0-0 19 dxc6 ♕xc6 20 ♘e5 or 19 dxe6 ♘xd4 20 ♕xc4.
♘d2 |
|
The attack evaporates soon after 19 dxe6? gxf3 20 exf7+ ♔f8! 21 ♕xf3 ♕xf7.
19 |
... |
♘xd4 |
20 |
♕e4! |
|
The complications also favour Black after 20 ♕e3 ♕f4!. For example, 21 dxe6 ♕xe3 22 exf7+ ♔e7! 23 fxe3 ♘e2+ or 21 ♖xc4 ♕xe3 22 fxe3 ♘e2+ 23 ♔f2 ♗xd5 24 ♖c5 and now either 24...g3+ 25 hxg3 ♘xg3! 26 ♔xg3 ♖g8+ or just 24...♗xa2.
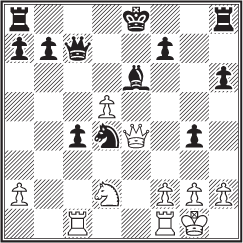
20 |
... |
♕f4!! |
A magical move (21 ♕xf4 ♘e2+) that Black had to have seen much earlier, since 20...0-0-0 allows 21 dxe6! (much better than 21 ♕xd4 ♗xd5 or 21 ♖xc4 ♘c6 22 dxc6 ♗xc4 23 cxb7+ ♔b8).
21 |
♖xc4! |
|
Not 21 ♕e1 b5. After 21 ♕xf4 ♘e2+ 22 ♔h1 ♘xf4 23 dxe6 Black keeps his extra pawn with 23...♘xe6 26 ♖xc4 h5 but has greater winning chances with a two-pawn edge on the queenside after 23...b5 24 exf7+ ♔xf7.
21 |
... |
♕xe4! |
Black has no rea1 edge after 21...♕xd2 22 ♖xd4 ♕xa2 23 ♖c4!.
22 |
♘xe4 |
♘e2+ |
This knight remains trapped behind enemy lines for another eight moves yet plays a key role in the defense.
23 |
♔h1 |
♗d7? |
Simpler is 23...f5! 24 dxe6 fxe4.
24 |
♖e1 |
♔f8 |
A clever way of stopping ♘d6+ and also enabling Black to meet 25 ♖xe2 with 25...♗b5.
But smoother is 24...♔e7 25 ♖xe2 ♖hc8! when there is no strong discovered check.
25 |
♘f6? |
|
With 25 ♘d6! White should not lose – and that was enough reason to kill its chances for inclusion in My 60 Memorable Games.
25 |
... |
♗b5 |
26 |
♖b4 |
♗a6 |
27 |
♘d7+ |
♔e7 |
Not 27...♔g7?? 28 ♖xg4+ and mates.
28 |
♘c5 |
|
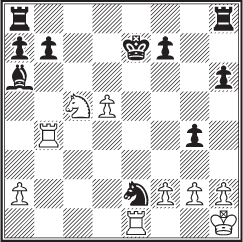
28 |
... |
♖he8! |
This indirectly protects the knight and threatens 29...♔d6 30 ♘ moves ♘g3+.
♘xa6 |
♔d6! |
|
30 |
♖xb7 |
|
White had nothing better (30 ♖d1 ♘c3).
30 |
... |
♘g3+ |
31 |
hxg3 |
♖xe1+ |
32 |
♔h2 |
♖c8! |
33 |
♖xf7 |
♖cc1 |
Mate on h1 is threatened.
White resigns