
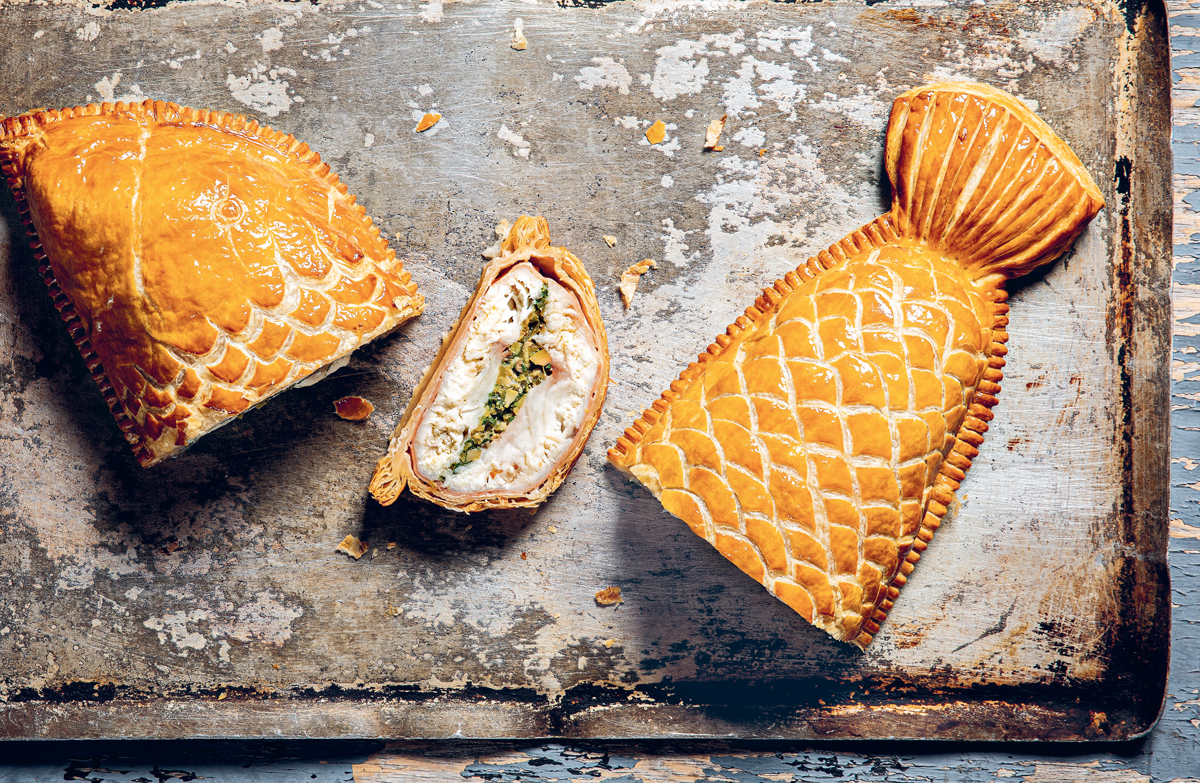
Stuffed Sea Bass en Croute
Sometimes there are moments at work where I stop and giggle at what I actually do for a living, whether it’s running around a toyshop looking for parts to make a mechanical pie that has been commissioned or hiding away in a room in the British Library looking at ancient recipes. Don’t get me wrong, this job can be incredibly tough at times, but I do feel lucky to be doing what I love.
I have very fond memories of making this dish in Las Vegas for a collaboration dinner we were invited to cook at by chef Joshua Smith from Bardot Brasserie. Josh is my type of chef, cooking classically with great ingredients with a clear honesty in his food. He is also a complete dude and he and his amazing wife Signe remain friends to this day. For the dinner he wanted a night of pure classics, with crafted dishes steeped in history, so we had an antique duck press at the table at one point and the most incredible, theatrical desserts from the pastry team. There was a point early in the day of the event where six of us were all making the pastry scales together for the sea bass en croute. It was a moment of joy in a hard, busy week, all of us kind of looking at each other thinking, ‘we actually get paid to make giant pastry fish’. This is a slightly simpler version of the sea bass en croute served that night, but just as joyous to make and no less tasty.
SERVES 6
2 large whole sea bass fillets, minimum 500g each, pin-boned and scaled
1 teaspoon table salt
10 slices (150g) prosciutto crudo
600g classic puff pastry (or shop-bought)
2 egg yolks beaten with 2 teaspoons water, for brushing
White Butter Sauce, to serve
For the stuffing
100g pitted green olives, finely chopped
100g gherkins, finely diced
30g capers, finely chopped
30g flat-leaf parsley, leaves picked
zest of 1 lemon
To make the stuffing, combine the olives, gherkins, capers, parsley and lemon zest in a bowl. Lay the two sea bass fillets skin side down and season with the salt. Spread the stuffing mixture over one fillet and then sandwich the other on top with the skin side facing up.
Tear off a sheet of clingfilm large enough to wrap the fish. Lay the prosciutto slices on the clingfilm, slightly overlapping one another, to make a rectangle. Place the stuffed fish along the bottom edge of the rectangle and then roll to wrap it in the prosciutto slices. The fish should be completely sealed within the prosciutto. Tightly wrap the whole thing in clingfilm and chill in the refrigerator for 20 minutes.
Line a large baking tray with parchment paper. On a lightly floured surface, roll out one-third of the pastry to a 5mm thick oval (with a tail, if you like, large enough for the fish to fit with at least a 5cm border around the outside. Remove the fish from the refrigerator and unwrap the clingfilm. Place the fish in the middle of the pastry and brush the area that is exposed around it with egg wash.
Roll out the remaining pastry again to a 5mm thick oval, but this time one-quarter bigger than the previous shape. Lay the pastry over the top of the fish, smooth it down with your hands to make sure there are no air pockets and then seal it down to the pastry base. Slide the pastry parcel onto the lined baking tray and chill in the refrigerator for 10 minutes to firm up a little.
Remove the tray from the refrigerator and, using a fork, work around the edges of the pastry base, pressing firmly to leave the imprint of the tines. If necessary, dust the fork with a little flour to stop it sticking. Trim the edges of the pastry to accentuate the fish’s shape and then lightly brush with egg wash all over. Rest in the refrigerator for 30 minutes.
Preheat the oven to 200°C fan/220°C/gas mark 8.
Using a small sharp knife, score scale shapes down the length of the pastry, being careful not to cut right through the dough. Brush the pastry again with more of the egg wash. Place the tray in the preheated oven and bake the fish for 25 minutes, until the pastry is golden brown. Serve immediately with the butter sauce.
Stuffed Sea Bass en Croute


Honey & Five-Spiced Glazed Ham
When done properly, a glistening, mahogany-coloured, honey-glazed roast ham in the middle of a dining table is jaw-dropping. As it feeds so many, a ham is great for any large family gathering, where people can come and take a slice off whenever they feel like it. Plus there is the benefit of leftovers the next day too. It is important to use a pan big enough to cook the whole ham, as it will need to be submerged in water throughout the entire cooking process – so beg, borrow or steal a giant pan if you don’t already have one.
SERVES 12
5kg bone-in, unsmoked gammon joint
2 celery stalks, roughly chopped
2 carrots, peeled and roughly chopped
1 onion, peeled and halved
1 leek, roughly chopped
3 garlic cloves
4 bay leaves
40 cloves
150ml runny honey
1 teaspoon five-spice powder
Equipment
digital probe thermometer
Put the gammon joint in a large pan and cover the meat completely with cold water. Bring to a simmer over a low-medium heat; skim off and discard any scum that rises to the surface of the water until it has mostly stopped. If necessary, top up the pan with more water. Add the celery, carrots, onion, leek, garlic and bay leaves and bring back up to a simmer.
Gently simmer the gammon for 2½ hours, topping up with more water as necessary so the meat is always covered. If your pan is not quite large enough to cover the meat completely, turn the gammon over halfway through the cooking time. If your gammon joint weighs less than 5kg, simmer for 20 minutes per 500g.
Insert a digital probe thermometer into the centre of the gammon joint. It needs to read 70°C or above. If necessary, continue to cook the meat until it reaches the required temperature.
Preheat the oven to 190°C fan/210°C/gas mark 7.
Wrap a clean dish towel around the largest exposed bone at the top of the gammon joint, and carefully pull the meat out of the pan and place it in a roasting tray on a chopping board. Set aside the cooking liquid to use later for the glaze.
Using a small, thin knife, carefully strip the rind from the outside of the gammon joint, leaving the layer of fat underneath intact as much as possible (this will protect the meat and stop it drying out). Let the rind fall into the tray. Without slicing into the meat, score the fat in a decorative diamond pattern: take the knife from one corner to the other, scoring parallel lines 2cm apart, then repeat in the opposite direction. Push a single clove into the centre of each ‘X’ or the corner of each diamond shape. Remove all the rind from the tray and discard.
Place the tray in the preheated oven and roast the gammon joint for 10 minutes. After the first 10 minutes, turn the tray in the oven and cook for a further 10 minutes.
Pour 2 medium ladlefuls of the reserved cooking liquid into the roasting tray. (The remaining cooking liquid can either be discarded or used as a stock for soup, however, it will be quite salty so be careful with seasoning.) Add the honey and five-spice powder to the tray and mix with the cooking juices in the bottom of the tray to make the glaze. Baste the meat all over with the glaze, pushing it into the scored lines with a brush, and then return to the oven for a further 10 minutes. Continue to baste the gammon joint every 5 minutes, turning the meat in the tray each time until it is covered in a sticky glaze.
Carefully remove the glazed ham from the oven. Place on a large platter and then slice and serve.

Honey & Five-Spiced Glazed Ham
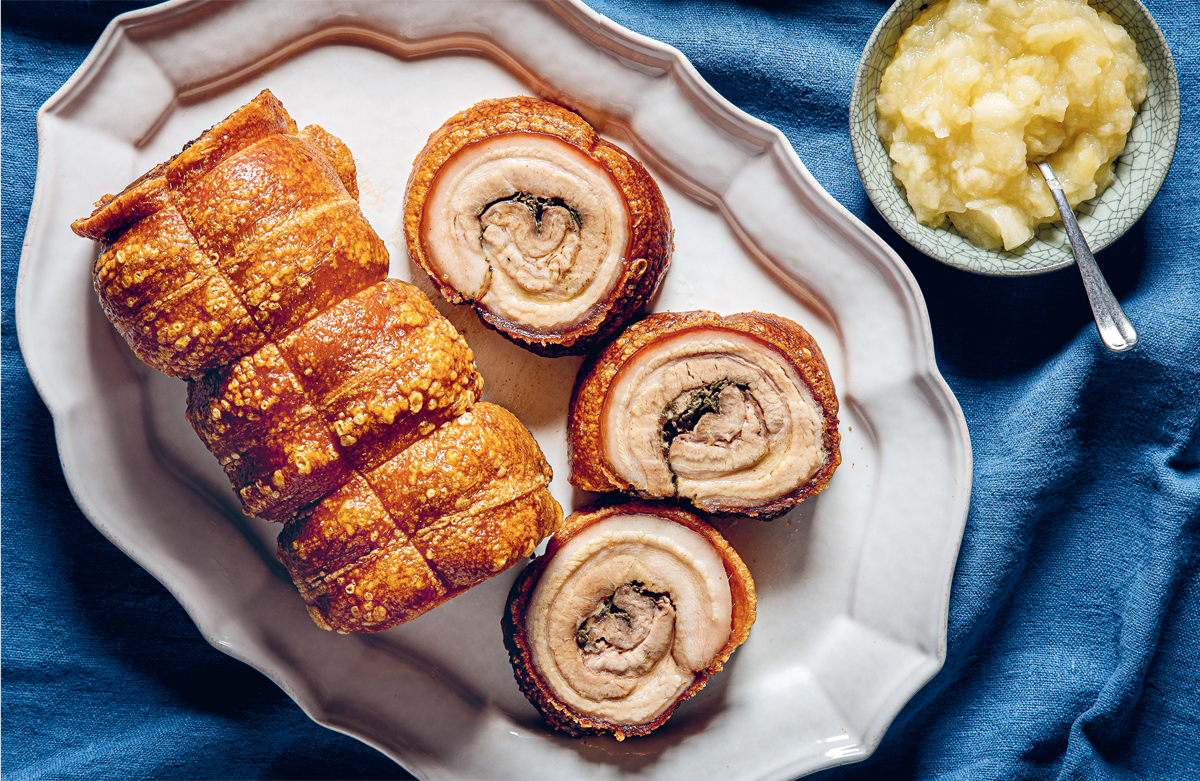
Pork Belly & Apple Sauce
This is the best method for cooking crispy skinned pork belly with tender, melting meat inside. Roasting at a very low temperature for a prolonged amount of time means that the fat breaks down but does not disappear, which is often the problem with pork belly when it has been overcooked. I have borrowed the wok method from Chinese cooking to create the most incredible crackling. If you want to avoid using a wok, take the pork out of the oven after the slow cook, turn the oven temperature right up to 260°C, rub the belly with a little oil and then roast it for 15–20 minutes. Although the resulting crackling is still good, it will not be quite as good as the wok method and it will definitely be a little smoky in your kitchen.
SERVES 8–10
half a long pork belly (2–2.5kg), ribs and cartilage removed, skin left on
2 garlic cloves, peeled and finely chopped
30g sage, leaves picked and finely chopped
25g table salt
200ml vegetable oil
For the apple sauce
500g Bramley apples, peeled, cored and sliced
½ lemon
20g caster sugar
To serve
Equipment
wok (optional)
Preheat the oven to 90°C fan/110°C/gas mark ¼.
Using a very sharp knife or Stanley knife, score the pork belly through the skin with diagonal cuts 2.5cm apart. Turn the belly over and rub in the garlic, sage and 20g of the salt. Trim a little fat off the bottom edge on a slant, then roll the pork tightly into the centre to form a cigar shape.
Tie one loop of butchers string tightly around the middle of the belly to hold it in place and then tie at each end. Finally tie tight loops in between these. Tying the middle and ends first will keep the belly evenly rolled.
Put the rolled pork belly in a clean sink. Boil a full kettle of water and, as soon as it boils, pour the water all over the skin. Repeat once more. Dab the skin dry with a clean dish towel. Put the pork in a roasting tray and rub in the remaining salt. Place the tray in the preheated oven and roast the pork for 6 hours.
Take a large wok and set a small rack over the top that will hold the pork belly but also leaves a small gap for a ladle. Pour the vegetable oil into the wok and heat to 180°C or until the surface of the oil is shimmering. Ladle the oil continuously over the skin of the pork belly until it no longer bubbles and is fully crispy. Leave the meat to rest for 15 minutes.
Meanwhile, make the apple sauce. Put the apples into a plastic bowl with the lemon juice and sugar. Cover the bowl tightly with clingfilm and cook in a microwave on full power for 4 minutes. (Alternatively, cook the apples in a saucepan with the lemon juice and sugar over a low heat for 10–15 minutes or until the fruit has roughly broken down.) Carefully peel back the clingfilm and mash up the apple with a fork. Carve the pork into thick slices and serve with the apple sauce, clapshot and slow-roasted carrots.
Pork Belly & Apple Sauce
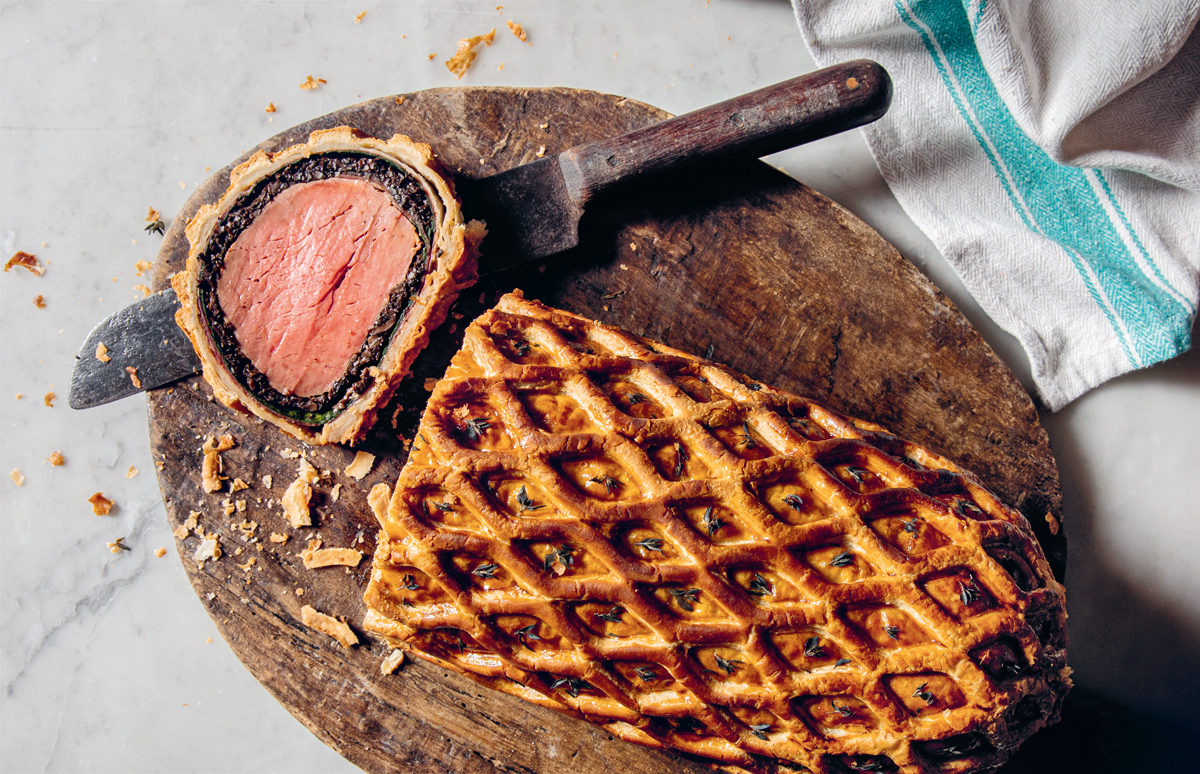
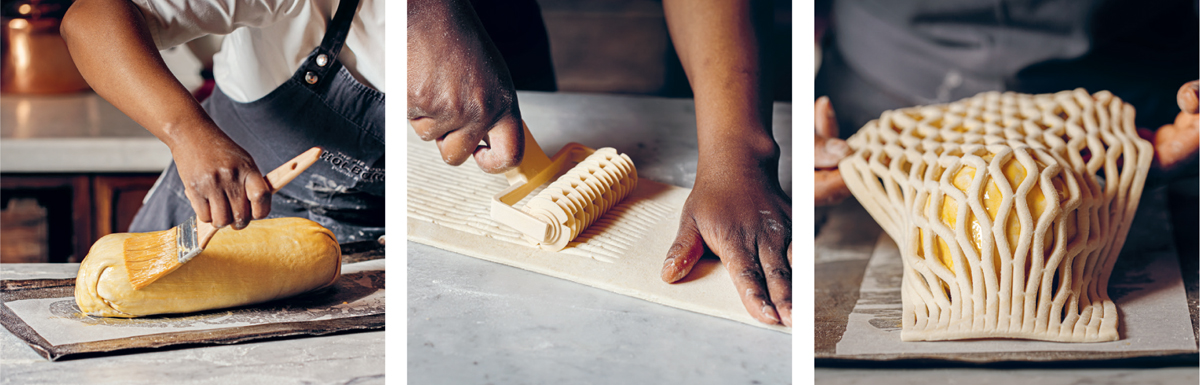
The Ultimate Beef Wellington
From the first moment we started discussing this book, one of the key things I always wanted to include was a comprehensive guide to making a restaurant-quality beef wellington at home. This is not the exact method we use to make beef wellington in The Pie Room kitchen – that just is not practical – but rather how best to replicate it in your home kitchen. Working in different professional kitchens over the past 20 years, I’ve made wellingtons under different chefs, but for the last five years I’ve been serving mine. Even over those five years, my method has evolved – and this is it.
A beef wellington of real quality, one that blows away your dinner guests, takes time and discipline. If you follow the steps below properly, you will have a wellington to be really proud of at the end. Below is a list of the most important factors to consider when making a wellington:
1.Allow yourself plenty of time. Do not attempt to make a wellington when you get home from work to serve for dinner that evening, it will not turn out well. I have split the work involved over two days, so if you want to do this as a weekend project, prepare the meat and mushroom duxelles on a Saturday so you are doing just the pastry work on the Sunday before sitting down to eat. Chilling the meat overnight makes it easier to handle and roll, plus it means everything will be as cold as possible when it goes in the oven, giving the pastry more time to cook.
2.Use the best quality beef you can afford for a superior flavour. Furthermore, dry-aged beef will release less moisture during cooking, helping to protect the pastry from becoming soggy.
3.Plan your timings meticulously. If you have told your guests what time they will be eating, work back from that hour and make sure to factor in enough time for both decorating the wellington and resting the meat on top of the cooking time.
4.REST THE WELLINGTON FOR A MINIMUM OF 30 MINUTES. I cannot stress enough how important this is. If you cut a slice of wellington without resting the meat, the beef will still be under tension from the cooking, the meat fibres will suddenly relax and all the cooking juices will flood out into the wellington, leaving the meat dry and the pastry soggy.
5.Do not use my classic puff pastry from the Doughs chapter with its hundreds of layers – it is too fragile for carving and will create a mess on the table. Instead, use either rough puff pastry or shop-bought puff pastry, which has slightly more strength and structure. Ready-made vegetarian puff pastry, which uses emulsified oils to create the lamination, also works well.
6.Buy a digital probe thermometer. Cooking the beef accurately to a specific temperature gives the best chance of a perfect rosy-pink cut-through.
7.Do not swap bresaola for Parma ham. I have seen this in so many recipes, but Parma ham has too strong a flavour and will only make your wellington taste of pork, which is odd if you think about it. Keep to cured beef and allow the flavour of the fillet to shine through.
8.Follow my guide for cooking times, depending on how you like your beef cooked. At the restaurant I serve beef wellington medium rare, because for me that is when it is at its best, but obviously it’s your wellington and so it’s your call.
SERVES 6–8
1kg thick centre-cut beef fillet, trimmed of any sinew
1 teaspoon table salt
30ml vegetable oil
1 tablespoon English mustard
20 slices (around 100g) bresaola
500g large leaf spinach
500g rough puff pastry for the wellington, plus 300g for the lattice (see here, or shop-bought puff pastry)
4 egg yolks beaten with 4 teaspoons water, for brushing
½ teaspoon sea salt flakes
For the mushroom duxelles
300g mixed wild mushrooms
400g button mushrooms
300g chestnut mushrooms
40ml vegetable oil
2 banana shallots, peeled and finely chopped
1 garlic clove, peeled and finely chopped
1 teaspoon table salt
100ml Madeira wine
20g thyme, leaves picked
20g rosemary, leaves picked
Equipment
lattice pastry cutter roller (optional) and digital probe thermometer
DAY ONE
To make the mushroom duxelles, finely chop all the mushrooms to an even size. Take the time to do this by hand as you will achieve a much better texture than by using a food processor, which will always leave uneven chunks. Take a large non-stick pan and warm 20ml of the vegetable oil over a low heat. Add the shallots and garlic to the pan, sweat them down for 10 minutes until soft, then transfer to a bowl and set aside.
Add another 20ml of vegetable oil to the pan and increase the heat to high. Add all the mushrooms and 5g of table salt. The mushrooms will start to release moisture after a few minutes, so cook, stirring, until any moisture has completely evaporated. Add the Madeira and cook until completely reduced, then return the shallots and garlic to the pan with the thyme and rosemary, stir for a minute then remove from the heat and spread across paper towels to remove any more moisture, and cool.
Dry the beef fillet all over with paper towels and then season with table salt. Heat a roasting tray or frying pan large enough to fit the beef fillet with 30ml of vegetable oil over a high heat and then carefully sear the beef all over using tongs. Make sure the oil is hot and shimmering before you add the beef or it will stick to the pan. Never cook for more than 5 seconds on one side – you are looking for an even, lightly caramelised sear, not to cook the beef. Transfer the beef to a plate to cool, then brush all over with the mustard.
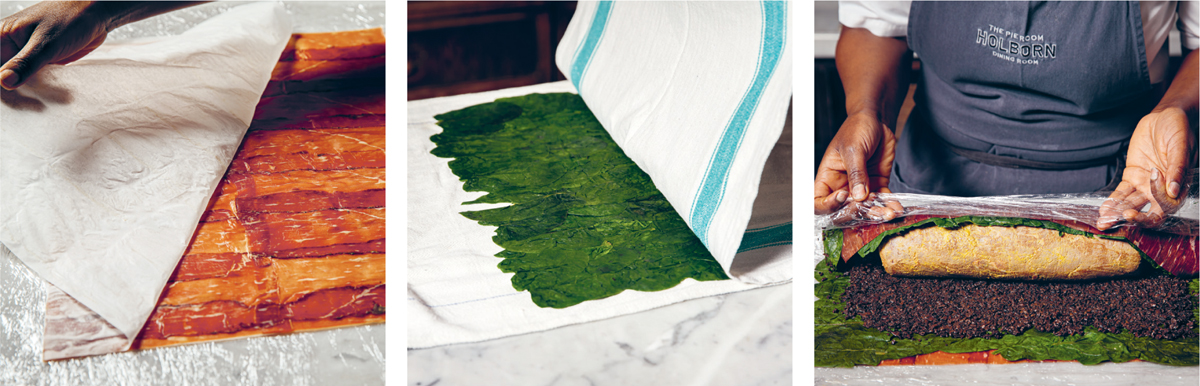
Lay a large 50cm x 35cm rectangle of clingfilm on your work surface and then add a second layer. Starting from the middle, flatten out any air bubbles using a clean dish towel. Working from the edge of the clingfilm closest to you, lay out the bresaola slices into a 35cm x 25cm rectangle, slightly overlapping the slices.
Dampen a clean dish towel and lay it across a large plate that fits inside your microwave. Spread one-third of the spinach across the section of towel that covers the plate, then cover with the rest of the towel and microwave on full power for 2 minutes. Pull back the towel to expose the spinach and allow to cool for 1 minute. (Alternatively, blanch the spinach leaves in boiling water for 5 seconds, then refresh in iced water.) Carefully peel the spinach off in patches and transfer to a flat dry towel to start building a 30cm x 20cm rectangle. Repeat with the remaining spinach in another two batches until the rectangle is built up. Lay another towel on top and, using a rolling pin, firmly roll across from one end to the other to remove any moisture and fully flatten the spinach.
Carefully lift the dish towel with the spinach by its corners and transfer on top of the bresaola rectangle – you want the spinach to touch the bottom edge of the sliced meat. Peel away the towel. Spread the mushroom duxelles evenly to the edges of the spinach and then lay the beef fillet horizontally across the bottom of the mushrooms.
Using the clingfilm, roll everything into a tight parcel with the bresaola encasing the spinach, mushrooms and meat. Just before the clingfilm comes round to meet itself, neatly tuck in the ends of the bresaola. Continue rolling the parcel, making sure the clingfilm doesn’t tuck into the bresaola. Fold over the ends of the clingfilm so it is airtight.
Lay the whole parcel down onto more clingfilm and wrap tightly. This will form the wellington into a neat cylinder shape and centre everything inside. Chill in the refrigerator overnight.
DAY TWO
Line a large baking tray with parchment paper. On a lightly floured surface, roll out the 300g of pastry for the lattice to a 40cm x 14cm rectangle. Slide he rolled-out pastry onto the lined tray, cover with clingfilm and chill in the refrigerator for 30 minutes.
On a lightly floured surface, roll out the 500g of pastry for the wellington to a 50cm x 35cm rectangle, no more than 5mm thick. Trim away any excess pastry. Dust off any excess flour from the pastry and then brush lightly all over with egg wash.
Carefully remove the wellington filling from the clingfilm using sharp scissors, taking care not to snip into the bresaola wrapping. Swiftly lift the filling as though cradling a baby (yes, a baby) and place it centred against the bottom edge of pastry closest to you. Lift up the bottom edge of the pastry against the filling and roll upwards until the filling is encased in pastry with a 4cm overlap. Make sure the seam of pastry runs directly along the bottom of the wellington.
Carefully flatten the loose ends down onto the work surface, thinning the pastry as much as possible but without tearing it. Leaving just enough to tuck under the wellington, trim away the excess pastry.
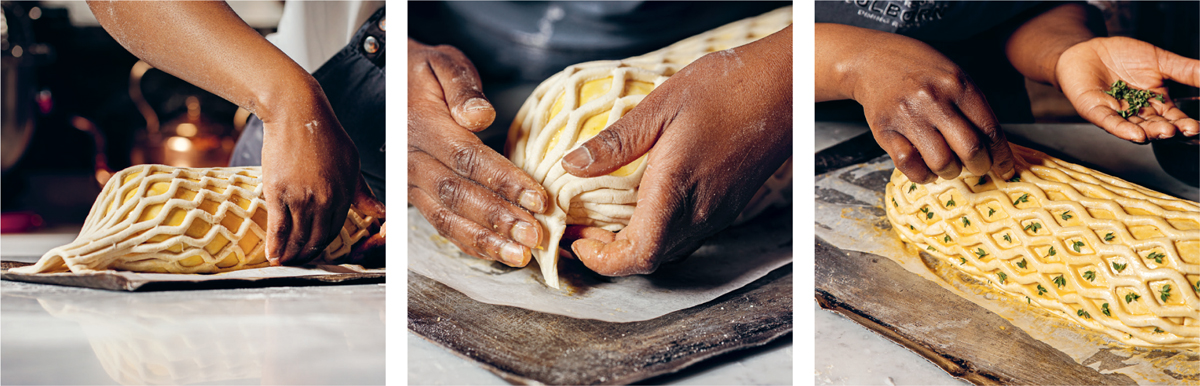
Line a large baking tray with parchment paper. Cradling it at either end, quickly transfer the wellington to the lined tray. Dust off any excess flour from the outside of the wellington and then brush it all over with egg wash. At this point, it is important not to rest the pastry – this is an opportunity to let the tautness of the gluten work for you as the pastry will shrink tightly against the filling inside providing a nicer cut-through.
Turn the tray so that the wellington is at a right angle to you and give it another light brushing of egg wash. Gently stretch out the lattice pastry and lay it over the top of the wellington, stretching it evenly from the middle outwards until the lattice goes all the way down the sides of the wellington and can be tucked under. It is important that the lattice tucks all the way under or it will ride up the sides of the wellington during the cooking. Lightly brush the lattice with egg wash, taking care not to let the egg pool in the diamond-shaped gaps. Chill in the refrigerator for 30 minutes.
Remove the rolled-out pastry for the lattice from the refrigerator and lay it flat on your work surface. Using a lattice pastry cutter roller, firmly roll up the length of the pastry. Using a small knife, work through each of the cuts made by the roller to make sure that they will open properly when lightly stretched.
Preheat the oven to 200°C fan/220°C/gas mark 7.
Immediately before cooking, remove the wellington from the refrigerator, and give it a final egg wash and sprinkle over the sea salt. If you are feeling fancy, place a small thyme flower in the centre of each diamond of the lattice.
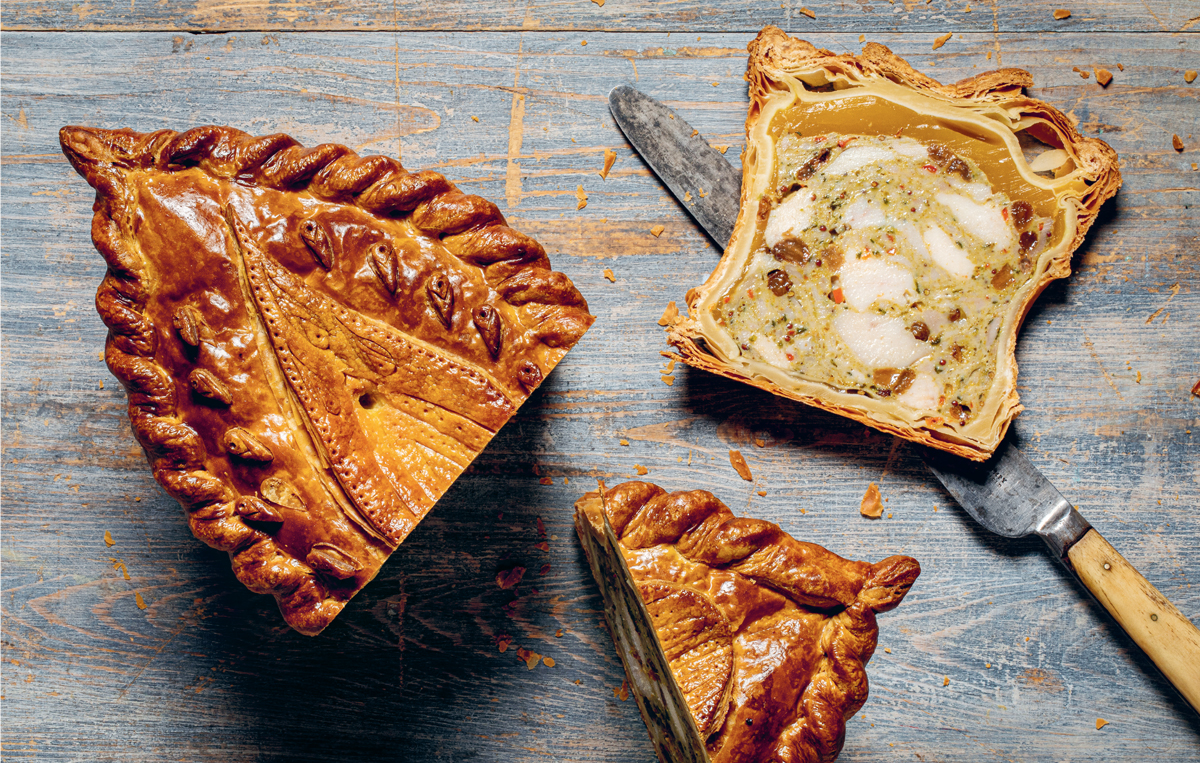
Place the tray in the preheated oven and bake the wellington for 30 minutes. After 30 minutes, turn the tray around inside the oven and then, referring to the timing guidelines below, take the meat to the correct temperature according to how you like your beef cooked. If you don’t have a digital probe thermometer, cook the wellington for 45 minutes to achieve medium rare. But honestly, buy a probe.
Transfer the wellington to a wire cooling rack (this will allow air to circulate under the pastry and prevent it getting soggy) and rest for a minimum of 30 minutes before serving. Using a serrated knife, slice into 3cm thick portions. While slicing, look down from above the wellington to get an even cut.
COOKING GUIDE
Insert a digital probe thermometer into the middle of the wellington through one of the ends to check the temperature of the meat. Bear in mind that these cooking temperatures factor in that the temperature will continue to rise during the resting period.
For medium rare:
Cook to 36°C. The temperature will rise to 45°C while resting.
For medium:
Cook to 48°C. The temperature will rise to 52–55°C while resting.
For medium well:
Cook to 60°C. The temperature will rise to 65–70°C while resting.
For well done:
Buy a sausage roll and save yourself the hassle.
The Ultimate Beef Wellington
 |
 |
 |
 |

Coronation Chicken Pie
First created to honour the coronation of Queen Elizabeth II, this dish was devised by two principals of the Cordon Bleu cookery school in London. The original recipe was a creamy curried chicken with sultanas, still fairly light on spice (more suited to the tastes in Britain at the time) but full of flavour. Served cold as part of a buffet, this decorative coronation chicken pie looks incredible on the table at a party. It is worth investing in an oval pie mould, which can either be bought new online or from vintage suppliers. If possible, buy a mould with a fluted design as they look spectacular when you unmould your pie.
SERVES 8–10
800g shortcrust pastry (or shop-bought)
10g butter, softened
1 egg yolk beaten with 1 teaspoon water, for brushing
For the pie filling
10g black mustard seeds
1 tablespoon ground turmeric
2 teaspoons garam masala
1 teaspoon ground coriander
1 teaspoon ground cumin
6 skinless, boneless chicken thighs
40g fresh coriander, stalks and leaves roughly chopped
20g table salt
2 skinless chicken breasts, cut into 3cm dice
100g sultanas
2 red chillies, deseeded and finely chopped
For the mango jelly
6 gelatine leaves
500ml mango juice
Equipment
fluted oval game pie mould (24cm long and 8cm deep) and digital probe thermometer
On a lightly floured surface, roll out the pastry to a 5mm thick large rectangle. Cutting diagonally from corner to corner, cut a pastry strip 20cm wide and at least 50cm long, squaring off the ends. Lay the pastry strip on a large piece of parchment paper, folding the pastry if necessary, and chill in the refrigerator until needed.
Unclip the pie mould and take it apart. Using the shape of the pie mould as a guide, cut out two ovals from the resulting triangles of pastry, reserving any trimmings for decoration.
Re-assemble the pie mould and secure it with the clips. Brush the inside of the mould with the softened butter. Remove the strip of pastry from the refrigerator, gently fold it into a loop and carefully place it inside the greased mould. Let the bottom 2cm of the pastry strip slide down onto the base of the mould and flatten down. Next, press the pastry strip against the sides of the mould following the fluted shape. There should be a substantial overhang of pastry at the top of the mould, which you can ease over the top edge by making small snips in the pastry at either pointed end of the mould. After pressing the sides in, make sure the seam where the two ends of the pastry strip meet is no more than a 2cm overlap. Trim any excess pastry with scissors, if necessary, then push the ends firmly together.
Take one of the pastry ovals, trim 1cm from all the way round the edge and lay it on the base of the mould. Push the pastry oval against the mould and into the pastry strip where it overlaps the base to join the two. Put the pastry-lined mould into the refrigerator with the remaining pastry oval and any trimmings for decoration and chill for 30 minutes.
Meanwhile, make the filling. Preheat the oven to 190°C fan/210°C/gas mark 7. Spread the mustard seeds and ground spices over a baking tray and toast in the preheated oven for 8 minutes.
Put the chicken thighs in a food processor along with the fresh coriander and salt. Pulse until almost smooth. Transfer the mixture to a bowl, add the toasted spices, mix well and then fold in the diced chicken breast, sultanas and chilli.
Remove the pastry-lined mould from the refrigerator and fill with the chicken mixture to 1cm below the top edge of the pastry. Lay the remaining pastry oval over the top of the filling and crimp together with the overhanging pastry from the sides (see here). Return the mould to the refrigerator and chill for 20 minutes.
Preheat the oven to 190°C fan/210°C/gas mark 7.
Remove the mould from the refrigerator and cut a 2cm hole in the middle of the pie lid to allow steam to escape. Decorate the top of the pie however you prefer (see here). I added a paisley design, which is often found on shawls from Kashmir in India, as a suggestion as to the flavours found inside. Lightly brush the pastry all over with egg wash and then return to the refrigerator to chill for 20 minutes. When ready to bake, remove the pie from the refrigerator and brush again with the egg wash.
Place the mould in the preheated oven and bake the pie for 1–1¼ hours or until the pastry is a deep golden brown and the core temperature of the filling reads 63°C or above on a digital probe thermometer. Remove the pie from the oven and leave to cool completely in the mould on a wire rack and then refrigerate overnight.
Put the gelatine leaves in a small bowl and cover with cold water. Meanwhile, pour the mango juice into a small pan and warm over a low heat. After 3 minutes remove the gelatine from the bowl and squeeze out any excess water. Add the gelatine to the mango juice and whisk well until fully dissolved.
Using a small funnel or squeezy bottle, fill the pie with the mango jelly through the steam hole. Place the pie in the refrigerator and chill for a further 30 minutes before taking the pie out of the mould and serving.
Coronation Chicken Pie