Chapter 8
Organize Your Life with the iPad
The iPad is equipped with the Reminders, Contacts, and Calendar apps that help you improve your efficiency when it comes to managing to-do lists, personal contacts, and important appointments.
Create a To-Do List with Reminders
Assign an Email Address to a Contact
Assign a Web Address to a Contact
Assign a Physical Address to a Contact
Create a Custom Label for a Contact
Add Extra Fields for a Contact
Add Appointments to Your Calendar
Convert an Event to an All-Day Event
Create a To-Do List with Reminders
The Reminders app helps you organize and prioritize your daily to-do lists, so when you are handling the big stuff, the smaller things do not fall through the cracks, such as picking up dry cleaning, getting groceries, or scheduling an oil change. Add tasks in Reminders, set notifications that help you to remember, and mark tasks as completed after you finish them. Create new to-do lists as well as browse and schedule reminders using the Date view.
Reminders works with iCal (Calendar in OS X Mountain Lion) and Outlook so that your calendars stay up to date. iCloud enabled on all your devices ensures that any changes you make in Reminders on your iPad are automatically updated for all your iOS 5 devices and iCloud-enabled Macs and Windows PCs.
Create a To-Do List with Reminders

 After launching the Reminders app from the Home screen, tap Date.
The present date appears in red.
 Tap a date for which you want to create a reminder.
The date on the notepad changes to the date you tapped.
 Tap the white notepad.
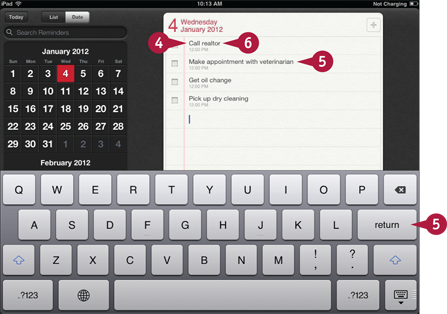
The keyboard appears.
 Type a task for which you want to create a reminder.
 Tap Return on the keyboard and type more tasks for the day.
 Tap a task to reveal the Details pane.
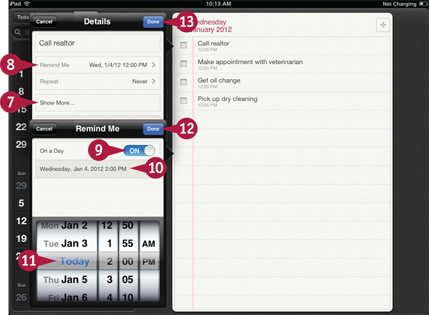
 Tap Show More to designate a priority level for the entry and write notes.
 Tap Remind Me to designate a time to receive a reminder.
 Tap the On a Day switch to the On position.
 Tap the date.
 Use the scroll wheel to enter a time for your reminder.
Note: You can also enter a day using the scroll wheel, if you have not already chosen a date on the calendar.
 Tap Done. You will now receive a reminder for the task(s) you entered at the time you designated.
 Tap Done.

A The time and/or day updates under the task in the list.
 When you have completed a task in your list, tap the empty box in the task’s field to mark it as completed.
Note: You can tap the plus sign ( ) to add another task to the list for that day.
Note: Tap a task to display the Details pane, and then tap Delete to remove a task.
Create a New Contact
Your iPad is highly capable of helping you organize your important data. The Contacts app can help you manage the sensitive information you receive from friends, colleagues, and prospective business associates. Think of the Contacts app as your virtual Rolodex, filled with contact information such as names, physical addresses, emails, notes, and so on.
Contacts relieves you from worry of losing a business card. If you have an iCloud account, all the information you gather in Contacts can be synced to your computer and updated automatically to your mobile devices. Understanding how to create a new contact helps you to manage your personal contacts.
Create a New Contact

 Tap Contacts on the Home screen.

A You can tap to contact this person by phone or email.
B You can tap the FaceTime button at the bottom of the contact’s page to place a video call.
C You can share a contact via email by tapping Share Contact. A virtual business card for the contact is embedded in an email and sent to the recipient.
The Contacts app opens.
 Tap the plus sign (
 ).
).
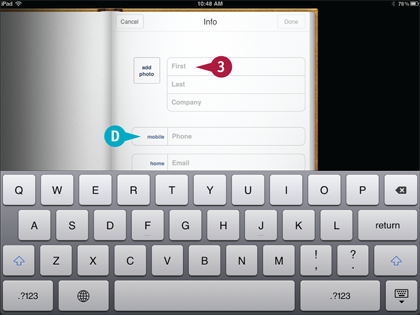
A new contact screen appears.
A blinking cursor appears in the box labeled First.
 Tap each field and then type the information you have for the contact.
D If you want to note the phone line type, tap the field labeled Mobile and then choose from the list that appears. You can make similar customizations to other fields including email and address information.
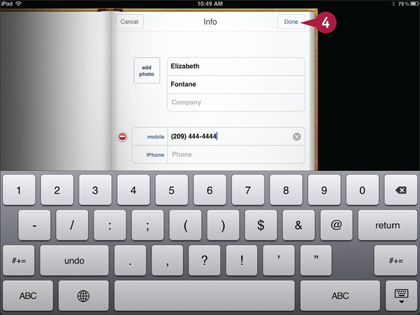
 Tap Done.
Your iPad saves the information you have typed and takes you to the All Contacts screen.
Edit an Existing Contact
Over time, the contact information for a co-worker, friend, or family member is subject to change. The Contacts app makes finding names, numbers, and other important information easy so that you can edit existing contacts without a hassle. The virtual keyboard enables you to enter and edit a contact on the spot, wherever you are.
If you use Contacts on your iPhone, editing contacts on your iPad follows a very similar procedure. If this is your first time using Contacts, like most things Apple, the app is very intuitive and quite simple to use. Understanding how to edit contacts enables you to quickly update information such as a contact’s phone number or email address.
Edit an Existing Contact
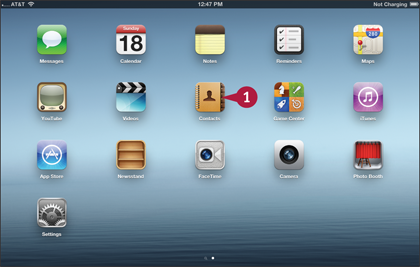
 Tap Contacts on the Home screen.
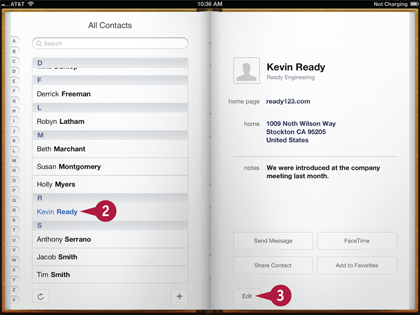
The Contacts app opens.
 Tap the contact you want to edit.
iPad displays the contact.
 Tap Edit.
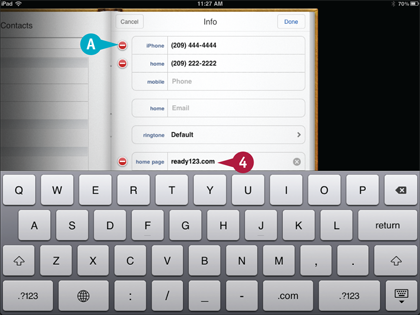
A iPad displays the contact’s data in the Info screen. A red button ( ) appears next to the data you can edit.
 Tap the data field(s) that you want to edit and then make your edits.
The on-screen keyboard appears as you tap the field you want to edit.
Note: If you make a typo in the middle of a word, it can be hard to tap between the exact letters where it occurred. Hold your finger down on the word to access the magnifying glass and cursor. Move your finger to place the cursor in the exact location.

 Tap Done.
Your iPad returns you to the All Contacts screen.
Assign an Email Address to a Contact
It may not be possible to acquire all the contact information from an individual in one meeting; so, naturally, you will have to add it later. Individuals commonly have a work and home number, and also an email address for work and one or two for personal use. The Contacts app allows you to enter multiple email addresses. That way, you can make sure that you send your correspondence to the appropriate email address. The Contacts app makes it very easy for you to assign an email address to a contact.
Assign an Email Address to a Contact
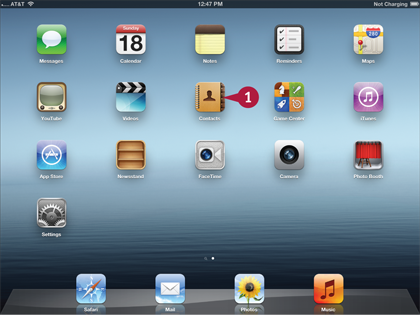
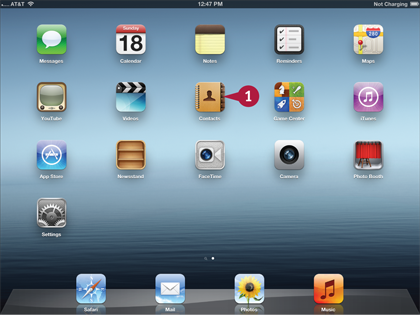
 Tap Contacts on the Home screen.
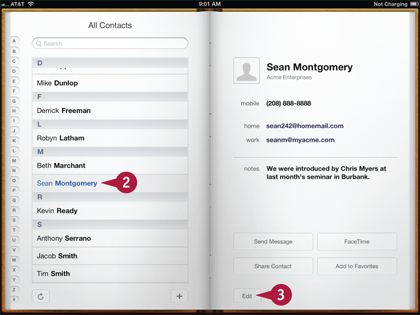
The Contacts app opens.
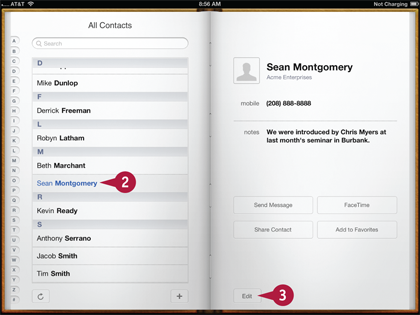
 Tap the contact to whom you want to assign an email address.
The contact’s Info screen appears.
 Tap Edit.
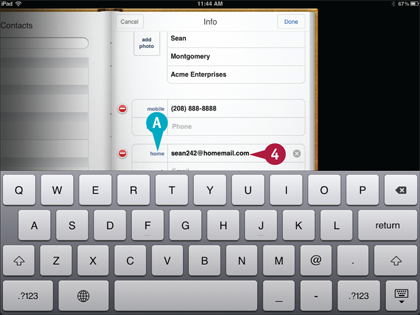
The Info screen appears.
 Tap the Email field and then type the email address.
A blinking cursor appears in the Email field when you tap it, and the on-screen keyboard appears.
A You can tap in the label field to change an email address’s label.

 Tap Done.
The email address is saved as part of the contact information.
Assign a Web Address to a Contact
It is now very common for individuals to be associated with multiple websites and not just a telephone number, email address, or street address. A typical person may have a company website and possibly more than one personal website. All these web addresses may be of importance to you. Contacts has conveniently supplied you the means of entering multiple web addresses for a contact. You can also change the label for an address to specify if it is a work or other type of web address. The Contacts app makes it very easy for you to visit an individual’s website just by tapping the URL on the Info screen.
Assign a Web Address to a Contact
 Tap Contacts on the Home screen.
The Contacts app opens.
 Tap the contact to whom you want to assign a web address.
The contact’s Info screen appears.
 Tap Edit.

The Info screen appears.
 Tap the URL field and then type the web address.
A blinking cursor appears in the URL field when you tap it, and the on-screen keyboard appears.
A You can tap in the label field to change the label for the web address. By default, the label field reads “home page.”
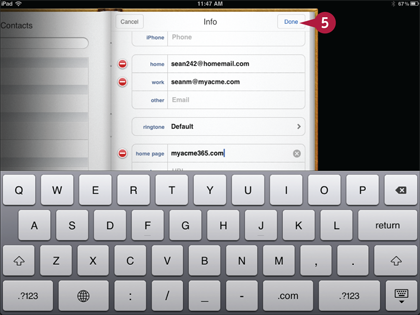
 Tap Done.
The URL is saved as part of the contact information.
Assign a Physical Address to a Contact
Assigning a street address to a contact enables you to save an individual’s address and access it quickly whenever you need it. For your convenience, some of the apps also work together to help you simplify your efforts. When you assign a physical address to a contact, the Maps app gives you the added benefit of being able to locate that address on a map later. If you need to visit the contact, Maps can generate accurate directions to that contact’s address stored on your iPad. You can easily add street addresses into the Contacts app so you can take advantage of these benefits.
Assign a Physical Address to a Contact
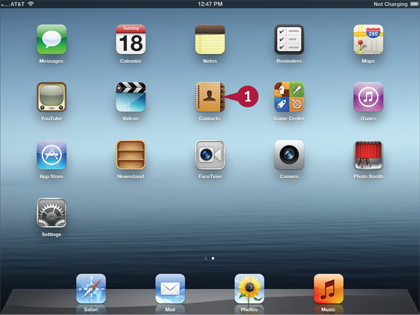
 Tap Contacts on the Home screen.

The Contacts app opens.
 Tap the contact to whom you want to assign a physical address.
The contact’s Info screen appears.
 Tap Edit.
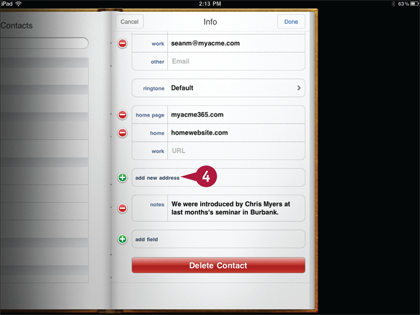
The Info screen appears.
 Scroll down to tap the Add New Address field and then type an address.
A blinking cursor appears in the Add New Address field when you tap it, and the on-screen keyboard appears.
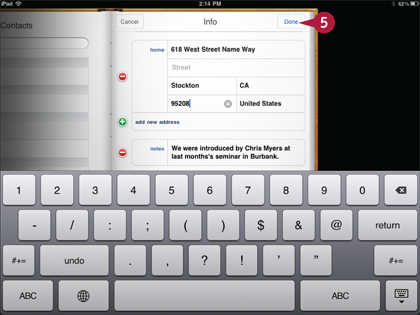
 Tap Done.
The address is saved as part of the contact information.
Create a Custom Label for a Contact
Whenever you assign information to your contacts, your iPad requires that you identify certain information, such as a telephone number or physical address, with labels, such as home, work, mobile, and so on. Occasionally, one of these labels may prove too generic for your purposes. Apple could not anticipate every possible label you may need for a contact, so they made it possible for you to customize your own. In this case, you can create a label for a field that contains temporary information for a project in just a few taps. Creating custom labels can help you better categorize your contact information.
Create a Custom Label for a Contact
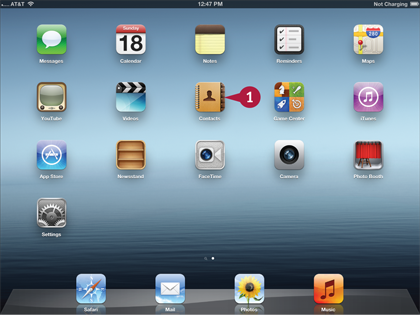
 Tap Contacts on the Home screen.
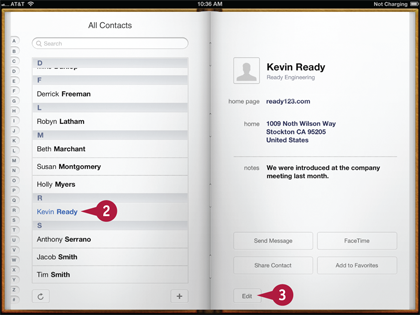
The Contacts app opens.
 Tap the contact for whom you want to create a custom label.
The contact’s Info screen appears.
 Tap Edit.
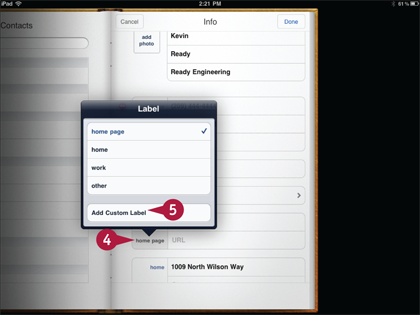
The Info screen appears.
 Tap the label for the contact data for which you will create the custom label.
Note: This section changes the label for an existing web address.
The Label menu appears.
 Tap Add Custom Label.
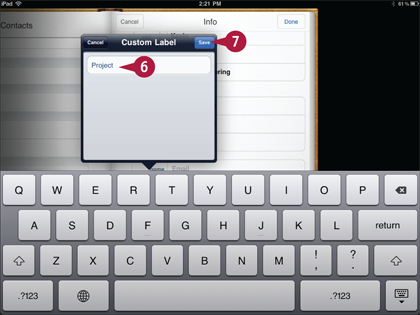
The Custom Label menu and the on-screen keyboard appear.
 Type a new label.
 Tap Save.
The custom label appears next to the data on the Info screen.
 Repeat steps 4 to 7 to create custom labels for other data fields if needed.
Add Extra Fields for a Contact
When you add a new contact, by default, your iPad supplies you with only the basic data fields. Fortunately, your iPad has a collection of additional descriptive fields that you can access and apply to a contact’s information. You can add extra fields, such as a prefix for Dr. or a suffix for Jr., Sr., and III. If one of your contacts goes by a nickname rather than a legal name, this is probably a detail of which you should be aware, and the Contacts app also has a field option for Nickname. The choices for other fields include Job Title and Department. Extra fields come in handy when every detail matters.
Add Extra Fields for a Contact
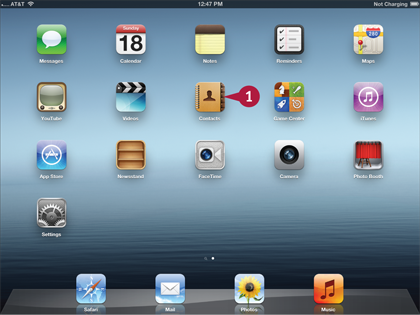
 Tap Contacts on the Home screen.
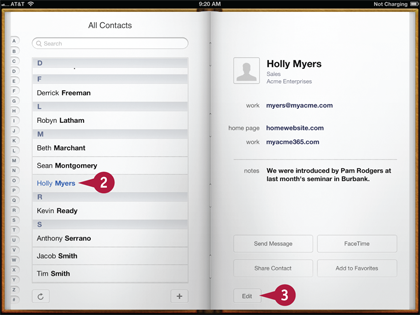
The Contacts app opens.
 Tap the contact for which you want to add a new field.
The contact’s Info screen appears.
 Tap Edit.
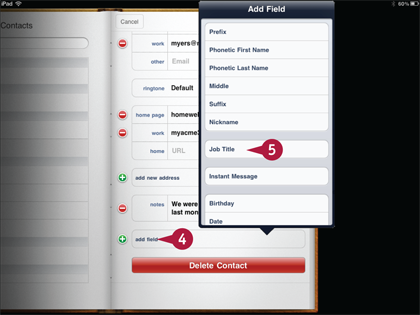
The Info screen appears.
 Scroll down and then tap add field.
The Add Field menu opens.
 Tap a new field to add to the contact.
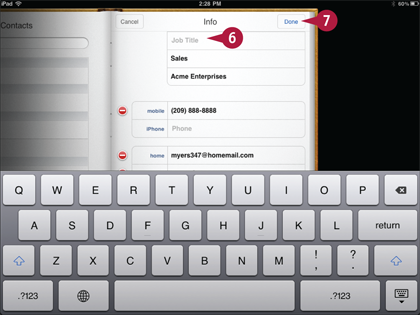
The Add Field menu closes, and the new field is added to the contact in the Info screen.
 Type the information into the new field.
 Tap Done.
Your iPad saves the new field for the contact and returns you to the All Contacts screen.
 Repeat steps 2 to 7 to add fields for other existing contacts if needed.
Add Notes to a Contact
Sometimes, when you are adding an individual to your Contacts list, it is very helpful to jot down some extra information about that person, such as where you met him or her, or the highlights of a recent meeting. Your iPad makes it easy for you to save important information such as this by enabling you to add notes to contacts.
An additional note can help you remember the specifics of a conversation that you had with an individual, if you have not talked in a while.
Add Notes to a Contact
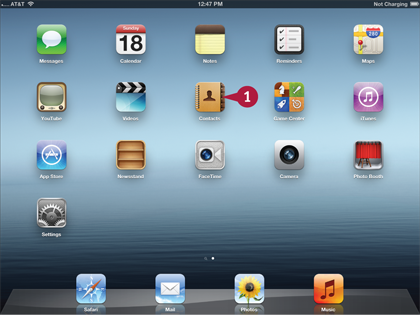
 Tap Contacts on the Home screen.
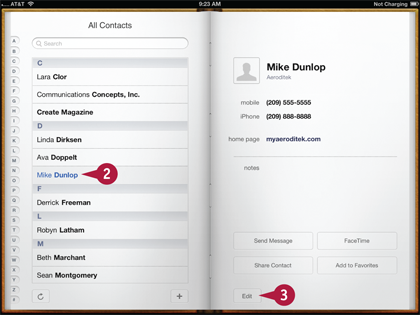
The Contacts app opens.
 Tap the contact to which you want to add notes.
The contact’s Info screen appears.
 Tap Edit.
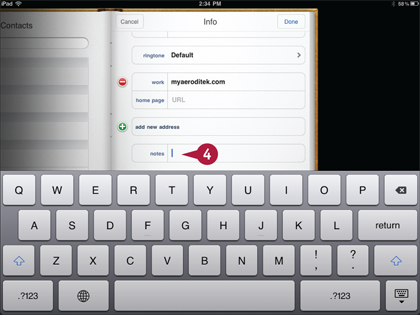
The Info screen appears.
 Scroll down and then tap in the Notes field.
The on-screen keyboard appears.

 Type your notes.
Note: You can type faster by double-tapping the spacebar at the end of sentences and letting iPad add the period and the space at the end.
 Tap Done.
Your iPad saves the notes for the contact and returns you to the All Contacts screen.
A You can tap the red button ( ) that appears next to the note field in the Info screen to delete the notes if needed.
Add Photos to Contacts
Your iPad provides you with a surefire way not to forget the faces of important contacts by enabling you to add a personal photo to a contact. Because the iPad 2 and the third-generation iPad have the ability to take photos, you can take a headshot on the spot. You can also sync a photo of a friend or colleague from your computer or use the Camera Connection Kit to get photos onto your iPad. You can also download a photo from a web page or an email.
Follow these steps with the Contacts app open.
Add Photos to Contacts

 Tap the contact for which you want to add a photo.
The contact’s information appears.
 Tap Edit.
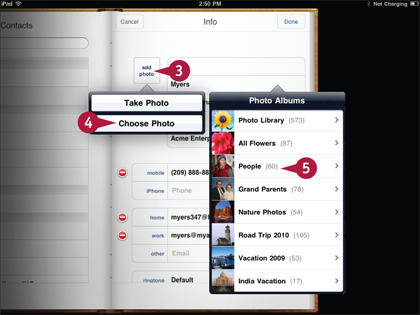
The Info screen appears.
 Tap add photo.
 Tap Choose Photo.
Your iPad displays your photo albums.
 Tap the photo album that contains the picture you want to add.
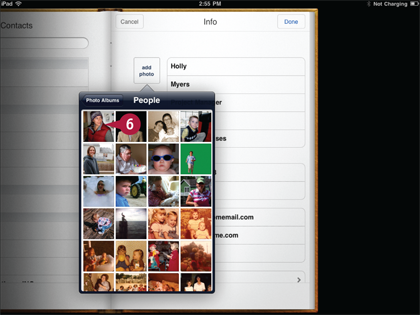
The photo album opens.
 Tap the photo that you want to use.
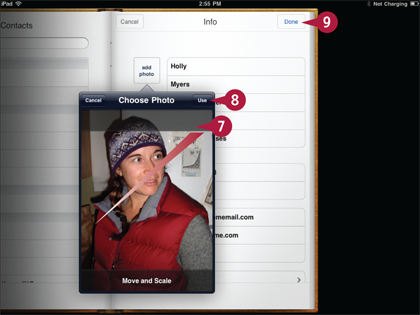
The photo enlarges in the Choose Photo dialog.
 Move and scale the image so it looks the way you want in the contact.
Note: You can pinch and then open or close your fingers to increase or decrease the scale of the picture. You can also reposition the photo with your finger.
 Tap Use.
The photo is inserted into the contact in the Info screen.
 Tap Done.
Your iPad saves the photo with the contact and returns you to the All Contacts screen.
Create Contact Groups
Creating contact groups is a great way to organize the many contacts you acquire. You can create a group to store a collection of similar contacts such as friends from work, family, career opportunities, or organization-specific groups. You cannot create groups directly on your iPad. You can create groups in other applications, such as Mac OS X Address Book (Contacts in OS X Mountain Lion), Yahoo! Address Book, Google Contacts, Windows Address Book, and Windows Contacts.
Once you sync contact groups to your iPad, you can easily add new contacts to a group from your iPad. Contact groups allow you to locate a list of similar contacts more quickly than wading through your entire list of contacts.
Create Contact Groups
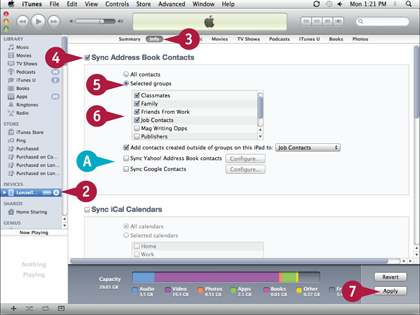
 Connect your iPad to your computer and launch iTunes.
 Click your iPad in the Devices list.
 Click Info.
 Click the Sync Address Book Contacts check box (
 changes to
  ).
).
Note: If you are syncing to a PC, click the Sync Contacts with drop-down menu to choose from the following options: Windows Contacts, Google Contacts, or Yahoo! Address Book.
 Click the Selected groups radio button (
 changes to
  ).
).
 Click the groups you want to sync to your iPad (
 changes to
  ).
).
A If you have a Yahoo! or Google account, you can click the sync check boxes ( changes to
  ) to add those contacts to the sync.
 Click Apply.
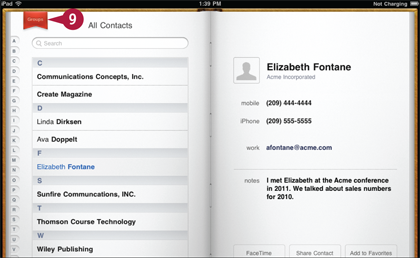
 Tap Contacts on the iPad Home screen.
 Tap Groups on the All Contacts page.
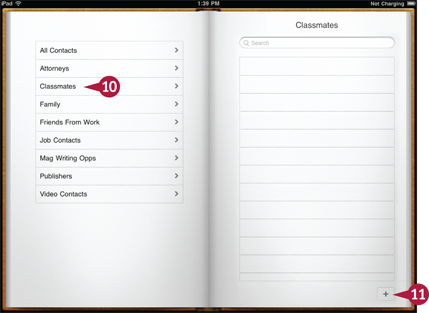
The list of groups synced to your iPad appears.
 Tap the group for which you want to add a contact.
The contact group opens.
 Tap the plus sign (
 ).
).
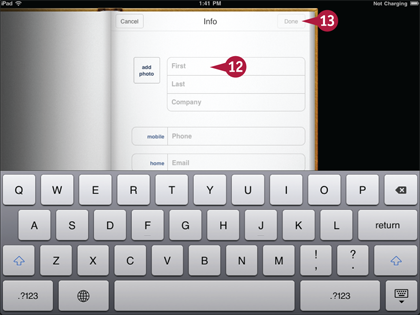
A new contact screen appears.
A blinking cursor appears in the box labeled First.
 Tap each field and then type the information you have for the contact.
 Tap Done.
Your iPad saves the information you have typed to the contact group.
Add Appointments to Your Calendar
Your iPad was designed for you to be mobile while still enabling you to manage the important stuff, such as doctor appointments, business meetings, and anniversaries. You can view your calendar by day, by week, by month, or even in List view. You can also see an overview of an entire month or a single day in detail. The Calendar app can display more than one calendar at a time so you can manage both your work and family schedules. Your iPad can help to ensure that you do not overlook important event dates.
Add Appointments to Your Calendar
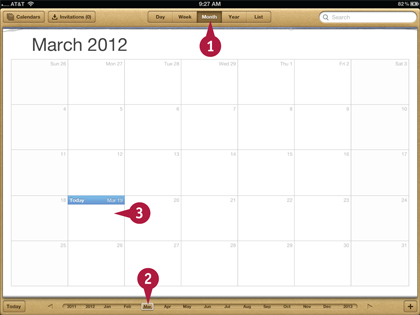
Note: Follow these steps after you have already tapped Calendar on the Home screen and opened the Calendar app.
 Tap Month.
 Use the arrows to navigate to the month of the event.
 Double-tap the date on the calendar on which the event is to occur.
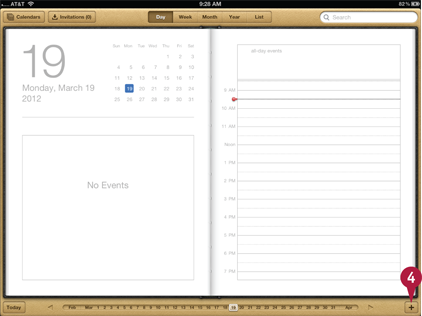
The date opens in Day view.
 Tap the plus sign (
 ) in the bottom right corner of the screen.
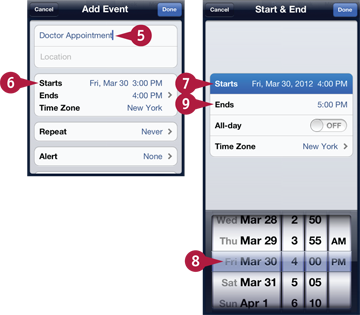
The Add Event dialog opens.
The Title field contains a blinking cursor.
 Type the title for the appointment.
Note: You can also tap in the Location field to designate a location for the event.
 Tap Starts Ends in the Add Event dialog.
The Start & End dialog opens.
 Tap Starts.
 Use the scroll wheels to set the date and time the appointment begins.
 Tap Ends.
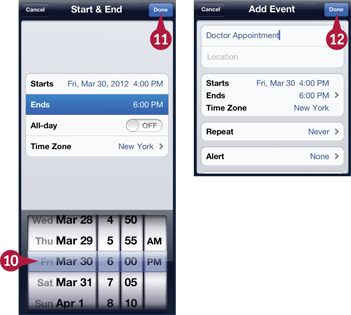
 Use the scroll wheels to set the date and time the appointment ends.
 Tap Done.
Your iPad saves the data and returns you to the Add Event dialog.
 Tap Done.
The data is stored as an event, and your iPad returns to the Calendar screen. A dot appears under the date in the calendar to signify that the date has one or more events scheduled on it. iPad lists all the events for that day at the bottom of the Calendar screen.
Edit an Existing Appointment
The details of your appointment, such as date and time, are always subject to change. Your iPad makes it easy for you to update your appointment schedules so your information is always up to date. The virtual keyboard enables you to edit an existing appointment on the spot, wherever you are. If you have an iCloud account, you can make sure that your updated appointment information is synchronized with your other devices.
If you use the Calendar app on your iPhone, editing appointments on your iPad follows a very similar procedure. Knowing how to edit calendar appointments enables you to quickly update information so that you do not miss important appointments or events.
Edit an Existing Appointment
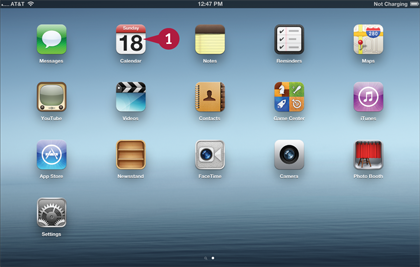
 Tap Calendar on the Home screen.
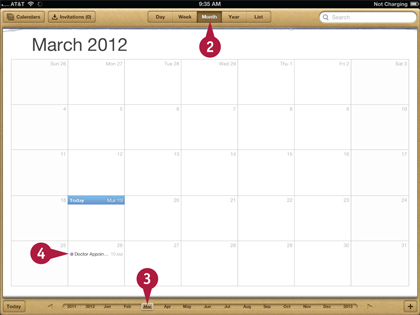
The Calendar app opens.
 Tap Month.
 Use the arrows to navigate to the month of the event you want to edit.
 Tap the date of the event you want to edit.
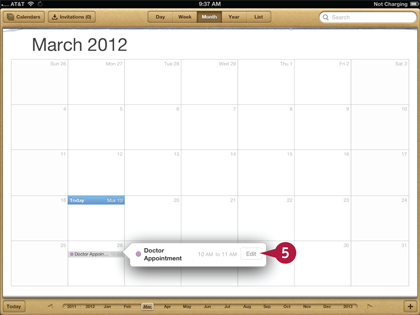
A banner appears on-screen for the event.
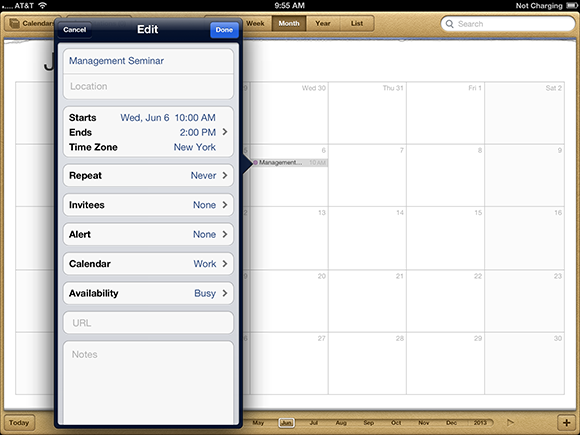
 Tap Edit.
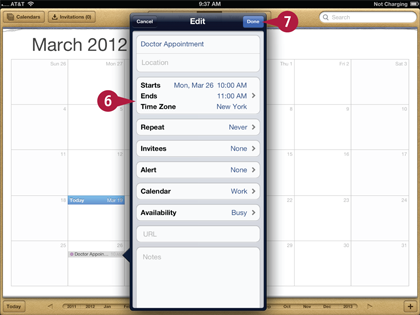
The Edit dialog opens.
 Make your changes to the appointment.
 Tap Done.
Your iPad saves the data.
Set Up a Repeating Event
For those events that may occur routinely, Calendar enables you to enter the event one time and then schedule it to repeat at a regular interval. For example, if you want to schedule to meet a friend for lunch every day for a week while he is in town for business, you can create the event and schedule it to end in a week.
If an event occurs bi-weekly, every month, or every year, the Calendar app can accommodate your schedule. Knowing how to set up a repeating event keeps you from having to enter each event by hand.
Set Up a Repeating Event
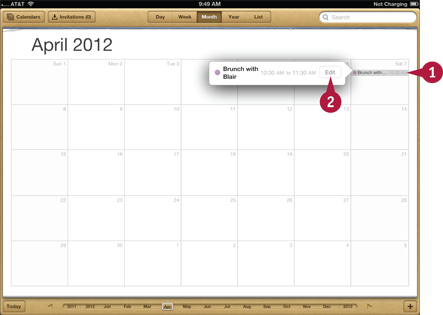
 Tap the date for the repeating event.
A banner appears for the event.
 Tap Edit on the banner.
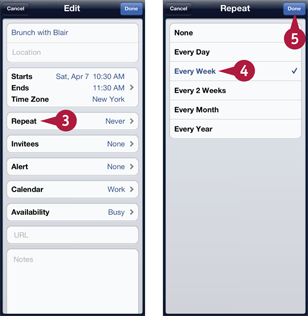
The Edit dialog opens.
 Tap Repeat.
The Repeat dialog opens.
 Tap the repeat interval you want.
 Tap Done.
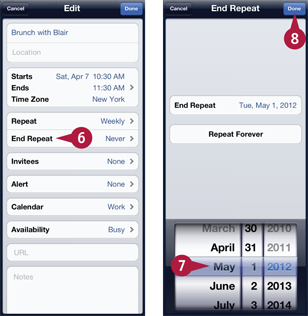
Calendar returns you to the Edit dialog.
 Tap End Repeat.
The End Repeat dialog opens.
 Use the scroll wheels to set the date you want the repeated event to end.
 Tap Done.
Your iPad saves the data and returns you to the Edit dialog.

 Tap Done.
The repeat data is saved.
Convert an Event to an All-Day Event
Typically, an appointment that you schedule with a doctor or for a meeting may last a few hours and not the whole day. Sometimes, the events that you schedule may not have clear start and end times, such as those for a conference, or a birthday, holiday, or anniversary. In these circumstances, you may need to block out an entire day for an important activity.
Calendar makes it easy for you to convert an event that you had previously scheduled for just an hour or two to an all-day event. When you specify an event as all-day, the event appears as such in each of the calendar views: Day, Week, Month, and List.
Convert an Event to an All-Day Event
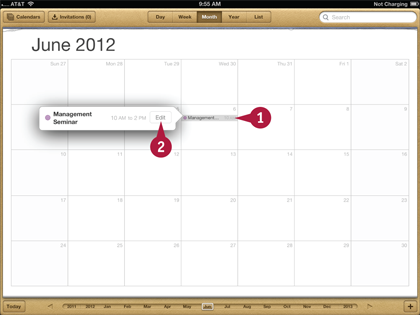
 Tap the date for the event.
A banner appears for the event.
 Tap Edit on the banner.
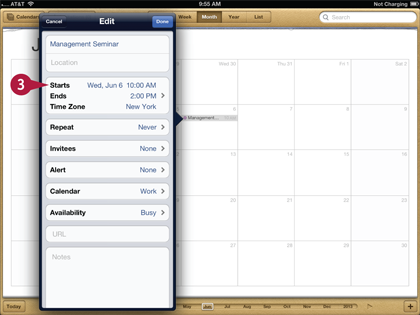
The Edit dialog opens.
 Tap Starts.
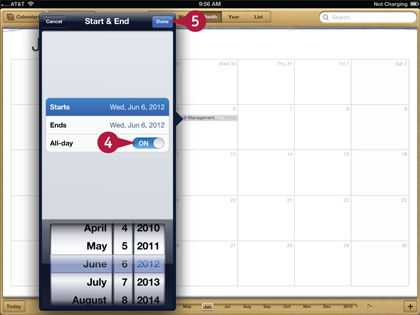
The Start & End dialog opens.
 Tap the All-day option to the On position.
 Tap Done.
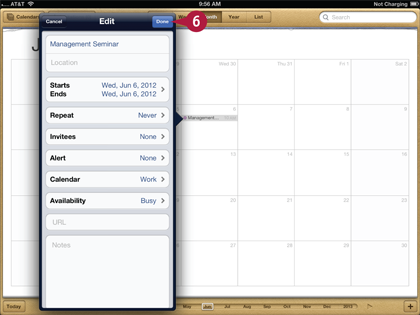
Calendar returns you to the Edit dialog.
 Tap Done.
The event is saved as an all-day event.
Set an Alert for an Event
Now that you have entered events into your calendar, edited those events, set up repeated events, and marked some as All-day, you need to remember them. Adding an alert to an event is a great way to give yourself a little reminder before the event takes place.
By default, an alert is scheduled 10 minutes before the event. You can set an alert minutes, hours, or days before the event, and you can even set up more than one — just to be safe. Calendar issues a chime during the specified alert time and sends a message to your iPad screen. The alert message clears as soon as you unlock your iPad.
Set an Alert for an Event
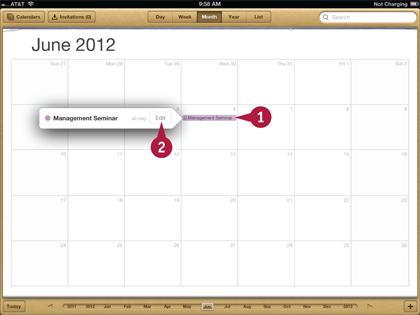
 Tap the date for the event.
A banner appears for the event.
 Tap Edit on the banner.
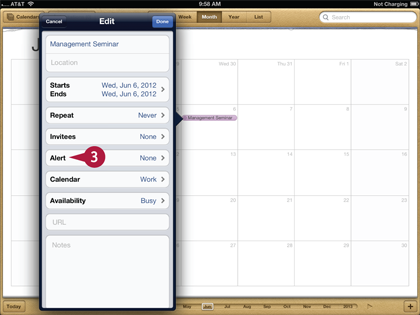
The Edit dialog opens.
 Tap Alert.

The Event Alert dialog opens.
 Tap the amount of time before the event that you want to receive the alert.
 Tap Done.
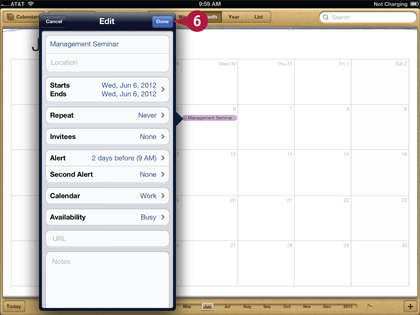
Your iPad returns you to the Edit dialog.
 Tap Done.
Calendar saves the alert.


