If you are new to origami, or if it has been some years since you picked up an origami book, please read this section. Instead of trying to fold the most complicated models in the book without perhaps knowing the difference between a valley fold and a mountain fold, you should read carefully through these pages. They will help you enjoy your folding and ensure your success.
Paper
Paper, of course, is essential. The absolute best paper to use for most of the toys in this book is specialist origami paper. Origami paper is square paper, colored on one side and white on the other, a little thinner than common copier paper. The difference in color between the two sides is often used to improve the recognition of a model—for example, by creating color-change eyes—rather than being used to prettify a model. Thus, the color change is often functional rather than merely decorative.
Origami paper can be bought from a number of sources:
Stores: Try arts and crafts stores, toy stores, Japanese and East Asian stores, stationary stores, and office supply stores.
Origami societies: Most cities have an organized origami society that will sell origami paper (and books and more). To find the society local to you, simply type “origami” and your country or city name into an online search engine.
Online: Entering “origami paper” into a search engine will bring up many online retailers. You could also try auction sites for a bargain.
For those impromptu moments when you are seized by the urge to fold, or when someone suddenly requests you fold that amazing model you made last week, other papers are also suitable for folding. Try using printed junk mail—a wonderful free source of excellent paper—or magazines, old photocopies, or notepads. In truth, most papers that are printed on are okay to fold, and the potential for recycling and reusing papers in this way makes great sense in this age of increasing green awareness. Indeed, I know of origami people who on principle never buy paper to fold—they reuse papers of all kinds that others have discarded. Good for them.
Papers to avoid include newspapers, paper towels, tissue, and any other paper that will not hold a crease well.
Most origami books will rightly encourage you to fold your favorite origami masterpieces from beautiful papers and exhibit them for everyone to admire. However, the models in this book are toys, designed to be played with rather than exhibited, so it isn’t at all a requirement that you hunt for that perfect sheet of Japanese handmade washi paper priced at six times the cost of this book. A certain snobbishness over paper for origami is generally a good thing, but it is probably unnecessary for the models in this book.
Creating a Good Environment
There’s nothing to stop you folding on your lap in front of the TV, your phone locked to your ear and the cat sitting on your head...but you can and should create a better environment in which to fold.
Sit at a table. Fold on a hard, smooth, clean surface. If a table is not available or if you are infirm, a large hardback book is a good substitute. Try to organize your seating arrangement so that the light is coming toward you from the front, not from directly overhead or from the sides. A frontal light source will create shadows across the folds of your paper, helping you to fold with greater accuracy and fluency. Try switching lights on or off, moving your chair, or even going to another room. Natural daylight through a window is a better source than artificial lighting. Good light is not an optional luxury, but a necessity.
Turn off your phone, switch off the TV, put the cat out, and do whatever you need to do to be able to focus on your folding. This is your time. We all need time to center ourselves, and doing origami is a wonderful way to achieve this.
Following the Drawings in this Book
Origami drawings are a language unto themselves. To fold successfully, you need to understand the instructions. Here are some tips and tricks:
Try to learn the folding symbols! When you are folding and you see a symbol you don’t understand, refer to the Symbols list.
Fold slowly. Take your time. Don’t rush. Enjoy the process of folding. You are not in a race.
Fold carefully. What one person may consider careful folding, another may consider unacceptably sloppy or unnecessarily precise, so the best advice is to fold as well as you can. Origami toys work best when the mechanisms are precisely folded, but if you are overly worried by the accuracy of what you are folding, just do what is within your capability. If precision is a problem, it will improve with practice.
Try again. From time to time, we all become stuck. To unstick yourself, first try unfolding a few steps to a point where you are sure everything is correct, and then fold forward again. Maybe you made a mistake somewhere and refolding the last few steps will solve the problem. Also, look ahead to the next step to see the shape that you are trying to achieve. If you are still stuck, put your paper down, do something else, and try again later. This often works! Remember that making origami from a book is always a challenge, and the learning curve for some people can sometimes appear steep, so an attitude of patience and cheerful perseverance is most helpful (and not just for origami!).
Folding your Paper
There are good and not-so-good ways to fold. Following a few simple guidelines will make your folding experience more pleasurable.
Fold away from you. When making a fold, always pick up an edge or corner near to you and fold it away from your body, making the new crease on the edge of the paper nearest to your body. Never do the opposite: never pull an edge or corner far away from you toward your body and crease across the top of the paper. You must constantly rotate the paper so that for every new fold the paper is correctly positioned. Rotate, rotate, rotate!
It is sometimes better to fold against a hard surface and sometimes better to fold in the air between your hands...but when and why? Generally, make long creases against a surface; they will be made more accurately. This usually means all the early folds. Later, when the main folds have been put in, pick up the paper and work with it between your hands. Experts like to fold entirely in the air (the “ballet of the paper” and all that), but it is better for beginners and improvers to fold against a surface.
It is worth remembering that origami is not just a folded art, but a folding art; that is, the process of folding should be enjoyable, not just a means to an end, to be rushed through as quickly as possible on the way to making a model. Think of folding as a gourmet meal, whose delicate and diverse flavors and many courses should be savored slowly. Folding should not be like gobbling down a drive-in take-away and speeding off. Following the above advice will make your folding experience pleasurable, not a chore, and you will want to do more. The art of origami should be a sensual experience, never just a mechanical means to an end.
What to Do with your Origami Toys
In two words...share them!
Of all origami genres, toys should be shared. Learn a few of your favorites by heart and make them for family and friends, or as icebreakers with strangers at parties, dreary meetings, long flights, and the like. A designer friend once told me how she traveled from remote village to remote village in several Southeast Asian countries on a research project, gaining the friendship and help of the villagers by folding origami toys for everyone!
If you have the confidence, teach origami toys to club groups, young or old. They are great to teach to children, who love to play with them; adults love them too. Some of my most enjoyable workshops have been with groups as diverse as graphic design students at a design college in central London, a group of engineering professionals, a group of elderly ladies, and a small class of children at a rural village deep in the English countryside.
If you are a teacher, teach origami toys in class as a fun end-of-semester treat, or more seriously in math, science, and technology classes (there are some great examples of levers and other mechanisms contained in the toys). Teaching toys to disruptive children gives them status and self-confidence, or they can be given as rewards for good behavior. I know of therapists who gain the trust of children by making origami toys for them and who use mouth toys in role-playing games.
The essence of an origami toy is its innocent delight. But presented in the right way at the right time, a toy may also have a serious educational or therapeutic use. Don’t confuse fun with triviality!
Symbols
It’s not so much the step-by-step drawings themselves as the symbols superimposed on them that tell you how to make an origami model. Over the years, a general consensus has been unofficially agreed upon between origami authors of many countries and different languages to make the symbols universal. This means—in theory, anyway—that paper folders around the world can pick up any origami book and be able to make the models it contains because the symbols are broadly the same, book to book and language to language. The symbols included in this book are not the complete set used worldwide, but they are sufficient to enable you to make the models it contains.
With two exceptions, the symbols are largely self-explanatory. The exceptions are the symbols for the two basic folds of valley fold and mountain fold (actually, if you think about it, they are the same fold). Each folding symbol should be learned before you begin this book.
Mountain Fold and Valley Fold: 3D
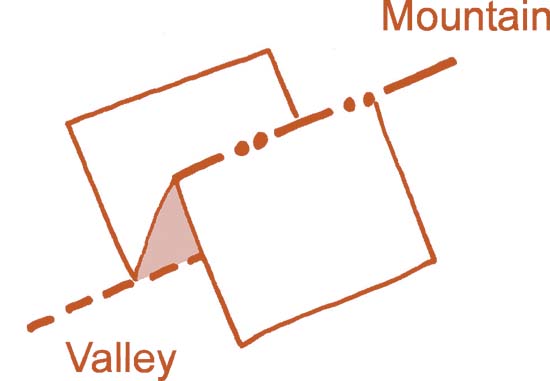
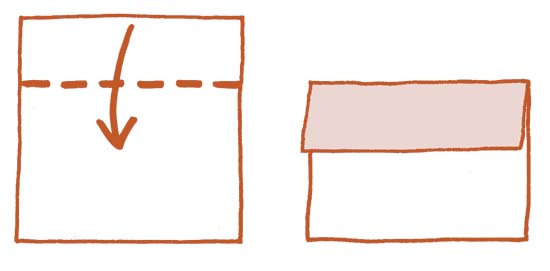
Valley fold
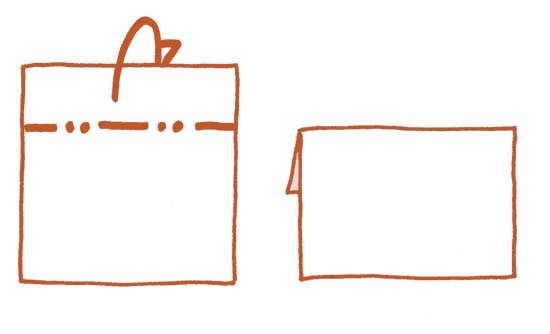
Mountain fold
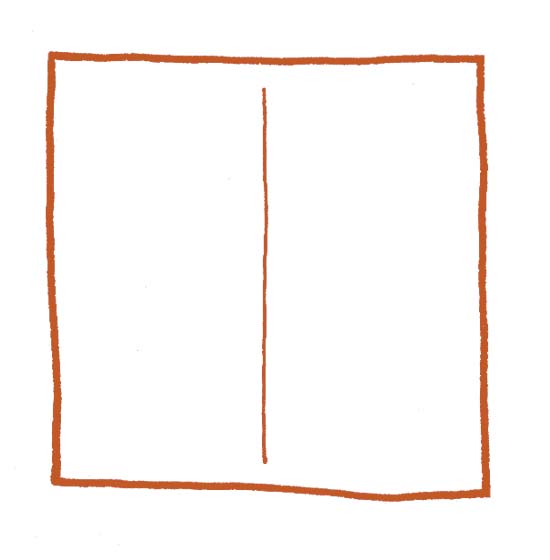
Existing fold
Fold and open
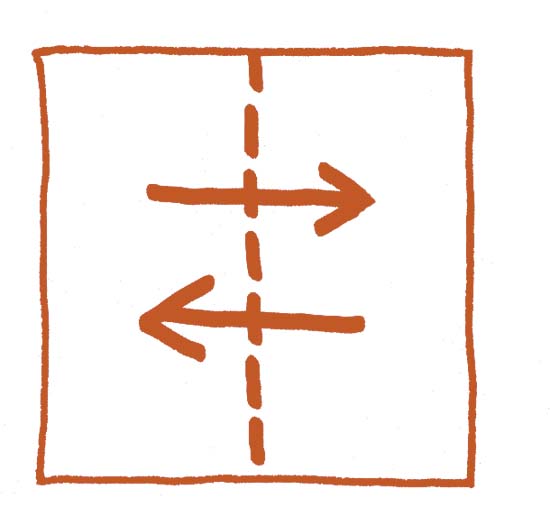
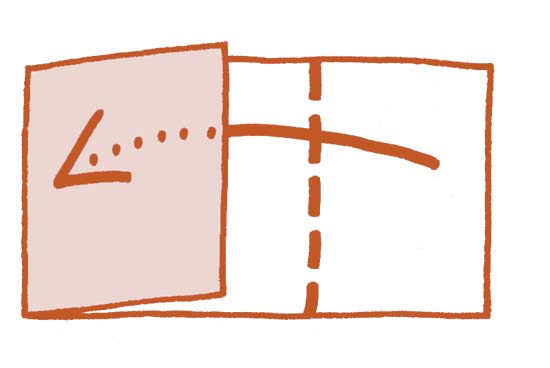
X-ray view or tuck in
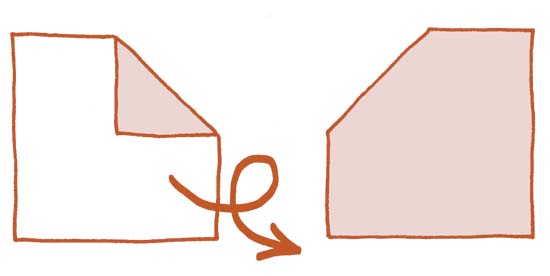
Turn over
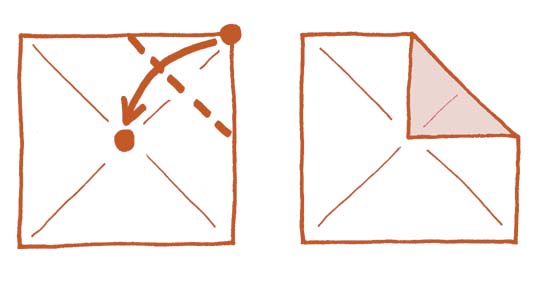
Fold dot to dot
Techniques
Valley folds and mountain folds are simply “folds.” That is, one new fold is made at a time, either by bringing part of the paper toward you (to make a valley fold) or turning it away from you (to make a mountain fold), and then flattening it to make a new crease. That’s really all there is to say about valley and mountain folding.
However, there are more complex techniques in which a number of new folds are made simultaneously. These techniques are important because they hugely increase the possible number of folded shapes, and thus they increase perhaps almost to infinity the number of models that can be made.
There are many advanced manipulation techniques (Squash, Sink, Rabbit Ear, Petal Fold, etc.), but the most common techniques are the Inside Reverse Fold and its less common complementary, the Outside Reverse Fold. Once learned, these are very quick and simple to make, but at first sight they can seem difficult to understand. If you are unfamiliar with these techniques, I strongly recommend that you make the examples that follow, rather than trying to fold them for the first time when making a model.
Inside Reverse Fold
This is so-called because the part of the paper that is manipulated reverses inside the remainder of the paper.
1. Begin with a square, white side up. Fold in half along a diagonal and unfold.

2. Fold the top left and top right edges to the center line.

3. Fold in half along the Step 1 crease
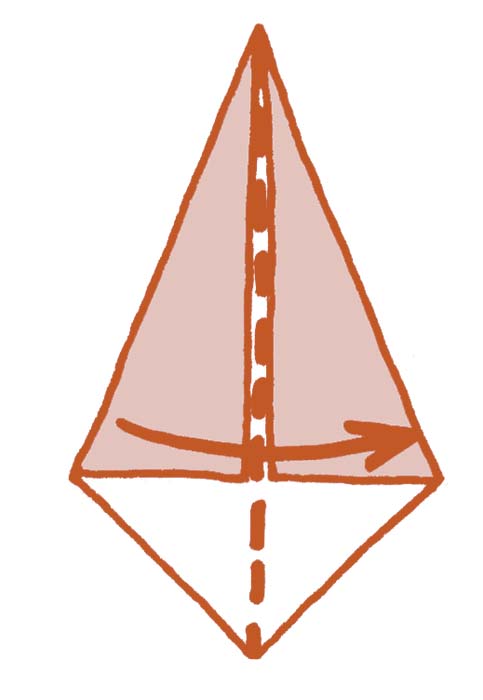
4. Fold the sharp corner across to the right, to the position shown in Step 5. The exact position is unimportant.
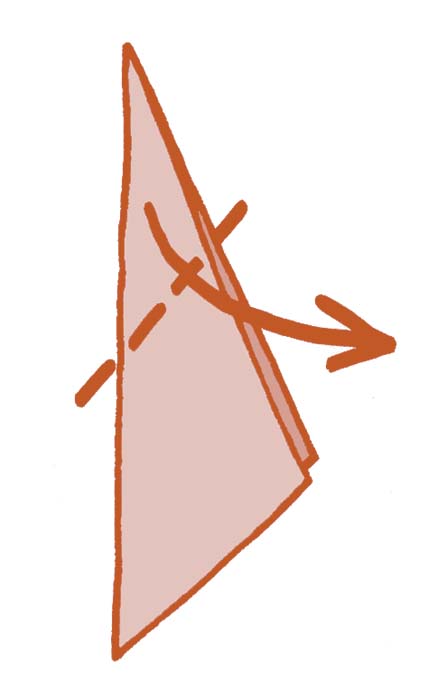
5. Unfold.
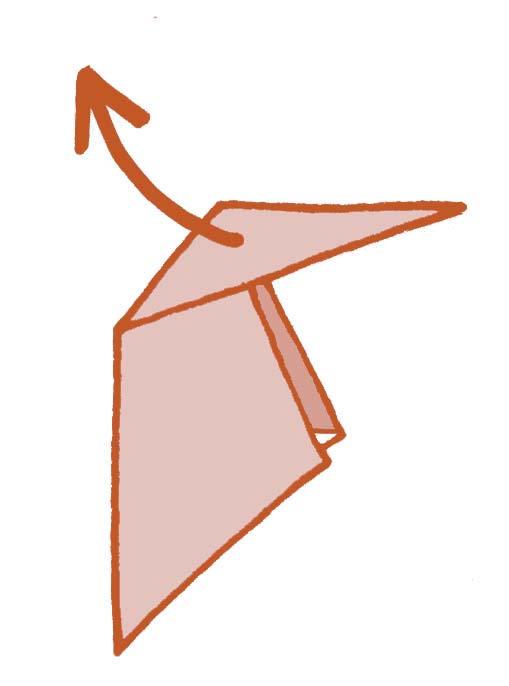
6. This is how the paper will look.
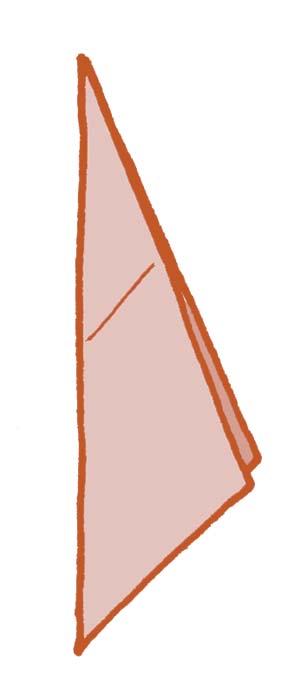
7. Along the same crease line just made, now make a mountain fold, bending the sharp corner behind.
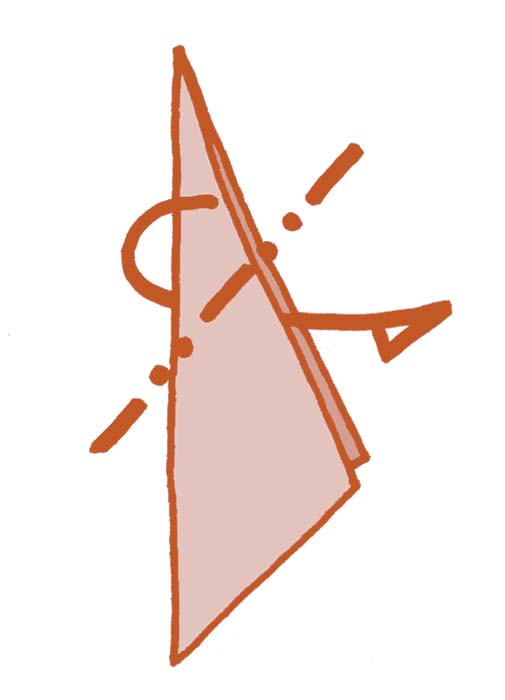
8. Unfold. The crease can now fold forward or backward.
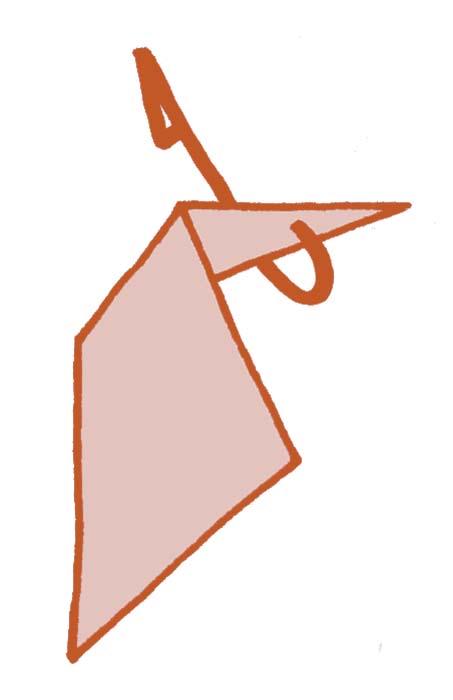
9. Unfold the Step 1 center crease.
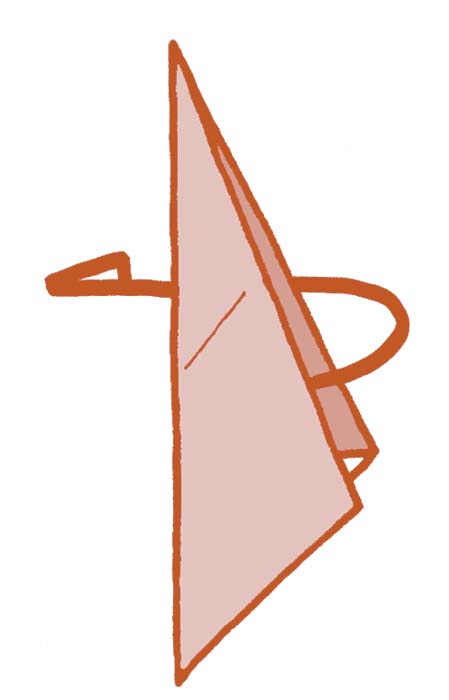
10. This is the pattern of folds. Note the “V” in the center.
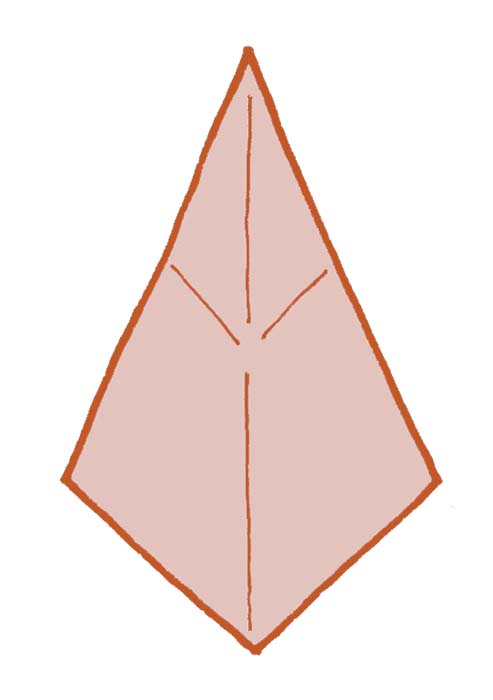
11. Think of the paper as having four folds that all meet at the bottom of the “V.” From this side of the paper, three of those folds will be mountains, and one will be a valley. If you make these four folds one at a time and then collapse all the creases simultaneously, you can jump straight to the end, at Step 16, but it is more instructive to follow the method in Steps 12–15.
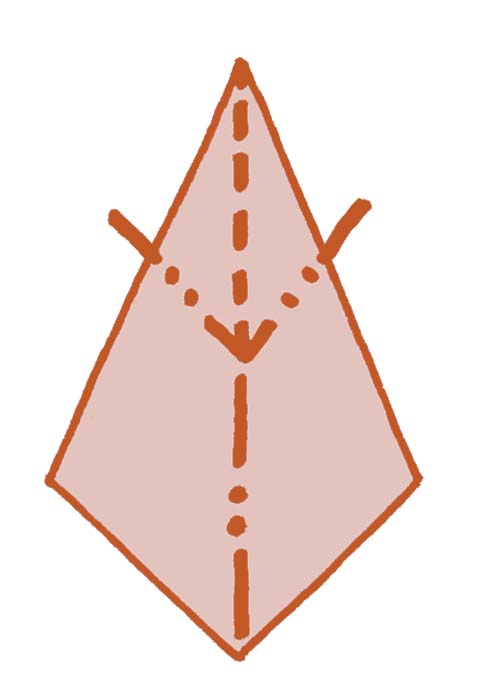
12. Fold back to Step 9.
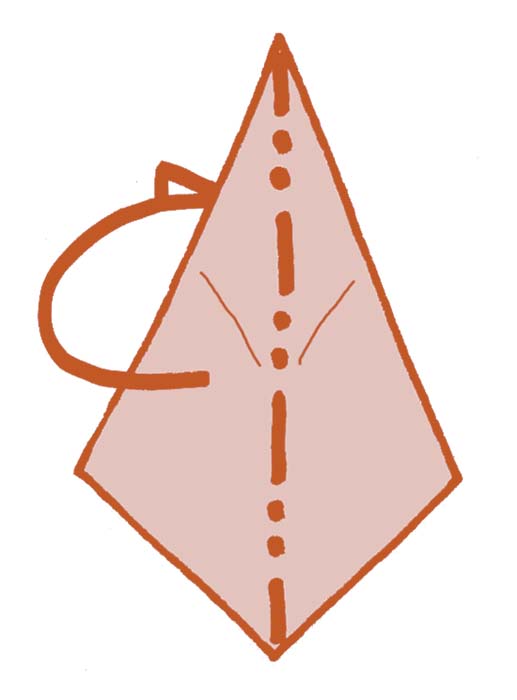
13. Hold the paper as shown between your two hands. Begin to move the sharp corner downward and—crucially—down through the middle of the paper, between the front and back sides...
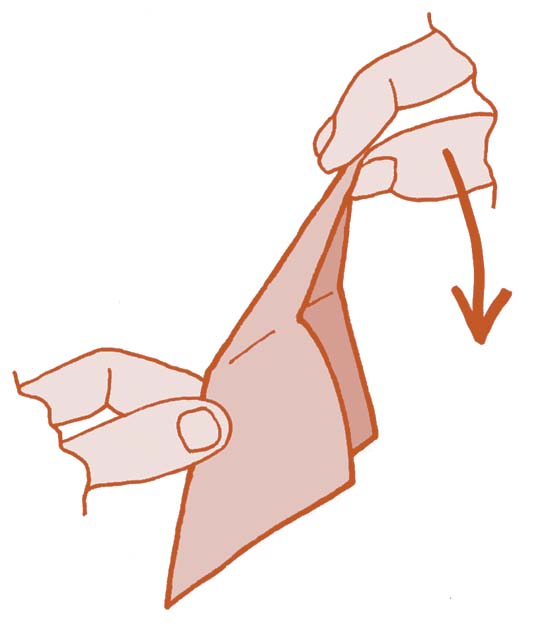
14....like this. Allow the “V” fold to form. Make the valley fold seen in Step 11, so that the paper will begin to flatten itself...
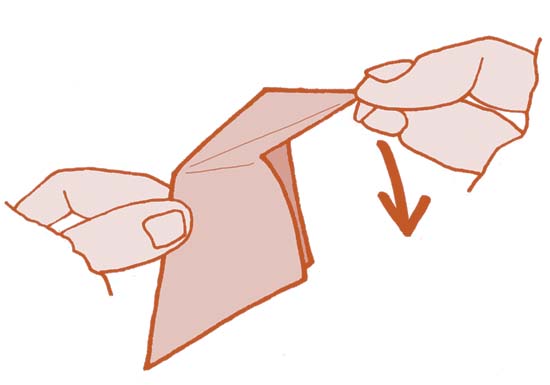
15....like this. Continue to flatten the paper...
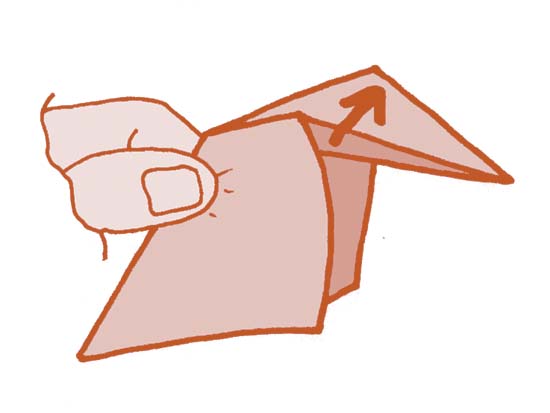
16....until the Inside Reverse Fold is complete.
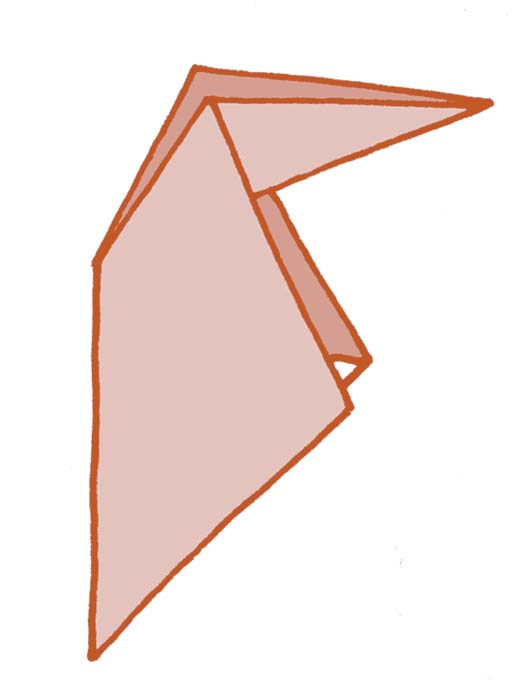
Inside Reverse Folds in the Book
The explanation above took many steps, too many to be repeated again and again in the book. So here is how the book explains what you have just done.
Inside Reverse Fold—in the book 1
Make an Inside Reverse Fold
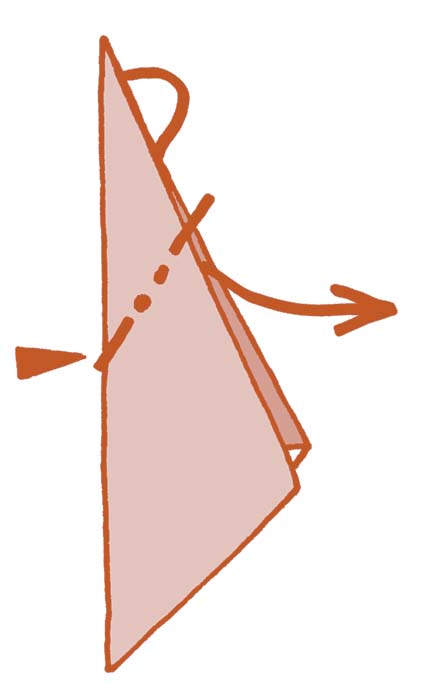
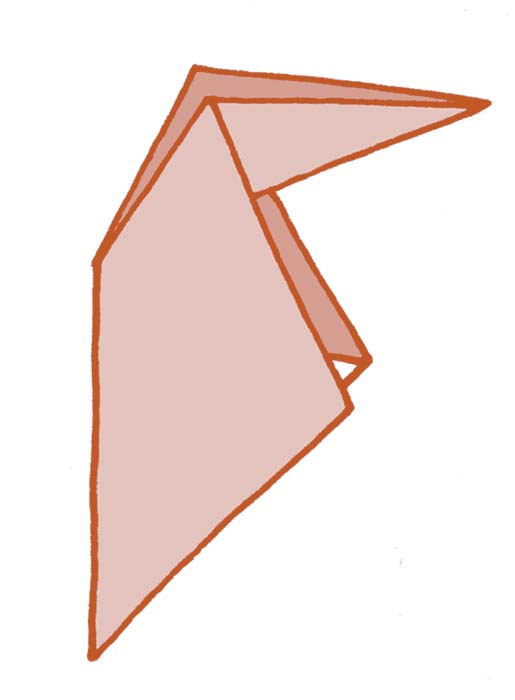
Inside Reverse Fold—in the book 2
Complete.
Outside Reverse Fold
This is so-called because the part of the paper that is manipulated reverses outside the remainder of the paper.
1. Begin with Step 4 of the Inside Reverse Fold, but without the new fold made on that step.
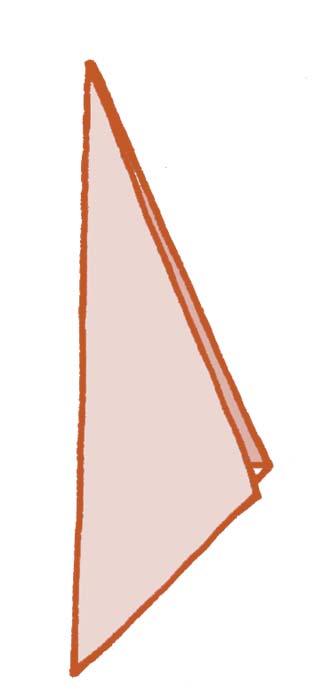
2. Bend the sharp corner out to the left. This is in the opposite direction to when making an Inside Reverse Fold.
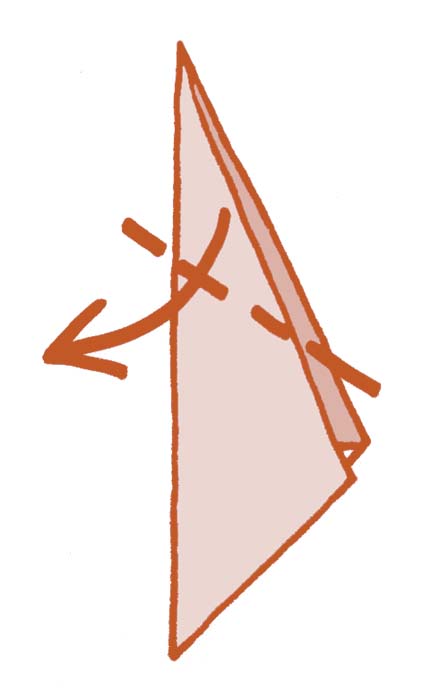
3. Unfold.
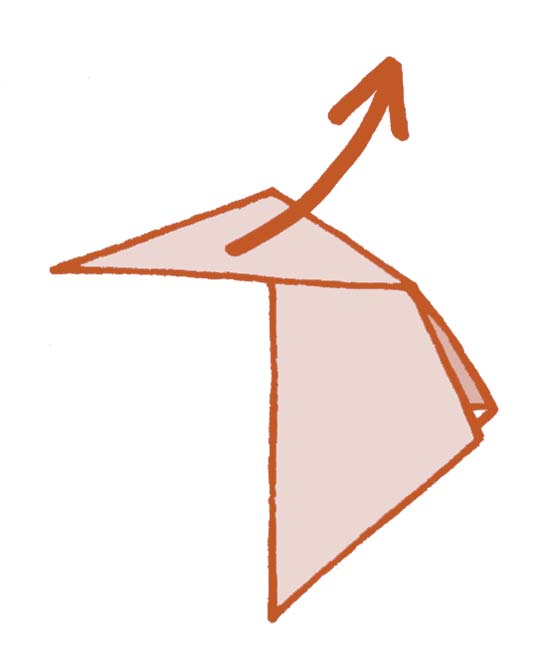
4. This is how the paper will look.
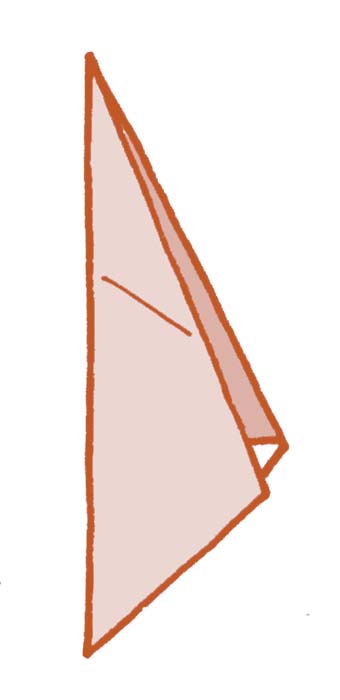
5. Along the same crease line just made, now make a mountain fold, bending the sharp corner behind.
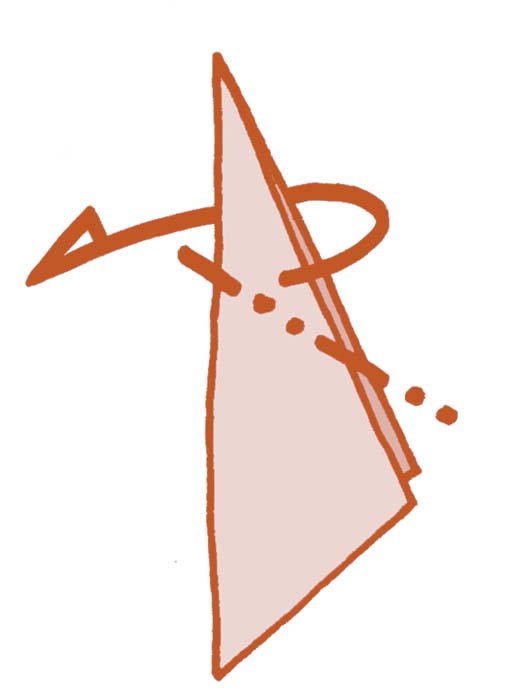
6. Unfold. The crease can now fold forward or backward.

7. Swing the back layer around to the left.
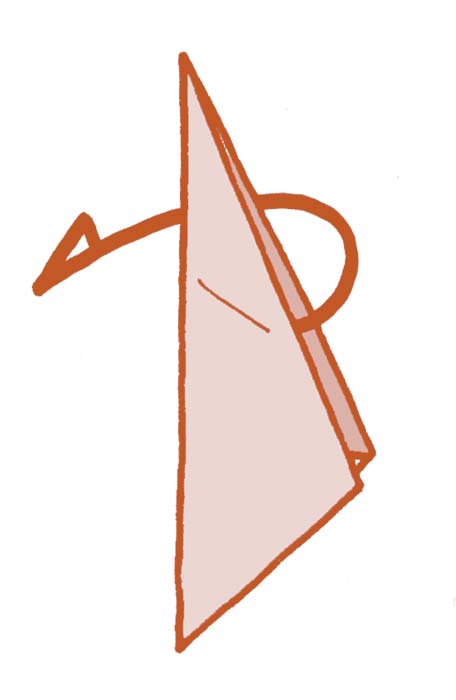
8. This is the pattern of folds. Note the upturned “V” in the center. Note too how this pattern differs from the Inside Reverse Fold.
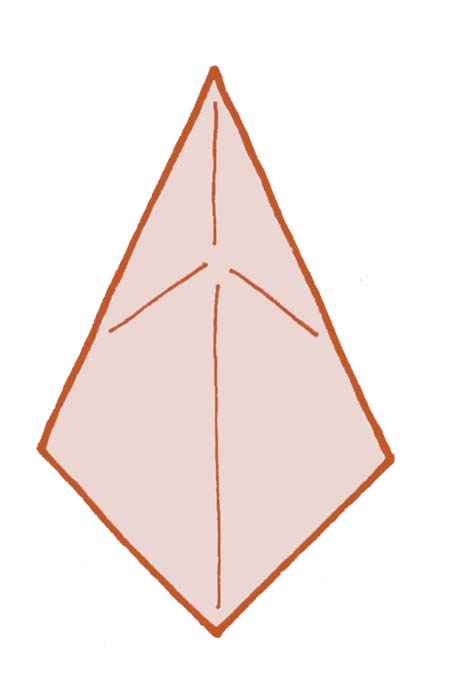
9. Think of the paper as having four folds that all meet at the top of the upturned “V.” From this side of the paper, three of those folds will be valleys, and one will be a mountain. Note how the number of valleys and mountains is reversed compared to the Inside Reverse Fold. If you make these four folds one at a time and then collapse all the creases simultaneously, you can jump straight to the end, at Step 12, but it is more instructive to follow the method in Steps 10–11.

10. Hold the paper as shown. Bend the sharp corner forward, simultaneously folding the paper in half down the middle and allowing the valley folds of the upturned “V” to form . . .
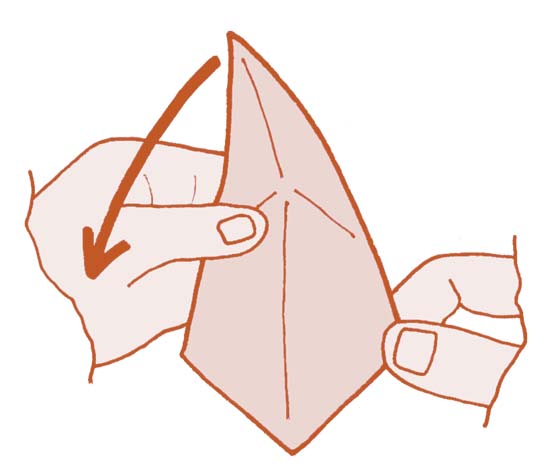
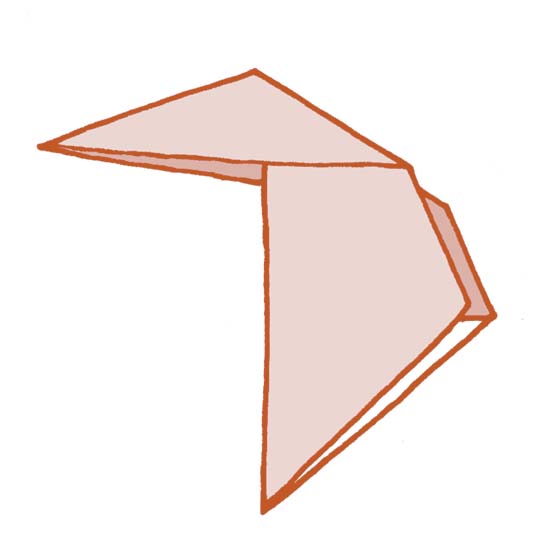
11....like this. For a while the paper will be curvy, so encourage it to flatten...
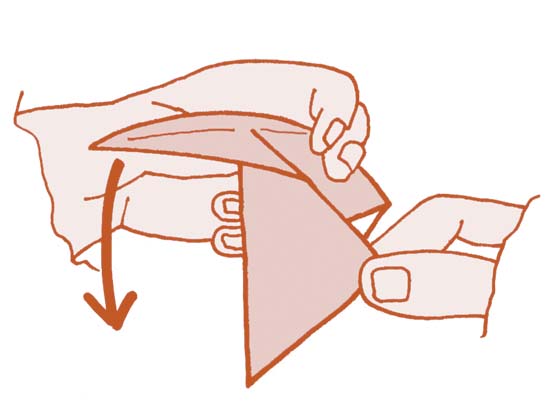
12....until the Outside Reverse Fold is complete.
Outside Reverse Folds in the Book
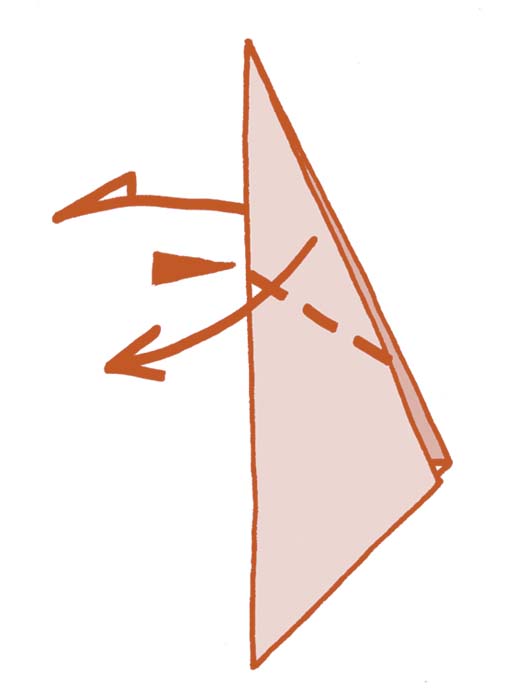
The explanation above took many steps, too many to be repeated again and again in the book. So here is how the book explains what you have just done.
Outside Reverse Fold—in the book 1
Make an Outside Reverse Fold
Outside Reverse Fold—in the book 2
Complete.
