CHAPTER III
CHIMNEYS, FORGES, FIRES, SHOP PLANS, WORK BENCHES, ETC
A PLAN OF A BLACKSMITH SHOP.
The plan shown here shows the arrangement of my shop. I keep all my tools and stock around the sides of the shop so as to have more room in the center. I do all my work, repairing, iron or wood work on the one floor, shown in Fig. 13. My forge is two feet four inches high, and four feet square; it is made of brick and stone. My chimney has a 12-inch flue, which gives me plenty of draught. My tuyere-iron is set four inches below the surface of the forge; this arrangement gives me a good bed of coal to work on. My vise bench is two feet wide and seven feet long; it has a drawer in it for taps and eyes. My wood-work bench is two and a half feet wide and eight feet long. The blower takes up a space of four feet ten inches; I can work it with a lever or crank. The drill occupies two by two feet. The tool-rack is built around the forge, so that it does not occupy much room and is handy to get at. The forge is hollow underneath, which allows me to dump the fire and get the ashes out of a hole left for the purpose. I use a blower in preference to the old-fashioned bellows, and consider it far superior in every way.
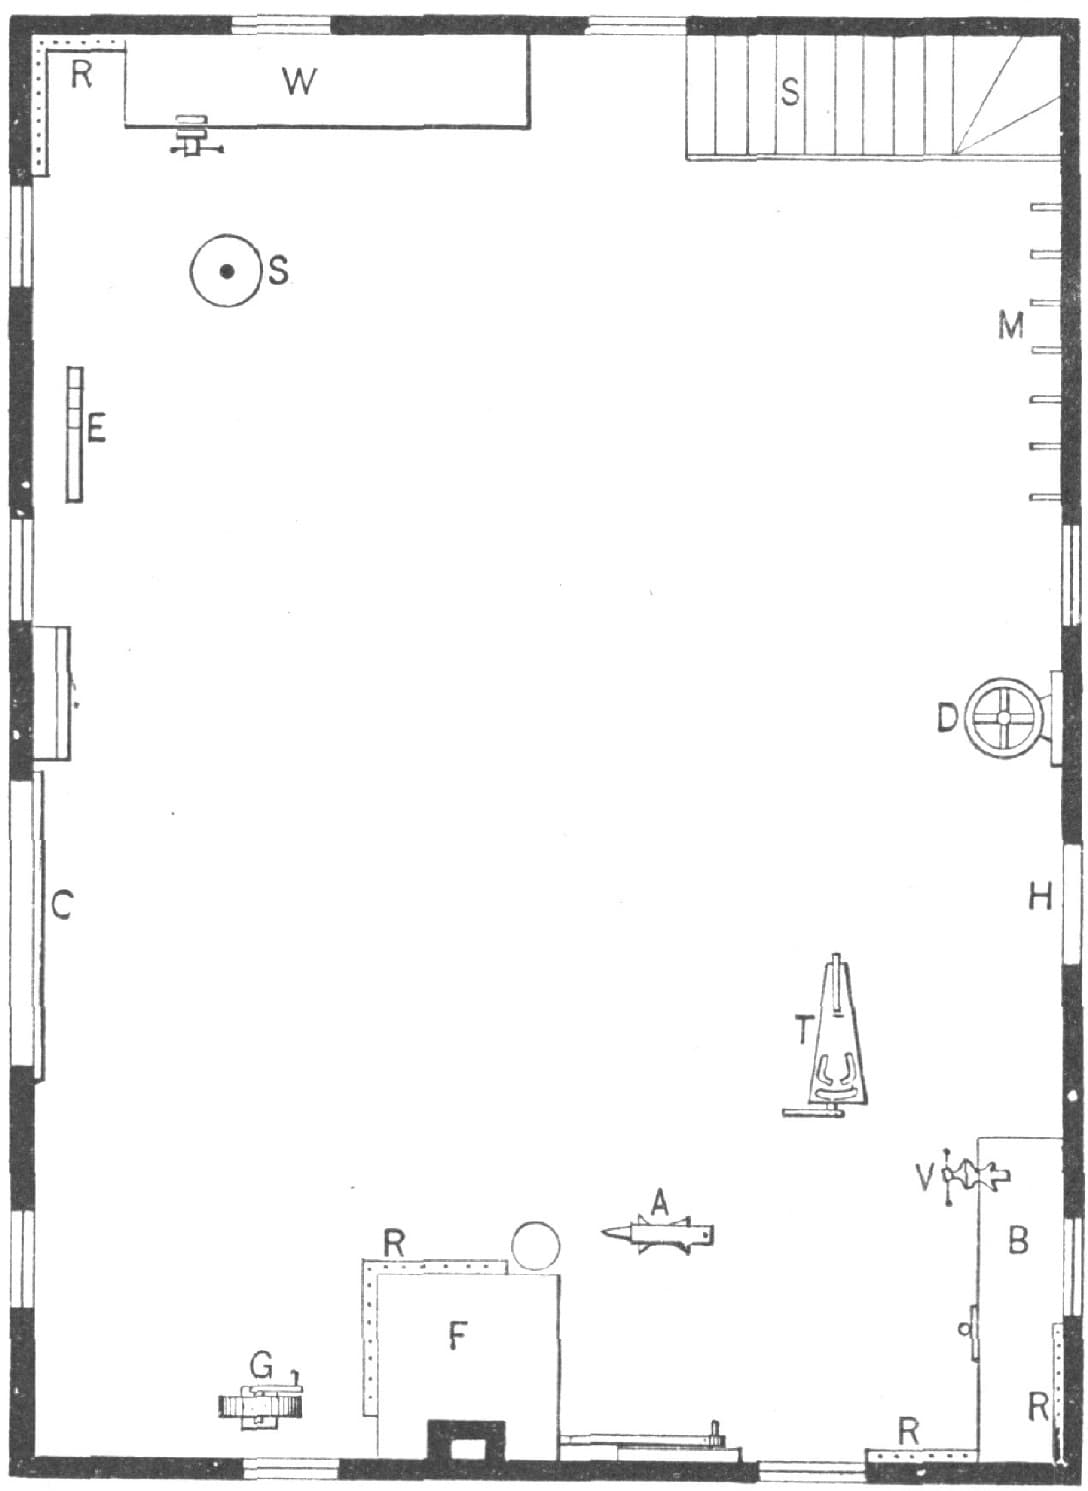
FIG. 13—PLAN OF A BLACKSMITH SHOP
In the illustration, A denotes the anvil; B, is a vise bench for iron work; RR, are tool racks for taps, dies and other small tools; C, is a large front door; D, is an upright drill; E, is a tire bender; G, is a grindstone; H, is a back door, and my tire stone is directly opposite, so I can step to it easily with a light tire from the forge; I, is my blower; V, is a vise for iron work; T, is a tire upsetter; M, is an iron rack; S, a pair of stairs; W, is my wood-working bench; R, is a rack for bits and chisels; S, is a wheel horse for repairing wheels; F, is the forge; and near it is a rack for tongues and swedges. The round spot at the corner of the forge is a tub. I have a small back attached to my anvil block for holding the tools I use while at work on any particular job.—By J. J. B.
AN IMPROVED FORGE.
My hood for smoky chimneys, shown in a previous communication, is a good one, generally speaking, but there are some kinds of work that will not go between this hood and the bottom of the hearth, and to get over this difficulty I have devised the arrangement shown in the accompanying illustration, Fig. 14.
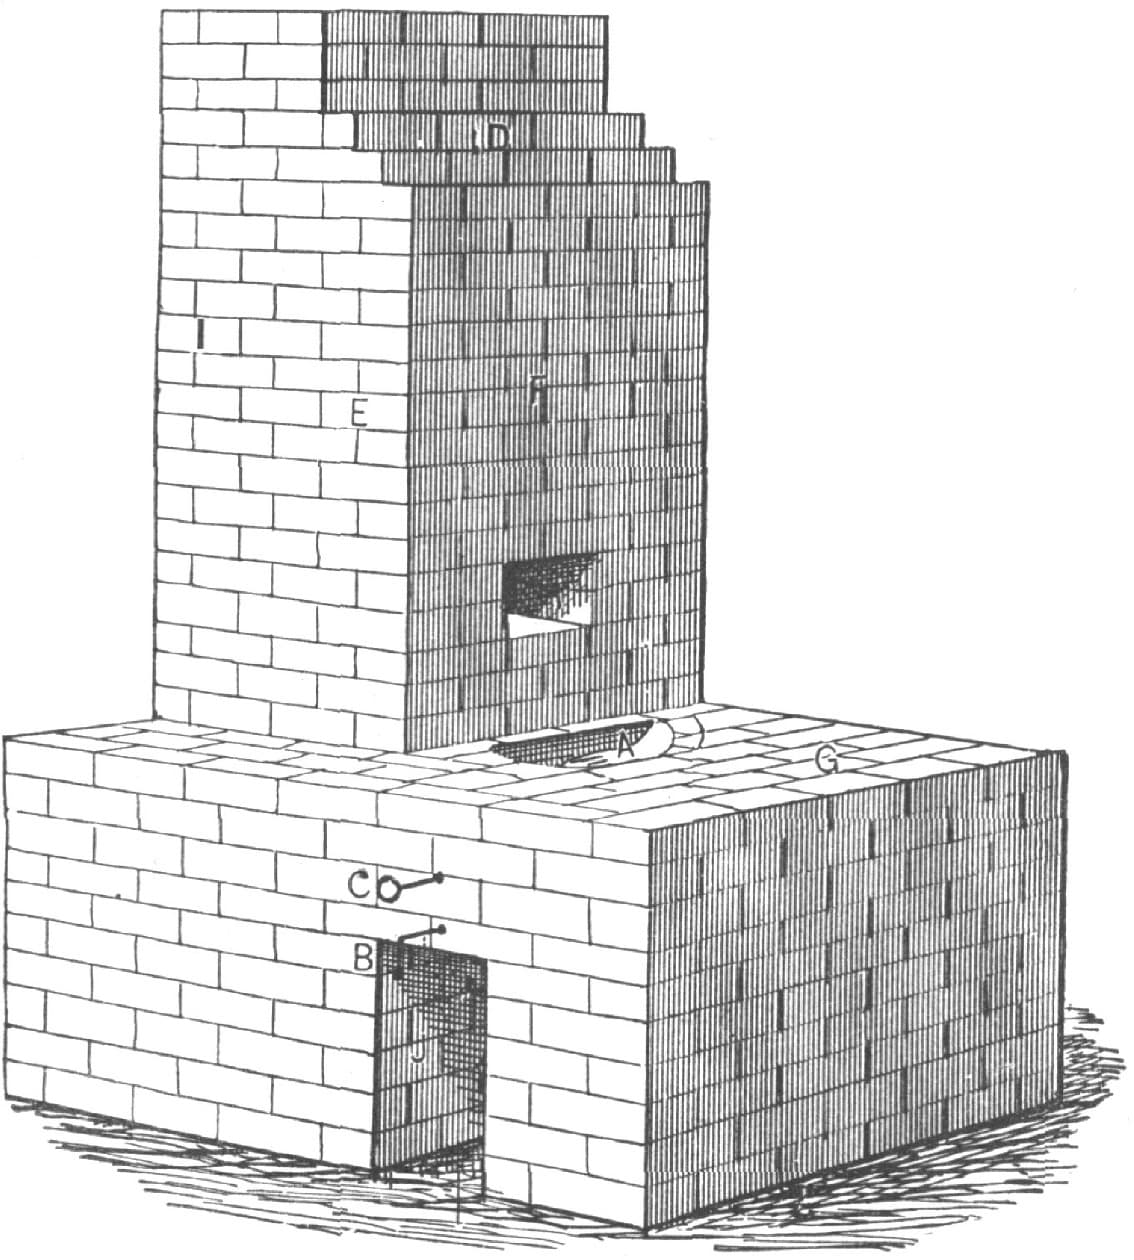
FIG. 14—AN IMPROVED FORGE
I derived the leading idea from a forge in Dundee, but in making mine I deviated from this pattern to suit myself. The great secret in having a good fire is to have a good draft, and to have a good draft it must be built after scientific principles. First, a vacuum must be made so large that when your fire is built, the blaze immediately burns the air, thereby forming a draft which acts after the balloon principle, having an upward tendency. The chimney should be at least sixteen feet in height. Now, for the forge: I tore the old one away clear down to the floor, and built a new one with brick, making it on the side four feet and two inches (that is, from the back part of the chimney), three feet and six inches in width and two feet and eight inches in height. I placed my tuyere four inches lower than the surface of the hearth, leaving a fire-box nearly semi-circular in shape, about fourteen inches across the longest way and ten inches the other way. I then finished the hearth, making it as level as I could conveniently. I then put a straight-edge on the face of the chimney four inches from each corner, marked it, and cut all of the front away for the distance of four feet and six inches, leaving the heavy sides undisturbed. I then commenced laying brick on the surface; beginning at the edge of the chimney; the front part of the extension chimney was allowed to come within three inches of the hole in the tuyere. I laid three courses of brick and left directly over the tuyere an opening four inches by eight inches—this is large enough for a draft opening. I then completed the chimney up as high as I had the old chimney, drawing in at the top, and the job was complete, and a better drawing forge cannot be found. The noise it makes in drawing, reminds one of the distant rumbling of a cyclone.
Now I would like to say just a little in reference to the tuyere I am using. It is manufactured by J. W. Cogswell, and I think it is the finest working tuyere I ever had the pleasure of using. It is made on the rotary principle, the top turning one quarter around. It suits almost any kind of work. By opening the draft a large fire can be obtained and by closing it you have a light one. You can have a long blast lengthwise, crosswise, or at any angle, and for welding light or heavy work, I can say the Cogswell tuyere is hard to beat.
In the illustration (Fig. 14), A, shows the position of the tuyere three inches from the face of the chimney. F, is the face of the chimney. G, is the upper section of the hearth. B, is the draft rod. C, is the rod that lengthens or shortens the blast. E, F, D, constitute the new part of the chimney. I, is the old chimney. H, is the draft, which is four inches by eight inches in the clear, and is six inches above the hearth. J, is the cinder box.—By L. S. R.
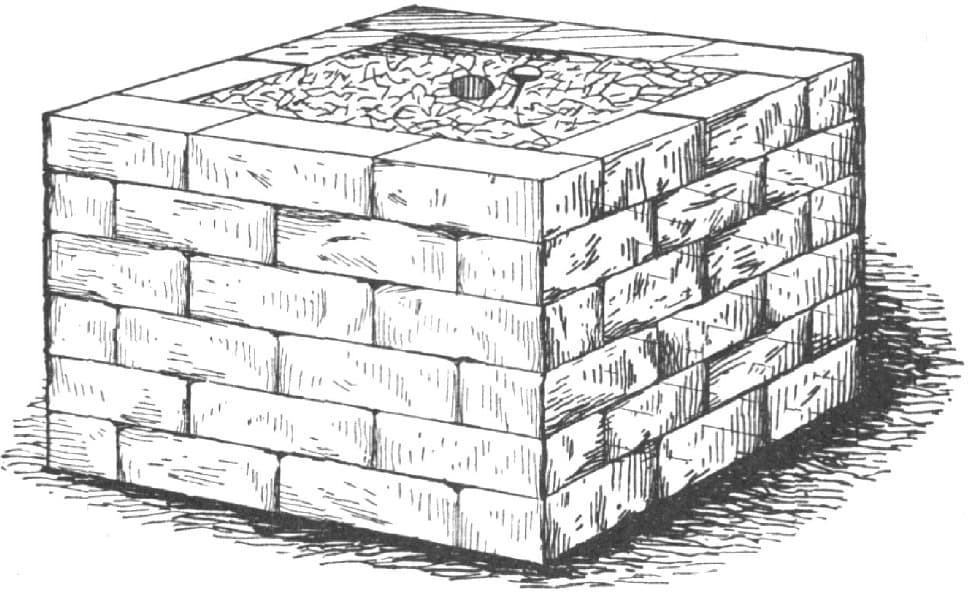
FIG. 15—THE FORGE-STAND
A SIMPLE FORGE.
The illustration herewith shows a simple forge at which may be performed some of the most difficult forgings.
The forge-stand, as shown in the illustration, is square in shape, but may be made round or any other shape to suit. A, Fig. 15, is the tuyere. The size of the forge must be made to suit the work. One that would answer for average purposes should be about twenty-four inches square, and about twenty or twenty-two inches high, and detached from the walls so as to allow of getting all around it. Fig. 16 shows the smoke-stack and bonnet. A, is the bonnet; B, the smoke-stack; C, is a dotted line showing the next joint of pipe as telescoped. D D, are chains running over the pulleys, E E, which are secured to the wall or ceiling. F F, are counterweights, which balance the bonnet when raised or lowered to accommodate the work in hand.—By I. D.
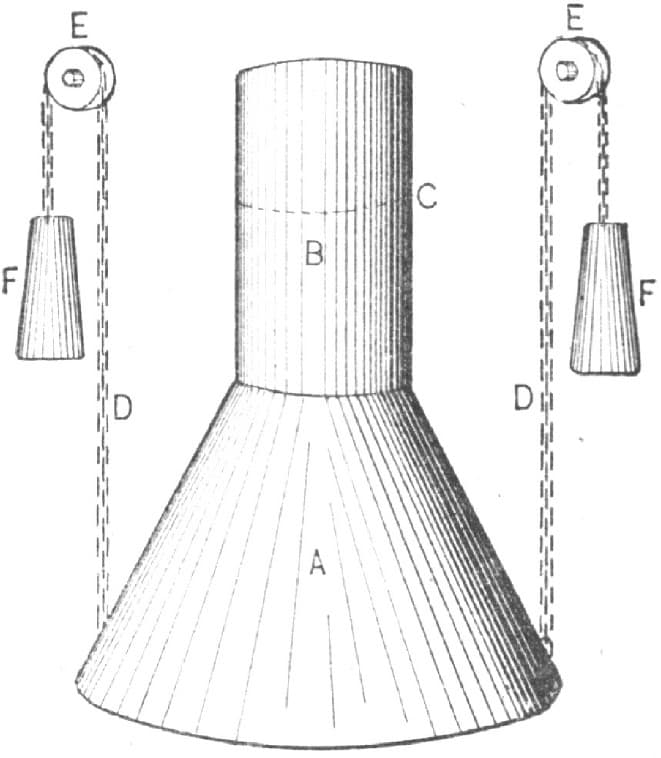
FIG. 16—THE SMOKE-STACK AND BONNET
CURING A SMOKY CHIMNEY.
I had a chimney in which the draught was bad, and it may be of interest to many to learn how I remedied the trouble. I did so by making a hood of boiler iron.
I first cut the hood to the shape shown in Fig. 17 of the accompanying engraving. The distance from A to C is two feet, and from A to B the distance is four feet, eight inches. From C to D it is two feet, five inches. I then cut away all projecting parts of the chimney, and next bent the hood to fit the chimney as closely as possible. I then put the hood up where I wanted it to be, that was about fifteen inches above the tuyere iron, and marked out the outline of the chimney, I then removed all the bricks inside the mark and riveted two straps, each eight inches long, on the hood at the points A and B. I also punched a hole at the top at C. I next drove a twenty-penny spike through the hole C to the middle of the chimney, being careful to set the nail in the mortar between the bricks.
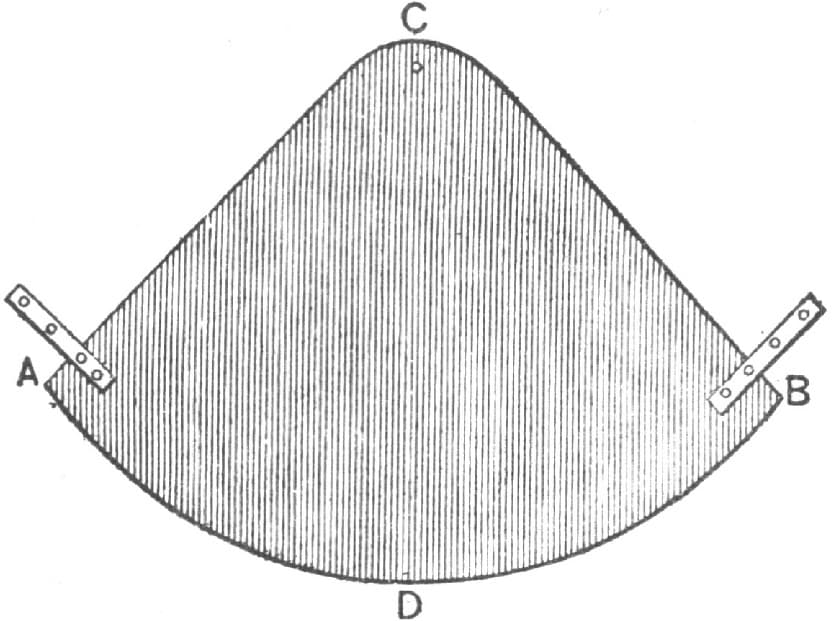
FIG. 17—THE HOOD
I then nailed the straps to the chimney and taking a strong wire drew the slack at A and B so that it fitted snugly. I next plastered it around the edge and gave it two coats of whitewash. The job was then finished and it is the best arrangement for a smoky chimney I have ever seen.
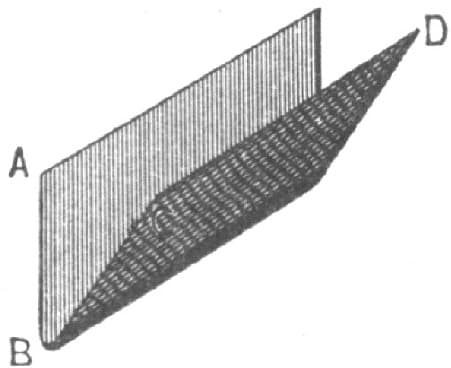
FIG. 18—THE CINDER CATCH
I have a very good cinder catch, also made of boiler iron, in the form shown in Fig. 18 of the illustrations. It was made by taking a piece eight inches wide and long enough to reach across on the inside of the chimney, and bending the piece as shown in the sketch. The catch should fit in tightly.
Fig. 19 represents the chimney with the hood attached. —By L. S. R.
A BLACKSMITH’S CHIMNEY.
The illustration, Fig. 20, shows my method of making a blacksmith’s chimney so that it will draw well. I know what it is to have a smoky chimney. I had my chimney torn down and built up again four times in two years. The last time it was built I think I struck on the right plan. The forge is built of stone. I use a bottom blast tuyere. The space B, in the illustration, is left open to receive the handle of the valve, and to allow the escape of the ashes. The front of the chimney, F, is built straight or perpendicular from the hearth, H. C denotes the opening for the smoke. The distance from H to C is about four inches, or the thickness of two bricks. Let me say here that the mouths of most all flues are too high up from the fire, and this allows the smoke to spread before it reaches the draught. The fire should be built as close to the flue as possible, and the top of the chimney should be a little larger than the throat.
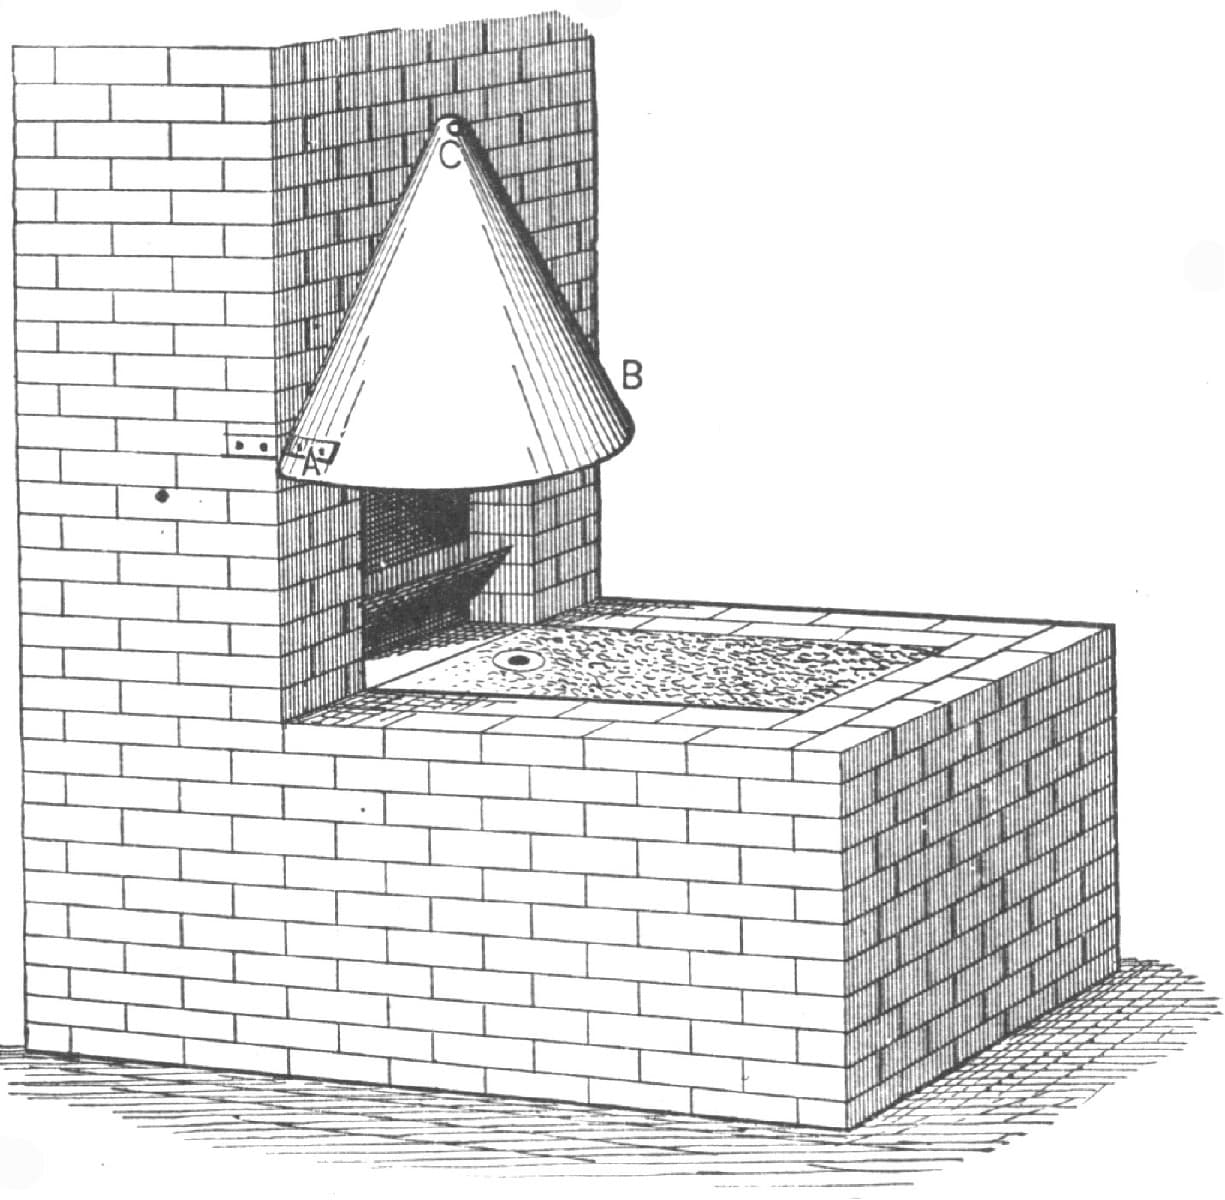
FIG. 19—SHOWING THE HOOD ATTACHED TO THE CHIMNEY
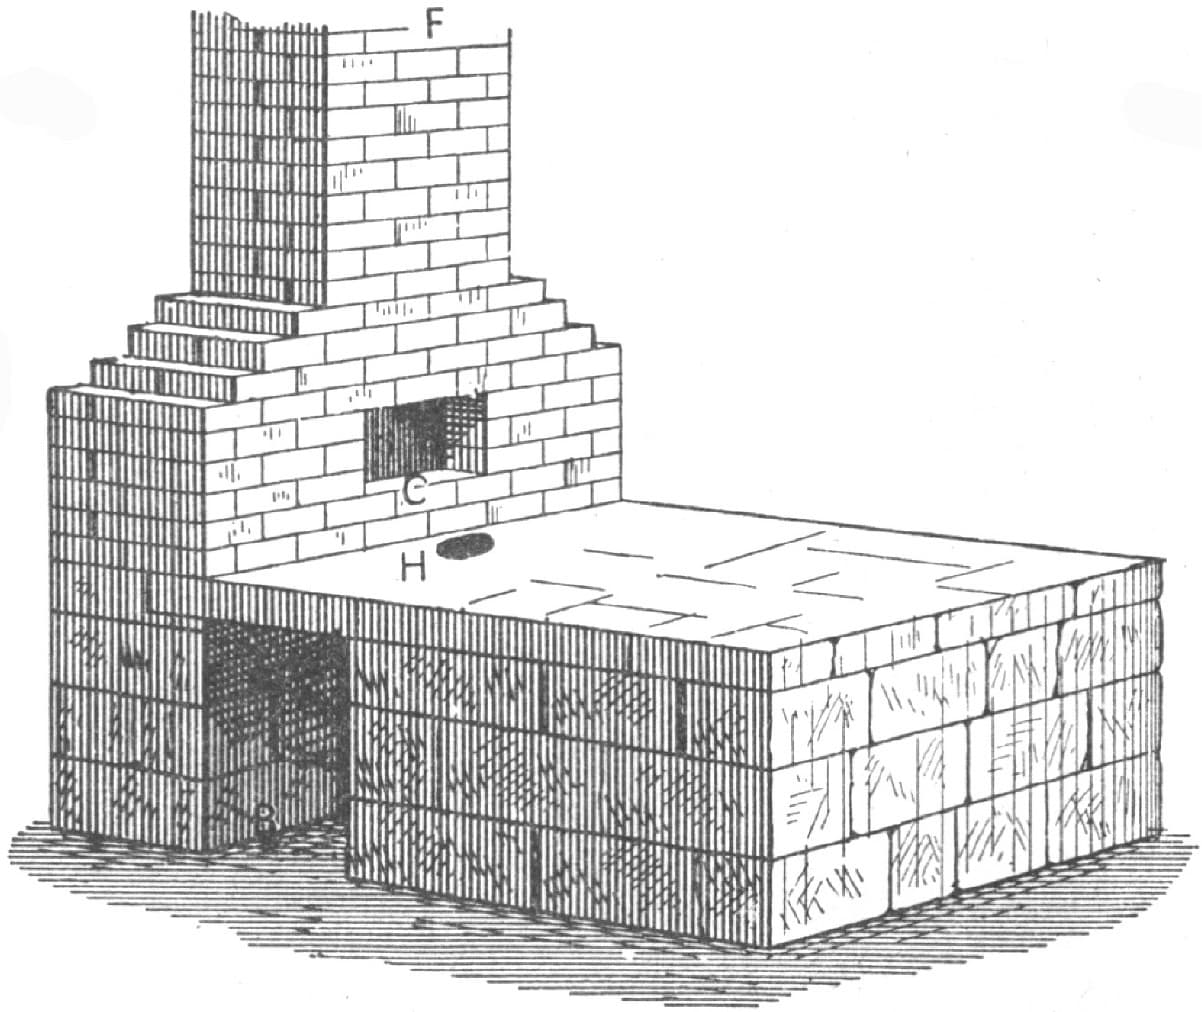
FIG. 20—A BLACKSMITH’S CHIMNEY THAT WILL NOT SMOKE
I think this is the handiest flue that can be built for general blacksmithing.—By J. M. B.
ANOTHER CHIMNEY.
As there are a great many who do not know how to build a chimney that will draw well, I send you a sketch, Fig. 21, of a chimney that I have been using for fifteen years and that has given me perfect satisfaction.
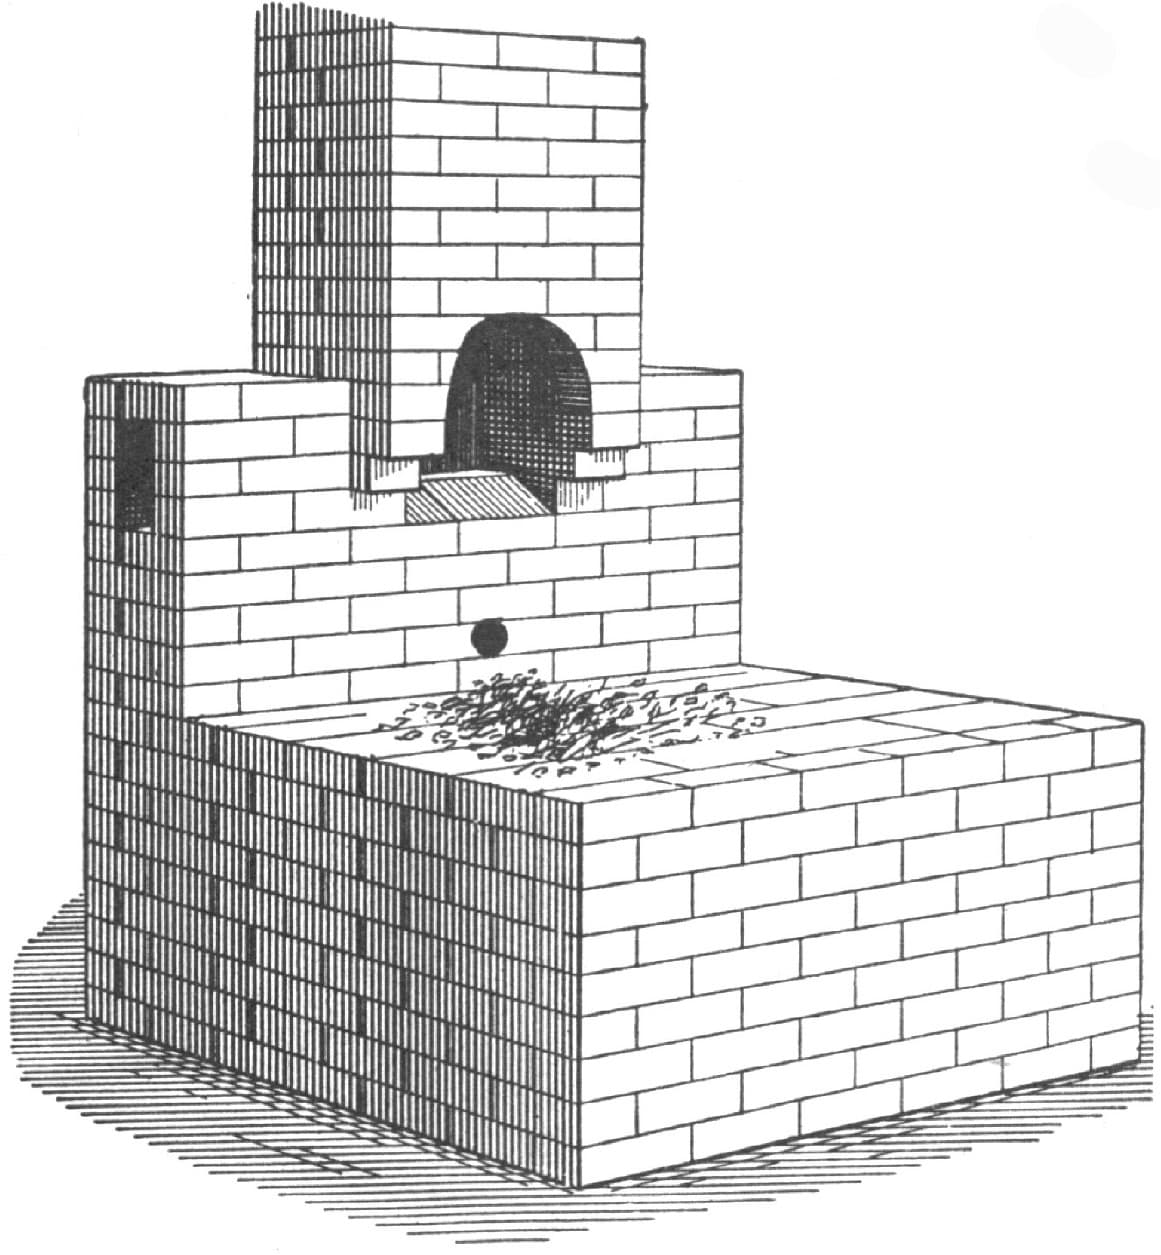
FIG. 21—A BLACKSMITH’S CHIMNEY THAT WILL DRAW
It is made of brick or stone and is joined to the hearth, the latter being six bricks below the jamb. The round hole in the bottom side is the bellows hole, and the square hole in the end of the jamb is very convenient for small tools, etc. The hearth and jamb can be built in size and height to suit the builder. —By J. K.
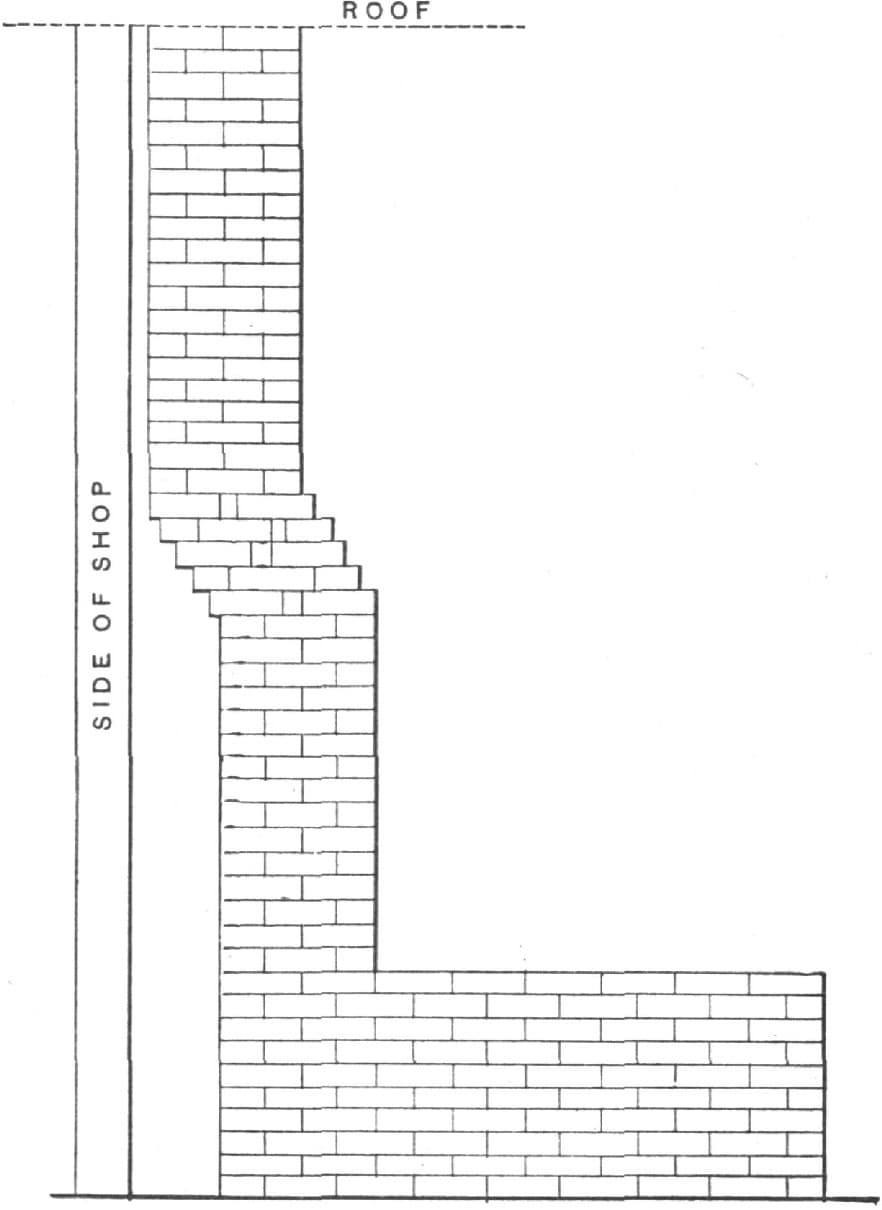
FIG. 22—ANOTHER BLACKSMITH’S CHIMNEY THAT WILL DRAW
STILL ANOTHER CHIMNEY.
The illustration above, Fig. 22, represents my method of building a blacksmith’s chimney so that it will draw well and will not smoke. The original chimney from which this sketch is taken has been in use in my shop for four years, and is as free from soot and cinders as it was the first day it was used. Its peculiar construction is due to the fact that the mason who built it made a mistake of eight inches in locating the forge, and, therefore, he had to give the chimney a jog of eight inches to get it out at the place intended for it. In making one it is best to run it out three feet, and if on the side run two feet above the comb.—By J. S. H.
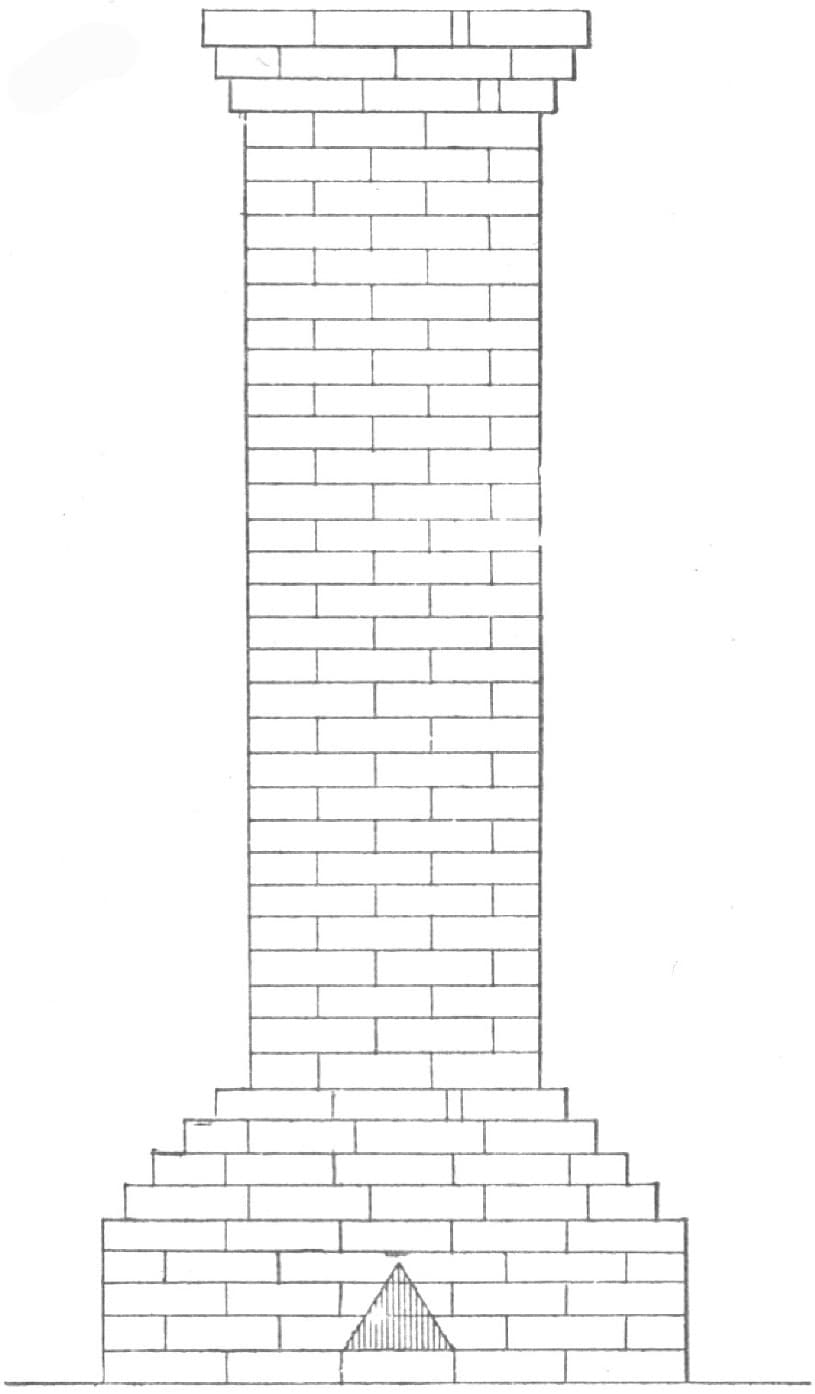
FIG. 23—STILL ANOTHER CHIMNEY THAT WILL NOT SMOKE
ANOTHER FORM OF CHIMNEY.
My way of building a blacksmith’s chimney, and one that will take up the smoke and soot, is shown in the accompanying engraving, Fig. 23.
It will be seen that there are five bricks across the base up to a height of five bricks, then a gradual taper to four bricks, and then two bricks and a half by one and a half. The flue or smoke hole is ten inches in diameter. This chimney will draw.—By G. C. C.
AN ARKANSAS FORGE.
The accompanying sketch, Fig. 24, with brief description, will give a good idea of the forge I use.
The shell of the forge is a section of iron smoke-stack, four feet in diameter, filled in with sand and brick. I use a water tuyere, and find it the best I ever tried. I use a blower in place of a bellows, and could not be hired to return to the bellows. My forge is at least six feet from any wall. The water keg rests on a bracket fastened to the wall, and, as shown in the illustration, the pipes extend downward and along the ground to the forge, and then beyond it. The pipes have caps on the ends. I use an angle valve, as shown, for shutting off water from the pipes. A rack for tongs is fastened to the back of the forge. A stationary pipe extends from a few feet above the forge through the roof. A smaller pipe with a hood on the lower end extends up into the large pipe, and this is suspended by weights so as to be raised or lowered at will.—By E. C.
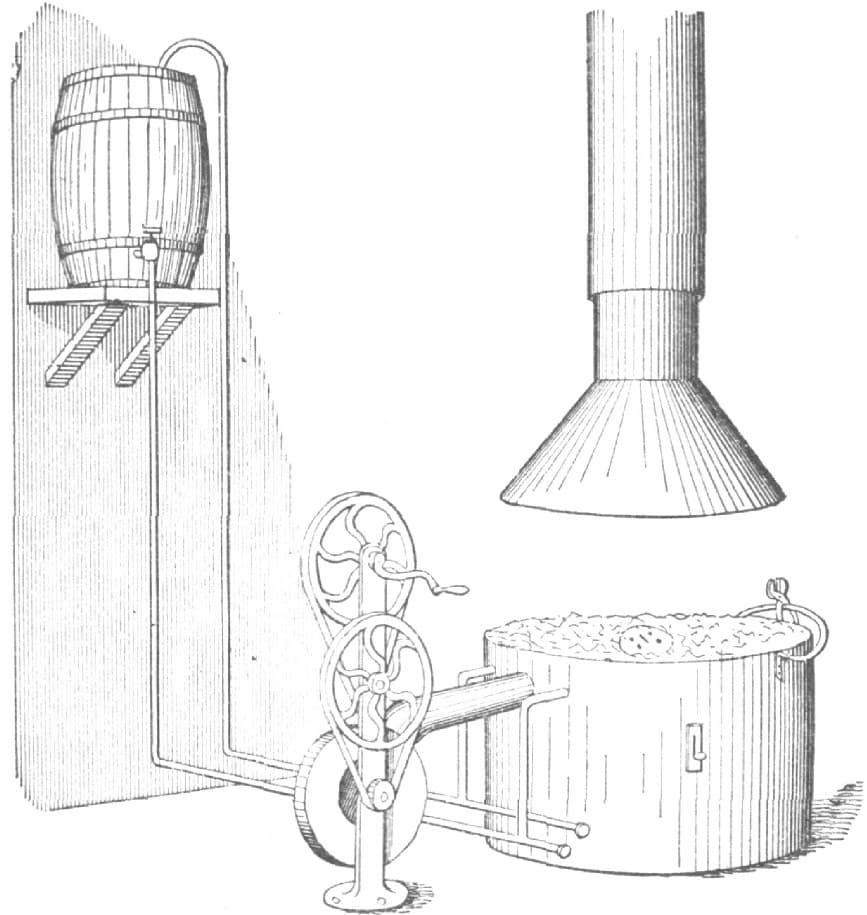
FIG. 24—AN ARKANSAS FORGE
SETTING A TUYERE.
Dropping into a small smithy on the west side of New York City, a short time ago, I found the proprietor much perplexed. He was trying to raise a welding heat on the center bar of a phaeton dash which had dog-ears or projections on each side. A dozen attempts were made while I looked on, and all were failures. “I’ll have to send this job out to my neighbor,” said the smith. Then I suggested that there was no necessity of doing so. The trouble was owing to the fact that the tuyere was about eight inches out from the back wall of the forge and the dog-ears on the dash projected about fourteen inches. With the old-fashioned back blast, the smith could have banked out a blow-hole with wet coal the whole length of his forge, and thus have accomplished his weld in short order, but there would have been more or less waste of coal. His tuyere was a bottom-blast one, and to him there was apparently no way out of the difficulty.
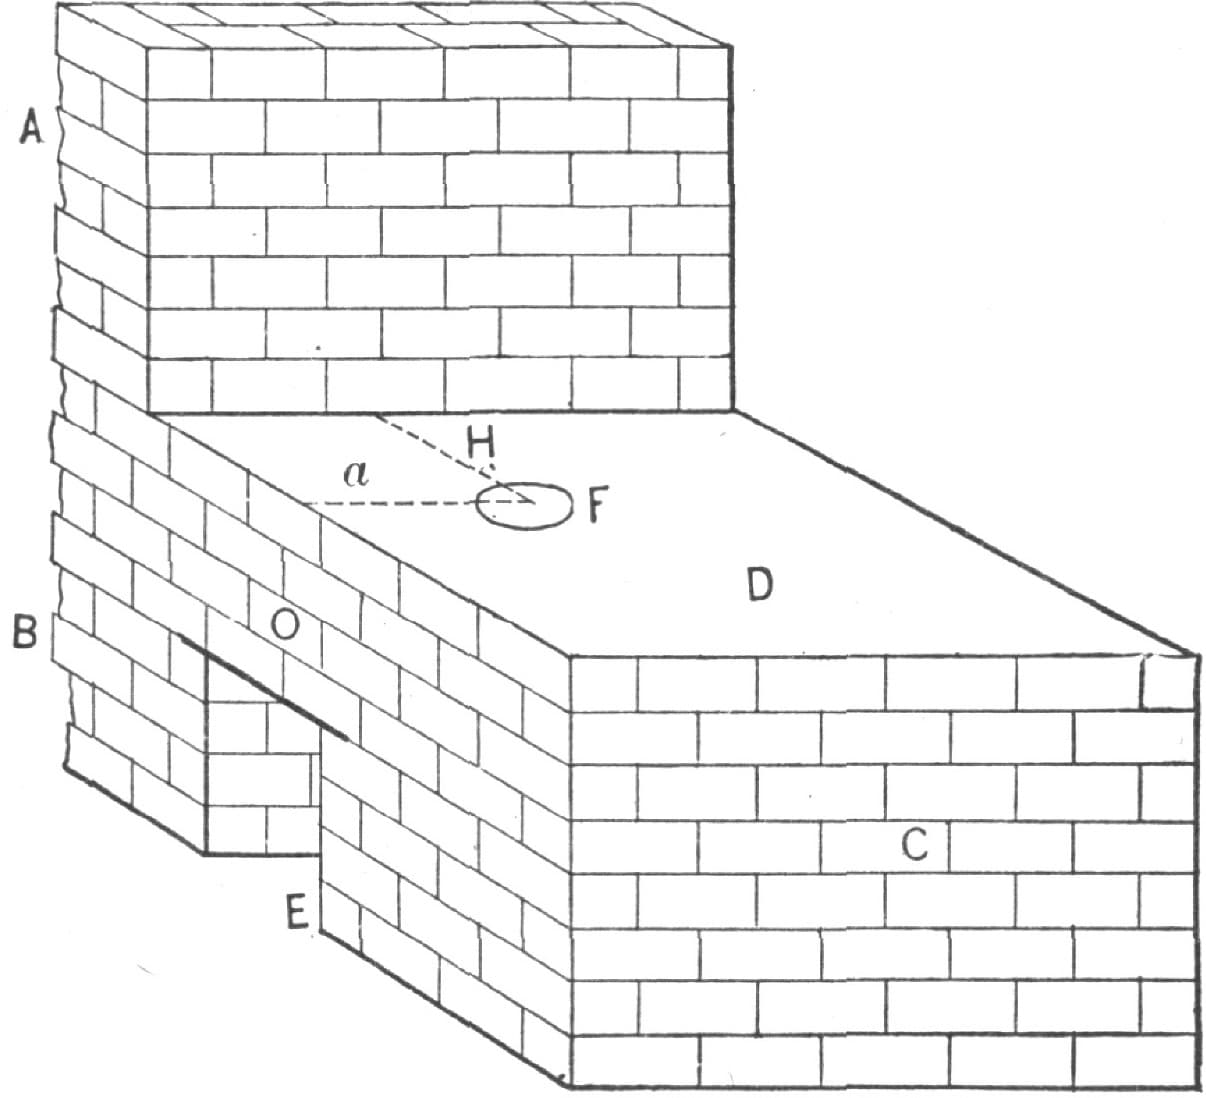
FIG. 25—SHOWING THE FORGE AND BACK WALL
I asked the privilege of trying my hand at the job and was given permission. My first trick was to locate the objectionable brick and remove it. Then one of the dog-ears of the dash could enter. I raised the heat, made the weld, and suggested to my friend that a handful of cement would repair the breach. Since then it has occurred to me that a short chapter on setting tuyeres would not be amiss, and I now present my ideas in type and illustrated.
In Fig. 25, A represents a section of the back wall of a brick forge; B is the working side; C, the face; D, the top; F, the center of the tuyere; O, the rod hole of the tuyere; and E, the ash pit. Measuring from A and B, the center of the tuyere is as shown by the line drawn, a and H; the distance should not be less than eighteen inches or more. The distance will be sufficient for most of the work that is done by the average wagon or carriage smith. Set the tuyere top from four inches to six inches below the level of the forge. The heavier the irons to be manipulated the deeper must the top of the tuyere be set.
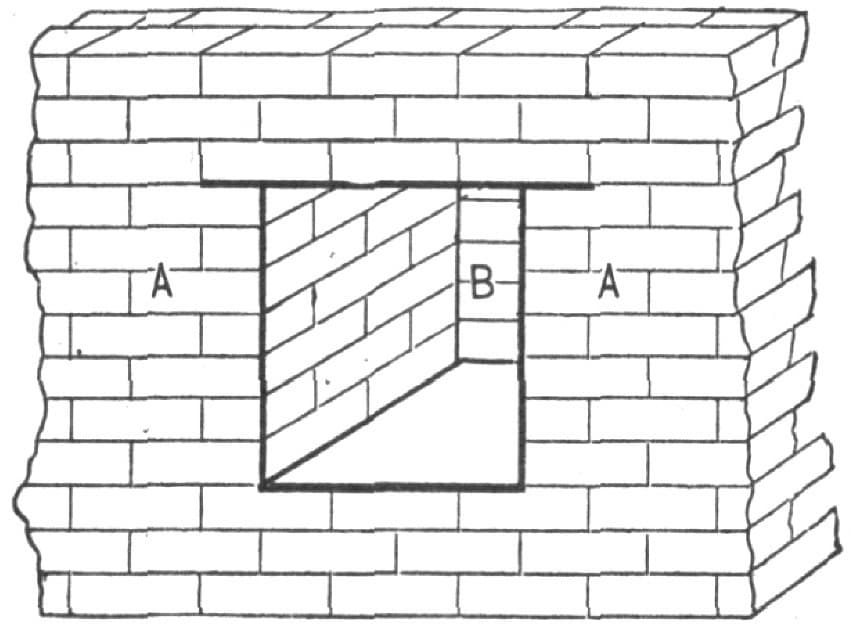
FIG. 26.—SHOWING HOW THE RECESS IS MADE
In building a new forge it is a wise precaution to build a recess in the back of the forge or forge wall as deep as the construction of the chimney will allow. If the wall be sixteen inches thick let the recess be not less than eight inches deep and twenty-four inches high and at least twenty-four inches or more wide; then, with the tuyeres set eighteen or more inches out, the most intricate forging can be handled with care. The sparks and ashes which ascend part of the way and then return, settle in the recess and thus keep the fire c1ean and clear. Fig. 26 shows the manner of constructing the recess, A A being the back wall, and B the recess.—By I. D.
A MODERN VILLAGE CARRIAGE-SHOP.
Prize Essay written for The Carriage-Builders’ National Association by WM. W. WETHERHOLD, of Reading, Pa.
In building a carriage shop, room, light and ventilation are the three great points to attain, and the builder who does attain these points and at the same time has everything convenient will have a perfect shop. In selecting a site I have taken a corner lot and have arranged my plans to run back to the ten-foot alley, using my full length of plot and getting light from three sides. Size of lot, 110x65 ft. (Height of stories: first, 12 ft.; second and third, 10 ft. For size and arrangement of room, see floor plan.) The office is fronting the main street, adjoining the wareroom, and is fitted with desks for clerks and a fire and burglar-proof safe, a table at side window at which to take the time of the hands in going to and from work, a letter-press, a stationary wash stand, shelves, speaking tubes to the different departments, and a private desk for the use of the proprietor. There is a door leading to the wareroom, one to the stock room, and is convenient to the elevator and stairway leading upstairs. The walls are plastered and kalsomined. The wareroom adjoins the office, facing the main street. The elevator opens into it, and there are sliding doors connecting it with the wood shop. The walls and ceilings are covered with cypress wainscoting, two inches wide, plowed and grooved, and finished in oil, and the windows have inside shutters.
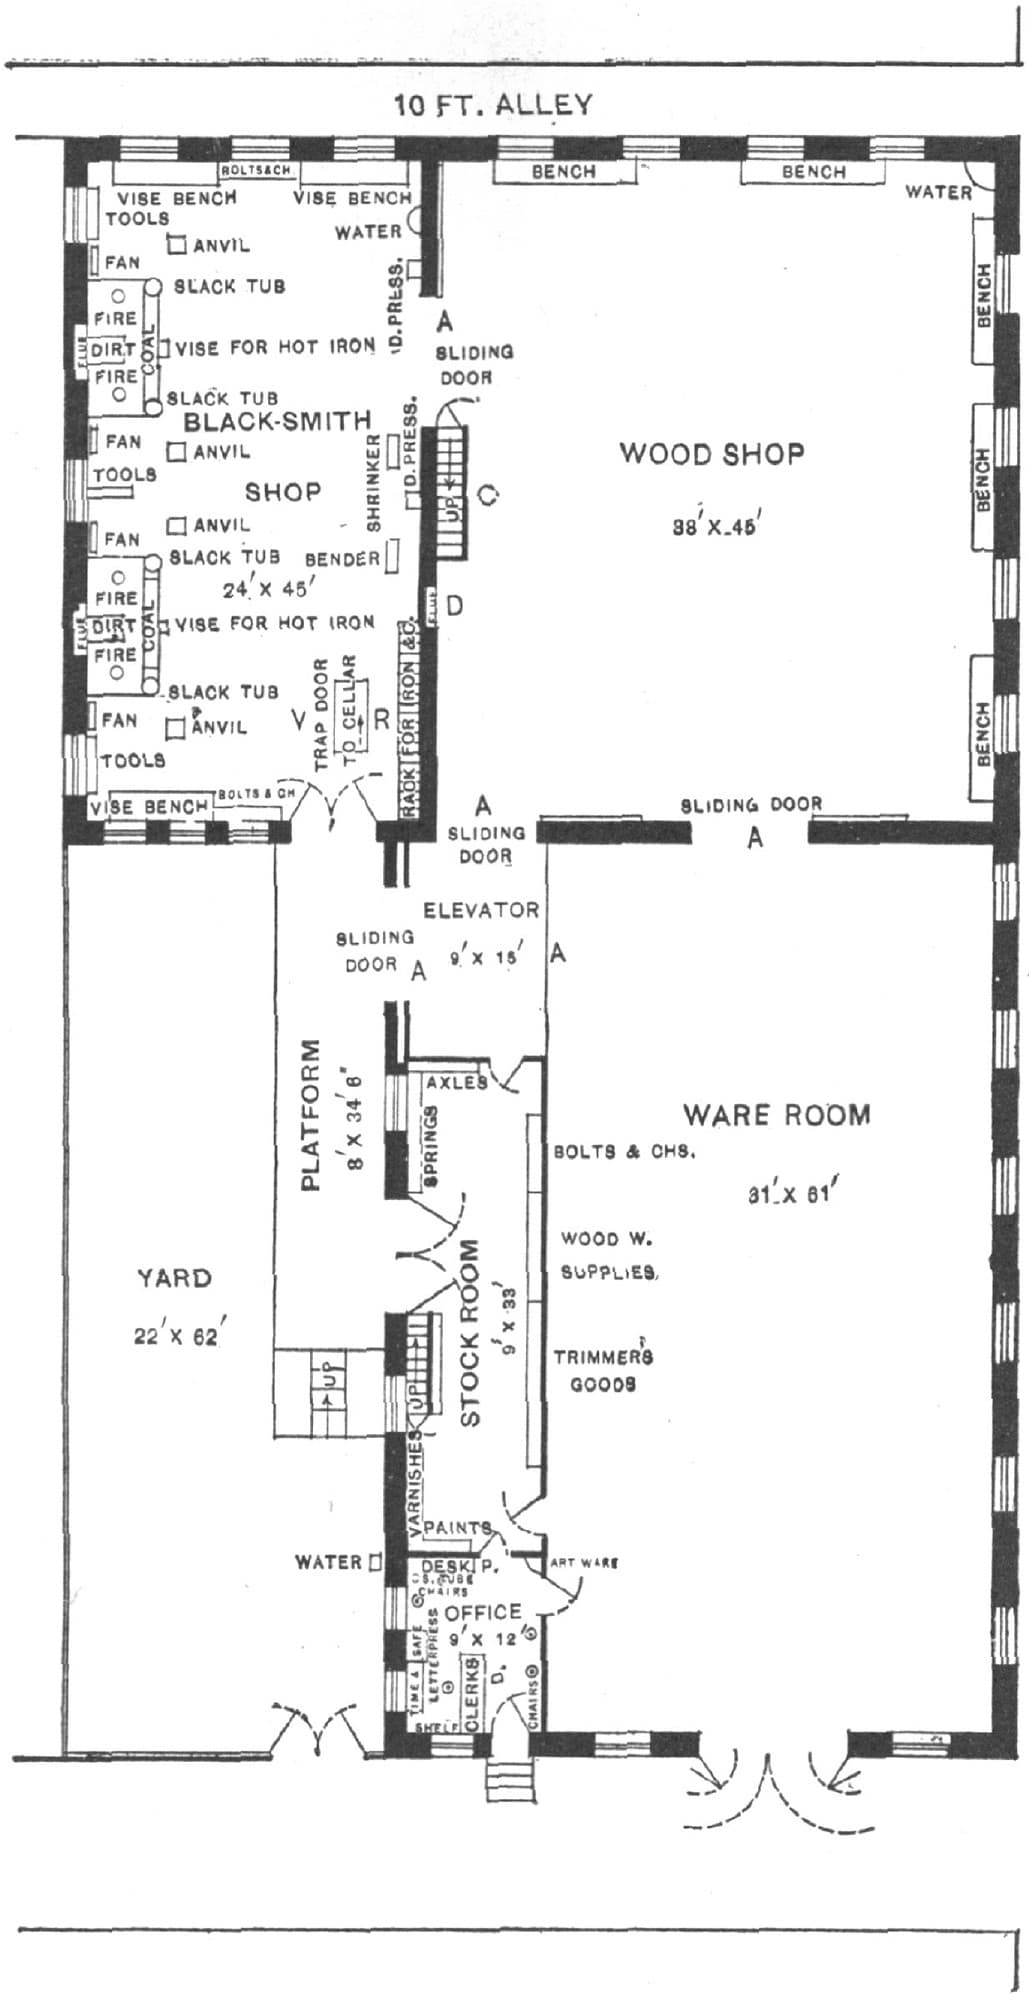
FIG. 27.—PLAN OF THE FIRST FLOOR
The stock room is next to the office, and is fitted with shelves and racks for proper storing and accounting of stock. There is a door to the elevator and a stairway leading upstairs; also a door to the yard for the unloading of goods without interfering with the workmen. The upper half of the partitions are ash with glass to admit light. The elevator is next to the stock room and is so arranged that the work of the smith shop can be put on and hoisted without going outside in unpleasant weather.
The wood shop is at the rear of the main building, adjoining the smith shop, and is fitted with five benches. It is next to the elevator and has a stairway leading to the second floor. The second floor is used entirely for the paint department. Going from the wood shop we get into the paint room, which has a paint bench with mill and stone to mix colors, etc. Shelves are arranged for the proper keeping of cups and brushes. There is also a vise bench in this room, with tools, bolts, screws, oil, washers, etc., for the taking apart and putting together of work. There are two spaces with cement floor, one for gears and the other for bodies. The elevator and stairway are in this room. The front of the second floor is partitioned off for varnish rooms. I have used the front so as to be removed from the smith and wood departments as far as possible. The windows are double and the ceilings and walls finished with cypress the same as the wareroom. These rooms have inside shutters also.
The trimmer room is on the third floor back, and is fitted with benches for three men. The floor plans will show position of shelves, closets and sewing machine. I have a small room connected with the trimming room to be used entirely for the stuffing of cushions, etc. It is of great help in keeping the trimming room and all the work clean. The third floor, front, is intended for the storage of bodies in stock, ironed and in the rough, and for a wareroom for second-hand work after it is rebuilt. Here, also, I have shelves for all cushions, carpets, curtains, etc., belonging to any job which is being rebuilt and repainted.
In case of my painters being crowded with work, I can have all new bodies brought upstairs and taken ahead in paint, thus giving them more room on the second floor. The smith shop I have placed in an annex, so as to remove all dirt and dust as much as possible from the main building. It is made to run four fires. The windows on the side are placed high to prevent looking into the next yard, but the large front and back windows allow plenty of light. The second floor of this annex will be used for storage of lumber, wheels, wheel stock, shafts, etc., for the wood-workers; the door in the yard can be used to unload lumber, and I have also one of the rear windows arranged with a roller by which to take in lumber. The trap door in the floor can be used to slide lumber down into the wood shop, as it is on a line with the sliding doors connecting the wood and smith departments.
I have arranged a heater in the cellar of the smith shop, and will heat the whole shop with steam generated by it.
It will work automatically, and will require attention only twice daily except in extremely cold weather, when more attention will be needed.
To stock a shop of this kind completely at once would be a very difficult matter. I should proceed as follows: I would order 5,000 feet of lumber, assorted into 500 feet 5/16 and 3/8-inch poplar surfaced on both sides; 2,000 feet 1/2-inch poplar, surfaced on both sides; 500 feet ash, 3/4-inch; 1,000 feet ash, 11/4 to 2 inch; 1,000 feet hickory, 11/4 to 2 inch. I would order wheel stock for 25 sets of wheels, as follows: 5 sets for 3/4-inch tire, 10 sets for 13/16-inch tire, 5 sets for 7/8-inch tire, and 5 sets for 15/16-inch tire; 2 dozen pair shafts, 2 dozen pair drop perches, wood screws, nails, glue, etc.; 25 sets of axles to suit wheel stock; 25 sets of springs, bolts and clips in assorted sizes, and paints and varnishes. Bows and trimming goods I would not order at once, as I would now open up shop, and try to book a few orders, and see what quality of work was wanted to suit my new customers.
I believe that in ordering a little sparingly at first I could do better in the end by watching the run of my trade, as I could then change my stock, if necessary, without any loss.
The floor plans of the shops are shown in the accompanying illustrations, in which Fig. 27 represents the first floor, Fig. 28 the second floor, and Fig. 29 the third floor. The drawings are on the scale of 24 feet to the inch.
BEST ROOF FOR A BLACKSMITH SHOP.
In answer to your correspondents, G. H. & Son, who inquire about the best roof for a blacksmith shop, let me say that I prefer a corrugated sheet-iron roof, made of the best galvanized Number 20 iron, fastened down with copper wires wrapped around the rafters. Nails will work out with the changes in the weather.—By J. B. H.
HOLLOW FIRE VS. OPEN FIRE.
For welding steel to iron I always use an open fire, or I should say for the last ten years have done so. Formerly I used a hollow fire, but as I became more experienced in welding dies I became convinced that a hollow fire was not the best or cheapest for that purpose.
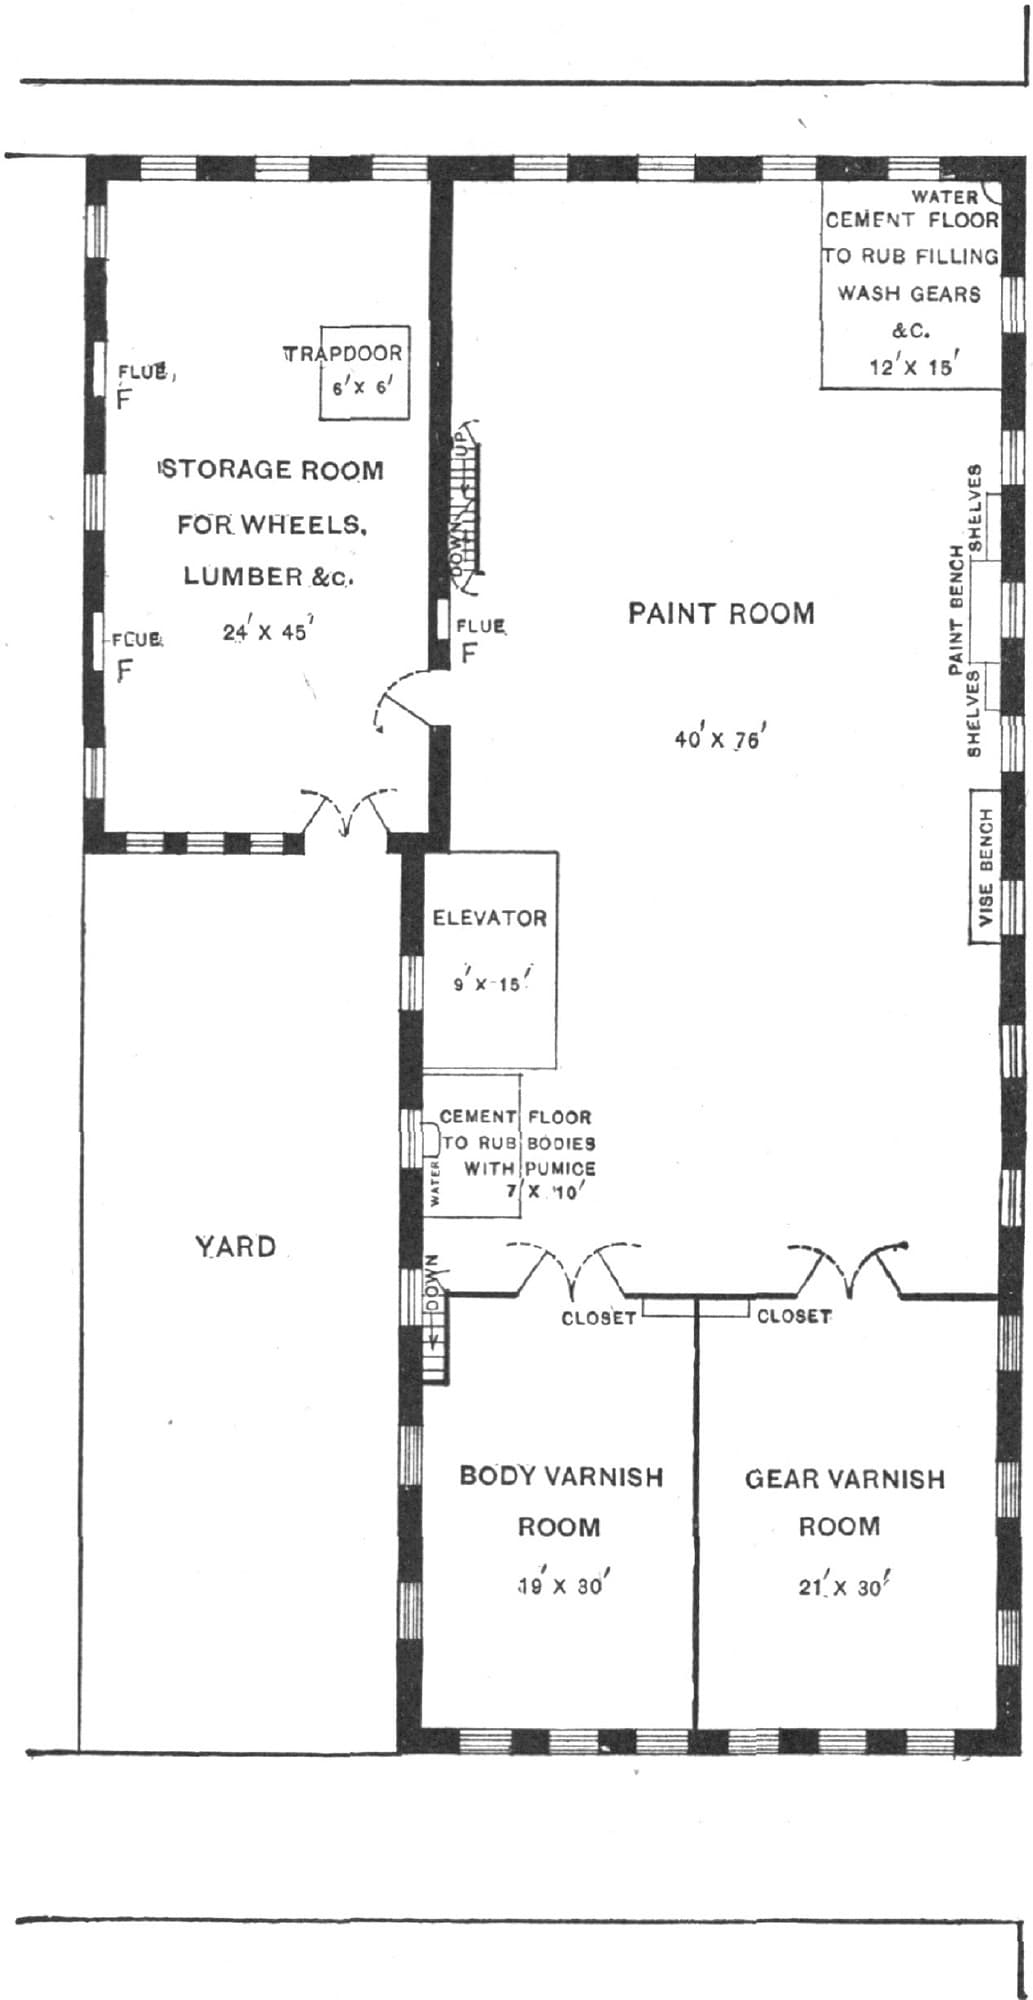
FIG. 28.—PLAN OF THE SECOND FLOOR
I have seen a great deal of work welded in a hollow fire, and have seen much of it burnt and rendered entirely worthless. In welding a steel plate to an iron one, I want my iron much hotter than I can get it in a hollow fire without burning the steel. As a hollow fire heats almost as fast at the top as it does at the bottom, it will be seen that in order to get a welding heat on the iron you are pretty sure to get the steel too hot, and if you do not get a welding heat on the iron of course the steel will not weld. It may seem to be welded a great many times when it is only stuck in one or two places, and if it is not thoroughly welded it is sure to start off when it is being hardened or used.
I have not used a hollow fire for several years for welding steel to iron, for many reasons, among which I may mention the following: First, because it takes more time, and, of course, is more expensive; and second, because I cannot do the work as well. My way of building a fire is this: I put on plenty of coal to make a fire of sufficient size for the work I have to do, and with respect to this part of the operation each man must be his own judge. I build up the sides of my fire pretty well, and let the middle burn out; then I fill the middle with good hard coke, and my fire is ready. Then I put in my work and cover it with small pieces of coke, and give the fire a slow blast, increasing it as the heat comes up. In this way I can bring my heat up from the bottom, getting a good welding heat on my iron when the top of the steel is at an ordinary working heat. In this kind of a fire you can see your heat better than you can in a hollow fire and tell when your steel is at the right heat. It is claimed that there are several ways to tell when the heat is right other than by looking at your iron, but I am satisfied to trust to my eyes to inform me when the proper result has been reached.—By G. B. J.
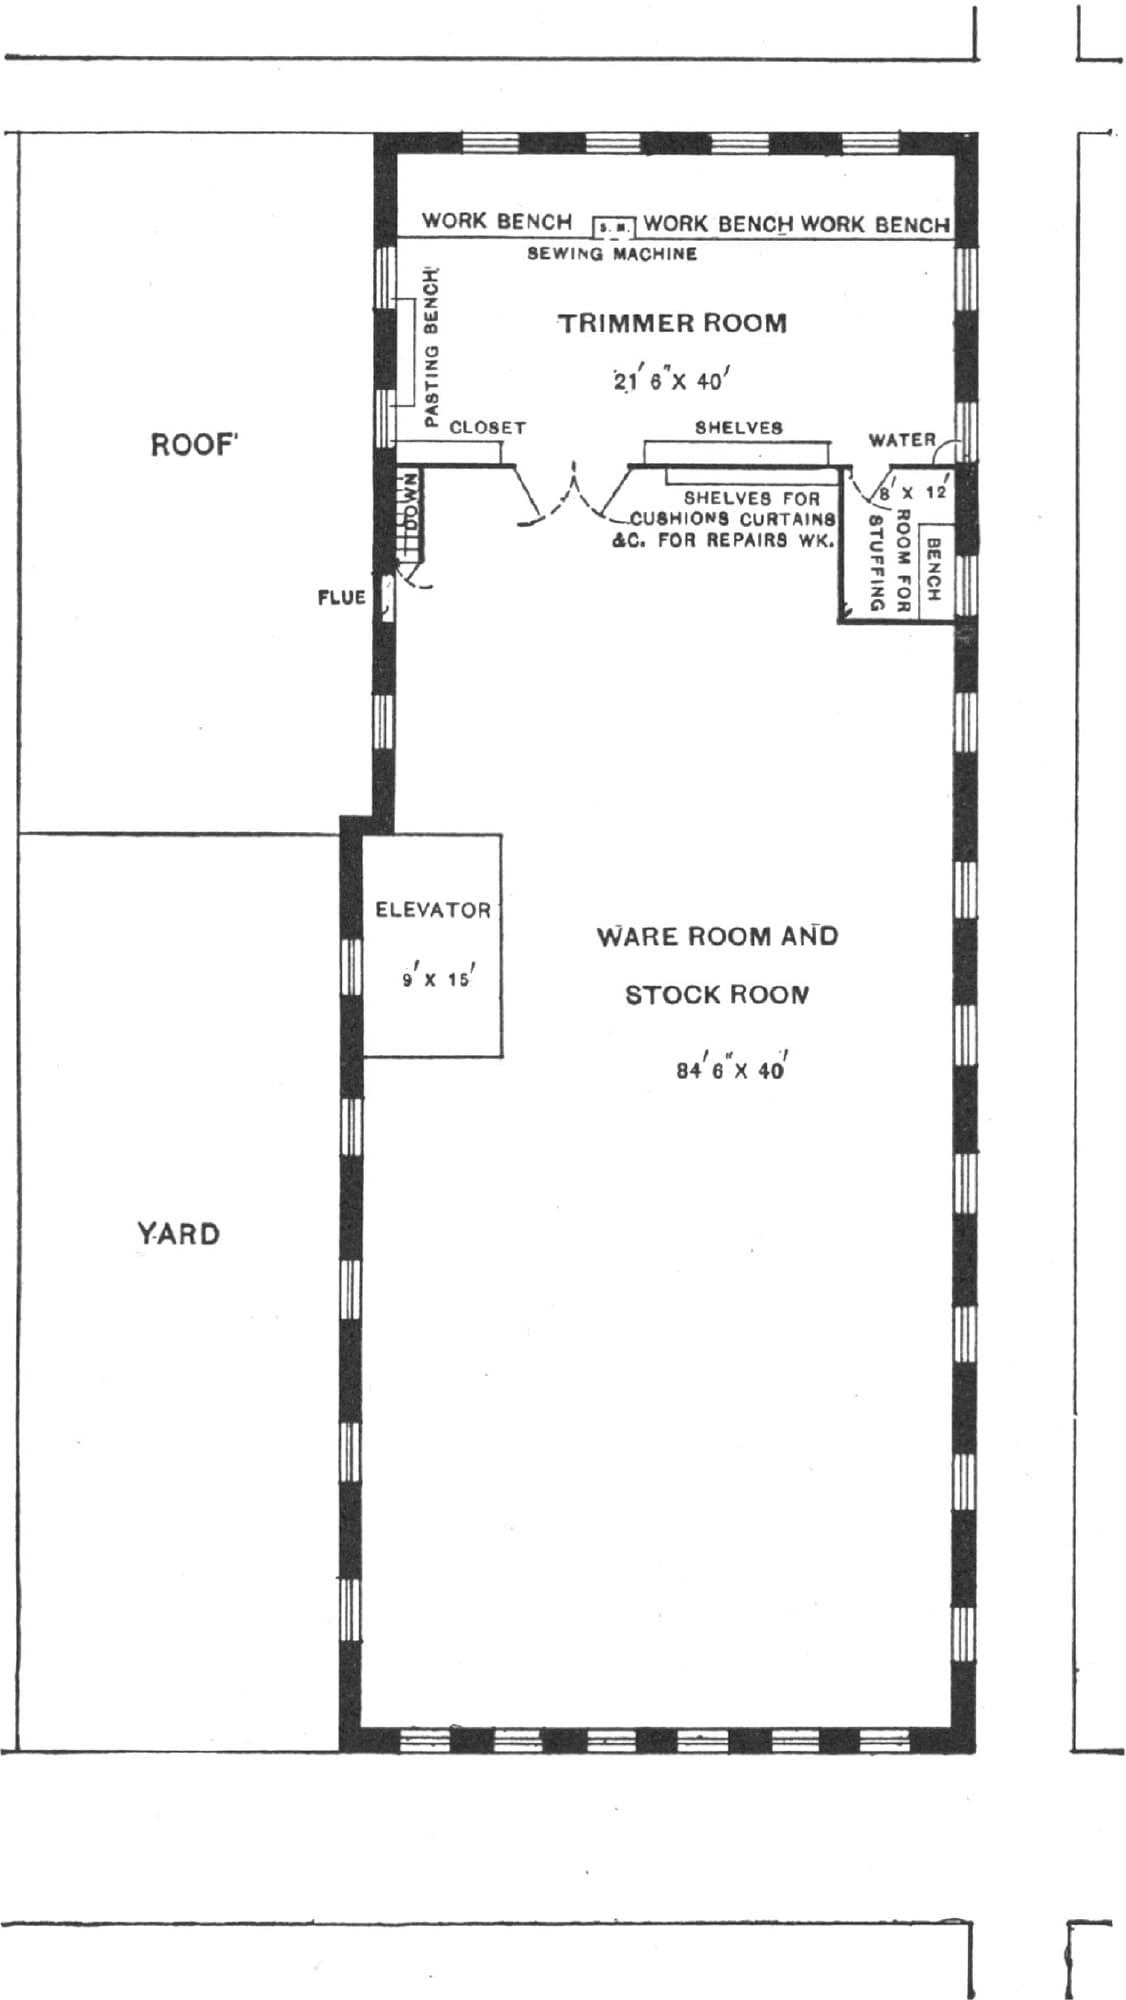
FIG. 29.—PLAN OF THE THIRD FLOOR
A POINT ABOUT BLACKSMITHS’ FIRES.
A common trouble in country blacksmith shops is the going-out of the fire while the smith is doing work away from it. This annoyance can be prevented by keeping at hand a box containing sawdust. When the fire seems to be out, throw a handful of sawdust on the coals and a good blaze will quickly follow. This may seem a small matter, but there are many who will find my suggestion a useful one.—By D. P.
TO KEEP A BLACKSMITH’S FIRE IN A SMALL COMPASS.
If clay or mortar soon burn out, mix them with strong salt brine and the trouble will be avoided—when an intense heat is required use fine coal wet with brine. Use a thin coating on top and around the fire. Salt and sand mixed and thrown on top of the fire also serves a good purpose.
BLACKSMITH’S FIRE FORGE.
With reference to the manner of managing a blacksmith’s fire so as to accomplish the best results, I will describe the forge I am using. It is 2 feet 6 inches high; the bed is 3 feet 10 inches long and 3 feet wide, and in construction is a box. The legs are made of 4x4 stuff. The tuyere is placed 5 inches below the surface. I use a common bellows, size 32 inches. With this forge I have no difficulty in welding a 21/4-inch axle or facing a 10-pound sledge-hammer. The chimney is an inverted funnel, and is made of sheet-iron. At the bottom it is 2 feet 5 inches in diameter. It joins a 7-inch pipe at the top.—By H. B.
CEMENTING A FIRE-PLACE.
To cement a fire-place so that the cinders will not stick, I use old axes instead of bricks. I put the polls of the axes out at the front of the breast of the forge. I use from 12 to 15 axes in one forge, putting two axes below the pipe and two on each side, and as many above as are needed. I use what is called yellow clay for mortar, putting a handful of salt in the clay, and then beating it thoroughly so that there will be no lumps in the mortar. I put the axes and mortar in as I would bricks and mortar. The fire-place is left deep enough to have a bed of dust in the bottom. A fire-place fixed in this way will last for twelve months. The cinders are lifted while hot.—By F. M. G.
CEMENTING A SMITH’S FIRE.
My way of cementing a blacksmith’s fire so that the cinders will not stick is as follows: I use Power’s patent fire-pot. I have used this fire-pot nine years, and it is as good now as it was the day I put it in my shop. There is no sticking of cinders, and no cementing or fitting up of the fire is necessary, and the saving in my coal-bill for one month amounts to more than the cost of the fire-pot.—By J. McL.
BLACKSMITH COAL.
Though little is said regarding the coal used in a blacksmith shop the subject is one well worthy the attention of all interested in the working of iron. The three coals in use are charcoal, anthracite and bituminous. For all purposes charcoal is the best, but its drawbacks are such as to curtail its use. These are the cost and the time needed to secure the proper combustion. Except in extreme cases, it is not likely to come in use again, and the blacksmith must therefore depend upon the mineral coals.
Bituminous coal possesses more of the essentials requisite than the anthracite, but the quality is an important matter. Some is more gaseous than others; then, too, there is the oily coal, and that charged with an excess of sulphur; in others there is a great deal of earthy matter. All these faults exist, and they do much toward retarding the work of the blacksmith if they are not guarded against. It is not many years ago when all blacksmith coal was imported, but the Cumberland coal of this country is without doubt the best that can be procured. It is remarkably free from earthy matter, ignites quickly and gives a powerful heat. Anthracite “dust,” as the fine siftings are designated, works well if the blast is all right, but, no matter how fine it is, it does not run together and make the close fire of the Cumberland. It also contains greater quantities of sulphur, which operates to the injury of the iron. Coke has been used to a good advantage where the fire-bed is large and the blast strong, but it does not lie close, and unless the blast is kept up it smoulders and fouls.
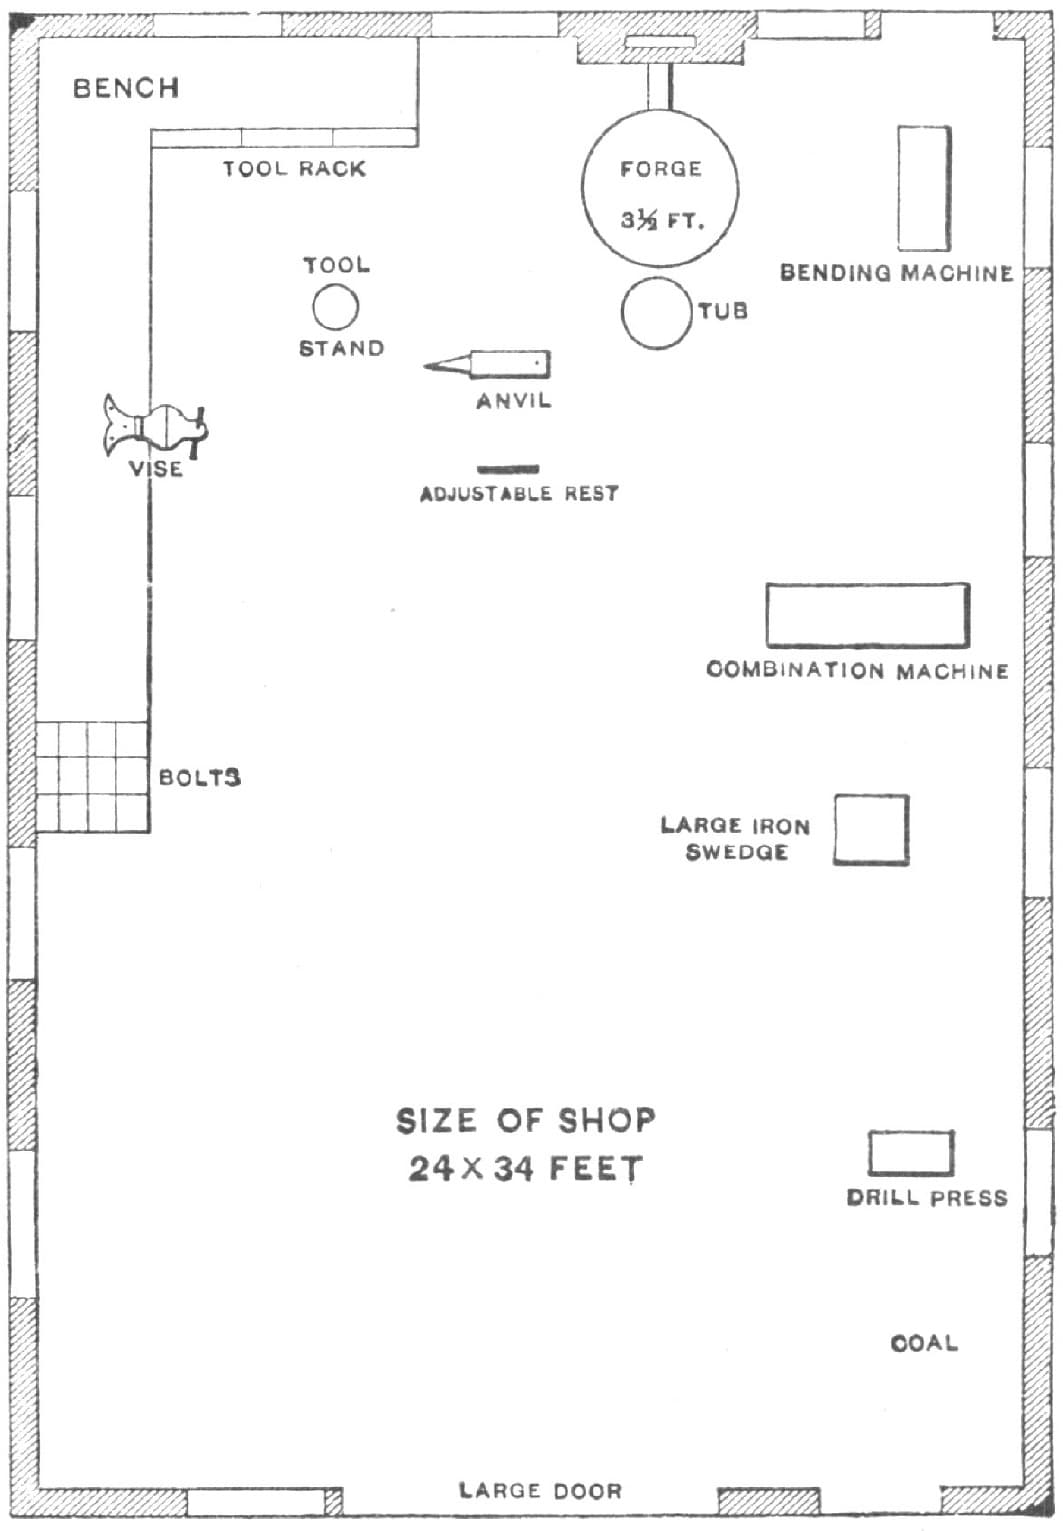
FIG. 30.—PLAN OF SHOP CONTRIBUTED BY “D. F. H.”
PLAN OF A SHOP.
I inclose you a sketch, Fig. 30, of my shop, which I think a very good one for a country place. The forge is a home-made article of tank iron, 31/2 feet in diameter, the bed being filled with brick and sand. The bellows are hung overhead, and are connected with the forge by a tin tube. A place is made in front for coal. I have a fire alarm that I am intending to connect with the house, about 30 feet away.—By D. F. H.
PLAN OF SMITH SHOP IN A NEW YORK CITY CARRIAGE FACTORY.
Fig. 31 makes the arrangement of forges, anvils, benches, etc., quite plain.
The style of forge used in this shop is shown in Fig. 32. It consists essentially of an oblong iron pan, a hole in the bottom of which communicates with the tuyere, contained in the box-like appendage clearly shown in the engraving. The entire structure is supported on four legs made in the shape of angle iron. A long, narrow compartment at the end of the forge contains fuel, while a second compartment of about the same shape and size contains water, thus putting it in a much more desirable position and in more convenient shape for use than the old tub so common in country shops. Attached to the outside of the water-trough is a small, square bench, to which is fastened an ordinary machinist’s vise, as may be seen by the engraving.
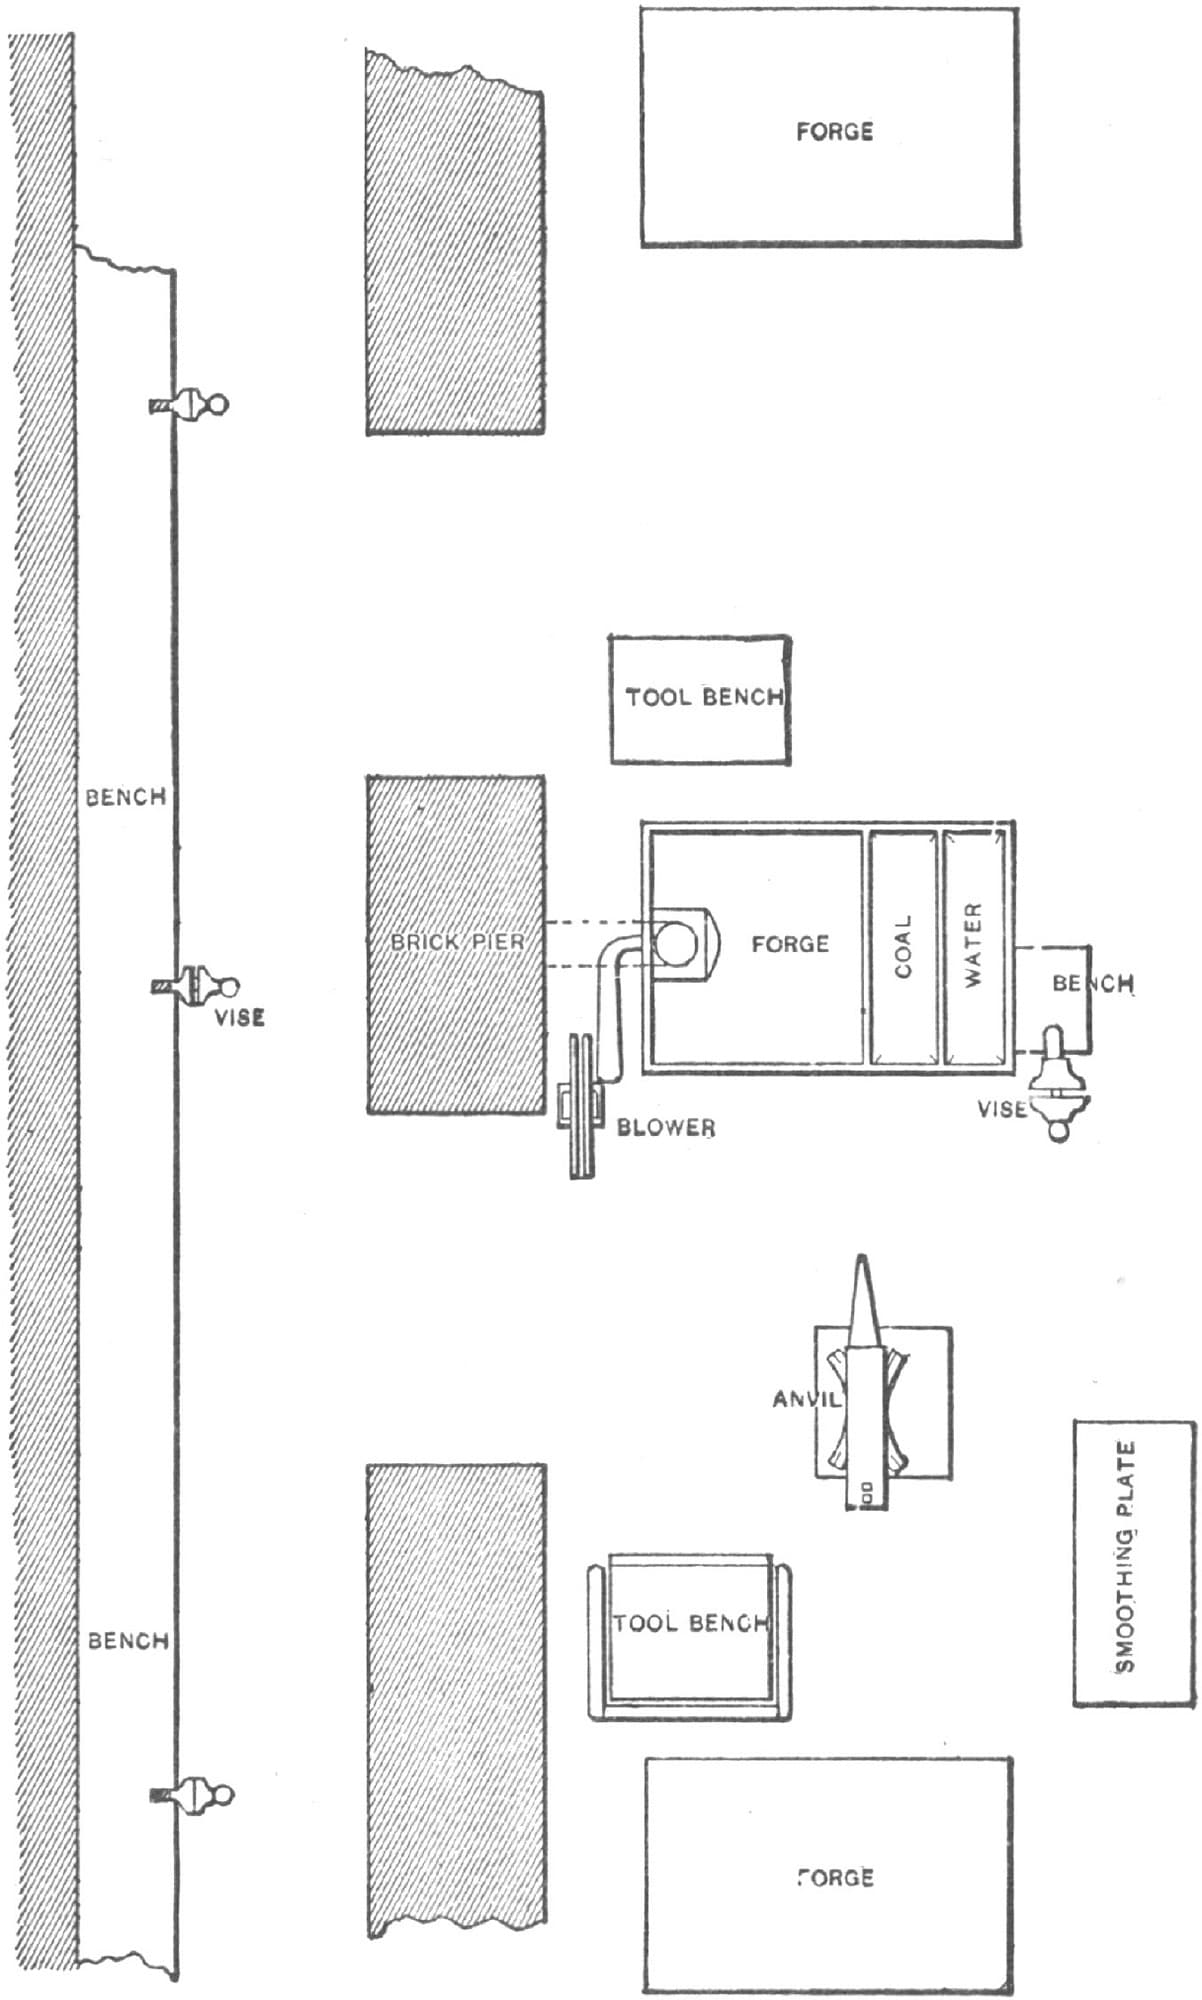
FIG. 31.—SMITH SHOP IN A NEW YORK CARRIAGE FACTORY
This forge possesses important advantages over the common brick forge. It occupies considerably less space, without lessening the capacity for work. Its construction admits of the shop being kept clean around it, which alone is a feature of sufficient importance to warrant its introduction. Its probable cost is about the same as that of a brick forge. The fact that it is portable, however, gives it a claim for preference in this particular. It is asserted by those who have used this forge, and who have also worked at the common brick forge, that it will save its own cost in a single year, in convenience over the latter. The position of the water-trough is an important feature. It is true that a water-trough of similar construction and arrangement might be attached to a brick forge, but not with the same facility. The character of the material, brick, would necessitate a thick surrounding wall, which would render the arrangement at once somewhat awkward in appearance, and in comparison with the iron forge quite inconvenient.
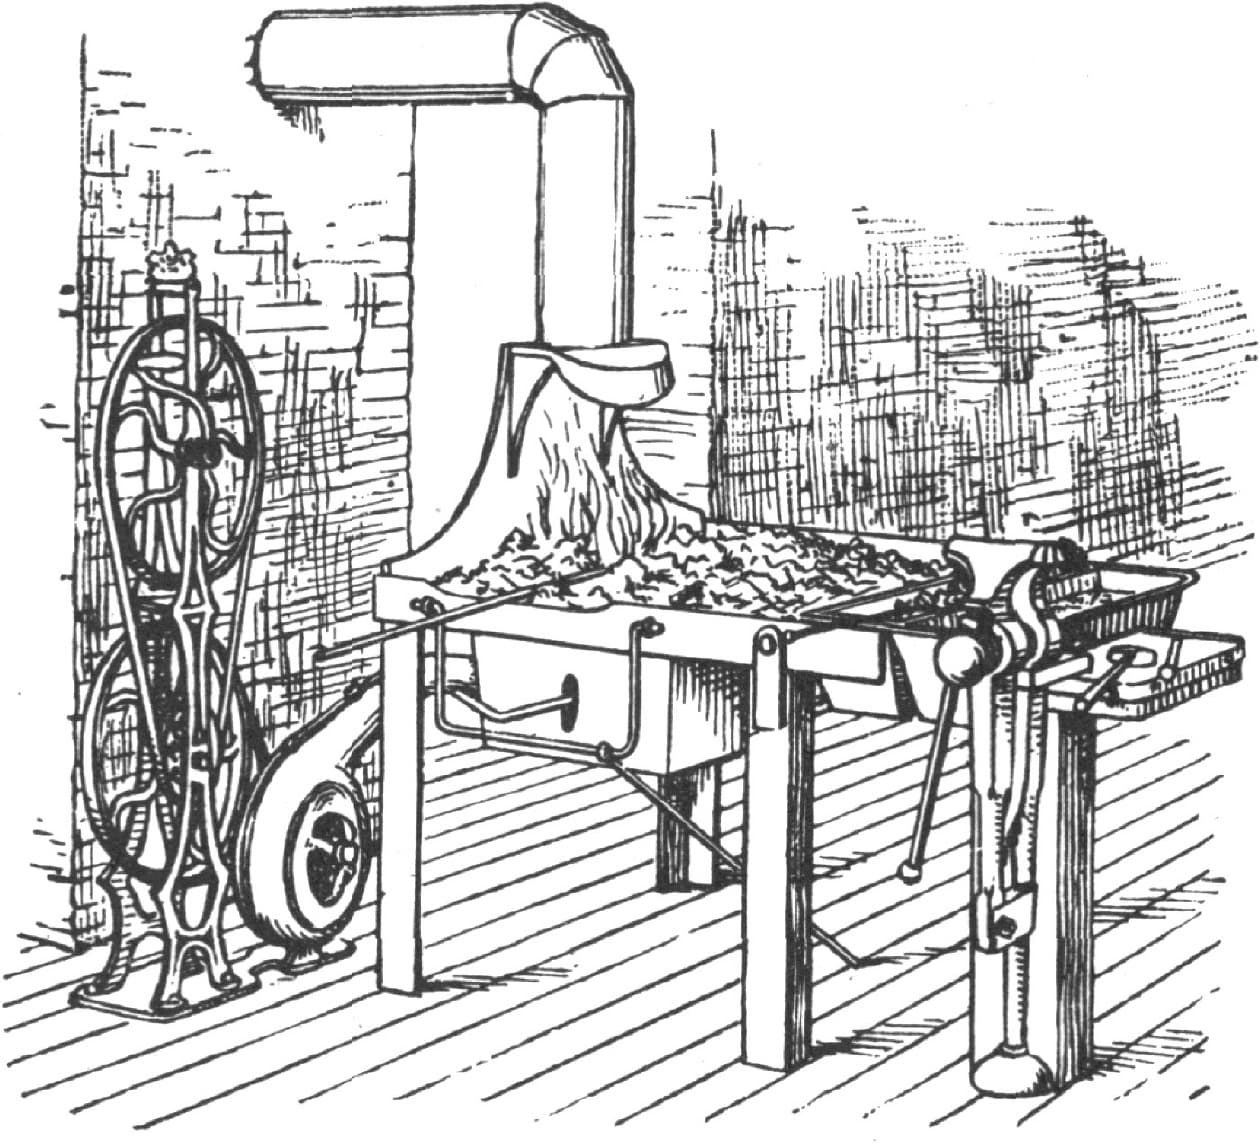
FIG. 32.—IMPROVED STYLE OF FORGE
A rack for supporting the ends of bars of iron in the process of heating is so arranged as to swing clear, under the forge, and yet to be ready whenever required. The brace or leg shown in the engraving is long enough to support this rack in any position that may be required.
The tool bench employed in this shop consists of a heavy wooden frame, proportioned somewhat to the load it is to carry and the use that is to be made of it. See Fig. 33. A shelf in the lower part, located but a few inches above the floor, is used as a receptacle for odd tools, bits of iron, and the general accumulation to be met with around any blacksmith’s fire. The sides on the upper part are carried several inches above the top and are surmounted by an iron guard, which extends outward and is continued three-quarters of the way around the bench, thus forming an opening through which the handles of the various tools may be dropped. By referring to Fig. 32 all these particulars will be made clear.
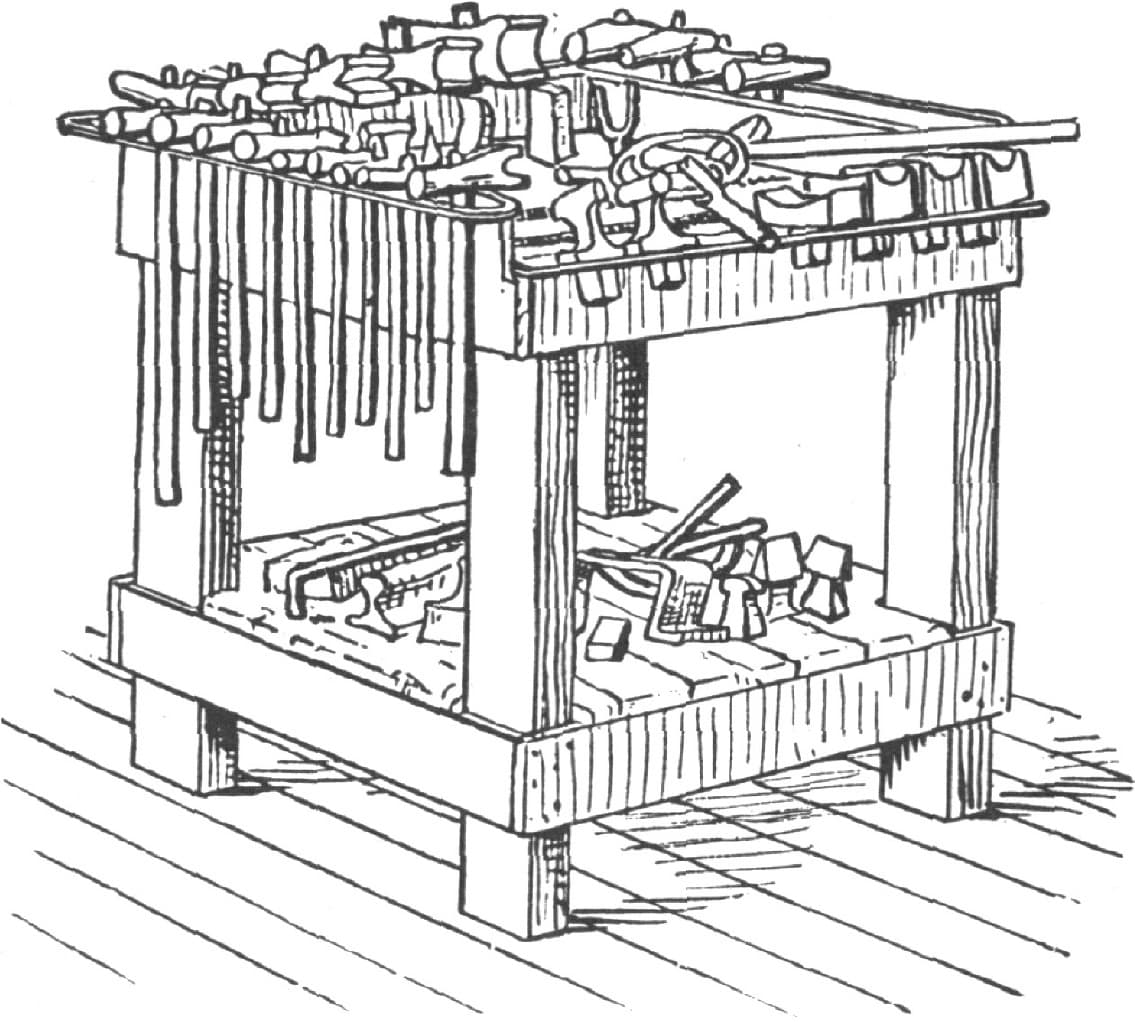
FIG. 33.—IMPROVED TOOL BENCH
The top of the bench is also perforated by two slots and by sundry odd holes, into which tools are dropped. A small guard extends across the front of the bench, on a level with the top, answering a similar purpose.
To aid those who may wish to construct a similar bench a top view is shown in Fig. 34, and another one of the side or end as shown in Fig. 35, upon each of which dimensions are given in such a way as to enable any one to work from them if desired.
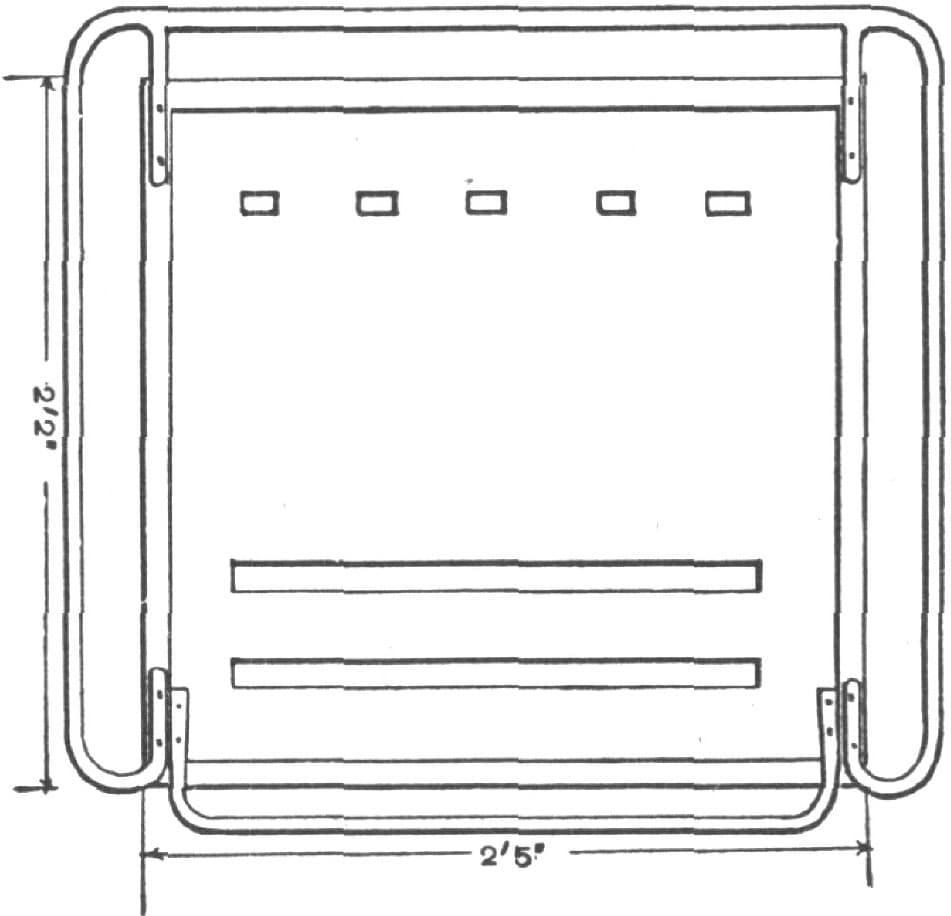
FIG. 34.—TOP VIEW OF WORK BENCH
Fig. 36 shows a style of smoothing-plate or smoothing bench in use in this shop, which, it is claimed, answers a very satisfactory purpose, and would constitute a most useful adjunct for any blacksmith’s shop. A heavy wooden frame supports a cast-iron plate, a section of which is shown in Fig. 37, and which is something like an inch and a half or two inches thick. This plate is made quite smooth on its upper surface. For straightening up various light irons used in wagon and carriage work, it serves a useful purpose.
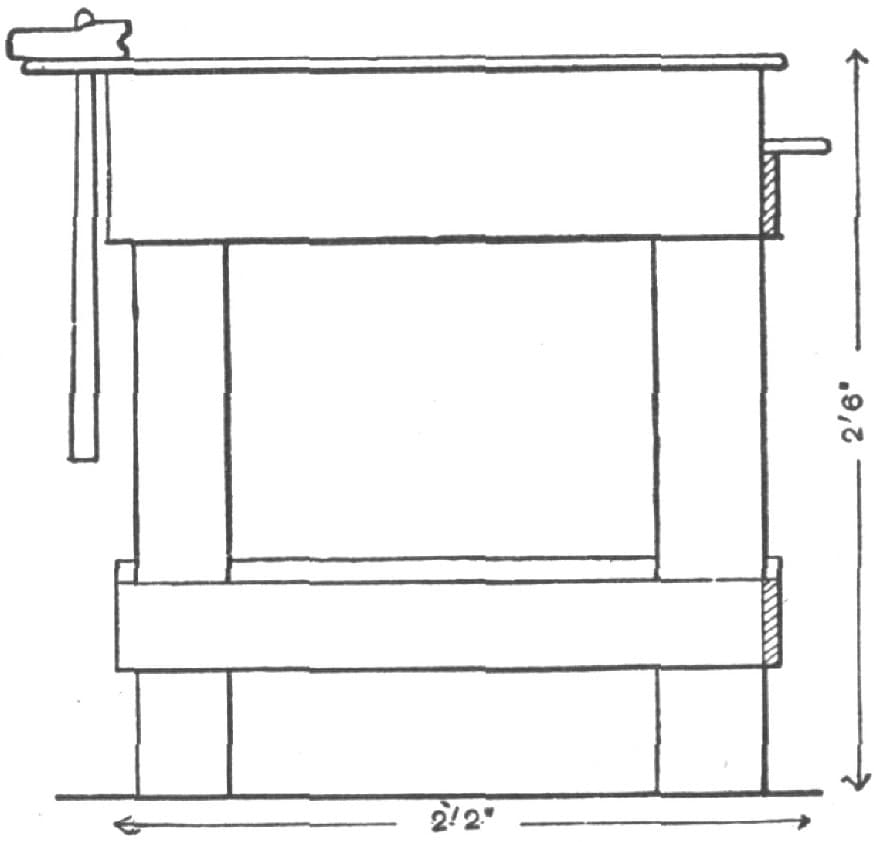
FIG. 35.—END VIEW OF WORK BENCH
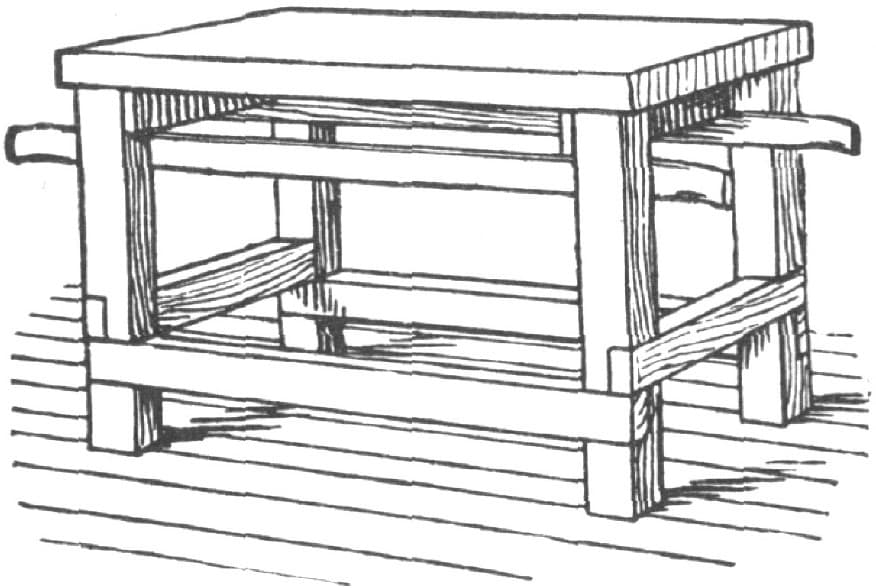
FIG. 36.—SMOOTHING BENCH

FIG. 37.—SECTIONAL VIEW OF SMOOTHING PLATE
Fig. 38 shows an adjustable trestle used for supporting the ends of vehicles. A screw in the center raises the upper bar to any desired height, while the guides at the side, by means of holes in them, and pins to fit, give it stability at whatever height it is placed. The upper bar is padded to prevent scratching. The entire construction is light yet strong.
A PLAN OF A BLACKSMITH SHOP.
I find the arrangements of the shop I am about to describe very convenient, and, with the aid of the illustration, Fig. 39, they can be very easily understood. A denotes the shoeing floor. B is the floor for plow work. C is the machine and wagon floor. D is the front door, which opens outwardly. E is a side door that slides. F is another sliding door. G is a double forge. HH are No. 1 Root blowers. I is a vise post. J is a bolt cutter. K is a drill. L are iron shears that will cut 1-inch square iron. M is the vise bevel. NN are tool benches. OO are anvils. P is a mandrel. Q is the swedge block. RR are windows. S is an erecting bench. TT are vises. U is the chimney. VVVVV are pins for iron. X is the tire sprinkler.
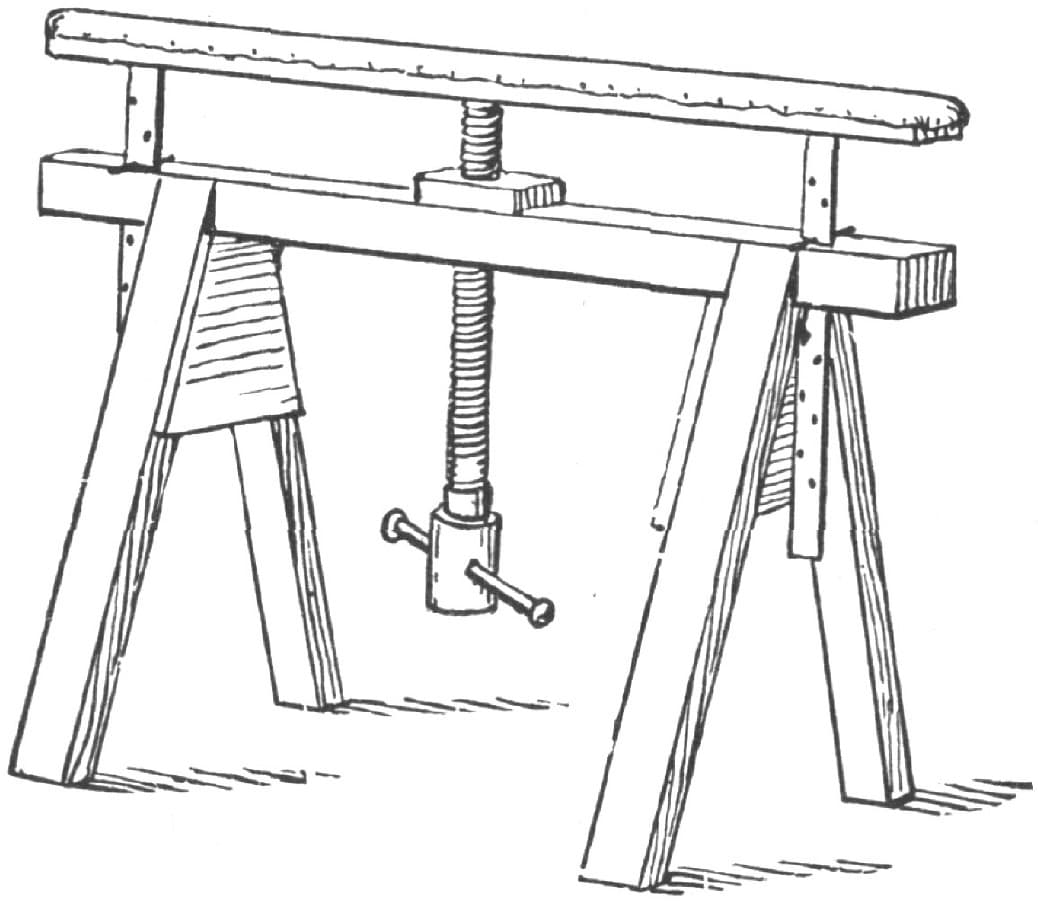
FIG. 38.—ADJUSTABLE TRESTLE
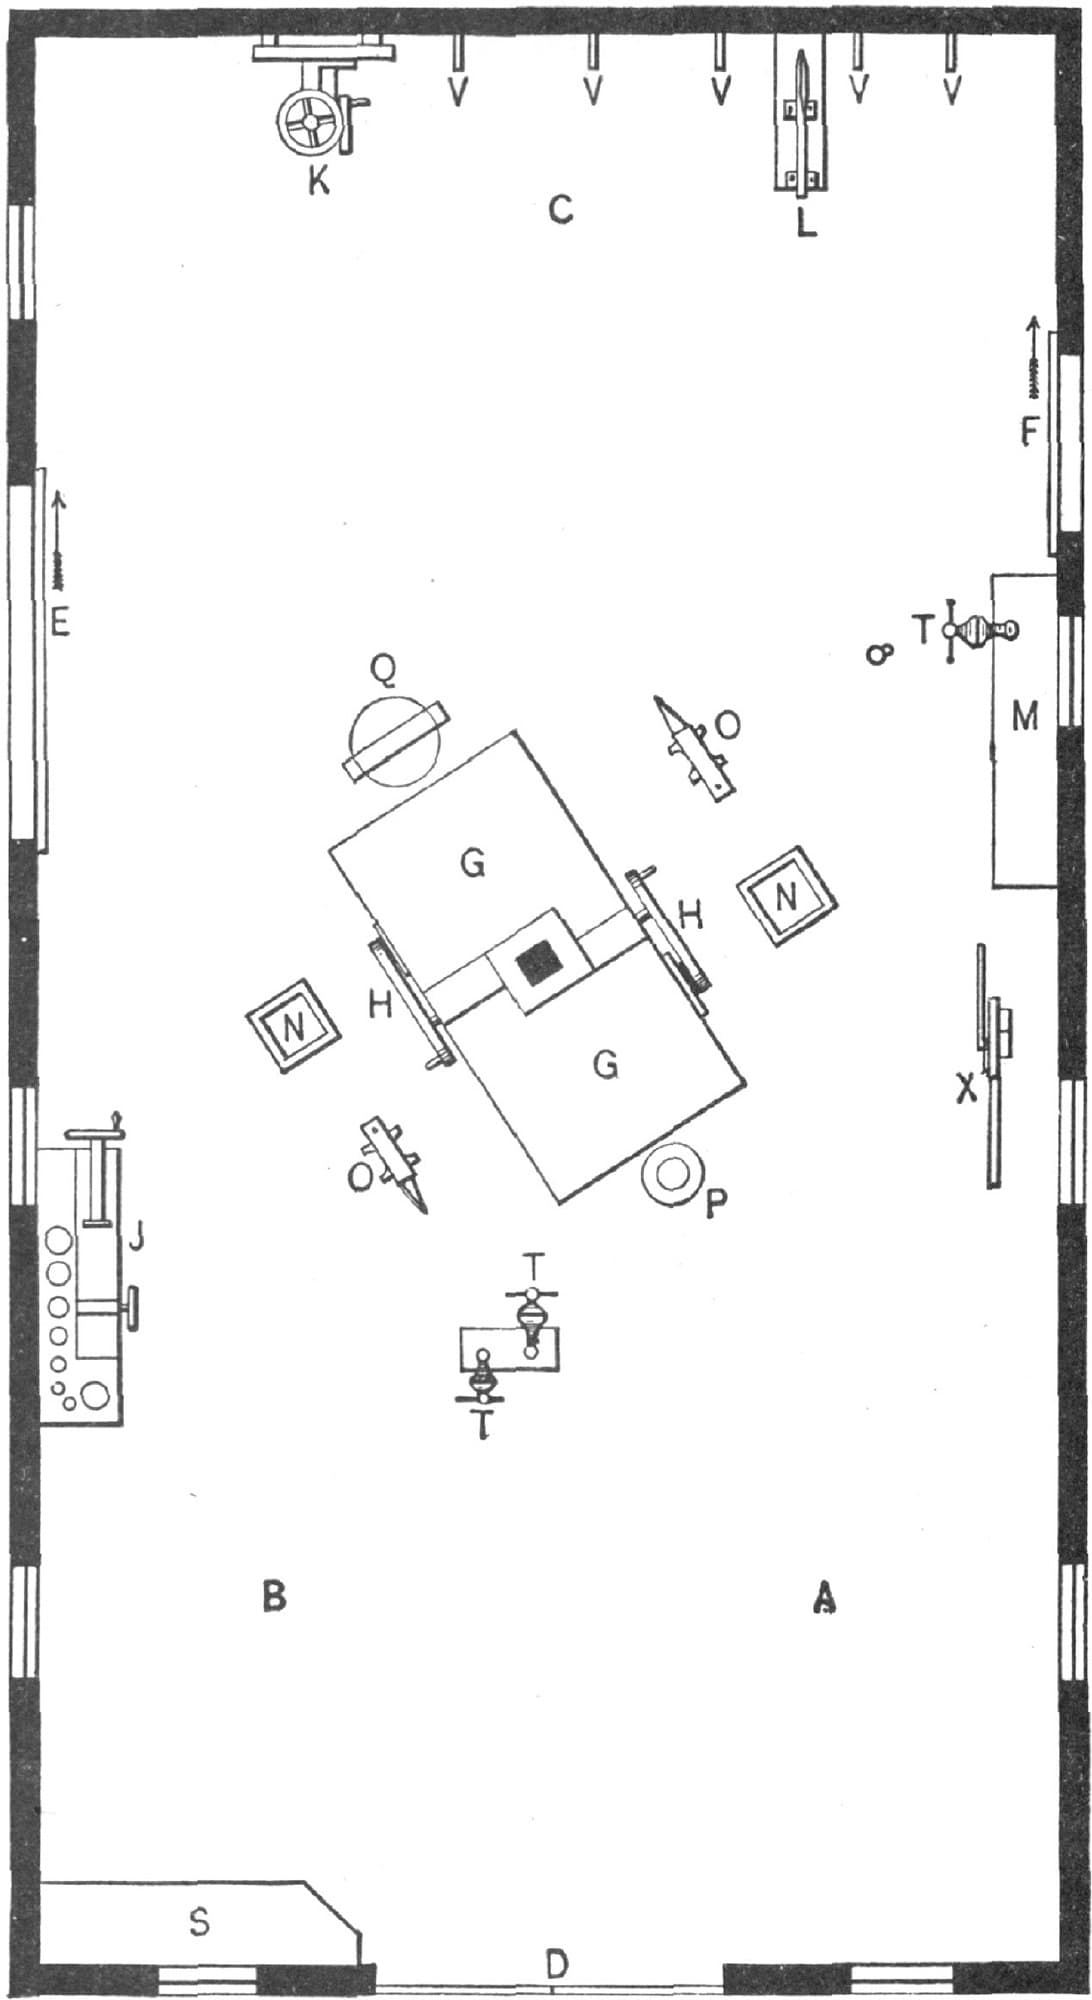
FIG. 39.—PLAN OF “J. E. M.’S” BLACKSMITH SHOP
In the west gable there are two windows, and in the east gable one. The platform in front of the shop is 12 × 24 feet. That on the south side is 12 × 12 feet. Both are of 2-inch plank. The sides of the shop are 9 feet high. The roof is one-third pitch. The shop is 24 feet wide and 44 feet long.
The forges are open underneath, and the blowers that set under them are connected with the tuyere by gas-pipe passing through the base of the chimney. A good hand will earn for me a dollar a day more with these blowers than with the best 36-inch bellows I ever owned.—By J. E. M.
CARE OF THE SHOP.
To do good work one must have good tools, as it is impossible for a smith to forge his work smooth unless his tools are in good order. It is likewise necessary for him to have good coal; but with a shop conveniently arranged, and with perfect tools and the best of coal, there is much which depends upon the way in which they are used that determines the character of work and the relative economy with which work is performed. There is no other branch of carriage making that requires so much skill as that of the smith. This is because he has no patterns, like the wood-workman, and is under the necessity of shaping all irons by his eye. A smith has more to endure than any other mechanic, for if there is anything wrong about a job the smith is sure to get the blame, whether it be his fault or not. The strength and durability of a buggy, for example, depends principally upon the blacksmith. If smiths would go to work and wash their windows, clean out behind their bellows, pick up their scrap that lies promiscuously about the shop, gather up the bolts, etc., they would be surprised at the change that it would make, not only in the general appearance of their shop, but also in the ease and convenience of doing work. One great disadvantage under which most smiths labor is the lack of light. Frequently blacksmith shops are stuck down in a basement or in some remote corner of a building. It is a fact, whether it be disregarded or not, that it is easier to do good work in a clean, well-lighted shop than in one which is dirty and dark.
A word about economy in work, for the benefit of the younger men in the trade especially. Don’t throw away a bolt or clip because a nut strips, but go to work and tap out a new one and fit a new nut. Old bolts that are sound and that are often thrown in the scrap are just as good for repairs as new. Careful attention to these points will make a material difference in the expenses of the shop in the course of time.—By B. P.
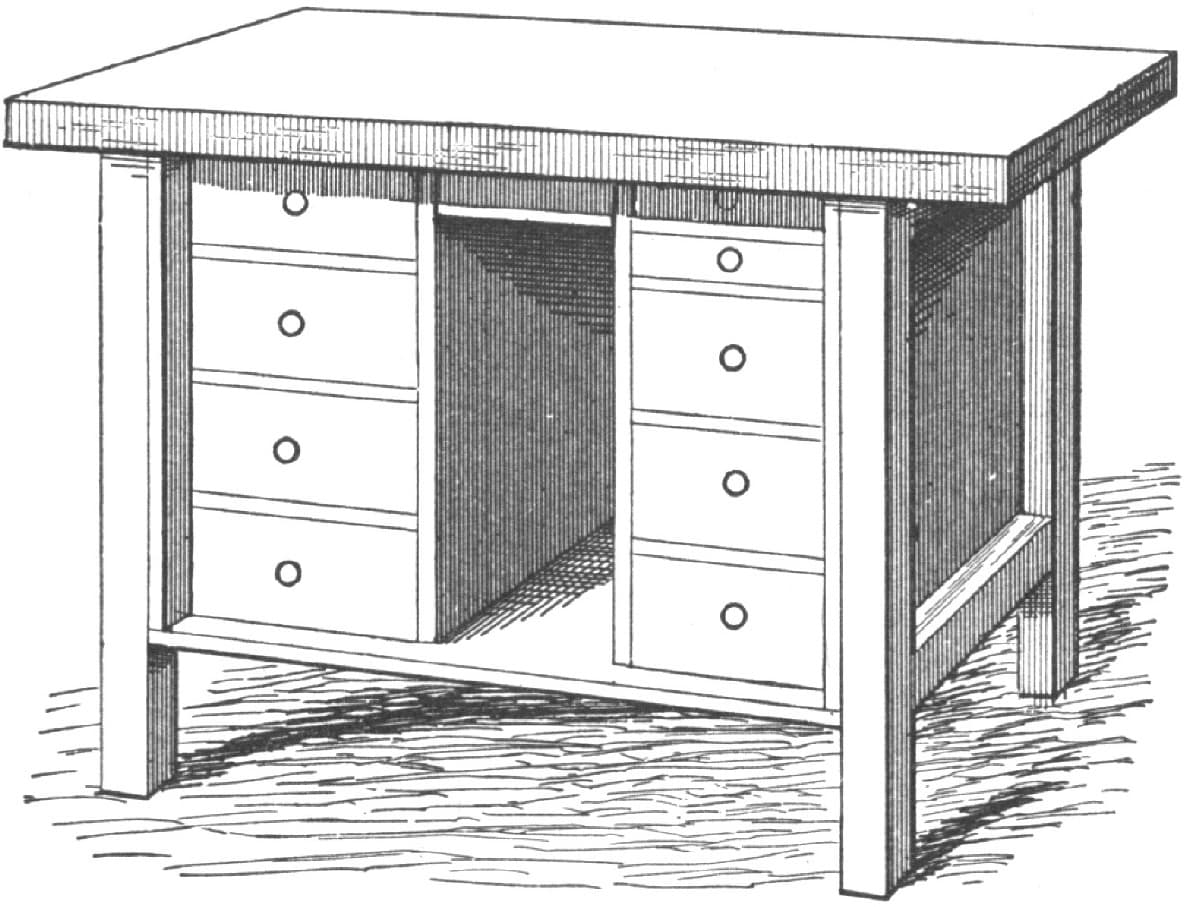
FIG. 40.—A HANDY WORK BENCH
A HANDY WORK BENCH.
The plan of a work bench shown in Fig. 40 shows a very handy arrangement for tools.
The legs and top are of hard-wood. Birch is very good. The ends, back and open space in the bottom are boarded up on the inside. The height of the legs is 2 feet 10 inches, length of body 4 feet 4 inches, width of end 1 foot 7 inches. The tops can project at the ends to suit your taste. Three drawers, 53/4 × 11 inches, are on the left side. On the right there are three 53/4 × 11 inches and two 21/4 × 11 inches. The middle drawer is 21/4 × 71/2 inches. I hinged a strip up and down the ends, so two padlocks would lock all the drawers except the middle one. Bolt the vise in the center of the bench, and it will be found very convenient. Such a bench ought not to cost over ten dollars.—By H. A. S.
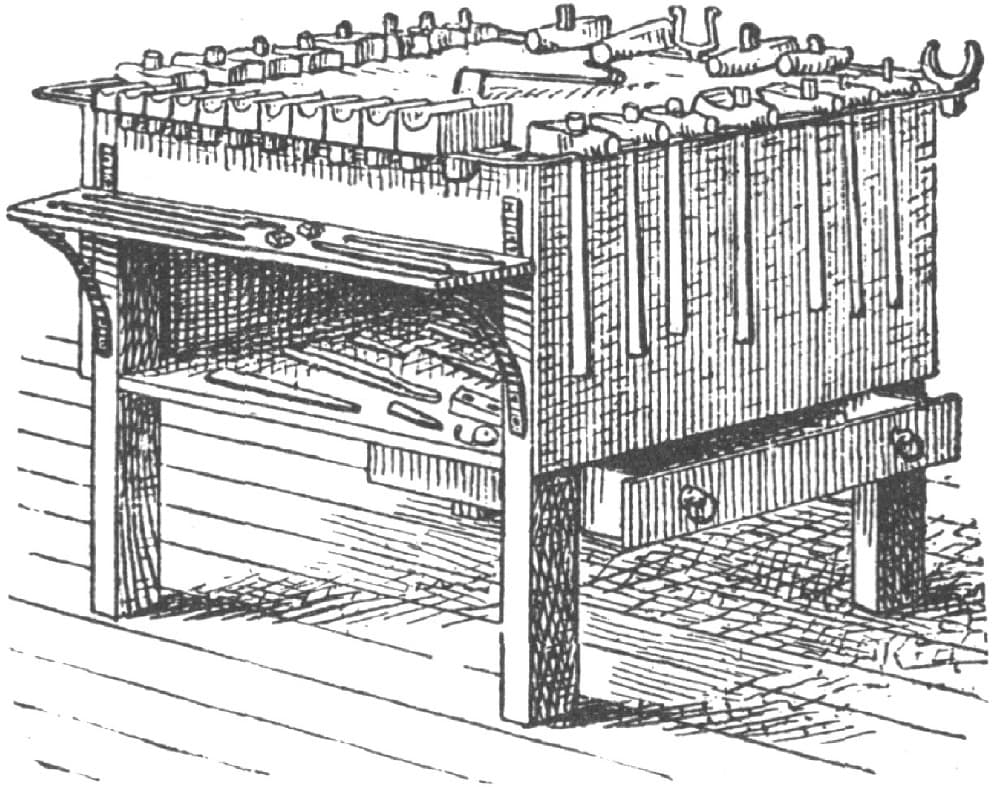
FIG. 41.—PERSPECTIVE VIEW OF TOOL BENCH
BLACKSMITH’S TOOL BENCH.
Inclosed I send drawings of a tool bench, such as is used by me, which I think handy in all respects. The bench was made originally from an old box that had been lying around our shop for sometime. Fig. 42 shows how the box has been adapted to the purpose. The size of the box was 2 feet 8 inches square, and 19 inches high. Four posts or legs were attached, as indicated in Fig. 41. One board was taken off from the end of the box, and out of it was made the shelf shown in perspective, in Fig. 41. This left the opening into the box below the shelf. In the box I keep my punches, heading tools, etc.; on the shelf I keep cold chisels, gouges, punches and pins. Below the box on the right-hand side I have placed a drawer in which I keep papers, slate pencils, chalk and new files. This is provided with a lock not shown in the sketch. Fig. 42 of the accompanying sketches represents a side view of the bench, and also shows the shelf A in profile. The different dimensions are indicated in figures upon this sketch. Fig. 43 shows a profile of the iron which forms the brackets that support the shelf. Fig. 44 is a top view of the bench. AA represent the front where the bottom swedges are placed. BBB shows the position of the handle swedges. Fig. 45 presents the shape of the two irons which hold the frame shown in Fig. 46 to the bench, a general view of which is also afforded by Fig. 41. Fig. 46 represents an iron frame which goes entirely around the bench, and serves as a rack for tools. It is made of 5/8 inch oval iron. The two irons shown in Fig. 45 are made of 7/16 × 3/16 steel tire. In fastening these two irons to the frame, the hooks come on the underside, so as to bring the frame level with the bench.—By NOW AND THEN.
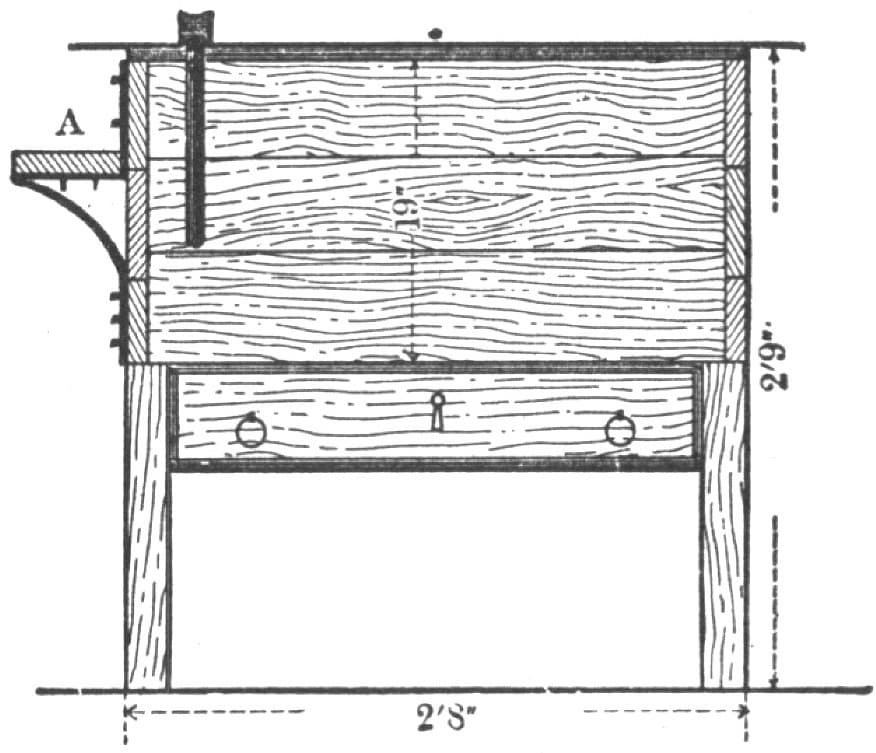
FIG. 42.—SIDE VIEW OF BENCH, SHOWING DIMENSIONS
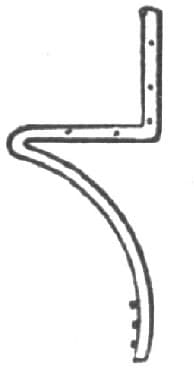
FIG. 43.—PROFILE VIEW OF BRACKET
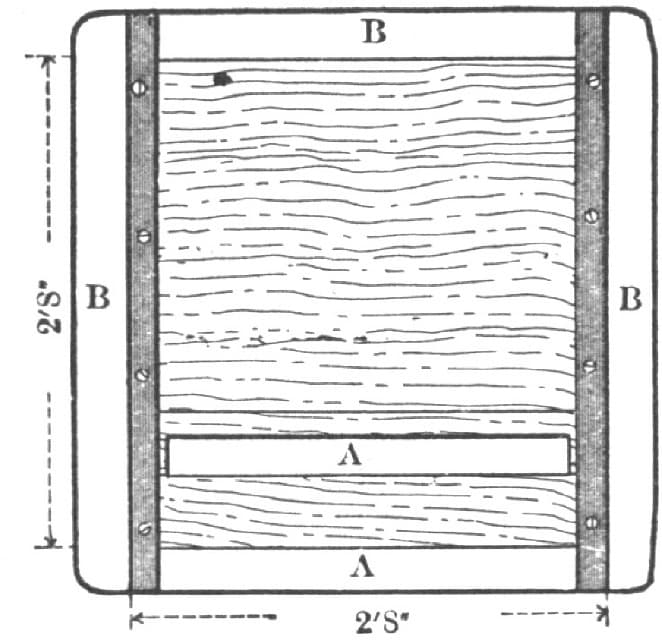
FIG. 44.—TOP VIEW OF BENCH
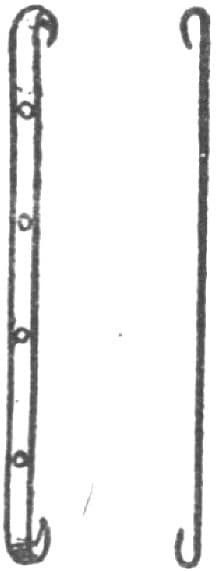
FIG. 45.—IRONS BY WHICH THE FRAME IS FASTENED TO THE BENCH

FIG. 46.—THE IRON FRAME EXTENDING AROUND TOP OF BENCH
A CONVENIENT WORK-BENCH.
The dimensions of the work bench shown in sketch, Fig. 47, are, length 16 feet, width 32 inches, height about the usual. It contains sixteen to twenty drawers and twelve to sixteen boxes that extend through its length and are six inches square or larger. These boxes are for iron bars such as 1/4, 5/16, 3/8, 7/16, 1/2, 9/16, 5/8, 7/8, round, and other light irons. The drawers may be used for horseshoes, nuts, washers, etc., etc.—By L. S. T.
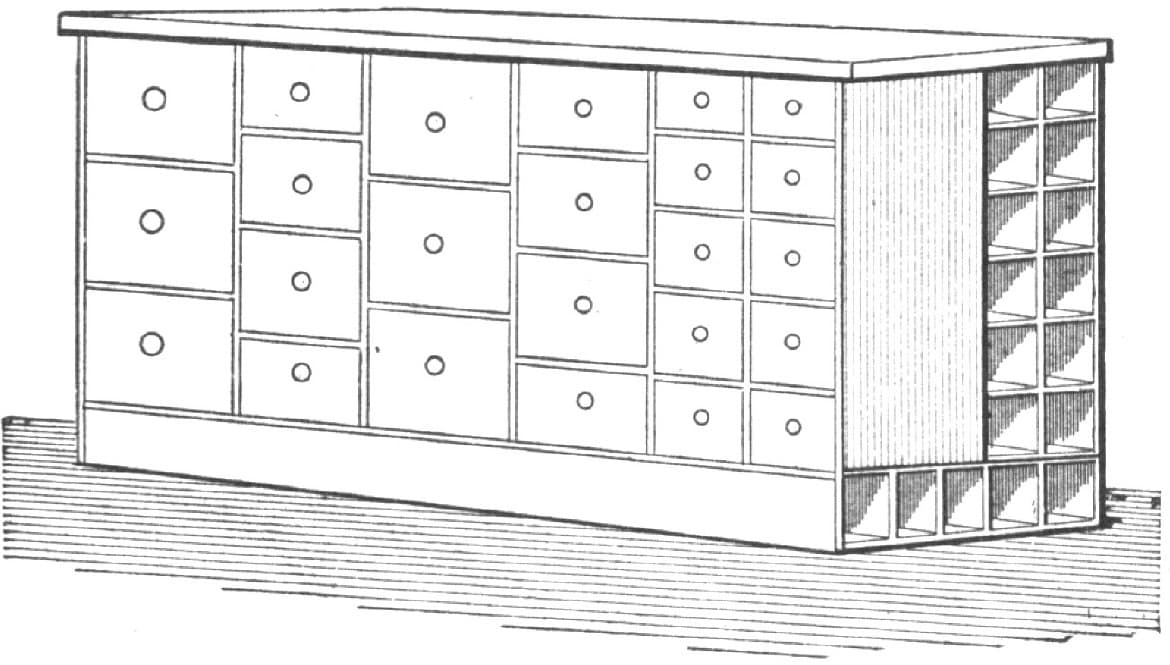
FIG. 47.—A WORK-BENCH DESIGNED BY “L. S. T”
HOME-MADE PORTABLE FORGE.
I made a small portable forge a short time since, as shown in sketch, Fig. 48. In size it is two feet square and three feet high; it is made entirely of wood; the bellows are round and are sixteen and a half inches in size. I covered them with the best sheepskin I could get. The bed of the forge consists of a box six inches deep. It is supported by corner posts, all as shown in the sketch. Through the center of the bottom is a hole six inches in diameter for the tuyere; this is three inches in outside diameter and is six inches high. The bed is lined with brick and clay. I find by use that it does not heat through. The bellows are blown up two half circles with straps from a board running across the bottom, all of which will be better understood by reference to the sketch.
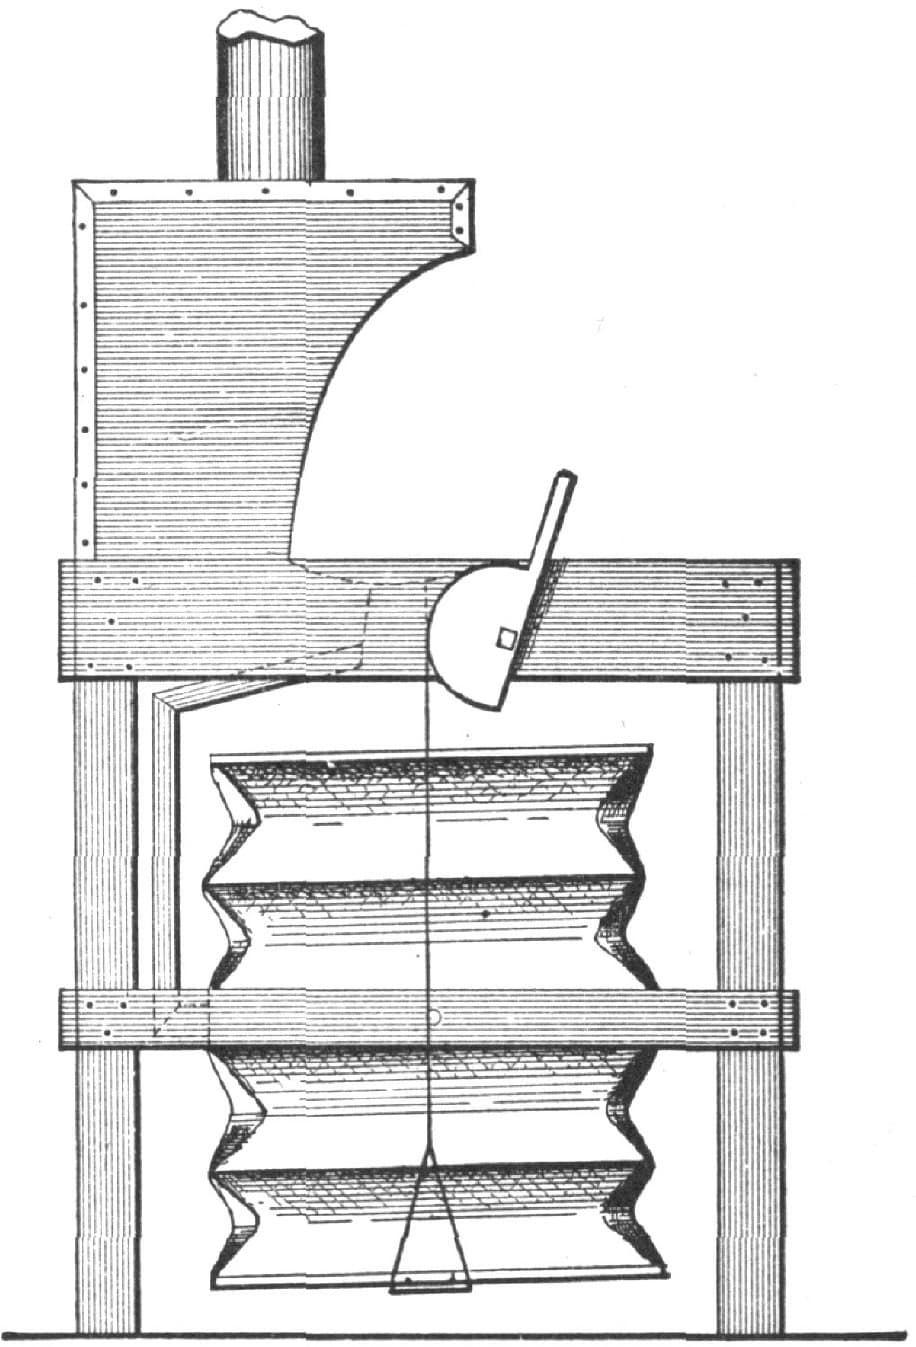
FIG. 48.—HOME-MADE PORTABLE FORGE
In addition to protecting the bed by brick and clay, the tuyere is set through a piece of sheet iron doubled and properly secured in place. The hood which surmounts the forge was made out of old sheet iron, and has been found sufficient for the purpose. The connection between the tuyere and the bellows is a tin pipe.—By S. S.
IMPROVED BLACKSMITH’S TUYERE.
Perhaps it would not come amiss if I gave you a sketch of a tuyere I am using and have had in use for twenty-five years. It works entirely satisfactory up to a certain size of work. For example, it will answer for the lightest work, and weld up to about a four-inch bar, and is made complete, or the castings only are furnished by the Pratt & Whitney Company, of Hartford, Conn., who are using it in their own shops. It consists, as will be seen from the accompanying sketch, Fig. 49, of a wind-box A, supported on brick-work which forms an ash-pit G beneath it. To this box is bolted the wind-pipe B, and at its bottom is the slide E. In an orifice at the top of A is a triangular and oval breaker D, connected to a rod operated by the handle C. This rod is protected from the filling, which is placed between the brick-work and the shell F of the forge, by being encased in an iron pipe I. The blast passes up around the triangular oval piece D. The operation is as follows: When D is rotated, it breaks up the slag gathered about the wind passage or ball in taking a heat, and it falls into the box below. At any time after a heat the slide E may be pulled out, letting the slag and dirt fall into the ash-pit beneath. A sectional view is seen in Fig. 50. It is a great advantage to be able to clear the fire while a heat is on without disturbing the heat. You will see that there is nothing to get out of order, and as a matter of fact the tuyere will last fifteen years or more. The top of the wind-box is two inches thick and the sides 1/2 inch thick; it weighs altogether about sixty pounds.—By J. T. B.
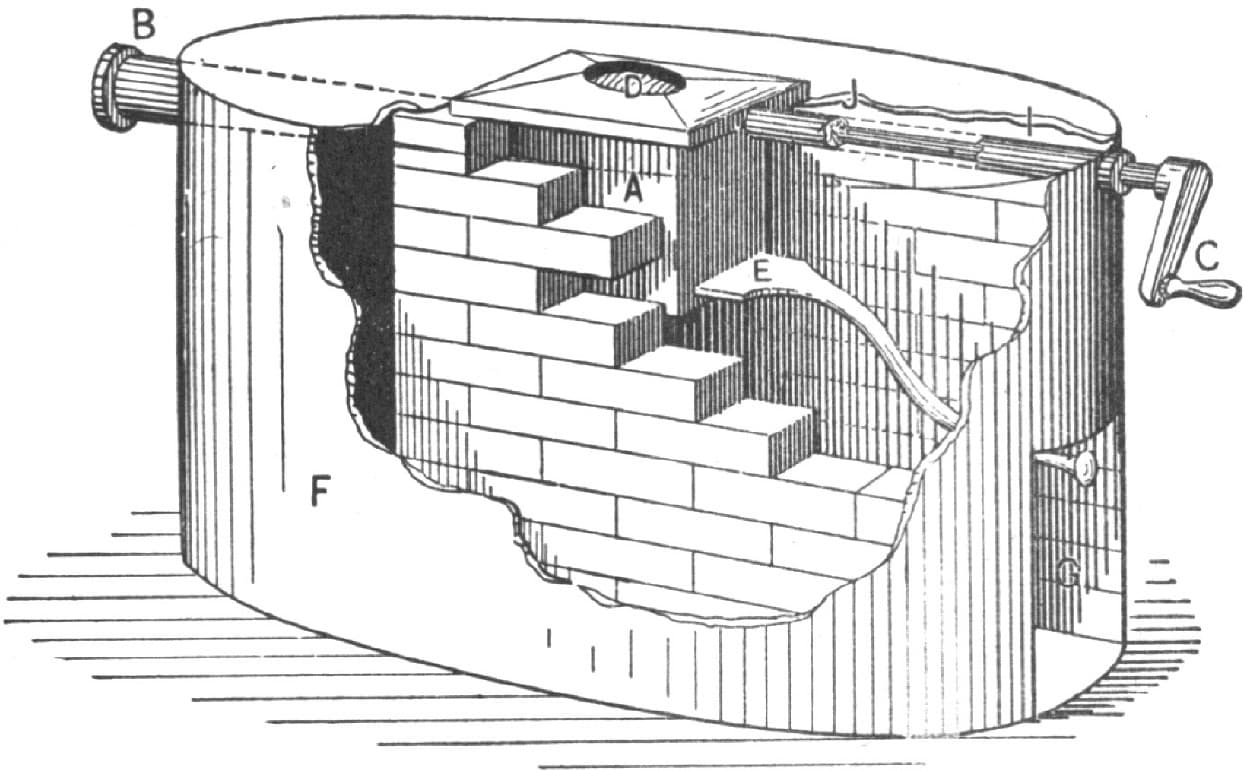
FIG. 49.—SHOWS POSITION “J. T. B.’S” TUYERE ON THE FORGE
THE SHOP OF HILL & DILL.
Prize Essay written for the Carriage Builder’s National Association.
The carriage shop that produces one hundred new vehicles annually, without steam or power machinery, has joined the “Society of the Obsolete,” but the shop of about that capacity without power, which makes repairing its chief dependence, and builds enough new vehicles to keep the shop open and the help at work through seasons when repairing is dull seems to have or ought to have a place in the industrial economy of mankind. To such an establishment Messrs. Hill & Dill have pinned their industrial faith and their sign-board. They cater to the wants of those who desire special vehicles out of the usual line of sale work. They build extra wide carriages for fat people, give extra head and leg-room to tall people, and welcome the butcher, the baker, and the coal money-maker, when they come to order business vehicles with special features. Even the cranky doctor, minister or school superintendent, who thinks he has invented a vehicle which will revolutionize the business, is not frowned upon. He will probably want a good sensible Goddard to ride in after he gets through fooling with inventions.
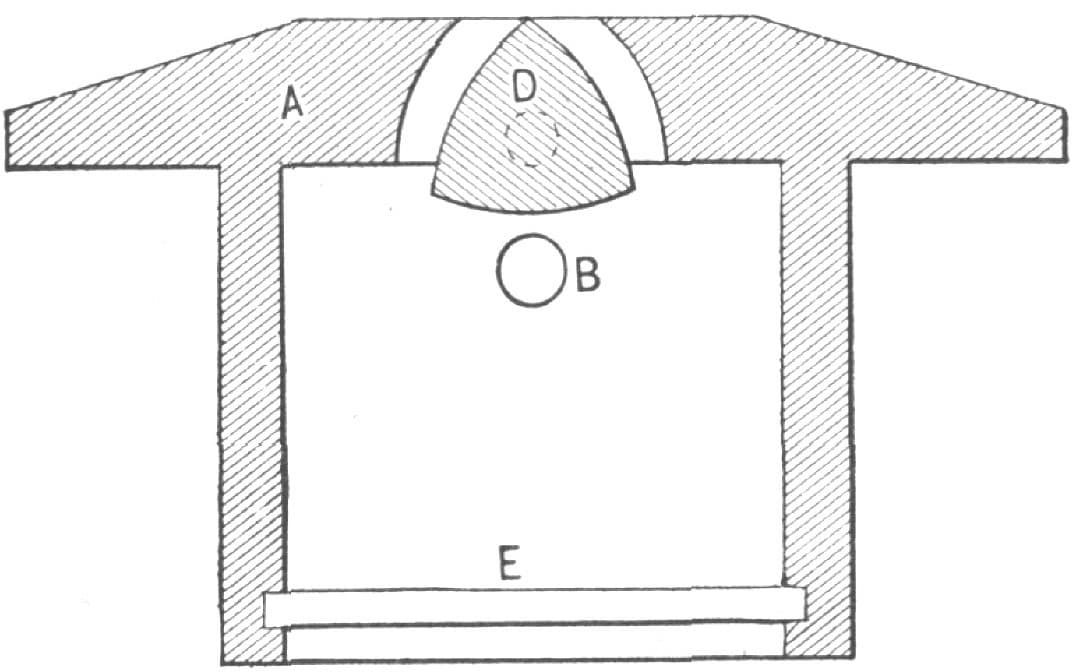
FIG. 50 IS A SECTIONAL VIEW THROUGH SLAG BREAKER D
To thoroughly know the establishment, we must know the firm. Mr. Hill, the capitalist of the firm, was formerly in the livery-stable business. He is a solid-built, shrewd, tidy-looking, affable business man. He has a large knowledge of carriages as a buyer and user, and paid repair bills for many years. He knows a good horse, a good carriage and a good customer at sight, and knows how to use them so as to get the most out of them.
Mr. Dill is some ten years younger than his partner, tall and bony, hair rather long and trousers rather short. The corners of his mouth point upward, and he looks as though he was on the point of laughing out loud, but no one ever caught him in the act. He talks but little, and is endowed with excellent judgment and numerous offspring. He was formerly a body-maker, but degenerated or developed into a foreman of a repair shop. He takes the world at its best and makes the best of his mishaps; if he falls down he manages to fall forward, and rise just a little ahead of where he fell. Both he and his partner are liberally endowed with the instinct that leads to accumulation, as evidenced by Mr. Hill’s snug bank account and numerous blocks of real estate which he owns; and a visit to Mr. Dill’s attic and cellar would convince the most sceptical that he also “lays up” everything for which he has no present use.
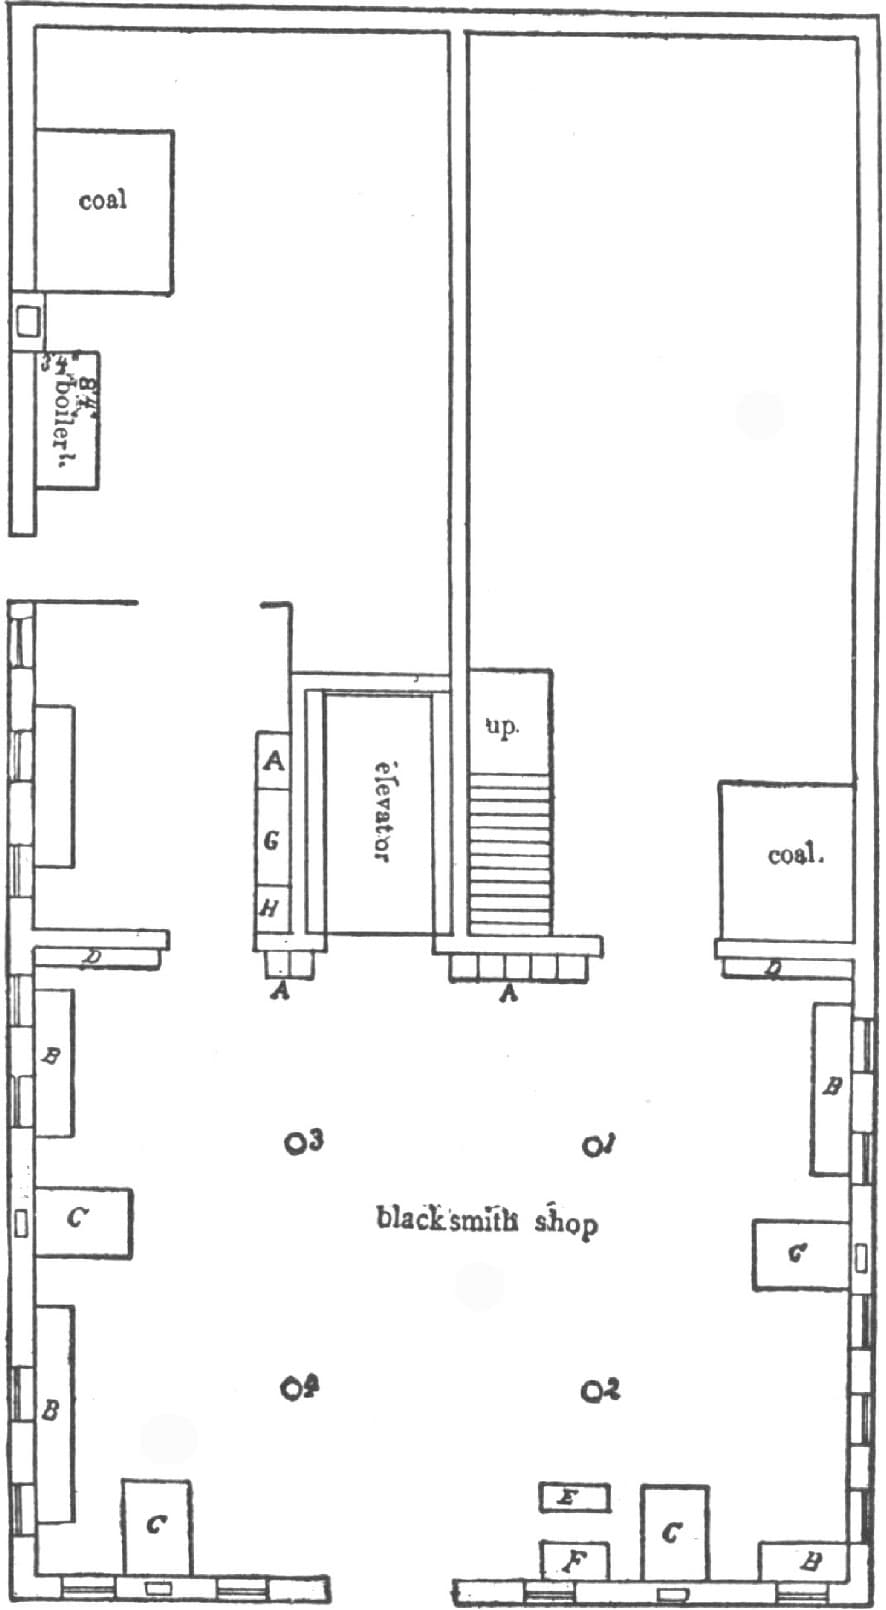
FIG. 51.—PLAN OF THE BASEMENT OF HILL & DILL’S SHOP
AAA, Closets. BBB, Benches. CCC, Forges. DD, Bolts. E, Bender. F, Bolt-cutter. G, Sink. H, Water-closet.
The first floor of the shop is level with the sidewalk and the grade is such that at 60 feet from the corner there is a full-size window (24 lights, 8 × 10 in.,) the bottom of which is 3 ft. above the basement floor, which is 11 ft. 8 in. below the first floor. The lot is 64 ft. on Main st. and 130 ft. on Glen st.
The shop is 54 × 100 ft. It is built of brick, three stories high above the basement, and has a flat graveled roof. The upper story is 10 ft. high between the joists, the other stories and basement are 10 ft. 6 in. between joists. The floor joists are all 12 in. apart to centers, 2 × 12 in. timber for the upper floor and 2 × 14 in. for the other floors except the basement, which will be explained further on. The outer walls are 16 in. thick up to the upper floor and 12 in. above that. There are two brick partitions, as shown in the plans, 12 in. thick, one running across the shop, the other from the front to the cross partition. These run to the upper floor but not above it. The top story is all one room, except the elevator. It is unfinished and has the necessary posts to support the roof. It is used entirely for storage. The three lower floors have gas fixtures in such positions as convenience has indicated. Having described the building in a general way, we will now consider the different departments, beginning with the basement.
The blacksmith shop in the east end of the basement is 40 × 41 ft., entirely above ground, and lighted on three sides by thirteen full-size windows and glass in the upper panels of the outside door. Four forges are located as shown in Fig. 51 of the accompanying cuts. The bellows are hung overhead, and the chimneys are set out from the wall enough to admit of the wind pipe going through the back of the chimney. This brings the front of the forges 6 ft. from the wall. The flues are 8 × 20 in., and the chimneys are curved back and into the wall near the top of the room. The tool benches are of the usual sort, except that at the side farthest from the anvil there is a double slot for swages, so that the top and bottom tools can be kept in pairs together. The anvils are wrought-iron.
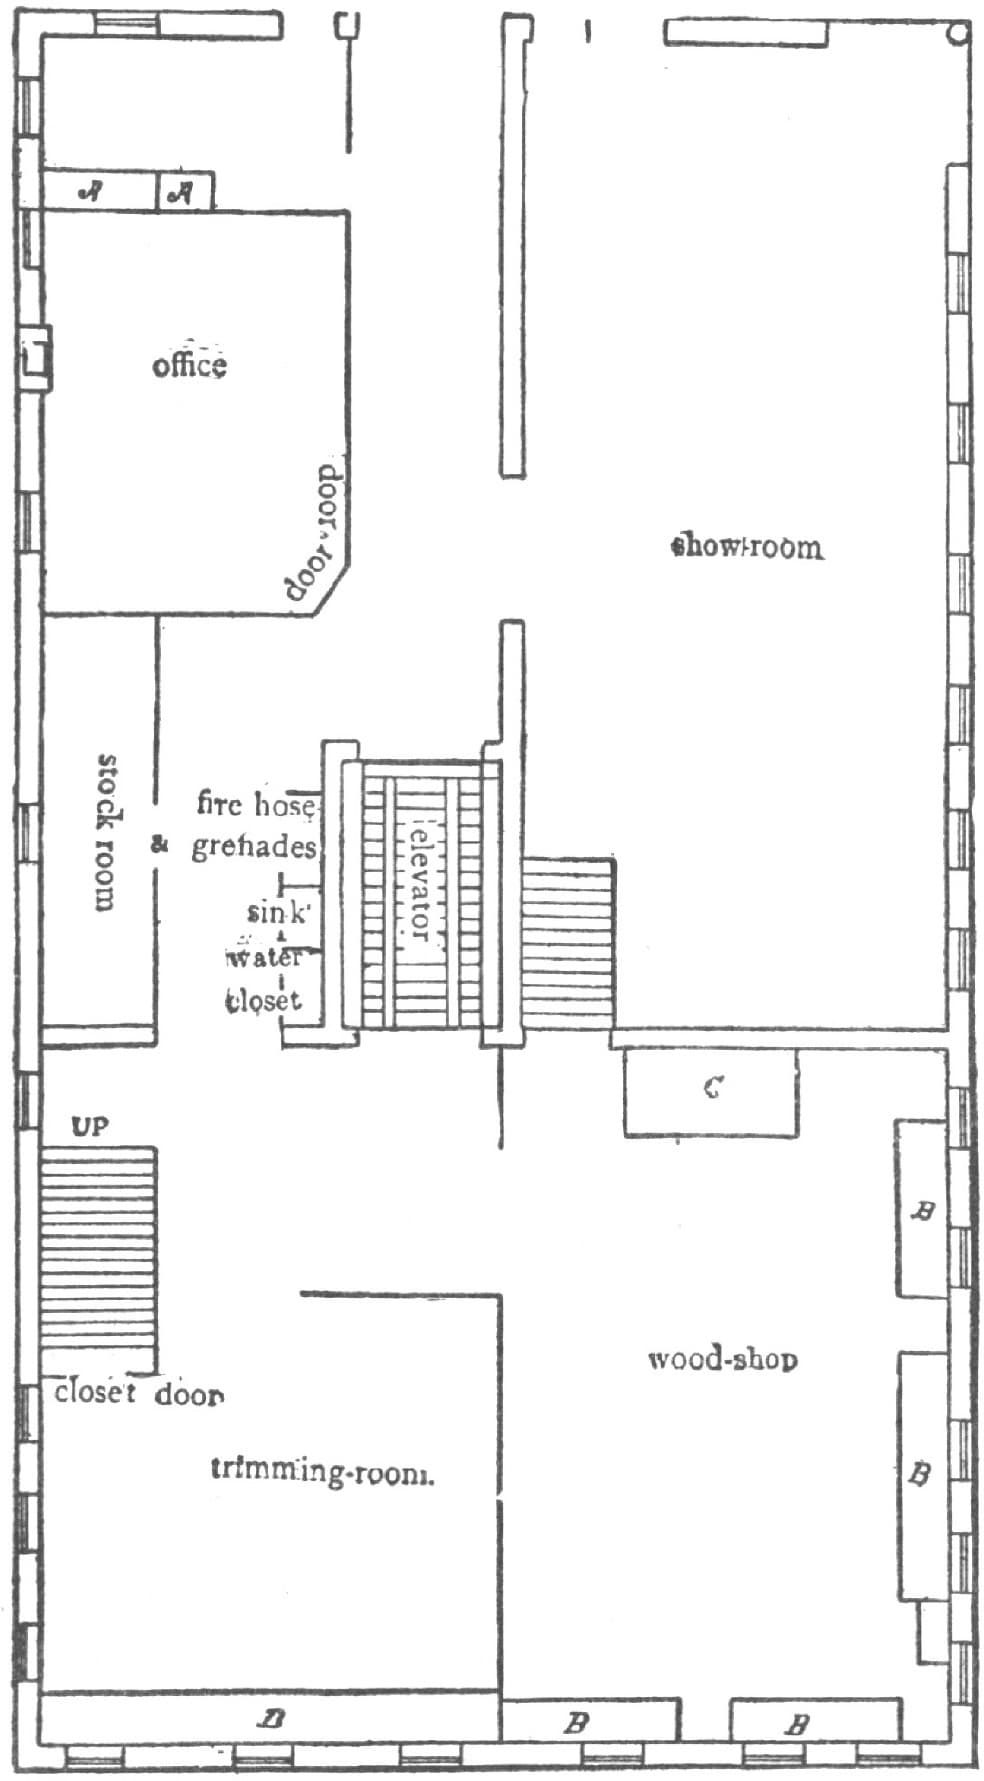
FIG. 52.—PLAN OF THE FIRST FLOOR
AA, Closets. BBB, Benches. C, Rack.
There is a smith’s and a finisher’s vise for each fire, attached to the benches in convenient places. The tire-upsetter is bolted to the southeast post. A horizontal drilling machine for tires, and an upright one for other purposes, bolt cutter, tire bender, two bolt clippers, two axle seats, and numerous wrenches are among the tools of the smith shop. There is a good-sized drawer under each bench for taps and dies and other small tools, two cases of drawers for bolts and clips (located as shown on plan) and also part of the “furniture.” Another convenience, and one not usually found in a smith shop, is a set of differential pulley-blocks. They are very handy on repair work. If a heavy vehicle comes in with a spring or axle broken it can be run under one of the several rings overhead and easily raised and the broken part removed. With them one man can raise 1,000 lbs., and they cost $13.00. Coat closets are provided here, as in all the other workrooms except the varnish rooms. A clock, broom and grindstone are also found here. The floor is 2-inch chestnut plank laid on joists bedded in concrete. (It is the same in the wheel jobber’s room.) The remainder of the basement has a concrete floor. The northwest part of the basement is used as a blacksmith store-room, and occasionally an old wagon finds its way in there. The coal-bin, rack for bar iron and tire steel, box for old scraps, place for old tire, etc., all find accommodations here.
The wheel-jobber’s room on this floor is fitted up with special reference to his work. He is required to do all the wheel work, examine and draft all wheels, old and new, before they are ironed, set the boxes, fix spring bars and axle heads, etc. He is provided with wheel horses, hub boring machines, a press for setting boxes, two adjustable spoke augers, cutting from 3/8 to 11/4 inches. One of these he is expected to use exclusively on new spokes, the other for old work. He is supplied with bits of all sizes from 3/8 to 11/4 inch to be kept and used exclusively for boring rims. He has also a dozen wood handscrews and a dozen iron screw clamps. By having a jobber near the smith shop it saves a good deal of travel to the wood shop and back. The shop is heated by steam, and as no steam is used for power a low-pressure 18-horse power heating boiler does the business. It is located in the basement, as shown on the plan. It is 6 ft. 2 in. high, 3 ft. 9 in. wide and 8 ft. 4 in. long outside of bricks, and cost about $500 ready for piping. It is supplied with water from the elevator tank on the upper floor, and, as the steam returns to the boiler after passing through the building, but little water is used. The radiating surface consists simply of coils of pipe placed against the walls in convenient places in the rooms it is desired to heat. On the north side of the boiler, 4 in. from the floor, is our steam box for use in bending. It is a galvanized sheet-iron cylindrical affair, 8 ft. long × 1 ft. diameter, with the open end toward the wheel jobber. The other end is 4 inches lower and has a drip outlet. It is supplied with steam from the boiler. It is a simple, inexpensive contrivance, but as most of the bent stock is bought ready for use, it answers the purpose very well. Besides the boiler and coal bin, this part of the basement has a bin for shavings and waste wood, and the remainder is used for general storage purposes.
The elevator occupies the position (as shown on plan) near the center of the building at the intersection of the two brick partition walls, which make two sides of the elevator shaft strong and fire-proof. The other two sides are brick, 12 in. thick from the foundation in the basement to the upper floor, and 8 in. thick above that. The elevator walls are continued 2 ft. 6 in. above the roof, and provided with openings on all four sides for ventilation. The shaft is covered with a metal-frame skylight. The elevator and shaft (or, rather room), serve several purposes: First, in its legitimate and more important work of raising and lowering carriages and stock from floor to floor; second, as a ventilating shaft; and, third, as a wash room. It is a hydraulic telescope elevator, run by water from the street main which passes the premises to supply the neighboring city with water. We are fortunate in being located on a street which has what is known as the high service main, with a pressure of 125 lbs. to the inch. 75 lbs. will run it satisfactorily with 2,000 lbs. load, but not so fast. There is a tank on the upper floor to hold the exhaust water, which is forced up by the descent of the elevator. It is then carried in pipes for use in different parts of the building. By using the exhaust water for other purposes, the cost of running the elevator is quite small. The doorways are arched; the doors are made of light lumber tinned on the inside, hung on hinges (opening outward, of course). They close by a spring and fasten by a catch which cannot be released from the outside except by pressing a short lever, which, for purposes of safety, is placed in an unusual place near the floor. At each floor above the basement, there is a light hatch covered with tin sanding on its edge, so hung with hinges that by releasing it (which can be done from the outside) it will fall and cover the hatchway, thus cutting off draft in case of fire. The car or platform of the elevator is made of spruce lumber, and the floor is 2-inch plank, laid crosswise with 1-inch spaces between the planks. The floor of the shaft in the basement is concrete, concave, with an outlet near the center (the plunger is in the center) connected with the sewer and provided with a stench trap. With the elevator thus arranged, we have a wash room on every floor, and, on the first and second floors, doors opening on opposite sides give plenty of light. The elevator shaft also serves a good purpose as a ventilator, ventilation being assisted by the elevator passing up and down. The shaft is 15 × 9 ft.
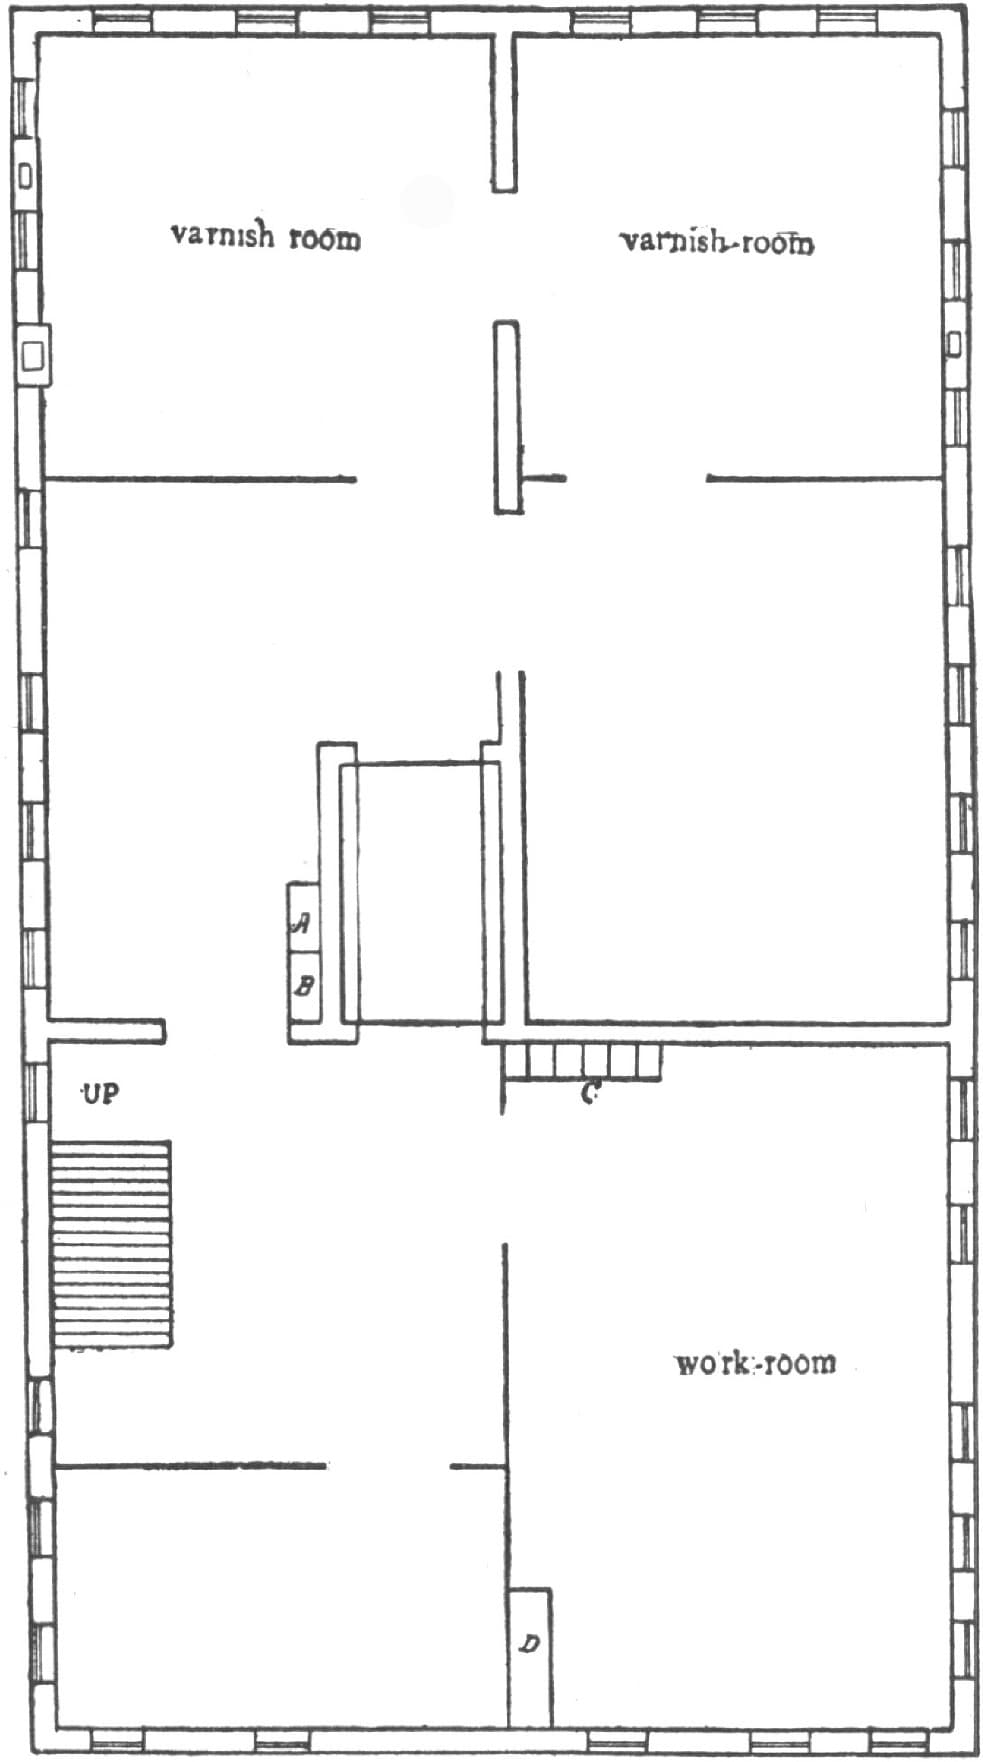
FIG. 53.—PLAN OF THE SECOND FLOOR
A, Sink. B, Water-closet. C, Wardrobe. D, Paint-bench.
The show-room is in the north front corner (see Fig. 52). It is 56 × 24 ft., and has two plate-glass windows at the northwest corner. It is sheathed with good pine sheathing and painted like the varnish rooms, a very light drab. This room, like the office and varnish rooms, has drab window curtains of the same shade as the paint. The furniture of this department consists chiefly of a display horse. A few harnesses are kept for sale, and a team is kept hitched up continually.
The office is in the south front corner; it is 8 × 17 ft., has two windows, and lights in the door. It is finished the same as the show room, but is varnished instead of painted. It is warmed by steam from the boiler and has an ornamental radiator. It has a wash bowl connected with the water pipes and the sewer. It is finished with a desk, safe, four chairs (no lounge—none of that business done in this shop), an umbrella stand and a couple of spittoons. There are two closets in this room, one (the smaller) for coats, etc. The other has three drawers, and the remainder in shelves. This closet is for back numbers of the trade journals, drawings of vehicles it is desired to preserve, etc.
The wood shop is in the northeast corner of the first floor. It is 40 × 25 ft., and has four benches, as shown on the plan. There is also a smaller bench at the northeast corner of the room on which there is a saw-filing clamp and saw set. The only stove on the premises is in this room. It is a sheet-iron drum stove with a lid on top, but no door except the ash door at the bottom. Its principal business is warping panels. It has a strong, smooth piece of horizontal pipe with a parallel rod, 3/4 in. iron, under which one edge of the panel may be placed while passing it around the pipe. The other furniture of this room consists in part of a clock and a broom, grindstone, two body-makers’ trestles, four horses, four dozen wood hand-screws, one dozen each 4.5 and 6 in. iron screw clamps, and four long clamps to reach from side to side of bodies.
The trimming room occupies the southeast corner of the first floor. It is 23 × 25 ft., and has a bench running the whole length of the east side. It is large enough to accommodate three trimmers and a man to do general work, such as oiling straps, polishing plated work, helping hang up work, fitting axle washers, shaft rubbers, etc. His bench is on the north side and has a vise on it. The sewing machine is on the opposite side. There is a closet for cloth and other stock under the stairs leading to the second floor. The small room (stock room on plan) is fitted up with shelving, and part is used for trimming stock, the rest for other materials, such as varnish and color cans, sandpaper, files, etc.
The paint shop occupies the entire second floor (see Fig. 53), and in case of necessity the room back of the office on the first floor can be used for such heavy jobs as are to be done without unhanging. The room at the northeast corner is the general work-room, and contains paint bench, where paints are mixed, paint mill, press for squeezing colors out of the cans, water boxes for paint brushes, coat closets, etc., but there is no corner or place in this room nor on the floor suitable for a collection of paint rags, worn sandpaper and discarded tins. A sheet-metal can holding about a bushel is provided for this debris, and it is expected that it will be emptied each day. The room is sheathed overhead with 3/4-in. matched sheathing, as are also the partition walls.
The outer brick walls are bare. The two rooms at the west end (front) are varnish rooms. Both are finished alike, sheathed with 3/4-in. matched pine on all sides and overhead, and painted two coats very light drab with enough varnish in the second coat to give it an egg-shell gloss. Each room has a ventilating flue in the wall. The furniture of these rooms consists simply of the necessary trestle, etc., on which to place the work while varnishing, cup stands and brush keepers. There is also a thermometer in each of these rooms. On the north side between the varnish room and the work room is a room into which work can be put when it is necessary to empty the varnish rooms before the work is dry enough to hang up. When not needed for this purpose it can be used for varnishing running parts or for storage; this room is also sheathed and painted. The small room at the east end is for sandpapering and all very dirty work. The workroom is 40 × 23 ft., the varnish rooms 25 × 24 ft. and 25 × 26 ft. respectively.
The lumber shed is 20 × 40 ft. It stands at the northeast corner of the lot. The posts are 18 ft. high. The roof is graveled and has just slope enough to carry the water off. It has four compartments on the ground, 9 ft. high, for heavy plank, and has lofts above for lighter lumber. It is boarded with matched boards, and has ample openings for air at the top and bottom of each story. The west side of the lower portion is entirely open, and the doors to the loft above may be left open when desirable. South of this shed is a place for a fire and a stone on which to set heavy tires. The water for cooling this is brought from the smith shop by means of a rubber hose. —By WARREN HOWARD.