CHAPTER III
CHISELS
The Chisel and Chisel-Shaped Tools.
The subject upon which I have been invited by the Franklin Institute to speak this evening is that of the chisel and chisel-shaped tools, and the object of my remarks will be similar to that I had in view in a former lecture, namely, to demonstrate, as far as it is possible in a talk of this kind, that in skillful handicraft the very foundation lies in a knowledge that may be obtained altogether independent of any actual use of the tool.
The first day I entered the machine-shop I was given a hammer and a cold chisel wherewith to chip the ends of some bolts level. I had looked forward to my entry into the shop with a great deal of pleasure, for my heart and mind were set upon becoming a skillful workman. The idea of being able to cut and shape metal to my will, and form it into the machines that were to save mankind the exercise of mere brute force, had such a charm for me that it was the height of my ambition. An apprentice of some two years’ standing was to show me how to use the chisel, which he did as follows: “You hold the chisel so, and the hammer so, and then you chip this way,” and he cut off the end of the first bolt very nicely and quickly. I tried to follow him, but after the first blow, which by chance struck the chisel-head sideways, I became aware that my hand was dangerously near to the chisel-head. I realized this more thoroughly at the second blow, for the hammer fell upon my thumb, to the great amusement of my neighbors. After that I could not be persuaded to hold the chisel near the head unless I held the hammer pretty close to its head, so that I could take better aim. For two days I struggled on, left to myself to find out by bungling along how to grind the chisel, and all the other points that could have been taught me in an hour. What was worse, I became disheartened, for instead of finding all plain sailing with nothing to do but to master the principles of tool using, feeling every day that I had made some progress, I found myself floundering in the dark, not understanding anything of what I was doing, asking others to grind the chisels because I had no idea how to do it properly myself, and at the end of the first month I should, but for the authority of my parents, have tried some other business. The machinist’s trade seemed to be nothing but one-half main strength, one-quarter stupidity, and the other quarter hand skill that every man had to work out for himself, for nobody seemed able to help me. Many a boy meets just this same experience, and getting discouraged drifts about a month at this trade, two months at that, until he finds himself at last without any trade at all, and very often in his old age without the means of earning an honest livelihood. Examples of this kind are, I believe, within the personal knowledge of most of us, and the fault is often attributed to the absence of an apprenticeship system, but if we go deeper I am persuaded that it will appear that it is more in the want of intelligent preparation for the workshop.

Fig. 42—Showing a Flat Chisel
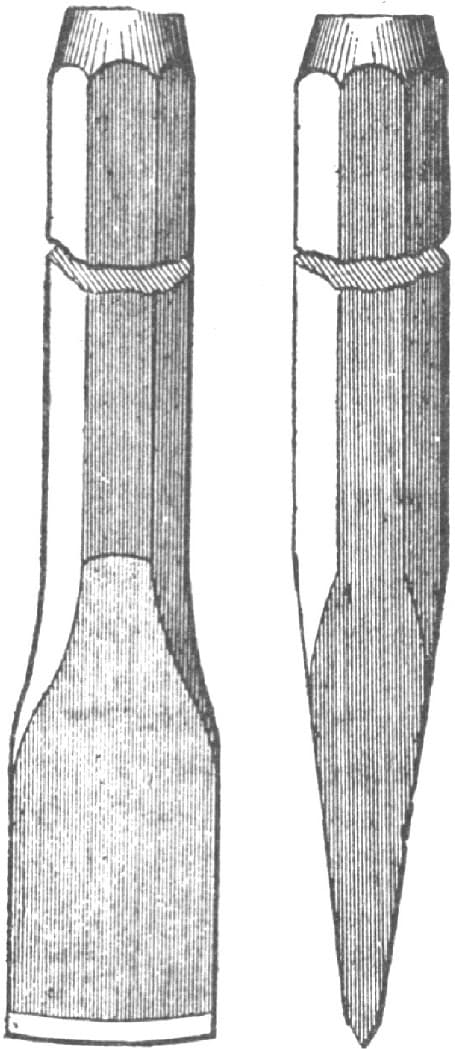
Fig. 43—Showing Another Shape of Flat Chisel. Side and End Views
Parental authority, as I have said, saved me from this misfortune, but since then I have, in the course of years, mastered the principle involved in the use of this cold chisel, and I can now draw you two pictures, which I hope will not be uninteresting. Suppose when I went to the shop doors to ask for employment the superintendent had said to me:
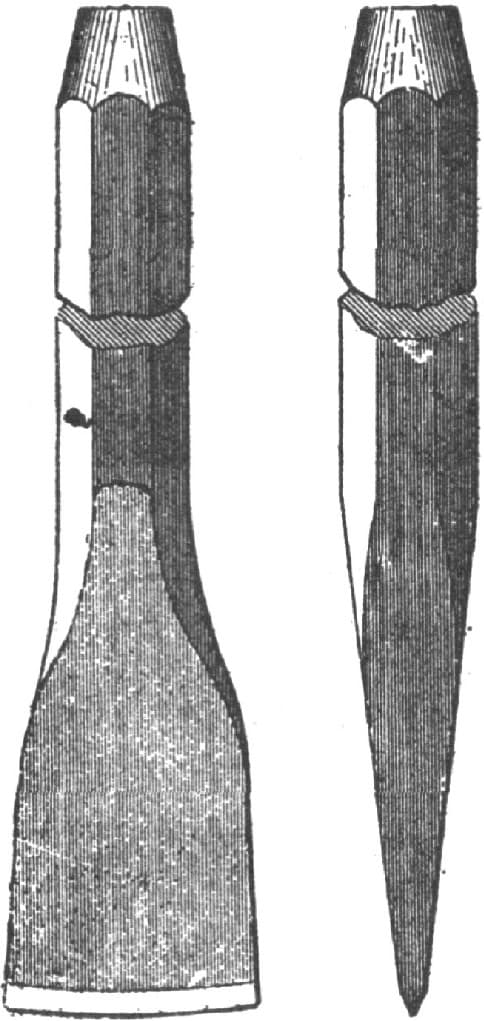
Fig. 44—Broad Chisels
“Want to be a machinist, do you? Well, why do you think you are fitted for it; do you know anything about it, or about tools? On what foundation have you built the opinion that you will ever make a good machinist?”
What could I then have answered except that I thought so, hoped so, and meant to try my best. But suppose I was again a boy, and again found myself at the shop door, having previously taken enough interest in mechanics to have remembered the principles I had already been taught, I could take a pencil and a piece of paper and answer him thus:
“I can only say, sir, that I have prepared myself somewhat for a trade”; here, for example, in Figs. 42 and 43, are shown the shapes in which flat chisels are made. The difference between the two is, that the cutting edge should be parallel with the flats on the chisel, and as Fig. 42 has the widest flat, it is easier to tell with it when the cutting edge and the flat are parallel, therefore the broad flat is the best guide in holding the chisel level with the surface to be chipped. Either of these chisels is of a proper width for wrought iron or steel because chisels used on these metals take all the power to drive that can be given with a hammer of the usual proportions for heavy chipping, which is, weight of hammer, 13/4 lbs.; length of hammer handle, 13 inches; the handle to be held at its end and swinging back about vertically over the shoulder.
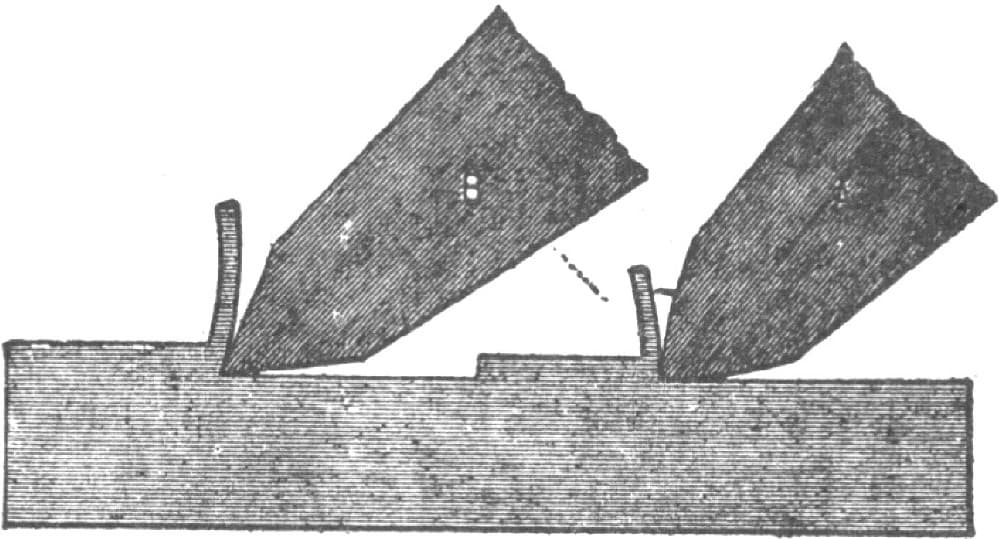
Fig. 45—Correctly and Incorrectly Ground Chisels
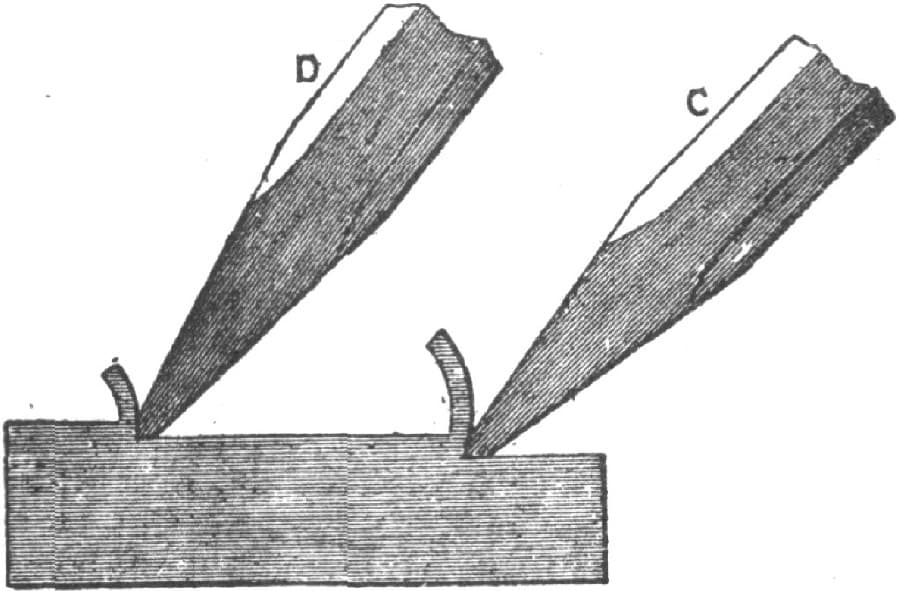
Fig. 46—Chisels for Brass and Steel
If I use so narrow a chisel on cast iron or brass, and give full force hammer blows, it will break out the metal instead of cutting it, and the break may come below the depth I want to chip and leave ugly cavities. So for these metals the chisel must be made broader, as in Fig. 44, so that the force of the blow will be spread over a greater length of chisel edge, and the edge will not move forward so much at each blow, therefore it will not break the metal out.
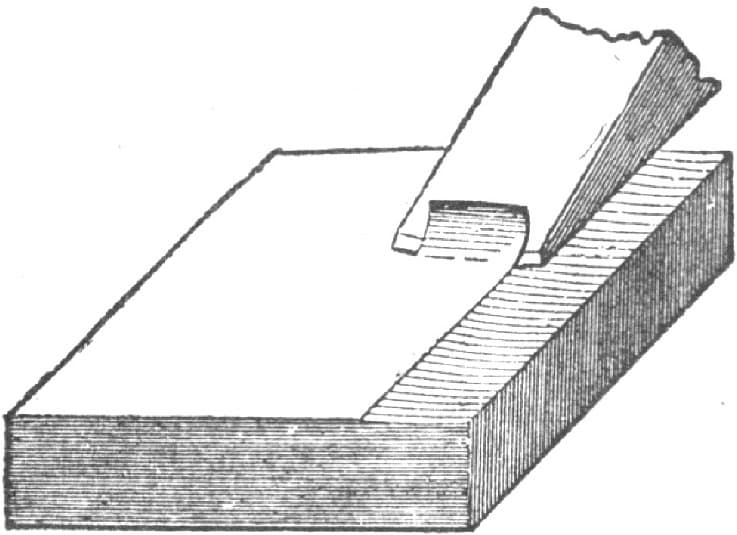
Fig. 47—Chisel for Fine Cuts
Another advantage is that the broader the chisel the easier it is to hold its edge fair with the work surface and make smooth chipping. The chisel-point I must make as thin as possible, the thickness shown in my sketches being suitable for new chisels. In grinding the two facets to form the chisel, I must be careful to avoid grinding them rounded as shown at A in the magnified chisel ends in Fig. 45, the proper way being to grind them flat as at B. I must make the angle of these two facets as acute as I can, because the chisel will then cut easier.
The angle at C, in Fig. 45, is about right for brass, and that at D is about right for steel. The difference is that with hard metal the more acute angle dulls too quickly.
Considering the length of the cutting it may for heavy chipping be made straight as in Fig. 42, or curved as in Fig. 44, which is the best, because the corners are relieved of duty and are therefore less liable to break. The advantage of the curve is greatest in fine chipping because, as you see in Fig. 47, a thin chip can be taken without cutting with the corners, and these corners are exposed to the eye in keeping the chisel-edge level with the work surface.

Fig. 48—Improperly Ground Chisel
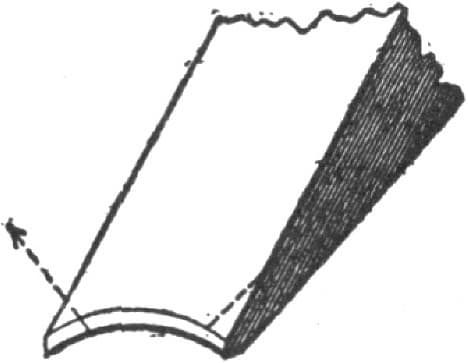
Fig. 49—Magnified View of the Chisel Shown in Fig. 48
In any case I must not grind it hollow in its length, as in Fig. 48, or as shown exaggerated in Fig. 49, because in that case the corners will dig in and cause the chisel to be beyond my control, and besides that, there will be a force that, acting on the wedge principle and in the direction of the arrows, will operate to spread the corners and break them off.

Fig. 50—Showing a Common Error in Grinding
I must not grind the facets wider on one side than on the other of the chisel, as in Fig. 50, because in that case the flat of the chisel will form no guide to let me know when the cutting edge is level with the work surface.
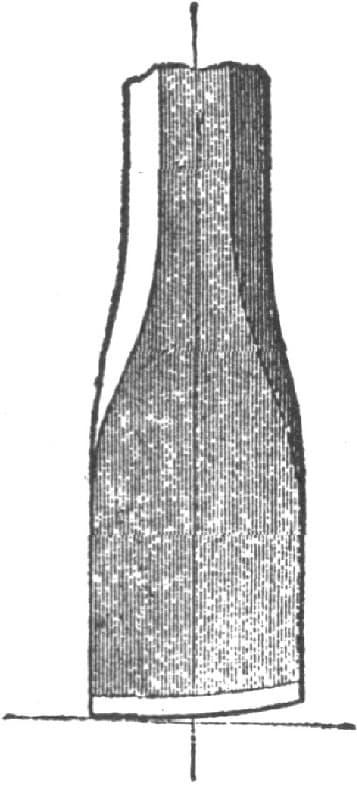
Fig. 51—Showing Another Error in Grinding
Nor must I grind it out of square with the chisel body, as in Fig. 51, because in that case the chisel will be apt to jump sideways at each hammer blow.
I can remove a quantity of metal quicker if I use the cape chisel in Fig. 52 to first cut out grooves, as at A, B and C, in Fig. 53, spacing these grooves a little narrower apart than the width of the flat chisel, and thus relieving its corners. I must shape the end of this cape chisel as at A and B, and not as at C, as in Fig. 53, because I want to be able to move it sideways to guide it in a straight line, and the parallel part at C will interfere with this, so that if I start the chisel a very little out of line it will go still farther out of line, and I cannot move it sideways to correct this.
The round-nosed chisel, Fig. 53, I must not make straight on its convex edge; it may be straight from H to G, but from G to the point it must be beveled so that by altering the height of the chisel head I can alter the depth of the cut.
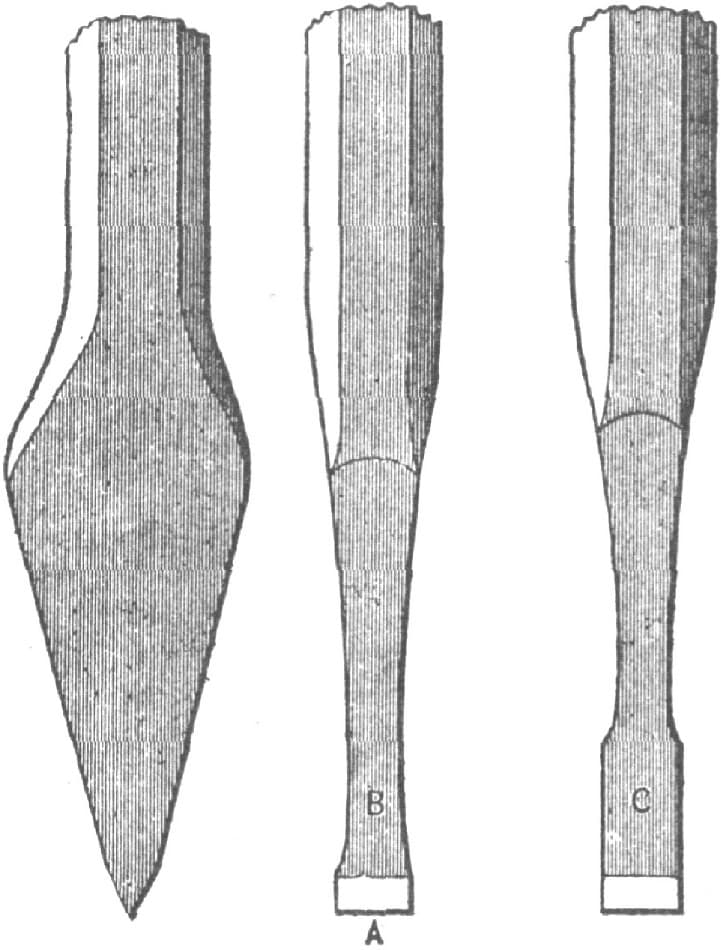
Fig. 52—Proper and Improper Shapes for Cape Chisels
The cow-mouthed chisel, Fig. 55, must be beveled in the same way, so that when I use it to cut out a round corner, as at L in Fig. 53, I can move the head to the right or to the left, and thus govern the depth of its cut.
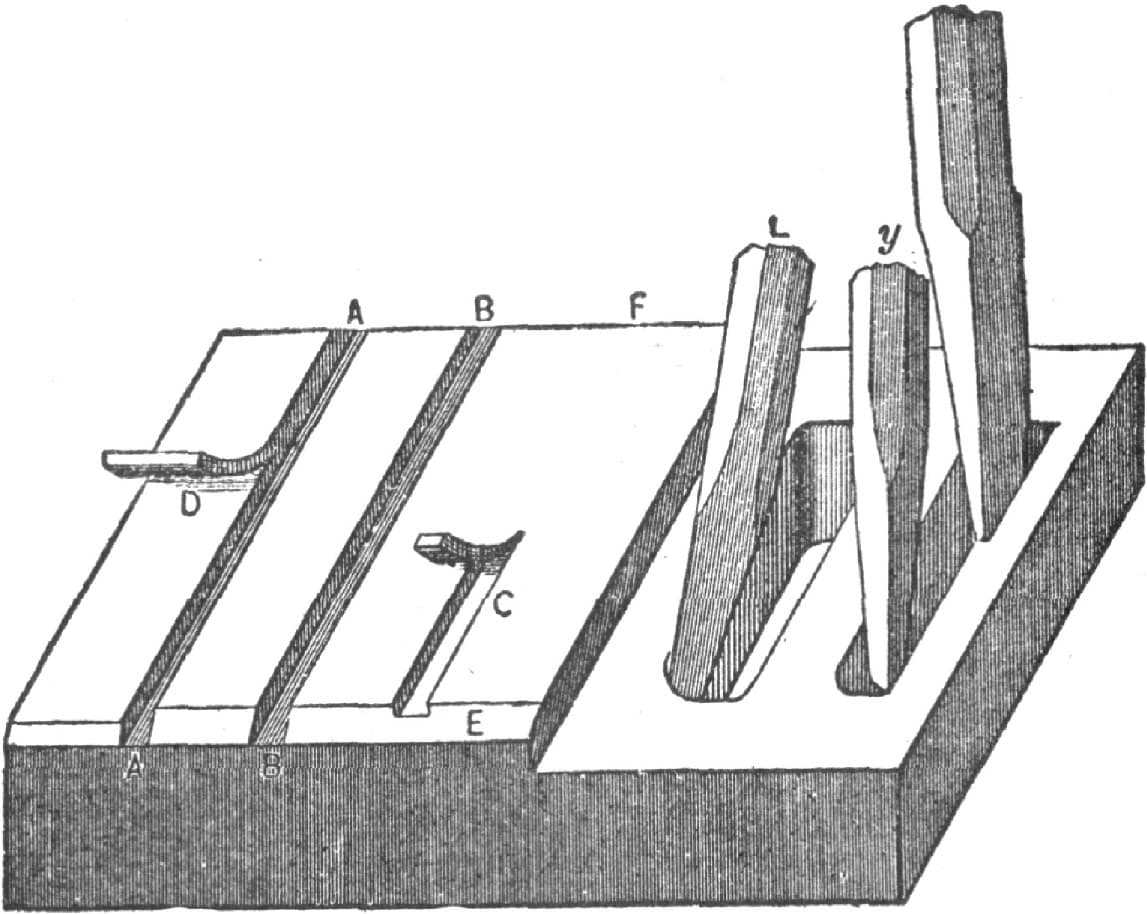
Fig. 53—Showing the Application of the Cape Chisel to Facilitate the Work of the Flat Chisel
The oil groove chisel in Fig. 56, I must make narrower at A than it is across the curve, as it will wedge in the groove it cuts.
The diamond-point chisel in Figs. 57 and 58 I must shape to suit the work, because if it is not to be used to cut out the corners of very deep holes, I can bevel it at M, and thus bring its point X central to the body of the steel as shown by the dotted line Q, rendering the corner X less liable to break, which is the great trouble with this chisel. But as the bevel at M necessitates the chisel being leaned over as at Y, in Fig. 53, it could, in deep holes, not be kept to its cut; so I must omit the bevel at M, and make that edge straight as at R R in Fig. 58.
The side chisel obeys just the same rule, so I may give it bevel at W, in Fig. 59, for shallow holes and lean it over as at Z in Fig. 53 or make the side V W straight along its whole length, for deep ones; but in all chisels for slots or mortises it is desirable to have, if the circumstances will permit, some bevel on the side that meets the work, so that the depth of the cut can be regulated by moving the chisel head.
In all these chisels, the chip on the work steadies the cutting end, and it is clear that the nearer I hold the chisel at its head the steadier I can hold it and the less the liability to hit my fingers, while the chipped surface will be smoother.
Now, what I have said here is what I might have learned before I applied at the shop, and is it not almost a certainty that if there was a vacancy I should have obtained the position? Nay, more, I venture to say that I should have received the appointment before I had made half my explanation, unless, indeed, the superintendent heard me through out of mere curiosity, for it certainly would, as things now are, be a curiosity for a boy to have any idea of the principle involved in using tools before he had them actually placed in his hands—unless, indeed, it be the surgeon’s tools.
There is an old saying that an ounce of practice is worth a pound of theory, but this sounds to me very much like saying that we should do a thing first and find out how it ought to be done afterwards. Yet I should not care to patronize a young dentist or a young surgeon who was pursuing his profession in this way.
I may, however, illustrate to you some of the points I have explained by adding to the pound of theory I have advanced an ounce of practice. Here, for example, I have to take a chip off a piece of wrought-iron, and, as it is a heavy chip, I stand well away from the vise, as an old hand would do, instead of close to it, as would be natural in an uninstructed beginner. In the one case you will observe that the body is lithe and supple, having a slight motion in unison with the hammer, while in the other it is constrained, and not only feels but looks awkward. If, now, I wish to take a light chip, I must stand nearer to the work, so that I can watch the chisel’s action and keep its depth of cut level. In both cases I push the chisel forward to its cut and hold it as steadily as I can.
It is a mistake to move it at each blow in this way, as many do, because it cannot be so accurately maintained at the proper weight.
Here I take a deep cut on a piece of brass, and the full force blows have broken it out, for the reasons I explained just now. Next we will take a finishing cut across, leaving the surface smooth and more level for the filing that is to follow. Light and quick blows are always necessary for the finishing cuts, whatever the kind of metal may be.
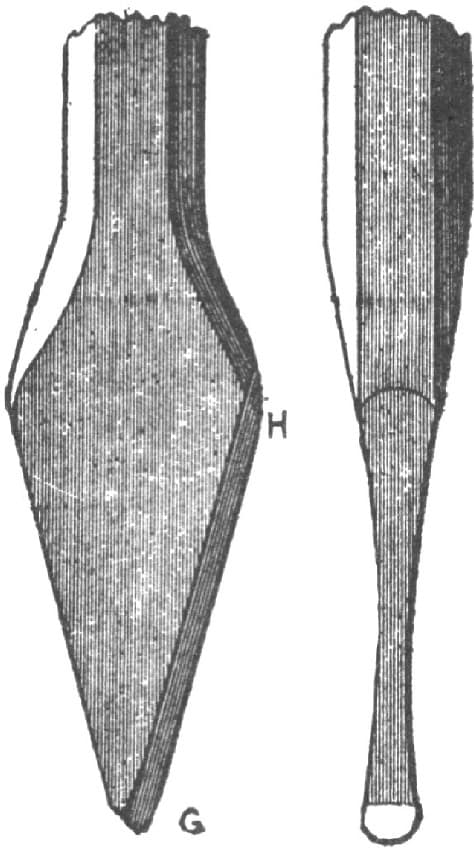
Fig. 54—The Round Nose Chisel
Here are two cape chisels, one formed as at B and the other as at C, in Fig. 52, and a cut being taken with each, you will see that I have been able to direct the path sideways of B, but that I could not do so with C.
With the side chisel alone I can illustrate the points made with reference to the chisel shown in Figs. 54, 55, 57, 58 and 59, namely, that there must be a bevel made at the end in order to enable the depth of cut to be adjusted and governed, for if I happened to get the straight chisel too deeply into its cut I cannot alter it, and unless I begin a new cut it will get imbedded deeper and will finally break. But with this side chisel, Fig. 59, that is slightly beveled, I can regulate the depth of cut, making it less if it gets too deep, or deeper if it gets too shallow.
The chisel that is driven by hammer blows may be said to be to some extent a connecting link between the hammer and the cutting tool, the main difference being that the chisel moves to the work while the work generally moves to the cutting tool. In many stone-dressing tools the chisel and hammer are combined, inasmuch as that the end of the hammer is chisel-shaped, an example of this kind of tool being given in the pick that flour millers use to dress their grinding stones. On the other hand we may show the connection between the chisel and the cutting tool by the fact that the wood-worker uses the chisel by driving it with a mallet, and also by using it for a cutting tool for work driven in the lathe. Indeed, we may take one of these carpenter’s chisels and fasten it to the revolving shaft of a wood-planing machine, and it becomes a planing knife; or we may put it into a carpenter’s hand plane, and by pushing it to the work it becomes a plane blade. In each case it is simply a wedge whose end is made more or less acute so as to make it as sharp as possible, while still retaining strength enough to sever the material it is to operate upon.
In whatever form we may apply this wedge, there are certain well-defined mechanical principles that govern its use. Thus when we employ it as a hand tool its direction of motion under hammer blows is governed by the inclination of that of its faces which meets the strongest side of the work, while it is the weakest side of the material that moves the most to admit the wedge and therefore becomes the chip, cutting, or shaving. In Fig. 60, for example, we have the carpenter’s chisel operating at A and B to cut out a recess or mortise, and it is seen that so long as the face of the chisel that is next to the work is placed level with the straight surface of the work the depth of cut will be equal, or, in other words, the line of motion of the chisel is that of the chisel face that lies against the work. At C and D is a chisel with, in the one instance, the straight, and in the other, the beveled face toward the work surface. In both cases the cut would gradually deepen because the lower surface of the chisel is not parallel to the face of the work.
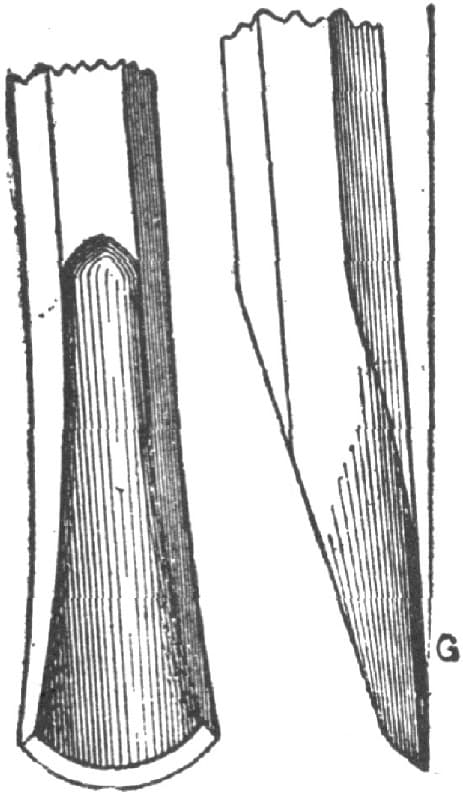
Fig. 55—Showing how the Cow Mouth Chisel is Beveled
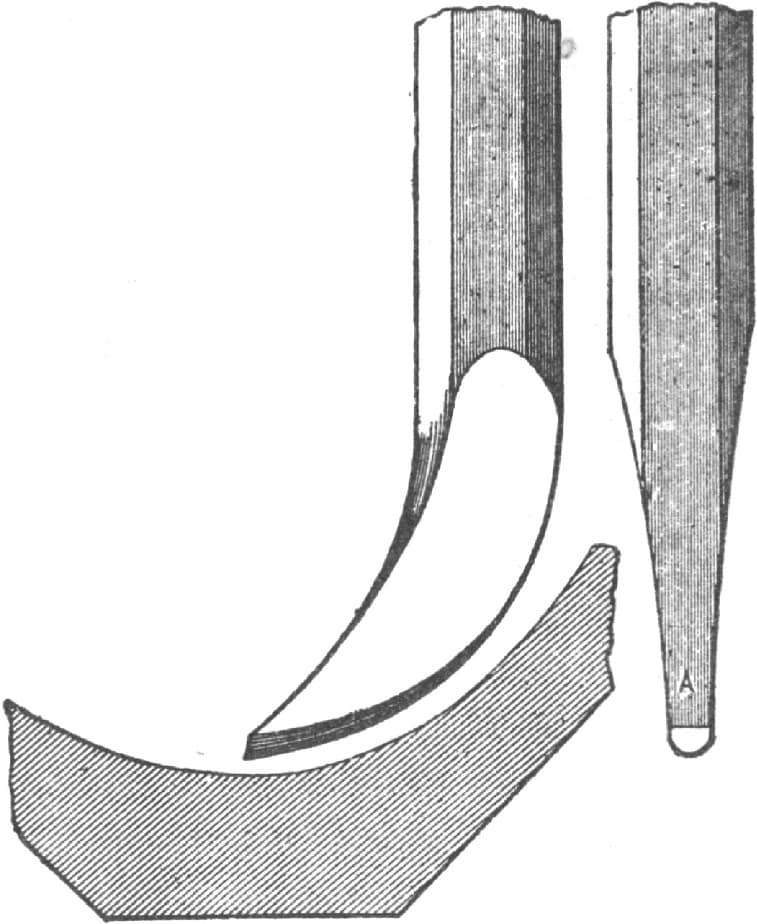
Fig. 56—The Oil Groove Chisel
If now we consider the extreme cutting edge of chisel or wedge-shaped tools it will readily occur that but for the metal behind this fine edge the shaving or cutting would come off in a straight ribbon and that the bend or curl that the cutting assumes increases with the angle of the face of the wedge that meets the cutting, shaving or chip.
I may, for example, take a piece of lead and with a pen-knife held as at A, Fig. 61, cut off a curl bent to a large curve, but if I hold the same knife as at B it will cause the shaving to curl up more. Now it has taken some power to effect this extra bending or curling, and it is therefore desirable to avoid it as far as possible. For the purpose of distinction we may call that face of the chisel which meets the shaving the top face, and that which lies next to the main body of the work the bottom face. Now at whatever angle these two faces of the chisel may be to the other and in whatever way we present the chisel to the work, the strength of the cutting edge depends upon the angle of the bottom face to the line of motion of the chisel, and this is a principle that applies to all tools embodying the wedge principle, whether they are moved by a machine or by hand.
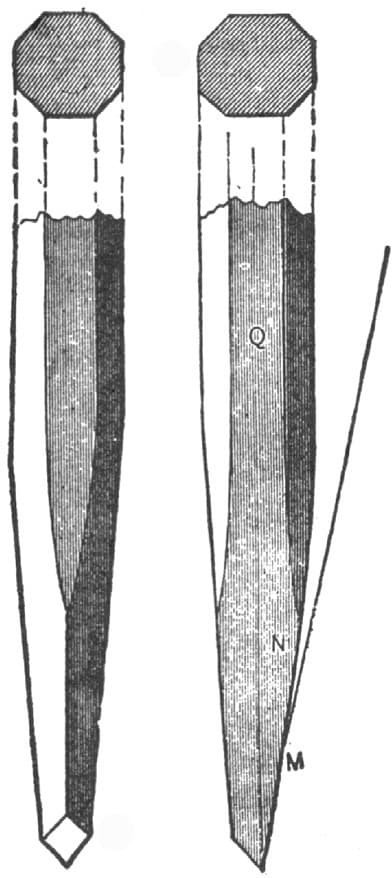
Fig. 57—The Diamond Point Chisel for Shallow Work
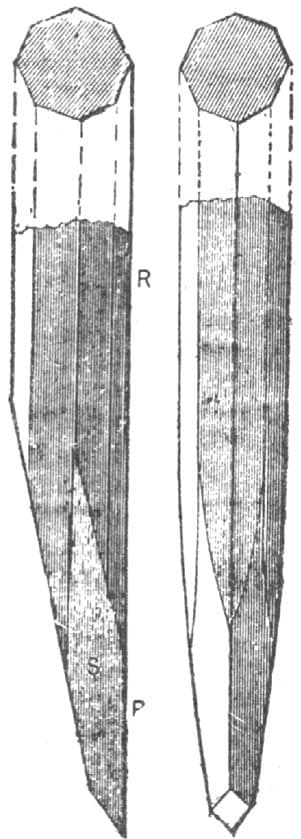
Fig. 58—The Diamond Point Chisel for Deep Work

Fig. 59—The Side Chisel
Thus, in Fig. 62, we have placed the bottom face at an angle of 80 degrees to the line of tool motion, which is denoted by the arrow, and we at once perceive its weakness. If the angle of the top face to the line of tool motion is determined upon, we may therefore obtain the strongest cutting edge in a hand-moved tool by causing the bottom angle to lie flat upon the work surface.
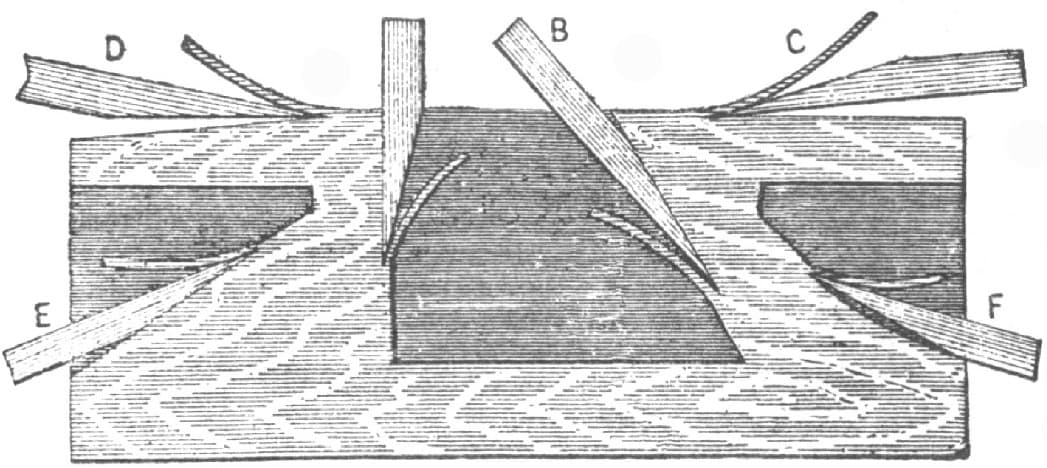
Fig. 60—Showing that the depth of the Cut depends upon the position and direction of the lower surface of the Chisel
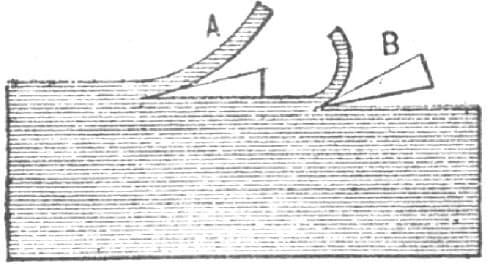
Fig. 61—Showing that the Effect of the Cutting Edge depends upon the Angle of the Bottom Face to the Chisel’s line of motion
But in tools driven by power, and therefore accurately guided in their line of motion, it is preferable to let the bottom face clear the work surface, save at the extreme cutting edge. The front face of the wedge or tool is that which mainly determines its keenness, as may be seen from Fig. 63, in which we have the wedge or tool differently placed with relation to the work, that in position A obviously being the keenest and least liable to break from the strain of the cutting process. —From a lecture delivered by JOSHUA ROSE before the Franklin Institute, Philadelphia.
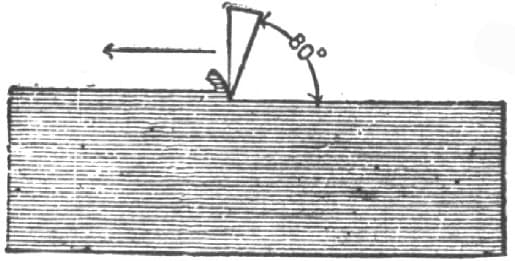
Fig. 62—Showing the Bottom Face at an Angle of 80 degrees to the Line of Motion
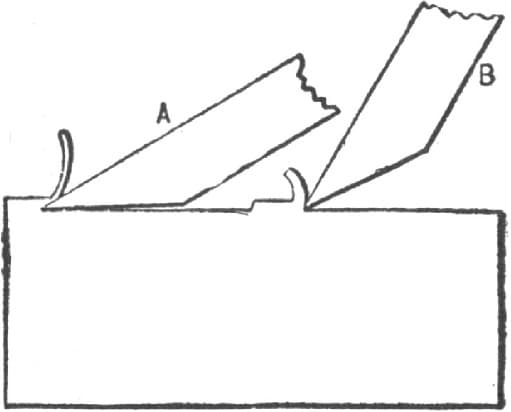
Fig. 63—Showing two Positions of the Wedge
Chipping and Cold Chisels.
Permit me to make some remarks on my experience with chipping chisels.
“There’s not much of interest in the subject,” you may say, “for everybody knows all about cold chisels.”
Not exactly, for there are a good many chisels that are not properly shaped. Figs. 64 and 65 represent common shapes of cape chisels. That in Fig. 64 is faulty because it is a parallel or nearly so from A to B and a straight taper from B to C; its being parallel from A to B causes it to stick and jam in the groove it cuts, or even to wedge when the corners of the cutting edge get a little dulled; while if they should break (and these corners sometimes do break) there is the whole of the flat place to grind, if the side is ground at all, as it is desirable when the break extends up the chisel and not across its cutting edge.
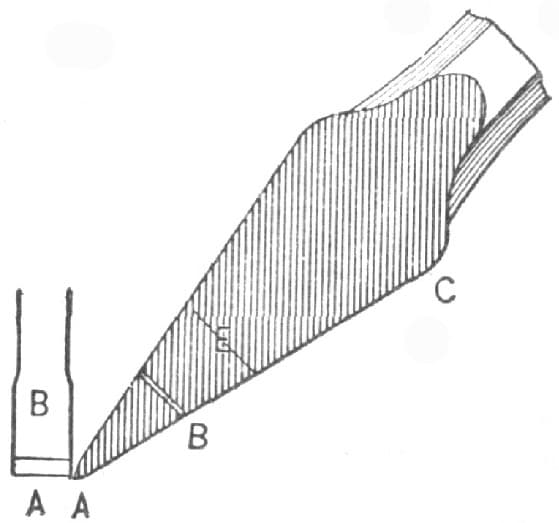
Fig. 64—Chipping and Cold Chisels. A Chisel Faulty at the Point
“The sticking don’t amount to much nor does the grinding,” is the answer.
It amounts to some unnecessary sticking that makes it very difficult to alter the angle of the chisel if it is going too deep or not deep enough, and so it is an impediment to smooth, even chipping. The grinding amounts to some unnecessary grinding, and furthermore, the chisel thus shaped is more difficult to forge, very little more difficult I grant, but more difficult all the same.
Haven’t you seen men tug at a chisel to get it out of a keyway? Haven’t you seen them hit it sideways with a hammer to loosen it in the sides of the cut? I have.
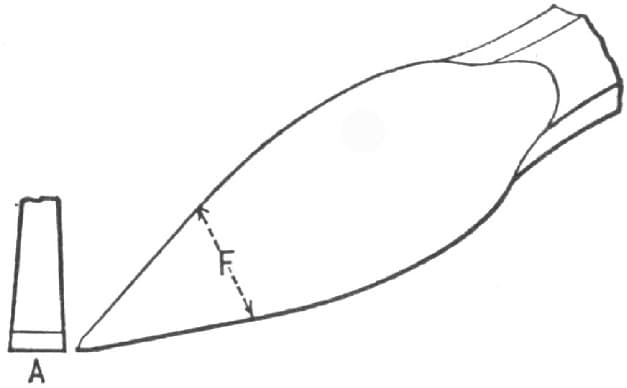
Fig. 65—A Better Shape for Cold Chisels
Fig. 64 would do very well for a keyway in a bore, but for outside work it is also faulty because it is too weak across E; hence Fig. 65 is, for outside work, the best shape, being stiffer and therefore less springy.
All these I think are plain and well grounded points, and so to settle a discussion on them I was blindfolded and given three cape chisels, two like Fig. 65, and one like Fig. 64, and in a dozen trials at chipping told each time I was given the one like Fig. 64. I claim that the shape makes a tangible difference. I could tell by the chipping, for it was a piece of machine steel I was chipping, and the corners of Fig. 64 soon began to round and the chisel to wedge.
As to the flat chisel, haven’t you often seen it hollow along the cutting edge, and isn’t that more likely to break and more liable to stick than one a little rounding?
There is one more point that I will mention, and that is a habit many have of pulling the flat chisel back from the cut after every blow. I have seen some good workmen do it, and I am not disposed to find particular fault with it, but I think it is unnecessary, at least I see no end that it accomplishes. I like the chisel to lie steadily under a little hand pressure against the cut so that I can feel that the lower face of the chisel rests fairly and evenly upon the bottom face (as it must do to chip straight), and having got it at the proper angle to the work, I like to carry the cut clear across without moving it once. It is a kind of machine chipping that reminds one of Rowell’s running, on, on, on; it goes without a falter. Now a word about using the hammer, not that there is much to discuss about it, but simply to round off the subject. The old style was a 13/4 lb. hammer with handle 15 inches long, and this is all right for the man who does chipping enough to keep his muscles well hardened and can swing his hammer ten hours a day without feeling it next day, but it is better to get broke in with a 11/4 lb. hammer.
I had at one time a 13/4 lb. hammer and a 11/4 (or a little heavier than that) hammer, and was well broke in at chipping, having had about a year at getting out work with hammer, chisel and file; the 13/4 hammer broke and I took to the smaller one; I found that I could not do as much work with it and it began to tell on my hands, because I could use the lighter hammer quicker, and in doing this I naturally gripped it tighter and it told on me, indeed it would sometimes be a minute before I could straighten my fingers out after releasing the hammer; of course the handle was a little less in diameter, and that had something to do with it, but not all, because my left hand, gripping the chisel, which I always did firmly, never tired, nor did the fingers stiffen, though the diameter of the chisel was smaller than the small hammer handle.
The palm of my hand would, with the small hammer, get red and feel nervous and twitchy, while it would not do so with the heavy one.
Did you ever notice what different styles there are in using a chipping hammer, how much more the wrist and elbow are used by some than by others? Yes, and there are graceful and ungraceful chippers. I like to see (I am talking of heavy hand chipping of course) the chipper stand, for the heavy cuts, not too close to the vise, use the wrist very little, the elbow not much, the shoulder a good deal, and to let the body swing a little with the hammer, the hammer head going as far back as about vertically over the shoulder, and that is the time when every blow tells.
For the last or smoothing cut I like to see the hammer handle held a quarter way up from the end, the chipper to stand pretty close to his work, using the wrist a little and the elbow, but not the shoulder joint; and just in proportion as the chisels are smaller, the wrist used more and the elbow less.
“What is a good day’s chipping for a man thoroughly broken in?”
Well, I should say on a chipping strip of cast iron 3/4 inch wide, taking a cut, say, a full 1/16 inch deep, 600 running inches is a good day’s work, to keep it up day after day.—By HAMMER AND TONGS.
How to Make Cold Chisels.
What I have to say about cold chisels is from purely practical experience. In the first place we do not get the best quality of cast steel, and the kind we do get is very inferior to what we used to have in years gone by (say “befo’ de wa’”). We now use what is called the Black Diamond, and this is not often very suitable for heavy cutting such as steel rails. When a chisel comes from the hammer of the smith, as a general rule, it is taken to the grindstone and given a bevel and then it is called ready for use. But it is not. If a chisel is made, tempered and ground properly it will stand until the head wears down to the eyes. In Fig. 66 of the accompanying illustrations, the reader can readily see that the chisel is not true with the hammer marks on each side, and that it also has hammer marks on the edges when it is made and tempered. It may seem as if this would not make a great difference, but nevertheless it does. When I make a chisel and temper it (I have to find the proper temper to put in the steel I am working, as steel differs in grade), I take it to the grinding stone and grind out the hammer marks on each side half way up to the eye, and on edges as seen in Fig. 67, so that it will be in the center of the chisel represented by dotted line in Fig. 67. By grinding all the hammer marks out on each side the tool becomes less liable to jar or chatter, and it is jarring or chattering which generally causes the chisel to break. I grind it rounding from the eye or half way from the eye to the point on both sides, after which I give it the bevel as in Fig. 68. I round it on the sides as an axe is rounded and also on the edge.
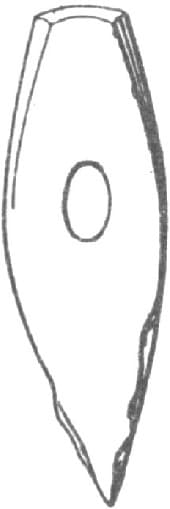
Fig. 66—Showing a Faulty Method of Making a Chisel
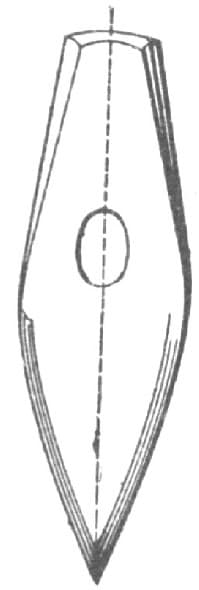
Fig. 67—Showing how the Hammer Marks are Ground out
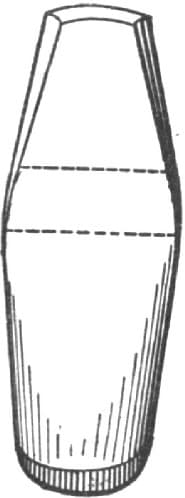
Fig. 68—Showing how the Chisel is Beveled
Cast steel should be worked with charcoal, which adds to instead of diminishing the most important element in steel, which is carbon, while stone coal, through its sulphur, takes away the carbon. The continual use of stone for smith coal reduces the steel and makes it almost worthless for tools.—By W.
Forging Cold Chisels.
Many blacksmiths find a difficulty in drawing out a cold chisel so that it will cut steel, but if they forge their chisels as I do, the trouble will disappear. Thus, let Fig. 69 represent the chisel to be drawn out to the dotted lines. Heat the chisel about as far up as shown in the cut to a blood red, and first forge it down to the dotted lines in Fig. 70; then flatten out the sides, but do not hammer the steel after it is cooled below a red heat. Strike quick and not too heavy blows, especially on the edge. —By O. P.
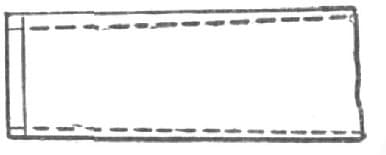
Fig. 69—Chisel to be Drawn out

Fig. 70—Shows Shape After Forging