CHAPTER III
WELDING, BRAZING, SOLDERING
The act of joining metals by the aid of heat is technically known as welding, brazing and soldering. The first is applied to iron and steel by heating the surfaces to be joined to a fusible state, then, by repeated blows, or by pressure, unite the particles and restore the whole to a condition similar to that existing before the metal was severed.
Brazing is the act of joining iron or composition metals by the use of brass heated to a fluid state in conjunction with the edges to be joined, and then allowed to cool slowly.
Soldering is the joining of metals of like or different kinds by another metal that fuses at a lower degree of heat than those which are joined, in which case the solder, only, is reduced to a fluid state. The degrees of heat, the condition of the surfaces, and the skill of the workmen, are all important factors.
The following tables will be found useful for reference:
| Degrees Fah. | ||
| The greatest heat of a smith’s forge (common) is | 2346 | |
| Welding heat of iron | 1892 |
MELTING POINT OF METALS.
| Degrees Fah. | ||
| Brass | 1900 | |
| Copper | 1996 | |
| Lead | 612 | |
| Solder (common) | 475 | |
| Solder (plumber) | 360 | |
| Tin | 442 | |
| Zinc | 680 | |
| Lead 1, tin 1, bismuth 4 | 201 | |
| Lead 2, tin 3, bismuth 5 | 212 |
Solders.
Under this head is grouped compositions used for uniting metals, the proportions being by weight.
| Tin | |
| Copper. | . . |
| Lead. | 75 |
| Tin. | 25 |
| Bismuth. | |
| Zinc. | |
| Silver. | |
| Gold. | |
| Antimony. | |
| Calcium. | |
| Tin | |
| Copper. | . . |
| Lead. | 16 |
| Tin. | 58 |
| Bismuth. | 16 |
| Zinc. | . . |
| Silver. | . . |
| Gold. | . . |
| Antimony. | 10 |
| Calcium. | |
| Tin (melts at 360°) | |
| Copper. | . . |
| Lead. | 33 |
| Tin. | 67 |
| Bismuth. | |
| Zinc. | |
| Silver. | |
| Gold. | |
| Antimony. | |
| Calcium. | |
| Spelter (soft) | |
| Copper. | 50 |
| Lead. | . . |
| Tin. | . . |
| Bismuth. | . . |
| Zinc. | 50 |
| Silver. | |
| Gold. | |
| Antimony. | |
| Calcium. | |
| Spelter (hard) | |
| Copper. | 67 |
| Lead. | . . |
| Tin. | . . |
| Bismuth. | . . |
| Zinc. | 33 |
| Silver. | |
| Gold. | |
| Antimony. | |
| Calcium. | . |
| Lead | |
| Copper. | . . |
| Lead. | 67 |
| Tin. | 33 |
| Bismuth. | |
| Zinc. | |
| Silver. | |
| Gold. | |
| Antimony. | |
| Calcium. | |
| Steel | |
| Copper. | 13 |
| Lead. | . . |
| Tin. | . . |
| Bismuth. | . . |
| Zinc. | 5 |
| Silver. | 82 |
| Gold. | |
| Antimony. | |
| Calcium. | |
| Brass or copper | |
| Copper. | 50 |
| Lead. | . . |
| Tin. | . . |
| Bismuth. | . . |
| Zinc. | 50 |
| Silver. | |
| Gold. | |
| Antimony. | |
| Calcium. | |
| Fine brass | |
| Copper. | 47 |
| Lead. | . . |
| Tin. | . . |
| Bismuth. | . . |
| Zinc. | 47 |
| Silver. | 6 |
| Gold. | |
| Antimony. | |
| Calcium. | |
| Pewter (soft) | |
| Copper. | . . |
| Lead. | 45 |
| Tin. | 33 |
| Bismuth. | 22 |
| Zinc. | |
| Silver. | |
| Gold. | |
| Antimony. | |
| Calcium. | |
| Pewter (soft) | |
| Copper. | . . |
| Lead. | 25 |
| Tin. | 50 |
| Bismuth. | 25 |
| Zinc. | |
| Silver. | |
| Gold. | |
| Antimony. | |
| Calcium. | |
| Gold | |
| Copper. | 4 |
| Lead. | . . |
| Tin. | . . |
| Bismuth. | . . |
| Zinc. | . . |
| Silver. | 7 |
| Gold. | 89 |
| Antimony. | |
| Calcium. | |
| Gold (hard) | |
| Copper. | 66 |
| Lead. | . . |
| Tin. | . . |
| Bismuth. | . . |
| Zinc. | 34 |
| Silver. | |
| Gold. | |
| Antimony. | |
| Calcium. | |
| Gold (soft) | |
| Copper. | . . |
| Lead. | 34 |
| Tin. | 66 |
| Bismuth. | . . |
| Zinc. | . . |
| Silver. | 80 |
| Gold. | |
| Antimony. | |
| Calcium. | |
| Silver (hard) | |
| Copper. | 20 |
| Lead. | . . |
| Tin. | . . |
| Bismuth. | . . |
| Zinc. | . . |
| Silver. | 67 |
| Gold. | . . |
| Antimony. | . . |
| Calcium. | 21 |
| Pewter | |
| Copper. | . . |
| Lead. | 20 |
| Tin. | 40 |
| Bismuth. | 40 |
| Zinc. | |
| Silver. | |
| Gold. | |
| Antimony. | |
| Calcium. | |
| Iron | |
| Copper. | 66 |
| Lead. | . . |
| Tin. | . . |
| Bismuth. | 33 |
| Zinc. | . . |
| Silver. | . . |
| Gold. | . . |
| Antimony. | 1 |
| Calcium. | |
| Copper | |
| Copper. | 53 |
| Lead. | . . |
| Tin. | 47 |
| Bismuth. | |
| Zinc. | |
| Silver. | |
| Gold. | |
| Antimony. | |
| Calcium. | |
FUSIBLE COMPOUNDS.
| Rose’s (fusing at 200°) | |
| Copper. | . . |
| Lead. | 25 |
| Tin. | 25 |
| Bismuth. | 50 |
| Zinc. | |
| Silver. | |
| Gold. | |
| Antimony. | |
| Calcium. | |
| Rose’s (fusing at less than 200°) | |
| Copper. | . . |
| Lead. | 33.3 |
| Tin. | . . |
| Bismuth. | 33.4 |
| Zinc. | 33.3 |
| Silver. | |
| Gold. | |
| Antimony. | |
| Calcium. | |
| Fusing at 150° to 160° | |
| Copper. | . . |
| Lead. | 25 |
| Tin. | 12 |
| Bismuth. | 50 |
| Zinc. | . . |
| Silver. | . . |
| Gold. | . . |
| Antimony. | . . |
| Calcium. | 20 |
FLUXES FOR SOLDERING OR WELDING.
| Metal. | Flux. | |
| Iron | Borax. | |
| Tinned iron | Resin. | |
| Copper or brass | Sal-ammoniac. | |
| Zinc | Chloride of zinc. | |
| Lead | Tallow or resin. | |
| Lead and tin pipes | Resin and sweet oil. |
Theory of Welding.
The generally received theory of welding is that it is merely pressing the molecules of metal into contact, or, rather, into such proximity as they have in the other parts of the bar. Up to this point there can hardly be any difference of opinion, but here uncertainty begins.
What impairs or prevents welding? Is it merely the interposition of foreign substances between the molecules of iron and any other substance which will enter into molecular relations or vibrations with iron? Is it merely the mechanical preventing of contact between molecules by the interposition of such substances? This theory is based on such facts as the following: 1. Not only iron, but steel, has been so perfectly united that the seam could not be discovered, and that the strength was as great as it was at any point, by accurately planing and thoroughly smoothing and cleaning the surfaces, binding the two pieces together, subjecting them to a welding heat and pressing them together by a very few hammer blows. But when a thin film of oxide of iron was placed between similar smooth surfaces, a weld could not be effected.
2. Heterogeneous steel scrap, having a much larger variation in composition than these irons have, when placed in a box composed of wrought-iron side and end pieces laid together, is (on a commercial scale) heated to the high temperature which the wrought iron will stand, and then rolled into bars which are more homogeneous than ordinary wrought iron. The wrought iron box so settles together, as the heat increases, that it nearly excludes the oxidizing atmosphere of the furnace, and no film of oxide of iron is interposed between the surfaces. At the same time, the inclosed and more fusible steel is partially melted, so that the impurities are partly forced out and partly diffused throughout the mass by the rolling.
The other theory is that the molecular motions of the iron are changed by the presence of certain impurities, such as copper and carbon, in such a manner that welding cannot occur or is greatly impaired. In favor of this theory it may be claimed that, say, two per cent of copper will almost prevent a weld, while, if the interposition theory were true, this copper could only weaken the weld two per cent, as it could only cover two per cent of the surfaces of the molecules to be united. It is also stated that one per cent of carbon greatly impairs welding power, while the mere interposition of carbon should only reduce it one per cent.
On the other hand, it may be claimed that in the perfect welding due to the fusion of cast iron, the interposition of ten or even twenty per cent of impurities, such as carbon, silicon and copper, does not affect the strength of the mass as much as one or two per cent of carbon or copper affects the strength of a weld made at a plastic instead of a fluid heat. It is also true that high tool-steel, containing one and one-half per cent of carbon, is much stronger throughout its mass, all of which has been welded by fusion, than it would be if it had less carbon. Hence copper and carbon cannot impair the welding power of iron in any greater degree than by their interposition, provided the welding has the benefit of that perfect mobility which is due to fusion. The similar effect of partial fusion of steel in a wrought-iron box has already been mentioned. The inference is that imperfect welding is not the result of a change in molecular motions, due to impurities, but of imperfect mobility of the mass—of not giving the molecules a chance to get together.
Should it be suggested that the temperature of fusion, as compared with that of plasticity, may so change chemical affinities as to account for the different degrees of welding power, it may be answered that the temperature of fusion in one kind of iron is lower than that of plasticity in another, and that as the welding and melting points of iron are largely due to the carbon they contain, such an impurity as copper, for instance, ought, on this theory, to impair welding in some cases and not to affect it in others. This will be further referred to.
The next inference would be that by increasing temperature we chiefly improve the quality of welding. If temperature is increased to fusion, welding is practically perfect; if to plasticity and mobility of surfaces, welding should be nearly perfect.
Then how does it sometimes occur that the more irons are heated the worse they weld?
1. Not by reason of mere temperature; for a heat almost to dissociation will fuse wrought iron into a homogeneous mass.
2. Probably by reason of oxidation, which, in a smith’s fire especially, necessarily increases as the temperature increases. Even in a gas furnace, a very hot flame is usually an oxidizing flame. The oxide of iron forms a dividing film between the surfaces to be joined, while the slight interposition of the same oxide, when diffused throughout the mass by fusion or partial fusion, hardly affects welding. It is true that the contained slag, or the artificial flux, becomes more fluid as the temperature rises, and thus tends to wash away the oxide from the surfaces; but inasmuch as any iron, with any welding flux, can be oxidized till it scintillates, the value of a high heat in liquefying the slag is more than balanced by its damage in burning the iron.
3. But it still remains to be explained why some irons weld at a higher temperature than others; notably, why irons high in carbon or in some other impurities can only be welded soundly by ordinary processes at low heats. It can only be said that these impurities, as far as we are aware, increase the fusibility of iron, and that in an oxidizing flame oxidation becomes more excessive as the point of fusion approaches. Welding demands a certain condition of plasticity of surface; if this condition is not reached, welding fails for want of contact due to excessive oxidation. The temperature of this certain condition of plasticity varies with all the different compositions of irons. Hence, while it may be true that heterogeneous irons, which have different welding points, cannot be soundly welded to one another in an oxidizing flame, it is not yet proved, nor is it probable, that homogeneous irons cannot be welded together, whatever their composition, even in an oxidizing flame. A collateral proof of this is that one smith can weld irons and steels which another smith cannot weld at all, by means of a skillful selection of fluxes and a nice variation of temperature.
To recapitulate: It is certain that perfect welds are made by means of perfect contact, due to fusion, and that nearly perfect welds are made by means of such contact as may be got by partial fusion in a non-oxidizing atmosphere, or by the mechanical fitting of surfaces, whatever the composition of the iron may be, within all known limits. While high temperature is thus the first cause of that mobility which promotes welding, it is also the cause, in an oxidizing atmosphere, of that ‘‘burning” which injures both the weld and the iron. Hence, welding in an oxidizing atmosphere must be done at a heat which gives a compromise between imperfect contact, due to want of mobility on the one hand, and imperfect contact, due to oxidation on the other hand. This heat varies with each different composition of irons. It varies because these compositions change the fusing points of irons, and hence their points of excessive oxidation. Hence, while ingredients, such as carbon, phosphorus, copper, etc., positively do not prevent welding under fusion, or in a non-oxidizing atmosphere, it is probable that they impair it in an oxidizing atmosphere, not directly, but only by changing the susceptibility of the iron to oxidation.
The obvious conclusions are: First, That any wrought iron, of whatever ordinary composition, may be welded to itself in an oxidizing atmosphere at a certain temperature, which may differ very largely from that one which is vaguely known as a “welding heat”; second, That in a non-oxidizing atmosphere, heterogeneous irons, however impure, may be soundly welded at indefinitely high temperature.—From the report of the United States Board appointed to test iron and steel.
Welds and Welding.
A weld to be sound, must, like everything else, be made according to sound common sense.
The theory of welding is simple enough, and only requires a little thought to make it easy to put into practice.
If the iron is got to a proper welding heat all through its mass, there are just three things to guard against in order to get a sound job: (1) the air; (2) scale; and (3) dirt. Referring to the first, suppose the pieces are scarfed as in Fig. 74 (which is a form that beginners are very likely to make), and when the two pieces are put together, they will meet all around the edges. This simply forms a hollow pocket enclosing a certain amount of air, and also whatever amount of dirt or scale there may be upon the surfaces, and a sound weld becomes impossible. Another fault that a beginner is apt to fall into, is to make the scarf too short, as in Fig. 75, where it is seen that blows upon the top piece, A, will act to force it down, sliding it off the lower pieces.

Welds and Welding. Fig. 74—Showing a Faulty Method of Welding

Fig. 75—Showing an Instance in which the Scarf is too short
We might simply lap the pieces as in Fig. 76, but the result will be an indentation in the corners C and D, and we may forge the lap down to the thickness of the base without getting this indentation out.

Fig. 76—Showing how the Pieces might Lapped
A similar indentation would be formed at C if lapping the end of a bar, as in Fig. 77. Furthermore, the surfaces coming together flat are apt to enclose scale, hence such a weld can only be made either in small pieces, when the dirt has not to travel far to be worked out, or else in pieces that are heavily forged at a high heat so as to drive out the impurities.

Fig. 77—Showing another Case in which an Indentation would be Formed

Fig. 78—Showing how the Weld may be effected by butting the Ends
The ends of two pieces, if short, may be butted as in Fig. 78, the bar being struck endwise, but this is a poor weld. In the first place only a short piece can be welded soundly in this way, because the force of the blow is lost in traveling through the weak and springy bar.
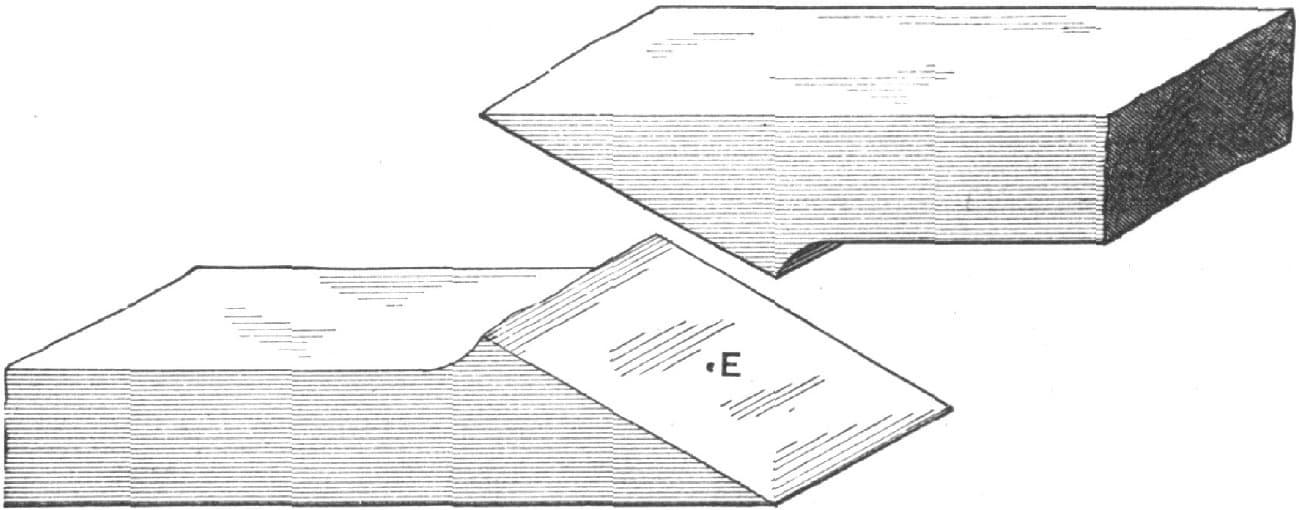
Fig. 79—Showing a good Method of Shaping the Surfaces
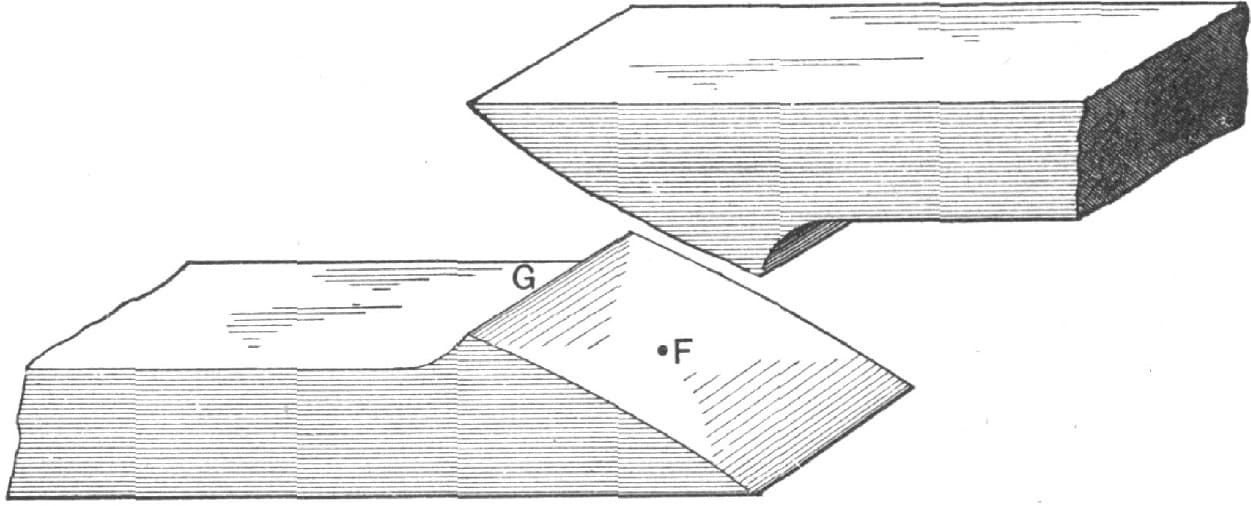
Fig. 80—Showing how the Scarf may be rounded endwise
The secret of a sound weld (assuming of course that the iron is properly heated) lies in letting the surfaces meet at first in the middle of the weld, so that as they come together they will squeeze out the cinder, etc., and in hammering quickly.
But there are several ways of shaping the surfaces so that they will squeeze out the foreign matter: thus we may round the surfaces crosswise, as in Fig. 79, in which case a piece of scale, say at E, would be squeezed out, moving across the scarf as the surfaces were hammered together. Or we may round the scarf endwise, as in Fig. 80, but in this case the piece of foreign matter shown at F, would have to move up to G before it would be repelled.
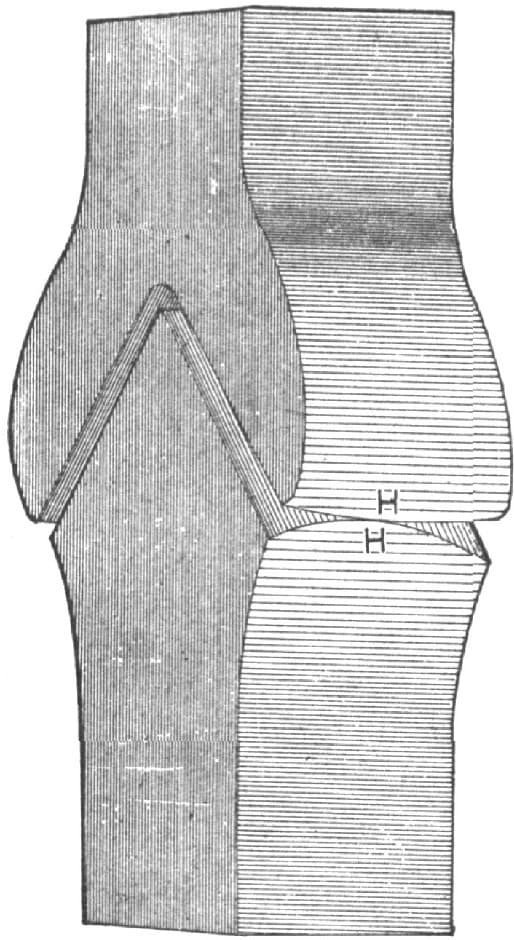
Fig. 81—Showing a Weld in which both Surfaces are rounded
A compromise between these two plans is to round the surfaces slightly both ways, and this is the best plan all things considered.
As soon as the heat is taken from the fire, it should be quickly cleaned with a brush the instant before putting the weld together. The first hammer blows should be comparatively light and follow in quick succession.
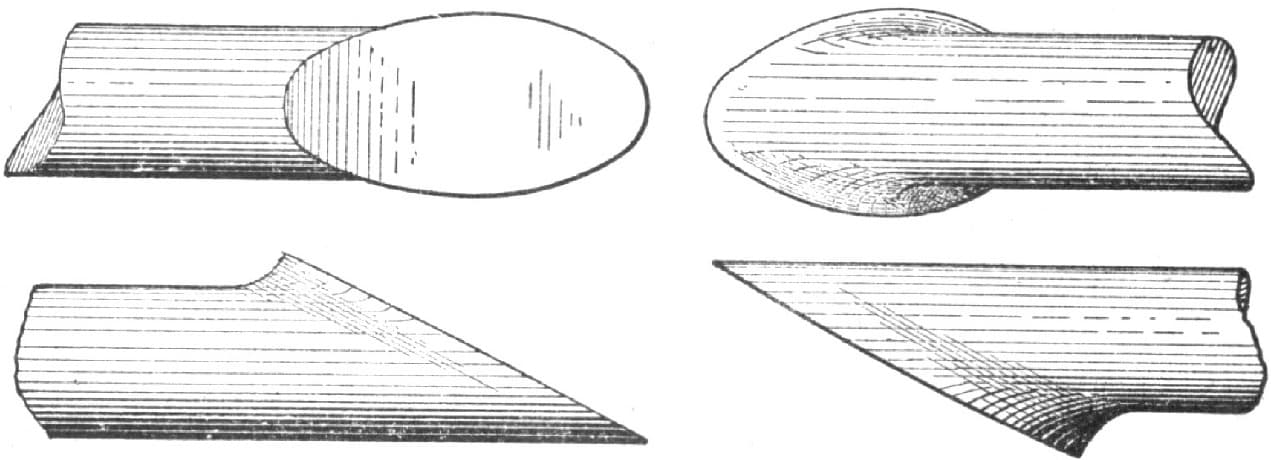
Fig. 82—Showing how round Bars are scarfed before being Welded
To weld up the outer edges of the scarf and make a sightly job, a second heat should be taken if the job is large enough to require it.
An excellent example of a weld is shown in Fig. 81 where both surfaces are rounded so as to meet at H. In this case dirt, etc., will squeeze out sidewise as the welds come together. In all these examples the air, as well as foreign matters, is effectually excluded.

Fig. 83—Showing how the Bars come together
We now come to the welding of round bars, which are scarfed as shown in Fig. 82, so that when the two pieces are put together, as in Fig. 83, the surfaces bunch at J in the middle of the weld, and foreign matter is squeezed out all around the edges.
If the pieces to be welded are short and light, the butt weld is at least as good as any that can be made, if the ends are rounded as in Fig. 84. If the pieces are heavy and can be stood up endwise under a steam-hammer, it is still the best weld, but if the pieces are long, too much of the force of the hammer blow is lost in traveling from the end of the bar to the weld.

Fig. 84—Showing a good Method of Welding when the Pieces are short and light

Fig. 85—Showing the Appearance of the Weld before the Swaging
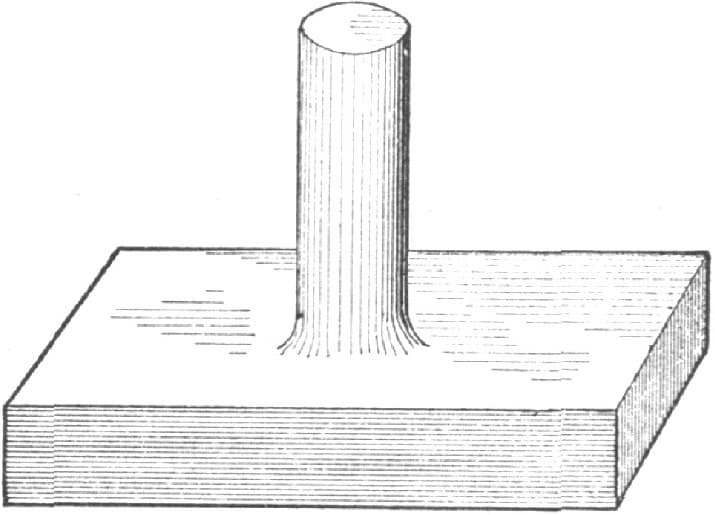
Fig. 86—Showing a Weld in which a Stem is welded to a Block
The appearance of the weld when made and before swaging down, is shown in Fig. 85, and it is seen that the air and any dirt that may be present, is always excluded as the pieces come together.
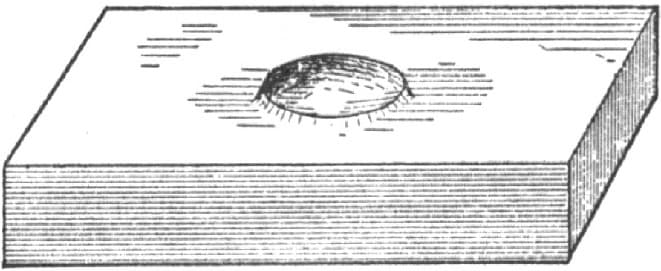
Fig. 87—Showing how the Block is cupped
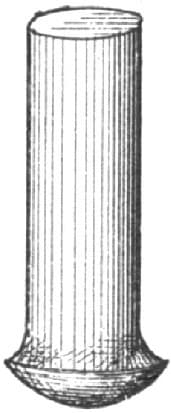
Fig. 88—Showing how the Stem is shaped
We now come to another class of weld where a stem is to be welded to a block, as in Fig. 86. The block is cupped as in Fig. 87, and the stem rounded and cut back as in Fig. 88, so that when the two are put together, they will meet at the point K, Fig. 89. The dirt and air will be forced upwards and outwards in this case. If the stem is short it may be driven home on the end, and fullered afterwards at the shoulders a and b, but if long the fullering only can be used to make the weld, and a good shoulder at a, b, is necessary.
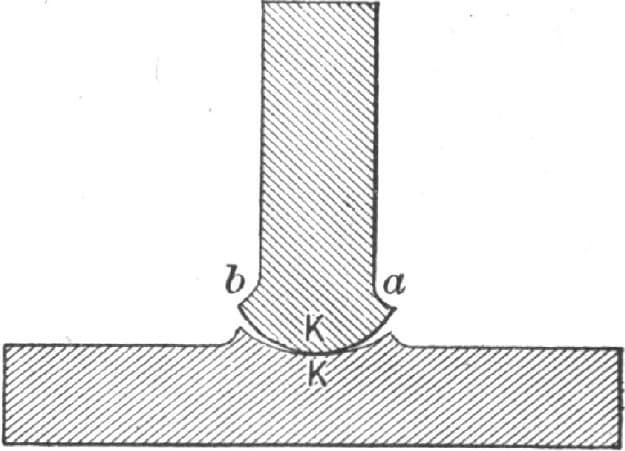
Fig. 89—Showing how the Stem and Block are put together
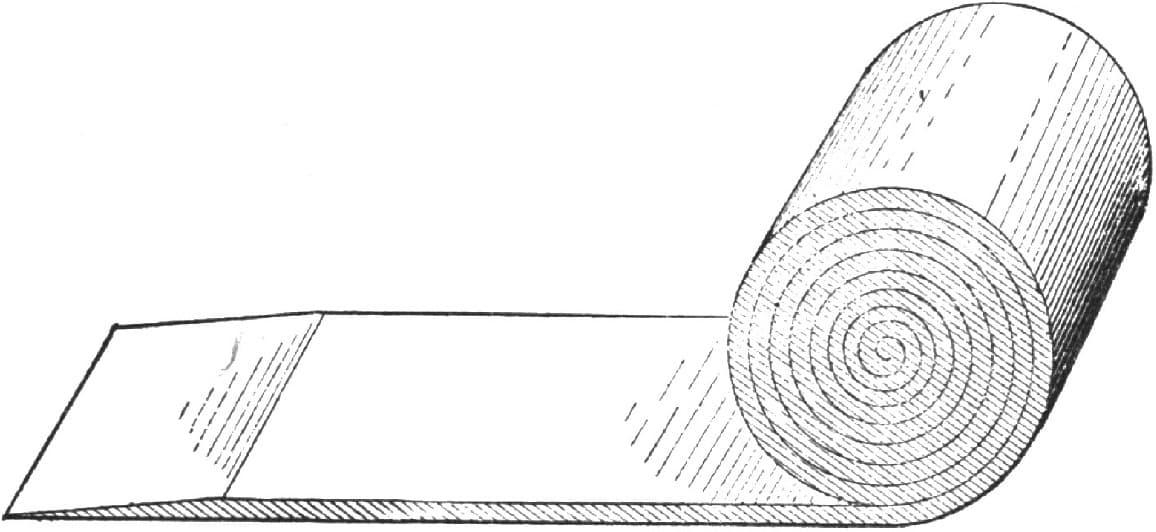
Fig. 90—Showing how the Heads of Swages and Fullers are made
In the days when blacksmiths made their own swages and fullers (and this is done in most first-class blacksmith shops at the present day in England), the heads of swages and fullers were made by rolling up a band of iron, as in Fig. 90. In this case the first hammering must be given to the outside and not to the ends of the roll, the end of the band being turned down so that it will roll down in the center. With good iron and first-class workmanship, this makes a good tool.
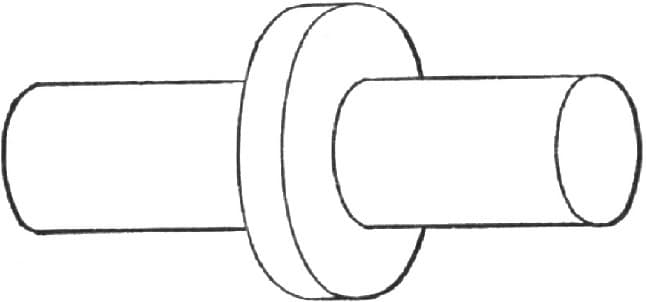
Fig. 91—Showing a Collar welded on a Stem
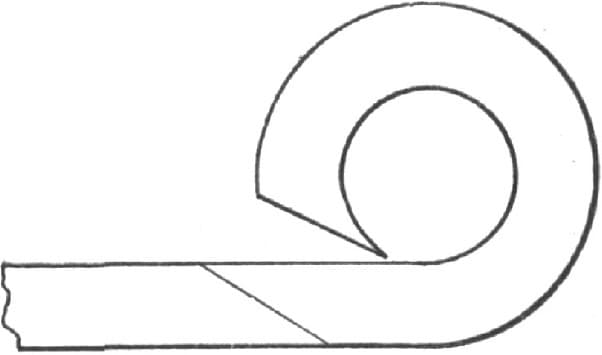
Fig. 92—The Collar ready to be cut
An example of welding a collar on a stem is shown in Figs. 91, 92, 93 and 94. Fig. 91 is the finished iron; Fig. 93 the stem jumped up in the middle to receive the collar; Fig. 92 the collar ready to be cut off the bar; and Fig. 94 the collar placed on the stem, ready for the welding heat.

Fig. 93—The Stem prepared to receive the Collar
Unless the stem is jumped up as shown, and the collar well beaded on it, there will be a depression or crack at the corners. Very thin washers are welded with the scarf made, as in Fig. 94, and made to overlap well.
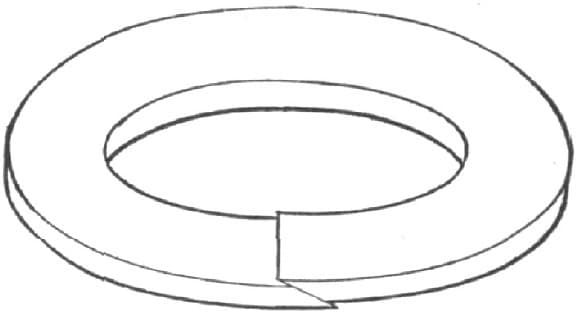
Fig. 94—The Collar ready for the Welding Heat
In any weld, dispatch and decision are necessary elements as soon as the heat has left the fire, the thinking being mainly done while the heat is in the fire.—By JOSHUA ROSE.
Welding Iron and Steel.
A series of experiments were undertaken by Prof. J. Bauschinger at the instance of an engineering firm. Similar experiments had been previously made at the Royal Technical Experimental Institute, at Berlin, and by Mr. W. Hupfield, at Prevali, which gave very different results, those at Berlin being very unfavorable, those at Prevali very favorable, as regarded the welding capacity of steel. Prof. Bauschinger recapitulates the main results of these tests before describing those made by himself. The test pieces were flat, round and square in sections, the largest being 3.149 by 1.181 inches. Each piece was swelled up on the anvil, when hot, 0.196 to 0.392 inch, and after heating to the proper degree, the two pieces were laid on each other and welded together by hand or steam hammer.
In the chief experiment the steam hammer was employed. Every piece after welding was tested in the usual way for tensile strength, the limit of elasticity, contraction, extension and ultimate strength being determined, the same quantities having been measured for pieces of exactly similar quality, section and length, but without a weld. The limit of elasticity in both steel and iron is nearly always reduced by welding, and this is, without exception, the case as regards the extension; the contraction of welded is less than that of unwelded pieces when the fracture takes place in the welded portion. The general conclusions arrived at are that for steel the best welding temperature is just at the transition from a red to a white heat; a quick fire and smart handling are necessary, as the pieces should not be long in the fire.—Midland Industrial Gazette.
Points About Welding.
To obtain a good sound weld, the following points should be observed:
The scarf should be sufficiently larger than the finished size to permit the weld to be full size after welding. The joint surface of the scarf should be slightly rounding, so that, when the two pieces are placed together to weld, there will be no air inclosed between them.
They should be heated in a clear fire of bright and not gaseous coal. Thick pieces should not be heated too quickly, or the interior metal will not be brought up to the required heat. They should be frequently turned in the fire, to insure uniformity of temperature, and be made as hot as possible without burning them.
They should be withdrawn from the fire occasionally and sprinkled with sand, which serves to exclude the air from the surface and prevent oxidation, and at the same time cools the outer surface and thin edges, giving the interior metal and thicker parts time to become heated all through.
When the pieces are placed upon the anvil to weld them, they should be quickly cleaned with either a wire brush or a piece of wood made ragged by having been hammered. The scarfs should be placed to well overlap each other, and should receive light and quickly succeeding blows at first, and heavier ones afterward.
As soon as the pieces are firmly joined, the hammer blows should be delivered with a view to close the edges of the scarf, so that the joint of the weld shall not show when the job is finished.
Welding Cast Steel Forks.
I desire to say with regard to springs, cast steel forks and other similar articles of this general kind, also with regard to spring-tempering in a country job shop, that I have been troubled in the same manner as other smiths. I have tried the same remedies that they have tried.
When I learned my trade I had occasion to mend forks, and had experience on other difficult jobs of the same kind. Not knowing how to hold the parts until I could weld them, I commenced by scarfing and punching, and then welding, also by riveting the parts together. This was not satisfactory, as they frequently broke at the riveting holes. I tried every device that I could think of, splitting and locking them together, sometimes putting in a good piece of iron or steel as the occasion required. At last I tried scarfing and lapping the ends together, and holding them together with forge tongs at one end of the lap until I could get a light borax heat to fasten the other end of the lap together. Then, by taking another good heat and welding the whole together, and drawing to their proper size and shape, I obtained a satisfactory job. Of late years I have found it a very great help in welding to keep some clean filings, and to use them between the laps. The filings cause the parts to unite very much more readily.—By A. H.
Welding Steel.
I have seen men try to weld steel in a fire where it would be impossible to weld iron; they prepared the pieces for welding skillfully, but they did not use borax in the best manner. They used it at times too freely, at other times not enough, using at the wrong time and not applying it on the right place. I will give my way of welding steel:
See that your fire is clean from all cinders and ashes, then take selected coal and build a fire so large that you will not have to add any unburnt coal while welding. Then prepare the steel which you wish to weld by upsetting both pieces near the ends, scarfing carefully, and when you can do it, punch a hole and rivet them together. Let the lap be from half an inch to an inch, according to the size of steel you wish to weld, and have the lap fit as snug as possible all around. Place the steel in the fire and heat to a low cherry, then apply borax to the part which is to be heated. Apply the borax not only on the lap but also next to the lap, but do not use too much. Then bring to a welding heat and strike quickly with light blows.—By G. K.
Welding Steel Tires.
Bessemer steel tires may be welded almost as readily as iron with the ordinary borax flux. Crucible steel tires require a little more coal and a lower heat.—By OLD TIRE.
Welding Tires.
No. 1. My plan in welding small tires, which works well, is to put good iron filings between the scarfs and avoid heating hot enough to burn. This plan will work fully as well on old tires as on new, and especially when you do not happen to get a weld the first heat.—By H. A. S.
No. 2. Open the unwelded lap of your tire and insert (if your tire is steel) steel filings (if iron, iron filings); close the lap, add your flux and weld at a fluxing heat.—By TIRE SETTER.
No. 3. Our way of welding tires is to cut the bar three times and three-fourths the thickness of the iron longer than the wheel measures. We then upset it thoroughly enough to get a good heavy scarf. In welding, instead of laying one end on top of the other, we put the ends of the scarf band together, place them in the fire, and bring them to a nearly white heat, then put them on the anvil and lap the welds, then sand and put in the fire. By so doing we have the top lap hot and get a weld thoroughly, without burning off any at the bottom in so doing. We get a nice, smooth weld, and the outside corners are flush and full, and show no canker spots on the tire. This method is specially for heavy tires, but it is a good plan for all sizes of tire.—By B. & S.
Do Not Burn Your Tires in Welding.
I would like to call the attention of carriage smiths to a great evil that many fall into when welding tires, viz.: of allowing the tire to burn on each side of the lap while taking a heat.
Many smiths fail to take into consideration the fact that it is impossible to heat a piece of iron two inches thick, especially when it is formed of two pieces of equal thickness, one placed upon the other, as quickly as one of half the thickness could be heated, and hence, having lapped their tire, the full force of the blast is thrown upon it.
As a result, the tire is put into service with a weakness at each side of the weld, caused by being burnt while the weld was being brought to the required heat. That there is not a particle of need for such carelessness every smith knows, no matter how poor a workman he may be.
Give your weld a gradual heat; attend to it yourself and not throw the responsibility upon your helper. Have a clean lot of coal and under all a clean fire, and you will never lose a good customer by having him discover a rotten place in his tire, causing it to break when far from a forge.—By J. P. B.
Welding Axles.
I will try to describe the way we weld axles in our shop. We first get the length between the collars and then cut them off, allowing on each piece three-fourths of an inch on each back axle for waste in welding. If we wish to make a hole in the front axle, the piece is made one and one-half inches longer. The piece is then heated to near a white heat and the end is pounded down on the anvil, until an end is made which is of good size, and also as flat as possible. Notches about half an inch apart, and a quarter of an inch deep are then made in the end with a chisel. The two pieces are then put in the fire with the ends together, and when they get to a welding heat, one man takes one piece, a second man takes the other, and the ends are put together true, and one of the men strikes a few blows on them with a wooden maul. Then the joint is hammered with the pene of a small hammer, set in a long handle. The piece is kept in the fire, with the bellows blowing all the time, so as to get a good welding heat. Finally five or six heavy blows are given with the maul, and the piece is then taken out and hammered on the anvil to the size desired. If it is a nut axle, the nuts should be put on to avoid battering the threads.—By J. K.
Welding Cast Iron.
The question is often asked, Can cast iron be welded to wrought iron? I will give you what I call a practical job: To weld cast iron sleigh shoes that have been broken when not worn out, I take the ends that I wish to weld together, cover them with borax, heat them to a nice mellow heat, lay them on a plain table of iron, so that when put together they will be straight on the runner. One of the pieces is held by a pin at the end; then I press the other end against it sufficiently to upset it a little, rubbing it with the face of my hammer until it is smooth. Allow it to cool and the job is done. I broke one in pieces and put it together, marking the welds with a prick punch, so as to know where it broke. It has been on a sled carrying heavy logs two and a half months, and has stood well on bare ground.—By FRANK E. NILES.
Cast iron can be welded by heating it nearly to a melting point in a clear fire, free from dirt, and hammering very lightly. But this job requires practice and great care. A plow point can be made as hard as glass by heating nearly to a welding degree, then having a piece of cast iron hot enough to run over the joint and finally putting it in the slack tub.—By M. T.
Welding Malleable Iron.
Malleable cast iron may be welded together, or welded to steel or iron by the same process as you would weld two pieces of steel. Experiment first with two useless pieces. A few attempts will enable you to become an expert at the business.—By H. S.
Welding Malleable Cast Iron Plates.
You can weld malleable cast iron plates by riveting them together and using a flux of powdered borax and Norwegian or crucible steel filings, equal parts. Let the first blows with your hammer be tender ones.—By DANDY.
Welding Cast and Wrought Iron.
It is no trick, but is easily done, if you know how. When a cast iron point is worn out, I break it off square and weld on another from one-quarter to one-half pound weight, making the point as good, and many say better than it was when new, from the fact that it sticks to the ground better.—By A. D.
Welding Steel to a Cast Iron Plow Point.
My experience in welding cast steel to a cast iron plowshare has not been very much, although I succeeded in welding the first one I tried. My plan is first to heat the metal hot enough so that you can spall it off (on the end you wish to weld to) as square as possible. Then make the steel point square also, to fit the metal as neatly as possible. Take heats on both with borax, heating the steel as high as possible without burning it, and the metal also as hot as can be heated without crumbling. Then jump them together, applying the hammer smartly, but not too hard, on the steel end for several seconds. When you see the heat getting off, stop hammering, and lay the job away where it will not be disturbed until perfectly cool. You may then heat the point and sharpen or dress it to suit yourself. Do not strike on the weld, as you will knock it loose. Let it wear smooth. I do not exactly call this welding, but rather cementing the parts together, which I think is the only way that it can be done.
Welding Plow Lays to Landsides.
I have found a good method for welding steel plow lays to landsides. It is as follows: After heating to a good bright red, put on plenty of wax, and when the wax is melted, put on dust from the anvil block, then take a good mellow heat and keep the top part of the lay from burning by throwing on sand. Use a light hammer and a stiff pair of tongs large enough to squeeze the lay and landside together and hold them solid while using the hammer. My object in using a light hammer, is to enable me to strike quicker and light blows, such blows being less likely to make the steel fly to pieces.—By C. N. LION.
To Weld Cast Steel.
Take rock saltpetre, one-quarter pound, dissolve in one-quarter pound oil of vitriol, and add it to one gallon of water. After scraping the steel, get it hot and quench in the liquid, and then heat, and it will weld like iron. Better than borax.—By A. D. S.
To Weld Steel Plate to Iron Plate.
To weld a steel plate to an iron plate, I would say, for a common fire you want a stout porter bar on your iron plate first—something to hold on to. If you have much of that work to do, you want a grate-fire and to use anthracite coal on the grate, with soft coal on top. A grate gives more heating area and uniformity of heat in the fire surrounding the work. The opening to the fire can be made with a piece of iron about fourteen inches long, bent at each end about three inches, and arched in the center. Place this in front and fill the center with cut wood, and cover all with soft coal; let the wood burn out, and you have a good fire with a clear entrance, like a furnace. Feed the fire till mellow, and insert the iron and steel together till red-hot. Have fluxing matter in a pepper-pot, and dust over the surface to be welded. Let it vitrify. Now place the steel and iron together, draw heat, flux at pleasure with a spoon five feet long. When the spoon sticks, the heat is nearly up. Draw, when ready. A single “drop” blow will weld, or ten blows with a heavy sledge. Cut off and finish. A charcoal, coke, or anthracite muffle-furnace is a fine thing for this work. If you are a good mechanic this will help you out. If inexperienced, you will be apt to get the fidgets, and had better let the job out.—By S. C.
A Practical Method of Welding Broken Spring Plates.
First heat, upset and scarf the broken ends of the “plate” (leaf we generally call it), just the same as if it were iron, and to be welded by separate sand heats; then place them in a clean fire and take separate borax heats; heat as high as the safety of the steel will permit. I then let my helper take out one end while I take the other, and when “stuck” come on to it lively with the sledge, and nine times out of ten I get a good sound weld at the first heat. Care must be taken to leave it as “heavy” at the weld as the original size of the steel.
The loss of length can generally be made good—if a “bed leaf”—by letting out, or taking up (as the case requires) the scroll at the end of the bottom “bed leaf,” or, if it is an outside or intermediate leaf, the little loss in length is of no importance.
Now the welded end of the “leaf” must be tempered—a spring temper—or, no matter how perfect the weld, it will not prove a good job. Tempering properly is the most important feature of the job, and a majority of smiths overlook it altogether.
My plan is (and it is the most satisfactory and practical that I have heard of), after hardening, draw to temper by passing forth and back over a clear fire until it will ignite a pine stick when rubbed over the surface. If it is high steel, heat until the pine will blaze when rubbed hard. If it is low steel, let it sparkle only; lay down to cool.
Since I have learned through my own observation the importance of tempering, I seldom weld a spring which fails to stand as well as its fellows.—By HAND HAMMER.
Welding Buggy Springs.
A good way of welding buggy springs is to first scarf the broken ends down to a sharp edge, and then split them back three-quarters of an inch. Then turn one point up, the other down, as shown by Fig. 95, having ready two thin strips of iron made pretty wide in the middle, and nearly to a point at the ends. Drive the ends together, and then drive the strips of iron in between the laps from each edge, as shown in the accompanying illustration. The inside edges of the strips of iron should be made thin and sharp.

Fig. 95—Welding a Buggy Spring, as done by John Zeck
I have welded springs in this way for many years, and it has never failed. The iron insures a perfect weld, and also makes up for the waste in working.—By JOHN ZECK.
Welding Springs.
No. 1. It is a fact that steel will waste away some by heating at a welding heat, and if it wastes away it will be thinner at each side of the weld than elsewhere, and more liable to break at the weak point, and more especially after taking two welding heats to one weld, and if not upset it must necessarily leave an imperfect job.
I hardly see the necessity of taking more than one heat on a weld, provided it is well executed. I will give you my method. I first upset each piece of steel, weld and chamfer nicely; then punch a small hole in each piece for a rivet. I then, at the lap, slip between the two pieces a thin piece of steel with a rivet hole in it, and rivet the three together. Each end of the middle piece is hammered sharp, and the amount must be about what will waste away in welding. Put each end of the weld alternately in the vise and hammer down the opposite end so that it lies close to the bar, then borax and weld down with one heat. Let the helper come down lively. It is not necessary to let the under point of lap come in contact with the anvil while welding, but it may extend beyond till a few blows are struck on the opposite end, and the reason is that the anvil would, perhaps, cool the thin part below the welding point.
The main object is to get a good weld, and one heat is far better than more for this purpose. Perhaps I had better add, make as short a lap as possible.—By FRANK.
No. 2. I don’t believe that a substantial weld can be made by the use of rivets.
I upset each piece of steel one inch back from the end, leaving the end its natural size. I then split the end twice and chamfer nicely; turn the center point of the split end down and the two outside points up. After preparing both pieces in this way, I slip them together and fit them both edgewise and flatwise, forming a lock and making the lap as short as possible. I try to make my weld at one heat.—By A. F.
No. 3. I will state how I have had the best results. Heat to a cherry red, chamfer the ends short, split into three equal parts about five-eighths up. Bend the two outsides one way and the center the other way of both pieces to be welded. Then put together and close the laps down, making them so they will stick together; then take a light borax heat and work quick. Do not hammer too much on one side, but turn in quick succession to prevent from chilling the scarf. This way of lapping springs requires no upsetting of the ends, and is the best way I ever saw to put springs together to get a heat. Hammer all the temper in that you give them.—By G. W. W.
No. 4. My way of welding springs is as follows:
I first upset the ends, then draw them down to a point, as shown by Fig. 96, then punch, rivet, and weld in a fire, taking care to first burn all gas out of the coal. I apply borax freely, heat slowly and make the hammer blows quick and hard. To ensure success I usually take two welding heats. There will be no thin edges in the laps, and if care is taken to avoid burning the steel, the job will be one that can be warranted every time.—By C. D.

Fig. 96—Welding Springs as done by “C. D.”
No. 5. My plan for welding springs is to upset to about the original thickness. Make a neat short scarf and weld the same as two pieces of common iron. I never split or punch holes. I find I can get a far better job otherwise. If, by accident, I should not get a good job, and some part is inclined to scale up and not weld thoroughly, I take a small piece of rusty hoop-iron and insert under the scale and take a second heat. There is a good deal in having a good, clean, well-charred fire in work of this kind.—By A. M. B.
No. 6. Will you permit me to say a few words about welding springs? Some years ago I was told by Mr. Frank Wright, of Waltham, Mass., to try one and pin or rivet it. I did so, and have employed that method ever since. If the end is split twice and the pieces locked together it is impossible to get a good solid weld, as it is necessary to weld the ends down, three on each side, and to weld the split lengthwise. Several years since I welded the main and second leaf of a 13/4-inch 5-leaf spring for the hind end of a wagon that was calculated to carry from 1,200 to 1,700 pounds, three trips per week. I know that it was used for three years after the time I repaired it, and it never broke or settled. By riveting the pieces together I find I can weld seven out of every ten and do the work so perfect that the line of weld cannot be discovered.—By L.
No. 7. My plan is to scarf each end and to punch a hole in about a half inch from the end, as at A, Fig. 97, then get a thin piece of iron and punch a hole in it, and lay it between the laps and put a rivet through it and the laps as at C, and then weld with borax. By welding in this way I never met with a failure, and I consider it better than splitting the ends.—By W. B.

Fig. 97—Welding Springs by the Method of “W. B.”
No. 8. I will tell you my way of welding springs. I do not upset the pieces, but chamfer them off fine, and punch two holes in each end, giving them about one and a half or two inches lap; rivet them firmly together, to prevent any possible displacement. Then I give them as low a borax heat as practicable to make a weld on one side near the chamfer of one end, and follow by a like operation on the other side; the drawing of the weld to the natural thickness and breadth of the leaf will fetch it also to its proper length. The loss of the metal in such a weld is not noticeable. I seldom ever have any springs come back after such treatment. My objection to heating the pieces separately is that it requires too strong heat to make them stick. Though the steel may not be actually burnt, it will lose much of its strength by overheating, and will be very liable to break at the same place again, though the weld may be perfect. Besides, it requires more quick and accurate movements to bring the pieces together on the anvil. I give no other temper than a gentle hammering, which I keep up a little while after the leaf is black.—By O. D.
Welding and Tempering Springs—Mending a Spring with a Broken Ear.
My way of welding springs may be of some interest. I first upset, then scarf a little, next split, care being taken not to split too deep, or you are liable to get too long a lap. Next turn the ends each way and scarf with the ball of the hammer, letting them flatten towards the center of the spring. Next warm them up, let the helper take one end and then press together. Beat down the laps and the welding will be almost as strong as if rivets had been used, without the disadvantage of rivets. In heating to weld, most of us make the mistake of heating too fast. The best results are got by heating as slowly as possible. I want the helper in welding to strike quickly and not too hard, as heavy blows are apt to drive the laps over to one side.
In tempering I take a light hammer, and hammer the spring until it is nearly cold. A spring treated in this manner will stand as much as any weld.
To repair a spring with the ears broken off, close up. I upset it, then take a piece of good iron, scarf the edges, cut half way through it, lap the ends over the end of the spring, weld it up in good shape, turn the ears on a bottom fuller; finish the end; and after filing it up, it cannot be distinguished from the other without close inspection.—By OBSERVER.
How to Mend Wagon Springs.
To mend a wagon spring so that it will be as strong and durable as before it was broken is no easy job, and nine-tenths of the smiths will tell you it cannot be done. I am of the opinion that if the work is carefully and properly done, nineteen-twentieths of the springs mended will do good service. There are various ways of mending a spring, and every smith has a way of doing the work peculiar to himself, and, of course, thinks his method is the best.
I first upset the pieces to be mended to such a thickness that when the work is done, there shall be no waste near the weld, the place where mended springs usually break. I next carry the pieces about one inch back, punch and put in a small rivet to keep them in place while taking a welding heat. After obtaining a good borax heat I make the weld. If it is not perfect I take a second or a third borax heat until a solid and uniform weld is obtained. Much depends upon uniformity of the weld. If the spring is left thickest at the weld a break near it is liable to occur, especially in the case of an inside leaf. The weld should be so perfect and uniform that it cannot be easily seen where the spring was welded. I never attempt to put any temper into a spring, any more than what can be done by hammering.—By W. H. B.
Welding Springs.
My way of welding a spring is as follows: I chamfer the ends and split them, as shown by Fig. 98, then place them together as closely and as firmly as possible. I then give the spring a bright red heat, next roll it in calcined borax, then place it in a clean fire of coal well coked, and blow very lightly, frequently baring the splice to see that the heat is strictly in the right place and to also make sure that it does not burn. The blower can hardly be worked too slowly, for the steel must have time to heat all through alike. It will take longer when the blower crank is moved so slowly, but the time is not wasted. Near the end of the heat I keep the steel bared nearly all the time, watching it closely and just before it comes to a sparkle I cover it and give it three or four good heavy blasts, then take it out and strike as rapidly as possible upon the several lips or splices. Before drawing it down to its usual size I see that all the welds are perfect, and if they are not I go over the work again paying particular attention to the unwelded parts. I hammer until it is black for the temper. No spring I ever welded in this way has been broken, and I warrant everyone if the steel is good.—By JERSEY BLACKSMITH.

Fig. 98—Welding Springs as Done by a “Jersey Blacksmith”
How to Weld a Buggy Spring.
I will give my way of welding a spring which I learned from a tramp six years ago, have used ever since, and have never had a spring break at the weld. I first lay the broken ends of the springs together to get the length, which I take with the dividers set to small center punch marks in each piece. I then place the two ends in a clean fire and hammer back a short scarf, thus giving the necessary upset.
I next punch a small hole close to the ends of each piece to receive the rivet that holds them together while welding.
I next take a piece of good Norway iron, flatten to one-sixteenth of an inch in thickness, the width of the spring, and just long enough to pass the laps when placed between them, punch a hole in this for the rivet, place this piece between the laps and rivet them together; heat enough to melt borax. Lift out of the fire and soak well with borax (for you can’t use too much on this kind of weld), replace in fire and heat carefully. Weld with rapid light blows, sticking both sides safely before striking on the edge; finish with as few heats as possible to make a solid job. Allow it to cool slowly, as it will require no other tempering. Fig. 99 shows how the spring and piece of Norway iron are prepared for welding. By following these directions you can weld a spring that you can safely warrant.—By D. F. K.
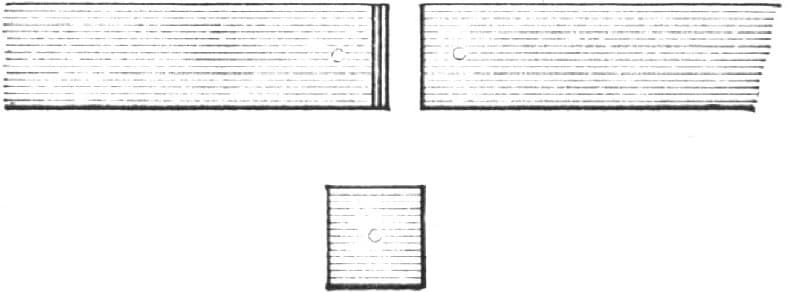
Fig. 99—Shows how “D. F. K.” Welds a Buggy Spring
Welding Shaft Irons for Buggies.
My method of welding such work as shaft irons for buggies is as follows: Fig. 100 shows the two pieces prepared for the welding process, and Fig. 101 shows the finished iron. The projection on Fig. 101 is split to receive the tongue A on Fig. 100. I get the rounded corners at C (where the strain comes) by widening at A, and by the projection at B. Fig. 102 shows the old way of forming the weld, the fault in this being that there are no rounded corners as at C in Fig. 101, and therefore the iron is apt to break in the neck. —By SOUTHERN BLACKSMITH.
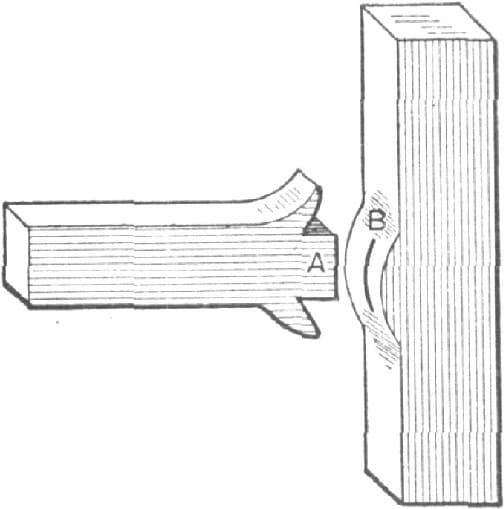
Welding Shaft Irons for Buggies. Fig. 100—Showing the Two Pieces Prepared for Welding
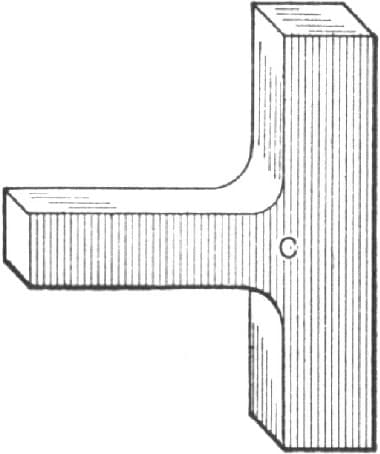
Fig. 101—The Finished Iron
Welding a Collar on Round Iron.
My method of welding a collar on round iron is as follows: Suppose the bar to be one inch in diameter. The seat of the collar must be jumped one-eighth of an inch larger, as at A in Fig. 103. Leave the collar C open one-quarter inch, and while the washer is cold and the bar red-hot, swage the collar on so that it will hold. Then take a welding heat. If the bar is not jumped the neck will shrink in as at B in Fig. 104, and will probably show a crack there.—By. J. R.
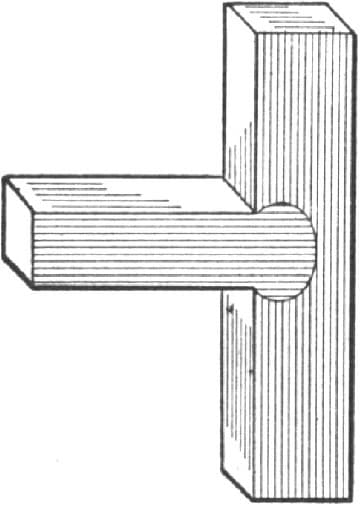
Fig. 102—Showing the Old Way of Forming the Weld
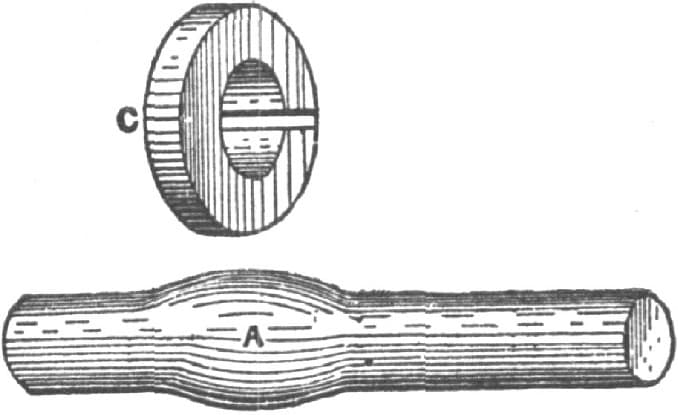
Welding a Collar on Round Iron, as Done by “J. R.” Fig. 103—Showing the Bar Jumped at A, and the Collar C
Welding a Round Shaft.
I will describe my method of welding a round shaft. A and B, Fig. 105, represent the two pieces to be welded. I make one end of one piece the shape of a dot punch and one end of the other piece is countersunk to fit the punch shaped piece. I then place them in the fire together, as shown in the illustration, and weld them in the fire. After they are welded I take a good welding heat, lay the piece on the anvil and work the part smooth. This plan insures a good weld every time, no matter what may be the size or length of the rod. In welding it be sure to place it in the position shown in the illustration, and strike at both ends while heating.—By H. H. L.

Fig. 104—Showing the Point B, where the Neck will Shrink if the Bar is not Jumped

Fig. 105—Welding a Round Shaft, by the Method of “H. H. L.”
Welding.
Here are some examples of heavy welding, such as jump welding long shafts, and scarf and swallow fork welds for the same. In my opinion the jump weld is decidedly the best, if properly done, as it can be bent after welding to a right angle without showing any sign of the weld.

Fig. 106

Fig. 107
To make a jump weld properly the ends should be rounded, as shown in Fig. 106, and, after being brought to a welding heat with a good blast, drive them together with very light hammer blows, as a heavy blow would cause them to bounce. As the welding proceeds employ heavier blows and the weld will drive up as in Fig. 107, after which the weld may be forged and swaged down. This weld will bend to a right angle, as shown in Fig. 108, without showing the scarf, whereas a scarf weld, such as shown in Fig. 109, would show, when bent, its scarf, as at A, in Fig. 110, while a swallow fork weld, such as is shown in Fig. 111, when bent will show its scarf, as in Fig. 112. Only the jump weld, you will see, will stand such bending and show a sound and complete weld.—By SOUTHERN BLACKSMITH.
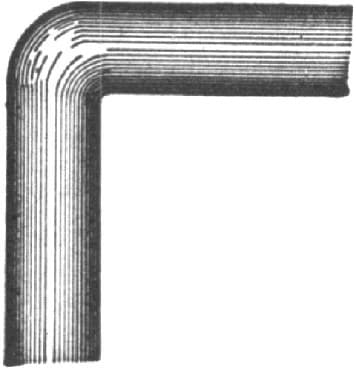
Fig. 108

Fig. 109
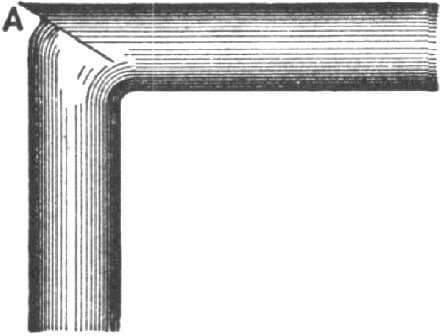
Fig. 110

Fig. 111
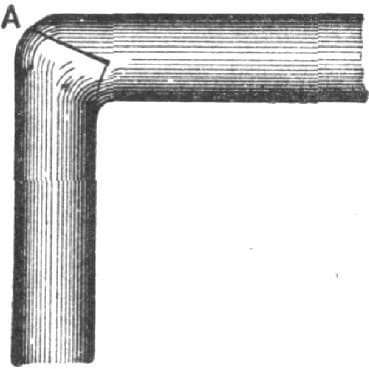
Fig. 112
Welding Shafts to an Exact Length.
An old blacksmith gives the following method of welding a shaft to an exact length, which he says he has used with unfailing success for many years.
Cut the ends of the two pieces to the exact length the shaft is to be when finished, leaving the ends quite square. Each end is then cut out as in Fig. 113, the length and depth of the piece cut out being equal in all cases to one-half the diameter of the shaft. The shoulder A, Fig. 113, is then thrown back with the hammer, and the piece denoted by the dotted line B is cut off, leaving the scarf as shown in Fig. 114.
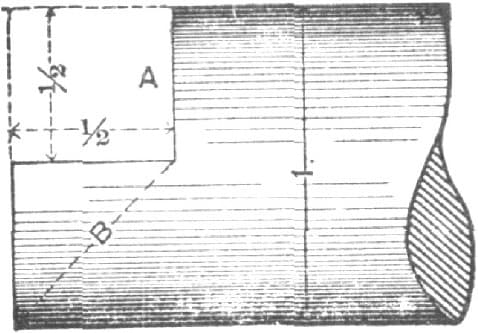
Fig. 113
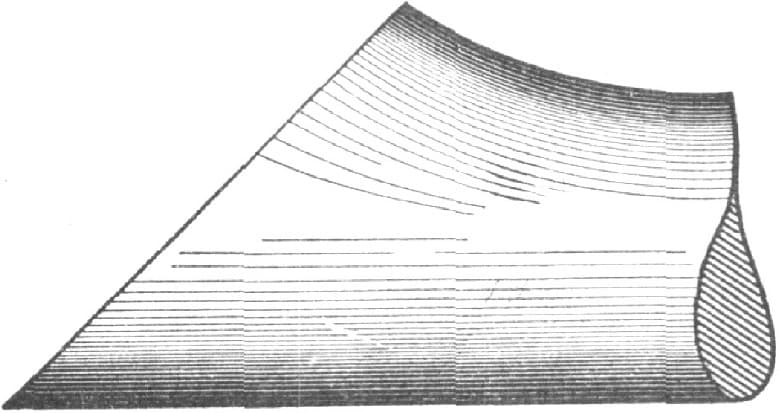
Fig. 114
The two ends are put together to weld as shown in Fig. 115.
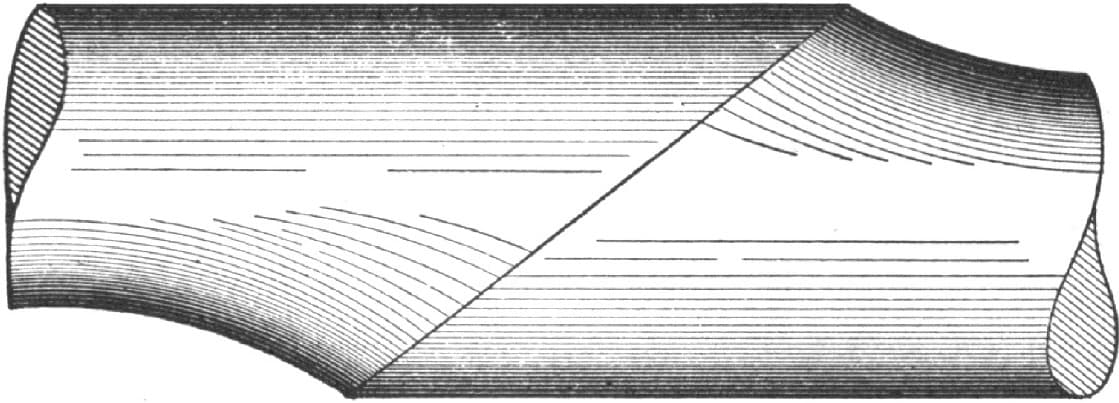
Fig. 115
The advantage of this plan is that the quantity of metal allowed for wastage during the weld is a known quantity, bearing the necessary proportion to the diameter of the shaft, so that when the weld is swaged down to the proper diameter the length of the shaft will be correct.
Welding a Heavy Shaft.
My plan is, dress the two ends you are going to weld, level, or somewhat rounding, for a four-inch shaft. Then punch a five-eighths-inch hole two inches down each end; then take a piece of five-eighths-inch round iron four inches long and dowel the two together with the same. Next, place the shaft in the fire and revolve it slowly until the welding heat is obtained, and then by means of sledges or a ram, butt it together while it is in the fire. The other end must be held firm if the shaft is very long. In doing this job I would prefer to use a ram made by taking a piece of shafting and swinging it in a chair. When the butting together has been accomplished, take the shaft out and swage it. The swage should be in front of the forge so that the shaft will lay in it while heating, and then it can be easily moved for swaging.—By L. B. H.
Welding Boiler Flues.
In welding boiler flues in a shop where you have only such tools as you make yourself, let the flue be held in a vise, then take a diamond point and cut off square, then cut off a piece of the length desired, scarf both the pieces, one inside and the other outside, drive them together and take a borax heat all around, being careful not to burn a hole through. Open the fire a little on top, keep turning the flue, weld the end of the lap down in the fire lightly, then take the flue out of the fire and round it on an old shaft or any round iron, but don’t let the shaft or iron be too large.
To test the work, plug up one end, fill the flue with water, heat the end and put in lime or ashes to anneal it. When it is cold anneal the other end. To put it in the boiler you need an expander and beader.—By H. R.
Making a Weld on a Heavy Shaft.
There is only one kind of a weld that will stand for a stem for oil tools, and that is a forked or “bootjack” weld. The accompanying cut, Fig. 116, shows the mode of handling the shaft. It has to be done with the beam A, pulley P, and chains C, revolving around the lower pulley, and the iron shaft or auger stem as seen in or running through the forge or fire. The crotch should be placed so that the blast shall drive the current of heat sidewise on the crotch. Catching any one of the four chains and drawing it down will revolve the shaft without misplacing the crotch in the fire until you have a welding heat. Then by drawing the shaft lengthwise, moving the upper pulleys, you can bring the weld to the anvil and with sledge or hammer make your weld.
It has been clearly demonstrated in the oil regions that a weld made with a sledge stands better on heavy stems than one made with a steam hammer. Why this is so I cannot say, but it appears to be a fact that cannot be denied.
I will make a weld after the above plan, and will guarantee that it cannot be jumped, whereas the ordinary lap or buck weld will not stand the continued jars that oil tools have to contend with.—By A. D. G.
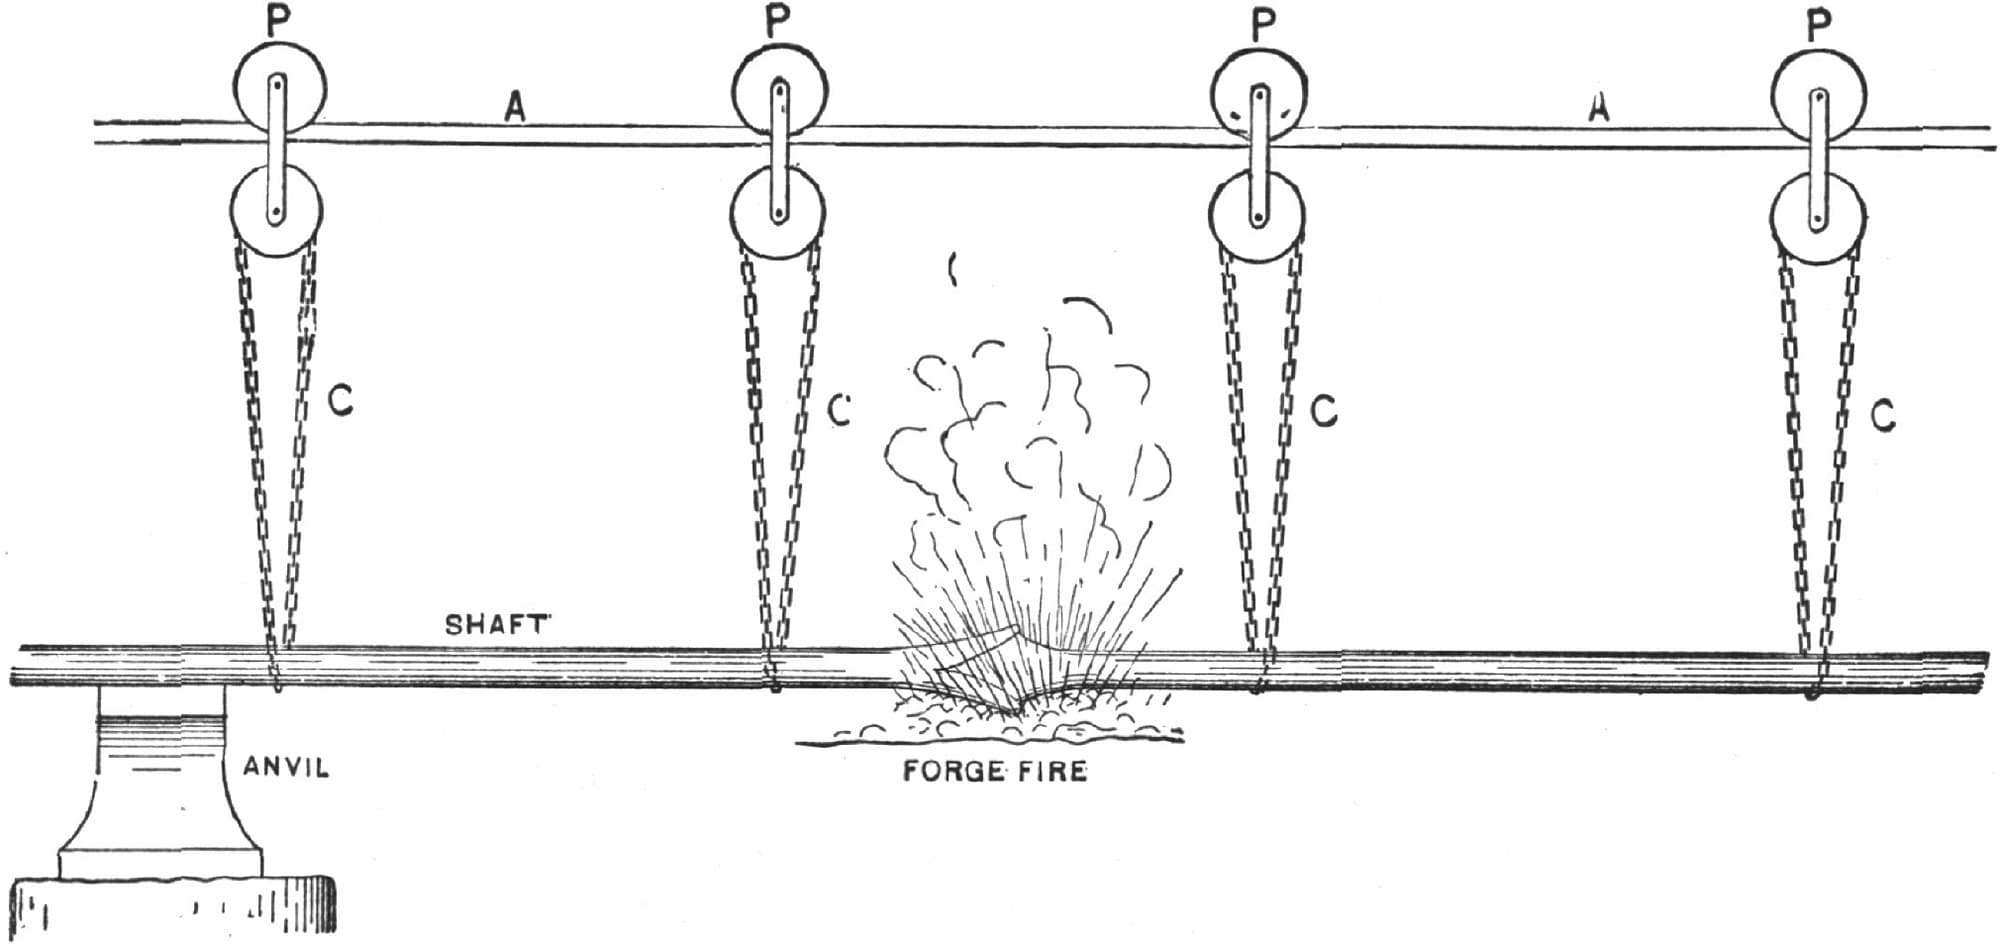
Fig. 116—Making a Weld on a heavy Shaft, as done by “A. D. G.”
Welding Angle Iron.
To be a good angle-iron smith is a thing to be proud of, for it requires skillful forging to make good, true, clean work of proper thickness at the weld. Some simple examples are given as follows:

Fig. 117—Angle Iron for Bending
It is required to bend the piece of angle iron shown in Fig. 117 to a right angle.
The first operation is to cut out the frog, leaving the piece as shown in Fig. 118, the width at the mouth A of the frog being three-quarter inch to every inch of breadth measured inside the flange as at B.
The edges of the frog are then scarfed and the piece bent to an acute angle; but in this operation it is necessary to keep the scarfs quite clean and not to bend them into position to weld until they are ready for the welding heat; otherwise scale will form where the scarfs overlap and the weld will not be sound.

Fig. 118—First Operation
The heat should be confined as closely as possible to the parts to be welded; otherwise the iron will scale and become reduced below its proper thickness.
The iron is then bent to the shape shown in Fig. 119, and the angle to which it is bent is an important consideration. The object is to leave the overlapping scarf thicker than the rest of the metal, and then the stretching which accompanies the welding will bring the two arms or wings to a right angle.
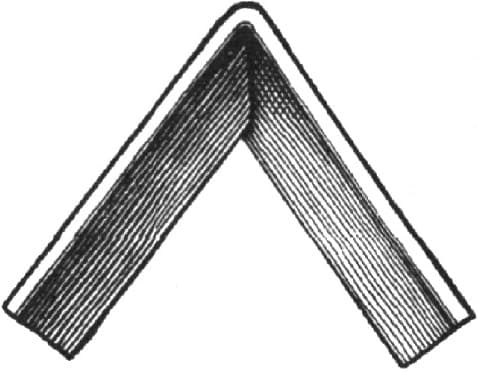
Fig. 119—Bending to Shape
It is obvious, then, that the thickness of the metal at the weld determines the angle to which the arms must be bent before welding. The thicker the iron the more acute the angle. If the angle be made too acute for the thickness of the iron at the weld there is no alternative but to swage the flange down and thin it enough to bring the arms to a right angle. Hence it is advisable to leave the scarf too thick rather than too thin, because while it is easy to cut away the extra metal, if necessary, it is not so easy to weld a piece in to give more metal. In very thin angle irons, in which the wastage in the heating is greater in proportion to the whole body of metal, the width of the frog at A in Fig. 118 may be less, as say nine-sixteenths inch for every inch of angle iron width measured, as at B in Fig. 118. For angles other than a right angle the process is the same, allowance being made in the scarf-joint and bend before welding for the stretching that will accompany the welding operation.
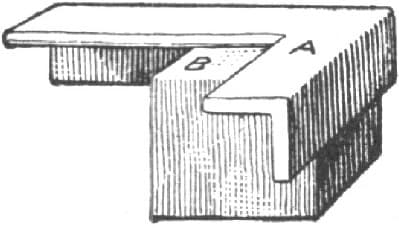
Fig. 120—How the Welding is Done
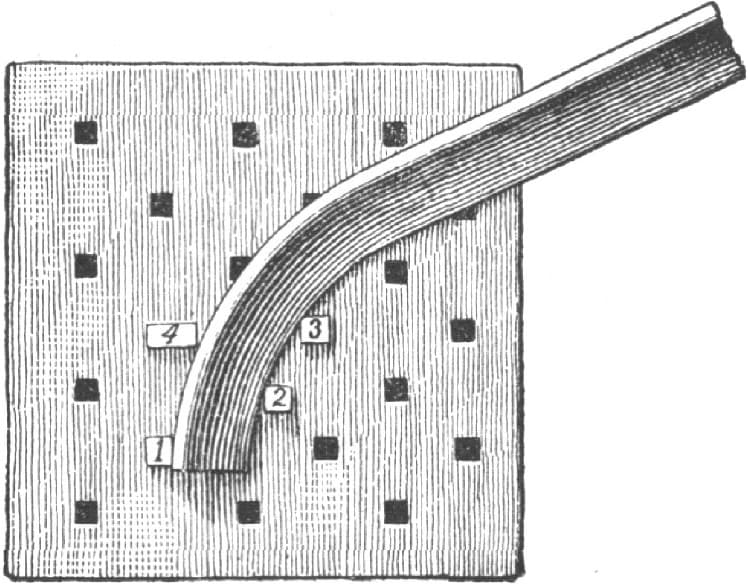
Fig. 121–Bending Angle Iron into a Circle
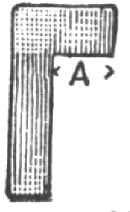
Fig. 122—Shape of Pins
The welding blows should be light and quick, while during the scarfing the scale should be cleaned off as soon as the heat leaves the fire, so that it will not drive into the metal and prevent proper welding. The outside corner should not receive any blows at its apex; and as it will stretch on the outside and compress on the inside, the forging to bring the corner up square should be done after the welding.
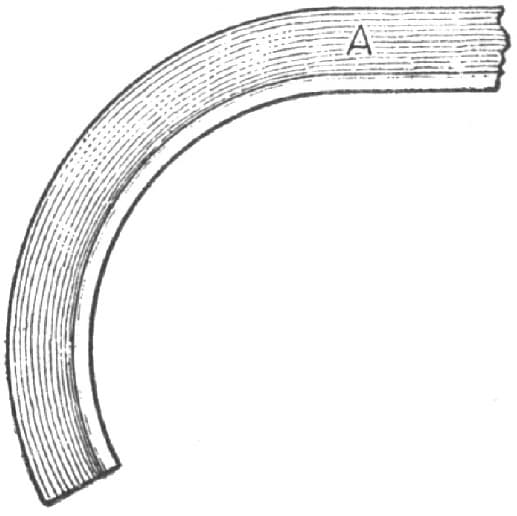
Fig. 123—Showing Flange Inside of Circle
The welding is done on the corner of an angle block, as in Fig. 120, in which A is the angle iron and B the angle block.
To bend an angle iron into a circle, with the flange at the extreme diameter, the block and pins shown in Fig. 121 are employed. The block is provided with the numerous holes shown for the reception of the pins. The pins marked 1 and 2 are first inserted and the iron bent by placing it between them and placed under strain in the necessary direction. Pins 3 and 4 are then added and the iron again bent, and so on; but when the holes do not fall in the right position, the pins are made as in Fig. 122, the length of the heads A varying in length to suit various curves.
To straighten the iron it is flattened on the surface A and swaged on the edge of the flange B, the bending and straightening being performed alternately.
When the flange of the angle iron is to be inside the circle, as in Fig. 123, a special iron made thicker on the flange A is employed. The bending is accomplished, partly by the pins as before, and partly by forging thinner, and thus stretching the flange A while reducing it to its proper thickness. —By JOSHUA ROSE.
Welding Collars on Round Rods.
I bend the rod for the collar as shown by Fig. 124, and cut off at A. In welding I hit first at B, and go on around to A. I weld either at the anvil or on a swage—it doesn’t matter which. For large collars I cut off a piece to make the collar, and leave it straight, then I heat the bar and collar separately, and weld one end of the collar first, and bend and weld as I go around, taking separate welding heats after the bending. —By SOUTHERN BLACKSMITH.
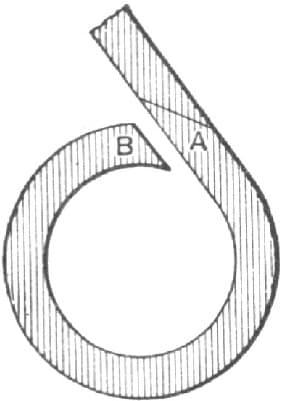
Fig. 124—Welding Collars on Round Rods by “Southern Blacksmith’s” Method. Showing how the Rod is Bent and Cut off
Shall Sand be Used in Welding?
The rule among smiths generally seems to be that the more sand they can get on in welding the better, the idea being that the iron will be heated more evenly by this process. Some time ago I got out of sand and could get no more for a time. After I had worked awhile without it I did not want any more, and have not used it since.
Some of the reasons for not using it I will name. The forging is cleaner, and it takes less time to do work without than with sand. I have done just as good work since I stopped using it as before, and have done it in less time.
The sand used by me is from molders’ castings.—By W. B. G.
Fluxes or Welding Compounds for Iron or Steel.
No. 1. Here is a welding compound equal to cherry heat:
Take ten ounces borax, one ounce muriate of ammonia, pound them roughly together, put them in an iron vessel, and roast them over the fire till all spume has disappeared, then turn it out to cool, afterwards pulverize and keep in a close tin box. Use about like borax, only not so much. I use this all the time and consider it equal to any compound in the market.
I can weld any kind of steel I ever tried with it—springs, fork tines, etc.—By J. C. McM.
No. 2. I will give a recipe for welding steel that I have used twenty years successfully: one ounce of copperas, half an ounce of saltpetre, quarter of an ounce of sal ammoniac, three ounces of salt, one and a half pounds of sand. Pulverize and mix together and keep in a dry place.—By R. S.
No. 3. An excellent welding compound for steel is composed as follows: two ounces of copperas; four ounces of salt; four pounds of white sand.
Mix the whole and throw it on the heat as is done with sand only.
No. 4. Equal quantities of borax and pulverized glass, well wetted with alcohol and heated to a red heat in a crucible. Pulverize when cool, and sprinkle the compound on the heat.
No. 5. Take copperas, two ounces; saltpetre, one ounce; common salt, six ounces; black oxide of manganese, one ounce; prussiate of potash, one ounce. Pulverize these ingredients and mix with them three pounds of nice welding sand. Use this compound as you would sand. The quantity I have named will cost twenty cents and last a year.—By T.
No. 6. Take one part of lime to two or three parts of river sand, such as a plasterer would use for a finishing coat. —By R.
No. 7. One part copperas, two parts salt, four parts sand. Thoroughly mix. This makes a splendid welding compound. —By A. G. C.
No. 8. Take one ounce of carbonate of iron and mix it with one pound of borax. In using it on plows, always fit the lay very close to the land side and rivet it to get a good weld. —By G. W. P.
No. 9. I offer below a recipe for welding steel without borax:
Copperas, two ounces; saltpetre, one ounce; common salt, six ounces; black oxide of manganese, one ounce; prussiate of potash, one ounce. All should be pulverized and mixed with three pounds of nice welding sand. With this preparation welding can be done at a cherry heat.—By ANXIOUS.
No. 10. I like this better than borax, but it takes a little more time when it is used. It is cheaper than borax. Those who want to try it can make it by taking a quarter of a pound of rock saltpetre, and dissolving it in a quarter of a pound of oil of vitrol and adding to one gallon of rain water.
After scarfing the steel get it red hot and quench it in this preparation, then heat and weld the same as iron, hammering very quickly with light blows. Keep the compound in stone jars with a tight, fitting lid, and it will be good for years.
Sand in Welding—Facing Old Hammers.
No. 11. I wish to say a few words with respect to the use of sand in welding. The question seems to be shall we or shall we not use sand in making welds. I consider it a very essential point in working steel, and use a composition, which I prepare as follows: Take a quart of quartz sand, one pint of common salt, one pint of pulverized charcoal, half a pound of borax well burnt. These I mix well together in a sand box, and consider the preparation much better than raw borax for working steel. In working iron I omit the borax from the compound.—By E. T. BULLARD.
Composition for Welding Cast-Steel.
Borax, ten parts; sal ammoniac, one part; grind or pound them roughly together; fuse them in a metal pot over a clear fire, continuing the heat until the spume has disappeared from the surface. When the liquid is clear, pour the composition out to cool and concrete, and grind to a fine powder, and it is ready for use.
To use this composition, the steel to be welded should be raised to a bright yellow heat; then dip it in the welding powder and again raise it to a like heat as before; it is then ready to be submitted to the hammer.
Brazing Cast-Iron.
“What is the reason that I cannot braze cast-iron?” asked a machinist the other day. “Every time I try, I fail. Sometimes the cast-iron burns away, and sometimes the brass will not stick. What is the reason?”
Cast-iron may be easily brazed, if, like doing other peculiar jobs, “you know how to do it.” Have the iron clean; make it free from grease and acids, which may be injurious; choose any soft brass, or make some for this purpose. The yellow brass used in brazing copper will do; it must contain a large percentage of zinc, or its melting point will be not much lower than that of the cast-iron itself.
Put on the borax before heating the iron. Dissolve the borax, and apply the solution freely to the parts to be brazed. By doing this before heating, a film of oxide is prevented from forming upon the iron. Fasten the parts together, and heat in a clear charcoal fire. Soft coal is not suitable; there is too much sulphur in it.
Heat the work gradually. Apply heat to the largest piece, and keep that piece the hottest. Sprinkle on powdered borax and brass filings, and use plenty of borax. Watch carefully, and get the iron up to a red heat before any of the brass melts. The brass will not adhere unless the iron is hot enough to melt the brass.
Be very careful not to get the iron too hot, or away it melts and the job is lost. When the brass “runs,” remove from the fire immediately, and wipe off the superfluous brass, cool off slowly, and finish up the joint.—American Machinist.
Brazing Ferrules.
Chamfer the ends of the piece to be brazed on opposite sides, and file them so that the iron will be bright and clean, bend and let the ends lap about one-eighth of an inch; then lay on a piece of brass. (I use old lamp tops or burners.) Put on a little pulverized borax with a stick or finger, throw on a few drops of water, and it is ready for the fire. Of course all that remains to be done is to melt the brass, and the ferrule is finished. You may or may not, as you like, dip it in water and cool immediately, as it only makes the brass the softer. Hammer on it or drive it, and it will not break in the brazed part. I have made this summer at least two hundred, and have yet to break the first one. They will stand more hammering than will the solid iron.—By A. L. D.
Brazing a Ferrule.
I will describe my way of brazing ferrules.
If a lap is wanted I file both edges sharp, as in Fig. 125 of the accompanying illustrations, and then make the bend as shown in Fig. 126, put a strip of copper or brass inside, apply burnt borax pulverized, place the ferrule in a clear fire and keep it there until I see a clear flame and then take it out to cool.

Fig. 125—Brazing Ferrules by the Method of Chas. W. Kohler. Showing how the Edges are filed
If I wish to make the ferrule without a lap, I file the ends square, bend around to the proper shape, bind it with iron wire so it won’t open when it gets warm in the fire, and then proceed as in making one with a lap.—By C. W. KOHLER.
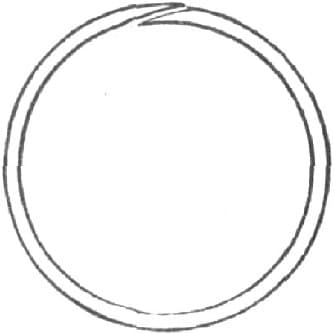
Fig. 126—Showing how the Ferrule is bent
Brazing.
You cannot braze with cast brass filings. Use granulated “brazier spelter,” or sheet brass clippings; white sheet metal for bright work. Wet with water the part to be brazed, then apply powdered borax. The water holds the borax until it calcines or slakes. Then lay on your brazing material. Use a clean coke fire, and as the metal melts poke it with a wet, pointed iron where you want it, and remove from the fire at once. Before the flux gets cold, scrape it off with a file or sharp cold-chisel and trim it off. Continue this process until all the flux is removed, heating slightly occasionally if necessary. —By COLORED BLACKSMITH.
Brazing an Iron Tube.
If it is anything very particular, I should make two small holes in the tube and two small holes in the piece of iron, and pin them together and wrap binding wire around them. Then take a piece of iron, say one and one-quarter inches thick by two inches wide, and make in it a slot longer than the piece of iron to be brazed. Lay your tube on the iron sideways, and you will see what packing you want under the iron that you are going to braze on to the tube. The larger the tube, the thicker the packing it will require if you want to get it on straight. I think if you follow the directions given you will come out all right. There may be a better way of doing it, but I know of none.—By G. P.
Brazing a Broken Crank.
It may be worth while for me to describe my way of brazing. It is as follows: I fasten the broken parts together just as they were before being broken. For example: The accompanying illustration, Fig. 127, represents a corn sheller crank broken at two places in the eye. A A indicate the places where the breaks exist. I dampen the broken ends, dip in very fine borax and then put on clamp C, which is made of iron as thick as the eye of the crank, and is put on the crank hot, the latter being cold. The hot clamp will make the crank swell and this will prevent the clamp from dropping off. I use plenty of brass or brazing solder, or pieces of an old clock frame, but never use cast brass, for it is useless for brazing. I use plenty of borax with the brass, but apply the brass first because if borax is put on first it will swell. When the brass is dropped in the fire and melts, the heat will look like a steel weld. After taking it out of the fire I dip it carefully in the water.—By I. N. BAILEY.

Fig. 127—Brazing. Showing a Method of Mending a Broken Crank
Brazing with Brass or Copper.
To braze brass or copper, I file the parts to be joined clean, wire them in place or rivet them; then take a few lumps of borax and burn them on a piece of sheet iron, then pulverize them, dissolve some, dip the article to be brazed in it, then lay on the piece of brass or copper, tie it fast, sprinkle some of the borax over it, and put it in a clear fire, blowing very slow at first till the iron gets red; then I will see a blue flame, which is the melting point of brass and copper. I allow it to lie in the fire a minute with blowing, then take it out, and lay it down gently on the hearth to cool.
Very delicate articles should be dipped in a batter of clay to keep them from burning. When the clay begins to glaze it is time to take them out of the fire.
Brass or copper should be brazed with silver. Copper can be brazed with brass, but the melting points of copper and brass are only a few hundred degrees apart, and so such work is not safe unless you have to deal with a large piece of copper. Brass and copper for brazing should be milled. When silver is used it should be old coin or Mexican coin, the silver being purer. The blowpipe is the best to braze with, but it requires some practice to use it successfully. —By CHAS. W. KOHLER.
Soldering Fluids.
Some of the soldering fluids used are injurious to tools, and also to parts that have been laid on the bench where such fluids have been used. The following recipe will do the work well, and will not rust or tarnish any more than water would: Take two ounces of alcohol and put it into a bottle, and add about a teaspoonful of chloride of zinc and shake until dissolved. Use it in the same manner as the muriate of zinc, or muriatic acid and zinc. It has no bad smell.
A good flux for soldering iron, brass, etc., is made by dissolving chloride of zinc in alcohol.