
POOL GARDENS • WATER IN THE LANDSCAPE PLANTS FOR WATER GARDENS • ROCK GARDENS
My relationship with author and friend Louise Riotte had a rocky start when I referred to her, in print, as “my favorite 80-year-old author.” My phone crackled. Louise chided, “Get your facts straight—I’m only 79!” Anything Louise took on she was passionate about, including her pond. Living in landlocked Ardmore, Oklahoma, made the thought of a pond all consuming. The pond her son built became the focus of Louise’s passions for fishing, gardening, natural science, and cooking. Her Cajun catfish, Texhoma hush puppies, stewed turtle, and barbecued rattlesnake will not soon be forgotten. This chapter starts with Louise’s advice on a small backyard lily pool.
—John Storey
Friends snickered, wrote the late Louise Riotte, when her son, Eugene, bought a piece of property containing a big ravine—until he turned that ravine into a beautiful pond. In her 80s at the time, Louise took on the task of landscaping the pond with trees, shrubs, and wildflowers. She then wrote her twelfth and last book, Catfish Ponds and Lily Pads, about the experience.
One of the nice things about gardening with water is that minimal work is required after the initial construction and planting. As long as the ecological balance of the area is maintained, there is no hoeing or cultivating, little weeding, and, of course, no watering!
For several years, we had a small pool in our backyard planted with red and white water lilies. It was much enjoyed both by us and by a friendly green frog who spent a lot of time sitting on the pads, catching insects, and being photographed by visitors. We made our garden by sinking a child’s plastic wading pool into the ground and filling it with water. We then placed several pots in it, each containing one lily planted in soil. Water trickled in slowly through a camouflaged inlet pipe, and the small amount of overflow spilled out onto the lawn. It could not have been more simple or carefree, which was its undoing. We became so accustomed to ignoring it that during a dry spell one summer we forgot to check the water inflow. It had stopped, and we lost all the plants.
If you already have a naturally wet area, you can scoop out part of it to create a pond about 2 feet deep. Plant water lilies directly in the muddy soil, provided the water isn’t more than 2 feet in depth. If you raise water plants in your pond, don’t try to keep ducks or geese there, because they’ll wreck the plantings.
—from Catfish Ponds and Lily Pads by Louise Riotte
Water lilies need at least five hours of full sunlight each day, and their location must be away from trees that might drop leaves or needles into the water. The pool should be 2 to 2½ feet deep for best results. At one time, most were built of reinforced concrete, but now fiberglass and heavy polyvinyl plastic are more often used because they are easier to install and less likely to crack in freezing temperatures. Nurseries that sell water plants frequently stock preformed pools and liners in many sizes.
Although a pool does not need fresh water running through it all the time, plumbing should be installed so that water can be added whenever evaporation makes it necessary. The pool needs cleaning occasionally; a drain and plug at the lowest end of the pool will save you the trouble of pumping out the water.
Edge your pool with flat stones placed on a shallow shelf just below water level.
Although a water garden requires less care than one planted in soil, it cannot be completely neglected. Remove any unsightly yellow foliage and seedpods as they appear. If the plants are not thriving, place soluble fertilizer tablets around their roots every two weeks.
Water lilies growing in the soil bottom of a shallow pond can be left undisturbed, but those in containers should be divided every two to five years. If the plants get too large, the flowers will become fewer and smaller, but if they are given proper care, the plants may live for 50 years or more.
Like their soil counterparts, aquatic plants are affected by pests. Never use insecticides as pest control in ponds or pools, however, especially if you have fish or frogs there.
—from Successful Perennial Gardening by Lewis and Nancy Hill
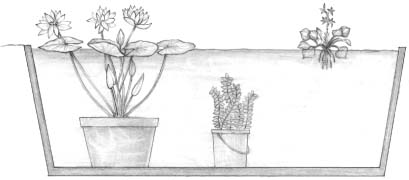
Examples of types of water plants (from left to right): aquatic (water lilies), submerged, and floating.
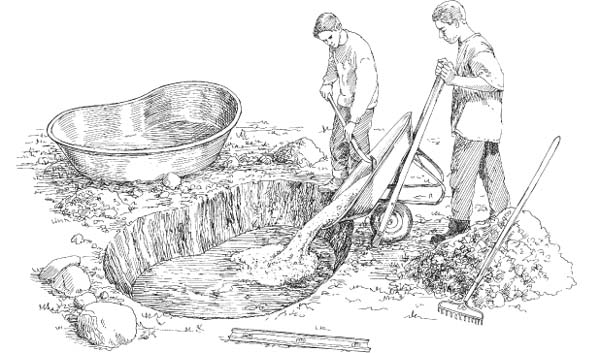
A great way to take the plunge into water gardening is to start with a preformed pool, available from catalogs and some garden centers. This is less daunting than digging your own free-form hole and cutting a large piece of plastic sheeting to size. A person can install one of these alone in just a single afternoon.
Pools sold for this purpose come in a variety of shapes and sizes and are durable and puncture resistant. Those made of ¼-inch-thick fiberglass will last up to 50 years. If you want to grow water lilies in your pool, choose a form that is at least 18 inches deep. The 4-foot by-6-foot, kidney-shaped pool shown here holds about 150 gallons of water and can provide a home for one or two water lilies, three or four marginal plants such as rushes and aquatic irises, some oxygenating plants to keep algae at bay, and perhaps a few goldfish or koi.
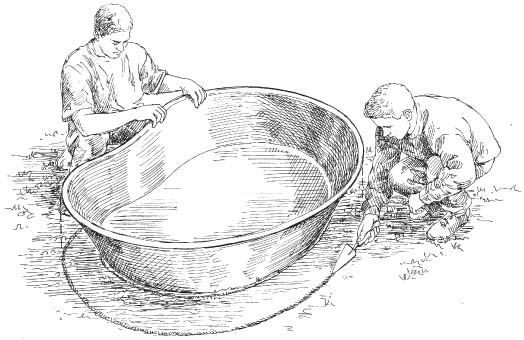
1. Mark the pool’s outline with a trowel.
1. Site the pool. Choose a spot out in the open, or at least away from the shadow of overhanging trees and shrubs. This also ensures that you won’t encounter tree roots when you dig or have to clean the pool of fallen leaves. A water garden tends to look more natural when sited in a low, level area. Avoid putting it in the lowest part of the yard, however, because it may overflow during rainy spells or be vulnerable to runoff contaminated by fertilizers, herbicides, or insecticides used elsewhere. Station the pool within reach of a hose as well. This will make it easier to fill the pool initially, and to top off the water level when necessary.
Set the pool on the chosen spot. The sides are slightly angled to prevent them from caving in, so your hole will need to reflect this shape. Use a trowel, rope, or a couple of hoses to mark an outline of the pool’s bottom and of its top edge. The result should be a circle-within-a-circle design.
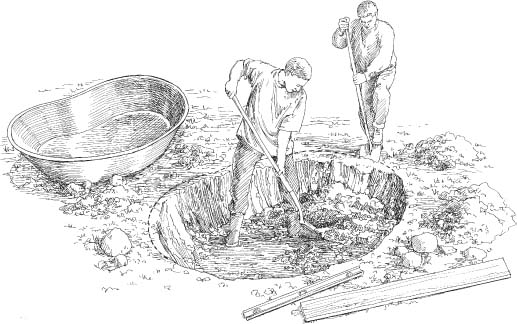
2. Make the hole slightly larger than the pool.
2. Dig the hole. Make the hole an inch or two bigger than the pool, excavating from the outer boundary down to the inner one, and trying to match the angle of the pool. Remove all sod, rocks, and debris as you work. The bottom of the hole must be level so the surface of the water will be level when the pool is filled. Once the hole is deep enough, stomp on the bottom or tamp it down with the back of the shovel blade. Smooth it further with a piece of lumber.
The top of the hole should also be level. To determine this, lay a board across the hole at various points and set a carpenter’s level on the board. If the top isn’t level, it’s better to adjust the soil on the ground’s surface than to change the depth of the hole.
3. Pour a 1-inch layer of sand in the bottom of the hole.
3. Set in the pool. The pool will sit more easily in the hole and respond better to fine-tuning if you set it on a base of sand. The sand also forms a protective cushion and provides a smooth surface for the pool to rest on. Empty enough builder’s sand into the hole to make a layer an inch or more deep. Then set in the pool and wiggle it into position. Remove it temporarily to see if it made a level impression. Add sand until it does. Add even more sand if you want the pool to be slightly elevated above the hole. This is a good idea if you’re concerned about runoff.
Return the pool to the hole and maneuver it into its final position. Use the board and carpenter’s level to make sure the pool is even all along the rim.
4. Fill the pool. To equalize the pressure from the water and the soil and to prevent bulges, it is important to fill the pool with water and surround the liner with soil simultaneously.
Set the end of a hose in the bottom of the pool and start filling it slowly with water. Begin filling the gap between the ground and the pool with the excavated soil. Tamp in the soil with a trowel or board. Work your way around a few times, until the gap is filled evenly on all sides.
To hide the pool’s edge and give it a more natural look, lay bricks, rocks, or stone slabs around and slightly over the edges. Wedge them in well or set them in with mortar so that you and other kneeling admirers won’t dislodge them.
Once the pool is finished, wait 24 hours before adding plants and fish to give the chlorine in the water a chance to evaporate. If your water also contains chloramine, treat the pool with liquid-concentrate chemicals sold for this purpose by water garden suppliers.
—from Year-Round Gardening Projects, text by Teri Dunn; illustrations by Elayne Sears
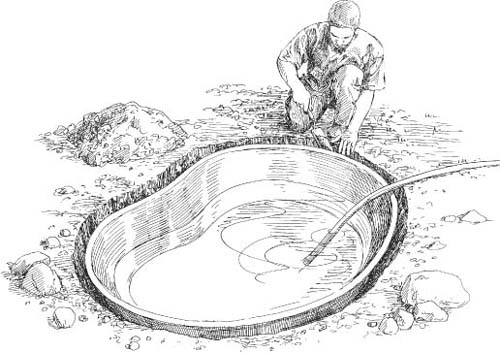
4. Fill the pool with water while you fill the outer gap with soil.
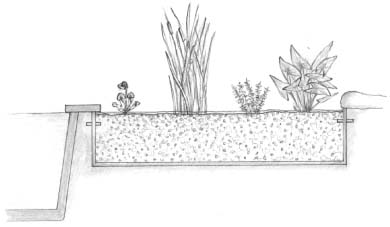
Best Plants for Bog Gardens
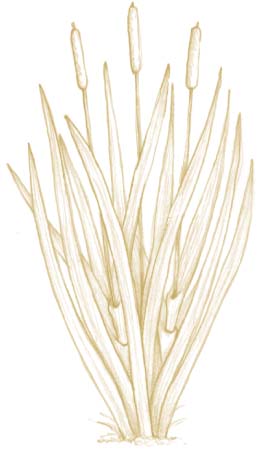
 Plant iris, horsetail, bulrush, cattail, and pickerel weed in natural-looking groups throughout the area.
Include surface-floating plants such as the four-leaf water clover and the white snowflake, whose foliage floats like lily pads on the water’s surface but adds a different texture. You will need at least 4 inches of water over the soil for these floating plants.
Tropical bog plants add an exotic flavor to your garden. Plant them as you would their hardy relatives. They will die off when cold weather hits in late fall. For this reason, tropical bog plants are treated as annuals—beautiful while they last.
—from Creating Your Own Water Garden by Charles B. Thomas
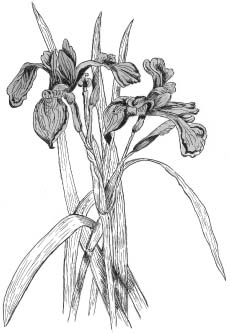
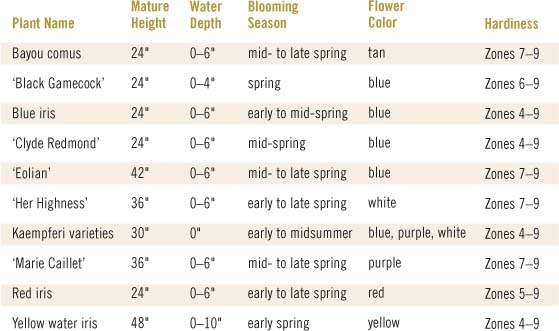
BLUE-FLAG IRIS
Is there a poorly drained or swampy area of your lawn that you just don’t know what to do with? That problem area, too wet for most terrestrial plants, is the natural place to create a water garden. If the area is always wet, even throughout the hot summer months, you can plant the bog plants directly in the soil without any previous construction effort. Keep in mind that bog plants generally like to spread, so there will be conflict among various inhabitants of the bog.
If your naturally low spot does not retain water, it is still easy to create a bog garden with a PVC liner. Dig out the area to a depth of 8 to 12 inches and put the liner in the excavation. Place the removed soil back on top and thoroughly saturate the soil with water. Plant the bog plants directly in the soil. Keep the bog area slightly below the surrounding ground level to catch runoff.
Bog plants like to keep their feet wet in soggy soil or in water 1 to 6 inches deep. They can be planted in a container of almost any size, but if you are dealing with a single plant, a 5- or 10-quart pail will do nicely.
When the first hard frost comes, trim back the foliage and lower the plant in its container to the bottom of the pond to weather the winter. The roots of surface-floating plants must not freeze or the plant will probably die. If this is a possibility, bring the plants inside in their soil containers for winter storage. Keep the plant moist (cover with a plastic bag) and cool, about 40°F.
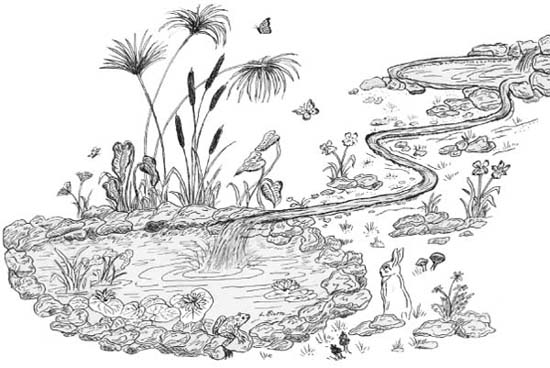
This bog garden is located next to a small man-made pool. A drainage hole is kept open with a short length of tubing.
IRIS: ROYALTY OF THE BOG
—from Creating Your Own Water Garden
If you want ornamental fish in your pond, the general rule of thumb is 1 inch of fish per 3 gallons of water.
To increase your pond’s oxygen content, recirculate the water with a fountain or waterfall, and grow plants in the pond.
Keep pH between 6.7 and 7.3, especially in newly concreted ponds; the concrete can turn the water very alkaline.
Do not overfeed your fish. Give them 48 hours to adjust to the pond before feeding them. Excessive feeding may cloud the water, as will feeding your fish bread or crackers. Use only the high-quality foods formulated for the type of fish you have chosen, and discontinue feeding the fish whenever water temperature is below 45°F.
—from Catfish Ponds & Lily Pads
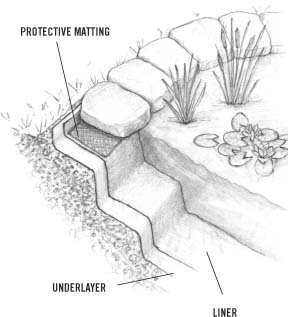
If a pond, a small stream, and a waterfall suit your waterscaping plans, the streambed must be poured at the same time as the pond. Here are some points to attend to when you pour these additions.
A pond/rill/spring combination requires flexible PVC tubing (I.D. ¾-inch is suggested), attached at the pond end to a submersible pump. Water is pumped uphill to the location of the waterfall or spring. Hide the tubing’s upper side for a natural look.
The flow of the water must be deposited in a catch basin before it moves down the rill to the lower pond. The rill should be a meandering stream that will slow the water down, looking more natural than if the water were shooting in a straight line toward the pond.
Dig the streambed deep enough to bury the flexible plastic water pipe beneath concrete work, and install the pipe before you pour. The concrete need be only 2 to 3 inches thick, but it must be reinforced. You can use chicken wire.
Dig a trench 12 inches deep and 12 inches wide on both sides of the watercourse and fill it with pea gravel and sand. The trenches will take up any overflow during heavy rains, and will provide a foothold for ferns, crested iris, and other moisture-loving plants.
A submersible pump that can handle 1,380 gallons of water per hour at 1 foot of elevation is just about right for operating a pond/rill/spring combination. With a 6-amp motor, it can lift 5 gallons of water a minute to a height of 20 feet. A pump that is too powerful will be a better buy than one that is too small.
Before installing the ¾-inch tubing under the rill, adapt the end at the lower pond to standard male garden hose threads and add a short length of flexible garden hose between the tubing and the pump, which also takes standard garden hose threads. It is then simple to connect the system by laying the pump on its side above a flat rock. (See chapter 3 for more on choosing pumps and building ponds.)
—from Catfish Ponds & Lily Pads by Louise Riotte
A backyard waterfall. A rill of water meanders about 20 feet downslope from the catch basin, over a small ledge, and into a lower pond. Occasional overflow provides a boggy area for water-loving plants. The rill is about a foot wide. The lower pond is 14 to 16 inches deep, 5 to 10 feet in diameter, with a surrounding border of rocks.
A tub or pool of water lilies brings all sorts of pleasures to a garden, among them constant, colorful blossoms; fragrance; and a parade of admirers ranging from your neighbors to bees and frogs. Once you choose a lily that suits you in terms of size and color, you’ll find that it is easy to plant and care for. All it requires is a pot to put it in, a tub or pool that is at least a foot and a half deep, and a spot that receives at least five hours of sun a day.
There are two kinds of water lilies: those that are cold-hardy and those that are not, called tropicals. The simplest way to tell them apart is to remember that the blossoms of hardy water lilies usually float on the water’s surface, while those of tropicals are raised several inches above.
Hardy water lilies grow from a rhizome and can be set in water as cool as 50°F. You can plant them early in the season and enjoy their flowers into the fall. Tropical water lilies, on the other hand, grow from tubers and require water temperatures of at least 65°F. Tropicals have a shorter bloom season than hardy water lilies, but they better endure the heat of summer.
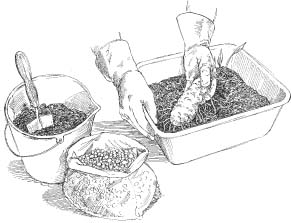
1. Prepare the rhizome or tuber. Water lilies are sold bareroot, usually with a few leaves intact. Keep the rhizome or tuber moist by placing it in a bowl of water as soon as you get it home. Keep it moist until you are ready to plant.
Carefully inspect the rhizome or tuber for viable roots, which are white and crisp. Use a small, sharp knife to trim off any brown, black, or limp ones. You may also notice some tiny lime green or bronze leaves emerging from the plant’s growing point.
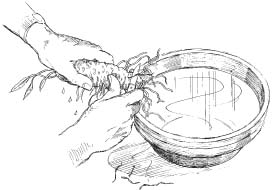
Step 1. Trim off dark or limp roots, and then place rhizome in water.
2. Get ready to pot. In nature, water lilies grow in soil at the bottom of ponds, but garden hybrids do fine in containers. The size of the pot you use depends on the size of your tub or pool. The more room you give the roots, the more robust the plant will be. A 4-quart pot is fine for a half barrel; for a pool, you may use a larger pot or a small laundry tub. Either way, be sure the container has a drainage hole, even though plant and pot will be immersed in water. This prevents gases from building up inside the pot.
Fill the container one-third full with heavy topsoil or garden loam. This soil is closest to pond muck and won’t float off the way a peat-based soil mix will. In addition, heavy soil helps hold the rhizome or tuber firmly in place.
Next, insert a water lily–fertilizing tablet (available from mail-order nurseries) or a handful of a low-analysis granular fertilizer such as 5-10-5 or 6-10-4. Then fill the container to the top with soil and drench it until water runs out the drainage hole.
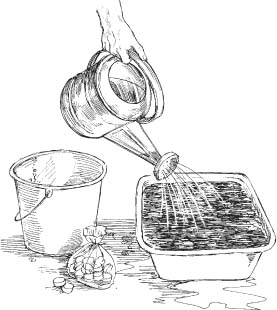
Step 2. Fill tub with topsoil, add fertilizing tablet, then water thoroughly.
3. Pot the plant. To pot the rhizome or tuber, remove a third of the saturated soil and set it aside. (You may want to wear rubber gloves, as this can be a muddy operation.) If you are planting a hardy water lily, set the rhizome roots-down in the pot at a 45-degree angle. Aim the rhizome so the plant has room to elongate across the pot and the crown is pointed upward. It’s okay to place the opposite end flush against the pot. If you are planting a tropical water lily, look for a white line on the tuber. This indicates where the soil level should be once you fill the pot. Set the tuber lengthwise in the center of the pot, roots down.
Gently top off the pot with the reserved soil, filling it to within an inch or two of the rim. Be sure to leave the growing point of the rhizome or tuber free of soil. To avoid air pockets, firm the soil with your thumbs as you work. Water the pot once more, taking care not to wash soil away from the root. Top off the pot with pea gravel (again, making sure to leave the growing point exposed) to prevent soil from washing away once it is in the tub or pool.
Step 3. Set rhizome so its roots are down, then replace soil.
4. Set the pot in water. Most water lilies prefer to be a foot or so beneath the water’s surface. If your pool is deeper than that, place some bricks or an empty, overturned pot on the bottom to elevate the plant. Lower the pot in slowly at an angle to allow air bubbles to escape, then set the pot on its base. If the plant has a few leaves, gently position them so they float on the surface of the water.
Within a few weeks, your water lily will adjust to its new home. New leaves will soon begin to appear, and shortly thereafter the first blossoms should make their debut.

Step 4. Set container in water.
—from Year-Round Gardening Projects, text by Teri Dunn; illustrations by Elayne Sears
Hardy Bog Plants
Arrowhead
Water arum
Dwarf bamboo
Cattail
Graceful cattail
Narrow-leaved cattail
Variegated cattail
Chinese water chestnut
Floating heart
Golden club
Horsetail
Lizard’s-tail
Parrot’s-feather
Pickerelweed
White pickerel rush
Spike rush
Sagittaria
Yellow snowflake
White snowflake
Sweet flag
Variegated sweet flag
Thalia
Water clover
If your property is sloped and dotted with interesting or weathered rock formations, it may be an ideal spot for a rock garden—or rockery, as it is sometimes called. But any garden that features rocks prominently can be called a rock garden. It is not even necessary to have a slope—one can be created on a flat location with just a few loads of topsoil and a pile of rocks.
Some purists feel that a rock garden should contain only those plants that grow naturally on rocky slopes in poor soil, but most rock gardeners use a wide variety of low-growing perennials, annuals, bulbs, and shrubbery. If you want the overall effect to be beautiful, a rock garden must be carefully designed rather than aimlessly constructed. Yet even though it may have been weeks in the planning, it should look as if it evolved naturally.
Because rockeries must be planted and cared for by hand, it is best to start with a small area unless you have lots of time, interest, and skill. If you have the perfect spot, you may simply have to choose plants, locate paths, and create level outcroppings as kneeling places. But if you must bring in rocks and soil, you’ll have planning and work ahead.
Choose rocks that are compatible with the landscape, if they are available, rather than those that are quarried, highly colored, or polished. If excavating is necessary, dump the topsoil in piles close by while the work is being done, so you can replace it later.
Set the rocks in the lowest, front part of the garden first and work upward, burying more than half of each rock firmly so it’s well anchored. After the rocks are in place, let the soil settle around them for a few days before planting. Check your construction frequently in the early stages by viewing it from a distance as well as close up, to be sure the positioning is aesthetically pleasing.
—from Successful Perennial Gardening by Lewis and Nancy Hill

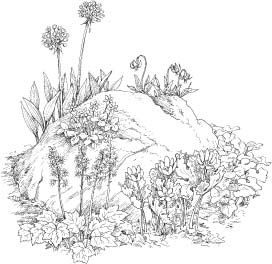
These plants thrive in many rock gardens.
(A) bellflowers
(B) rock candytuft
(C) Crimean iris or crested iris
(D) mother-of-thyme
Jan Kowalczewski Whitner is a professional writer and garden designer living in the Pacific Northwest. She has always been intrigued with the contrast of the garden’s “living” elements, such as plants, water, sunlight, shadows, and the use and placement of stone. She is author of Stonescaping: A Guide to Using Stone in Your Garden.
If your garden has no natural stone outcrop but does contain banks, hillocks, or areas with a significant grade change, these are the best spots in which to design and construct a rocky outcrop.
Your major concern is to make the feature look as natural as possible. Study rock outcrops in the natural landscape. They invariably look like the worn, exposed tips of a huge mass of buried rock. To replicate the effect, grade your site to a gentle slope of no greater than 45 degrees. Leave space for a relatively flat area several feet wide at the bottom, which will tie the outcrop to the rest of the garden when mulched and then planted as the last step in construction.
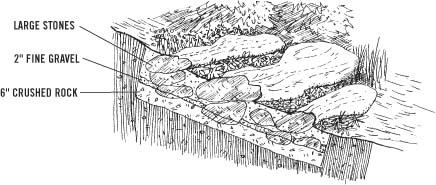
Excavate the contours of the slope at least 18 inches deep. Then lay a drainage layer of 6 inches of crushed rock topped by 2 inches of fine gravel or coarse sand. Bury a few large rocks beneath this layer as a stable foundation for the major exposed stones or boulders.
Most natural outcrops feature one or two large boulders set among smaller stones that have fallen away from the main mass. When constructing your outcrop, cant the major boulders slightly upward and inward, so rain will run along their surfaces to the plant roots nearby. Then carefully set a few stones around them, preferably at their bases. Fill the crevices between the stones with an appropriate soil mix, tamping it firmly. If you use a stratified stone such as limestone or sandstone, position all the rocks so their strata lie on the same angle, as though an earthquake had heaved them into place simultaneously.
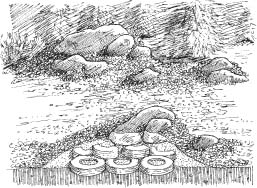
Large, buried rocks on a bed of fine gravel form a stable foundation for the rock garden.
If you wish to build a rock garden on a flat site, you can use a construction technique first developed by ancient Chinese gardeners to introduce different levels. Dig out low areas, then mound the excavated earth into ridges and plateaus above. Use half-buried, weathered stones to replicate outcrops, and work from the bottom of the rock garden toward the top.
A few large boulders with a litter of smaller stones and gravel at their base will look more natural and more restful than a hodgepodge of smaller stones or, even worse, rocks evenly spaced like gravestones. As an alternative, you might use flat sedimentary stones to establish a restful horizontal or tiered effect, varying the height from outcrop to outcrop for a natural look.
Some gardeners who are starting with a flat site eliminate large-scale excavation and rock moving by using old tires as the foundation for their rock gardens. They form the base of their mound on level soil with the tires, then fill the tires with gravel, sand, or crushed rock. After building up several layers of tires in a rough mound, they cover the entire construction with a good, porous soil, then bury the rocks in it.
—from Stonescaping by Jan Kowalczewski Whitner
The best plants for rock gardens are compact, low-growing perennials. To achieve pleasing combinations, consider not only plant color and mature height but also form: Are they rounded (cranesbill), spiky (iris), or prostrate and spreading (thyme and ground phlox)?
The size of the plants should be on the same scale as the garden itself. Tiny plants look best in a small space; taller perennials, dwarf evergreens, and low-growing shrubs are appropriate for a long, wide hillside. And because so many of the plants best suited to rock gardens bloom only in the spring, consider strategic placement of summer-blooming heaths, heathers, and perhaps annuals to add color during the rest of the growing season.
Select plants suitable for your climate and exposure. If you live where winters are long and the growing season short, you may be able to establish a true alpine garden of plants that are native to the European mountain ranges, the Rockies, the White Mountains, or other high elevations. Most of these are small or compact, with rugged root systems that enable them to live in poor soil and under severe weather conditions. They need cool weather and perfect drainage to do well.
A rock garden with a foundation of tires. Secondary outcrops tie the rockery to the rest of the garden.
Your rock garden could be compared to a collection of potted plants, and each will grow best if you tend it accordingly. Be sure each “pot” is well drained so water will not collect there and drown the plant. Loosen the soil in each pocket occasionally with a small garden fork. Although most rock plants do well in poor soil, add dry manure or liquid fertilizer if the plants seem weak.
Housekeeping chores for a rock garden include:
cutting back leggy plants after flowering
clipping off dead portion
dividing plants that become rootbound or too large for their space
checking for insects (especially slugs) and diseases
weeding unwanted plants out of the nooks and crannies
Winter can be hard on tender plant varieties in rock gardens, because they are more exposed to cold winds and dehydration than are plants growing in level beds. If you don’t get much snow, a mulch will help protect both hardy and more tender plants. In particularly exposed regions, cover the entire bed with evergreen branches or straw, as well, just after the ground starts to freeze.
—from Successful Perennial Gardening by Lewis and Nancy Hill
Common Alpine Plants
alpine anemone
alpine columbine
alpine rockcress
alpine aster
alpine pink
alpine sunflower
edelweiss
alpine forget-me-not
alpine poppy
savory
alpine catchfly
The Japanese believe that stone is a magical, evocative garden material. Western gardeners can follow that approach as well, using the following principles as guidelines:
Respect the conditions and appearance of the site and its surrounding landscape. Use stone and rock native to the area, or choose nonnative stone that harmonizes with the site.
Use nature as a guide when positioning rocks in the garden.
Whenever possible, avoid mixing different types of stone and rock in the same feature.
When piling rocks together, make sure the striations and furrows of each rock point in the same direction.
Set stones and stone features with broad, horizontal lines to create a sense of tranquillity and serenity. Use low, flat-headed rocks; large, rounded rocks; and reclining rocks as the major stones, with a few tall, vertical stones for accent.
Keep a pleasing balance between rock features and plants. Too much rock in a garden makes it heavy and overwhelming; too little makes it seem frivolous and unconvincing.
—from Stonescaping by Jan Kowalczewski Whitner
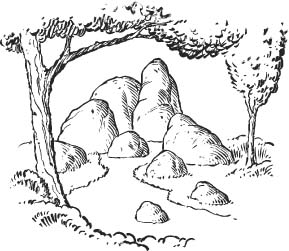
These rocks have been placed harmoniously in the landscape.
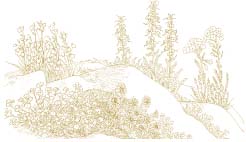
This rock garden is planted with woodland wildflowers.
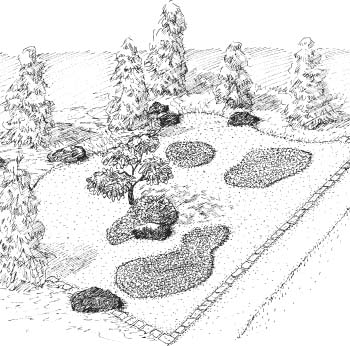
A rock, gravel, and thyme garden is a drought-tolerant landscape that blends into many garden styles.