
A DIFFERENT WAY TO EXERCISE
Internal Qigong and the Power of Moving Meditation
“Make yourself big, like a giant.”
When I am teaching students in my foundational qigong classes how to perform the series of focused movements that help balance qi, that is my first direction, and one that I repeat frequently. To do the exercises for proper benefit, you must give them your full attention, stand with your feet firm on the ground, and open your chest wide with your shoulders down and back, because your body will be the conduit between earth and sky, and your goal is to feel the qi flow through you as you summon it with the big spirit of a human being who fully inhabits her place on the earth. Doing this helps you build your five elements and zang fu, build your solid organs, and correct any blockages in your body’s flow of energy.
I also tell my students that if they commit to practicing these graceful, flowing movements for one hundred days, they will develop a new sense of well-being unlike anything they’ve ever felt before. They will understand what it means to live with balance. Everyone knows that a healthy lifestyle is an active one. Regular qigong exercise is essential to keeping your qi in balance and your body functioning smoothly, with no nagging pains or chronic conditions. I am always amused when people tell me that they “practice” yoga one or two hours a week. That is not practice. To get the benefits from this kind of exercise, you need to connect with the idea and do it every day, or at least most days.
As you will see, these are not “exercises” in the Western sense of the world. There is no special clothing to wear—wear what you want, as long as it’s comfortable, and keep your feet bare—or special equipment required. You can do these exercises indoors, or outside in nature with your feet in the grass. The movements will seem unfamiliar unless you’ve studied tai chi or Asian martial arts, but they are a critical part of a health-giving qigong practice to eliminate what Western medicine calls disease or virus and Eastern medicine calls blocked energy, or stagnant qi, that is stuck in one area of the body.
Aligning Mind, Spirit, and Body
In Western medicine, we only consider the biological processes that run the body, like the circulation of blood. We do not think about yin and yang running the body, and that is a major explanation for why so many people experience lower back pain, wrist pain, knee pain: it’s blocked qi. In Western medicine the doctor prescribes surgery for these complaints and cuts into your body. Based on my years of treating clients, I have observed that if ten people have surgery to relieve chronic pain, six of them will experience side effects afterward, because the body’s yin/yang energy balance is never taken into consideration and thus never restored.
These short, focused qigong exercises align mind, spirit, and body. As you practice them regularly and learn to focus, you will discover that the increased internal strength gives you control over your qi, allowing you to put the extraordinary power of your own vital energy to work in every part of daily life. On another level, the exercises are an excellent way to enhance your performance at work and in sports because they are not just about physical movement—there is a powerful mind-body connection that takes place. Within the spiritual and mental realm, you use your mind to think about how to connect to the qi, and your brain benefits from the circulation of energy.
Kung fu, tai chi, wushu, and other Asian forms of exercise share many of the principles and practices of qigong. So does yoga, to some extent. However, while those disciplines focus on stretching and strengthening the muscles, qigong emphasizes stretching the nerves and activating the meridians inside our bodies.
All qigong energy is the same, whether it results from acupuncture, energy healing, or herbal remedies. Physically, you can get it from any kind of practice. In Asian martial arts, although the body seems relaxed, the mind is alert. In kung fu, for example, you must concentrate on arm and foot placement, direction of energy, muscular tension, and formation of postures while moving and maintaining balance. You must also visualize each movement’s respective martial arts applications. With dedication and practice, it is possible to develop and control qi that way.
My unique qigong exercises, which can be done in 15-minute increments, are directed solely at enhancing the flow of qi. You can even practice the breathing techniques for 5 minutes at a time and feel an improvement. They can be done formally or informally. In formal practice, you stand between heaven and earth with eyes closed, while informally, you can call on the exercises throughout the day, whether you’re at work, standing at the kitchen counter, or riding public transportation.
The exercises are very simple. When I first came to the United States, people were just beginning to explore the study of Asian martial arts and self-defense; although this series of qigong exercises is mine alone, and intended as moving meditation, some of the movements may be familiar if you’ve ever practiced karate. Some people can feel their vital energy almost as soon as they begin practicing these exercises. For others, it may take hours of doing the foundation exercises before they are able to identify the movement of vital energy within their bodies. Thus the true first step in the practice as I teach it is called “First 100 Days.”
There are as many styles of qigong exercise as there are stars in the sky. My particular form is based on the classic movements, with a few subtle revisions that can make a world of difference. It follows the same principles as the acupuncture and acupressure points, or dantians, that I stimulate when I do treatments on people, but it uses your own movement rather than external manual manipulation or needles. It is internal, self-guided qigong, as opposed to the external or “emitted” qigong I use to treat patients, in which I am able to heal them with my own enhanced energy.
Regardless of the style, the benefits of regular qigong practice involve a level of mindfulness that may seem daunting at first, but is rooted in a basic human intuition that most of us have lost touch with: learning to sense blockages and imbalances inside our own bodies. By tuning into the energies around us, we can learn to normalize ourselves and maximize flow of qi for relaxation, general well-being, and, most significant, relief from pain and various kinds of physical and mental distress.
In this chapter I show you the seven essential qigong foundation exercises that are so useful to women: they are invaluable for treating PMS, balancing hormones, regulating bowel movements and digestion, aiding in weight control, and cleansing organs of infections and energy blockages. The prelude to this series is a trio of simple and effective basic breathing exercises that focus on the chest, upper stomach, and lower stomach, respectively.
I have also included six advanced animal and element exercises for further qigong practice. Building on the foundation exercises, they help you sustain a higher level of open qi maintenance and free flow throughout the meridian system.
I teach my unique form of traditional Chinese qigong to students in small group classes throughout the year. This hour-long class, lasting ten weeks, introduces the basic theories, concepts, and first group of exercises. I explain the notion of qi, the meridian system, the history of qigong, and its current applications. Year after year, I am gratified to see students of all ages and all physical conditions begin to experience a strong visceral feeling of qi and gradually become more comfortable performing the exercises, along with controlled breathing and mindful concentration that circulates, balances, and builds qi. They learn to heal and rejuvenate themselves and maintain that good health, as well as help others do the same.
In the advanced or applied qigong therapy workshops that follow that series of classes, students learn basic techniques using touch and non-touch qi methods to heal others. These classes are for those who have completed two applied qigong therapy workshops and are ready to learn more in-depth healing methods.
The classic recommendation is to perform these exercises five times a day, but that is not realistic for most people. Still, practice is so important. I do not suggest working up a sweat all day long, but surely a brief and purposeful qigong exercise interlude three times daily—once in the morning, once in the middle of a busy afternoon to revitalize yourself, and once in the evening—is possible. From there you may well find yourself inclined to do it more often. When people tell me they wake up in the middle of the night and can’t get back to sleep, I advise them to perform the breathing exercises. If you are someone who has trouble getting out of bed in the morning, practice the seven qigong exercises at night.
Qigong practice creates dramatic results and dramatic changes. Students have told me their lives improved both at work and in personal relationships after they began their practice. Since you are not moody or stressed, you project a positive energy, and people like being with you. And since your brain feels clearer, your work improves.
My qigong practice is a very good use of 15 to 20 minutes of your time. It’s as important as charging the battery in your phone. If you practice the basic exercises faithfully for one hundred days, you will locate and maintain qi in your body, ensuring that stagnant energy is eliminated. Having this power to create free flow throughout your meridian system will serve you well for the rest of your life. After three months of practice, you will be able to summon the energy, and begin understanding how to use it to heal yourself, and perhaps others, too. If you miss days during that period, you may feel the qi, but it will not stay with you. Ultimately, as with most good things, the effort put into learning and repeating these exercises will repay you with a lifetime of better health. Anyone can do them. Every woman should.
Relax Your Mind with Your Tongue
People tell me they know they should meditate, but they have trouble turning off their brains. This is very common. Before you begin the breathing exercises, take the time to learn a simple cue to help you relax your mind.
This technique is helpful when learning to breathe mindfully. Place the tip of your tongue on the roof of your mouth just slightly behind your upper front teeth, where they meet the gum. (When you make the sound “le,” as pronounced in the word “let,” your tongue touches the correct spot.) Focusing your tongue on that spot continuously stimulates and balances all the body’s meridians, making it a powerful qigong point.
That place just behind your upper front teeth is the point where the governing and conception vessels meet. These points are two of the eight “extraordinary meridians,” connected to the twelve main acupuncture meridians of the body. The points along these two meridians form the qi pathway known as the microcosmic orbit. There, upward-flowing energy from the yang meridians in the back of your body changes to downward-flowing energy in the yin meridians along the front of your body. In Chinese medicine we say that the tongue is like a person between heaven and earth.
Practicing breathing with your tongue in that position will gradually train the muscles on the base of your tongue and allow you to maintain the position comfortably, without effort. These techniques are tools that help you to become more mindful of your breathing and eventually to make your automatic breathing more effective.
Mindful Breathing
Breathe in. Breathe out. What an extraordinary gift. Think about that: You breathe all day, every day with little or no awareness, bringing air into and out of your lungs in a ceaseless, essential rhythm. Oxygen enters, and carbon dioxide is dispelled. This most automatic and instinctive of actions is essential to life.
Normal breathing may be unconscious, but it plays an all-important role in harnessing and directing your vital energy. Mindful breathing, as a prelude to qigong exercise, is active, conscious, and self-regulated. It also figures significantly in every woman’s well-being. The form of qigong breathing that I teach is a powerful force you can call upon to engage and direct essential energy. Your breath acts as a propellant and guide to qi, and a cleanser of the body’s organs. Learning to breathe consciously is a first step, and a very important one, on the path to wellness and longevity. All you need to do is look for the way, and you will find it.
Before You Begin
To learn foundation breathing, as I call it, requires an awareness of your own breathing pattern and, at first, real concentration. A few simple, focused exercises will help you begin to feel your qi’s flow and gradually understand how to control it. As you perform them, breathe slowly and steadily, aware of the fresh, clean air flowing into your body and the toxins exiting silently through your mouth. You want to make your exhalations last slightly longer than your inhalations. Be careful not to breathe loud, fast, or hard—the goal is to stay relaxed but in control.
You can do these short, focused breathing exercises at any time of the day and as often as you like. They should be the start of any session of qigong exercise. Many of my students find them very helpful in everyday situations, especially when they need to restore their inner calm while putting their minds at attention.
Stand up when you start practicing them. Later, you can try them sitting or lying down to find out if you are more focused and relaxed in those positions. I’ve gotten to the point where I can do breathing exercises in public without drawing attention to myself, or when I’m driving in my car.
To begin, place your feet about as far apart as your shoulders, letting your arms hang at your sides. Consciously relax your body, from your eyes to your shoulders to your perineum (hui yin point). Close your eyes and clear your mind.
The ideal number of breaths in each exercise is 24 for women and 36 for men (inhaling and exhaling is one breath). Counting breaths can be a distraction from mindfulness, so when you first begin practicing the exercises, time yourself and count so you can figure out how long it takes you to complete a set. Remember that amount of time and thereafter simply perform the exercise for that duration. For most people, it will be about 5 minutes.
Breathing Exercises
The following three exercises are specifically aimed at teaching you to access control over your essential energy. These techniques also allow your body to purge accumulated toxins and stale energy. They emphasize breathing from the lower dantian, an area four fingers below the navel, which stimulates blood circulation and promotes the flow of qi. It is connected to the reproductive organs, bladder, and kidneys.
Most people rely on the relatively weak muscles around and within their rib cage to flex as they pull air into their lungs and release it. The result, as any trained singer can tell you, is frequent, shallow breaths that provide your body with the minimal amount of oxygen it needs. Stale air is not always released, leaving it to linger inside your body.
In contrast, “belly breathing”—a simple way to describe a healthy breathing pattern—helps to relax the neck, shoulders, and arms. It stimulates blood flow to all the organs. Most of all, it centers awareness in your body, rather than in your head, to help you feel more attuned to your qi. This form of abdominal breathing employs the powerful muscle in your belly—the diaphragm—to inflate the lungs with air and to propel all of it out when you exhale. It lets you take in and use more oxygen and completely release carbon dioxide with each breath. Buildup of carbon dioxide in the cells and lungs leads to sluggishness, hampering your mental clarity. In stressful situations, belly breathing calms the nerves and prevents the hyperventilation that often accompanies upset, fear, and anxiety.
To begin practicing mindful breathing, try to inhale through your nose and exhale through your mouth. Breathe smoothly, silently, and fully, inhaling and exhaling without straining. You’ll soon find that when you exhale fully, your next inhale will naturally be smooth and full. Hyperventilation is a cycle of extremely shallow breathing, a cycle that can be hard to break as an incomplete inhale is followed by a quick and incomplete exhale.
A simple way to train yourself to breathe more consciously and fully is to practice breathing through a straw, concentrating on inhaling and exhaling as steadily as you can. If you do this for a few minutes each day, you will become more aware of your breathing, and after a few weeks of practice, you can change the way you’ve been breathing your entire life.
As you practice, try to exhale a little more than you inhale. Inhale for a count of four, for example, and exhale for five seconds. Take care not to hold your breath for that one second between inhaling and exhaling, but rather let one flow into the other in as relaxed a manner as possible. Breathe evenly and continuously, without stopping and starting.
In tense situations, all of us have occasionally found ourselves holding our breath. We know that’s not good, as it both triggers and escalates stress. But the opposite is not helpful, either. Straining to inhale and exhale longer generates tension within the body and negates the benefits of belly breathing. It is much better to breathe deeply while relaxed. Think about using 70 percent of your full, automatic breathing capacity; most people use much less than 50 percent. By increasing your capacity but not pushing yourself to the limit, you can reach a level that is easily sustained while you remain relaxed and calm.
Eventually, even when you are not practicing the exercises, you will enjoy better health and increased vitality. If you pay attention to the way you are breathing and work at changing some of the long-held habits that you—like most other people—have developed, you can improve your health with, literally, every breath you take.
Chest Breathing
This is a basic, elemental qigong breathing exercise. As the lungs expand, air goes through and pushes out any toxins. This is good for all ages and is a valuable way to focus and ground yourself. Practiced faithfully, chest breathing will benefit weak lungs and make skin noticeably smoother and more elastic, because the lungs control the health and appearance of the skin. If you do this regularly, you will see your skin quality improve, especially if you suffer from rashes, dryness, or itchiness.
Make sure to use your nose to inhale and your mouth to exhale. And I do not mean loud, strong inhale and exhale. Instead, breathe silently and take your time. Never make noise or purse your lips. This exercise may be done formally, standing outside in nature between heaven and earth with eyes closed, or informally throughout the day, while you’re traveling or watching TV.
Inhale slowly through your nose as you expand your chest. Keep going until your lungs are filled to capacity. Physically push your chest forward to make it as big as you can, allowing the air to automatically circulate through your lungs. Your rib cage should be fully spread, and your stomach may be sucked in slightly.
Gradually push the breath out of your mouth by contracting your chest. Empty the lungs thoroughly, until your chest looks concave. The contraction is the practice. The rest of the body should be relaxed and still. Make your chest area big, then expand and contract. Practice this for 3 to 5 minutes at a time, a couple of times a day.
If you have ever studied yoga, you will be familiar with the two forms of belly breathing that follow. These exercises are beneficial for PMS, releasing carbon dioxide in your cells and lungs, relieving sluggishness, and enhancing mental clarity. They also help to calm the nerves, clean the liver and gallbladder, and balance qi overall.
Upper Stomach Breathing
This is a good exercise to do in the morning, and I guarantee that it is the best for digestion issues, stomach ulcer, acid reflux, diverticulitis, cramps, liver dysfunction, low blood sugar, stomach pain, and cramps caused by eating bad food. It is also useful when you’re feeling hunger pangs and there’s no food nearby. I have been known to take off my shirt at speaking engagements when demonstrating this very important exercise so that students can observe the movement of my abdomen.
Do not do more than 15 breaths at a time. Nine breaths will stop pain in that area about 85 percent of the time.
Concentrate on the area below the ribs and above the navel. Expand the muscles between your diaphragm and navel as you inhale slowly through your nose. It is challenging for most people to isolate these muscles when first learning the exercises, but do your best to keep your chest and lower belly flat. Suck your lower stomach in a little, making the upper stomach as big as you can.
When your lungs are full, contract your diaphragm muscles to push out the internal air and stale energy as you slowly exhale from your mouth.
The physical expansion of the upper abdomen above the navel is what brings the air in through the nose, and the contraction will move it out through the mouth. Do not suck air in through your nose or blow out through your mouth. When learning to perform this exercise, touch your palms to your upper and lower stomach to check if they are moving correctly. It’s important to keep your palms open.
Repeat 23 more times. Compared to the others, this exercise is challenging. Do the best you can and do not be discouraged if it feels unnatural at first. The usual problem is that the entire stomach gets big and then small. To learn to separate upper from lower takes concentrated practice. Most people get it wrong at first.
Lower Stomach Breathing
When you first start a qigong movement program, this exercise is much easier to perform than Upper Stomach Breathing. You are only moving the area below the navel and above the pubic bone. This technique tones the reproductive organs and helps relieve constipation, stomach pain, cysts, endometriosis, and infections of the bladder and kidneys.
When teaching this exercise, I tell students that they should make their lower belly big like Buddha. I have observed that some American women are very uncomfortable doing this, because culturally, they have been conditioned to believe that they should hold their stomachs in at all times, and making the lower abdomen big so it sticks out can actually be upsetting and embarrassing to them. I always tell them that in addition to the other benefits of this exercise, it helps keep your stomach flat!
Push the muscles below your navel out like a Buddha belly as you breathe in slowly through your nose. Try to keep your chest and diaphragm flat. Visualize your pelvis expanding as you inhale.
Pull in your lower belly muscles as you exhale the breath quietly and steadily through your mouth. When the lower belly gets small, it pushes out stale energy and cleanses the internal organs. As an additional benefit, it also moves fat, helping to keep your stomach taut and flat.
Repeat 23 more times.
Six Essential Qigong Foundation Exercises
Here you go! Suspend your disbelief and resolve to give yourself over to this fascinating and beneficial way of moving your body. Just think—you can put down this book and start doing them right this minute, whatever you’re wearing, whether you’re in a waiting room, at home in the kitchen, or in your office at work with the door closed. The movements will seem odd at first, or like they’re not strenuous enough, but once you become familiar with them, you will gradually understand how awesome it is to be able to feel—and ultimately affect—your own qi, that powerful life force of energy that moves through your body, connecting you to sky above and earth below.
When beginning these qigong exercises, it is important not to separate one aspect of them from another. In other words, the movements, meditation, and breathing must all be done at the same time without pause.
QI BALL: A HANDFUL OF POWERFUL ENERGY
This is always the first exercise I teach when doing a demonstration of qigong. It seems very simple, but when done with purpose, it can be a revelation to everyone. Qi Ball is all about concentration and a brief series of movements that beautifully illustrate the concept of qi. I talk about qi a lot, but this is a way for people who are new to qigong to recognize and guide the flow of universal energy within their bodies. As I tell my students, any sensation you experience while doing this exercise is qi! All feelings and sensations are good, because they are all manifestations and types of qi. Embrace them, develop them, and strive to control them.
Feeling overwhelmed at work or at home? Try Qi Ball during the day to increase focus and concentration, but especially to regain control of your qi in stressful moments. You can practice this while standing or sitting, whichever feels more comfortable. Once you understand the exercise and have experienced its effects, you can do it for 5 minutes and reap the benefits. Be aware that you may feel warmth in some parts of your body and coolness in others, and you may also sense a pulsing of energy in your body.
Make yourself big, like a giant: inhabit the space you are in. Understand that you are the connection between the earth beneath your feet (yin) and heaven above (yang). Close your eyes, relax your shoulders, neck, and anus dantians, and try to clear your mind of all thoughts except the sensations you are feeling in that moment.

STEP 1
Bend your elbows and hold your arms away from your body.

STEP 2
Position your arms and hands as if you are holding a basketball out in front of you and presenting it to someone.

STEP 3
Visualize the ball you are holding as an orb pulsing with energy.
While keeping your body still, visualize the ball bouncing energetically from palm to palm, from left to right, back and forth from one hand to the other. You are not moving your hands, but the ball is bouncing between your open palms. This is the essence of the exercise. Concentrate on feeling the energy of the ball as it bounces. You may feel your palms getting warm.
Now that you’ve felt the qi, take it a step further: While keeping perfectly still, visualize spinning the ball between your hands in one direction, like a globe rotating on its axis. After a few revolutions, spin the ball in the opposite direction. Try speeding up the rotation, then slowing it down. Alternate between moving the ball clockwise and counterclockwise, fast and slow. If the ball jumps too fast, use your mind to control the speed. Feel the energy like waves, or circles, in your mind.
Now slowly move your hands apart to stretch the energy. Gently bring them together to compress the energy. After you’ve practiced this exercise for a while, you may notice a magnetic power in your hands. As you stretch the energy, you may feel it pulling your hands back together as if by a magnet. As you compress the energy by bringing your hands closer, you may feel your hands repelling each other gently, as if there’s too much energy to contain the small space. It’s okay if you didn’t feel the qi the first time. Just keep practicing. This exercise may be done for five minutes at a time or longer, as long and as often as you like.

STEP 7
STANDING POLE
Breathing and movement work together in this exercise to promote the circulation of blood and qi through your body. The movement helps to activate the entire meridian system while stretching and aligning nineteen of your spine’s thirty-three vertebrae.
While learning to guide the flow of qi, you may feel warmth in each part of your body as the energy passes through it. If you experience discomfort in any way as you’re executing the movements, it may indicate a spot where the qi is blocked.
Stand with your feet as far apart as your shoulders, with your arms loose and slightly away from your torso. Relax your hands, neck, shoulders, and face. Take a moment to relax your perineum (the hui yin point).
Close your eyes and clear your mind of any thoughts. Think only about breathing. Recognize that you are the link between heaven and earth.
Inhale slowly and steadily through your nose, and as you do, bring the energy up your back, passing through your heels, calves, and thighs. Feel your knees relax but remain unbent. The qi flows through your hips to the base of your spine. Lift your shoulders to pull the energy up your spine, over your shoulders and neck, to the top of your head (bai hui point). Your hips, waist, and spine contract and lift up as qi moves through them.
When the qi has reached the top of your head, exhale through your mouth, slowly and steadily, without making a sound. Do not blow out the air. Instead, let it out gently, in a whisper. Feel the energy flow down the front of your body like a sheet of water. As with your back, your body’s movement should follow the energy down the front, tilting forward at the waist. Feel the qi as it flows down your face, neck, shoulders, chest, and stomach. When the qi reaches your legs, it splits and goes down your legs as your knees bend.
Repeat. The surest way of feeling the benefits of Standing Pole is by doing it for at least 5 minutes.
THREE WHIPS
Once you’ve learned to feel and guide your qi, you’re ready to try moving and storing it. This exercise is actually a set of three moves: two single whips and one double whip. Start by practicing these movements 9 times for each whip, for a total of 27 whips. The order is not important, as long as you take care to move slowly and steadily.
As you lift your arms, they may feel noticeably heavy or light. This is the result of the balance of yin and yang energy in your body, and is impacted by the time of day. The feeling may be different from day to day, season to season. When you’re moving your arms down the front of your body, you may notice the qi as the heat flows down your face, chest, and stomach. You may feel a tingling sensation on your skin, especially on your arms.
Stand with your feet about shoulder width apart, with your neck, shoulders, and arms relaxed.
Slowly raise your right arm (left arm for men) out to the side directly in line with your shoulder and parallel to the earth. Hold your palm facing down and focus on lifting from the shoulder, with your shoulder blade back and down. Move slowly and steadily, keeping your elbow and wrist straight. Visualize pulling the qi up from the ground.
When the arm is level with your shoulder, slowly rotate it from the shoulder so that your palm is facing up. You should feel stretching across your shoulders and back.
In a continuous motion, lift your arm (using only the shoulder) above your head until your arm is parallel to your ear.
Pause briefly and flick your wrist, dropping the ball of qi you’ve raised up onto the top of your head (bai hui point).
Slowly push the qi into the top of your head, allowing your elbow to bend. As you move the qi to the crown of your head, tuck your thumb in slightly to prevent it from touching your face.
With palms facing down, move the qi down your forehead, face, neck, chest, and stomach.
Pause at your stomach (lower dantian) to store the energy there. As you feel warmth spread through that area, relax your arm and allow the remainder of the qi to flow down your legs.
The second whip is simply the same movements and feelings, but with the left arm (right for men). Remember to move slowly and steadily on this side, too.
Perform the double whip by raising both arms at the same time. Use only your shoulders to lift your arms—not your upper arm or chest muscles.
With arms at shoulder level, rotate them so your palms face up, just as you did with each arm individually.
Rotate your arms halfway back, so that your palms are facing each other, as if you are holding the qi ball between your hands. When done correctly, you will feel stretching across your shoulders and back.
Lift your arms (using just your shoulders) as you raise the qi ball above your head, until your arms are in a straight line and parallel to your ears.
Pause and, with a flick of the wrist, drop the qi on top of your head.
With palms facing down, guide the energy down over your face, neck, chest, and stomach.
Hold briefly at your stomach (lower dantian) to store the energy there.
After feeling the warmth there, relax your arms and experience the remaining qi flowing down your legs.
Practice this exercise 9 times for each whip in any order with which you feel comfortable. Just make sure you do a total of 27 arm lifts (or whips).
SHOOTING SPARKS
Many women suffer from lower back pain, knee pain, ankle pain, swollen legs, and bladder and kidney problems. This exercise can really help if you do it correctly, but that takes practice. Done properly, it is very effective. It can change your proportions and the way you walk. Stretching the meridians from your lower back to your feet protects and heals the many muscles and joints in the bottom half of the body. Shooting Sparks moves qi in and out of your palms, while loosening the energy pathways below your waist.
Close your eyes and relax as you do the exercise, but be mindful of your form. Do not bend at the waist. You need to be in full control of your movements to reap the full benefits. Your bent knees should never be past the tips of your toes. To do that, you need to hold your back straight. Only go as low as you are able to while still keeping your back straight. As you practice this exercise, you will eventually be able to squat more deeply while maintaining the form. Do this exercise nine times in a row and then move on to another.
Stand with your feet as wide apart as your shoulders. Point your feet forward and keep your heels on the ground throughout the exercise.
Relax your shoulders and your eyes, and clear your mind.
With your palms facing forward and elbows bent at a 45-degree angle, bring your arms up to the level of your shoulders. Keep your elbows aligned with your knees throughout the exercise.

STEP 3
Lower your body slowly and steadily by bending your knees, holding your spine straight as you move. Exhale slowly and quietly as you descend.
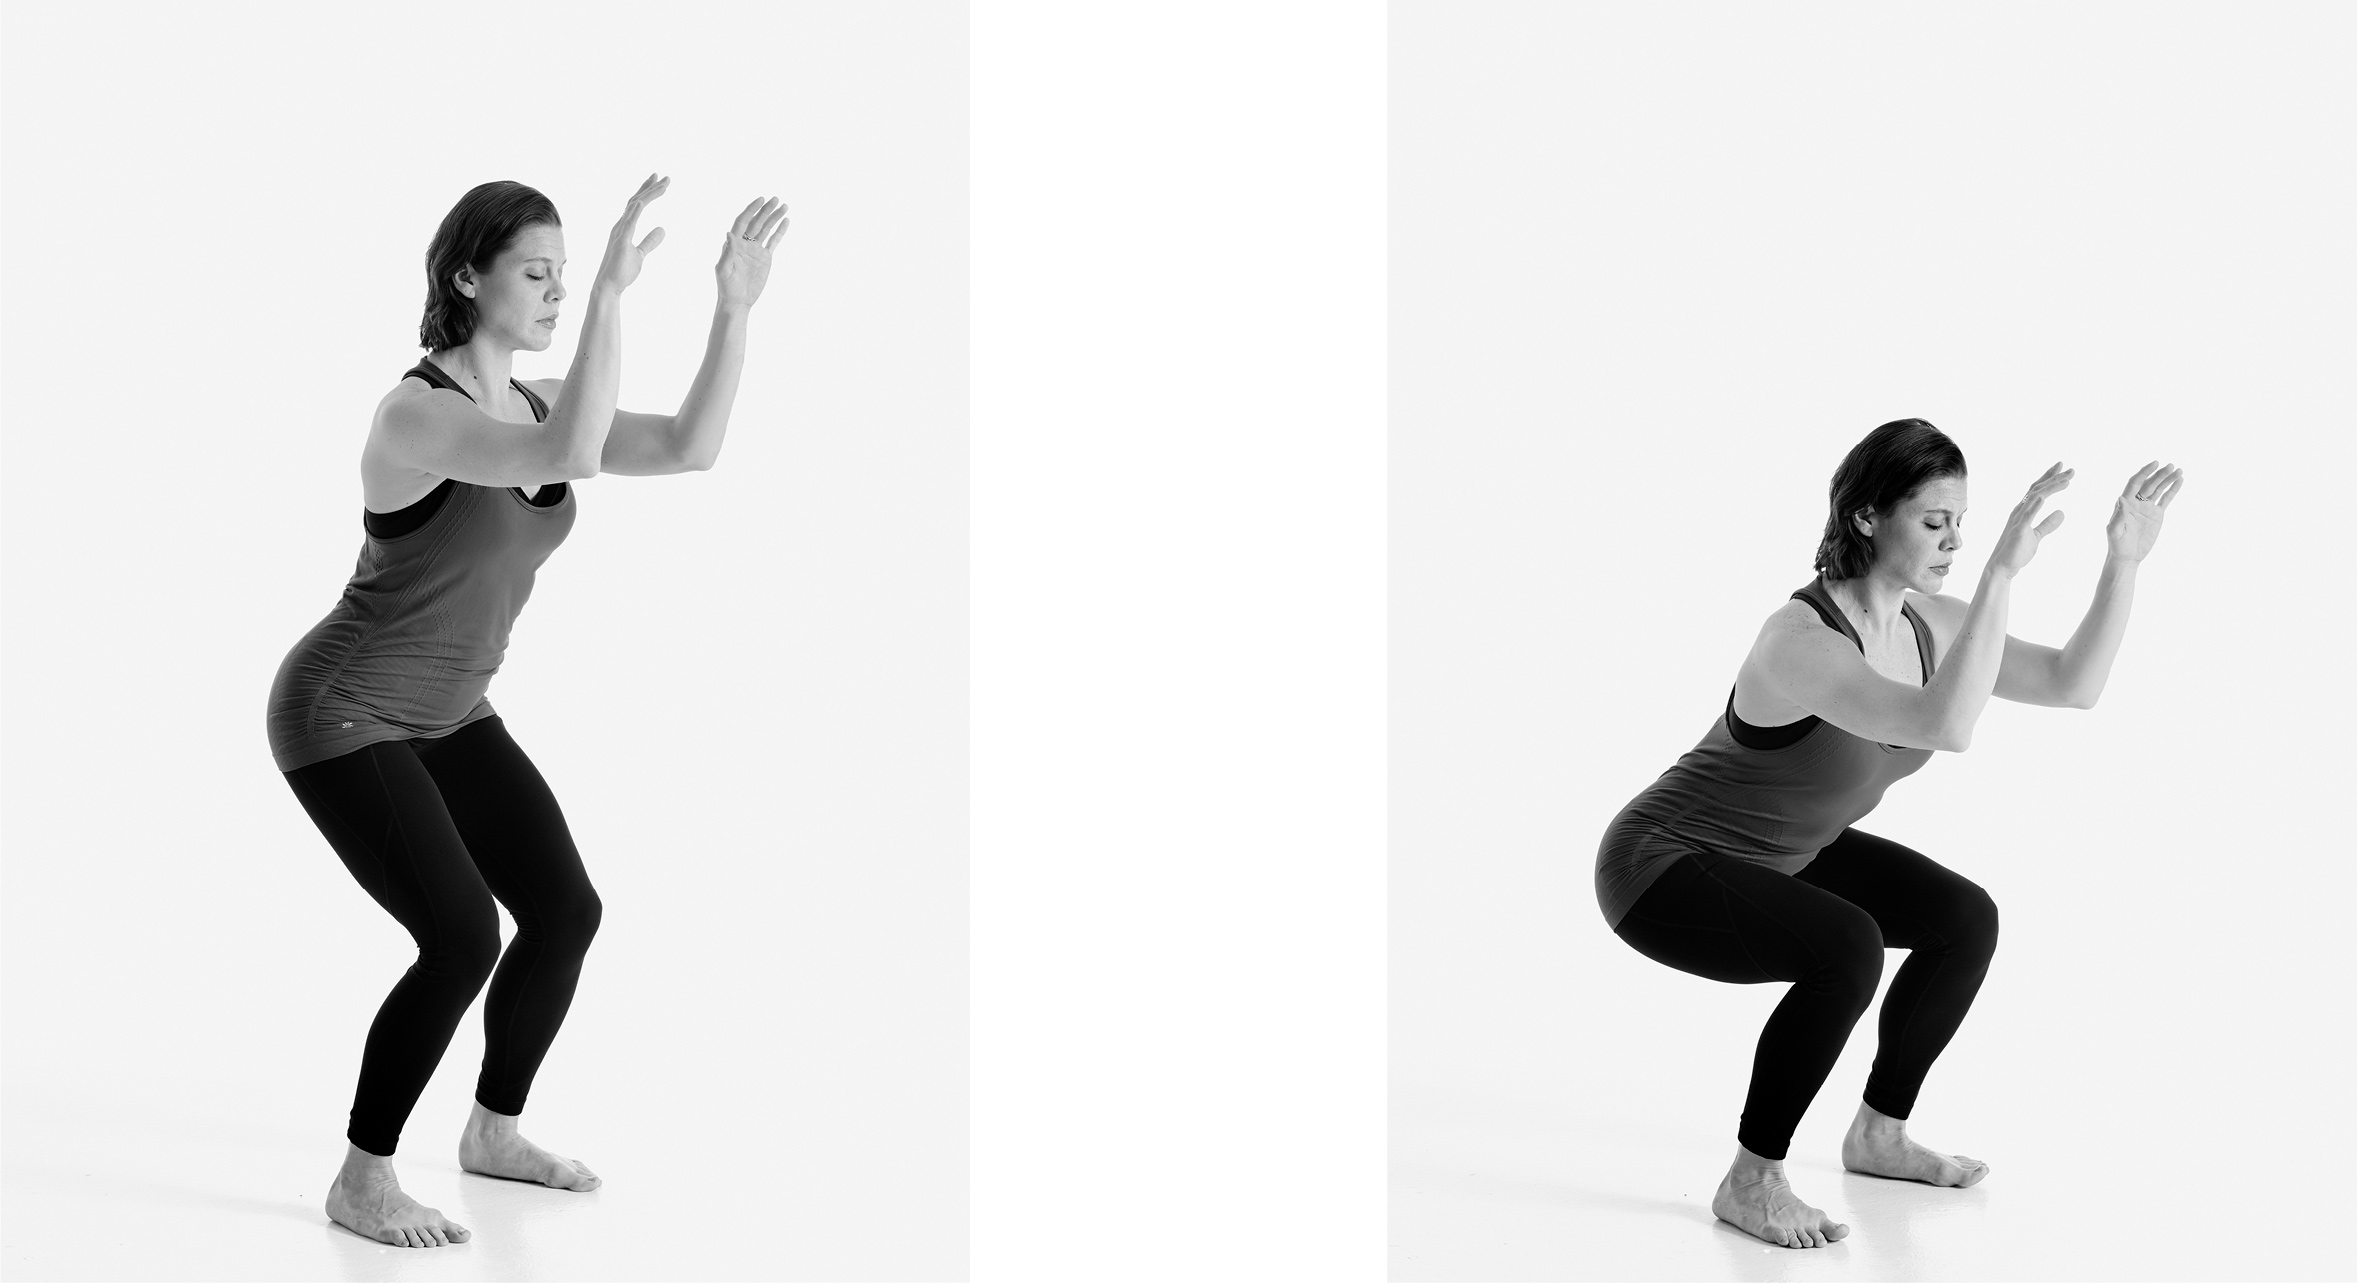
STEP 4
As you reach the squat position, you may feel the qi shooting from your palms (lao gong points) and upper dantian.

STEP 5
The opposite happens on the way back up: you inhale steadily as you rise, and feel the qi moving back into your palms and upper dantian.
Be sure to perform only 9 repetitions of this exercise, and take your time to ensure that you are doing them correctly. During practice, you may feel a sensation of warmth through your body. Don’t worry—it’s just your qi stirring.
SUN THROUGH THE POLE MEDITATION
Focusing your attention on our greatest external source of energy—the sun—is a powerful way to recharge your internal energy, or qi. Through this brief meditation, you can capture the sun’s energy, even on a cloudy day. Strive to keep your focus during the exercise for 10 minutes. With practice, the time will pass quickly and you can continue the meditation for as long as you want. This is great for those recovering from illness, lethargy, and any condition that saps energy.
Sit with your legs crossed in a full or half lotus position, with your palms facing up and the backs of your hands resting on your legs. If you can’t sit in a lotus position, sit with your back straight and your legs outstretched or sit on a chair, holding your back straight but not resting against the chair’s back.
Close your eyes, slowly relaxing your shoulders, neck, and eyes.
Visualize a bright, golden light in front of you. The light is brilliant and you can feel its warmth on your face.
In the middle of your forehead (upper dantian) is a door. Visualize it opening and the light and warmth flowing in.
See the door close, holding in the light and warmth. The energy descends slowly from your face to your neck to your chest to your stomach. It reaches your navel (middle dantian) and finally your groin (lower dantian).
Feel the warm energy rest for a moment in your midsection.
Visualize the energy ascending, traveling up the pole along the same waypoints it passed through on the way down.
As it reaches your forehead, see the door at the upper dantian open and the energy flow out.
A concentrated focus on the sun and its traveling path through the pole should ideally be done for 10 minutes, or as long as you are able to maintain your focus. If you can’t make it that long at first, remain in your position and let your mind wander in free meditation until the 10 minutes are up.
CLOSING EXERCISE
Particularly beneficial for anyone suffering from high blood pressure, this series of movements is the finale of a qigong session. Its purpose is to cleanse the meridian system and rebalance the body’s energy, which also works to moderate blood pressure.
You can do this series of movements anytime you feel out of balance, but if you have practiced qigong for 15 minutes or more, you should end with 9 repetitions of Closing Exercise. As a stand-alone exercise, this can be performed for 5, 10, or 15 minutes at a time. Women should keep their right hand on top of the left as the hands meet while performing this exercise, and men their left hand on top.
Stand up straight with your legs spread to the width of your shoulders. Relax your neck, shoulders, and arms. Close your eyes and relax your forehead. Clear your mind.

STEP 1
Swiftly, but under control, raise your arms up along both sides of your body and above your head. Move in a kind of sweeping motion, as if you are scooping up the energy around you. Women should raise their right hands slightly higher than their left. (For men, the left hand should be higher.)

STEP 2
Slowly and steadily bend your elbows and bring your palms down toward the bai hui point on top of your head, as if you are pushing energy into the point, but still not touching the head.

STEP 3
Turn your palms down, and move your hands down along the front of your body in an even motion, but don’t touch your face.

STEP 4
Feel the energy washing down your face and through your body as you move your hands down. It will pass through your neck, chest, and stomach before dividing as it flows down your legs and out the balls of your feet. You may feel a rush of energy leave your feet, and you may feel warm both inside and on the surface of your body.

STEP 5
Repeat 8 more times.
Animal and Element Exercises
These beautiful movements, based on the natural motions of animals and the elements, are the next step in building a healthful, centering routine of qigong. They will enhance your understanding and control of your body’s qi. Once you’ve learned them, you can practice all of them on a regular basis or choose those that you find most beneficial.
Animal Exercises
GOOSE
Attention, anyone who works at a desk! I cannot recommend this exercise highly enough for relieving tension in the neck, back, and shoulders. It is also valuable for helping to move stagnant energy from the breasts and lymph nodes, reducing the risk of cysts and tumors. The Goose was created to move qi up and down your spine, front and back, along a meridian. You may not feel the sensation of qi traveling along the spine when you first begin practicing, but you’ll gain a greater awareness of the feeling by repeating the exercise daily. Some may feel a clicking up and down their spines as the vertebrae align themselves, and a warm sensation in the upper chest and breasts as the qi passes through those areas.
Stand straight with your feet as far apart as your shoulders. Relax your forehead, neck, shoulders, and arms. Close your eyes and clear your mind.
Imagine yourself as a wild goose, flying gracefully across the sky.
Pull your shoulders back as you extend and stretch your rib cage.
Bend slightly at the waist until you feel your body weighing down your lower back and coccyx.

STEP 4
Slowly and gradually roll your shoulders up and forward in a half circle. Your head will naturally tilt forward.

STEP 5
As your shoulders move forward and down, slowly raise your head and then straighten your body again.

STEP 6
You may repeat the motion slowly and in a steady flow for up to 15 minutes.
TIGER
Virtually every woman can benefit from relieving stale energy and learning to direct qi in a purposeful manner. The purpose of Tiger is to move vital energy up your back and out through your palms (lao gong) and forehead (upper dantian). To get the most benefit, you need to practice this carefully and precisely. Most important, hold your hands level with your temples throughout the exercise. It works best when you repeat the sequence nine times. If you suffer from lower back pain, however, limit yourself to three repetitions and bend your knees while moving forward; otherwise, keep them straight.
Stand with your feet as far apart as your shoulders, with your knees slightly bent.
Hold your hands on either side of your face, level with your temples. Flex your hands back so your palms are facing in the same direction as your face, and curl your fingers gently.

STEP 2
Slowly and silently, inhale through your nose as you straighten your knees. The qi will travel up the back of your body, from your heels to your buttocks to your shoulders, neck, and head.
Bend quickly at the waist, holding your back straight. The movement should be fast and crisp, like a snapping motion. Exhale forcefully but quietly as you move. Envision the qi shooting from your palms and forehead.

STEP 4
Slowly raise your back, straighten your knees, and inhale. Just as when you began the exercise, lift the qi from your heels and up your back again.

STEP 5
Repeat the sequence 8 more times to fully purge the stale energy.
BEAR
Perform this exercise to balance the qi in your body. The movement is unique in that it sends energy through the nerves rather than the meridians, like all the other qigong movements. It is good for diagnosing areas of the body—kidneys, liver, heart, lungs—that need healing. That is just one benefit of moving qi throughout the nervous system. Keep your body—head, neck, shoulders, arms, and legs—loose and relaxed as you do it. You can practice the exercise at home or while you are out walking.
Stand with your feet as far apart as your shoulders. Take a deep, silent breath through your nose and relax your whole body.
Raise your arms so your hands are level with your temples, but leave your hands loose (not flexed, as in the Tiger exercise). Imagine yourself as a big, lumbering bear.
Slowly inhale through one of your nostrils and lift your leg on the same side as if you are about to take a step. Bring the qi up that side of your body.
Exhale slowly through the same nostril as you put your foot down again.
As your body moves forward, you may feel soft, flowing energy around the palm of your hand.
Repeat the sequence on the other side.
Start with about 5 minutes and work your way up to 15 minutes. Remember to perform an even number of repetitions so your energy is balanced on both sides of your body when you are finished.
TURTLE HOLDING ITS SHELL
This exercise is great for relieving pain and tension in the upper back, neck, and shoulders, as it helps align the cervical vertebrae. It also moves energy through your brain, helping to clear the mind. As you do it, move slowly and steadily. Repeat the exercise to your left, right, and front, making sure you do each an equal number of times. Nine times in each direction is ideal, in any order you like.
Be mindful about holding your arms up throughout the exercise. Do not let them slip down as you inhale or exhale.
Stand with your feet as far apart as your shoulders.
Bend at the waist, holding your back straight, so that your body is shaped like the number 7.
Raise your arms behind your back with your palms facing up. Imagine holding a turtle shell on your back.

STEP 3
Inhale through your nose, raising your shoulders and pulling your head in. Imagine tucking your head inside the turtle shell. Remember to keep your arms up.

STEP 4
Exhale silently through your mouth as you move your shoulders down. Stretch your neck out, envisioning the turtle sticking its head out of the shell. Again, keep your arms engaged and don’t let them drop.

STEP 5
Inhale once more through your nose, raising your shoulders and pulling your head in.

STEP 6
Exhale again through your mouth, lowering your shoulders and stretching your neck forward, but this time turn your head to the left as you move.

STEP 7
Repeat the sequence, turning your head to the right as you exhale, lower your shoulders, and stretch your neck forward.
Repeat 8 more times, making sure you stretch forward, left, and right an equal number of times.
ROLLING PAPER
As this stretching exercise releases tension in the spine and surrounding back muscles, it allows vital energy to move through each of twenty-four presacral vertebrae, providing greater flexibility and range of motion. More than in other qigong exercises, your breath and movements work in concert here to circulate the essential qi. Take care to perform this exercise slowly and steadily, and always keep your arms above your head and parallel to your eyes while exercising.
Stand with your knees bent very slightly, with your feet as far apart as your shoulders.
Raise your arms straight over your head with your palms facing forward. Hold your arms so they are parallel with your ears.
Gradually, with full control over your movement, bend forward, stretching one vertebra at a time, from your neck to your tailbone. Continue until you are bent forward fully with your hands touching the ground. Exhale slowly and silently through your mouth as you bend forward.
Hold this position for a few seconds.
Inhale slowly through your nose as you gradually stand straight up, one vertebra at a time, from tailbone to neck, purposefully reversing every step you performed on the way down.
When you are finally facing forward, pause for a few seconds before repeating the sequence. Repeat 8 more times to get the full benefits of the exercise.
Elements Exercises
Women can gather and store the yang heat and light of the sun, or the cool yin glow of the moon, in their own energy with these slightly more advanced exercises. Keep them in mind for energizing body and mind when you’re feeling depleted or sluggish. By focusing on the essence of these natural sources of vitality, you can learn to access their different but equally valuable forms of qi, and move that power through your body. To reap the full benefits, you need to do these exercises 18 times, 9 times with each leg forward.
SUN AND MOON
When you first start exploring this set of movements, you may find that you get better results when you perform it during the day, in a spot where you can actually see the sun. Likewise, if you do it while standing in front of an open window on a moonlit night, you’ll have a better chance of feeling the moon’s yin qi and inviting it into your body. Since it is safe to look directly at the moon, best results are achieved if you practice this while looking at the moon on the three days of the month when it is totally full. While performing the exercise, you should see the colors of the sun and then of the moon in your mind’s eye. Such visualization will help to manifest and spread the qi throughout your body.
Stand with your feet as far apart as your shoulders and your knees slightly bent. Relax your arms, shoulders, neck, and forehead.
Take a half step diagonally forward with your left leg.

STEP 2
With your eyes open, visualize the sun. Once you have a clear image, move your arms quickly to “embrace” and “pick up” the sun. As you move your arms, bend your front (left) knee while holding your back straight.

STEP 3
Close your eyes and shift your weight backward by pushing with your front leg until it is straight and your back leg is bent. While transferring the weight, pull the sun’s energy into your head with your arms until your hands are touching your forehead (upper dantian). Hold the pose for a few seconds.

STEP 4
Now shift your weight forward until your front knee is again bent and your back leg is straight. With your palms facing downward, slowly move your arms down your body, guiding the qi from your forehead to your face to your neck, chest, and stomach.

STEP 5
Pause briefly at your stomach (lower dantian) to store the energy there. You will feel warmth in that area.
Move your arms back to your sides as the remaining qi moves down your legs.
Repeat the sequence with your right leg forward.
Continue the repetition until you have completed the sequence 9 times with each leg forward, for a total of 18 repetitions.
The movements are the same for the Moon exercise, except that you visualize the moon rather than the sun.
NATURE
As you begin this exercise by taking a half step diagonally forward—so that the toes of your stationary foot are on the same plane as the heel of your stepping foot—make sure your eyes are open so you can visually absorb all the colors of nature, whether you are looking at a tree, plants, the ocean, mountains, or just the sky outside your window. The greater variety of natural elements you are able to see, the more beneficial this exercise will be.
As with the Sun and Moon exercise, stand with your feet as far apart as your shoulders and your knees slightly bent. Take the time to relax your arms, shoulders, neck, and forehead.
Now step forward diagonally with your left leg.
Keep your eyes open as you visualize some scene from nature, such as a meadow, beach, mountain, or a single tree or flower.
Extend your arms and gather the energy from the nature scene within them. Keep your arms horizontal to your body as you do this, rather than diagonal as you do with the Sun and Moon exercise. As you extend your arms, bend your front knee and keep your back leg straight.
Use your front leg to shift your weight backward, ending with your front leg straight and back leg bent.
Bring the energy to your chest and into your body between your nipples (shanzhoung point). Pause for a few seconds.
Shift your weight forward until your front knee is again bent and your back leg is straight. With your palms facing downward, move the qi down your forehead, face, neck, chest, and stomach.
Pause briefly at your stomach (lower dantian) to store the energy there.
Once you have felt the warmth in your stomach, let your arms return to your sides, and the remaining energy will automatically travel down your legs.
Repeat the exercise with your right leg forward.
Continue the repetition until you have completed the sequence 9 times with each leg forward, for a total of 18.
Qigong Practice
Comparable to tai chi, but with a focus on physical wellness based on unique energy access points on the body, all of my special qigong exercises will make a discernible difference in your health and outlook if practiced regularly so that you can reflexively call on them in times of stress to restore and balance your energy. As with any other exercise program, the amount of time you spend practicing is commensurate with the level of well-being you will feel as a result. Don’t think of doing these qigong exercises in the same scheduled way you go to yoga or the gym twice a week, but more like the frequency with which you plug in your electronic device to recharge it: regularly, day after day, with purpose and discipline.

CHAPTER TAKEAWAYS
Learning to breathe consciously is the first step on the path to meditation, wellness, and longevity.
Instead of being concerned with burning calories, it’s much better to think about burning toxins.
Doing these qigong exercises is a form of moving meditation that will ground you, balance your vital qi, and target any physical and mental health problem areas.