Three 4- x 8-foot modules lined up side by side, leaving 2-foot pathways between, measures 8 feet by 16 feet, plus 2 feet of space all around, equals 12 feet by 20 feet, the area needed to accommodate a side by side three-module garden.
The choice of a location will require some thought. Take the time to carefully analyze the site.
The first three most important things are Sunshine, Sunshine, Sunshine. This cannot be stressed enough. Sunshine is of primary importance, the garden must be located where it will get a minimum of six to eight hours of sunlight a day.
Soil condition is of secondary significance as it can always be improved. Anyway, generally, in a backyard there is not much difference in this respect from one spot to another. But be sure that the area is free of roots from trees or large bushes.
Good air circulation helps plants breathe, grow better, and helps prevent diseases. Avoid any sites too closed in.
Drainage is another aspect to consider. When it rains, check to see if there are any areas where the water puddles up. Stay away from those places if you can.
Lastly, it should not be too far away from the house or a water supply. Otherwise it probably will be neglected.
But you shouldn’t worry too much about finding the perfect spot for the garden, it may not exist. Most of us, not having a lot of land, have very little choice about where the garden is to go.
Some people like to do the location planning on paper before doing any digging, but if making sketches is not your cup of tea just make the three frames and procedure as follows:
First: Go to pages 24 and 25 and follow the instructions of how to make the frames. Then, once the frames have been completed go out and place them on the ground in the area (or areas) that you have chosen. Keep in mind that the garden will be easier to care for if they are close to each other. When placed side by side all maintenance will be simpler. But if that is not possible, position them wherever they need to be to fit into your lot.
Then for the next few days walk around them and generally observe them. Do they get enough sun? Are they far enough away from trees or fences? Is there at least 2 feet of room all around?
When you are completely satisfied, drive a small stake into the ground at each inside corner to mark their position. Then lift and put them out of the way from where the soil is to be dug up.
With the locations of the modules having been set you can start to prepare for the double digging of the plots. If there is grass in the area chosen for your beds, it should be smothered out. Mow it very close and cover with a thick layer of newspapers, cardboard or anything else to block out the sun. It will take several months to smother out the grass but it needs to be done since the soil should be more or less bare before double digging. (You can double dig in grass but it is more difficult to do so, best to smother it out.)
The ideal time of year to do this double digging is in the fall. This allows the digging, aerating and the adding of organic material to the soil far enough in advance of planting to, through weathering, improve the soil structure. In the spring the soil will be ready for planting after a few rakings. If it is not possible to do this in the fall, then the next best time is in the early spring.
Whenever, fall or spring, avoid working the soil when it is wet and sticks together excessively. If dug at these times the soil will tend to form clods. Before you dig, test it. Pick up a handful of the soil and squeeze it into a ball. Press this ball with a forefinger, it should crumble. If it doesn’t the soil is still too wet, if it does it’s ready for digging. But before you start, gather as much organic material as you can; tree and other leaves, crop residues, weeds, grass clippings, small trimmings, and similar. The more that you can incorporate into the earth at this time the better. This is your chance to improve the fertility of your soil.
Double digging
The raised bed is basically made by loosening up the soil to create air pockets. The adding of organic material further helps to fluff it up and enriches the soil. The spade work is done by the time-honored practice of double digging. It is a bit of work but necessary to develop a deep root zone soil for the growing of vegetables. Just work smart, taking breaks when needed.
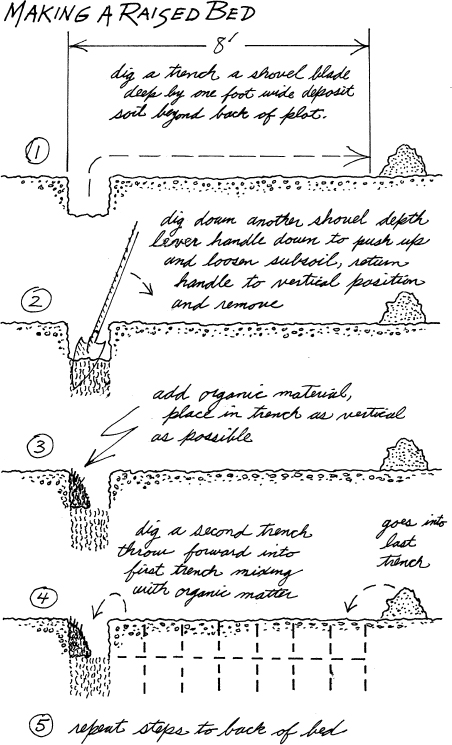
When digging, top soil should stay on top, toss each shovelful forward so that natural layering remains. (If digging in sod, each shovelful goes forward, is turned over and whacked to crumble it.)
1) To begin, using a long-handled pointed shovel, start at one end of a measured 4- x 8-foot plot. Dig a trench a shovel blade deep by about a foot wide across the four foot width. Deposit the removed soil beyond the other end. You will need this soil to fill the last trench.
2) Then standing on the untouched part of the bed, dig down another shovel blade depth (or as far as you can go). Leave it there and lever the handle down, then return it to the vertical position. Repeat this levering back and forth several times to loosen the subsoil. Remove the shovel, move a blade width over, and repeat this procedure all the way to the end of the trench.
3) When this has been completed, place organic material in the far side of this first trench as vertically as possible.
4) Dig a second trench, throwing the soil forward to mix with the organic material in the first trench. Then loosen subsoil, as it was done in the first trench, digging down another shovel blade length and levering. After that add the organic material. Repeat this process across the bed’s width to complete second trench.
5) Dig a third trench and so on, repeating the procedure until the whole bed is dug. Shovel the soil that was moved to the back into the last trench. That will complete the bed.
Once the bed has been prepared, do not step on it. This would compact the soil and adversely affect plant growth. The beds won’t have too much height the first year. But you can slowly build them up a little at a time. When the double digging of all three beds has been completed they can then be framed.
The double digging procedure described is necessary only once to establish the garden. After that, it becomes a matter of doing what is organically necessary to maintain a good soil structure and to keep up its fertility.
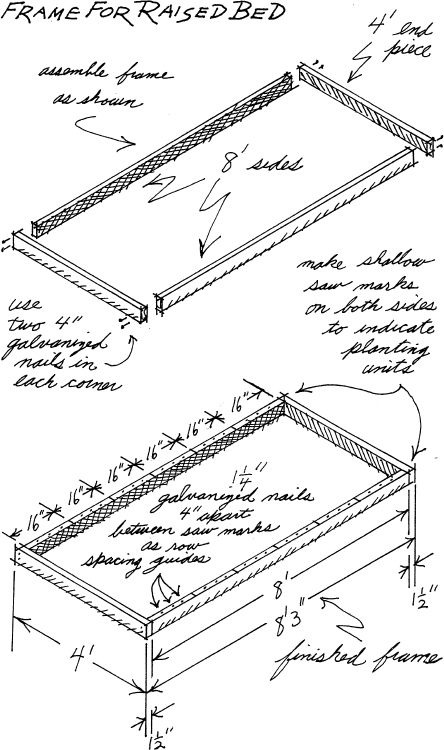
Standard-size lumber is used, three 8-foot 2x4s for each frame. Two 8-foot 2x4s remain intact to form the sides. Cut the third one in half to make the ends. Nail the 4-foot ends onto the 8-foot sides to form a rectangle. Use two 20D 4-inch galvanized nails at each corner. Next, measure off 16-inch increments on the tops of both sides to indicate the planting units. Make a shallow saw cut across these points so that they will be permanent. Then, as row spacing guides, in-between those marks, just drive a 3D 1¼-inch-galvanized nail at 4-inch intervals.
The frame is then complete. Now make two more. To place them down in position to encase the raised beds, you probably will have to remove a little soil from all sides with a garden trowel. Remove as needed so that the frame goes down easily without disturbing the bed too much. Once all three are in place, check again to make sure that the pathways between them are at least 2 feet wide. If you are completely satisfied and feel comfortable walking around them, drive a stake at the center of the sides and ends to keep them from moving. Put back any soil that was removed earlier.
When the 4-foot ends of the frame are nailed to the 8-foot sides, their thickness increases that dimension by 3 inches. This makes the actual overall outside dimensions of the frame 4 feet by 8 feet, 3 inches, but in the interest of simplicity I have been calling them 4- x 8-foot modules and will continue to do so.
After the raised beds have been made and framed, the three module garden is complete. But, before getting into procedures, a few words about the items needed to do the work.
In this section the items needed are described and illustrated. If the listing seems exceptionally “bare bones,” that is because it is. Don’t waste money on things that you don’t need.
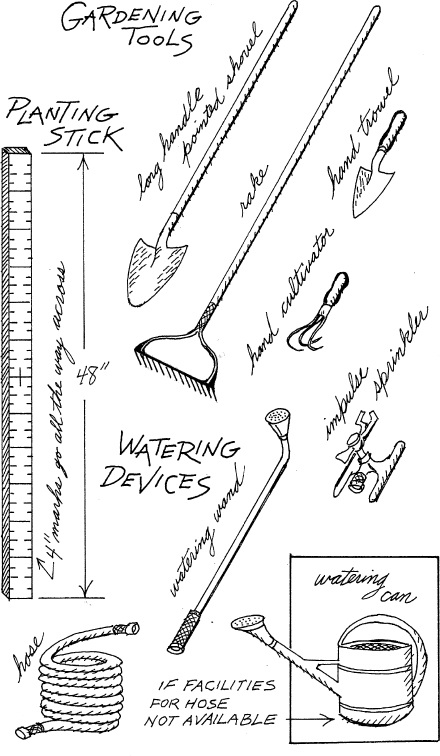
I have designed a planting stick specifically to be used with the modular gardening system. It is made using a 4-foot length of 1x2 lumber: First, it is painted white; then small pencil marks are made in 1-inch increments along both edges. Starting from one end, using a ballpoint pen and a straight edge, at every fourth mark a line is drawn all the way across the stick. Next, at the marks in-between those, draw a ⅜-inch-long line on both edges. Then in-between those, a ⅛-inch-long line is drawn. To indicate the center point a 1-inch long line is drawn perpendicular to and crossing the line in the center of the stick.
At planting time this is the only measuring device needed, no strings, stakes, or tape measures to complicate matters.
To work the garden you will need only the basics. They are readily available anywhere gardening supplies are sold.
Long-handled pointed shovel: The point is important as it makes it easy to penetrate the soil. The long handle gives leverage, requiring less effort. It is essential in establishing a new garden, but once the garden is established it is seldom used.
Rake: The rake is indispensable for leveling off and preparing a seedbed. Also used for taking up the mulch in early spring and tamping down after sowing peas. In addition it performs a variety of tasks—the workhorse of my garden.
Hand trowel: The hand trowel is used for transplanting and for a wide variety of other small digging tasks.
Hand cultivator: The hand cultivator is used to break up any crusting of the soil and to keep it loose.
Hose, impulse sprinkler, watering wand: The impulse sprinkler puts out a fine mist and is used for freshly seeded plots. The watering wand can be adjusted from a spray to a stream and is used mostly for established plants.
Watering can: If one does not have the facilities for the use of a hose then a watering can will be required.
But even if you have a hose, I strongly recommended that you buy a watering can. I think that every gardener should have one. If used in conjunction with the hose, it has many advantages.
1) By using it you can make use of any rainwater that is collected, or, if available, natural stream or pond water.
2) Most municipalities add chemicals to their water. If tap water is used there will be a bit of a chemical buildup in your soil over the years. You can lessen this by filling the can and then letting it sit for 24 hours; a certain amount of the chemicals will evaporate. This also has the benefit of warming the water. Cold water stresses plants. In addition, many times a watering can is quicker and easier to use than the hose. The old standby is the classic galvanized model but they are expensive. One of the lower priced plastic watering cans will do the job just as well.
Lastly, the question arises: what quality of tool should I buy? The answer is: the one that you can afford!
That said, stay away from the ultra-cheap tools they are never a bargain. It won’t be long before you will regret the day that you “saved money” by investing in them.
At the other extreme, don’t waste your hard-earned cash on the top of the line, imported, finest steel, expensive tools. In fact many of them are very heavy and are tiring to use.
Raised beds do not put an excessive strain on your implements, sturdy medium-priced brands will last a lifetime if properly cared for. The following are some rough guidelines.
Long handled pointed shovel. Wood handle 48 inches long, blade 8½x11½ inches. Sizes will vary. Make sure that it has a rolled-over top for foot comfort when digging. Industrial grade is bigger and stronger, but homeowner’s grade is good enough.
Rake. Do not buy a “T” rake (the head attached directly to the handle). Buy a bow rake, it is the one illustrated on the previous page. It has better balance and is just easier to use. The handle should be long and slender. The head should have 14 or 15 teeth, the teeth being no longer than three inches.
Trowel and hand cultivator. Both should be made of stainless steel or comparable rust-resistant metal. Handles are usually wood, but good grade plastic is OK. Trowel blade should be about 2¾ inches wide and about 5 inches long. Hand cultivator should have 3 or 4 tines.
The guidelines given are flexible; the main consideration is that you have tools that you feel comfortable with.