Compost is the finest, most valuable soil conditioner available, and the best part of it is, all of the ingredients needed for its creation can be had for free. It will cost you nothing. Once a pile of organic material is built, it will practically make itself. This happens all the time in nature with no help from anyone.
Don’t be put off by “experts” who cite complicated formulas and procedures. They would have you believe that one needs a master’s degree in science before attempting such a challenge.
Also to be ignored are ads peddling a wide range of “must have” products, yeasts, bioactivators, and other special compost pile additives. Regular garden soil and anything you add to the pile is already covered with more than enough bacteria to do the job. Worms are another item heavily hyped. Don’t buy them! If you build a pile, local earthworms will come.
Organic material over time will rot. The building of a pile is really just a matter of creating the conditions that will speed up the decaying process. Which brings us to the next consideration: What form should the pile take?
Organic material can simply be piled up on the soil in an uncontained pile, a pit can be dug and filled with the material, or the pile can be enclosed in some sort of container.
An open pile is messy, unsightly and may attract pests. If none of that bothers you it is a simple, no-cost way to go.
A pit works well and with a lid is practically invisible. Its biggest drawback is that it takes a lot of work to remove the finished compost. A big disadvantage.
A container is neat, efficient, easy to add to, and easy to remove the finished compost. It is the method recommended.
Compost containers
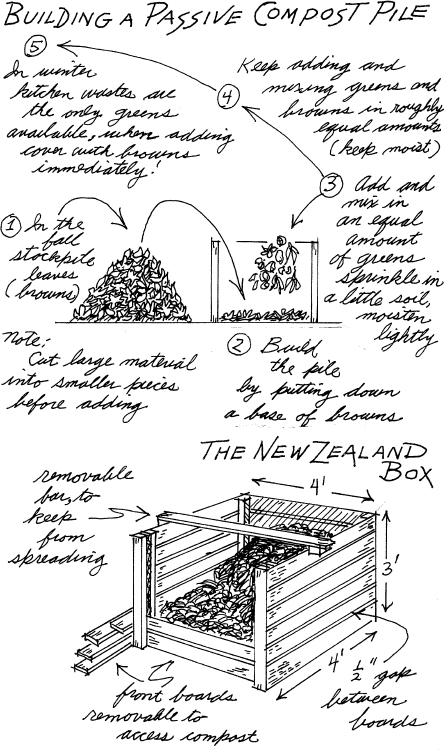
The New Zealand Box is the grandfather of all of today’s compost containers. It is made of wood, 4 feet wide by 4 feet deep by 3 feet high. It has no bottom or top. Boards are nailed to uprights, leaving a ½-inch space between each, to form three sides. The front boards are removable. This is accomplished by leaving a small space between two uprights at the front, creating a channel. The boards are then just slid in and out of this channel. The New Zealand Box is attractive, practical, and efficient. (See illustration on page 67.) If used lumber or discarded wood pallets are available, it can be built very cheaply or even at no cost.
Round containers can be made at low cost by taking a length of wire fencing about 3-feet-wide by 9-feet-long, bending it into a circle and tying the ends together.
Three-sided containers can be made by stacking used bricks or cement blocks, dry, to build the walls. The bricks need to be staggered leaving air gaps between; the concrete blocks are placed on their sides so that the holes provide ventilation.
There are, of course, many other materials and methods of making suitable containers. If you don’t care to build one yourself, commercially manufactured bins can be purchased. They come in a wide array of models, are attractive, efficient, and durable. They are however, also expensive.
Location of the compost pile
The compost pile should be sited in an easily accessible spot on level ground. It should be convenient to you and, of course, it should not be too far away from your garden. It should have space all around for good air circulation. It can be in the sun or shade. In the sun it will heat up faster, in shaded spots it will be less likely to dry out.
Building the pile with greens and browns
There are many ways to build a compost pile. I use the simplest way. This method uses materials that are available to any gardener, greens and browns.
Greens (nitrogen rich, wet) are fresh leaves, prunings, green grass, weeds, flowers, plants, garden and kitchen wastes such as vegetable trimmings, banana skins, coffee grounds, tea bags, citrus rinds, melon rinds, carrot tops, fruit skins, etc.
Browns (carbon rich, dry) are fall leaves, dried plants, very small twigs, straw or hay, egg shells, wood chips or sawdust.
Building the pile is simply a matter of mixing approximately equal amounts of greens and browns.
Optional handling of coffee grounds and eggshells
Since these can be used in a special way besides just mixing them in with all of the rest of the kitchen wastes there is the option of collecting a certain amount of these two items separately. But why go to the extra trouble to do this?
Coffee grounds are high in nitrogen and eggshells are a good calcium source, therefore you can make good use of these special properties if you have some on hand when you need them.
Use a small pail to collect just coffee grounds. When it is full, spread the grounds on a tray in the sun to dry. Once they are thoroughly dry put them into a container that has a lid, like the container that the coffee came in. Now they are ready for use whenever needed.
Eggshells can also have their separate small container. When it is full, crush and spread them out on a tray and let it sit out in the sun until the shells are completely dry. After that put them in a container with a lid.
The coffee grounds are used when there are any plants that seem to need more nitrogen. The usual sign is yellowing leaves. In this case give a side dressing, sprinkle the soil on both sides of the plants with the coffee grounds, and then water them in.
The crushed egg shells are used when setting in the tomato transplants. After the hole is dug just throw in a handful. This is to protect them from being deficient in calcium which in tomato plants can cause blossom end rot, a condition that causes the bottom of the fruit to become discolored and shrunken in. Once started on a tomato it cannot be reversed and that fruit is ruined.
If you have a problem with slugs chewing on certain plants, they can be controlled by encircling the base of those plants with a mixed coffee grounds–crushed eggshell barrier. Slugs don’t like to crawl over rough material and caffeine is toxic to them.
Materials to avoid—read carefully
For the health of the compost pile, as well as for the overall garden health, don’t add any pesticide-treated or diseased plants to the compost pile. (This includes treated or chemically fertilized grass clippings.) Other forbidden materials are pressure-treated wood chips or sawdust, charcoal briquets or their ashes, and obviously, no poison sumac or poison ivy.
As for household wastes, leave out of the collection pail any meats, fats, bones, oils, and all dairy-related products. It is also important that dog, cat, or other carnivorous pet fecal waste never be used. This could expose you and your family to disease when using the compost. When in doubt, leave it out!
Active or passive composting
One can be active, passive, or a little in between when it comes to composting. Active will produce compost quicker, passive later. Active requires regular turning or aerating of the pile. Turning consists of blending fresh ingredients with older material usually using a pitchfork. Aerating is creating vertical air passages in the pile, using an aerating tool, or an old broomstick.
Active: If one has enough greens and browns in roughly equal amounts on hand to build a pile 3 feet square all at once, chops everything into little pieces, keeps the moisture content right, turns or aerates the pile every three to seven days, compost can be produced very quickly, in about three months.
Passive: Using the passive method, one builds the pile as materials become available and lets nature takes its course. With this method it will take much longer to produce compost, at least a year. The time can be shortened if the pile is aerated every time it has shrunk noticeably in size.
I use the passive method, aerating when necessary.
Building a passive compost pile
A little advanced planning is needed when a pile is to be built. Greens are abundant in spring and summer, but browns are not abundant until fall. It therefore requires stockpiling browns in the fall so that they are available for the coming winter plus next season’s spring and summer. Collect leaves, put them in large plastic bags and store in an inconspicuous spot.
In fact, fall is a good time to start a pile since both greens and browns are available at that time. Of course, during the winter months the only greens to be had will be kitchen scraps, but that will be enough. A pile consisting solely of fall leaves and kitchen scraps will make a very fine compost.
To start a pile: First, put down about a 6-inch layer of browns. Then, throw and mix in an equal amount of greens, a sprinkling of soil and wet lightly. After this initial base, as the materials becomes available, add in approximately equal amounts of greens and browns. Mix together. Ideally the pile should be always moist under the topmost layers. Every time you throw in some greens also throw in some browns. If it is consistently too dry add more greens than browns. If the pile is consistently too wet, add more browns than greens.
It will take a little time before you get the proportions right. But, in passive composting you don’t have to be too concerned about being very precise, in the end you will have compost.
A covering on the bin will help keep moisture in. If your bin has no lid, a piece of plastic will do. Aerating the pile when it has shrunk noticeably will speed up the decaying process.
Continue adding and mixing greens and browns until the bin is full. It is important that kitchen wastes be covered. If left uncovered they may attract unwanted pests and cause odors. As soon as they are added, cover immediately with browns.
Up to this point compost making has been discussed in terms of one bin. With one bin, finished compost is taken from the bottom of the pile and fresh material is added to the top.
While making compost using one bin is a good method and widely used, it’s not the most efficient way of making compost. Two bins are better and three bins are best.
Using two bins, fill one this year, the other one the next year. Take compost from each every other year. While one is being filled, the other is being emptied.
Using three bins, fill one this year, let the one filled the previous year sit to cure, take fully aged compost from the one that was filled two years ago. This will be prime stuff.
Screens
For some sowings of very small seed vegetables I spread a thin layer of fine compost over their seedbed. This fine compost is obtained by sifting through a ⅛-inch screen. Screens can be bought or you can make your own by stretching a piece of hardware cloth over a wooden frame. Screens of ¼ or ½ inch are used most often as a little coarser compost will usually do just fine.
Compost tea
I use the passive “extract” method which produces a balanced organic liquid plant food. The tea is made by steeping well-aged compost in water. It is essential that well-aged finished compost is used as fresh compost can contain harmful pathogens.
One shovelful of well-aged compost to five gallons of water is the formula. Place a plastic garbage can, out of the sun, in a shady spot. Fill it with five gallons of water. Put a shovelful of compost into an old pillow case (pantyhose also works well). Tie the end of the pillowcase with a length of twine, immerse it into the water, bring the loose end of the twine up over the top and tie it to one of the handles. Then stir the water with a stick. After that be sure to stir it at least once every day for the next two weeks to give time for the formation of beneficial bacteria and the required fermentation process. Keep the can covered to slow the escape of nitrogen gas.

After two weeks, the tea is done. Remove the compost and use it as a mulch or just throw it back into the compost pile.
To use the finished tea it has to be diluted to the color of a weak iced tea (3 parts water to 1 part tea). Fill a pail or watering can with 3 quarts of water, then dip out 1 quart of tea into that. Apply by just pouring it slowly on the soil around a plant’s base making sure not to get any of it on the stem or on the leaves, go from there outward to about where you think the roots end. Also used as a side dressing by flowing between rows of plants.
As needed, dip out tea to mix new batches until it is used up. Wash out the empty can thoroughly. It must be clean for reuse.