The pests that a backyard gardener has to be concerned with can be put into two categories: 1) Animals and Birds. 2) Bugs and Slugs. In my garden I have had to go to greater lengths to control the animal and bird pests than the bugs and slugs.
There is nothing more frustrating than, after spending several hours painstakingly sowing a crop, to wake up the next morning to find the seedbed dug up and in total disarray. Without effective animal and bird controls this can happen all too often. It was apparent, early on, that the success of my garden depended to a large extent on how successfully these lovable but vexing creatures could be constrained.
On the other hand, the bugs and slugs were a relatively minor inconvenience. Being in the habit of inspecting my crops on a regular basis, it was mostly a question of hand picking or washing off some insect pests with a few squirts of water. This just became a part of my regular routine, and bugs and slugs never became a problem of any significance.
The animal and bird dilemma being number one, as far as I am concerned, it will be the first topic to be discussed.
Living in a populated area as I do, there is no problem with real wildlife. My number one enemy is squirrels, who for reasons know only to themselves, love to romp and dig in spongy soil. My number two enemy is the cat. As soon as one discovers a nice soft piece of earth, that spot becomes its litter box. Birds, at times are enemies as they consider seeds as their rightful meals and can really mess up a sowing. At other times they are my friends as they can eat a lot of bugs.
Many gardening books give “magic” formulas for controlling garden pests. One is told that by using everything from cayenne pepper to mothballs these intruders will keep their distance. If it were only that simple! I have tried most of these “miracle methods,” plus a few of my own without success.
It has been my experience that only a mechanical barrier will protect a garden. This presented a problem, as in my backyard, it is not practical or desirable to fence off the entire garden.
Further a fence does not protect newly seeded plots from the birds. I concluded that the solution was in finding a way to protect each individual module with its own barrier.
This was accomplished by developing two items. One was what I call a “pest panel,” the other a “module fence.”
Pest panels
The basic barrier constructed was the pest panel. This simple item is my first line of defense against small animals and birds.
These interlopers seem to be particularly attracted to the beds in the spring, when the ground has been freshly raked and seeds sown. The use of the pest panels during that phase will see your plots through undamaged.
Beyond that, depending on your particular circumstances, you may, or may not, need to take any further animal and bird pest control measures.
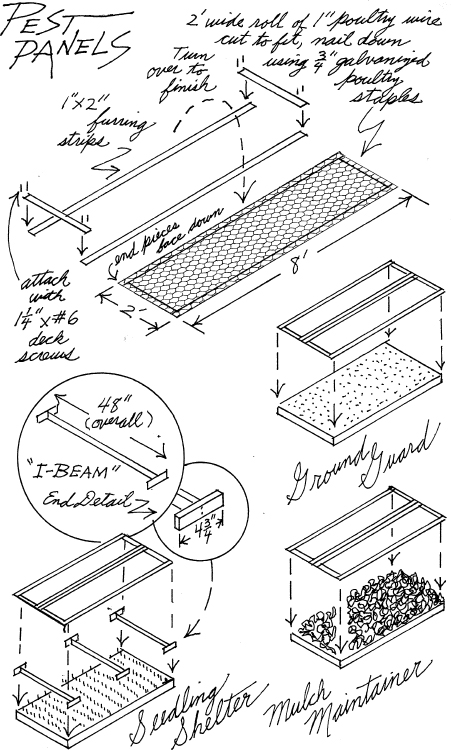
The panels are 2- x 8-foot rectangular frames with 1-inch poultry wire stretched within. The panels are not difficult to make. Materials needed are standard 8-foot lengths of 1x2 furring strips* and 2-foot-wide rolls of 1-inch poultry wire (buy vinyl covered if it is available).
These materials are readily available at home improvement centers, lumber yards and many hardware stores.
A pest panel is made using 1x2 furring strips for the frame. Two 8-foot lengths form the sides, and two 2-foot lengths make the end pieces. Place the two 8-foot lengths parallel on a flat surface 2 feet apart, outside edge to outside edge. Cut two 2-foot end pieces; place one at each end on top of the side pieces to form a rectangle. Attach them using two 1¼-inch x #6 deck screws at each corner.
Turn the frame over, end pieces facing down and roll the 2-foot-wide, 1-inch poultry wire across lengthwise. Nail down using ¾-inch galvanized poultry staples, cut to fit. This finishes one panel. Two panels are needed for each module, as they are used side by side.
The panels are a convenient size, can be handled easily, and are used in a variety of ways:
1) Ground Guard. When beds are bare, the pest panels are put down, side by side, right on top of the module directly in contact with the ground. This will prevent squirrels, cats or any other small animals from digging it up.
2) Mulch Maintainer. When beds are mulched in the fall, pest panels are put down, side by side, directly on top of the mulch. This keeps the shredded-leaf mulch in place, preventing it from being blown away or otherwise scattered.
3) Seedling Shelter. When a bed is freshly sown in the spring, again to protect from small animals and birds, the panels are used. But, in this situation, an extra step must be taken.
The panels have to be raised slightly to allow for the newly germinated seedlings to grow. Simple “I-beams” will have to be constructed. To make an I-beam, cut one 46½-inch-length and two 4¾-inch-lengths of 1x2 furring strip. Using 1¼-inch x #6 deck screws attach the 4¾-inch-pieces, centered, to both ends of the 46½-inch-length to form an “I” shape.
Three are needed: One at each end, just within the ends of the frame and one in a central position, between rows. The panels are then placed on their tops, poultry wire side down. Space underneath may seem excessively small, but it isn’t, if any larger, squirrels can crawl under and create havoc.
When the seeds have germinated and seedlings have grown to the point that they begin to touch the poultry wire, the panels will have to be removed. At this point, since there is no longer any seed, birds should cease to be a problem and the animal pests may have lost interest. If your pest problem is not too severe this early season protection may be all that is necessary. Conversely, if there are rabbits or other crop eaters of their kind around you will probably have to go to the next step in the modular pest control system: The erecting of a module fence.
Module fence
The module fence will afford further protection for the plants beyond the seedling stage. While the protection is not total, it is very substantial.
To form a module fence two “end panels” have to be constructed. They are 2- x 4-foot rectangular frames covered with poultry wire. Positioned one at each end of the module, panels are held erect by two posts which are pushed into the ground.
Pest panels are then placed between these end panels in an upright position enclosing the entire module in a mini-fence. The pest panels are held in place by latches and are easily removed when the crops need tending, or harvested, then replaced.
To construct an end panel: All components are cut from standard 8-foot lengths of 1x2 furring strips. Two end panels are needed for each module fence. First, cut two 32-inch strips and saw a point on one end of each (we will call these “posts”). Next, on a flat surface, place two 48-inch strips parallel to each other and 24-inches apart outside edge to outside edge.
Measure in 1¾ inch from each end of the strips and make a vertical pencil mark. Place the 32-inch posts vertically on the 48-inch strips so that both outside edges are on the pencil marks and the flat end is flush on top. The pointed end will extend considerably beyond the lower strip.
On the lower strip only, behind the posts, put ⅛-inch thick 1½-inch-square shims. (Shims can be cut from plastic detergent jugs; two stacked are about ⅛ inch thick.) Tack all into position using 4D 1½-inch finishing nails. Check to make sure that all is correct then fasten everything using 1¼-inch x #6 deck screws.
For the inside top, cut a 44½-inch-strip of 1x2. Place so that each end is resting on a post, flush with top and outside edge. Slide shims in between. Attach, then measure in ¼ inch from the ends, centered top to bottom, drill a  -inch hole. Next, take a screw-on soda bottle cap (caps are about 1⅛ inch in diameter), ¼ inch from its edge, drill a -inch hole. From the inside start a 6x¾-inch wood screw until its tip protrudes slightly. Line up tip with predrilled hole in top strip and fasten so that biggest part of the cap protrudes beyond the edge. Repeat on the other end. Turn the entire framework over, spread 2-foot-wide, 1-inch poultry wire across and nail down using ¾-inch-poultry staples. Cut to fit.
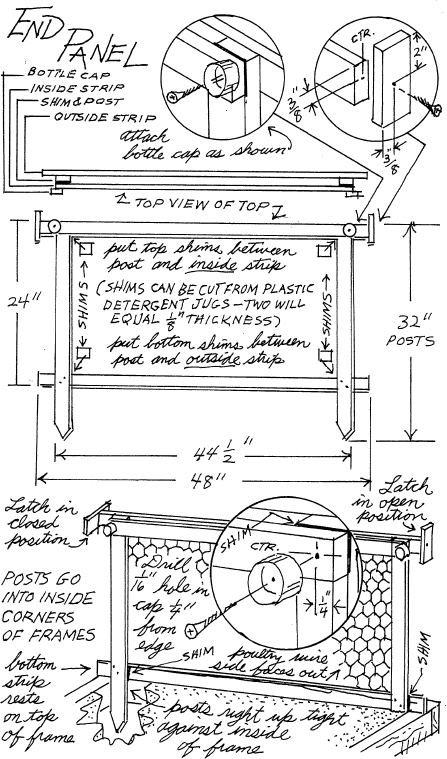
Last, make latches: Two per end panel. Cut a 4-inch-piece. In the exact center of the wide dimension, measure in ⅜ inch from one edge and drill a ⅛-inch hole. On tip of the end panel top 48-inch-horizontal strip, also drill a ⅛-inch hole: This hole should be ⅜ inch down from the top centered left to right. Then using a 1⅝-inch #6 deck screw; drive it through the predrilled hole of the latch letting it protrude slightly. Line up with predrilled hold on tip and finish driving the screw to attach.
Repeat on other side. This will complete one end panel; two are needed to create a module fence. (See illustration, page 153.)
Erecting the module fence: To assemble a module fence you will need two end panels and two pest panels: The end panels are put up first. At one end of the module, position an end panel so that its poultry wire side is facing out and its posts are at the inside corners of the module frame. Making sure that the posts are right up tight up against the inside of the frame push it down into the soil until the bottom strip of the end panel rests on the frame’s top. (If your soil is hard you may not be able to push the posts in. If this is the case, with a trowel dig holes for the posts.) Repeat the same procedure to erect the other panel.
Once the end panels are up, first turn the latches to their open positions. Then place a pest panel, poultry wire side facing out, in between the protruding tips of the end panels. One long rail of the pest panel should be resting on the top of the module frame, both short rails up against the end panel posts. When fully in position, swivel the latches to hold in place. Do the same on the other side. This completes the assembly.
Accessing the module fence: When access is needed, just turn the latches to the open position and lift out the pest panel: It then can be leaned up against one of the end panels for support while you go about your chores. When finished, put the pest panel back in place and turn the latch to the lock position.
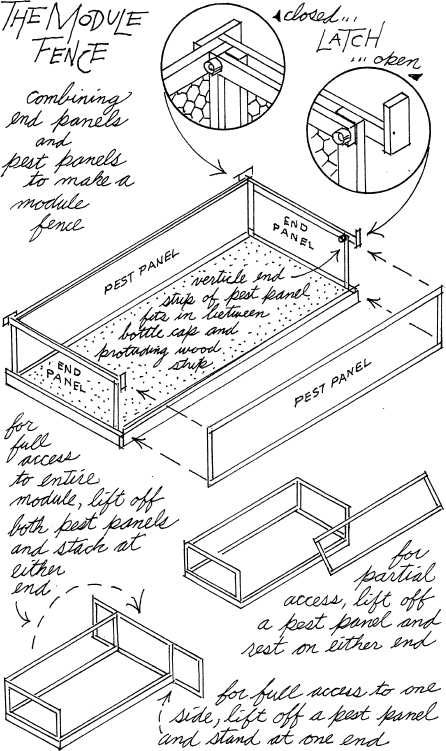
When partial access to the bed is needed, just lift out the pest panel and move it so that it clears your working area. Lean it up against the side of an end panel for support.
When full access to only one side of the bed is needed, lift out that pest panel and carry it to one end of the module and set it down, face to face, leaning it against the end panel.
When full access to the complete bed is needed, remove both pest panels and stand together at one end leaning them slightly against the end panel.
The module fence is a bit of an inconvenience, but it in no way interferes with any of the gardening chores, as it is easily accessed. It should protect from most of the animal pests. Birds, of course, can fly in. But at this stage of the crops growth they usually do no damage, just eat a few bugs or grubs, and fly out.
In most situations this should give adequate protection. But if there are still a few unwanted bird or animal interlopers getting in, then the last line of defense is to put on a top.
Topping out
The module fence with a top provides maximum security. Of course the tops can be kept on only as long as the crops within do not get any taller than two feet. For the C group leaf and root crops this is for their full life. For others it will be for a large portion of their growing period.
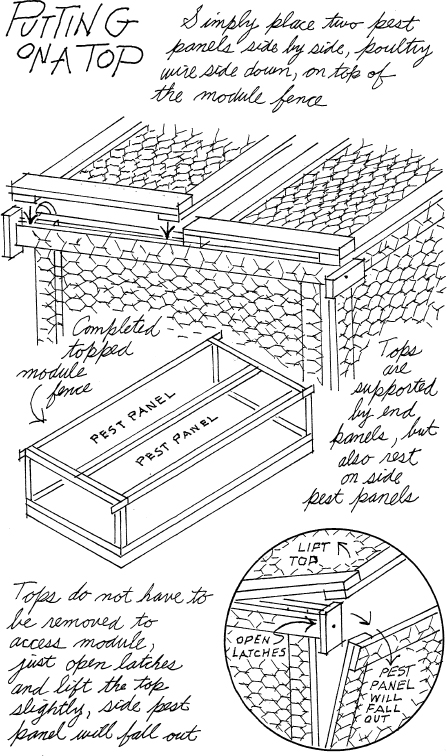
Pest panels are used as tops, two per module fence. Before making any new ones, analyze your situation, usually there is only one crop group at a time that will need a top. Perhaps freed up panels can be used, or only one new set will be needed.
To put on tops: Simply place two pest panels side by side, poultry wire side down, on top of the module fence so that their ends rest on the end panels. That’s all there is to it!
Beyond pest control: The module fence with the top can also be used in cool or hot weather as follows:
1) In early spring, or late fall, it can be covered with clear plastic to provide a warmer mini-climate.
2) In hot weather lath panels can be placed on top to give partial shade to cool-season crops. When summer sowing fall crops, they can be covered over with any material to provide full shade, until seeds germinate.
Bugs and Slugs
It isn’t possible to get rid of all of the insects and the countless other creepy-crawly things that are in a garden, and you shouldn’t try to do it. The bug that you hate may be the food supply of a bug you love. Insects are an essential part of nature and will always be there. One has to be tolerant and recognize that all of them are a part of an extremely complicated ecosystem. If you meddle too much you risk throwing it out of balance.
Accordingly, for the home garden there is no question in my mind that we follow nature’s way as far as it is practical. This does require a little bit of patience as it will not give you instant results. However, it will give you long term permanent results.
Short term, if you experience a bug problem, you will have to resist the temptation to buy a pesticide and start spraying everything in sight. If you are starting a new garden using the organic method, usually this will not be the case.
If you already have a garden and have been using chemicals, stop! Please don’t panic when you see the bugs upon coming out of their drunken trance, attacking the plants vigorously.
Happily, this situation will be brief, as things will quickly begin to stabilize. Good bugs will start to increase along with the nasty ones, and when they have to cope with more predators and a reduced food supply a lot of them will die or just leave and everything will revert back to a more natural state.
Once you stop using chemicals, never, never, go back to using them, not even for a one-shot occasion: To do so will set back some of the advances that have been achieved.
In the organic garden practice on-going control: Routinely inspect your plants handpicking the bigger insect pests and washing off smaller ones with a spray of plain water. But, if you see a lady beetle in the midst of a group of aphids do not interfere with her dinner. Leave enough aphids so that she has a food supply. If she runs out of food she will leave your garden.
Cultural controls, the first line of defense
If sound gardening procedures are meticulously followed there is very little chance of having any major pest problems. Briefly, to review the basics of cultural control:
Build up your soil organically. A healthy soil supports a wide range of organisms in providing good growing conditions. This not only lessens the chance of diseases but actually helps control some pests. Healthy plants are not much bothered by a few bugs chewing on its leaves.
Avoid monoculture. A mixed planting creates a more balanced bionetwork that is attractive to beneficial insects. It does not attract an inordinate amount of any one particular type of pest. A variety will be the norm.
Practice good garden hygiene. Remove yellowed wilted leaves from plants. Pick up dropped dead leaves and fruits.
Clean up thoroughly in the fall. Clear and cultivate empty plots to expose larvae.
Mulch the modules for the winter. This will ensure that the beneficial under-soil life will survive through the cold weather.
Rotate crops. Don’t forget to move crop groups to a different module every year.
Identify and control, the next step
Beyond cultural controls the next step is to control without doing undue damage. This can be done by using mild sprays and hand picking. Many household products come in hand operated plastic spray bottles that can be adjusted to a spray or to a stream. Just wash them out and fill with your own mixture.
I use two of them. One is filled with plain water; the second is filled with a water/soap mixture (½ teaspoons of Ivory dishwashing liquid soap to a quart of water). When I have an aphid problem, first I try to wash them off using the first bottle of plain water adjusted to a stream, if that doesn’t work; I go to the second one with the mixture.
The following are some of the most common pests one is most likely to encounter:
Black aphids: Small pear shaped, suck juices from tender young growth of fava beans. Clusters of feeding aphids cause stunting and deformation of stems and leaves. Look for them on the new growth at the end of stems. Control by grasping the stem that they are on between the thumb and first two fingers and gently rub back and forth to squash them. Leave the dead aphids on the plant as a deterrent. If this method is used as soon as they first appear they should not become a problem. Another method used is spraying with the water/soap mixture. However, be aware that this will cause a certain amount of burn on the leaves. Also the infestation will be lessened by pinching off the centers of plants when about 24 inches high. The aphids don’t like the rest of the plant as much, because it is bitter. Inspect daily.
Cutworms: Brown, gray or black caterpillars. Are called cutworms since they sever plant stems: Curl around the base of young stems, chewing through transplants and seedlings near the soil line. Work at night. A real danger to tomato transplants: Controlled by encircling stems with 3-inch-high light cardboard collars. Press into soil around stem at ground level, 1 inch into soil, 2 inches above. The cardboard from cereal boxes is ideal for making these collars.
Leafminers: Most leafminers found on vegetable plants are fly maggots. The parent lays white eggs on leaf undersides. Within four days tiny pale green maggots emerge and start tunneling through the small, microscopic space between the upper and lower top and bottom of a leaf. As feeding continues, the tunnels join together making light-colored blotches.
Maggots can move from leaf to leaf. They do not do a lot of harm to established plants: Usually attracted to Swiss chard and beets. Just cut out the damaged portions of the leaves, completely remove and destroy badly affected leaves. After three weeks they drop from the plants and spin cocoons in the soil, from which adult flies emerge.
Cultivating under the plants will destroy these maggots thereby controlling somewhat. Although most leafminers are fly maggots, some are tiny caterpillars or beetle grubs. Cabbage, tomato, pepper, and others may be attacked.
Mexican bean beetle: Adults are tan, round backed, about ¼ inch long with 16 black spots: (Do not confuse with the beneficial lady beetle, which is red with any number of spots.) They hibernate in wooded areas or garden debris. In spring, fly to bean plants and lay clusters of bright yellow eggs on the undersides of leaves, which develop into yellowish orange larvae. There can be up to three generations per year. Adults and larvae are plant-feeders. They skeletonize leaves and chew holes in stems and pods. Control by inspecting plants daily; look for holes eaten in the leaves, turn over and if any eggs or larvae are present, fold leaf over them and crush. Handpick adults which are found both on top or bottom of leaves.
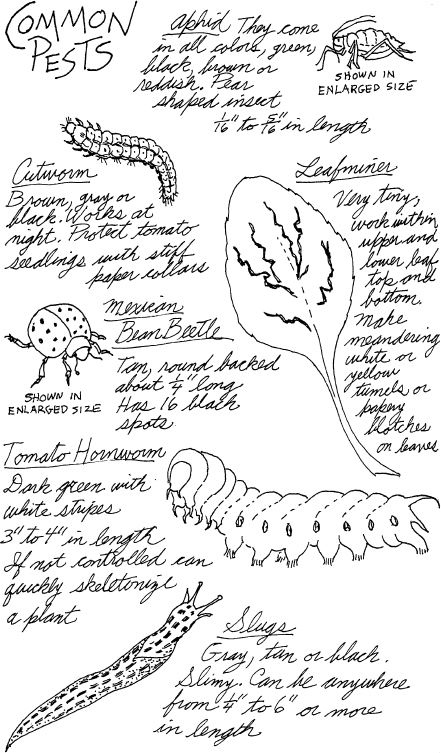
Tomato hornworm: Green with white stripes, they are about 3 to 4 inches long. Eggs are round yellow green, can be found on undersides of leaves. Worms are difficult to see, green in color, are perfectly camouflaged on tomato vines. They do most of their feeding at night. In the morning look for small, black droppings on tops of leaves or on soil under plant. Hornworm usually is somewhere directly above these droppings.
Control by handpicking, if worm has numerous white cocoons on its back, leave it, those are wasp larvae which will kill it and grow up to infect other hornworms. Any that are missed will in time drop to the ground and burrow to pupate. In the spring they will emerge as mature moths and lay eggs on your new plants. The eggs then develop into hungry hornworms. At season’s end, with a rake, give a deep 2-inch cultivation over the entire area. This will destroy any pupae that are in the soil.
Slugs: Gray, tan or black, and slimy-soft bodied, ¼ inch to 8 inches long. Active at night, leave shiny slimy trails: Will attack almost anything. Eat holes on plants, sometimes defoliating them. They hide during the day. Spread used coffee grounds around plants to protect. Caffeine is toxic to slugs and they don’t like to crawl over any coarse material. In addition, traps can be made with boards, raised slightly above the soil. They will congregate under them before the sun comes up. Another method is to fill empty tuna cans with beer and set into ground up to the top rim. Slugs are attracted to the beer and fall in. Inspect traps daily.
Green aphids: Small pear shaped, suck plant juices causing stunting or deformed leaves. As they feed, they exude a sticky substance called honeydew. Ants which eat the honeydew are often a sign of aphid infestations. Soot mold grows on the honeydew. Aphids pass through stages from nymph to adult, both with and without wings. When they become overcrowded on one plant, they all of a sudden develop wings and fly to another plant. Found on a variety of plants. Look for them in clusters under leaves, on buds and shoots. Wash off with a stream of water.
Other pests: The pests listed here are the usual culprits found in the majority of home gardens. For information on any others I suggest consulting a book on garden pests at your local library.

*Note: Furring strips are specified because they are cheap. Regular 1x2 lumber can be used instead and will cost more but will give you a better job. Also: Standard size 8-foot-length lumber is sometimes a little longer than 8 feet. If excessive, trim as needed.