12
Making Tools and Equipment
The tools and pieces of equipment included here can be manufactured inexpensively with ordinary woodworking tools from readily available woods, metals, and fasteners, in many cases from leftovers and scrap materials.
Use dry hardwoods such as maple, birch, beech, walnut, or cherry, all of which will take a high finish. Sharpen the woodworking tools and hone their cutting edges as necessary while the work progresses. Lay out and check the work with a square, and use the miter box whenever possible to ensure clean, smooth saw cuts.
Make all cuts a fraction wide of the mark, then dress the edge to size with a sharp plane or a double-cut file and 220- and 320-grit sandpaper. Because these binding tools will be used on paper, cloth, and other fragile materials, their surfaces must be as smooth as possible and maintained clean and dry to prevent scarring or staining the work.
When the wooden pieces have been cut to size, shaped, and finish-sanded, apply a thinned first coat of polyurethane. Allow this coat to stand until hard dry. Then fine-sand it, wipe it clean with a tack rag, and apply one or two additional full-strength coats of urethane rubbed down between coats with 600-grit wet-or-dry silicon carbide paper and mineral oil. This treatment is preferable to using steel wool, particles of which tend to become imbedded in the urethane. Wipe the finished work with a clean damp cloth, then allow it to dry. Do not use oil finishes, as there is usually enough residue to stain paper even after several weeks’ drying.
When joining wooden parts, use a combination of screws and a good waterproof glue, leaving the work in clamps to dry overnight. Metal fasteners such as bolts, washers, and nuts should be scrubbed with a toothbrush and paint thinner to remove the coating of factory machine oil, and the nuts run back and forth several times on the bolts to make sure there are no burrs to obstruct their free operation.
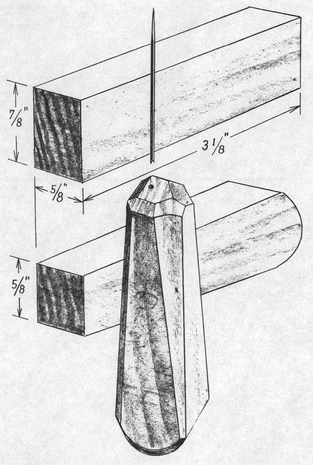
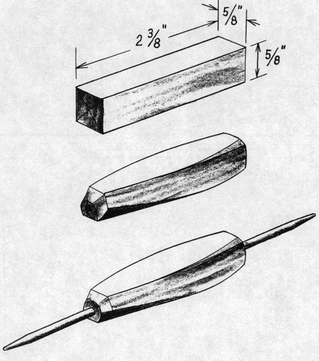
Awl (256)
This handmade awl is superior to commercial ones, which usually have much too thick a shank and consequently pierce holes too large in diameter for the best sewing.
Cut a piece of dry white pine to the dimensions shown in the illustration, then use a block plane, a double-cut file, and sandpaper to give the handle a comfortable shape. Stand the handle on end and make a pilot hole for the needle by driving a ¾-inch No. 20 wire nail straight into the handle not quite to the head. Remove the nail.
Break off the eye of a 2-inch sharps needle by holding it with a pair of pliers while snapping off the eye with another. Insert the broken end of the needle in the pilot hole. Put the needle in a metal vise or hold it tight in a large pair of pliers with about ½ inch of the broken end projecting. Pick up the awl handle, start it over the needle, then push it on firmly up against the pliers. Leave about 1⅛ inches of the needle exposed. Sand the handle with 320-grit sandpaper and apply the finish.
256
257
258
259
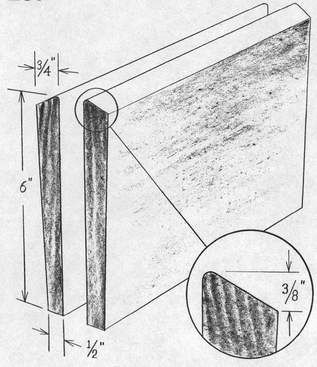
Backing boards (257)
These boards should be made of close-grained hardwood lumber that is flat—not warped, bowed, or twisted. Maple is ideal. It is strong, stiff, and has high resistance to denting and bruising. As they are meant to drop well down into the press, they should be made ½ inch shorter than the distance between the press screws. Plane and sand their inside surfaces as smooth as possible. Taper their outside surfaces as shown to prevent their being driven down into the press and out of alignment while backing a book. Plane the ⅜-inch top bevels as nearly alike as you can, then use 120-grit sandpaper to carefully round their extreme top edges to the shape of a book’s shoulder. Sand the bevels, then apply the finish. Give the end-grain edges at least two coats to minimize warping.
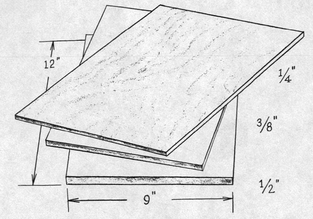
Blank boards (258)
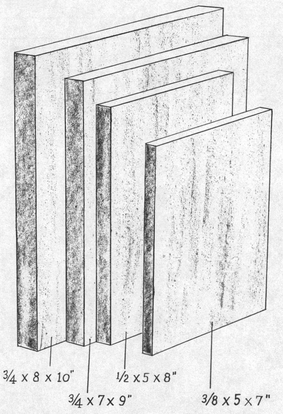
Three or four boards of various thicknesses are almost indispensable for supporting the work in the several stages of binding, as well as for pressing. Before applying the finish, sand their surfaces and edges as smooth as possible and slightly round their sharp edges with fine sandpaper held over a wooden block.
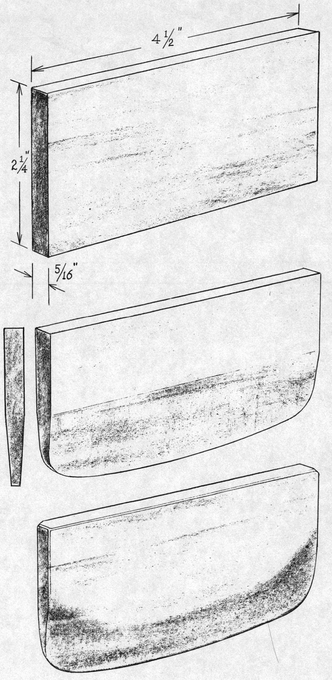
Flat folder (259)
Cut a piece of hardwood to the dimensions shown in the illustration. Use a coping saw and block plane to round the corners and trim the bottom edge to a uniform contour. Then with the plane taper the sides from the middle toward the bottom edge. With 80-grit sandpaper and a double-cut file, taper these same sections toward the ends, letting the tapers follow the curvature of the bottom edge. These are the working parts of the folder, and their edges and surfaces should be made as fair and smooth as possible—with no ridges. Sand thoroughly with 220- and 320-grit paper before applying the finish.
Folding needle (260)
Use a 4¾-inch steel knitting needle with a ⅛-inch diameter. Cut the wooden handle blank to size and draw diagonals on both ends to locate their centers. Drill a test hole in a scrap of wood to find the drill size that will make the needle a tight push-fit. Then drill a hole clear through the handle blank, working from both ends to the center if necessary. Next shape the handle as you wish, tapering the sides and edges to make it comfortable in the hand. Note that the under side of the handle is planed flat—and closer to the needle—to accommodate working in tight places. Sand the handle to final smoothness before applying the finish. Finally, force the handle onto the needle, centered on its length. If the fit is a bit too easy, remove the needle, touch a few drops of glue into the hole with a bamboo skewer, then replace the needle. Wipe the exposed ends of the needle clean of glue with a damp cloth and let the work dry for a few hours.
260
261
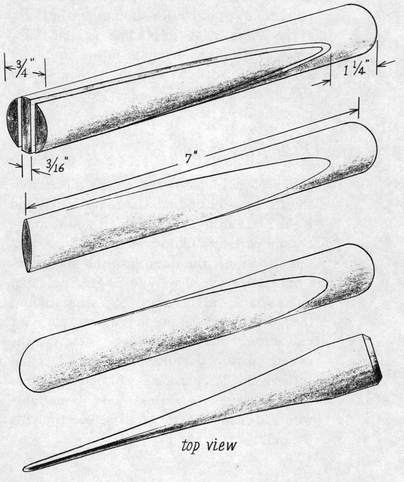
Folding stick (261)
Make two saw cuts from the end of a 7-inch length of ¾-inch hardwood dowel to remove tapered slabs. Use a double-cut file and 80-grit sandpaper wrapped over a flat stick to make both sides slightly convex in the narrow dimension and concave in the length, and to round the end. Sand the edges to a thin but rounded contour as shown in the top view of the illustration. Then sand all the surfaces with 320-grit paper before applying the finish.
262
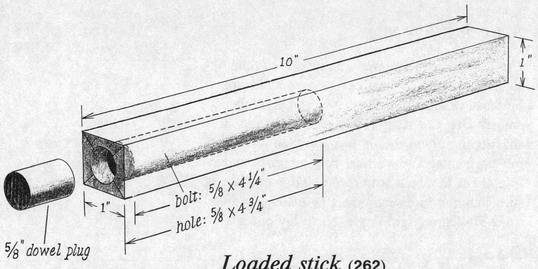
Loaded stick (262)
This is a simple wooden bar with a section of iron bolt fitted into the working end to give it weight. Cut and plane a length of hardwood to the size given in the illustration. Draw diagonals on one end to locate the center.
Drill a ⅝-inch hole into this end to a depth of 4¾ inches. If a drill press is not available, use a ⅝-inch auger bit and a bit brace. Have someone sight the bit as straight as possible while you bore the hole. Knock out the shavings. Cut off a ⅝-inch bolt with a hacksaw to a length of 4¼ inches after first cutting off the head. File around the sawn ends to remove the sharp burred edges.
Plane the sides of the stick smooth, then sand them well with 320-grit paper held over a wooden block. Slightly round the long edges. Slide the bolt into the hole. It should be an easy push-fit, but if not, file around and around the bolt with a flat mill bastard file. Don’t file too much, however, for the bolt must not rattle in the hole.
Push the bolt into the stick. Then glue a 1-inch length of ⅝-inch hardwood dowel and tap it into the hole tight against the end of the bolt. Let the work stand overnight to dry. Trim the end of the stick square, taking off the excess dowel along with about ⅛ inch of the stick. Before applying the finish, round off all the edges and corners of this working end with fine sandpaper.
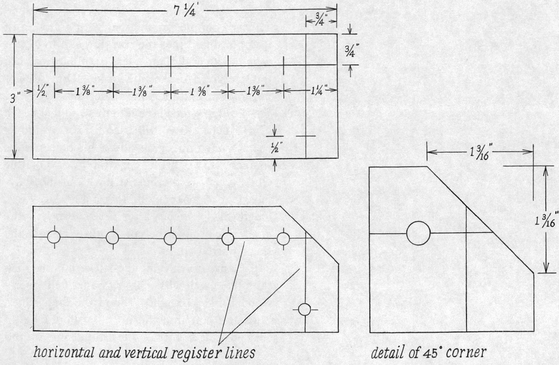
Mitering jig (263)
Use a dense, stiff material about  -inch thick, such as is used for the covers of manuscript binders available in a mottled brown and other colors. Use the steel ruler, a square, and a sharp knife to cut the jig to size. Then lay out the horizontal and vertical register lines and rule them in black waterproof india ink. Be sure that the intersection of these lines is an exact 90-degree right angle. Next, lay out and cut the 45-degree angle, using the dimensions in the full-scale detail of the illustration. This jig will work for cover boards up to ⅛ inch in thickness. For heavier boards the position of the 45-degree angle must be shifted out from the corner accordingly. Lay off five marks spaced along the horizontal register line, and one mark on the vertical line. Center a paper punch over each mark and punch a hole. Then coat the entire jig with urethane or spray it with two coats of workable fixatif.
263
264
265
Piercing board (264)
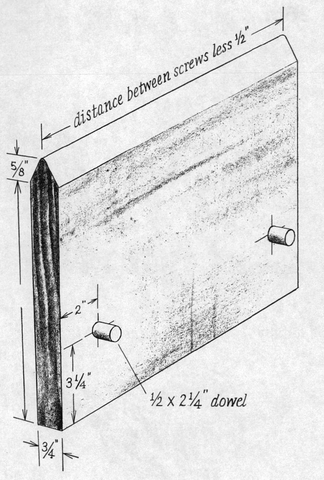
This board is best made from a piece of 1 × 12-inch white pine, with the grain running in the long dimension. As the board is meant to drop down into the press and rest on the dowel stops, its length should be ½ inch less than the distance between the press screws.
Plane bevels on the long top edge to the dimensions given in the illustration. Round the extreme top edge slightly to fit the inside fold of a signature. Then sand all the surfaces to final smoothness—especially the bevels—and apply the finish before gluing in the dowel stops.
After repeated piercing, the beveled top edge of the board will need to be renewed. This is easily done by planing new bevels and refinishing them.
Press and tub (265–269)
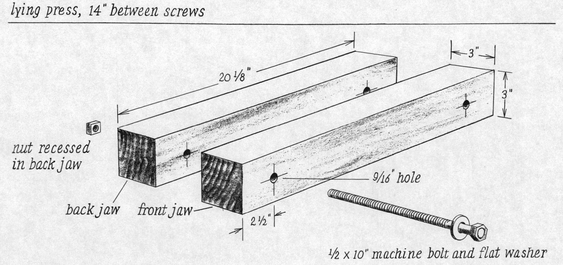
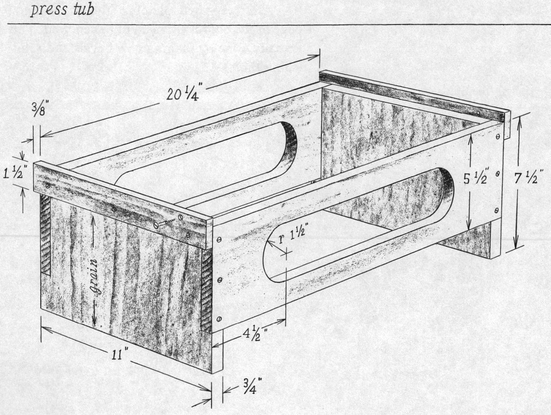
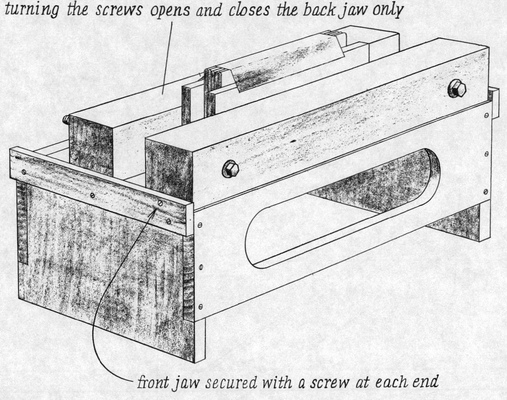
This press and its tub, or stand, are strong and will do entirely satisfactory work. The press should be made of good dry hardwood to withstand heavy work, but pine can be used for the tub.
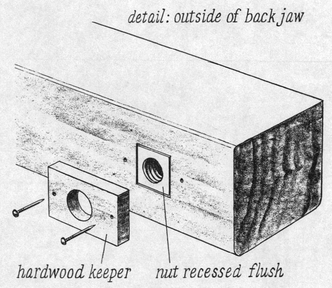
Position and bore the bolt holes in the press as accurately as possible. If a drill press is not available, make a jig by boring a  -inch hole in a short length of 2-inch stock, while someone sights the auger bit for you. Then clamp the jig to the press jaws in the correct position to guide the auger bit.
Sand the top and meeting surfaces of the press jaws as smooth as possible with 400-grit sandpaper. Then apply two coats of polyurethane, wet-sanded between coats with 600-grit silicon carbide paper. Thoroughly clean the bolts, nuts, and washers with paint thinner to remove all factory oil. Run the nuts back and forth several times on the bolts to make sure nothing obstructs their free movement.
266
267
268
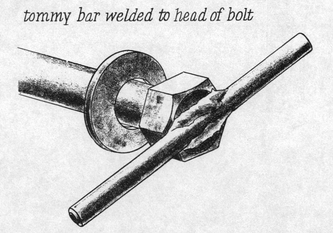
Although the press screws can be operated with a wrench, welding ¼ × 6-inch tommy bars to the bolt heads greatly improves the convenience of the press.
Assemble the tub with glue and flathead steel or brass screws. Clamp the joining parts in position and drill and countersink pilot holes for the screws. Then take the work apart, glue the joints, and reassemble with screws and clamps. Leave the work in clamps to dry overnight.
269
270
Right-angle card (270)
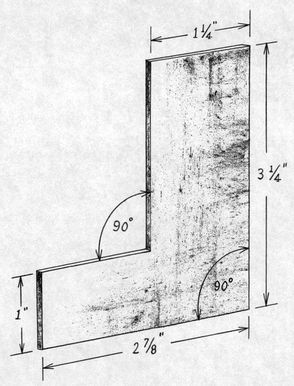
This is in effect a miniature square, particularly useful for squaring up the head of a book just before attaching the mull. Its small size makes it much more convenient to use than a conventional carpenter’s try square.
Lay out the work on a piece of good quality 2-ply illustration board, using the square to ensure that both right angles are accurate. Then cut it to shape—again using the square—and finish it with a coat of urethane.
271

272
273
Sewing frame (271)
This frame will accommodate all but very large books and works quite as well as a commercial model. Maple is the ideal wood for the platform because its weight helps hold it from sliding during sewing. But satisfactory frames have also been made entirely of white pine. Select a piece of lumber for the platform that is flat—not warped, bowed, or twisted end to end. Plane and sand the top surface smooth, then immediately apply finish to both sides to minimize warping.
The sewing tapes are secured under the platform slot by keys made of maple, plywood, or heavy-gauge wire.
Squared card (272)
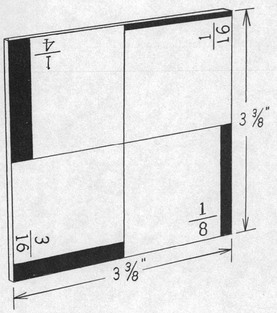
Use a piece of good quality 2-ply illustration board, white on both sides. Lay out the dimensions of the card so that all four corners are exact 90-degree right angles. Rule the intersecting center lines with black waterproof india ink. Then rule bands of the different widths and label each section with the designated fraction. To make this card the most useful, prepare the reverse side the same way, with the bands of like width back to back.
Cut out the card, using the square and a sharp knife. Check the work by laying the card inside the angle of the carpenter’s square. Minor inaccuracies can be corrected by carefully sanding the edges of the card with 120-grit sandpaper held over a wooden block. Recheck the work and then apply a coat of polyurethane to both sides and let dry.