Chapter 5
Working with Multimedia Devices
EXAM OBJECTIVES
Understanding scanners
Understanding digital cameras
Working with other multimedia devices
It is amazing to see an old uncle at a birthday party who just a few years back had not even touched a computer but now snaps photos with his digital camera and drones on about how simple it is to upload the pictures to his computer and then burn them to a DVD! When I try to think of examples of how computers have entered our daily lives, this is the most promising example I can think of.
In this chapter, you find out about popular multimedia devices used in everyday life. In the following pages, I discuss a number of multimedia devices, starting with digital cameras and scanners — the two most popular types of computer-related multimedia devices. I also introduce a few key points about microphones and MIDI technology, which are very important to the many people who will record music through their computers and are objectives covered by the A+ Certification Exams.
Understanding Scanners
In this section, you find out about different types of scanners. I also show you how to scan a photo in Windows 7 and how to save the photo as a file on the computer.
A few years back, scanners were very popular because they were one of the only ways to get your photos into a digital format. Maybe you wanted to use the computer to alter the photo or to send it to a relative via email. To do any of these actions, you had to use a scanner, which would copy the photo as a digital image that could be saved on your computer.
Many different types of scanners have been manufactured over the years, and you need to be familiar with the different types of scanners for the A+ Certification Exams. They are
-
Flatbed: The flatbed scanner is the most popular scanner today. With a flatbed scanner, you lift the cover of the scanner and place the photo on the flat sheet of glass (a platen). A scan head then moves beneath the picture, scanning the image by using a piece of technology called a charge-coupled device (CCD). Figure 5-1 shows a flatbed scanner.
Nowadays you’ll often find flatbed scanners integrated into a multi-function device (MFD). MFDs combine print, fax, and scan into a single unit.
- Handheld: A handheld scanner is great where it is impossible to place the object to be scanned on a flatbed scanner. To use a handheld scanner, you move the scanner over the object that you want to scan.
- Sheetfeed: A sheetfeed scanner acts very much like a fax machine in the sense that the scan head is stationary. You insert the paper object to be scanned, and the feeder passes the paper over the scan head. This scanner type looks very similar to a portable printer and is also the scanner type typically found in multifunctional printers.
- Drum: A drum scanner uses a technology called a photomultiplier tube (PMT), which involves wrapping the photo around a glass tube. The drum releases light that is converted to electrical data to become the image file.
 You need to be familiar with the different types of scanners for the A+ Exams.
Scanning process
Most scanners use a CCD, which is responsible for capturing the photons created by the light being exposed to the picture and then converting those photons to electrons, which are a form of electrical data. The image is then created from the electrical data.
The scanner has a scan head that contains the CCD along with a number of mirrors and lenses. The mirrors reflect the light from the lamp onto the photo being scanned. That light then passes through the lenses to the CCD to create the image.
Connecting a scanner
You can use a number of different types of ports to connect a scanner to the computer, depending on what type of connection your scanner wants to use. The popular ports used by a scanner are as follows:
- SCSI: Another popular form of scanner connection a few years back was the SCSI (Small Computer System Interface) connection. To connect a SCSI scanner to a computer, make sure that you
- Have an SCSI host adapter.
- Assign a unique ID to the scanner.
- Terminate the SCSI bus.
- USB: The most popular method used to connect a scanner to a computer these days is the USB (Universal Serial Bus). With USB, you simply connect the scanner to the computer, and Plug and Play kicks in and either loads the driver or prompts you for it.
Scanning an image
In this section, I show you how to scan an image in Windows 7. You will most likely not be tested on the actual scanning of a document or picture for the A+ Exams, but you may need to scan a document on the job. For this discussion, I assume that you already connected the scanner and loaded the driver for the device.
Although our procedure here assumes you’re using the Windows-provided Plug and Play driver, you should always install the software included with your printer. This vendor-specific software almost always gives you more flexibility and more features than the PnP driver does.
Follow these steps to scan a picture in Windows 7:
-
Choose Start ⇒ Control Panel ⇒ Hardware and Sound ⇒ Scanners and Cameras.
You should see your scanner in the Scanners and Cameras window.
-
To scan an image, select your scanner and click Get Pictures on the Imaging Tasks pane on the left side of the screen.
This launches the Scanners and Cameras Wizard, which copies pictures to your system.
- Click Next on the wizard’s welcome screen.
- If you want the scan in color, then choose color picture and then click Next.
-
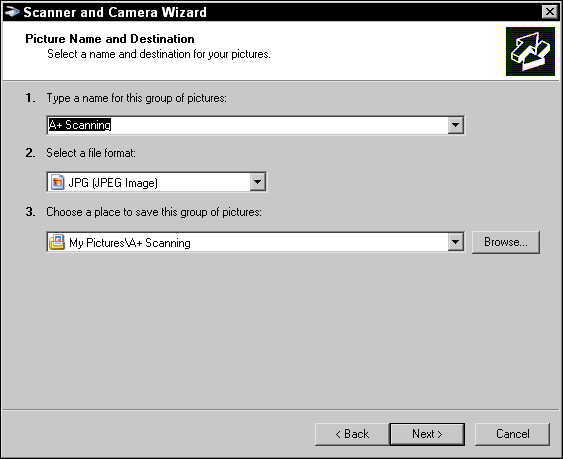
Type the name for this group of pictures, as shown in Figure 5-2.
The name you give to the group of pictures will be the name of a folder in My Documents that holds all the photos you scan. It will also be the first part of the name of each image (followed by an incremental number).
-
Select which graphics file format you would like to save your pictures in.
Graphics file formats are beyond the scope of this book, but here is a guideline: As a general rule, if you will use the image only for onscreen viewing, go with JPEG. If you hope to eventually print the image on paper, save it as a TIFF. The TIFF file will be larger, but it will include more detail than a JPEG file.
-
Click Next.
Your scanner starts doing its thing.
-
When the scanning is complete, click Next and then click Finish.
A new folder appears with your newly scanned image(s)!
 The scanned images are stored in the Pictures folder in Windows 7, Windows Vista, and Windows 8.1 by default.
Using Digital and Web Cameras
Just a few years ago, taking pictures involved buying film for your camera, snapping some pictures, and then taking the exposed film to a photo lab to be developed — often only to find out that of the 24 pictures you took, only 4 of them were any good!
Photography has changed dramatically since then. Today, you can use a digital camera, which stores the picture in memory on the camera, not on film. You can also navigate through the pictures by using the built-in viewer on the camera and then delete the ones you do not like — then print only the ones you want developed!
The following sections introduce you to digital cameras, digital video cameras, and web cameras (webcams).
Digital cameras
A digital camera is different from a conventional camera because instead of storing the image on film, a digital camera stores the image as a digital file on the camera. This file can then be uploaded to a computer and can be used in any application on the computer, such as email, presentation software, or a photo editor.
The digital camera works the same way that a scanner does — it captures light and uses a CCD to convert the captured light into an electrical charge that is used to create the pixels in the image. The light is captured through the lenses on the digital camera and is then passed through the CCD so the CCD can do its job of converting the light into data.
 When shopping for a digital camera, you want to be sure you get the best camera for your dollar. The quality of a digital camera is measured in its resolution and zoom levels.
Camera resolution
Camera resolution is measured in pixels, just like monitor resolution. The more pixels recorded in the photos being taken, the more detail displayed in the picture. The resolution also affects how large the picture can become before becoming grainy. A camera advertises its resolution by indicating how many pixels it supports, which is typically measured in megapixels (MP; or millions of pixels). The higher the number of pixels supported, the better quality image you will get from your camera. Here are what some common camera resolutions translate into:
- 4MP: Supports an image resolution of 2240 x 1680
- 5MP: Supports an image resolution of 2560 x 1920
- 6MP: Supports an image resolution of 2816 x 2112
- 8MP: Supports an image resolution of 3264 x 2448
- 11MP: Supports an image resolution of 4064 x 2704
- 12MP: Supports an image resolution of 4368 x 2912
- 14MP: Supports an image resolution of 4416 x 3312
- 16MP: Supports an image resolution of 4608 x 3456
By way of comparison, a 50MP camera is professional quality. At the time of this writing, the typical consumer-grade digital camera has a resolution of around 16MP.
Most digital cameras allow you to specify which resolution you would like to take photos in. For example, on my 8MP camera, I can specify that I want to take pictures with a resolution of 4MP, which creates a smaller image file but also creates a lower-resolution image. But if I am happy with the quality of my 4MP images (they are fine for eBay!) because they are smaller files, I can store more of them on the camera.
Zoom
Digital cameras can have two types of zoom, optical and digital, both of which let you zoom in on your subject when taking a photo. In the following list, optical and digital are compared against what is known as fixed focus:
- Fixed focus: A fixed focus camera does not support any type of zooming features. What the camera sees is what the camera takes as a picture. To zoom in, you need to physically get closer to the object. This is the zoom type (actually a lack of zoom) used on disposable cameras.
- Optical zoom: Optical zoom is the “good” zoom type that uses lenses on the camera to change the focus and zoom in on the object. This zoom type does not alter the image in any way: It simply zooms in and takes the picture.
- Digital zoom: Digital zoom is what I like to refer to as a virtual zoom. It takes the picture and then goes to the center of the image and magnifies the subject. This is the same as you taking an original photo into a photo editor and magnifying the image and then cutting to the part you like. This typically never turns out right because as you magnify the image, it becomes grainy.
Uploading pictures to the computer
The steps to upload pictures from your digital camera in Windows 7 and Vista are pretty easy — you simply plug the camera into the computer and power it on, and the Autoplay window in Windows 7/Vista will appear asking how to upload the pictures. If you choose Import Pictures, the Import Pictures Wizard will launch asking you to tag a name to this group of pictures. It then copies the pictures to the system.
To upload pictures from your digital camera in Windows 7, follow these steps:
-
With your camera powered-off, plug the camera into the computer’s USB port; then turn on the camera.
The digital camera uses a dedicated USB cable that has a USB connector on one end to connect to the computer while the connector on the other end is a small connector for that camera.
Windows detects the camera, loads the driver for the camera, and then asks which program you want to use to copy your photos to the system.
- Choose Microsoft Scanner and Camera Wizard and then click OK.
-
When the Camera Wizard displays its introduction screen, click Next.
You are presented with a list of photos that can be uploaded.
-
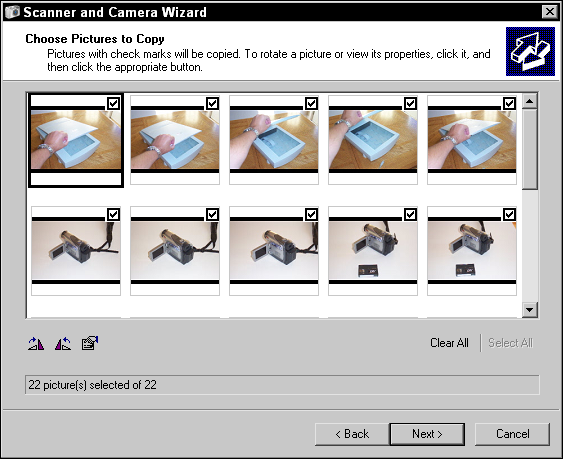
Make sure that a check mark appears beside each photo you want to upload (as shown in Figure 5-3) and then click Next.
The wizard asks you to name the group of photos you want to upload.
-
Type a name for this grouping and then click Next.
The photos are then copied to your system and placed in the My Documents ⇒ My Pictures folder.
- When all the photos are copied, click Next and then click Finish.
Web and digital video cameras
In this section, I introduce you to web cameras, digital video cameras, and the concept of a codec, all of which are important to understand when supporting video devices or video applications.
Web cameras
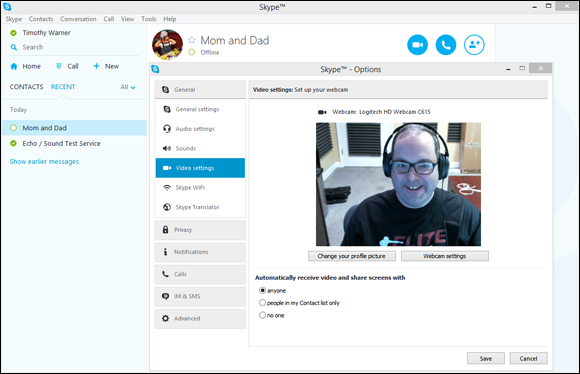
Web cameras (also called webcams) can capture video and display it on the computer screen, or they can be used to record a video and store it in a digital format on the computer. Webcams are popular with conferencing applications, which allow you to have a live conversation while seeing the person you are talking to, over the Internet. An example of an application that can use a webcam is Skype (see Figure 5-4).
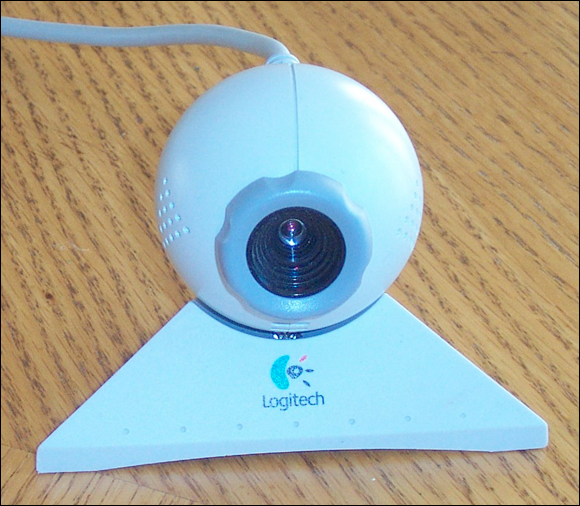
A webcam is typically shaped like an eyeball with a lens on the front and connects to the system’s USB port. Most webcams have a stand that holds the camera and allows it to sit on the monitor or desk. There are also laptop versions of webcams that clip to the frame around the laptop’s LCD and also a number of laptops today have a webcam built-in to the LCD. Figure 5-5 shows a webcam.
Digital video cameras
Just like digital cameras have replaced conventional methods of taking snapshots, recording video with a digital video camera has become popular in this day and age. A digital video camera can record directly to the computer and store the video as a file on the computer, or it can store the video to memory on the camera. It can also store the information to a digital video tape that can then be played later and recorded on the computer as a file.
A digital video camera typically connects to the computer via a USB 2.0 or IEEE 1394 (FireWire) connection, which is currently the more popular choice.
Understanding codecs
The problem with digital video is that with all the information that needs to be recorded, the files can quickly become huge. Digital video file sizes are kept to a minimum by compressing the video using special compression/decompression (codec) software. There are a number of different types of video formats and codecs, the most popular of which are
- DV: Digital video cameras have their own proprietary format to store the video, known as the DV format. The DV format typically has no loss in quality.
- DivX: DivX is one of the most popular codec types today. It supports high-quality video with high compression ratios. A video using the DivX codec uses only about 15 percent of the disk space that other codec types do.
- MJPEG: MJPEG is based on the JPEG compression standard used to compress still images. This compression type is optimized for transferring video to and from tape but is not suited for Internet applications because special hardware is required to play the video back.
- MPEG1: MPEG1, developed by the Moving Picture Experts Group, has been used heavily for creating videos to be distributed over the Internet because of its small file sizes and because only the codec is needed to play the video back.
- MPEG2 and MPEG4: The MPEG1 video compression has been improved again and again to create the MPEG2 and MPEG4 compression standards, which have better compression rates and better resolution. For example, the MPEG2 standard offers four times the resolution of MPEG1.
 The important point to remember with codecs is that you must have the same codec installed on your computer that was used to record the video in the first place. Otherwise, the computer will not know how to decompress the video. If you do not have the correct codec, you will not be able to play the video.
Looking at Other Multimedia Devices
Two other multimedia devices that are popular in today’s systems are MIDI devices and microphones. Sound cards typically have a microphone port (also known as a mic port) and a MIDI port.
Microphones
The microphone port on the computer is indicated with a little pictograph of a microphone. You can use the microphone port to plug a standard microphone into the computer. If you have a microphone whose cable will not connect in the mic port, you need to head to your local electronics store and find an adapter. After you plug in the microphone, you can use it as a recording source as long as you have specified it as a recording source in Windows.
To set the microphone as a recording source in Windows 7, follow these instructions:
-
Choose Start ⇒ Control Panel ⇒ Accessories ⇒ Hardware and Sound.
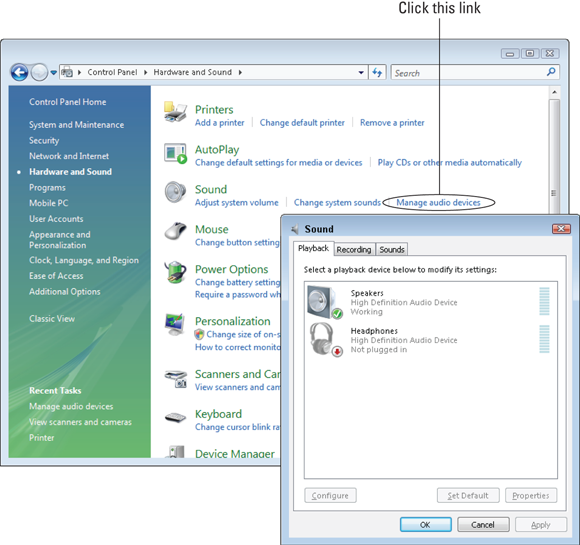
In the Sound category, click the Manage Audio Devices link to open the Sound dialog box where you can configure your recording devices and playback devices (shown in Figure 5-6).
-
To ensure that the microphone is set as a recording device, choose Options ⇒ Properties in the Volume Control dialog box.
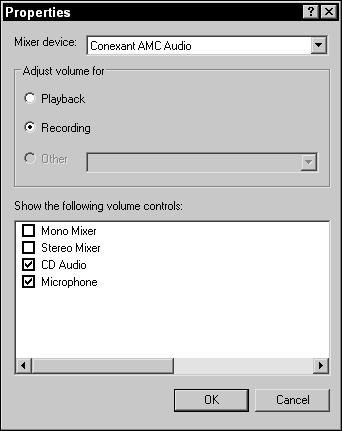
The Properties dialog box appears. Notice that Playback is selected, which means that you are seeing and can select which devices will play back sound.
- Select the Recording radio button and verify that the microphone is selected, as shown in Figure 5-7.
- Click OK and then close the Volume Control dialog box.
MIDI
Musical Instrument Digital Interface (MIDI) is a standard developed to allow musical instruments to communicate with one another or with a computer. MIDI is a common language that all MIDI-capable instruments can speak. To use MIDI, you must have a MIDI-capable instrument — for example, a keyboard with a MIDI port on it — and a system with a MIDI port. You do not need to worry about the details of MIDI for the A+ Certification Exams.
TV tuners, video capture cards, and camcorders
The days of having to sit in front of a big television to watch your favorite TV shows are over. If you are interested in watching TV on your computer, just add a TV tuner card to your system. The TV tuner card has a connector with which you connect the TV cable to the computer to receive the television signal so you can watch TV on the computer.
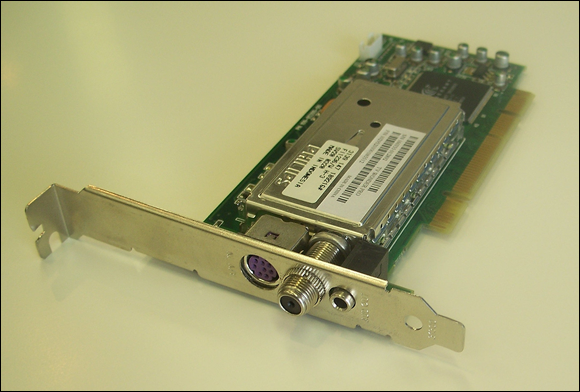
Most TV tuner cards act as video capture cards and come with software that allows you to record TV shows to video files on the computer that can be played back at a later time. Figure 5-8 shows a TV tuner card. Most TV tuner cards come as PCI, PCIe, or USB devices.
A camcorder can be connected to the Windows system to either use the camcorder as a video source for video capturing or to upload videos recorded on the camcorder. You typically connect the camcorder to the computer using either USB or FireWire. After the camcorder is connected to the system and the power is turned on, you should have the Windows Import Wizard appear, asking if you want to import the videos like you would pictures.
Getting an A+
This chapter introduces you to some of the different devices used when working with multimedia and multimedia applications. Here are some key points to remember about multimedia devices:
- A flatbed scanner is the popular type of scanner and uses a technology called a charge-coupled device (CCD). The scan head on the scanner moves under the image, exposing the image to light that is captured and then converted into electrical data by the CCD, which creates the image.
- The most popular connection used by scanners and digital cameras is USB 2.0 or USB 3.0.
- Digital cameras are measured by the quality of image they provide. The measurement unit is megapixels — millions of pixels. The larger the number of megapixels, the higher the resolution and the larger the image.
- Codecs compress videos so that they do not use up as much hard disk space. To play a video on the computer, you need the same codec installed on your system that was used to compress the video.
- If you are having trouble with your microphone picking up the sound around you, make sure that the microphone is set as a recording device.
1. What type of scanner is portable and is swiped over the object to be scanned?
(A) Flatbed
(B) Handheld
(C) Sheetfeed
(D) Drum
2. What technology do flatbed scanners and digital cameras use to create an image?
(A) OCC
(B) CCO
(C) PMT
(D) CCD
3. What zoom type on a digital camera simply magnifies the image to emulate the zooming feature?
(A) Fixed zoom
(B) Digital zoom
(C) Optical zoom
(D) Pixel zoom
4. Modern digital video cameras typically use which type of connection to connect to the computer and upload the video?
(A) SCSI
(B) Bluetooth
(C) FireWire
(D) USB 2.0
Answers
- B. A handheld scanner is carried around by the user, and the scanner is moved over the object to scan the object. See “Understanding Scanners.”
- D. Charge-coupled device (CCD) is the technology used by flatbed scanners and digital cameras to create the image. Review “Understanding Scanners.”
- B. Digital zooming is the zoom type that simply magnifies the image, just like you would do yourself in image editing software. This could make the image appear grainy. Check out “Digital cameras.”
- D. While it was true that older digital video cameras typically used IEEE 1394 (FireWire) connections to connect to the computer, modern-day camcorders almost exclusively employ USB 2.0 or 3.0. Peruse “Digital video cameras.”

 You need to be familiar with the different types of scanners for the A+ Exams.
 The scanned images are stored in the Pictures folder in Windows 7, Windows Vista, and Windows 8.1 by default.
 The important point to remember with codecs is that you must have the same codec installed on your computer that was used to record the video in the first place. Otherwise, the computer will not know how to decompress the video. If you do not have the correct codec, you will not be able to play the video.