Chapter 2
Working with Applications
EXAM OBJECTIVES
Identifying how 32-bit and 64-bit applications operate in Windows
Diagnosing application install, start, or load failures with Windows
If you work for a large contemporary company, then you may only have to deal with the newest of technology and may never have to deal with applications that are more than a few years old. If, on the other hand, you work for a consulting or service company that deals with small- to medium-sized businesses or organizations that focus on keeping technology spending down, then you will likely encounter a lot of old technology.
You never know when you are going to run into something old but still actively used. Recently I worked with a new customer with 20,000 computers. Due to a security requirement, this company still has a large number of users who are required to store data on floppy disks. Because you cannot purchase new machines with floppy disks, the company switched to using USB floppy disks (and you are probably not surprised to hear that the supply of those is pretty well dried up). Within the last 10 years, I have had two customers — a large grocery chain and a multi-site hospital — who both had current solutions that relied on ISA expansion cards. Once they exhausted all of their suppliers of replacement motherboards, they both were finally forced to implement new solutions. This goes along with a packaging and plastics company that still used an MS-DOS–based program to control components of its manufacturing process, well after the release of Windows XP.
To properly maintain and diagnose applications, an A+ Certified Professional must be able to manage the installation and removal of applications. In addition to these skills, this chapter also reveals the operating architecture in which applications run. Understanding this architecture allows the professional to diagnose problems quickly. You also examine the level of backward compatibility that is built into the modern Windows OSes, and you explore multitasking.
Given my history for dealing with people who hang onto and use old things, and that even the 32-bit version of Windows 8.1 supports MS-DOS and 16-bit Windows applications, I close this chapter with a few paragraphs on the old things, which if you are lucky, you will never need to know or use. If on the off chance you do need to support or deal with these devices, then this small background may help you.
Installing, Removing, and Repairing Applications
Before you can work with applications on your computer, you need to install them. With the rate at which the computer industry changes, you cannot avoid the need to upgrade or remove applications on your computer as they become obsolete.
 The terms app, application, and program are synonymous: They all refer to programming code that performs a function. In this chapter, though, I use the term application to describe the programming code that represents the functions you want installed on your computer — like a word processing application or a game. I use the term program to describe the programming code that allows you to install the application. And when referring to applications purchased from the Windows Store or applications that run on mobile devices, this is when the term app is used. (This chapter will not deal with apps, however.)
Installing an application
Most applications come with an installation program that must be run to install the application. Some applications (say, the terminal emulation program PuTTY, from www.chiark.greenend.org.uk/~sgtatham/putty) are actually stand-alone applications that do not require extra files and settings to be created on your computer, but these are rare. Most applications require several files to be installed and often require Registry entries to be created to hold the settings for the application. Because of the complexity involved in copying the files and creating the settings, you use the installation program to ensure that the application is installed properly. The application’s developer decides the name of the setup program, which in many cases is setup.exe or install.exe.
Very few installation programs work in exactly the same way. In general, though, you are asked for the location where you want the application installed. Other options, such as whether you want to create a desktop shortcut to the application or whether you want a specific option to be enabled, are application specific.
There are several ways to install a program on your computer, but each basically runs the installer program. The following options are available from which programs may be installed:
- Optical disc (DVD-ROM or CD-ROM)
- Flash drive
- Internet
- Network
Windows 8 adds the option to also install software from the Windows Store. Windows Store applications differ from other applications as they are accessed via the Windows Store and are packaged in an .appx file format.
To install an application from the network, you can locate an install program on a network share, or you can use the Programs and Features Control Panel. To use the Program and Features Control Panel on a Windows 8.1 computer, use the following process:
- Right-click Start and choose Control Panel.
-
Click Get Programs.
If the Get Programs link is not present, it is because your computer is not part of Active Directory.
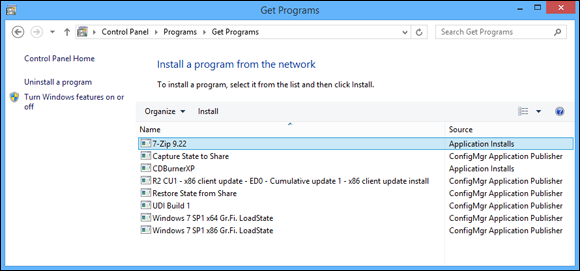
The Get Programs screen will list any programs which are published through Active Directory or from other network sources, such as Microsoft’s System Center Configuration Manager, as shown in Figure 2-1.
-
Select a published application and click the Install button.
The installation process for the application begins.
 Many applications are distributed on CD-ROM, DVD-ROM, downloaded from a website, or a web service, like the Windows Store. For software shipped on an optical disc, when you insert the disc into your optical drive, Windows searches for an autorun.inf file and launches the program specified by the autorun.inf file. In most cases, the specified program is the application setup program if the application is not already installed. This AutoPlay feature of Windows makes installing applications even easier.
If you are using Windows 8.1, you have the option of installing an application from the Windows Store. These applications are published to the store by the application developer and are either free or available for online purchase. To install an application from the Windows Store, follow these steps:
-
Click Start.
The Start screen opens.
-
Click the down arrow in the circle in the bottom-left corner of the screen.
A list of all the applications installed on your computer appears.
-
Click the Store icon in the S section of the listing.
This launches the Store application. At this point you may use the Search bar in the top-right corner of the screen to look for an application or scroll through the collections, top charts, and categories of applications for the app you are interested in installing.
 You may also find the Store icon pinned to the Taskbar or the Start screen.
-
Select the application you want to install.
The details regarding that application will be listed. If it is a purchased application, a Buy button appears; otherwise you will see an Install button.
-
Click the Install (or Buy) button to install the application.
If this is the first application you have installed, you will be asked if you want to set up a payment method for future purchases, even if the current application is free.
- Move your mouse to the top of screen to activate the Title bar, and click the X in the top-right corner to exit the Store.
Removing an application
Most applications also provide a program to uninstall the application when you no longer want it on your hard drive. The path to the program and any switches that are required for it to function are usually stored in the Registry during the installation of the application.
 Always use care when working in the Registry; improper changes can leave you in a position where you will be required to re-install the OS.
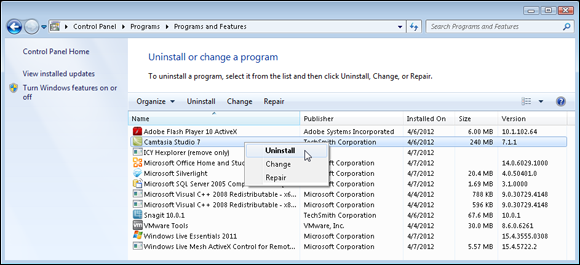
The procedure to uninstall or remove a program from a Windows computer is very easy. After opening the Programs and Features Control Panel applet and clicking Uninstall a Program, select an installed application from the list, as shown in Figure 2-2. You are provided details about that application, such as its size and when it was installed. In addition, you will see three buttons above the list of applications: Uninstall, Change, and Repair. To change the installed components of an application, click the Change button; to remove the application, click the Uninstall button. Some applications will have a Change/Remove button, which will then allow you to make changes to the list of installed components, or to remove the application; it uses the same program to accomplish both tasks. Windows looks up the name of the uninstallation program to run in the Registry and executes it.
Like the installation procedure, there is no set uninstall procedure, and it is left up to the software developer to design the uninstall routine. Some developers do an excellent job, and others do not. In the case of applications that do not uninstall properly, you might find the icons, files, or Registry entries still present after the uninstall program has completed. If that is the case, manually remove the leftover components.
 In many cases, applications are removed by using special options with the setup program that originally installed them. One nice feature of using the setup program is that many developers allow you to not only remove the application, but also to change the components that are installed.
Repairing an application
From time to time something will happen to an application, be it user error or a system error. Whatever causes the problem is less important that the cure, and that is the application repair process. This process can easily be accessed via the Program and Features Control Panel using the following process on a Windows 8.1 computer:
- Right-click Start and choose Control Panel.
-
Click the Programs link.
Programs opens and displays the Programs and Features link.
-
Click the Uninstall a Program link.
A list of programs that can be uninstalled or changed appears.
-
Select a program that presents a Change option and then click Change.
The application launches the setup program, which allows you to change, repair, or re-install the application.
- Follow the Repair Wizard options until the repair is complete.
 Make sure that you are familiar with the standard method of adding and removing applications from your system through the Programs and Features Control Panel.
Getting the Most out of Multitasking
Multitasking is a computer’s ability to balance the processing time given to multiple applications that are running at the same time. Multitasking comes in handy when running multiple applications at the same time.
The two basic types of multitasking are cooperative (which is very old), and preemptive. In this section, I discuss differences between the two types of multitasking; by the end, you should have a clear picture of which one is better.
Cooperative multitasking
Cooperative multitasking means sharing time on the processor by cooperation. By its name, you would think cooperative multitasking is the better form of multitasking. This is probably because cooperation has always been thought of as a good thing. If you needed to get a job done (like building a house) and you had five people to help you, you could get the house raised quickly through teamwork and cooperation. This is a good illustration of when cooperation works. However, if a couple of those people do not work with the rest of the team (they go to get more nails and never come back), their lack of cooperation slows down the process.
Likewise, with cooperative multitasking in the computer environment, a few programs that do not cooperate well with others can slow down the process. If you launch Microsoft Excel, for example, and start a large recalculation of the entire spreadsheet, Excel occupies 100 percent of the processor’s time. At periodic intervals, Excel checks whether any other programs require processing time, at which time Excel turns control of the processor over to the other applications. Each application follows the same process that Excel does; they occupy 100 percent of the processor’s time if needed, and give up control only when they reach their periodic interval for checking with the rest of the OS. If a program doesn’t check with the other applications often enough, it is thought of as a noncooperative program. The big problem with noncooperative programs is that they can hog 100 percent of the processor time for as long as they want.
Cooperative multitasking was implemented to allow multitasking in a 16-bit Windows environment. Most of that environment was single threaded, meaning that only a single element (or thread) in the OS gives the processor instructions. As such, all applications have to work while sharing a single thread of execution. It might seem that cooperative multitasking is inefficient, but cooperative multitasking is better than no multitasking. However, because you are not likely to work with 16-bit applications, unless you are very unlucky, do not worry too much about cooperative multitasking.
Preemptive multitasking
Preemptive multitasking takes a different approach to multitasking in the Windows environment. With preemptive multitasking, the OS decides which applications get execution time. Preemptive multitasking is designed to work in a 32-bit multithreaded environment, in which applications have multiple execution threads, and the OS can manage multiple threads issuing instructions to the processor or processors. Each thread of operation can run on any available processor in the computer.
Each application is given a certain percentage of execution time to use during each second. The OS then manages each process that accesses the processor. With the OS acting as the conductor, sharing the processor is more equal, with fewer conflicts. This does not mean that certain tasks do not attempt to run away with all the processor’s computing time; it is just less likely to happen. Preemptive multitasking entered the Windows OS with the development of Windows NT, the grandfather of modern Windows OSes, and has been improving ever since.
All of what applies to 32-bit Windows applies equally to 64-bit Windows. To see this multitasking in action, find a single processor computer and an application that will use 100% of the CPU performing a function. Launch two to three copies of the application and watch the Processes tab in Task Manager. What you should see is that each copy of the application gets about the same amount of time on the processor, which shows preemptive multitasking in action. If you have multiple processors or cores in your computer, then to see this really work, you need to run many more copies of the application, two to three times the number of cores in your computer, to see the same sharing of processors on the computer.
Running 32-Bit and 64-Bit Windows Applications
The 32-bit Windows applications are the ideal type of applications to run under a Windows 32-bit environment, and 64-bit applications are the ideal type of applications to run under a Windows 64-bit environment. All versions of Windows support 32-bit environments. All current Windows OSes have a 64-bit option when running on 64-bit processors. Because all these OSes are 32-bit or 64-bit in nature, it only makes sense that the applications that are run in these environments are also 32-bit or 64-bit. With that said, you should understand the benefits of running 32-bit and 64-bit applications and how those applications are executed in Windows environments.
Using 32-bit applications
When Windows 32-bit applications entered the market, there were several benefits to running Windows 32-bit applications instead of 16-bit applications; and these were directly to showing the stability and power of the 32-bit Windows OS. These features are as meaningful today as when they were implemented. Features such as
- Multithreading
- 32-bit data transfers
- Process isolation
One of the greatest benefits of 32-bit Windows applications is the ability to be multithreaded. Multithreaded applications run several threads of code concurrently. Each thread usually is assigned to a specific task. In the case of Microsoft Word, different threads can process typed characters, check spelling, or check grammar in your document all at the same time. If your computer has only one processor, only one task is actually performed at any given instance even though scheduling of all these different tasks is optimized. Even the latest couple of generations of phones have multicore processors, which really show off multithreaded applications, as each thread can be assigned to execute on a different processor. This not only optimizes the execution of the program but also evenly uses the processors. Be aware, not all 32-bit applications are multithreaded, and you will quickly see that in Task Manager as a single threaded application will heavily use a single processor or core, leaving the other relatively idle.
The 32-bit Windows applications work with data in 32-bit blocks, just as 16-bit applications work with data in 16-bit blocks. In any given clock cycle, a 32-bit application should be able to process more information than a similarly written 16-bit Windows application. In a perfect world, the speed factor of a 32-bit application would be twice that of a 16-bit application. Because we do not live in a perfect world, though, this multiplier is not actually realized. Other factors that affect the performance of the application include how the logic in the code was optimized to allow these 32-bit blocks to provide better performance.
The 32-bit Windows applications also run with some level of isolation from other applications that are running on the system. This provides better stability for the applications that are executing.
 When running 32-bit applications on a 64-bit version of Windows, the application runs in a 32-bit emulated environment called Windows on Windows 64, or WoW64. This allows the applications to run without any modifications. Applications that install into the C:\Program Files directory on a 32-bit Windows system will be installed into C:\Program Files (x86) on a 64-bit Windows system. The directory C:\Program Files is reserved for use by 64-bit Windows applications
Benefiting from 64-bit applications
Microsoft now offers a 64-bit version of all current Windows OSes to run on computers with 64-bit processors. Most companies, unless they have a critical 32-bit application, have switched completely over to using 64-bit Windows on 64-bit computers. Some companies that implemented Windows 7 and Windows 8.1 have chosen to run 32-bit Windows on their new 64-bit computers to ensure compatibility with their current applications, but these companies are quickly becoming the exception to the rule. Like with 16-bit versus 32-bit applications, applications need to be rewritten and compiled to take advantage of this faster 64-bit architecture.
The 64-bit applications offer all the same benefits of 32-bit applications, such as multithreading. They have the additional benefit of 64-bit data transfers and processing units, which theoretically would provide a huge speed improvement over 32-bit processing.
Executing in the Windows environments
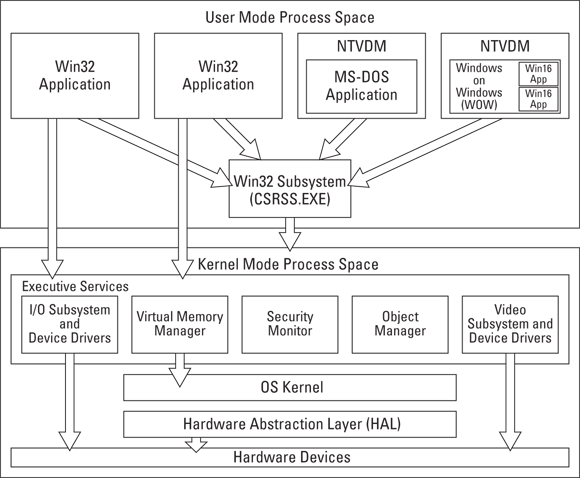
The architectural diagram of 32-bit Windows is shown in Figure 2-3, and all 32-bit versions of Windows use a similar architecture. Note that 32-bit Windows applications are executed as separate processes in the user mode portion of the OS, while 16-bit and MS-DOS applications run in an emulated 16-bit environment. This still holds true of any current 32-bit Windows OS, but it is very rare to find someone who needs support for 16-bit or MS-DOS applications.
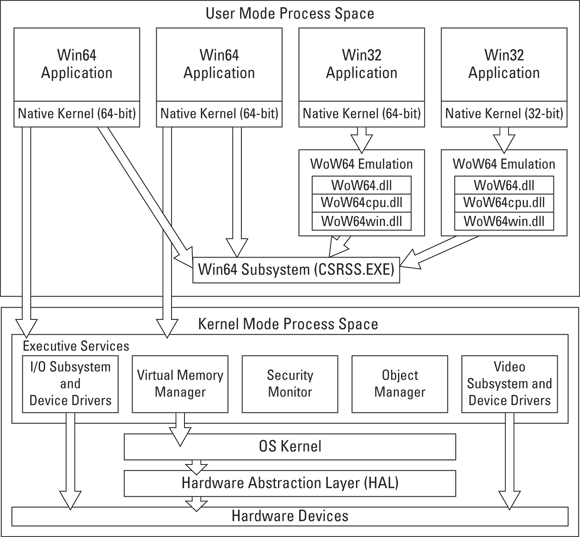
The 64-bit architecture is similar to the 32-bit architecture, except it does not support 16-bit applications; it runs 64-bit applications in their own process space and runs each 32-bit Windows application in an emulated 32-bit environment hosted by Windows-on-Windows 64 (WOW64). This structure is shown in Figure 2-4.
In Windows, 32-bit and 64-bit Windows applications are executed in an area that is completely separate from where the OS executes processes. This provides the best stability for both the OS and the applications that are running in it, but does hinder some of the backward compatibility of the product. This does not mean that Windows is not backward compatible, but rather that it is less backward compatible than the previous generations. There have been attempts to increase the backward compatibility of the Windows product line, so applications that may not have worked with earlier versions of Windows may work under Windows Vista, and applications that might not have worked under Windows Vista may work under Windows 7 or Windows 8.1.
Each 32-bit and 64-bit Windows application is given
- Its own address space to work with: If an application hangs or crashes, the separate memory address space makes it easy to destroy or flush the entire memory that deals with that application.
- A separate message queue: By having a separate message queue, if an application hangs or crashes, that halted application doesn’t block the messages that are destined for other applications.
- The ability to own several threads that are preemptively multitasked by the OS: Multiple threads per application allow the application to perform multiple operations at the same time.
Running 16-Bit Windows Applications
While it would be rare for you to encounter 16-bit applications in your technological journey, it doesn’t hurt to have a little background. The 16-bit Windows applications were originally designed to run under Windows 3.x. Some of these applications look for specific components in the OS to function properly. To support 16-bit Windows applications, Windows emulates the 16-bit Windows environment called Windows on Windows. (You can read about WoW earlier in this chapter.) The way in which this emulation is performed represents one of the big differences between versions of Windows.
The 16-bit Windows applications are single-threaded applications that actually share a single unit of execution with the 16-bit Windows environment. This is what I refer to earlier in the chapter as cooperative multitasking. The entire 16-bit Windows environment executes via a single processor thread. This thread is then shared among all 16-bit Windows applications running in the 16-bit Windows environment.
Within Windows, all 16-bit Windows applications are executed from within a 32-bit Windows NTVDM (Virtual DOS Machine). This NTVDM is a complete, emulated DOS environment onto which a complete emulated 16-bit Windows environment is loaded. It is within this environment that 16-bit Windows applications are executed. Although this seems like a small point, it means that the entire 16-bit Windows environment that is implemented is contained within a newer Windows 32-bit or 64-bit environment. That makes the entire environment as safe and stable as any other Windows application running on the system.
An advantage to using current Windows environments is that 16-bit Windows applications can be run in separate memory spaces. When a 16-bit Windows application runs in a separate memory space, a new NTVDM is loaded along with a new WoW environment. The benefits of running applications in separate memory space are preemptive multitasking between applications and process isolation. It is important to note that 16-bit Windows applications cannot be run on 64-bit Windows.
As a CompTIA A+ Certified Professional, knowledge of these environments will allow you to address issues with applications and provide compelling reasons for late adopters to upgrade to the current Microsoft Windows OS.
Running MS-DOS–Based Applications
This is the second piece of background information for dealing with technology holdouts, again, with luck, you will never have to deal with it. MS-DOS–based applications represent the oldest type of applications you are likely to run on your computer. MS-DOS applications are supported by 32-bit Windows. MS-DOS–based applications have always been designed to run alone on a computer. They expect to be the only application ever running on that PC, and as such expect to see certain things, like no Windows presence. Microsoft uses virtual machines to provide a unique environment for these applications. These virtual machines simulate all the hardware that would normally be found in a computer, including
- Keyboard
- Mouse
- Monitor
- COM ports
- RAM
- Disk drives
With all these components being virtualized, an MS-DOS–based application believes that it is running alone in a computer. The virtual computer’s settings can be modified through a program information file (PIF), which I discuss in the next section.
Program information file (PIF) settings
Every MS-DOS–based application that executes on your computer starts by configuring a working environment from settings found in a PIF. This is the case even if you are not aware that a PIF file is being used because a _default.pif file on your hard drive is used if no other PIF exists.
If you want to create a default PIF for a specific application, right-click the application and choose Properties. Even though there is not currently a PIF for the application, you will see all the PIF-related tabs, such as Screen, Memory, Font, and Misc. If you make any changes to the application settings on the tabs and click OK to close the dialog box, a file named <application>.pif is created in the same directory as the application executable. This PIF then becomes the default PIF for that application because it is in the same directory as the application and is named <application.pif>. Unlike most files, the .pif extension stays hidden, even if displaying file extensions is enabled.
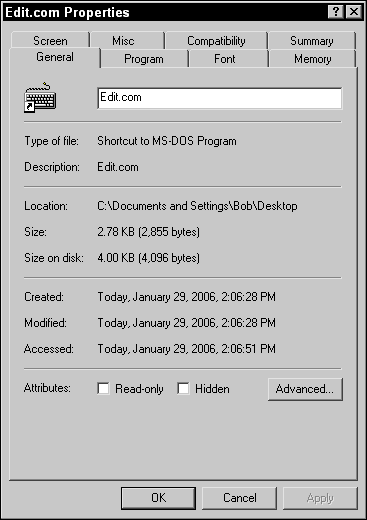
You can discern a PIF file by viewing the properties of the file (right-click it and choose Properties). The file type will be Shortcut to MS-DOS Program; and the Font, Memory, Screen, and Misc tabs are specific to PIF files, as shown in Figure 2-5. At any time after closing the dialog box and the default PIF has been created, you can make changes to it by right-clicking either the application or the PIF to bring up Properties; either action allows you to edit the settings. Even though you can access the settings through the properties of the application, you are really editing the PIF.
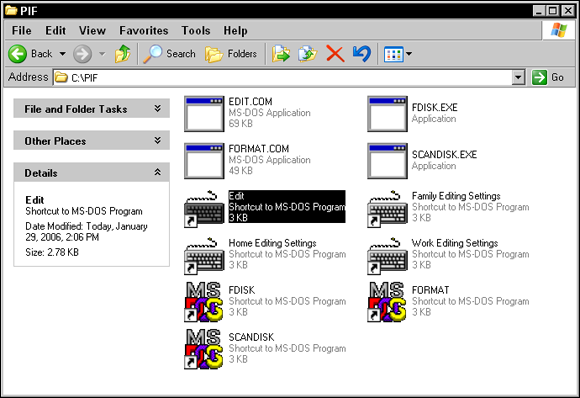
You might also be confused by the fact that a PIF for an application looks exactly like a shortcut for a LNK file. Figure 2-6 shows a series of PIFs created for four MS-DOS–based applications. Notice that the first four icons in the window are MS-DOS application icons, and the last three icons are the default PIFs for the fdisk.exe, format.com, and scandisk.exe applications. In addition to the default PIF, edit.com has three additional PIFs that have been created for it (the keyboard-looking icons in the middle of the window). Each edit.com PIF can have its own unique settings. To access the settings for a PIF, right-click it and choose Properties. The Properties window of a PIF contains seven tabs:
- General
- Program
- Font
- Memory
- Screen
- Misc
- Summary
 You should always exit your MS-DOS application from within the program, using whatever commands or options are required. Unlike Windows programs that have a standard Exit in the File menu, MS-DOS applications usually have their own special commands for exiting or closing the application, such as key combinations using CTRL or ALT, and Q, X, or W.
Understanding incompatibilities
When you examined 16-bit Windows-based applications earlier in this chapter, you looked at potential incompatibilities that could arise from direct hardware access. The same incompatibilities apply to MS-DOS–based applications. If your application attempts to make direct hardware calls instead of standard MS-DOS–based system calls, it will not function under modern Windows OSes. Modern Windows OSes attempt to be backward compatible, but not at the risk of OS stability. Basically, if you have an application that makes direct hardware calls, it will not work under the newer Windows OSes.
Windows Compatibility Modes
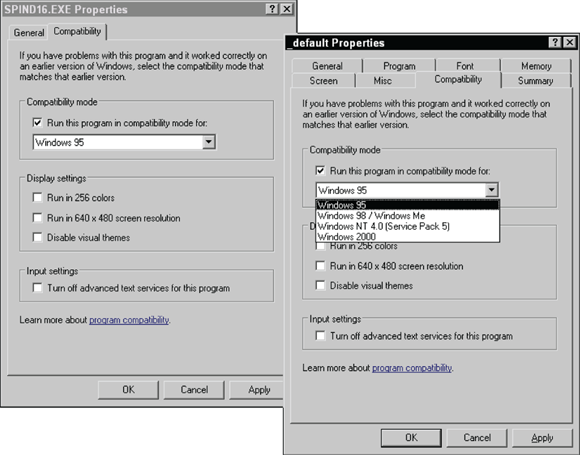
Microsoft takes backward compatibility seriously, so many applications written for their first OS (MS-DOS) or earlier versions of Windows will work with current versions of Windows with a few minor tweaks. Microsoft has provided a new set of options to aid with backward compatibility for applications that are not included with the OS. These features are found on the Compatibility tab in the Properties dialog box of the executables, shortcuts, and PIFs. Compatibility settings for an old Windows application are shown in Figure 2-7.
 These options are designed to be used with locally installed applications. You can use them with applications from CD-ROMs or from a network drive, but the settings will not be saved.
Because many applications have been written to take advantage of specific features found in various versions of the OS, the Compatibility Mode section allows you to emulate the following OSes:
- Windows 95
- Windows 98/Windows Me
- Windows NT 4.0 (Service Pack 5)
- Windows 2000
- Windows XP (Service Pack 2)
This does not emulate the entire OS, but rather disables some newer APIs (application programming interfaces) and emulates some older ones, thereby improving compatibility.
Windows 7 adds the following OSes to the Compatibility Mode section:
- Windows XP (Service Pack 3)
- Windows Vista
- Windows Vista (Service Pack 1)
- Windows Vista (Service Pack 2)
Windows 8 adds Windows 7 to the Compatibility Mode OS list, and Windows 8.1 adds Windows 8 to the Compatibility Mode OS list.
Another common problem revolves around screen settings. Many times, I have had to change my screen resolution or color depth to run a specific application (and then reset it later). The Display Settings section allows you to automatically change the display settings for the application to one of the following settings:
- Reduce color mode to 8-bit (256) colors
- Reduce color mode to 16-bit (65,536) colors
- Run in 640 x 480 screen resolution
- Run this program as an administrator
- Disable visual themes
- Disable desktop composition
- Disable display scaling on high DPI settings
- Enable this program to work with OneDrive files
 If you have an application that has problems displaying menus or toolbar buttons, you can attempt to use the Disable Visual Themes setting. This removes the modern rendering of buttons, with the Windows smoothness, drop shadows, Aero desktop, and so on.
 Most of the settings that can be adjusted or disabled on the Compatibility tab can also be changed elsewhere, such as the Performance Options, on the Advanced tab of the System Control Panel, which will change the setting globally for the computer.
 If you have an old application that will not run properly on Windows, do not forget about the Application Compatibility Settings.
Windows XP Mode
With the ever-increasing number of security features that are incorporated into new Windows OSes — such as User Access Control (UAC), tightened permissions on file systems and the Registry, and restrictions on service access — more compatibility issues arise for applications that require more liberal access to the computer. Windows 7 brings these security restrictions one step further, and to try to deal with possible compatibility issues for users who are upgrading from Windows XP, Microsoft has provided XP Mode.
The secret of XP Mode is that you are actually running Windows XP on your computer, and that copy of Windows XP is what runs the applications that you cannot get to work with Windows 7. Microsoft provides a Virtual PC image file that contains a Windows XP installation, which can be downloaded at www.microsoft.com/windows/virtual-pc. To install Windows XP Mode, download the current XP Mode file and Virtual PC from Microsoft’s website and install Virtual PC followed by XP Mode. Using the default installation, Windows XP Mode will start at the end of the installation process, starting the Windows XP Mode Setup configuration.
The Windows XP Mode setup will get you to agree with a license agreement, choose an installation folder, set a password for the XPMUser account, enable Automatic Updates, and inform you that drive sharing will be enabled between the Virtual PC machine and your host computer. At the end of the process, the Start Setup button will apply your settings. Setup will take several minutes to prepare Windows XP Mode for its first use.
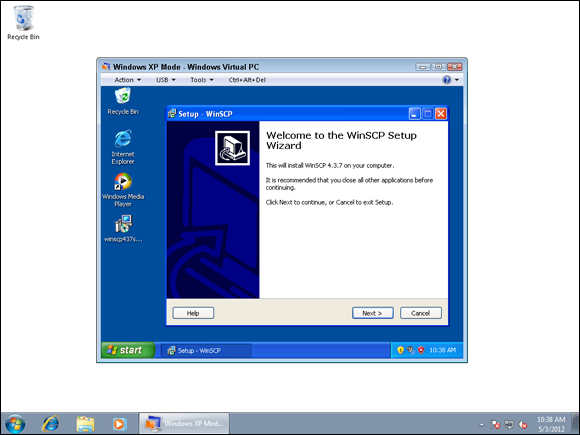
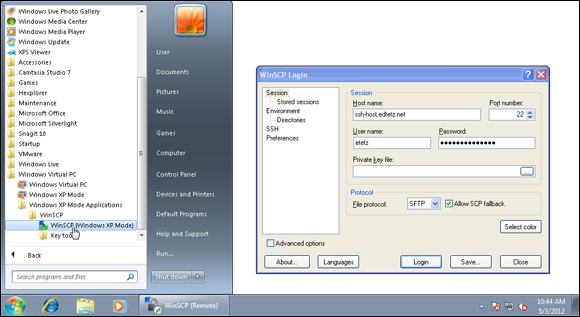
After installation, you will be able to launch XP Mode by choosing Start ⇒ All Programs ⇒ Windows Virtual PC ⇒ Windows XP Mode. When you run Windows XP Mode, you will have a Virtual PC window containing a Windows XP virtual machine, into which you can install any compatible application. Figure 2-8 shows the installation of WinSCP inside the Windows XP virtual machine running on the Windows 7 computer. Windows XP Mode tracks these application installations and publishes links to them on your Windows 7 Start menu, under Start ⇒ All Programs ⇒ Windows Virtual PC ⇒ Windows XP Mode Applications. If you have other applications that you would like to have published, which did not add the appropriate shortcuts, place the shortcuts in the C:\Documents and Settings\All Users\Start Menu directory on the XP Mode virtual machine.
When launching applications from the Windows XP Mode Applications folder on your Start menu, the applications are launched on the virtual machine, but run in a seamless window. Seamless window means that although the application is running on the virtual machine, all the surrounding windows from the virtual machine are hidden from the user, so it appears that the application is running on the Windows 7 host computer.
Figure 2-9 shows the seamless window running WinSCP, as well as the menu item from which it was launched.
While it is not truly running the applications in Windows 7, Windows XP Mode does provide the user with an experience that is similar to running the applications on his or her Windows 7 computer. If not for Windows XP Mode, some applications could not be used on Windows 7 computers, so this provides you with a valid work-around to those issues. Issues of application compatibility could be enough to hold up a corporate OS upgrade to Windows 7.
Windows 8.1 and newer OSes do not include Windows XP Mode, as this feature was designed to be used as a temporary measure to allow Windows XP applications to run on Windows 7 until suitable Windows 7 replacements could be found.
Application Install, Start, and Load Errors
Many Windows application errors are related to permissions to the file system when using NTFS and the Registry. Starting with Windows Vista, the default permissions restrict changes to files, addition of files to specific directories, and changes to portions of the Registry. In addition to these restrictions, many applications that attempt to directly access hardware will fail. If the application is a modern 32-bit or 64-bit Windows application that is supposed to work with Windows Vista, most installation errors can be traced to not meeting either the minimum installation requirements or permissions.
Microsoft has made these permissions changes to prevent most users from being able to install their own applications and make unauthorized changes to the OS. One way to see whether the problem is with a user installing or launching an application is to temporarily add the user to the local Administrators group and see whether the problem is resolved. If that resolves the issue, you know that the problem is related to permissions to one of these locations.
If you can’t get permissions information from the application vendor or can’t grant the user elevated group membership, the Microsoft Sysinternals (http://technet.microsoft.com/en-us/sysinternals/default.aspx) Process Monitor utility can help you identify the permissions changes required.
Getting an A+
This chapter examines application management from installation to execution. The following points are covered:
- The application support architecture of 32-bit Windows and 64-bit Windows when it comes to running and supporting applications.
- There are core architectural differences between 32-bit and 64-bit Windows. Support for applications differs based on the architectural differences of the OSes.
- The new application compatibility features in Windows allow it to support a wider range of older Windows applications.
1. You are working with a customer and are trying to resolve issues with application compatibility when running older applications on her Windows 7 computer. What Windows 7 feature allows running incompatible applications on the Windows 7 computer?
(A) Backward Compatibility Mode
(B) Windows 7 16-bit Mode
(C) Windows XP Mode
(D) Windows 7 Mode
2. You have an application that has very large memory requirements. How large is the memory space that each 32-bit Windows application has to work with?
(A) 16MB
(B) 1GB
(C) 2GB
(D) 4GB
3. To support your company’s 16-bit custom application, you need to select an OS for the computers that will be running the application. Which of the following operating systems support 16-bit Windows applications? Choose all that apply.
 (A) Windows 7 32-bit
 (B) Windows 7 64-bit
 (C) Windows 8.1 32-bit
 (D) Windows 8.1 64-bit
 (E) MS-DOS
4. You are assisting a user with an application that is constantly crashing when it is launched. What effect does a 32-bit Windows application have on the rest of a Windows system when it hangs or crashes?
(A) It halts 32-bit Windows applications that are running on the system.
(B) It causes a panic in the NTOSkernel.
(C) It results in a halt screen or blue screen (BSOD) error.
(D) It has no effect on other applications.
 You may also find the Store icon pinned to the Taskbar or the Start screen.
 Always use care when working in the Registry; improper changes can leave you in a position where you will be required to re-install the OS.
 Make sure that you are familiar with the standard method of adding and removing applications from your system through the Programs and Features Control Panel.
 When running 32-bit applications on a 64-bit version of Windows, the application runs in a 32-bit emulated environment called Windows on Windows 64, or WoW64. This allows the applications to run without any modifications. Applications that install into the C:\Program Files directory on a 32-bit Windows system will be installed into C:\Program Files (x86) on a 64-bit Windows system. The directory C:\Program Files is reserved for use by 64-bit Windows applications
 These options are designed to be used with locally installed applications. You can use them with applications from CD-ROMs or from a network drive, but the settings will not be saved.
 (A) Windows 7 32-bit