1 Locate all your belongings before vacating the premises.
2 Replace missing clothing.
If you are lacking pants, put your legs through the sleeves of your shirt and tape or staple the neck. If you are missing a shirt, use your socks as a bikini top, held in place with shoelaces from your running shoes: One lace goes through the top of each sock and is knotted at each end; that lace will go around your neck. The other lace goes through the heel of each sock, is knotted at each end, and becomes the strap that goes behind your back. Adjust for proper fit.
3 Dumb down your evening garments.
Remove any showy clothing or jewelry and wash your face to remove any trace of heavy makeup. Wear a hat, sunglasses, and drab clothing, if you have the option.
4 Avoid crowds.
Leave for home very early in the morning, when there will be fewer people on the street. If you wake up late, do not cross campus during peak class times.
Match the gait of other passersby—but do not run. The faster you walk, the less likely you’ll be noticed. Walking fast also cuts down on the amount of time and thus the number of people to whom you will be exposed.
Be Aware
• Arrange in advance a signal (bird call) to get your roommate’s attention when you arrive after hours with no keys.
• Prepare and practice excuses and explanations for parents, boyfriend, and others you may encounter.
1 Do not get drunk.
When you need to refill your glass, do it yourself. Do not let a stranger get a drink for you. Drink a glass of water between alcoholic drinks.
2 Clearly convey your desire for a straightforward hook-up.
Verbalize your desire to hook up with him for that night. State that you are not interested in pursuing a relationship of any sort. If he agrees to this, he may be interested in only a one-night stand as well, and may be just what you’re looking for.
3 Clear the potential hook-up with a trusted friend.
Always go to a party or bar with a reasonably conscientious friend who does not have a penchant for drink or proven bad taste in men. Leave your keys with her. Introduce her to your potential hook-up and ask if she thinks you are about to make a mistake.
4 Retrieve your keys from your friend.
5 Go to your place.
Your place is usually the preferred destination, since you will be more in charge and comfortable.
6 Give yourself a last-minute excuse to get out.
Say that your roommates may be home and they would create a problem, so you will have to say good-night right now.
7 Assess his place.
If you do wind up at his apartment or dorm room, look for signs of misrepresentation or personality disorder. Flip through recent photos to get an idea of his social activities. Lock yourself in the bathroom and check out the contents of his medicine cabinet. Check the bedroom for concealed cameras. If his roommates are home, note whether your hook-up is winking at them or if he politely introduces you by name. Chat with them to make sure you are comfortable in the situation.
If you become uncomfortable or suspicious, leave quickly if you are at his place. If you are at home, say that you forgot that your boyfriend is coming over or that you’ve got a major headache/infection/test in the morning and need to get a few hours of sleep. If he seems reluctant to leave, give your roommate a sign to rescue you. Do not make any promises, however vague, to see him again.
Be Aware
• Going to your place for a hook-up can be problematic because he will know where you live and he may observe more about you than you would like. Also, you can’t get up and leave when you want to end the hook-up.
• If you anticipate that you may be bringing a hook-up home, leave a note taped to your door. “Honey, I went to bed early. Please be quiet when you come in.—Mike.” You can then explain later to your hook-up, if you want an excuse to end the evening, that your boyfriend has unexpectedly come over. If you want to continue with the hook-up, you can say that Mike is dating your roommate.
![]() Assign them the same nickname.
Assign them the same nickname.
Call them all “honey” or “sweetie” or “pumpkin” so that you do not accidentally use the wrong name with the wrong person. It also helps if you discuss the same topics and pick the same song as “our song.”
![]() Keep to a schedule.
Keep to a schedule.
See them only on their assigned day—Mary every Thursday, Emily every Friday, and Jenny every Saturday. They will see you as highly disciplined and will not expect to monopolize your time.
![]() Select three different favorite bars, activities, or restaurants.
Select three different favorite bars, activities, or restaurants.
A special place for each reduces your chances of running into another date. Look for dimly lit, off-campus locations.
![]() Be vague.
Be vague.
Provide few details to each date about your whereabouts during nondate evenings. Offer ambiguous responses like “I wish I had time to see you more often, too.”
![]() Keep your answering machine volume turned down.
Keep your answering machine volume turned down.
If you are home with one of your dates and another calls, you will not be found out.
![]() Advise your roommate to say as little as possible.
Advise your roommate to say as little as possible.
Explain your situation and ask for cooperation. Tell your roommate to say only “Nice to see you” when he sees one of your dates. He should avoid “Nice to meet you” or “Nice to see you again” since he may be easily confused about who he is talking to.
![]() Do not place photographs around your room.
Do not place photographs around your room.
The fewer things and people to explain, the better. Also remove stuffed animals, flowers, cards, mix CDs, or anything that might look like a romantic gift.
![]() Tell everyone that you have a large family.
Tell everyone that you have a large family.
Prepare for the time that you will be spotted with another date. If asked later who you were with, you can say she was your cousin.
![]() Refer to several part-time jobs.
Refer to several part-time jobs.
Say that you are sorry to be so unavailable because you are always working. Mention that you are saving all the money you are earning for tuition and other living expenditures so that you don’t build expectations about gifts or expensive dates.
![]() Do not boast.
Do not boast.
Aside from your roommate, keep any mention of the simultaneous relationships to yourself. The more people you tell about your multiple assignations, the more likely it is that you will be discovered.
1 Stop rowing.
As soon as a team member falls off the scull, cease rowing.
2 Coordinate strokes.
Position the boat to within an oar’s length of the victim.
3 Perform an extension rescue.
The person closest to the teammate in the water should extend an oar to the victim, making sure not to hit him with it. If the victim is injured or otherwise unable to grab the oar, the rescue must take place in the water; skip to step 7.
4 Pull the victim close to the boat.
5 Hold the victim against the side of the boat.
Do not attempt to bring him on board (or let him climb in), or you will risk capsizing the craft.
6 Row the boat to shore.
Stop rowing.
7 Enter the water.
Dive from the boat (or swim from shore) to the downed rower.
8 Approach the victim from the rear.
9 Perform a double armpit tow.
Facing the victim from behind, place your dominant arm under one of the victim’s arms. Extend your arm across the victim’s chest and grab him under the opposite armpit.
Swim to safety
10 Tow the victim to safety.
Using a breast-stroke or side-stroke kick, swim the victim back to the boat, to a trailing boat, or to shore.
Be Aware
If the victim is unconscious, call for emergency assistance.
1 Place the victim on her back.
Lying with the eye facing up reduces the chance of leakage of the liquid inside the eyeball.
Place a folded jacket or towel underneath the victim’s head, elevating it slightly above the level of the heart to reduce pressure inside the skull and the eyeball.
3 Apply a cold compress.
Place ice in a plastic bag. Do not apply the compress directly to the skin: Use a layer of clothing or plastic to prevent tissue from freezing. Hold the compress gently on the tissue surrounding the eye. Avoid pushing or putting pressure on the eye.
4 Offer pain medication.
If the victim is conscious, administer 600 milligrams of ibuprofen. If ibuprofen is not available, use acetaminophen. Avoid administering aspirin: It may cause excess bleeding, which can be harmful during an eye operation.

Elevate the head slightly to reduce pressure.
Tell the emergency operator that you require an emergency room with a qualified ophthalmologist and ear-nose-throat (ENT) surgeon on call.
Be Aware
• A hockey puck to the head may fracture the socket containing the eye and/or rupture the eyeball itself. Both conditions require immediate medical attention.
• Always ask the victim about allergies to medicine before administering any drugs, even ibuprofen.
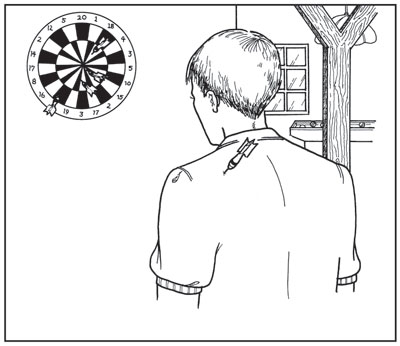
1 If the dart is embedded in the head, neck, chest, or back, leave it in place.
Rinse a small, clean towel in cold water, wring it out, and wrap the towel around the base of the dart to stabilize it and prevent further penetrating or shearing injury. Take the person to the hospital, or call for an ambulance.
2 Remove the dart.
If the dart is embedded in an arm or leg, remove it from the victim using a fast, pulling motion. Put the dart in a safe location where it will not cause further injury. (If the dart bounced or has already fallen off the victim, ask where he was hit.)
3 Place the victim in a sitting position.
Locate the dart.
4 Examine the wound.
If blood is spurting from the wound, apply a clean cloth to the injury site. If there is bleeding but no spurting, skip to step 8.
5 Apply pressure.
Elevate the affected area above the level of the heart. Hold the cloth firmly in place for 5 minutes.
6 Remove the cloth and check the wound.
If blood continues to spurt, apply a new, clean cloth, elevate, and apply pressure for 15 additional minutes. Change the cloth as needed. For persistent oozing, apply pressure for 30 minutes.
Once the wound has stopped spurting, check the injury site, wiping away any seeping blood.
8 Rinse.
When the bleeding has stopped or slowed, gently rinse the wound under cool tap water.
9 Bandage.
Cover with a large, sterile dressing.
10 Clean the dart.
Rinse the dart under hot tap water, then wipe thoroughly with rubbing (isopropyl) alcohol.
11 Remove the victim from the field of play.
Be Aware
A tetanus booster may be required if the victim has not had one in the previous 10 years.
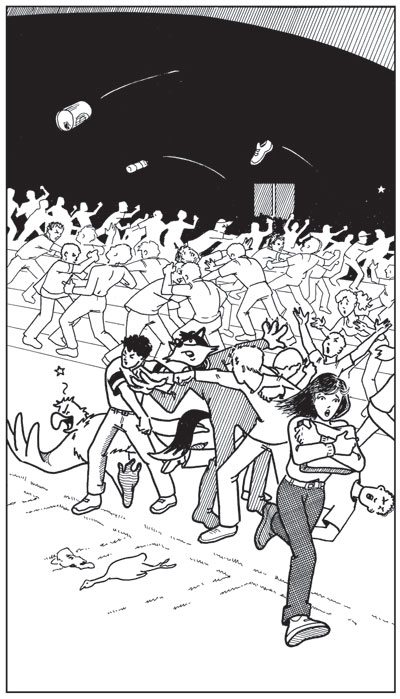
1 Scan the crowd.
Quickly determine the focus of the rioting: mascot, goalpost, star player, referee, fans, band members, coaches, or cheerleaders. Physically distance yourself as quickly as possible.
2 Hide any obvious school affiliation.
If the mob appears to be attacking your school’s fans, remove any clothing items with school colors, letters, or emblems. Stuff these items into a nondescript bookbag or plastic bag. Wrap your arms around your bag and use it to shield your torso as you begin your escape. If you do not have an appropriate carryall, leave your school gear behind.
3 Create a protective helmet.
Stuff crumpled-up newspaper or cardboard inside your hat for cushioning. If you do not have a hat, place an empty popcorn tub or other container over your head.
4 Move away from the mascots.
Regardless of whether they are the focus of the riot, both teams’ mascots are especially vulnerable to attack. Stay well clear of either mascot.
Moving quickly away from the mascots.
Most rioters move en masse in a single direction toward a particular object. Determine which way the mob is headed.
6 Watch for projectiles.
Bend your knees and keep your head low to avoid flying cans, bottles, pennants, water balloons, rocks, pipes, benches, people, or other objects.
7 Move sideways through the crowd to the nearest exit.
Avoid moving forward (toward the center of the riot) or backward (against the surging mob).
Be Aware
If you’re the cause of the riot due to your actions as a fan, player, or mascot, ditch your uniform or suit and run.
![]() Appeal to your friends’ soft side.
Appeal to your friends’ soft side.
Tell your friends that you are having your annual “drink-free” night. When they look confused, express mild discomfort and then sheepishly admit you are broke. Your reluctance to take advantage of the situation may result in your friends plying you with free drinks.
![]() Goad strangers into making you drink.
Goad strangers into making you drink.
Sidle up next to someone, preferably from a boisterous state like Texas. Order water. When he ridicules you, tell him you have never had a drink before. Allow him to goad you into drinking for as long as he is willing to buy. This strategy will also work on someone who is alone and is not particularly attractive.
![]() Tell a sob story.
Tell a sob story.
Create a plausible tale of woe. Sit next to a woman with a sympathetic face. Say that you had to put your dog to sleep that day. Reveal that you caught your girlfriend in bed with your roommate. Pepper your story with as many details as possible. Cover your face with your hands. Apologize for being so upset and thank her for being such a good listener. Gratefully accept a drink.
Ask for a glass of water with a twist of lime. Pick a mark—choose someone with sweeping arm movements—and accidentally bump him with your elbow and spill your drink on yourself. When he offers to get you a new drink, ask for a gin and tonic. You can also set your glass of water near someone’s elbow. When she knocks it over, allow her to replace it.
![]() Scavenge leftover drinks.
Scavenge leftover drinks.
Drink the half-empty beers or mixed drinks left behind by bargoers. Carry a small spray bottle of disinfectant or soapy water. Spray a napkin and wipe the glass with it. Beware of smokers who leave behind drinks—they often drop butts in their drinks or bottles.
![]() Gamble.
Gamble.
Make bets that you know you will win, or perform a surefire bar trick for drinks. Select a mark, preferably someone who has been drinking heavily. You will need a small brandy snifter, an empty glass, and a stemless maraschino cherry.
• Place the snifter upside down over the cherry.
• Wager a free drink that you can get the cherry into the empty glass without touching the cherry or empty glass. The cherry can touch only the snifter, which must remain upside down. Squashing the cherry onto the rim is prohibited.
• When he bets, show him the power of centrifugal force. Hold the base of the snifter and rotate it quickly on the bar top. When the cherry starts spinning inside the glass, lift the snifter off the table. Keep rotating the snifter and hold it over the glass. When you slow your rotation, the cherry will drop into the glass. Collect your free drink.
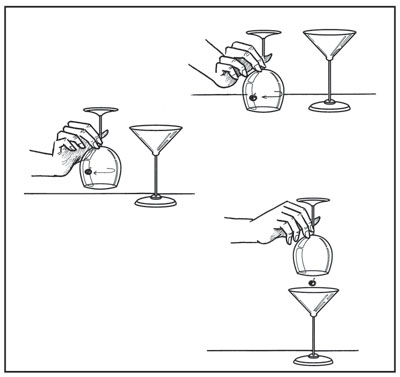
Rotate sifter. Lift sifter off the table as the cherry spins. Drop the cherry into the target glass.
Be Aware
• Frequent the same bar. Bartenders and waitstaff will get to know you and may occasionally send free drinks your way or let you drink on credit.
• Skip dinner. The drinks you do get will have more effect on an empty stomach.
• Frequent happy hours that have two-for-one specials. Other patrons may be willing to give you their “free” drink.
1 Hold the bottle you wish to open upright in your nondominant hand.
Grip the neck of the target bottle, placing your index finger over the back edge of the cap.
2 Hold the second bottle horizontally around the label.
Grip this bottle, the opener, as though shaking hands with the bottle.
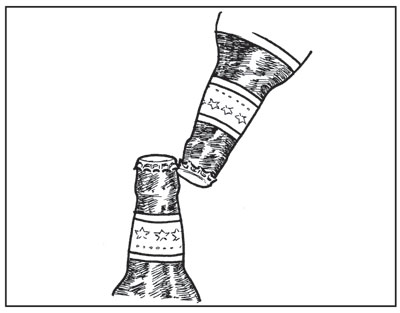
3 Fit the shallow ridge found at midcap of the opener bottle under the bottom edge of the cap of the bottle you wish to open.
By using this ridge, and not the bottom of the cap, you will not risk opening the second bottle in step 4.
4 Using the opener bottle as a lever, press down and pry the cap off the target beer bottle.
5 Enjoy.
ALTERNATE METHOD:
Hold both bottles end to end perpendicular to the ground, with the crimped edges of the caps together, locking them in place. Pull. Be careful, however, as either or both bottle caps could come off.
1 Grip the bottle in your nondominant hand.
Make a fist around the top of the bottle so that your thumb overlaps your index finger and the web between your thumb and index finger sits in the groove under the cap.
2 Fit the bottom of the lighter under the teeth of the cap.
Position the lighter so that it rests on the middle knuckle of your index finger.
3 Press the top of the lighter down and toward the bottle.
Use the index finger on your dominant hand to provide resistance.
4 Pry off the cap.
If necessary, turn the bottle and repeat.
1 Put the teeth of the bottle cap against the edge of a table.
The cap should be on top of the table edge; the bottle should be below the table. Do not attempt on a soft wood or antique table.
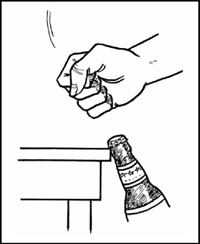
2 Use your fist to hit the bottle.
The bottle will take a downward trajectory, and the cap will pop off.
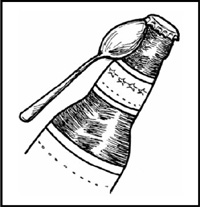
1 Place the implement under the bottle cap, as high as it will go.
2 Pry off the cap.
Slowly go around the cap and lift up each crimped area with the tool, similar to opening a can of paint.
3 When the cap starts to move, fit the tool higher up under the cap and remove it.
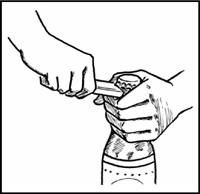
1 Unfasten your belt buckle.
If your pants are in danger of falling down, sit.
2 Pull the “tooth” of the buckle to one side.
3 Fit the cap into the buckle so that one edge is wedged against the buckle.
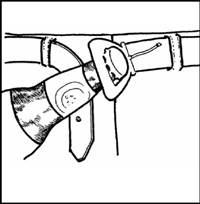
4 Pry off.
Pull the bottle slowly. A quick tug may result in a spill.
5 Refasten your belt.
1 Fit your bottle into the lock.
Place the head of the bottle into the recession in a doorframe into which a deadbolt slips, so that the cap fits against the notch in the lock’s frame.
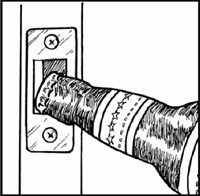
2 Pull up slowly.
The bottle cap should pop right off.
1 Look for an arrow on top of the hydrant labeled “open.”
2 At the end of the arrow, locate the recess between the screw and the nut.
3 Insert the cap into the recess.
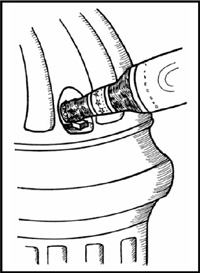
4 Press down slowly on the bottle until the cap comes off.
1 Place the cap between the shoe and the blade.
Hold onto the bottle with your dominant hand. If you are wearing the skate, use the hand opposite the skate to open the bottle.
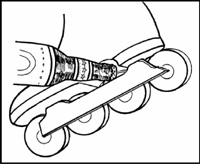
2 Pull up slowly on the bottle and pry off.
Quickly right the bottle to avoid spilling.
1 Hold the stick of the bridge in one hand and a beer bottle in the other.
Do not attempt to open over the pool table.
2 Position the cap inside the opening of the bridge.
Fit the cap snugly against the edge.
3 Press down on the bottle.
Slowly increase the pressure until the cap loosens. Right the bottle immediately to prevent spillage.
1 Locate a newspaper, snack, or soda vending machine.
An older soda machine might actually have a bottle opener.
2 Place the cap in the coin return.
Wedge the cap against the top of the opening.

3 Press down slowly until the cap is removed.
Be Aware
Never drink from a bottle with broken or chipped glass.
![]() Make your own cooler.
Make your own cooler.
Fill a washing machine, bathtub, or sink with ice for an instant cooler. Drain the water when it warms and add more ice. For faster cooling, twirl the bottles in the ice. Guard these locations if they are in shared or public areas.
![]() Use a toilet tank.
Use a toilet tank.
The water in the tank is usually cool. Place sealed bottles and cans in the tank. Thoroughly wash and rinse the bottle before drinking.
![]() Use a soda machine.
Use a soda machine.
Stick a bottle of wine up the ramp of a soda machine. Guard it well.
![]() Use an aerosol “keyboard duster.”
Use an aerosol “keyboard duster.”
Turn the can upside down and spray it around the bottle from about six inches away. The cold air under pressure will come out more quickly, slightly chilling the beverage.
Hang a bucket with brevages outside window.
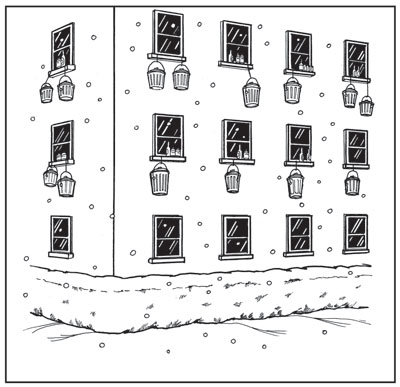
![]() Use the weather.
Use the weather.
If the weather is cold, rainy, or snowy, place the beverages on your windowsill or hang a bucket or shelf from your window to store beverages outside. Do not leave drinks outside for more than an hour on very cold days, or you run the risk of freezing them. Do not hang drinks outside the window if you live on the first floor unless you are able to guard them constantly.
• BUCKET METHOD: Tie a square knot to fasten one end of a rope to the handle of a bucket; secure the other end of the rope to your desk or another sturdy, immovable object. Dangle the bucket outside the window. Make sure the bucket is not overloaded, or the bucket or bottles may fall and seriously injure a passerby below. Do not fill the bucket with water; the cold air will cool the bottles enough.
• SHELF METHOD: Use a plank and knot a rope around each end. Lower the shelf out your window so that it is level and within arm’s reach. Tie securely to sturdy objects inside the room. Place your bottles carefully on the shelf and hang it out the window. Note: Do not use this method on especially windy days.
![]() Stow bottles and cans in a fountain.
Stow bottles and cans in a fountain.
Chilling your beverages in public places can result in theft or unwanted attention from authorities, so store your beverages in a less-trafficked location.
![]() Ask an ice cream vendor to chill your bottle.
Ask an ice cream vendor to chill your bottle.
Ask a friendly looking vendor with an ice-cream or food cart to store your beverage in his cooler or refrigerator. Make sure you know his route if he moves around campus so you can retrieve it when it is needed. Do not entrust beverages to a vendor in a motorized vehicle.
1 Focus your gaze on a stationary object in the room.
Keep your eyes open. Avoid looking at ceiling fans. Stare at the object for one minute.
2 Close your eyes.
3 Picture the object you were looking at.
Imagine that the object is imprinted on the inside of your eyelids.
4 Open your eyes.
If the spinning returns, stare at your object for one minute.
5 Close your eyes.
Repeat steps 3 and 4.
6 Repeat steps 3, 4, and 5 until the spinning stops or you pass out.
Be Aware
• The spins usually occur when your eyes are closed. Watch television, go out for some air, or eat a meal—anything to stay awake and keep your eyes open until you sober up.
Stare at a fixed object.
• Eating reduces drinking-related sickness by reducing the speed at which alcohol in the stomach is absorbed into the bloodstream. Eat before drinking: Once you have the spins, it is too late.
• Alcohol is a diuretic and dehydrates. After drinking, replace lost fluid, vitamins, and electrolytes by consuming sports drinks. Avoid drinking excessive amounts of plain water, which will dilute the sodium concentration in the body.
1 Be prepared.
Vomiting may be preceded by sweating, nausea, gagging, increased saliva, or the sensation of swelling under the tongue.
Get to a quiet bathroom or a private area with an appropriate receptacle, such as a toilet, trash can, or metal bowl. If outdoors, look for an area secluded by trees or bushes. Avoid public spaces.
3 Remove necktie or necklace.
4 Open collar.
Unbutton your shirt at least two buttons and pull the sides apart. If you are wearing a pullover, remove it completely, if time permits. Tie back long hair.
5 Relax.
Do not resist.
6 Target a destination.
Vomit into the receptacle. If vomiting into a toilet, grip the sides for support.
7 Wait.
The first bout of vomiting may not be the last. Wait several minutes to make sure you remain in control.
8 Clean up.
Wash your hands and face, rinse out your mouth, and brush your teeth.
9 Return to the party.
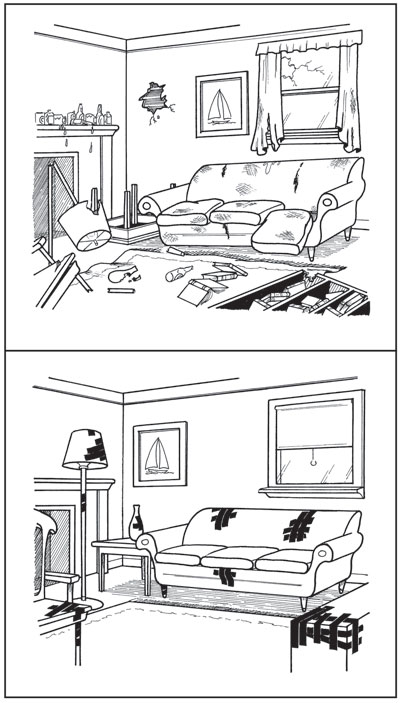
1 Hide it.
If the hole is above waist height, hang a poster or other wall decoration over the hole. If the hole is below waist height, move a sofa or easy chair from another location and place it in front of the hole. Sweep or vacuum the floor where the furniture was previously located, or its absence will be obvious.
2 Make faux-Spackle.
Slowly mix flour and water together until they form a thick paste, or use white toothpaste for a quick fix.
3 Fill the hole.
Using a butter knife or your fingers, fill the hole with the mixture. For very large holes, first fill the cavity with crumpled newspaper. Make sure the paste completely covers the hole and extends onto the wall around it. Spread paste evenly and remove clumps.
4 Allow to dry.
Wait at least 30 minutes, or until the paste hardens.
Using fine-grain sandpaper, sand the wall until it is smooth. Paint if necessary.
6 Camouflage the fix.
If the wall color was not white originally, use a suitable Magic Marker or nail polish to conceal your repair.
Be Aware
Repairing large broken sections (bigger than fist-size) may require extensive sawing of the cracked drywall and patching with drywall and/or chicken wire, which is a difficult, time-consuming process. For holes of this size, cover the affected area with a piece of furniture until professional repairs can be made or you move out.
1 Secure the remaining glass.
Stripe duct tape diagonally across pane to help prevent further breakage.
2 Patch the hole.
Use cardboard to cover the hole, securing it with more duct tape.
3 Pull down the shade or close the curtains.
• If you are expecting to have a particularly raucous party, striping windows with tape beforehand can minimize damage.
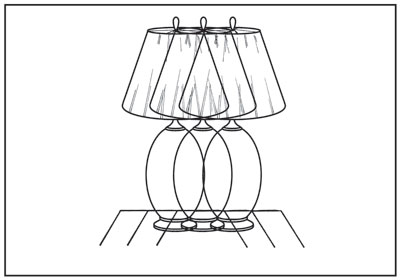
• Other things that can be fixed with duct tape include torn upholstery, plates and mugs (but do not put in dishwasher), pole lamps, putters, vases, end tables, and small goldfish bowls.
1 Blot rug or carpet immediately.
Use an absorbent cloth (like an old T-shirt) to soak up as much of the stain as possible. Do not rub the stain, as you will push the wine further into the carpet.
2 Saturate.
Pour large amounts of club soda or cold water on the stain and surrounding area. White wine is also an effective stain remover, but pouring good wine on the carpet is wasteful.
3 Repeat.
Reiterate steps 1 and 2 several times until the stain disappears. If the stain remains but is no longer being transferred to the cloth, stop blotting and saturating.
4 Make a stain removal paste.
If stain persists, make a paste of 3 tablespoons of borax or baking soda and 1 tablespoon of water.
5 Rub the paste onto the stain.
Use an old toothbrush or a spoon. Allow the paste to dry.
6 Vacuum.
7 Repeat steps 4 through 6 until the stain is no longer visible.
If the stain still remains, treat with a commercial carpet spotter.
1 Allow to dry.
Do not attempt to remove the wax while it is still hot.
2 Place an ice cube on the wax.
Hold the ice in place for 30 seconds or until the wax hardens completely.
3 Break and scrape.
Gently break apart the wax with your fingers until you have a pile of loose shavings. Scrape as much wax as possible off the carpet with a spoon or dull knife.
4 Vacuum.
5 Iron.
If wax still remains, place a clean cloth or paper bag over the wax. Slowly move a warm iron across the cloth or bag. The wax will melt and adhere to the warm surface of the cloth/bag. Rotate the cloth/bag as the wax is absorbed so you are always ironing on a clean section.
6 Vacuum.
If wax remains, use a commercial carpet cleaner to remove remnants.
1 Unplug the keyboard.
Do not turn on the computer.
2 Place the keyboard upside down on an absorbent cloth.
3 Leave overnight.
4 Dry.
Using a can of compressed air or a blow-dryer, thoroughly dry keyboard, making sure no wet or damp areas remain.
5 Test.
Plug the keyboard into an older computer or one without critical files, if available. Turn on the computer. If the keyboard is recognized and the computer works properly, it is safe to plug the keyboard into your main system.
• Powering up a computer with a wet keyboard can result in an electrical short circuit, which damages the entire system.
• For laptop computers, keep the system off and follow steps 2 through 5. If you are not sure the keyboard is completely dry, send the unit out for repair before turning it on.
• Highly acidic drinks like coffee and tea or sugary beverages like hot chocolate and soda may cause electrical parts to corrode if the spill is not properly cleaned.
1 Control your breathing.
Take deep breaths and exhale slowly. Ignore others who are attempting to eat the item, especially if they are gagging or vomiting. Remember, it will go down in a second.
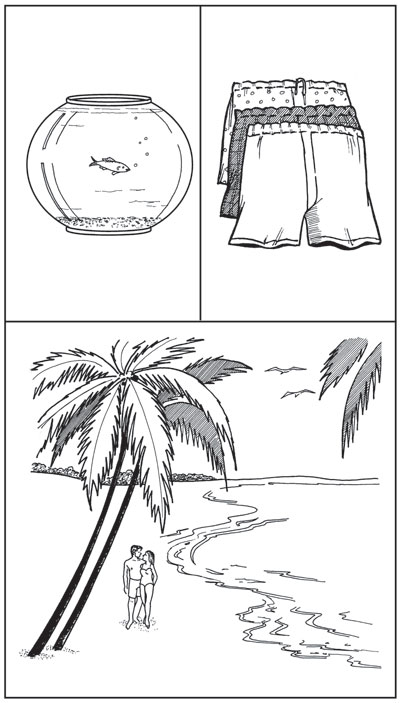
2 Center yourself.
Visualize yourself lying on a beach, sipping a cool drink, or strolling by a breezy lake.
3 Numb your tongue.
Apply ice or an over-the-counter oral numbing agent to your tongue. You will temporarily lose feeling but not your sense of taste.
4 Breathe through your mouth.
You can reduce any bad taste by breathing through your mouth, not your nose.
5 Move the object to the back of your tongue.
Taste buds on the front and sides of the tongue are most sensitive. Quickly push the object as far back on your tongue as you can.
Use one quick gulp. Do not chew.
1 Wear several pairs of underwear.
Underwear will reduce pain if you are required to lower your pants. Consider wearing flannel boxers. Avoid thongs.
2 Wear thick pants.
Put on bulky trousers, not shorts. Avoid corduroy, which may leave paddle lines.
3 Do not bend all the way forward.
Bending fully forward will tightly stretch your gluteus maximus, creating a less-forgiving surface and reducing your body’s natural padding. Try to remain upright, or bend only slightly.
4 Exhale.
Inhale deeply, then exhale as the paddle connects.
1 Do not show weakness.
Your tormentors will look for weak individuals, focus on them, and exploit their fears. Resist the urge to burst into tears, beg for mercy, flee, or bond with your tormentors.
Be prepared to swallow anything. Wear several pairs of underwear. Visualize yourself in a pleasent place.
Do not worry about what comes next. Do not dwell on what just passed. Deal with each horror on its own terms, as it happens.
3 Keep your mind occupied.
You may be isolated from the group, kept awake for several days, or seemingly singled out for special treatment. In such situations, keep your brain active by recalling the lyrics of all the songs you know, remembering pleasurable experiences, or focusing on the goal of joining the group.
1 Request a single.
If you notice an empty cell, ask to be housed there. Do not offer special reasons for wanting a private cell—those factors may work against you if you are later placed in a group cell.
2 Do not show fear.
Fear means weakness in jail. If you cannot stop shaking, pretend you are psychologically unsound: Wave your arms around, babble nonsense, and yell at no one in particular.
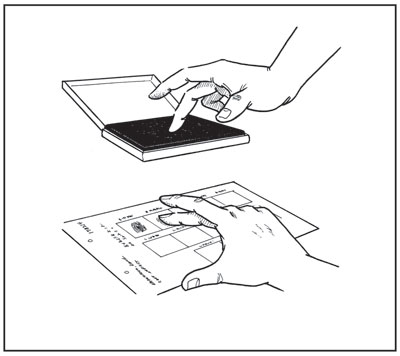
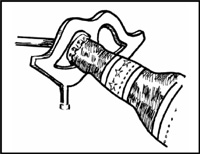
Relax hand a roll finger to make a clean print.
3 Stay within sight of the guard.
The cell may be monitored in person by a guard or via closed-circuit television. Make sure you remain visible.
4 Do not sleep.
Lying down on a bench or cot gives other inmates the opportunity to claim that you are lying on “their” bunk. Sit on the floor with your back to the wall, preferably in a corner of the cell. Do not remove any clothing to use as a blanket or pillow, or you will risk losing the item to other inmates.
5 Keep to yourself.
Do not start a conversation with anyone, but do not be rude. Answer any questions you are asked, and keep your responses short. Do not talk about the reason for your arrest, as there may be police informants in the cell. Do not make eye contact with other inmates, but do not avert your eyes.
6 Do not accept favors.
Other inmates may offer to help you in various ways, then claim that you “owe” them. Resist the temptation to ask for or accept help.
7 Do not tell anyone you are a college student.
The population of the cell may make various assumptions about the privileges, wealth, health, preferences, defenselessness, connections, and value of students.
8 Do not try to escape.