Programming with Scratch
Scratch is an easy-to-learn toy programming language for kids. Scratch is preinstalled on the Pi desktop, so you can start learning how to make simple games and animations right away.
Respond to the Mouse and Keyboard
Understanding Scratch
You can use an application called Scratch to learn programming on your Pi. Scratch is a toy language created at MIT for use in schools. It introduces many basic features of programming and software, and is also fun to play with.
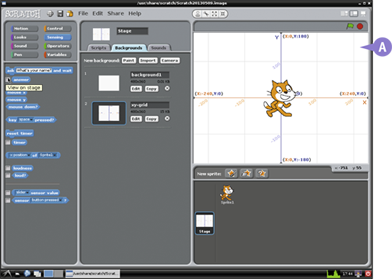
Understanding the Stage
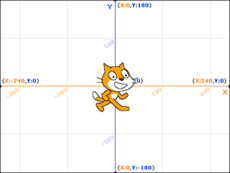
In Scratch, everything happens on the stage. Initially the stage is a plain white rectangle, but you can set a background. A typical Scratch project makes images and animations appear on the stage. Then simple programming code moves them around, makes them respond to collisions and key presses, and so on. To help you position items, the stage is divided into horizontal (x) and vertical (y) steps. Step 0,0 is the center of the stage. Negative x steps are in the left half of the stage, positive x steps in the right half, negative y steps in the bottom half, and positive y steps in the top half.
Understanding Sprites
The items on the stage are called sprites. Each sprite has a selection of costumes, or images. You can keep a single costume for a sprite, or switch between different costumes to animate the sprite or make it respond to events. Each sprite has an x,y position on the stage, and you tell Scratch to move it.
You can control sprites by connecting Scratch blocks together. There are many blocks, and each does something different. For example, you can use a block to move a sprite by a certain number of steps or to glide a sprite to a position on the stage. Blocks can play sounds, show or hide sprites, and make think and speech bubbles appear next to a sprite.
Understanding Block Types
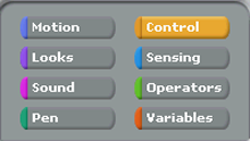
Scratch on the Pi includes eight kinds of blocks. Motion blocks can rotate a sprite and set its position. Looks blocks change the size and color of a sprite, select costumes, and add speech and think bubbles. Sound blocks play notes and sounds. Pen blocks can draw lines on the stage. Control blocks repeat other blocks and perform tests. Sensing blocks create timers, check colors and sprite positions, and report the mouse position. Operators perform arithmetic and combine test results. Variables hold settings.
Understanding Scripts
You can drag blocks from the block palette and connect them like puzzle pieces. A sequence of blocks is called a script. With scripts, you can combine all the different blocks to make sprites respond in complex ways. Sprites can hold more than one script, but only one script can be active at a time.
Scratch is associated with the website http://scratch.mit.edu. You can upload your Scratch projects to the site and download projects created by other people. You can find out more about Scratch from the shared Scratch WIKI at http://wiki.scratch.mit.edu. Note that the version of Scratch on the Pi is not the most recent version, and some features mentioned in the Wiki are not available on the Pi.
Import a Costume
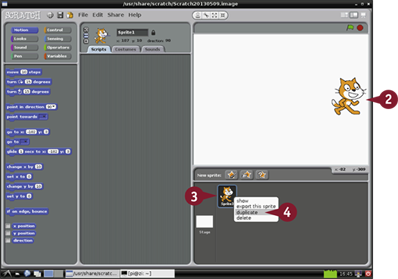
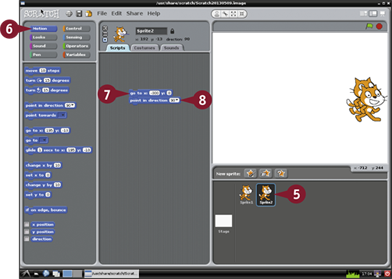
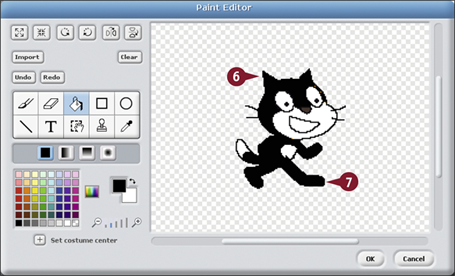
You can import one or more costumes to clothe a sprite. A sprite is really just a blank object with a position on the stage. To make the sprite visible, you import a costume and switch it to select it.
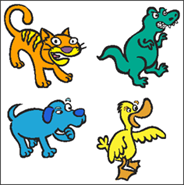
When you launch Scratch, it loads a default sprite named Sprite1. The default costume is a cartoon cat. Scratch includes a costume library with many predrawn costumes. You can import one or more costumes from this library. To clothe a sprite with a costume, click a costume image in the costume area.
Import a Costume
 If the desktop is not running, launch it with startx.
 Double click Scratch.
Scratch loads and displays the default project with a single sprite on a blank stage.
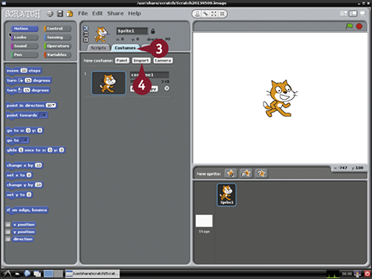
 Click the Costumes tab.
 Click Import.
Scratch opens the Import Costume dialog box.
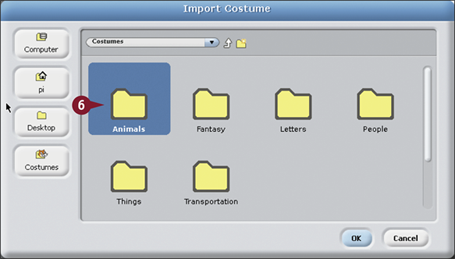
 Double-click the Animals folder.
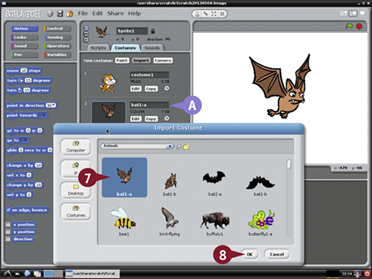
 Click a costume, bat1-a for example.
 Click OK.
A Scratch imports the bat1-a costume and adds it to the list of costumes available for Sprite1.
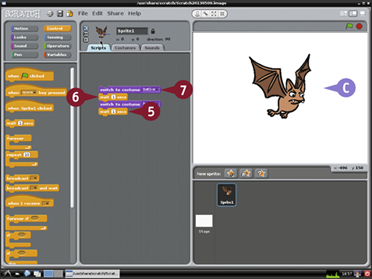
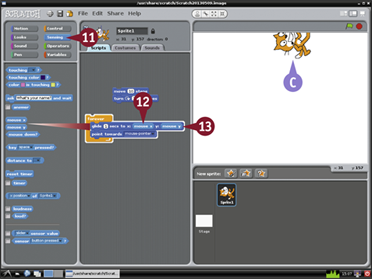
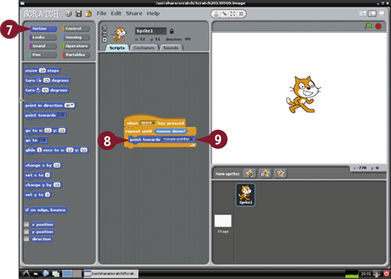
Switch a Costume with Blocks
You can switch a costume by clicking it in the Costumes tab. But you can also use blocks to switch costumes. Blocks make switching automatic, so you can create simple animations with two or more costumes, or you can create more complex effects where the costume changes when a sprite bounces off an object or collides with another.
Switch a Costume with Blocks
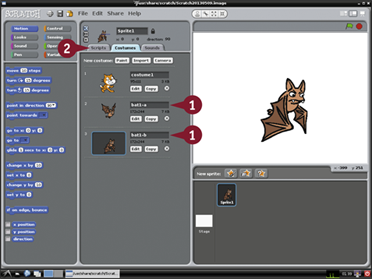
Import the bat1-a and bat1-b costumes.
Note: See the previous section, “Import a Costume,” for details about importing costumes.
Click the Scripts tab.
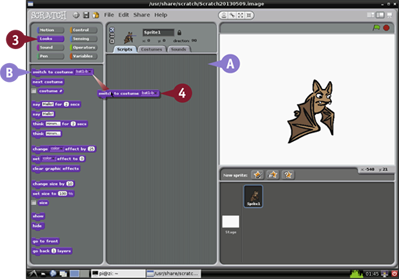
A Scratch shows the empty scripts area for Sprite1.
Click Looks.
B Scratch displays a collection of Looks blocks.
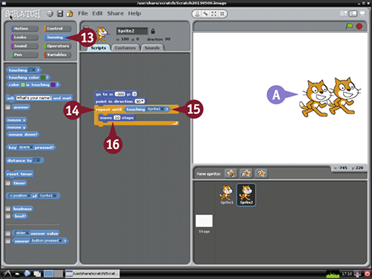
Click the switch to costume block, drag it to the Scripts area, and release it.
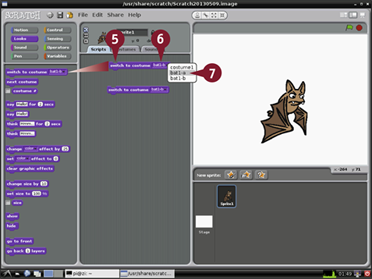
 Click and drag another copy of the switch to costume block to the Scripts area.
In either block, click the area showing a costume name.
Select the bat1-a costume.
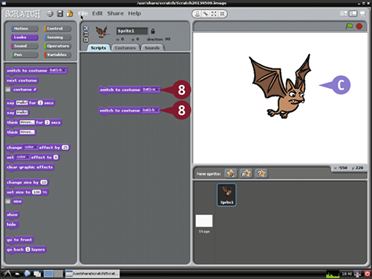
C Clicking a block selects a different costume.
The bat appears to flap its wings.
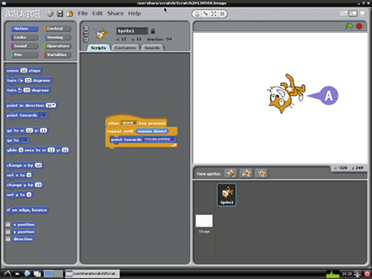
Create a Loop
You can use control blocks to repeat other blocks in a script. You can also use them to make decisions — for example, to change a sprite's costume or modify its behavior when it is in a certain part of the screen.
To loop part of a script, use the forever block. To repeat part of a script a set number of times, use the repeat block, which includes a repeat count. You can use the delay block to make the script pause during the loop.
Create a Loop
Starting with a blank Scripts area, import two costumes and add two costume switching blocks.
Note: For instructions, see the sections “Import a Costume” and “Switch a Costume with Blocks.”
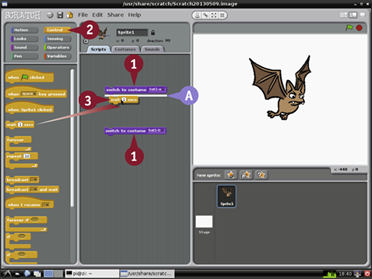
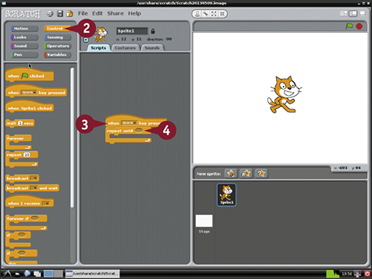
Click Control.
Drag a wait block from the Blocks area onto the lower edge of a costume switching block.
A Scratch draws a white border.
Note: The border indicates that if you drop the floating block, it joins the other block.
Release the block to connect it.
B Scratch joins the blocks to show they work in sequence.
Note: You can drop blocks above or below other blocks.
Note: You can only connect blocks if they have a matching tab and notch. Some blocks have a rounded top edge. You cannot drop blocks on top of them.
Drop another wait block under the other costume switch block.
Drag the bottom pair of blocks and drop them on the bottom edge of the top pair of blocks.
Scratch joins all four blocks together to make a single script.
Click any block in the script to run it.
C The bat flaps its wings once.
Note: You can join any number of blocks together in any combination.
Note: Clicking any block runs the whole script.
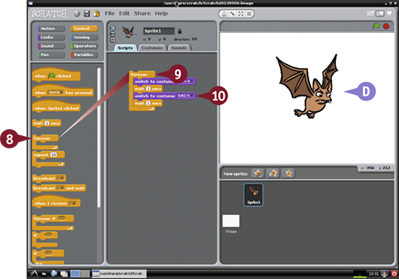
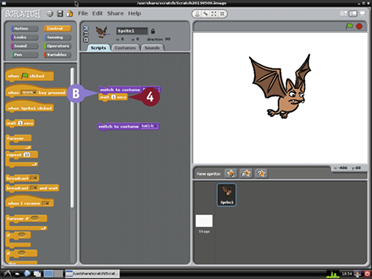
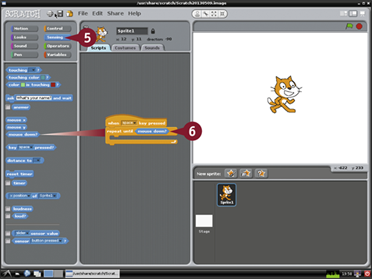
Drag a forever block from the blocks area.
 Drag the block to the top of the group.
Note: The bracket automatically expands around the group.
Note: You can also drop the block lower; the bracket expands around just some of the group.
 Click any block.
D The bat flaps its wings forever.
Move a Sprite
You can use motion blocks to change the position of a sprite on the stage. To move a sprite, change its x position to move it left and right, and its y position to move it up and down. You can use a go to block to make a sprite jump from one location to another. Use a glide block to make the sprite move smoothly. You can set a relative position with a move...steps block. Step moves depend on the sprite's direction — its angle on the stage sets where it points. You can use sensing blocks to make the sprite follow the mouse cursor, or the position of another sprite.
Move a Sprite
Launch the desktop and Scratch, if they are not already running.
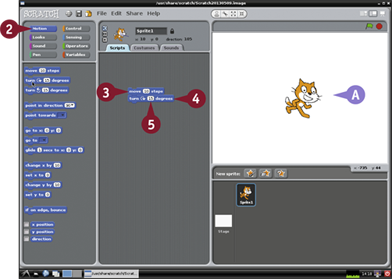
Click Motion if it is not already selected.
Drag a move 10 steps block to the Scripts area.
Join a turn 15 degrees clockwise block under it.
Click either block.
A The sprite moves 10 steps to the right and turns 15 degrees clockwise.
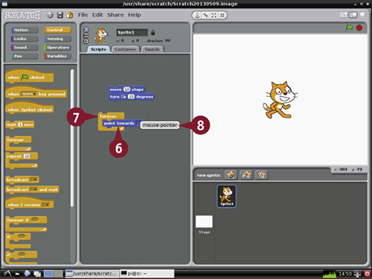
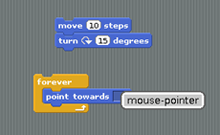
Drag a point towards block to the Scripts area.
Drag a forever block to the Scripts area around the point towards block.
Click the box in the point towards block and select mouse-pointer.

Click the forever block to run the script.
B The sprite rotates to follow the mouse pointer.
Drag a glide block from the Blocks area and drop it above the point toward block.
 Drag a mouse x block onto the x: slot in the glide block.
 Drag a mouse y block onto the y: slot in the glide block.
Note: The mouse x and mouse y blocks read the current mouse position.
C The sprite chases the mouse pointer around the stage.
Add a Bounce
You can use an if on edge, bounce block to make sprites bounce off the edges of the screen. Bouncing a sprite changes its direction. By default, sprites can rotate in any direction, so when the sprite bounces, Scratch draws it upside down.
If this is not what you want, you can fix it by using three small buttons in the area next to the sprite preview at the top of the screen. The top button ( ) allows full rotation. The middle button (
 ) allows the sprite to point left or right. The bottom button (
 ) turns off all rotation.
Add a Bounce
Launch the desktop and Scratch, if they are not already running.

Click Motion if it is not already selected.
Drag a move 10 steps block onto the Scripts area.
Drag an if on edge, bounce block under it.
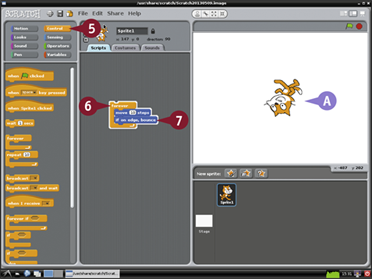
Drag a forever block around the motion blocks.
Click any block.
A The sprite bounces off the edges of the screen and turns upside down on each bounce.
Note: If you did not reset the sprite direction in step 4, the sprite may bounce around the stage diagonally.
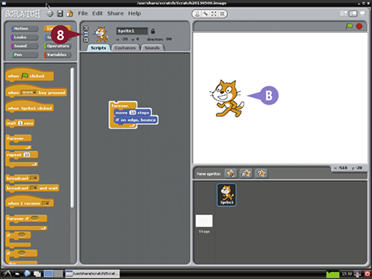
Click the only face left and right button ().
B When the sprite bounces, it faces left or right only.

Click the do not rotate button ().
C The sprite always faces the right.
Check for Collisions
You can use the touching block in the Sensing group to check if a sprite is touching another sprite, or the edge of the stage. To use the touching block, embed it in a control block that makes a decision. The repeat until block is a good way to keep moving or changing a sprite until it collides with another one.
You can make your sprites behave in complex ways by chaining control blocks together. For example, you can make a sprite move from the right of the screen, stop when it reaches another a sprite, display a message, wait a while, and then move back again.
Check for Collisions
Launch the desktop and Scratch, if they are not already running.
Drag the default sprite to the right edge of the screen.
Right-click Sprite1 in the Sprite area.
Click duplicate to make a copy.
Click Motion if it is not already selected.
Drag a go to block to the Scripts area and set x to –330 and y to 0.
Note: You can set a field by clicking it, typing a number, and then pressing  .
.
Drag a point in direction block to the bottom of the go to block.
Note: The direction should be 90. If it is not, click it and select 90.

Click Control.
Drag a repeat until block and join it to the bottom of the point in direction block.
 Click Motion.
Drag a move 10 steps block into the repeat until bracket.
 Drag a touching block and drop it on the empty test field in the repeat until bracket.
 Click the box and select Sprite1 from the pop-up menu.
 Click any block to run the script.
A Sprite2 jumps to the left of the screen, glides to Sprite1, and stops when the sprites touch.
Respond to the Mouse and Keyboard
You can use sensing and control blocks to make your sprites respond to mouse clicks and keyboard taps. Sensing blocks do nothing until you embed them in the hexagonal spaces of a control block.
The most useful sensing blocks are mouse down and when...key pressed. The mouse down block checks if a mouse button is pressed. The when...key pressed block checks one key on the keyboard. You can pick a key to test by clicking the small box on the block and selecting the key from a pop-up menu.
Respond to the Mouse and Keyboard
Launch the desktop and Scratch, if they are not already running.
Click Control if it is not already selected.
Drag a when...key pressed block to the Scripts area.
Drag a repeat until... block under the when...key pressed block.
Note: You can change the key the when...key pressed block responds to by clicking the space box and selecting a different key.
Click Sensing.
Drag a mouse down block and drop it on the hexagonal area of the repeat until... block.
Click Motion.
Drag a point towards... block inside the repeat until... bracket.
Click the box and select mouse-pointer.
A The sprite rotates to follow the mouse position.
Note: If nothing happens click the can rotate button () to allow sprite rotation.
Click the mouse button.
The script ends and the sprite stops rotating.
Note: You can press  again to make the sprite rotate, and click the mouse again to stop it.
Edit a Costume
Scratch includes a simple editor for costumes. You can use it to draw a costume from scratch or to change an existing costume.
Drawing a recognizable costume requires some artistic skill. Even if your skills are very basic, you can still use the editor to experiment with custom shapes and images. If you have no drawing skills you can experiment by changing the existing costumes.
Edit a Costume
Launch the desktop and Scratch, if they are not already running.
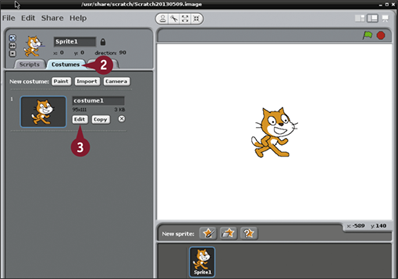
Click the Costumes tab.
Pick a sprite and click the Edit button next to it.
Note: This example edits the default costume.
Scratch loads the Paint Editor.
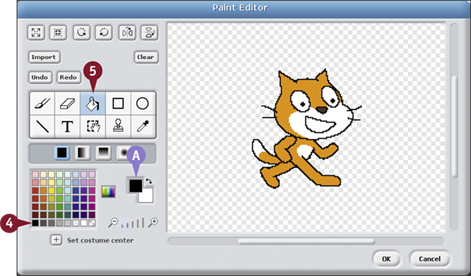
Click the black color in the color palette.
A Scratch sets black as the foreground color.
Click the Fill tool ( ).
).
Note: The Fill tool paints entire areas with a single color.
Click one of the orange areas on the cat to paint it black.
Note: The Fill tool fills areas of color that match where you click.
Click the remaining orange areas to paint the whole cat black.
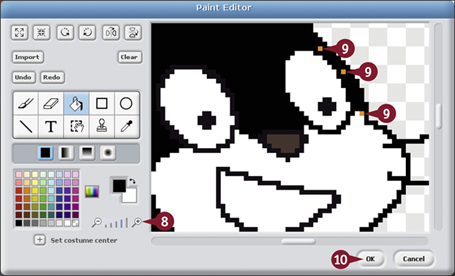
Click the Zoom icon ( ) to make the image bigger.
Note: You can move the image by dragging the scroll bars under and to the right of the edit area.
Click the remaining orange pixels to make them black.
Click OK.
Note: Scratch saves the modified sprite when you click File and then Save As and save the project.
Note: Editing a costume does not change it permanently.
Change the Stage Background
You can replace the default white stage with a photo or some other background. Changing the stage does not change how scripts work or how sprites look. It simply provides a different backdrop.
Scratch includes a selection of photos and images you can import to change the look of a stage. Most are decorative, but one is very useful — an xy backdrop that you can use as a guide when placing and moving sprites.
Change the Stage Background
Launch the desktop and Scratch, if they are not already running.
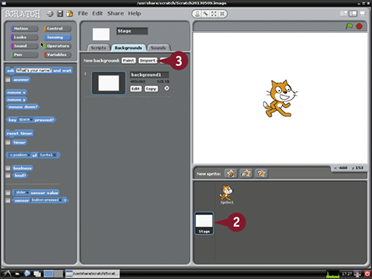
Click Stage.
Click Import.
The Import Background dialog box opens.
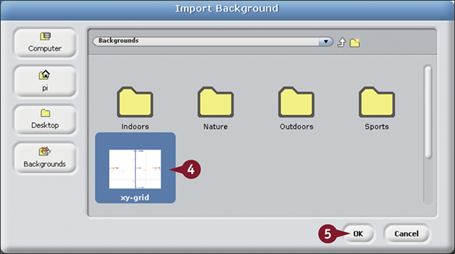
Click xy-grid.
Click OK.
A Scratch changes the background to an x y guide.
Note: The numbers and points are x y values. You can use them as a guide for the numbers to use when you place sprites on the stage with motion blocks.
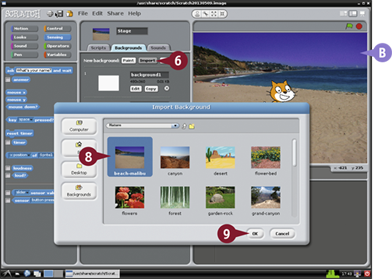
The Import Background dialog box opens.
Double-click any folder (not shown).
Note: This example shows the contents of the Nature folder.
Click any photo or image.
Click OK.
B Scratch loads the photo as a background.
Play Sounds
You can play sound and music in Scratch with sound blocks. On the Pi, you can play samples, melodies, and simple drum sounds. In theory, you can select different instruments. In practice, all instruments sound the same.
Versions of Scratch on other computers support a full palette of sounds known as the General MIDI Specification, which includes simple emulations of popular instruments and many drum sounds. Unfortunately you cannot use these instruments on the Pi, because it does not have a General MIDI synthesizer.
Play Sounds
Launch the desktop and Scratch, if they are not already running.
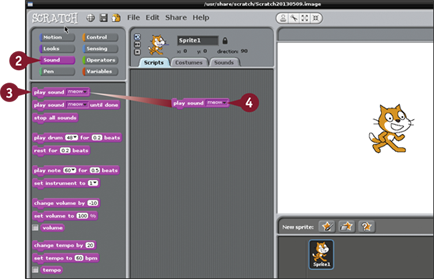
Click Sound.
Drag a play sound... block to the Scripts area.
Click the block to play the sound.
Note: If you do not hear sound, see Chapter 8 for more information about setting up audio.
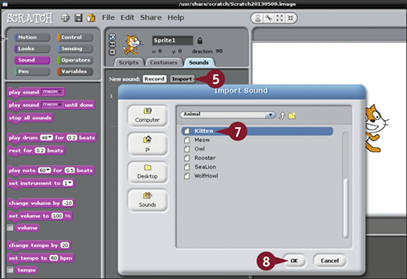
Click Import.
The Import Sound dialog box opens.
Double-click any folder to open it (not shown).
Note: This example shows the contents of the Animal folder.
Click a sound to hear it.
Click OK to import it.
You can now select the sound in a play sound... block.
Note: If you cannot hear a sound or you see an error when you try to import it, install the extra audio player options described in Chapter 8.
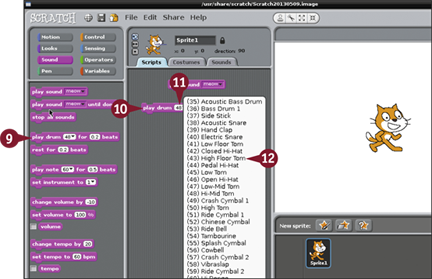
Drag a play drum... block to the Scripts area.
Click the block to play the sound.
Click the number box to see a list of drum sounds.
Click any menu item.
Scratch plays a slightly different version of the original sound.
Note: Scratch does not play a different drum sound, because no synthesizer application is installed.
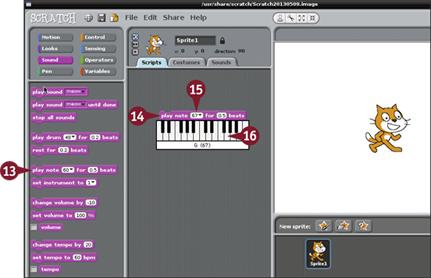
Drag a play note...for... beats block to the Scripts area.
Click the block to play a note.
Scratch plays a clean, flute-like note.
Click the number to change the note.
Click a note on the keyboard to change the note.
Note: You can also click the number once and type in a different number.
Note: Note 60 is middle C.
Note: To play a simple tune connect seven blocks and set their numbers to 60, 60, 67, 67, 69, 69, and 67.
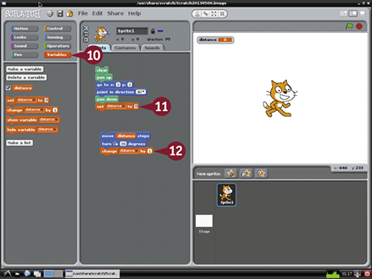
Work with Variables
You can use variables to make scripts more powerful. Variables store a value that you can change at any time. Instead of using a fixed number in a block, you can use a variable, and do math on the variable when you need to change it.
By default, variables appear on the stage in a box. You can choose the appearance of the box: a small number with the variable name; a large number; or a small number, the name, and a slider. If you choose the slider option you can change the variable by dragging the slider.
Work with Variables
Launch the desktop and Scratch, if they are not already running.
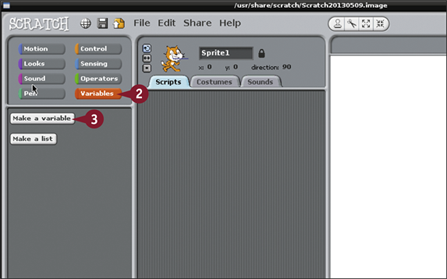
Click Variables.
Click Make a variable.
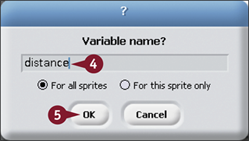
Note: In this example the variable is named distance.
Click OK.
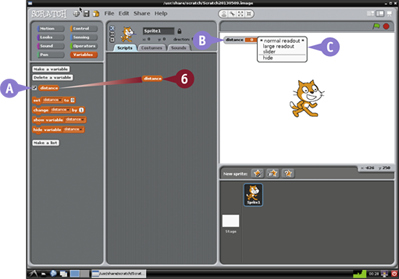
A Scratch adds the variable to the Variables blocks.
B Scratch also adds the variable to the stage.
C You can optionally right-click the box and select one of the display options.
Drag the variable block to the Scripts area.
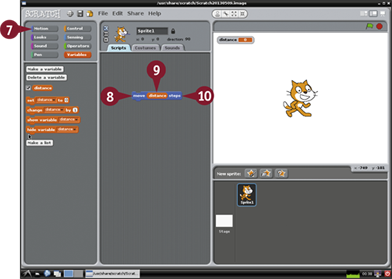
Click Motion.
Drag a move...steps block to the stage.
Drag the distance block and drop it on the 10 in the move...steps block.
Note: This step replaces the old fixed number with the value of the variable.
Click the move...steps block.
The sprite does not move. The variable value of 0 has replaced the default 10.
Note: To make the sprite move, change the variable value and click the move...steps block again.
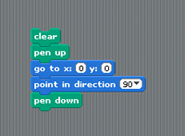
Using the Pen
You can use the pen in Scratch to draw lines and shapes. After a pen down block, a sprite leaves a line as it moves. Use a pen up block to stop drawing, and a clear block to remove all lines. You can also set the pen color, change the pen color by a step to cycle through colors, and change the width of the line the pen draws.
The pen is a good way to learn how to draw shapes. This example draws a complicated shape with simple rules. Turning by 89 degrees after each line draws a square shape that rotates and never closes.
Using the Pen
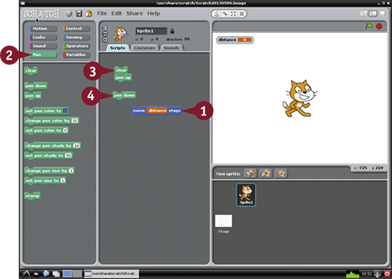
Either continue from the previous section, "Work with Variables," or repeat the steps to create a variable called distance in a move...steps block.
Click Pen.
Drag a clear block to the scripts area and drag and join a pen up block under it.
Drag a pen down block to the scripts area but do not join it.
Click Motion.
Drag/join a go to... block under the pen up block.
Drag/join a point in direction... block under the go to... block.
Note: By default, x and y should be 0, and the direction should be 90. If you have changed the defaults, change them back in the script blocks.
Join the pen down block under the point in direction... block.
Drag/join a turn clockwise block under the move...steps block, click the value, and type 89.
Click Variables.
Drag/join a set distance... block under the pen down block.
Drag a change distance... block under the turn clockwise... block.
Note: If you created other variables, click the selection box to select distance.
Note: The set value should be 0, and the change value should be 1. If they are not, click them and type the correct value.
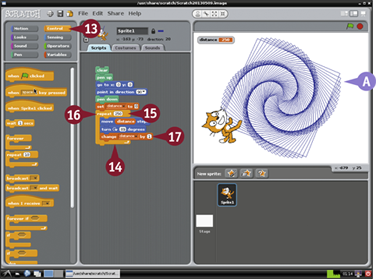
Click Control.
Drag a repeat... block around the move/turn/change blocks.
Click the number and type 250.
Drag the repeat... block up to join it to the bottom of the set distance... block.
 Click any block in the script to run it.
A The sprite moves around the stage and draws a pattern.
Note: The distance variable also shows the number of lines drawn so far.