CHAPTER
1
Birthdays
BIRTHDAYS ARE FUN DAYS full of cake, ice cream and cards! When birthdays roll around, we all love going to the mailbox to see if there’s a card for us, bringing with it best wishes from afar.
In this chapter you will find cards that span the ages and delight both the young and the young at heart. Discover beautiful basic cards and cards that will really WOW! We’ve created cards that double as fun games and cards that incorporate either a small gift or a gift card. Others practically shout a hearty happy birthday with a festive banner or celebratory balloons. Something as simple as using elastic thread can make a sweet treat spin and twirl. We’ll even show you how to make a cool card that might just grant a wish when the birthday boy or girl blows out a paper flame. We’ve got dolphins wearing birthday hats while they jump in the air and rockets that blast off with a single pull of a tab. And finally, we share a few ways to incorporate gift cards, such as hiding them in big oversized cupcakes covered in gemstone sprinkles.
Imagine the delight when someone you love receives such an amazing card created by YOU.
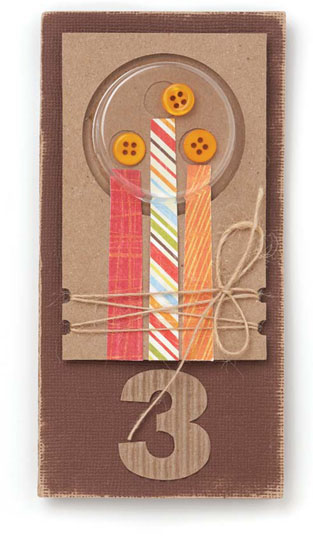
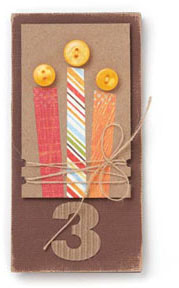
Shake It Birthday Card
By Sarah Hodgkinson
Let this cute card light up their big day! It becomes even more fun when you transform the basic card into a shaker game. (And feel free to customize the card to whichever age is appropriate for your recipient.)
WHAT YOU’LL NEED
 Cardstock
Sandpaper
Paper trimmer
Paper punch
Patterned paper
Adhesive
Buttons
Twine
Die-cut number
Circle punch
Craft knife
Pencil
Shaker cup
Materials List cardstock: Core’dinations, Jillibean Soup; patterned paper: Jillibean Soup, Fancy Pants Designs; die cuts: Jillibean Soup; twine: Jillibean Soup; floss: DMC; buttons: Buttons Galore; clear cup: Stampin’ Up!; punches: EK Success, We R Memory Keepers, Fiskars; other tools: Core’dinations Sand It Gadget, Xyron craft knife
The Basics
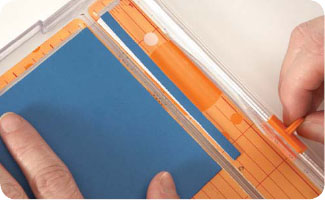
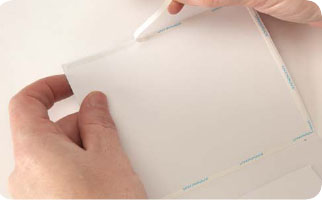
1. Create the 3" × 6" (7.6cm × 15.2cm) card base by folding a 6" × 6" (15.2cm ×15.2cm) square of brown cardstock in half. Lightly sand the edges to distress them.
2. Cut a 2½" × 4" (6.4cm × 10.2cm) piece of Kraft cardstock.
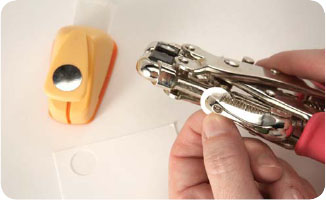
3. Using a hole punch, punch half circles to create notches on each side, ¼" (6mm) and ½" (12mm) up from the bottom.
4. Cut three strips of patterned paper to approximately ½" × 3" (12mm × 7.6cm). You’ll want a little variation in size here. Adhere the strips to the Kraft cardstock.
5. Adhere the buttons to the top of the patterned paper strips to create candles.
6. Wrap 15" (38cm) of twine around the bottom of the Kraft cardstock and through the notches you created in Step 3. Tie the twine into a bow on the front of the cardstock. Adhere the cardstock to the card base.
7. Adhere the die-cut number to the card base, below the cardstock.
Beyond the Basics
To Start:Follow steps 1–3 of The Basics. Cut an additional two pieces of cardstock (you’ll be working with a total of three), each measuring 2" × 2" (5cm × 5cm). Cut the three strips of patterned paper but do not adhere them.
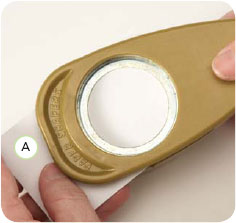
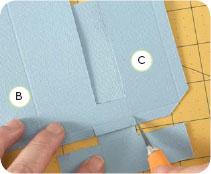
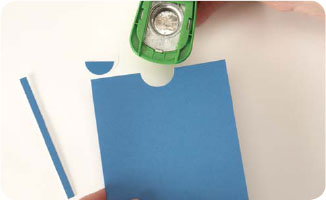
1 Punch a 1¾" (4.5cm) circle in one of the pieces of Kraft cardstock, about 1⁄4" (6mm) from the top. This will be Layer A of the cardstock.

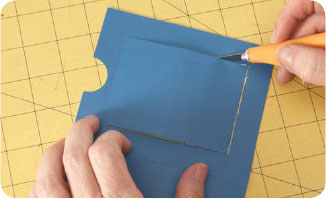
2 Cut a slit in the cup with a craft knife. The slit should be large enough to accommodate the paper candles.

3 Lay the buttons on one of the smaller pieces of Kraft cardstock and trace around them with a pencil. This will be Layer B of the cardstock.
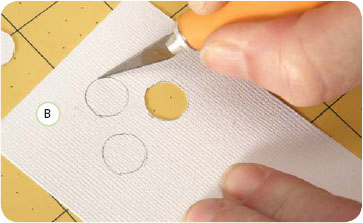
4 Cut out the holes for the buttons with a craft knife.
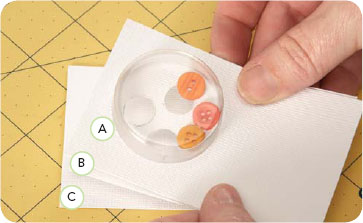
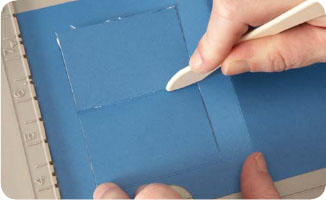
5 Assemble the shaker by placing the buttons in the cup. Place the cup through the punched circle in Layer A, positioning the slit at six o’clock. Adhere Layer B behind Layer A. Then, adhere the remaining piece of Kraft cardstock (Layer C) behind Layer B.
To Finish:
Adhere the bottom half of the patterned paper candles to Layer A of the Kraft cardstock. Carefully insert the top parts of the candles into the cup through the slit. Follow steps 6–7 to finish the card.
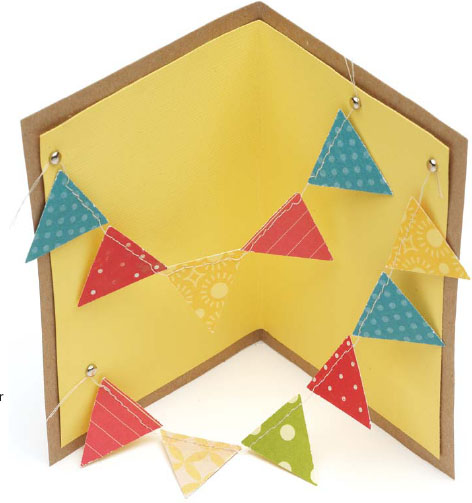
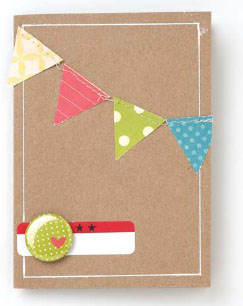
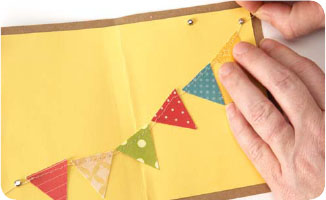
Happy Birthday
Banner Card
By Kimber McGray
Birthdays are banner days. Celebrate by stringing up a breezy banner card full of color and whimsy.
WHAT YOU’LL NEED
Cardstock
Gel pen
Triangle punch
Patterned paper
Thread and sewing machine
Adhesive
Buttons
Stickers
Paper Trimmer
Paper piercer
Decorative brads
Materials List Cardstock: Jillibean Soup, Core’dinations; patterned paper: Crate Paper, BoBunny Press; punch: Fiskars; brads: Making Memories; sticker: Jenni Bowlin Studios; button: American Crafts; pen: Uniball Signo; sewing machine: Singer; thread: Coats & Clark
The Basics
1. Start with a standard A2 Kraft card base (4¼" × 5½" [10.8cm × 14cm]).
2. Draw a border ¼" (6mm) around the card base with a white gel pen.
3. Punch triangles from patterned paper. Machine stitch the triangles together to make a banner. Adhere the banner to the card.
4. Embellish the card with buttons and stickers.
Beyond
the Basics
To Start:
Follow steps 1–4 from The Basics to make the card front.

1 Punch triangles from patterned paper—eleven or twelve should do the trick.
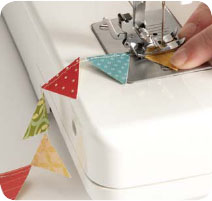
2 Machine stitch the triangles together to create two banners. Leave a length of extra thread on the ends of the banners. Do not trim.
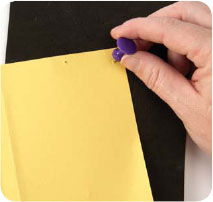
3 Cut an 8" × 5" (20.3cm × 12.7cm) piece of patterned paper to use as a card liner. Pierce holes in the card liner to accommodate the brads.
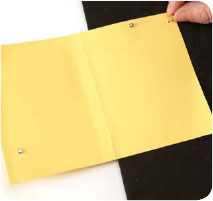
4 Insert the brads and flatten the backs of the brads behind the liner.

5 Adhere the liner to the interior of the card base.
6 Wrap the ends of the sewn banner threads around the brads to secure.
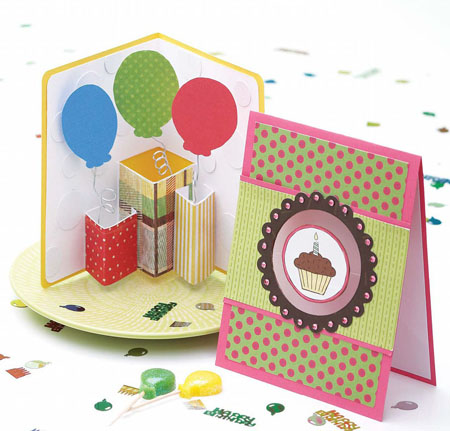
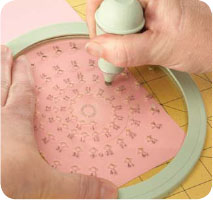
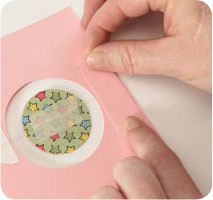
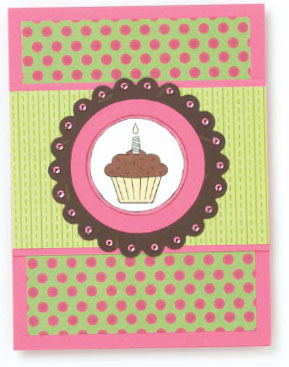
Cupcake Spinner Card
By Rae Barthel
What a sweet treat to receive a card that has as many wonderful details as this one!
WHAT YOU’LL NEED
Cardstock
Paper trimmer
Patterned paper
Adhesive
Scissors
Circle cutter
Ink
Border punch
Rhinestones
Elastic cord
Tape
The Basics
1. Make a 6" × 4½" (15.2cm × 11.4cm) card base from pink cardstock. (This card will open vertically.)
2. Cut a 4" × 5½" (10.2cm × 14cm) piece of polka-dot patterned paper and adhere it to the center of the card.
3. Cut a piece of stripe-patterned paper to 4½" × 23⁄4" (11.4cm × 7cm) and mat with a piece of pink cardstock cut to 4½" × 3" (11.4cm × 7.6cm). Adhere this panel to the card.
4. Cut a circle (approximately 13⁄4" [4.5cm]) from patterned paper, centering any dominant design in the center of the circle, and ink the edges of the circle.
5. Cut a circle (about ¼" [6mm] larger than your patterned paper circle) from pink cardstock, and cut a scalloped circle (about 3⁄8" [1.0cm] larger than the previous circle) from brown cardstock.
6. Adhere all three circles together and then adhere this piece to the card.
7. Adhere rhinestones to the scalloped circle.
(See the basic card on page 21.)
Materials List cardstock: Hobby Lobby; patterned paper: Nikki Sivils Scrapbooker; rhinestones: Michaels Stores; dies: Spellbinders; die-cutting tool: Cuttlebug by Provo Craft; stretch cord: Pepperell; ink: Clearsnap

Beyond
the Basics
To Start:
Follow steps 1–5 from The Basics. For this version of the card, you will need two circles of the size cut in step 4.
1 Cut a circle out of center of the front of the card base. The circle should be about 3⁄4" (2cm) larger than the circle you cut from patterned paper.

2 Tape an elastic cord (about 4" [10.2m]) to the back of one of the circles from step 4 in The Basics.

3 Adhere elastics to the interior of the card with tape.
4 Cover the taped elastic with cardstock pieces. Adhere the second circle to the first to cover the taped elastic.
To Finish:
Adhere the scalloped circle to the card base, around the edges of the circle cutout, and adhere rhinestones to the scalloped circle. Line the interior of the card with a contrasting color of cardstock or patterned paper.
Tip
If your patterned paper circles have a dominant image (like the cupcakes in the main project card), be sure to adhere them together so that the image lines up correctly when spun on the elastic. You wouldn’t want one of your cupcakes to look like it’s upside down when it’s spinning, for example.
Birthday Gifts and Balloons Pop-Up Card
By Kimber McGray
Nothing says birthday more than balloons. This card is sure to delight when the balloons appear to float out of wrapped birthday gifts.
WHAT YOU’LL NEED
Cardstock
Paper trimmer
Corner rounder
Patterned paper
Adhesive
Border punch
Craft knife
Black pen
Wire
Pencil
Tape
Foam adhesive
Bone folder

Materials List cardstock: Core’dinations; patterned paper: BasicGrey, BoBunny Press, Crate Paper; punches: EK Success, Stampin’ Up!; wire: Michaels Stores

The Basics
1. Create a standard A2 card base from yellow cardstock (4" × 5½" [10.2cm × 14cm]) and round the right-side corners.
2. Cut a piece of patterned paper to 4½" × 3½" (11.4cm × 9cm) and round the right-side corners. Adhere a 4½" × ½" (11.4cm × 1.3cm) strip of scalloped white cardstock to the back of the patterned paper and adhere the patterned paper piece to the front of the card.
3. Using the template on page 138, cut out a balloon from green patterned paper. Outline the balloon with a black pen.
4. Create a metal tail for the balloon by wrapping wire (approximately 6" [15.2cm]) long) around a pencil. Press the wire to flatten, and attach it to the back of the balloon with a piece of tape. Adhere the balloon to the front of the card with foam adhesive.
Beyond
the Basics
To Start:
Make the front of the card according to the instructions for The Basics. Then...

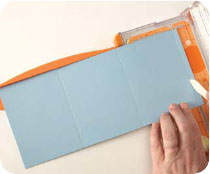
1 Cut a 8" × 5" (20.3cm × 12.7cm) card liner from white cardstock. Mark a line on the back of the card liner 2½" (6.4cm) from bottom and 1½" (3.8cm) to the right of the fold. Cut on the 1½" (3.8cm) long line.
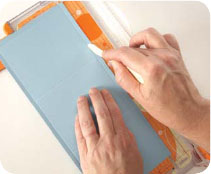
2 Score on the 2½" (6.4cm) line.
3 Fold along the score line to create a pop-up box inside the folded liner.

4 Cut a piece of patterned paper to 2½" × 3" (6.4cm × 7.6cm) and adhere it to the pop-up box on the interior of the card. Create two more boxes by cutting a 2" × 3" (5cm × 7.6cm) piece of white cardstock and score at ½", 1½" and 2½" (1.3cm, 3.8cm and 6.4cm), and a 1½" × 3" (4.8cm × 7.6cm) piece of white cardstock and score at ½", 1½" and 2½" (1.25cm, 4cm and 6cm).

5 Create curly wires for the balloons by wrapping craft wire around a pencil. Pull the wire off the pencil and press it flat.
6 Cut out balloon shapes, adhere the shapes to wire and secure the wire to the back of the boxes with tape.

7 Cover the smaller boxes with patterned paper and adhere the tabs to the liner and the center box. Adhere the liner to the body of the card.
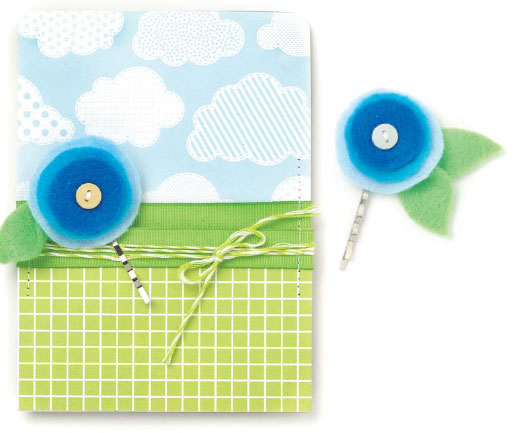
Birthday Bobby Pins Card and Gift
By Summer Fullerton
These adorable posies are sweet enough as an embellishment, but bobby pins? Any little girl (and some big girls, too!) will fall in love with these.
WHAT YOU’LL NEED
Cardstock
Paper trimmer
Patterned paper
Scissors
Ribbon
Adhesive
Twine
Circle cutter
Felt
Buttons
Thread and sewing machine
Hot glue
Bobby pins
Corner rounder punch
Materials List Card base: Jillibean Soup; patterned paper: Jillibean Soup; ribbon: Jillibean Soup; twine: Jillibean Soup; felt: Jo-Ann Fabric and Craft Stores; buttons: Fancy Pants Designs; floss: DMC; bobby pins: Horizon Fabric
The Basics

1. Create a 4" × 51⁄2" (10.2cm × 14cm) card base from cardstock.
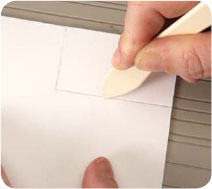
2. Cut a piece of cloud patterned paper to 4" × 4" (10.2cm × 10.2cm) and adhere it to the top of the card.
3. Cut two 4" (10.2cm) pieces of green ribbon. Adhere one strip of ribbon 23⁄4" (7cm) from the bottom of the card.
4. Cut a piece of green grid-patterned paper to 4" × 3" (10.2cm × 7.6cm), and adhere the second strip of ribbon across the top edge of this piece. Wrap baker’s twine three times around the ribbon and tie into a bow on the front of the ribbon.
5. Adhere the green grid-patterned paper to the bottom of the card.
6. To make the flowers, cut two sets of three different-sized circles from three different shades of blue felt, and layer the felt circles together. Cut three leaves from green felt. Stitch a small button in the center of the circles and stitch the leaves to the back of the flowers. (See step 2 of Beyond the Basics.)
7. Adhere felt flowers to the card front with glue.
8. Round the top corners of the card with a corner rounder punch.
Beyond
the Basics
To Start:
Follow steps 1–3 from The Basics. Attach the first piece of ribbon only to the left and right edges of the card. Then follow step 4.

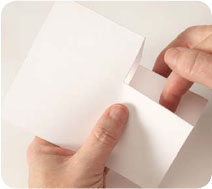
1 Adhere the green grid-patterned paper to the card base, adhering only the sides and bottom edges to create a pocket. Machine stitch all the layers along the sides to secure the pocket.
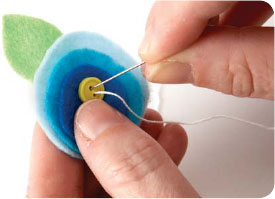
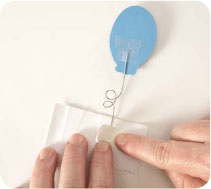
2 To create the felt flower bobby pins, cut different sized circles and leaves from felt and stitch together with a button.

3 Adhere the felt flower to a bobby pin with hot glue.
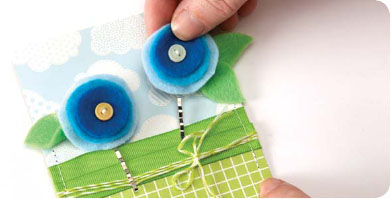
4 Slide the finished felt bobby pins in the front pocket of the card.
To Finish:
Round the corners of the card with a corner rounder punch.
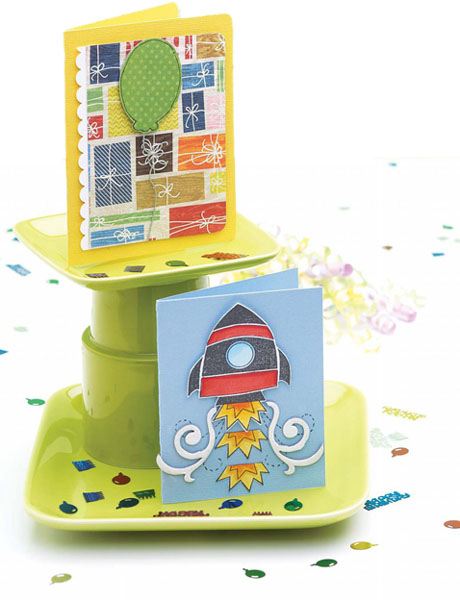
Rocket Ship Birthday Card
By Kimber McGray
5, 4, 3, 2, 1. . . Blast off to birthday fun with a card that is out of this world!
WHAT YOU’LL NEED
Cardstock
Paper trimmer
Stamp
Ink pads
Markers
Craft knife
Foam adhesive
Black pen
Chipboard
Adhesive
Bone folder
Pencil
The Basics
1. Create a 4" × 5" (10.2cm × 12.7cm) card base from light blue cardstock.
2. Stamp a rocket ship image on white cardstock, color the image with markers and then cut it out. Stamp, color and cut out a few extra flames. Adhere the images to the card with foam adhesive.
3. Draw scrolls with a black pen.
4. Color chipboard scrolls with a white ink pad. Adhere the chipboard pieces to the card.
(See the basic card on page 14.)

Materials List cardstock: Core’dinations; stamp: Bella Blvd by Unity Stamp Company; ink: Momento by Tsukineko, Maya Road; markers: Copic; chipboard: Maya Road; foam adhesive squares: 3L Scrapbook Adhesives
Beyond the Basics
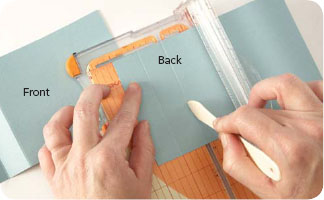
1 Cut a piece of cardstock to 5" × 11½" (12.7cm × 29.2cm). From the left, score at 3¾", 7½" and 11¼" (9.5cm, 19cm and 28.6cm).
2 Rotate the card base 90 degrees and score at ¼" (6mm) along both long sides.
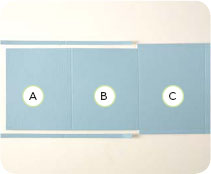
3 Fold along the three shorter score lines and trim off the cardstock along the ¼" (6mm) score lines on panels A and B.
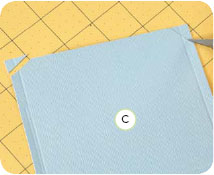
4 Notch the corners of Panel C.
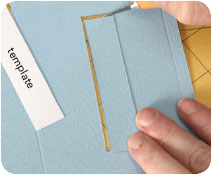
5 Cut a template from cardstock to ¾" × 3½" (2cm × 9cm). Place the template on Panel C, 1½" (3.8cm) from the bottom. Trace around the template and then cut it out.
6 Create a slide pull from a piece of cardstock cut to 4¾" × 3" (12cm × 7.6cm). From this piece, cut a “T.” The legs of the “T“ should each measure 1" (2.5cm).
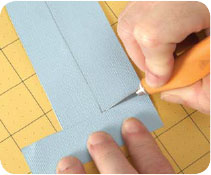
7 Cut a 1¼ (3.2cm) notch in the 1⁄4 (6mm) scored area at the bottom of Panel C. The slide pull will slide through this notch when the card is done.

8 Fold the ¼" (6mm) tabs to the interior of the card, as shown, and adhere Panel C to Panel B, with the slide pull installed as shown.

9 Create the rocket ship embellishment as per step 2 of The Basics. Adhere the chipboard scrolls to the back of the embellishment, and adhere the embellishment to the slide with foam adhesive. Adhere the extra flames to the cardstock behind the slide.
Make a Wish Card
By Kelly Goree
Make a wish and blow out the candles! With a simple tug, the flame on this fancy card disappears. Wouldn’t both the young and the young at heart love this card?
WHAT YOU’LL NEED
Cardstock
Paper trimmer
Patterned paper
Adhesive
Brown marker
Corner rounder punch
Border punch
Foam adhesive
Pencil
Craft knife
Glitter glue
Circle punch
Gel pen (optional)
Materials List cardstock: Bazzill Basics; patterned paper: My Mind’s Eye; pen: Zig, Uni-Ball Signo; stickles: Ranger; punches: Fiskars, Creative Memories

The Basics

1. Create a 5" × 7" (12.7cm × 17.8cm) card base from red cardstock.
2. Adhere a 4½" × 6½" (11.4cm × 16.5cm) piece of floral patterned paper to the center of the card front. Draw faux-stitching around the edges of the patterned paper with a brown marker.
3. Cut a 3½" × 5" (9cm × 12.7cm) piece of green patterned paper and round the top corners (see template on page 137).
4. Scallop the edge of a 7" × 1" (17.8cm × 2.5cm) piece of pink patterned paper and cut it in half. Layer and adhere the strips on the bottom of the green patterned-paper panel.
5. Adhere a 3½" × ½" (9cm × 1.3cm) strip of stripe-patterned paper over the scalloped strips. Faux-stitch a line along the top edge with a brown marker.
6. Adhere the green patterned paper panel to the front of the card with foam adhesive.
7. Using the template on page 137, cut the bottom of the cupcake out of brown patterned paper. Add dashed lines with a white gel pen if desired. Adhere to the card front.
8. Cut a ½" × 2" (1.3cm × 5cm) strip of stripe-patterned paper and adhere it to the card for the candle.
9. Using the template, cut out the top of the cupcake from pink patterned paper. Adhere it to the card.
10. Using the template, cut out the swirl from pink polka-dot patterned paper and adhere it to the card front with foam adhesive. Add a little bit of glitter glue on each of the polka dots.
11. Cut out two flames from yellow patterned paper, one slightly larger than the other. Adhere the larger flame to the card directly above the candle, and then adhere the smaller flame on top of the larger flame with foam adhesive.
Beyond
the Basics
To Start:
Follow steps 1–5 from The Basics.

1 With a craft knife, cut two horizontal slits just larger than 1" (2.5cm) in the middle of the green patterned paper (see template on page 137), about 11⁄2" (3.8cm) from the top and 1" (2.5cm) from the bottom. Here, I’m doing the cutting on the back side of the patterned paper.

2 Create a candle out of white cardstock and cover the flame with patterned paper (use the template on page 137). Cut a piece of white cardstock to 2" × 2" (5cm × 5cm). Fold the cardstock in half so that it measures 1" × 2" (2.5cm × 5cm). This will be your pull tab.

3 Adhere the pull tab to the bottom of the candle, extending it ½" (1.3cm) below the bottom of the candle, and round the bottom corners of the tab. The total length of the candle with the pull tab attached should be 4¾" (12cm).
4 Create the cupcake using the template on page 137. Cut the flame off the long candle and cover the rest of this candle with patterned paper to create the “flameless” candle. Adhere this to the back of the cupcake, not to the back of the “flamed” candle.

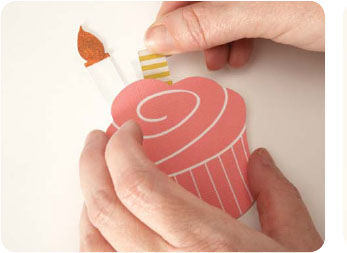
5 Slide the candle through the slits on the 3½" × 5" (9cm × 12.7cm) piece of patterned paper, as shown. Adhere this piece to the card.

6 Adhere over the interactive candle portion, lining up the non-flame candle with the flamed candle. Notch the bottom of the cupcake using a 1" (2.5cm) circle punch. Adhere the notched cupcake over the interactive candle portion, lining up the flames.
To Finish:
Finish embellishing the card by using the template to cut out just the swirl of the cupcake and the cupcake liner from coordinating patterned paper. Adhere both to the card with foam adhesive.

Pop-Up Gift Card Holder
By Kimber McGray
They’ll flip when they find a gift card inside this great card! With a little tug on the ends, a gift card will pop out and surprise your friend.
WHAT YOU’LL NEED
Cardstock
Paper trimmer
Patterned paper
Adhesive
Border punch
Circle cutter
Ink pads
Corrugated die-cut shape
Button
Foam adhesive
Craft knife
Corner punch
Bone folder
The Basics
1. Create a standard A2 card base (4¼" × 5½" [10.8cm × 14cm]) from white cardstock.
2. Cut five strips of coordinating patterned paper to 1" × 4¼" (2.5cm × 10.8cm). Adhere the strips to the card base.
3. Adhere a yellow scalloped strip of cardstock, 4" × ½" (10.2cm × 1.3cm), under a 4" × ½" (10.2cm × 1.3cm) piece of patterned paper, staggering the two slightly, and adhere to the card.
4. Cut a 1¾" (4.5cm) diameter ring from brown cardstock and adhere it to the front of the card.
5. Ink the top of a corrugated cardboard star with a white ink pad. Add a small button and adhere the star to the front of the card with a foam adhesive square.
6. Finally, punch the corners of the card with a ticket notch punch.
(See the basic card on page 33.)
Materials List cardstock: Bazzill Basics, Core’dinations; patterned paper: Jillibean Soup; punches: Stampin’ Up!; corrugated shape: Jillibean Soup; ink: Maya Road; button: Nikki Sivils Scrapbooker
Beyond the Basics
1 Cut two pieces of cardstock to 4¼" × 7" (10.8cm × 17.8cm). Score at 1" (2.5cm) and 2" (5cm) on each piece, from the left side of the cardstock.
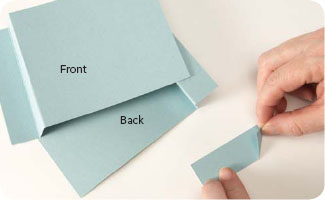
2 Create the pop-up piece—cut a strip of cardstock to 1" × 3" (2.5cm × 7.6cm) and fold a 1" (2.5cm) triangle into one end, creating a flap.
3 Adhere the flap to the second fold on the back piece of cardstock, ½" (1.3cm) down from the top.

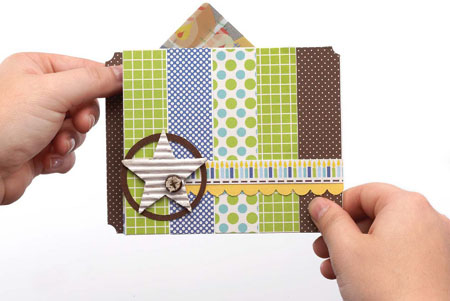
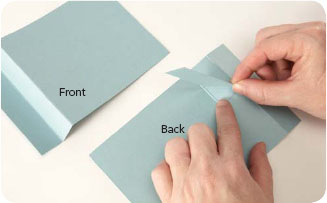
4 Adhere the cardstock pieces together as shown.
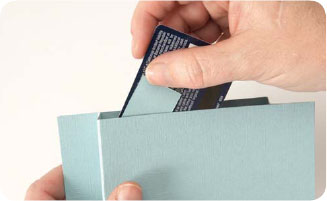
5 Use removable adhesive to adhere a gift card to the pop-up piece.
To Finish:
Embellish the front (and sides) of the card following the directions for The Basics. The pop-up card in this project uses eight strips of patterned paper (seven on the front and one on the right side behind the brown strip).

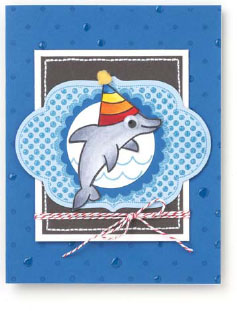
Pop-Up Dolphin Card
By Nichol Magouirk
Who doesn’t love a sweet dolphin? Add a googly eye and a festive party hat and he will be the hit of the party! You can also create an interactive version of the card. Your card will dazzle when that same sweet dolphin appears to leap out of the water and off the card!
WHAT YOU’LL NEED
Cardstock
Paper trimmer
Stamps
Ink pad
Adhesive
Thread and sewing machine
Baker’s twine
Dies and die-cut machine
Markers
Craft knife
Googly eyes
Pom-pom
Circle punch
Pencil
Bone folder
Hole punch
Materials List card base: Hero Arts; cardstock: Neenah; stamps: Lawn Fawn, Papertrey Ink, Hero Arts; ink: Memento by Tsukineko, Stampin’ Up!; markers: Copic; glossy medium: Ranger Glossy Accents; gemstones: Hero Arts; eye: Hobby Lobby; twine: Divine Twine; ribbon: Stampin’ Up!; dies: Papertrey Ink; punches: EK Success

The Basics
1. Trim ¼" (6mm) off the top of a standard A2 card base (4¼" × 5½" [10.8cm × 14cm]) and stamp with a polka dot stamp.
2. Cut a piece of white cardstock 3" × 3¾" (7.6cm × 9.5cm) and a piece of black cardstock 2¾" × 3¼" (7cm × 8.3cm). Adhere the black cardstock to the white cardstock.
3. Machine stitch around the edges of the cardstock panel, wrap the panel with baker’s twine and adhere it to the front of the card.
4. Die cut a label shape from light blue cardstock and stamp it with a coordinating stamp.
5. Die cut a scalloped circle from a darker blue cardstock and adhere it to the center of the label.
6. Die cut a circle from white cardstock and stamp with it with blue waves. Adhere this circle to the center of the scalloped circle.
7. Adhere the layered label panel to the cardstock panel.
8. Stamp a dolphin and a party hat onto white cardstock and color the images with markers. Cut out and adhere the pieces to the card, on top of the circle. Add a googly eye and pom-pom to embellish.
9. Add glossy accents to some of the background-stamped images so they look like bubbles.
Beyond the Basics
1 Trim ¼" (6mm) off the top of a standard A2 card base (4¼" × 5½" [10.8cm × 14cm]).
2 Notch the top center of the card with a 1" (2.5cm) circle punch.
3 Draw a line ½" (1.3cm) in from the edge on all four sides of the front of the card. Score along the top marked line. With a craft knife, cut along the other three marked sides, leaving the scored line intact.
4 Score a line in the center of the cut panel.
5 Adhere the front and back of the card together, along the side and bottom edges, creating a pocket at the top of the card.
6 Create the tag by cutting a piece of light blue cardstock to 3" × 5¼" (7.6cm × 13.3cm). Next, create a 1⁄2" (1.3cm) circle tab and punch a hole in it with a standard sized hole punch. Adhere the circle tab to the top of the cardstock.
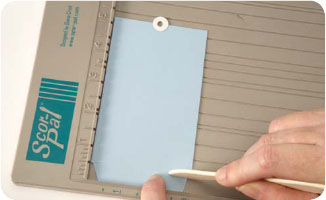
7 Clip the bottom two corners. Score the tag ½" (1.3cm) from the bottom edge.

8 Slide the tag into the card base through the pocket. Fold the tag along the score line, and adhere the ½" (1cm) tab to the back of the bottom edge of the cut panel of the card base.
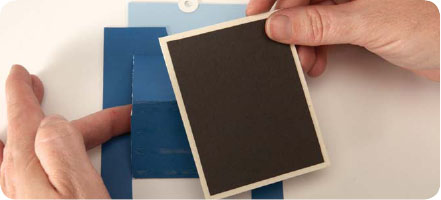
9 Cut a piece of black cardstock to 23⁄4" × 31⁄2" (7cm × 9cm) and mat it with a piece of cream cardstock cut to 3" × 33⁄4" (7.6cm × 9.5cm). Machine stitch around the edges of the matted pieces, if desired. Adhere this piece to the bottom half of the cut panel on the front of the card, lining up the bottom edges.
To Finish:
Follow steps 3–9 of The Basics to embellish the card. Embellish the inside of the pocket with more fish, and tie a piece of twine through the hole in the circle tab.

Cupcake Gift Card Holder
By Lisa Dorsey
WHAT YOU’LL NEED
Cardstock
Paper trimmer
Patterned paper
Adhesive
Decorative edged scissors
Pencil
Craft Knife
Embossing folder
Chalk ink
Gemstones
Adhesive dots
Sewing machine and thread (optional)
A sweet treat with a surprise all its own?
Yes, please!
Materials List cardstock: Bazzill Basics; patterned paper: The Paper Studio; embossing folder: Sizzix; gemstones: Creative Charms; ink: Clearsnap; adhesive dots: Glue Dots International

The Basics
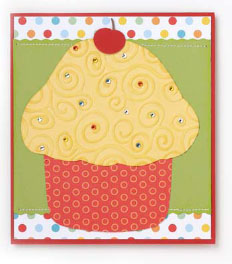
1. Create a 51⁄2" × 6" (14cm × 15.2cm) card base from red cardstock.
2. Cut a piece of polka-dot patterned paper to 51⁄8" × 53⁄4" (13cm × 14.6cm) and adhere it to the front of the card.
3. Using decorative edged scissors, cut a piece of green cardstock to 51⁄8" × 41⁄2" (13cm × 11.4cm). Add machine stitching, if desired. Adhere the cardstock to the card.
4. Using the template on page 137, cut the bottom of the cupcake from red patterned paper and adhere it to the card.
5. Using the template on page 137, cut the top of the cupcake from yellow cardstock and dry emboss it. Ink the edges of the cupcake top and adhere it to the card.
6. Cut a cherry shape and adhere it to the top of the cupcake.
7. Embellish the cupcake with gemstones.
Beyond the Basics
To Start:
Follow steps 1–7 from The Basics, but do not adhere the cupcake top or bottom to the card base. Instead...

1 Create a pocket with the cupcake base by adhering only the sides and bottom to the card base.

2 Attach a gift card to the back of the cupcake top using adhesive dots. Leave the bottom of the gift card exposed.
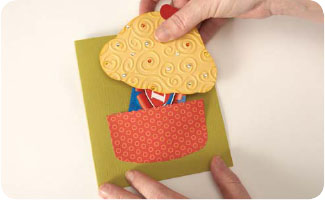
3 Slide the gift card into the pocket to hold the cupcake top in place.