CHAPTER
2
Winter Holidays
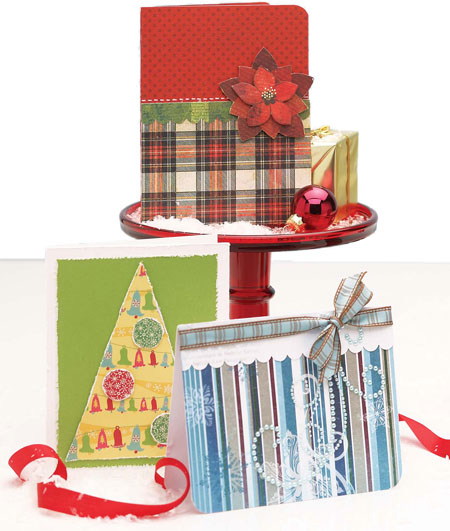
TIS THE SEASON for keeping in touch with family and friends. In this chapter you will find great resources for creating simple cards—the kind you can mass produce when your holiday card list numbers in the dozens or more. There’s a sweet snowman made from simple punched circles and buttons, and there’s a beautiful nativity scene accordion card created quickly and easily with stamped images. Of course you will also find in this chapter lots of great cards that shake, pop and roll. Check out the Christmas tree card with penny slider ornaments, the beautiful, rustic pop-up snowflake card, the Santa pop-up card and the spinning Hanukkah card. And we’ve also included a few different options for giving gift cards, including a traditional stocking created from paper. Now, who wouldn’t like to find that hung by the chimney with care?

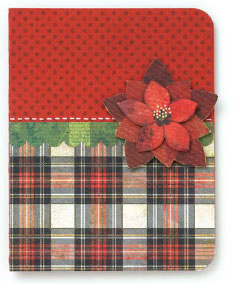
Christmas Tree Pop-Up Card
By Kimber McGray
Nothing says Christmas more than the classic colors of rich red and evergreen mixed with traditional plaid and poinsettias. Imagine the surprise when your loved one opens this card and a Christmas tree appears, adorned with beautiful bulbs and topped with a gold star.

Materials List cardstock: Core’dinations; patterned paper: BasicGrey, BoBunny Press; punches: EK Success, Stampin’ Up!, Marvy Uchida; twine: BasicGrey; pearls: BasicGrey; pen: Uni-Ball Signo; foam adhesive squares: 3L Scrapbook Adhesives
WHAT YOU’LL NEED
 Cardstock
Paper trimmer
Corner rounder
Patterned paper
Adhesive
Border punch
White gel pen
Scissors
Foam adhesive
Pencil
Bone folder
Twine
Self-adhesive pearls
Craft knife
The Basics
1. Create a standard A2 card base (4¼" × 5½" [10.8cm × 14cm]) from red cardstock. Round the upper and lower right corners with a corner rounder.
2. Cut a 3" × 4¼" (7.6cm × 10.8cm) piece of plaid patterned paper and adhere it to the bottom of the card. Round the lower right corner with a corner rounder.
3. Cut a 4¼" × ½" (10.8cm × 1.3cm) scalloped border from green patterned paper using a scalloped border punch. Adhere the border to the card, along the top edge of the plaid paper.
4. With a white gel pen, faux stitch a line above the green patterned paper border.
5. Cut out two poinsettia flowers from patterned paper. Leave one whole and cut out the inner flower from the design on the second one. Adhere the two flowers together with foam adhesive. Adhere the flowers to the card.
Beyond
the Basics
To Start:
Make the front of the card following the instructions for The Basics.
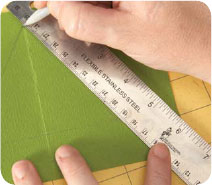
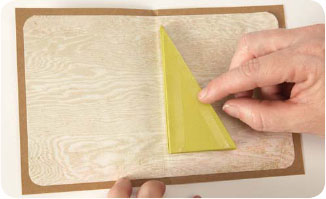
1 For the card liner, cut patterned paper to 5 × 7½ (12.7cm × 19cm) and round the corners. With a pencil, mark 1¼ (3.2cm) from the bottom and 2 (5cm) out from each side of the center fold. Draw a straight line connecting the two marks to create a triangle.
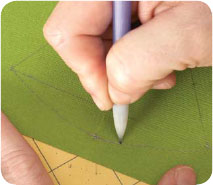
2 Make a mark ½ (1.3cm) from the bottom with a pencil. Draw an arc going through the mark connecting the bottom corners of the triangle.
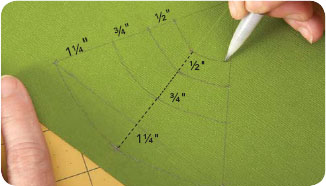
3 Mark the other tiers of the tree: 1¼ (3.2cm) up from the bottom on each side and up from the bottom of the curve on the fold. Join all three marks to create the next arc; ¾ (2cm) up from the last marks on the sides, connect with an arc; ½ (1.3cm) up from the last marks on the sides connect with an arc.

4 Cut each arc from left to right along the arc lines with a craft knife.
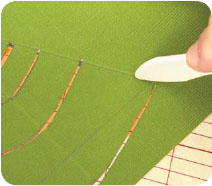
5 Score from the top of the tree down to the lower corners of the tree.
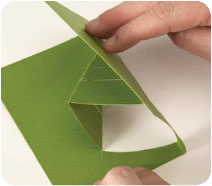
6 Push the tree to the inside of the card to create the pop up. Then adhere the liner to the interior of the card base.
To Finish:
Embellish the interior of the card as shown in the photo on page 42.
Snowman Shaker Card
By Kimber McGray
This sweet snowman card will warm your heart. Simple punched circles and basic buttons come together to create a homespun friend. Adhering simple shaker containers over the circles and adding a dash of sparkling glitter brings him to life right before your eyes.

WHAT YOU’LL NEED
Cardstock
Paper trimmer
Patterned paper
Adhesive
Border punch
Baker’s twine
Circle punch
Buttons
Ribbon
Shaker pouches
Glitter
Foam adhesive
Materials List cardstock: Core’dinations; patterned paper: Jillibean Soup; twine: Jillibean Soup; buttons: Stampin’ Up!; ribbon: May Arts; plastic cup: Stampin’ Up!; punches: EK Success, Stampin’ Up!; foam adhesive squares: 3L Scrapbook Adhesives; glitter: Our Craft Lounge
The Basics

1. Create a standard A2 card base (4¼" × 5½" [10.8cm × 14cm]) from white cardstock.
2. Cut a piece of patterned Kraft paper to 4¼" × 5½" (10.8cm × 14cm) and adhere it to the card.
3. Scallop the edge of a 5¼" × 1½" (13.3cm × 3.8cm) piece of red cardstock. Adhere it to the front of the card, along the left edge. Wrap baker’s twine around the card three times and tie a bow on the front of the card.
4. Cut three 2½" (6.4cm) circles from white cardstock and adhere them to the front of the card with foam adhesive, overlapping the circles slightly. Trim a bit off the bottom circle if it hangs off the edge of the card.
5. Adhere buttons and a red ribbon scarf to the circles to create a snowman.
6. Cut a small triangle from orange cardstock and adhere it for the nose.
Beyond the Basics
To Start:
Create a card base to measure 31⁄2 × 7" (9cm ×17.8cm). Cut a piece of patterned Kraft paper to 31⁄4 × 63⁄4" (8.3cm × 17cm) and adhere it to the card base. Scallop the edge of a 1⁄2 × 63⁄4 (1.3cm × 17cm) piece of red cardstock and adhere it along the left edge of the card base. Wrap baker’s twine around the card three times and tie a bow on the front of the card. Then...

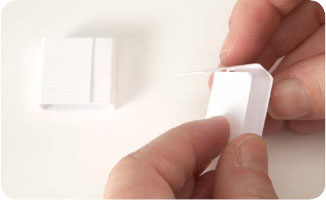
1 Cut three circles from white cardstock to match the size of the shaker pouches. Glue buttons and a nose onto the various circles. Then fill the shaker pouches with glitter.
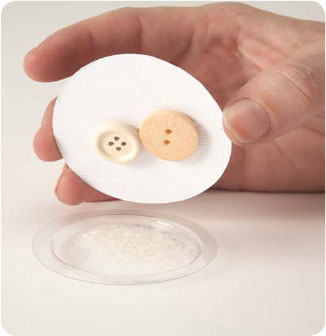
2 Remove the backing from the shaker pouch adhesive and adhere the cardstock circles to the pouches. (Adhere cardstock to the pouches to avoid spilling the glitter—once it’s free, it can’t ever be fully contained again!).
To Finish:
Adhere the pouches to the card base with foam adhesive, and adhere a ribbon scarf to the snowman.
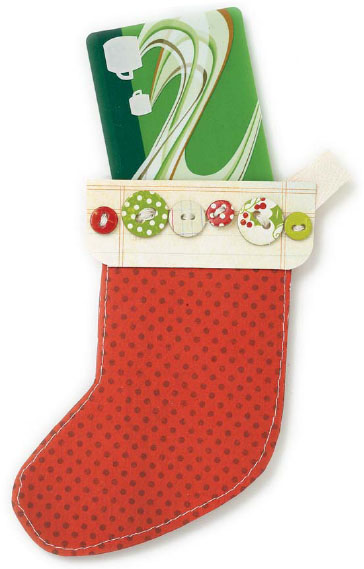
Stocking Gift Card Holder
By Kimber McGray
Some stockings are hung by the chimney with care. This one is filled with a gift card. This is a unique way to present a gift card using a traditional icon of Christmas.
WHAT YOU’LL NEED
A2 card base
Patterned paper
Paper trimmer
Pencil
Scissors
White gel pen
Corner rounder
Adhesive
Twill tape
Chipboard buttons
Sewing machine and thread (optional)
Materials List cardstock: Jillibean Soup; patterned paper: Making Memories, BoBunny Press, My Mind’s Eye; buttons: Making Memories; pen: Uni-Ball Signo; sewing machine: Singer; thread: Coats & Clark; twill: Creative Impressions; floss: DMC
The Basics

1. Begin with a standard A2 Kraft card base (4¼ × 5½" [10.8m × 14cm]).
2. Adhere a 4 × 5¼ (10.2cm × 13.3cm) piece of patterned paper to the card base.
3. Using the template on page 136, cut out a stocking from red patterned paper. Faux stitch around the edges of the stocking with a white gel pen.
4. Cut a strip of patterned paper to 1½ × 3" (3.8cm × 7.6cm), round the bottom corners of the strip and adhere it to the top edge of the stocking.
5. Fold a small piece of twill tape to form a loop, and adhere the loop to the back of the stocking.
6. Adhere the stocking to the front of the card and embellish the top edge with chipboard buttons.
Beyond the Basics
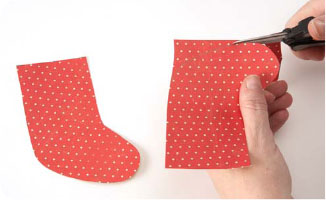
1 Using the template on page 136, cut out two stockings from patterned paper. Remember to flip the template over before cutting out the second stocking so the stockings are mirror images. This will allow the “right sides” of the patterned paper to be on the outside of the finished stocking.
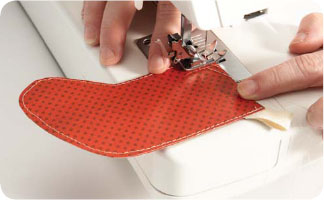
2 Adhere the wrong sides of the stockings together around the outside edges only, leaving the top edge open. Or, if desired, machine stitch the stockings together with an 1⁄8 (3mm) seam allowance, again, along all edges except the top.
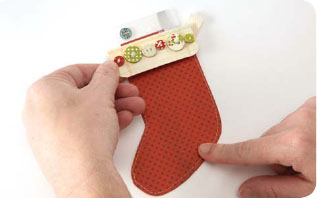
3 Embellish the front of the stocking as instructed in steps 3–6 of The Basics. Finally, slide a gift card into the stocking.
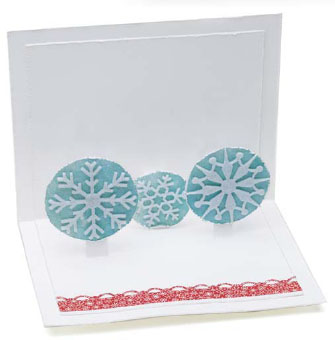
Snowflakes Pop-Up Card
By Lily Jackson
These felt snowflakes might melt your heart, but they’ll never melt in your hand.

Materials Listcardstock: Gina K. Designs; patterned paper: Cosmo Cricket, BasicGrey; pearls: Recollections; ribbon: Craft Supply
The Basics
1. Create a standard A2 card base (4¼ × 5½" [10.8cm × 14cm]) from white cardstock. Distress the edges.
2. Cut a piece of pink patterned paper to 3¾ × 5 (9.5cm × 12.7cm) piece of pink patterned paper. Distress the edges.
3. Cut a piece of sheer ribbon 4½ (11.4cm) long. Tie a knot in the ribbon, slightly off center. Wrap the ribbon around the pink patterned paper and adhere the ends to the back of the patterned paper. Adhere the patterned paper to the card.
4. Embellish the card with a few swirls cut from green patterned paper. Glue a pearl to the center of a felt snowflake and adhere it over the knot in the ribbon.
WHAT YOU’LL NEED
Cardstock
Paper trimmer
Sandpaper
Patterned paper
Ribbon
Scissors
Adhesive
Self-adhesive pearl
Felt snowflakes
Pencil
Craft knife
Circle punch
Beyond the Basics
To Start:
Make the front of the card following the instructions for The Basics. Then...

1 Cut a cardstock liner to 4¾" × 8" (12cm × 20.3cm). Fold the liner in half. With a pencil, mark three different sets of pop-up hinges on the back of the folded liner, each ¼" (6mm) wide and varying in length from ¾" to 1¾" (2cm to 4.5cm). Cut along the length of the hinges but be sure not to cut along the ¼" (6mm) measures.
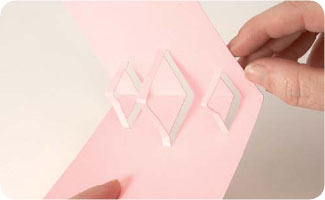
2 Open the liner and push the hinges in to the interior of the card liner.

3 Adhere the liner to the inside of the card base.

4 Adhere felt snowflakes to appropriately sized patterned paper circles, and then adhere the snowflakes to the hinges. Adhere a 4¾ × 1⁄2 (12cm × 1.3cm) scalloped patterned paper strip to the bottom edge of the card liner.
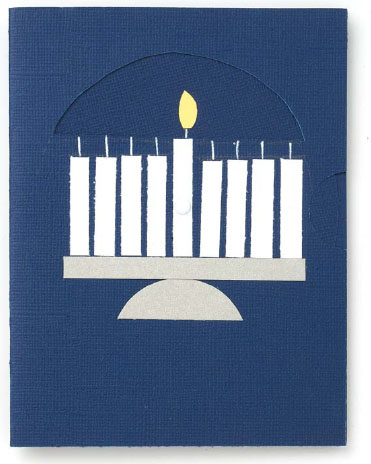
Hanukkah Spinner Card
By Kimber McGray
Light up the night of a cherished friend or family member with this unique “spin” on the tradition of lighting the menorah.
WHAT YOU’LL NEED
Card base
Cardstock
Paper trimmer
Circle punches
Adhesive
White gel pen
Pencil
Craft knife
Paper piercer
Brad
Materials List cardstock: Core’dinations; brad: Making Memories; punches: EK Success, Marvy Uchida
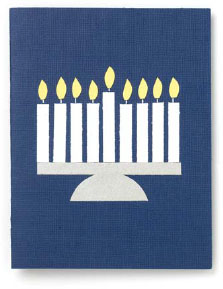
The Basics
1. Start with a standard A2 navy blue card base (4¼" × 5½" [10.8m × 14cm]).
2. Make a menorah: Cut a ¼" × 3" (6mm × 7.6cm) strip of silver cardstock for the base of the menorah. From silver cardstock, punch a 1½" [3.8cm]) circle and cut a segment from that circle that is equal to about one-third for the menorah stand.
3. Cut eight ¼" × 11⁄4" (6mm × 3.2cm) pieces of white cardstock and one ¼" × 11⁄2" (6mm × 3.8cm) piece of white cardstock for the candles.
4. Adhere all pieces to the card base, as shown. Draw candlewicks with a white gel pen.
5. Cut nine candle flames from yellow cardstock and adhere to the top of the candlewicks.
Beyond the Basics

1 Follow steps 1–4 of The Basics.
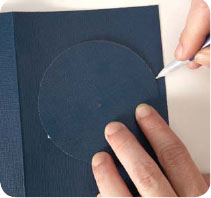
2 Using a 3½ (9cm) circle as a template, draw an arc with a pencil centered above the candles.

3 Cut along the arc line and along a straight line above the center candlewick to create a window.
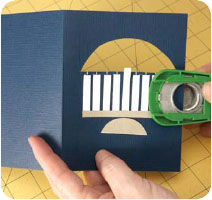
4 Create a notch on the right side of the card front using a 1 (2.5cm) circle punch.

5 Place a blue 4 (10.2cm) circle behind the window and pierce a hole through the center of the middle candle and through the 4 (10.2cm) circle.

6 Insert a white brad into the hole and through the front of the card and the 4 (10.2cm) circle.
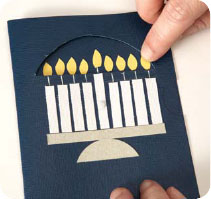
7 Adhere one candle flame to the blue circle directly above the middle candle.

8 Rotate the 4 (10.2cm) circle 180 degrees and add nine flames, one above each candle, for a fully lit menorah.
Winter Snow Gift Card Holder
By Kimber McGray
While the winter winds blow outside, send a beautiful blue and white card covered in pearl swirls to keep in touch with a special friend over the winter holidays.
Materials List cardstock: Core’dinations; patterned paper: BoBunny Press; ribbon: Bazzill Basics; punches: Stampin’ Up!, EK Success; gemstones: Zva Creative

WHAT YOU’LL NEED
Cardstock
Paper trimmer
Patterned paper
Adhesive
Border punch
Self-adhesive pearl swirls
Ribbon
Scissors
Corner rounder
Bone folder
Craft knife

The Basics
1. Begin with a standard A2 white card base (5½" × 4¼" [14cm × 10.8cm]).
2. Cut a piece of stripe-patterned paper to 4¼" × 5½" (10.8cm × 14cm), and adhere it to the card.
3. Cut a 5½" × 1" (14cm × 2.5cm) strip of white patterned paper. Using a border punch, scallop one edge. Adhere the strip to the front of the card.
4. Embellish the card with a self-adhesive pearl swirl.
5. Tie a ribbon around the card and in a bow.
6. Round the bottom corners of the card with a corner rounder.
Beyond
the Basics
To Start:
Follow all The Basics steps to make the card front. Then...

1 Cut two 1" × 3¼" (2.5cm × 8.3cm) strips of white cardstock. Score each from the left edge at 1", 1¼", 2¼" and 2½" (2.5cm, 3.2cm, 5.7cm and 6.4cm).
2 Fold and adhere the ¾ (2cm) side to the 1 (2.5cm) side to create blocks.

3 Adhere the blocks to the interior of the card base.

4 Cut a 5" × 51⁄2" (12.7cm × 14cm) piece of patterned paper and scallop the top edge. Score 1" (2.5cm) from the top edge. Adhere the paper to the interior of the card, lining up the bottom edge of the paper with the bottom edge of the card. The score line should fit neatly against the blocks and the remaining inch (2.5cm) will fit to the top of the blocks, creating the gift card holder. Cut a piece of patterned paper to 3¼" × 51⁄2" (8.3cm × 14cm) and adhere it to the top of the interior of the card. Round the corners and embellish the interior with ribbon and self-adhesive pearls.
Christmas Tree
Penny Slider Card
By Lily Jackson
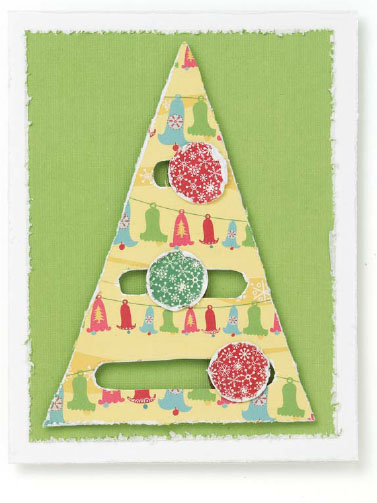
Adorning a Christmas tree is a fun holiday tradition. Creating a card with penny slider ornaments is almost as much fun. Tilt the card from side to side to see the Christmas balls move across the tree.
Materials List cardstock: Gina K. Designs, DCWV; patterned paper: Cosmo Cricket; paper distresser: Tim Holtz; punch: Stampin’Up!
WHAT YOU’LL NEED
Cardstock
Paper trimmer
Sandpaper
Patterned paper
Adhesive
Pencil
Craft knife
Circle punch
Foam adhesive
Slot punch
Pennies
The Basics
1. Create a standard A2 card base (4¼" × 5½" [10.8cm × 14cm]). Distress the edges, if desired.
2. Cut a piece of green patterned paper to 3¾" × 5" (9.5cm × 12.7cm) and distress the edges. Adhere it to the card front.
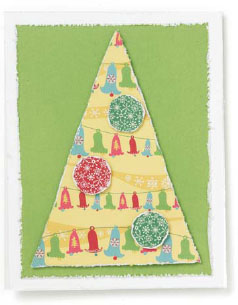
3. Cut a triangle from a piece of yellow patterned paper. The triangle should measure 3½" (9cm) at its widest point and 4½" (11.4cm) at its tallest point. Adhere the triangle to the card.
4. Punch three small circles from coordinating patterned paper, distress the edges and adhere the circles to the front of the card with foam adhesive.
Beyond
the Basics
To Start:
Follow steps 1–3 for The Basics, but do not adhere the triangle to the card. Instead...

1 Use a slider punch to create a horizontal opening in the center of the triangle. (In all, you will create three slider openings.)
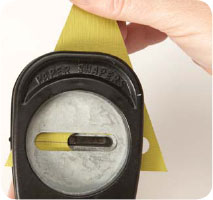
2 For the bottom slider opening, you will need to punch multiple times—line up the punch carefully and take your time.
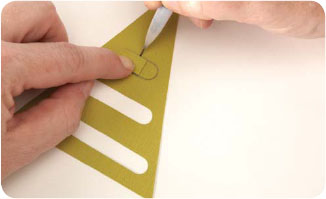
3 For the top row, use one of the waste punch pieces from a previous step. Fold it to create a shorter channel and use it as a template. Cut this channel with a craft knife.
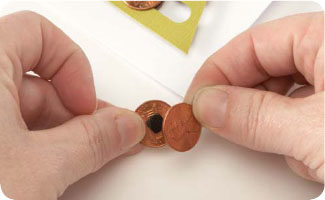
4 Create three penny sliders by sandwiching foam adhesive between two pennies.

5 Adhere the tree to the card with two layers of foam adhesive, stacked one on top of the other. Carefully slip the penny sliders into the channels.

6 Cover the penny sliders with circles of patterned paper so they resemble ornaments.
Jolly Old
Soul Card
By Kimber McGray
You just never know when Santa Claus will pop up and surprise you! This time around, he’s here to spread some holiday cheer ... but only if you’ve been nice.
Materials List cardstock: Jillibean Soup, Core’dinations; Santa embellishment: Hobby Lobby; punch: Martha Stewart; glitter: Hobby Lobby; gemstones: Queen & Co; foam adhesive squares: 3L Scrapbook Adhesives
WHAT YOU’LL NEED
A2 Kraft card base
Cardstock
Craft knife
Adhesive
Glitter glue pen
Adhesive foam squares
Santa embellishment
Snowflake punch
Bone folder
Gemstones


The Basics
1. Start with a standard A2 Kraft card base (4¼ × 5½" [10.8cm × 14cm]).
2. Cut a piece of embossed red cardstock to 3¾ × 2¼" (9.5cm × 5.7cm). Hand cut a strip of white cardstock to 4½ (11.4cm). Hand scallop the edge of the strip so it resembles snow. Adhere the strip to the chimney. Embellish with a glitter glue pen.
3. Adhere the cardstock chimney to the base card with adhesive foam squares. Adhere only along the edges of the chimney, being sure to leave an opening in which to insert a Santa embellishment.
4. Cut off as much of the bottom part of the Santa embellishment as necessary to fit it snugly into the chimney.
5. Adhere two snowflakes punched from white cardstock to the card base.
Beyond the Basics
1 Begin with a standard A2 Kraft card base. Cut a piece of embossed red cardstock to 3¾" × 2¼" (9.5cm × 5.7cm). Hand cut white cardstock to approximately 4½" (11.4cm) and hand scallop the edge. Adhere the white cardstock “snow” to the top edge of the chimney.

2 Using foam adhesive, adhere the cardstock chimney to the card base. Adhere only the edges, leaving an opening in which to place the Santa embellishment.
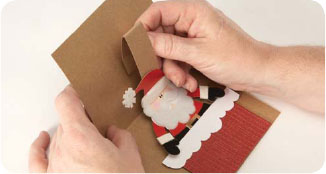
3 Cut a 1" × 5½" (2.5cm × 14cm) strip of Kraft cardstock. Score and fold one end at ¾" and 2½" (2cm and 6.4cm). Adhere the ¾" (2cm) tab to the inside of the card, 1¾" (4.5cm) from the top edge. Adhere the Santa embellishment to the lower half of the Kraft strip. Slide Santa’s feet into the chimney.
To Finish:
Embellish the front of the card by creating another chimney with snow. Adhere a few die-cut snowflakes to both the interior and the front of the card. Add a little sparkle to the snowy chimneys with a glitter glue pen. Adhere various gemstones to the card for added shine and dimension.
Three Wise Men Accordion-Fold Card
By Kimber McGray
Spread the joy of the Christmas story with a rustic accordion-fold card.
WHAT YOU’LL NEED
Cardstock
Paper trimmer
Patterned paper
Twine
Kraft tags
Stamps
Ink pads
Markers
Craft knife
Foam adhesive
Bone folder

Materials List cardstock: Jillibean Soup, Core’dinations; patterned paper: Jenni Bowlin Studio; tags: Jillibean Soup; stamps: Inkadinkado; ink: Memento by Tsukineko; markers: Copic; twine: Jillibean Soup

The Basics
1. Start with a standard A2 card base (4¼ × 5½" [10.8cm × 14cm]).
2. Cut a piece of patterned paper to 3¾" × 5 (9.5cm × 12.7cm) and adhere it to the card.
3. Tie twine around two Kraft tags and adhere the tags to the front of the card.
4. Stamp images onto white cardstock and color the images with markers.
5. Cut out the images and adhere them to the tags with foam adhesive.
Beyond the Basics

1 Start with a Kraft card base measuring 5½" × 11½" (14cm × 29.2cm). Score the card, from the left, at: 4¼", 4¾", 5¼", 5¾", 6¼", 6¾" and 7¼" (10.8cm, 12cm, 13.3cm, 14.6cm, 16cm, 17cm and 18.4cm).
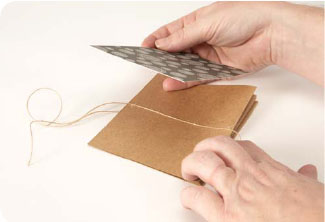
2 Fold along the score marks to create a card that measures 5½ × 41⁄4 (14cm × 10.8cm). You will work with the accordion fold at the bottom of the card. Adhere a 24 (61cm) piece of twine around the length of the card, leaving approximately 6 (15.2cm) extending beyond the top and bottom of the card and including 2 (5cm) of slack along the accordion fold spine. Adhere a 3¾" × 5 (9.5cm × 12.7cm) piece of patterned paper to the front of the card and a 3¾" × 5 (9.5cm × 12.7cm) piece of cardstock to the back of the card.
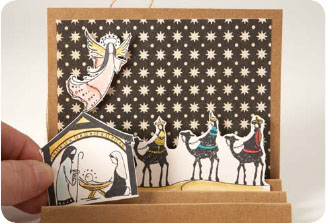
3 Adhere a 3¾" × 5" (9cm × 12.7cm) piece of patterned paper to the inside of the card and adhere stamped embellishments to the patterned paper and in the valleys of the accordion folds to create your scene.
To Finish:
Embellish the front of the card with stamped images, Kraft tags and twine, as instructed in The Basics. Tie the 6" (15.2cm) of twine from the top and bottom of the card to close the finished card.
Pop-Up Triangle Tree Card
By Kimber McGray
By simply duplicating the same shape multiple times, you can easily create a pop-up element for a card. With this card, it’s easy to see how a handful of triangles easily turn into a simple Christmas tree design.

Materials List cardstock: Jillibean Soup, Core’dinations; patterned paper: Jillibean Soup, BoBunny Press; punches: Marvy Uchida, Fiskars, EK Success; twine: Jillibean Soup; foam adhesive squares: 3L Scrapbook Adhesives

The Basics
1. Start with a standard A2 Kraft card base (4¼ × 5½" [10.8cm × 14cm]).
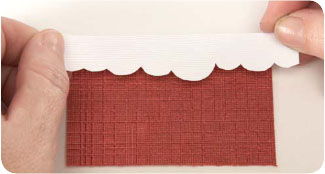
2. Cut a piece of Kraft cardstock to 5½" × 3½ (14cm × 9cm). Punch both long sides of the cardstock with a decorative border punch. Adhere the cardstock to the card base.
3. Cut a 5½ × 3 (14cm × 7.6cm) piece of patterned Kraft paper and adhere it to the card base. Using a white gel pen, add faux-stitching along the edge of the patterned Kraft paper.
4. Cut a triangle from a piece of green patterned paper; the triangle should measure 4 (10.2cm) at its widest point and 41⁄2 (11.4cm) at its tallest point. Wrap twine around the triangle four or five times to mimic garland, and tie it into a bow on the front of the card. Adhere a piece of brown patterned paper cut to 3⁄4" × 1 (2cm × 2.5cm) to the bottom of the patterned paper tree.
5. Adhere the tree to the front of the card with foam adhesive.
6. Punch a star out of yellow cardstock and adhere it to the top of the tree with a foam adhesive.
WHAT YOU’LL NEED
Cardstock
Patterned Kraft paper
Paper trimmer
Border punch
Adhesive
Patterned paper
White gel pen
Twine
Foam adhesive
Star or asterisk punch
Corner rounder
Bone folder
Beyond
the Basics
To Start:
Following all steps for The Basics, create the front of the card. Cut a piece of patterned paper to 8" × 5" (20.3cm × 12.7cm), round all corners and adhere it to the interior of the card as the card liner. Then...

1 Cut six triangles from 4" × 4" (10.2cm × 10.2cm) pieces of green patterned paper. Score and fold each in half.

2 Adhere the wrong sides of the triangles together.
3 Adhere the two outermost pieces of the folded tree to the card liner, aligning the center of the tree with the center fold of the card.
To Finish:
Add a tree trunk and a star to the tree, and embellish it with paper-punched asterisk snowflakes decorated with a white gel pen.