CHAPTER
4
Celebrations

THERE ARE SO MANY different things to celebrate in life: traveling life’s journey with our friends and family, showing our support and offering our congratulations. Doing these things lets loved ones know we care and support them in all of their endeavors.
In this chapter, we will help you celebrate the milestones in the lives of your loved ones. Imagine the pride your favorite new driver will feel when he receives the cool, interactive scooter card. For graduates, we have a great congratulatory card that tosses a mortarboard in the air right alongside them.
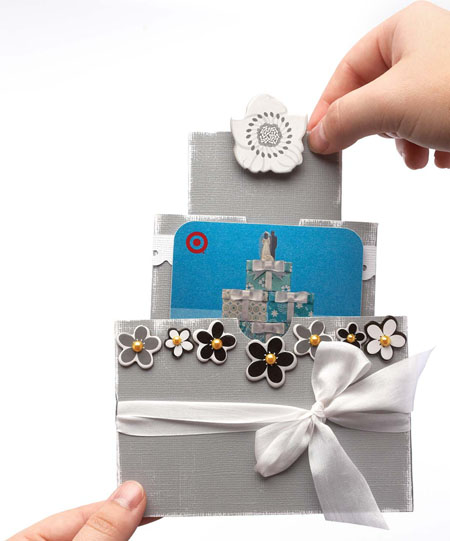
You can also help a bride and groom celebrate their nuptials with an amazing three-tiered wedding cake that extends to reveal a gift card.
Or maybe you know someone who is moving into a new home. We have cards for that occasion too.
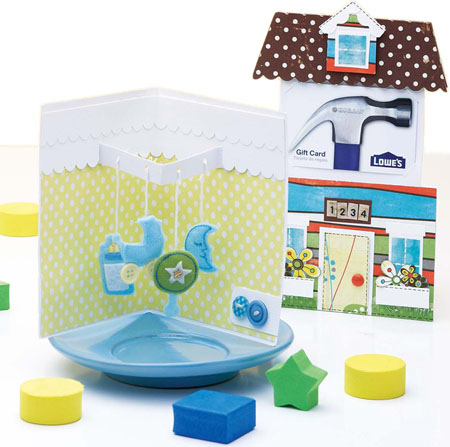
And then there are new babies. Learn how to make an adorable card that opens to reveal a sweet hanging mobile—perfect for your friend’s baby boy or girl.
And surely you know someone approaching a significant anniversary. Our cards honoring 25th and 50th anniversaries will dazzle with the sparkle, glitz and, most of all, the love you put into them!
Wedding Cake Card and Gift Card Holder
By Kimber McGray
WHAT YOU’LL NEED
 Cardstock
Paper trimmer
Sewing machine and thread
Corner, border, circle and hole punches
Sandpaper
Adhesive
Ribbon
Chipboard embellishments
Self-adhesive pearls
Foam adhesive
Bone folder
Craft knife
Brads
Adhesive dots
Materials List cardstock: Core’dinations; chipboard: Momenta; ribbon: Creative Impressions; pearls: Queen & Co.; punch: Fiskars; adhesive dots: Glue Dots International
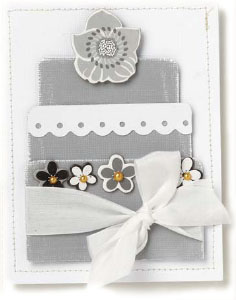
A simple wedding card adorned with a sweet cake is a great way to congratulate the newlyweds on their big day. Now imagine their awe when you hand them a card that extends to an amazing three-tiered cake that includes a gift card to their favorite store. Either way, they will enjoy this sweet treat of a handmade card.
The Basics
1. Start with a basic white card base in a standard A2 size (4¼" × 5½" [10.8cm × 14cm]).
2. Machine stitch a border ¼" (6mm) from all edges.
3. Cut three pieces of gray cardstock to: 3½" × 2" (9cm × 5cm), 3¼" × 1½" (8.3cm × 3.8cm) and 2¾" × 1½" (7cm × 3.8cm). Round the top corners and lightly sand the edges of all three pieces. Adhere the pieces together, layering them to create a cake shape.
4. Cut a strip from white cardstock to 3¼" × ½" (8.3cm × 1.3cm) and scallop the edge with a scalloped border punch. Adhere the strip to the middle tier of the cake and trim the edges.
5. Wrap a ribbon around the bottom layer and tie it into a bow.
6. Adhere chipboard flowers and pearls to the cake for decoration.
7. Adhere the embellished cake to the card base with foam adhesive.
Beyond the Basics
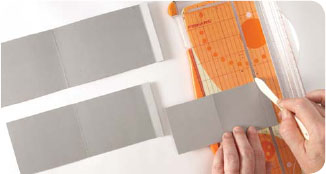
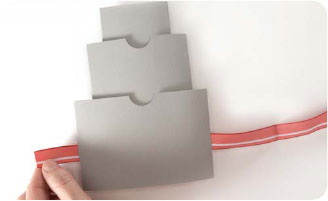
1 Cut three pieces of gray cardstock to 11" × 3½" (28cm × 9cm), 8½" × 3¼" (21.6cm × 8.3cm) and 6" × 2¾" (15.2cm × 7cm). From the left, score the large piece at ½" (1.3cm) and 5¾" (14.6cm), the medium piece at ½" (1.3cm) and 4½" (11.4cm) and the small piece at ½" (1.3cm) and 3¼" (8.3cm).

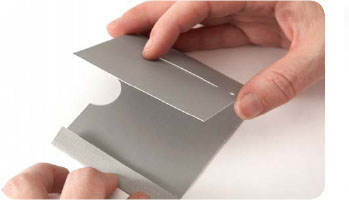
2 On the middle panel of the large piece: Using a craft knife, cut a 1 (2.5cm) slot, 2½ (6.4cm) from the bottom, on each score line. (In a later step, ribbon will be inserted through these slots.)

3 On the middle panel of the large piece: Punch a ½" (1.3cm) circle notch in the center of the top edge with a 1 (2.5cm) punch.

4 On the end panel of the large piece: Cut a 1⁄16 (1.5mm) channel in the middle of the panel, starting ½ (1.3cm) from the top edge and ending 1⁄2 (1.3cm) from the bottom edge.
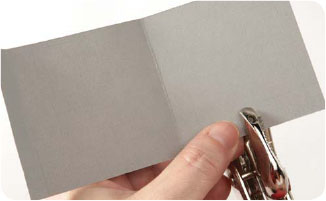
5 On the large piece: Fold in on the 1⁄2 (1.3cm) score line to form a tab and adhere the tab to the cardstock to close this tier or pocket.
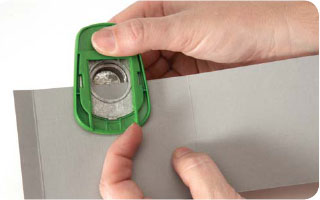
6 On the middle panel of the medium piece: Punch a ½ (1.3cm) circle notch in the center of the top edge with a 1 (2.5cm) punch.

7 On the end panel of the medium piece: Cut a 1⁄16 (1.5mm) channel in the middle of the panel, starting ½ (1.3cm) from the top edge and ending 1⁄2 (1.3cm) from the bottom edge.

8 On the end panel of the medium piece: Punch a small hole in the bottom of the panel, ¼ (6mm) from the bottom and centered.

9 On the medium piece: Fold in on the 1⁄2 (1.3cm) score line to form a tab and adhere the tab to the cardstock to close this tier or pocket.
10 On the end panel of the small piece: Punch a small hole in the bottom of the panel, ¼ (6mm) from the bottom and centered.

11 On the small piece: Fold in on the 1⁄2 (1.3cm) score line to form a tab and adhere the tab to the cardstock to close this tier or pocket.
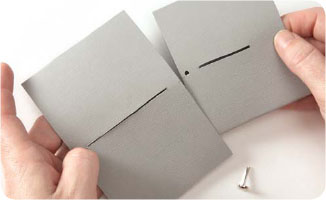
12 To assemble the card: Insert the medium piece into the large piece.

13 Line up the channels and insert a brad into the channel in the large piece and through the hole in the medium piece.

14 Extend the medium piece and insert the small piece into the medium piece.

15 Line up the hole in the small piece with the channel in the medium piece and insert a brad to attach the tiers.
16 With all pieces extended, slide a ribbon through the slits in the bottom tier, bring the ribbon to the front and tie it in a bow. Finish embellishing the front of the card with border-punched white cardstock, chipboard flowers and self-adhesive pearls.
Baby Mobile Pop-Up Card
By Kimber McGray
Does someone have a new baby? This adorable and whimsical mobile pop-up card will warm the hearts of any new parents as you congratulate them on their little bundle of joy.

Materials List cardstock: Core’dinations; patterned paper: Jillibean Soup; felt embellishments: KI Memories; punches: Fiskars, Stampin’ Up!; buttons: Stampin’ Up!; floss: DMC
WHAT YOU’LL NEED
Cardstock
Paper trimmer
Patterned paper
Adhesive
Hole, star and border punches
Corner rounder
Buttons
Pencil
Craft knife
Baby-themed embellishments
Embroidery floss

The Basics
1. Create a standard A2 card base (4¼ × 5½" [10.8cm × 14cm]) from white cardstock.
2. Cut a piece of patterned paper to 4 × 5¼ (10.2cm × 13.3cm) and adhere it to the card.
3. Scallop one edge of a 1 × 4 (2.5cm × 10.2cm) strip of white cardstock and adhere it to the top of the card front.
4. Cut a piece of white cardstock to 1 × 1½" (2.5cm × 3.8cm), round two of the corners of the piece and adhere the piece to the bottom right corner of the card.
5. Embellish the card with a star punched from blue cardstock and a few buttons.
Beyond
the Basics
To Start:
Make the front of the card according to the instructions for The Basics. Then...

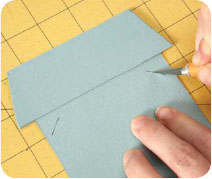
1 Cut a piece of patterned paper to ¼" × 8¼" (6mm × 21cm) and fold it in half. This will be your card liner. On the folded edge, draw a box, marking the paper at 1" (2.5cm) and 11⁄2" (3.8cm) from the top. You’ll want the strip to be 2" (5cm) long. Unfold the lining and cut along the long sides of the box only.

2 Adhere a piece of white cardstock cut to ½ × 4 (1.3cm × 10.2cm) over the pop-up strip.

3 Punch holes in the white strip.

4 Adhere the card liner to the interior of the card base.
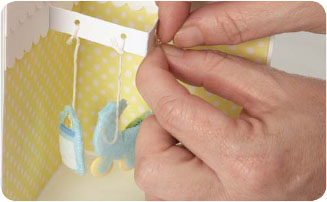
5 Tie baby-themed embellishments through the holes in the pop-up strip. Finish embellishing the inside of the card by adding strips of scallop- punched paper to the top edge of the card.
New Home
Gift Card Holder
By Kelly Goree
Moving into a new home is very exciting. Send a fun, customized card to congratulate the homeowner. The fancy version of this one holds a gift card. Don’t forget to embellish the front door, windows and flower boxes of the house!
The Basics
1. Create a 41⁄2" × 41⁄2" (11.4cm × 11.4cm) card base out of white cardstock.
2. Cut a piece of stripe- patterned paper to 4½" × 4½" (11.4cm × 11.4cm) and adhere it to the card.
3. Using the template on page 136, cut a roof shape out of brown patterned paper. Scallop the bottom edge of the roof and adhere it to the card, aligning the top edge of the roof to the top edge of the card.
4. Cut a piece of white cardstock to 1½" × 21⁄8" (3.8cm × 5.4cm). Cut a 1¼" × 2" (3.2cm × 5cm) piece of yellow patterned paper. Adhere the yellow paper to the white cardstock and adhere this piece to the card.
5. Punch a 4½" × ½" (11.4cm × 1.3cm) strip of green cardstock with a decorative border punch and adhere it to the bottom edge of the card.
6. Create the windows by cutting two 3⁄4" × 1¾" (2cm × 4.5cm) pieces and one ¾" × ¾" (2cm × 2cm) piece of blue patterned paper.
7. Mat the windows with white cardstock and trim so just a little bit of a white edge shows as a border around the windows.
8. Adhere the larger windows to either side of the door. Set the smaller window aside.
9. Adhere a small 11⁄8" × 1⁄8" (3cm × 3mm) strip of white cardstock to the top of each of the two larger windows.
10. Adhere a 11⁄8" × ½" (3cm × 1.3cm) piece of white cardstock to the bottom of the larger windows to create flower boxes.
11. Cut a piece of stripe- patterned paper to 1½" × 1¾" (3.8cm × 4.5cm). Trim one end into a triangular shape and adhere it to the roof with foam adhesive. Adhere the ¾" × ¾" (2cm × 2cm) blue window to the patterned paper square.
12. Scallop a 3" × ¼" (7.6cm × 6mm) strip of white cardstock, cut it in half and adhere it above the roof window.
13. Embellish the card with markers, Glossy Accents, brads and more, as desired.
(See the basic card on page 86.)

Materials List cardstock: Bazzill Basics; patterned paper: BoBunny Press; stickers: BasicGrey; brad: BasicGrey; glossy medium: Ranger Glossy Accents; pen: Zig and Uni-Ball Signo; punch: Fiskars
WHAT YOU’LL NEED
Cardstock
Paper trimmer
Patterned paper
Pencil
Craft knife
Border punch
Adhesive
Foam adhesive
Border punch
Markers
Glossy Accents
Decorative brads
Beyond the Basics

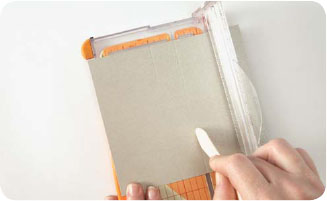
1 Use the template on page 136 to make the card base out of cardstock. Using a craft knife, cut a slit along the fold, leaving ¼ (6mm) uncut at each edge.

2 Use the template on page 136 to cut a slider out of cardstock.

3 Slide the “T” through the slit in the card base so the “T” is inside the card, as shown.

4 Adhere the edges of the card, encasing the “T” inside and securing this sliding mechanism in place.

5 Using the template on page 136, cut a roof shape out of cardstock.

6 Adhere the free end of the sliding mechanism inside the roof. Pulling on the roof should pull the slider up from the card base.

7 Pull the slider up from the base and lay a gift card on the panel. With a pencil, mark slots in which to insert the card corners.
8 Use a craft knife to cut the slots. Embellish the card following instructions for The Basics.
Congrats Honeycomb Stars Card
By Kimber McGray
Recognizing the achievements of a child is so very important. Encourage them to reach for the stars and let them know anything can be accomplished.

Materials List cardstock: Core’dinations; patterned paper: Jillibean Soup, My Mind’s Eye; ribbon: Jillibean Soup; tag: Avery; punches: Stampin’ Up!, Fiskars, EK Success; honeycomb paper: Inky Antics; foam adhesive squares: 3L Scrapbook Adhesives
WHAT YOU’LL NEED
Cardstock
Paper trimmer
Patterned paper
Adhesive
Border and star punches
Corner rounder
Twill tape
Metal ring
Foam adhesive
Pencil
Scissors
Honeycomb paper

The Basics
1. Create a standard A2 card base (4¼ × 5½" [10.8cm × 14cm]) from white cardstock.
2. Cut a piece of blue patterned paper to 3¾ × 5 (9.5cm × 12.7cm) and adhere it to the front of the card.
3. Cut a piece of grid patterned paper to 3¾ × 21⁄4" (9.5cm × 5.7cm). Punch the top edge with a border punch and round the bottom edges with a corner rounder. Adhere the piece to the card, aligning it with the bottom edge of the blue patterned paper piece.
4. Adhere a 33⁄4 (9.5cm) piece of decorative twill tape to the card.
5. Adhere a metal ring tag to the card with foam adhesive.
6. Punch a star out of yellow cardstock. Cut the star tails from yellow and orange cardstock, using the templates on page 136. Adhere the tails to the back of the star.
7. Adhere the star to the metal ring tag, and adhere the metal ring tag to the card with foam adhesive.
Beyond the Basics
To Start:
Follow all The Basics steps to create the card front. Cut a piece of blue patterned paper to 8 × 31⁄2" (20.3cm × 9cm). Round corners with a corner rounder and adhere the paper to the interior of the card. Cut a piece of grid-patterned paper to 8 × 2" (20cm × 5cm). Use a border punch on the top edge of the paper and round the bottom corners. Adhere it to the interior of the card. Adhere an 8 (20cm) piece of printed twill over the area where the two papers meet. Then...

1 Punch a star out of scrap paper. Cut it in half. Trace around the half star onto a piece of honeycomb paper, following the manufacturer’s instructions.

2 Cut the half star from the honeycomb paper.

3 Adhere one side of the honeycomb star to the interior of card, along the center fold.

4 Adhere the other side of the honeycomb star to the card.
25th Anniversary
Flip Card
By Kimber McGray
Congratulate the happy couple on twenty-five years of marriage with this beautiful interactive card embellished with tokens representative of their special day those many years ago.

WHAT YOU’LL NEED
Cardstock
Paper trimmer
Patterned paper
Adhesive
Foam adhesive
Dies and die-cutting machine
Ring embellishment
Brad
Gems
Bone folder
Pencil
Craft knife
Materials List cardstock: Core’dinations; patterned paper: Making Memories; gems: Queen & Co.; metal rings: Making Memories; die: QuicKutz; punch: Marvy Uchida, EK Success; foam adhesive squares: 3L Scrapbook Adhesives

The Basics
1. Create a standard A2 card base (4¼ × 5½" [10.8cm × 14cm]) from silver cardstock.
2. Cut a piece of stripe-patterned paper to 3¾ × 5" (9.5cm × 12.7cm) and adhere it to the card.
3. Cut a piece of white cardstock to 3 × 4 (7.6cm × 10.2cm) and adhere it to the card with foam adhesive.
4. Cut a piece of eyelet paper to 3 × 4 (7.6cm × 10.2cm) and adhere it over the white cardstock piece.
5. Die cut a 3 (7.6cm) heart from silver cardstock and a 2¾ (7cm) heart from white cardstock. Adhere the two together.
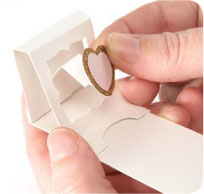
6. Die cut the number 25 from silver cardstock and adhere it to the front of the heart with foam adhesive.
7. Attach a ring embellishment to the heart with a brad. Cover the brad with a clear heart-shaped gemstone. Adhere the heart to the card with foam adhesive.
Beyond the Basics
1 Cut a piece of silver cardstock to 5½" × 6¼" (14cm × 16cm). From the left side of the cardstock, score at 2½" and 3½" (6.4cm and 9cm).

2 Using a pencil, draw lines 1" (2.5cm) from the top and bottom edges and 11⁄2" (3.8cm) from the right and left edges (leaving 1" [2.5cm] in center). You’ll have a 3" × 31⁄2" 7.6cm × 9cm) rectangle in the middle of the card (leaving 1" [2.5cm] in center). With a craft knife, cut along all pencil lines except the lines that intersect the center 1" (2.5cm) fold.

3 Fold along the score lines in opposite directions to create the flip panel.

4 Cut two pieces of cardstock to 3" × 3½" (7.6xcm × 9cm), and adhere the pieces to the front and back of the flip panel. Embellish the card as directed in The Basics.

(View of the back of the card)
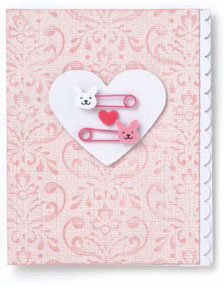
Baby Girl
Fancy Fold Card
By Kimber McGray
Sugar and spice and everything nice! This beautiful embossed card is a wonderful way to congratulate the happy parents and welcome a new little one into this world.

Materials List cardstock: Core’dinations; patterned paper: BasicGrey; punches: Stampin’ Up!, Marvy Uchida; foam stickers: Jolee’s
WHAT YOU’LL NEED
Cardstock
Paper trimmer
Adhesive
Border and heart punches
Sandpaper
Foam adhesive
Baby girl-themed embellishments
Bone folder
The Basics
1. Create a standard A2 card base 41⁄4 × 51⁄2" [10.8cm × 14cm]) from white cardstock.
2. Scallop the right edge of the card base with a border punch or decorative scissors.
3. Cut a 4 × 51⁄2 (10.2cm × 14cm) piece of embossed cardstock. Lightly sand the cardstock and adhere it to the card.
4. Punch a heart from a piece of white cardstock and adhere it to the card with foam adhesive.
5. Adhere baby girl-themed embellishments to the heart.
Beyond the Basics

1 Cut a piece of pink cardstock to 5½" × 10¼" (14cm × 26cm). From the left, score the cardstock at 1½", 3", 4½" and 6" (3.8cm, 7.6cm, 11.4cm and 15.2cm).

2 Fold along the score lines to create an accordion fold.

3 Cut two pieces of white cardstock to 1¾" × 5½" (4.5cm × 14cm). Punch one 51⁄2" (14cm) edge of each of the pieces with a scallop punch or trim with decorative-edge scissors. Adhere the strips to the inside edges of the first two accordion folds.

4 Punch a few hearts from white cardstock and embellish the hearts with baby girl-themed stickers. Adhere the hearts inside the accordion folds and on the back panel.
Graduation Pop-Up Card
By Kimber McGray
Spread the joy and pride in graduation! A light tug on the sides of this fancy card releases a mortarboard into the air. Make it extra special by customizing the card in the colors of your favorite grad’s alma mater.
WHAT YOU’LL NEED
Cardstock
Paper trimmer
Pencil
Craft knife
Adhesive
Star punch
Graduation
themed embellishments
Bone folder

The Basics
1. Create a standard A2 card base (5½" × 4¼" [14cm × 10.8cm]) from white cardstock.
2. Hand draw an arc on a piece of 5½ (14cm) wide blue cardstock. Cut out the arc and mat it with yellow cardstock. Adhere the piece to the card.
3. Embellish the card with stars punched from yellow cardstock and graduation-themed embellishments.

Materials List cardstock: Core’dinations; chipboard: Momenta; ribbon: Creative Impressions; pearls: Queen & Co.; punch: Fiskars
Beyond the Basics

1 Cut two pieces of cardstock to 4¼" × 7" (10.8cm × 17.8cm). From the left, score at 1" and 2" (2.5cm and 5cm), and fold along the score lines.
2 Create the pop-up piece: Cut a strip of cardstock to 1" × 3" (2.5cm × 7.6cm). Fold a 1" (2.5cm) triangle on one end of the strip to create a flap.

3 Adhere the flap to the second fold on one of the pieces of cardstock, about ½" (1.3cm) from the top edge of the cardstock.

4 Adhere the front and back pieces together, as shown.

5 Adhere graduation-themed embellishments to the pop-up piece. Embellish the front of the card according to The Basics.

New Home Accordion Fold Card
By Kimber McGray
Customize the house on this card to resemble the new home of your friend or family member. Then set the scene
by tucking trees, grass and that happy home inside the valleys of a fun accordion-fold card.

Materials List cardstock: Jillibean Soup; patterned paper: Jillibean Soup; corrugated shapes: Jillibean Soup; ink: Maya Road; punch: EK Success
WHAT YOU’LL NEED
Cardstock
Paper trimmer
Patterned paper
Corner rounder
Adhesive
Craft knife
Die-cut shapes
Ink pads
Foam adhesive
Circle punch
Bone folder

The Basics
1. Create a standard A2 card base (4¼" × 5½" [10.8cm × 14cm]) from Kraft cardstock.
2. Cut a piece of blue patterned paper to 4" × 4" (10.2cm × 10.2cm), round the top corners of the piece and adhere it to the card base.
3. Cut a piece of green patterned paper to 4" × 2½" (10.2cm × 6.4cm), fringe the top edge to create grass and adhere it to the card.
4. Cut a piece of yellow patterned paper to a size slightly smaller than the corrugated die-cut house. Pop the windows and door out of the house shape and then adhere the yellow paper to the back of the house.
5. Ink the front door with red ink and adhere it back in place. Adhere the house on the front of the card with foam adhesive.
6. Hand cut a Kraft paper sidewalk and adhere it to the card front, from the door to the bottom edge of the card.
7. Punch a 1½" (3.8cm) circle from green patterned Kraft paper. Adhere a die-cut tree trunk onto the front of the circle and adhere the tree to the card with foam adhesive.
Beyond the Basics

1 Cut a piece of Kraft cardstock to 5½" × 11½" (14cm × 29.2cm). From the left, score at 4¼", 4¾", 5¼", 5¾", 6¼", 6¾" and 7¼" (10.8cm, 12cm, 13.3cm, 14.6cm, 16cm, 17.2cm and 18.4cm).
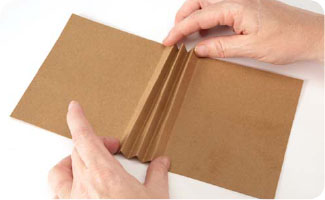
2 Fold along the score lines to create a 5½" × 4¼" (14cm × 10.8cm) card base.

3 On the ends only, adhere the folds together.
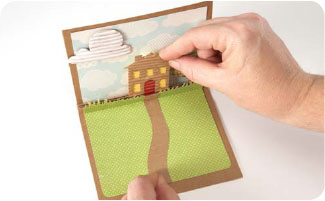
4 Embellish the interior of the card with patterned paper and adhere embellishments in the valleys of the accordion folds.
To Finish:
The front of the card can be embellished with patterned papers (skies and grass, for example) and more.
New Wheels Scooter Pull Card
By Kimber McGray
Vroom vroom … gentlemen, start your engines! Celebrate the coming-of-age ritual of getting your first set of wheels or earning your driver’s license with this delightful slider card.
WHAT YOU’LL NEED
Cardstock
Paper trimmer
Stamps
Ink pads
White gel pen
Adhesive
Ruler
Markers
Craft knife
Foam adhesive
Bone folder
Pencil
Corner rounder

Materials List cardstock: Core’dinations; stamps: Paper Smooches, Jillibean Soup; ink: Momento by Tsukineko; markers: Copic; pen: Uni-Ball Signo; foam adhesive squares: 3L Scrapbook Adhesives

The Basics
1. Create a standard A2 card base (4¼ × 5½" [10.8cm × 14cm]) from black cardstock.
2. Cut a 2 × 5½ (5cm × 14cm) strip of gray cardstock. Stamp a city image with black ink and color in random windows with a white gel pen. Adhere this strip to the card.
3. Using a ruler, draw dashed lines with a white gel pen on the black card to create street markings.
4. Using the template on page 138, cut out one scooter on white cardstock, color it with markers and cut it out. Adhere the scooter to the card with foam adhesive.
Beyond the Basics
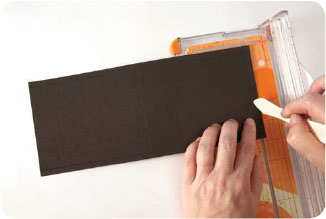
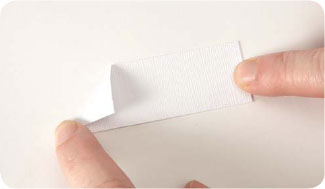
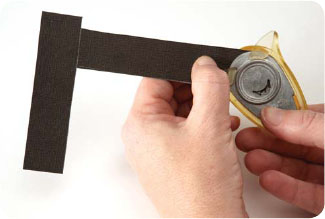
1 Create a standard A2 card base (4¼" × 5½" [10.8cm × 14cm]) from black cardstock and set it aside. Then cut a piece of black cardstock to 4¾" × 11¼" (12cm × 28.6cm). Score at ¼" (6mm) along both long sides and one short side. Score at 5½" (14cm) from the unscored short side.
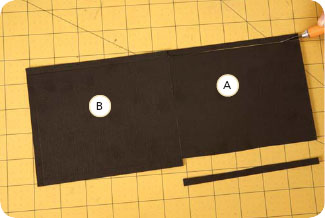
2 Trim off the ¼" (6mm) scored piece from Panel A with a craft knife.

3 Trim off the corners from Panel B with a craft knife.

4 Create a rectangle template measuring ¾" × 5" (2cm × 12.7cm). Place the template on panel B, ½" (1.3cm) from the bottom edge and centered. Trace around the template with a pencil.
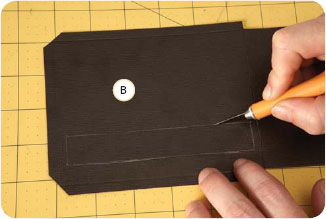
5 Using a craft knife, cut out the rectangle.

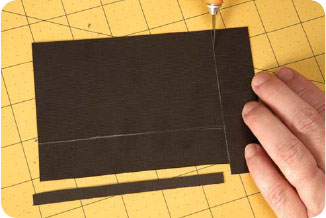
6 Using a craft knife, cut out a 1" (2.5cm) notch from the left edge, next to the rectangular opening for the slide pull.
7 Create the slide from a 4" × 5¾" (10.2cm × 14.6cm) piece of black cardstock. The stop on the left is 1" (2.5cm) wide and the slide is 1" (2.5cm) wide. Cut ¼" (6mm) off the bottom and 2¾" (7cm) off the top.
8 Round the corners of the slide with a corner rounder.

9 Fold up all scored pieces and add adhesive to the ¼" (6mm) tabs. Lay the slide in the notch. Adhere closed.
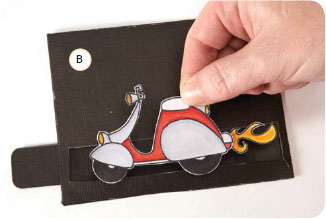
10 Using the template on page 138, cut out one scooter on white cardstock, color it with markers and cut it out. Adhere the scooter to the slide with foam adhesive.
To Finish:
Adhere the slider portion of the card to the card base. Embellish the card following steps 2 and 4 of The Basics. Using a ruler and a white gel pen, draw dashed lines on the slide and behind the slide.
50th Anniversary Sizzix Pop-Up Card
By Kimber McGray
A golden anniversary is something to celebrate! This beautiful card honors the happy couple on their grand achievement.

WHAT YOU’LL NEED
Cardstock
Paper trimmer
Heart, border and hole punches
Sewing machine and thread
Adhesive
Ribbon
Foam adhesive
Dies and die-cutting machine

Materials List cardstock: Core’dinations; ribbon: Creative Impressions; punches: Stampin’ Up!, Creative Memories; dies: Sizzix and QuicKutz; foam adhesive squares: 3L Scrapbook Adhesives
The Basics

1. Create a standard A2 card base (4¼ × 5½" [10.8cm × 14cm]) from white shimmer cardstock.
2. Cut a piece of pink shimmer cardstock to 3¾ × 5" (9.5cm × 12.7cm).
3. Cut two pieces of white shimmer cardstock to 2 × 5 (5cm × 12.7cm) and two pieces of red shimmer cardstock to 1½ × 5 (3.8cm × 12.7cm). Scallop one 5 (13cm) edge of each piece of red shimmer cardstock.
4. Lay the white shimmer pieces on the pink shimmer piece; then lay the red shimmer pieces on the white simmer pieces. Machine stitch across the top edge of each red shimmer piece, sewing through all three layers. Adhere the pink shimmer piece to the card base.
5. Cut a 2½ × 4 (6.4cm × 10.2cm) piece of white shimmer cardstock and trim the corners to create a tag. Punch a small hole in the top of the tag. Tie a ribbon through the hole and adhere the tag to the card with foam adhesive.
6. Die cut the number 50 from gold glitter cardstock and adhere it to the tag with foam adhesive.
7. Punch two sets of hearts from red and pink shimmer cardstock. Adhere the hearts to each other as shown in the photo above, and adhere the hearts to the tag with foam adhesive.
Beyond
the Basics
To Start:
Follow steps 1–4 of The Basics. Then...
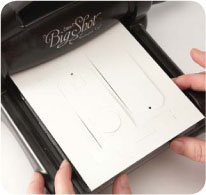
1 Run a 5½" × 8½" (14cm × 21.6cm) piece of white shimmer through the Sizzix Big Shot to create the pop-up tag.

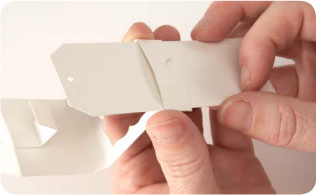
2 Pop out the die-cut pieces. Start with the piece that has a window in it. Fold along the score lines and then adhere the tabs closed to create a band at one end.

3 Adhere the three-sided loose tab piece to the perforated area.
4 Slide the flat tag into the band of the window piece.

5 Adhere the notched tag pieces together with the tab of the flat tag facing down.
6 Adhere a heart embellishment (see The Basics, step 7) to the three-sided tab.
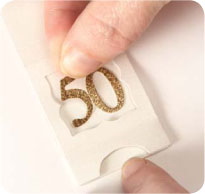
7 Lay the pop-up flat and adhere a gold 50 in the window. Use foam adhesive to adhere the pop-up embellishment to the card.