CHAPTER
5
All Occasions
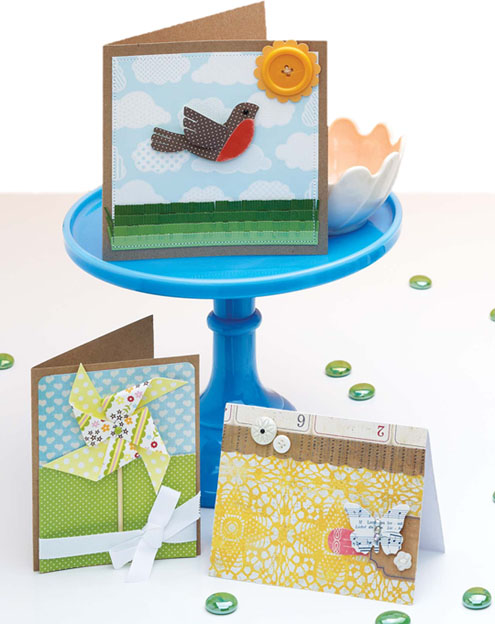
SOMETIMES YOU JUST need a simple little card to let a friend know you are thinking of her or to thank a neighbor for helping you out. This chapter is full of such cards that will not only express your gratitude but also light up the day of the recipient.
Our butterfly spiral card, for example, unexpectedly springs to life when opened. We also have pinwheels that spin in the breeze and handmade shaker cards filled with butterflies, flowers and beads.
Is your friend a bird aficionado? Try one of several cards that are sure to charm her. There are so many different ways to bring a friend cheer, and this is the chapter you don’t want to miss because it is chock-full of ideas you can use over and over again to let your loved ones know that no matter how far away you might be, they are always in your thoughts.
Pinwheel Spinner Card
By Kimber McGray
Nothing screams childhood fun more than a pinwheel spinning in a light breeze. Share that childhood memory with a friend by sending this fresh and fun card.

Materials List cardstock: Jillibean Soup, pattern paper: Pink Paislee, Jillibean Soup; ribbon: Stampin’ Up!; punch: EK Success; brad: Making Memories; skewer: Kitchen Supply
WHAT YOU’LL NEED
 Cardstock
Paper trimmer
Patterned paper
Corner rounder
Craft knife
Adhesive
Foam adhesive
Ribbon
Adgesive dots
Wood skewer
Thumbtack or paper piercer
Brad
Pencil
Pennies

The Basics
1. Create a standard A2 card base (4¼ × 5½" [10.8cm × 14cm]) from kraft cardstock.
2. Cut a piece of blue patterned paper to 4 × 4 (10.2cm × 10.2cm) and round the top corners of the piece.
3. Cut a piece of green patterned paper to 4 × 2½ (10.2cm × 6.4cm) and fringe the top edge to look like grass.
4. Adhere the green patterned paper to the blue patterned paper, fringed edge overlapping the blue paper so that as a single piece, the paper measures 4 × 5¼" (10.2cm × 13.3cm). Adhere this piece to the card base with foam adhesive.
5. Slip a piece of white ribbon behind the green patterned paper and tie it into a bow.
6. Follow steps 1–4 in Beyond the Basics to create a pinwheel. Adhere the pinwheel to the card with an adhesive dot.
7. Cut a wood skewer to 3 (7.6cm) and adhere it to the card and under the pinwheel with adhesive dots.
Beyond the Basics
To Start:
Create a standard A2 Kraft card base (4¼" × 5½" [10.8cm × 14cm]) and set it aside.

1 To create the pinwheel, cut a 3" × 3" (7.6cm × 7.6cm) piece of patterned paper. Cut in from the corners toward the center, leaving about ½" (1.3cm) uncut.
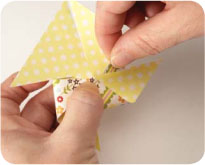
2 Fold every other corner to the center.
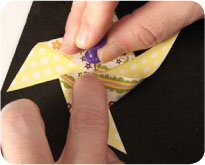
3 Using a thumbtack or paper piercer, pierce a hole through the center of all (five) layers.
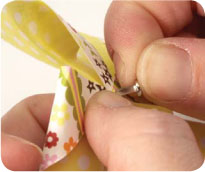
4 Secure the layers with a brad.
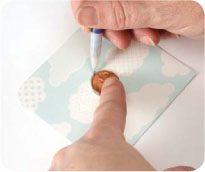
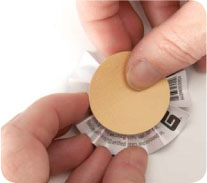
5 Cut a piece of patterned paper to 4" × 3" (10.2cm x 7.6cm). Place a penny in the center of the paper and trace around it.
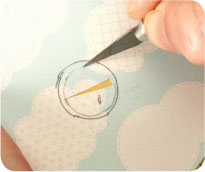
6 Using a craft knife, cut just inside the traced circle.

7 Adhere the patterned paper to the card base with two layers of foam adhesive.
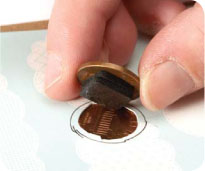
8 Lay one penny under the hole and adhere a second penny to it with foam adhesive.

9 Adhere the pinwheel to the penny spinner with an adhesive dot.
To Finish:
Embellish the card as directed in The Basics.
Butterfly Shaker Card
By Lily Jackson
Butterflies are a sign of friendship and kindness. Lily’s hand-cut butterfly is simply beautiful and the shaker version adds so much whimsy and fun.

Materials List cardstock: Recollections; patterned paper: BoBunny Press; stamp: Hero Arts; pearls: Recollections; microbeads: Martha Stewart; acetate: Avery; twine: Jillibean Soup
WHAT YOU’LL NEED
Cardstock
paper trimmer
Stamp ink pad
Patterned paper
Adhesive
Circle cutter
Twine
Self-adhesive pearl
Foam adhesive
Acetate
Scissors
Microbeads or glitter

The Basics
1. Create a 4¼ × 4¼ (10.8cm × 10.8cm) card base from Kraft cardstock.
2. Stamp a butterfly in the center of the card with brown ink.
3. Mat together two pieces of patterned paper cut to 3 × 3 (7.6cm × 7.6cm) and 3¼ × 3¼" (8.3cm × 8.3cm). Cut a 2 (5cm) hole in the center of the matted piece, and embellish the piece with twine and a self-adhesive pearl.
4. Using foam adhesive, adhere the piece over the stamped butterfly.
5. Stamp another butterfly with brown ink on a scrap of Kraft cardstock and cut it out. Adhere the butterfly cutout to the center of the card with two layers of foam adhesive. Slightly bend up the wings for added dimension.
Beyond
the Basics
To Start:
Create a 4¼ × 4¼ (10.8cm × 10.8cm) card base from Kraft cardstock and stamp a butterfly with brown ink in the center of the card. Then...

3 Place foam adhesive around the edges of the shaker top. Fill the top with microbeads or glitter.
4 Adhere the card base to the shaker top.

2 Cut a piece of acetate to 3" × 3" (7.6cm × 7.6cm) and adhere it to the back of the matted paper shaker top. Embellish this piece with twine and a self-adhesive pearl.

1 Mat together two pieces of patterned paper cut to 3" × 3" (7.6cm × 7.6cm) and 3¼" × 3¼" (8.3cm × 8.3cm). Cut a 2" (5cm) hole in the center of the matted paper to create a shaker top.
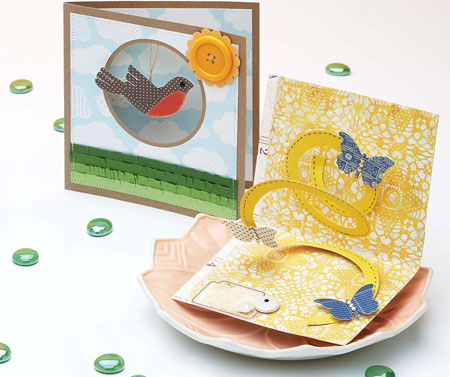
Butterfly Spiral Card
By Kimber McGray
This vintage-inspired card brings instant warmth to any message and it really couldn’t be easier to make!
WHAT YOU’LL NEED
Cardstock
Paper trimmer
Patterned paper
Adhesive
Scalloped sticker strip
Buttons
Stickers
Die cuts
Scissors
Adhesive dots
Craft knife

Materials List cardstock: Core’dinations; patterned paper: Crate Paper; stickers: Crate Paper; buttons: Jenni Bowlin Studio, Stampin’ Up!; butterflies: Jenni Bowlin Studio

The Basics
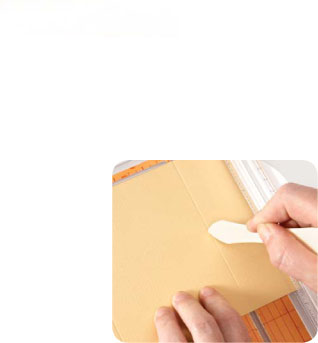
1. Create a standard A2 card base (4¼ × 5½" [10.8cm × 14cm]) from white cardstock.
2. Cut a piece of yellow patterned paper to 3¼ × 5½ (8.3cm × 14cm) and adhere it to the bottom edge of the card.
3. Cut a strip of cream patterned paper to 1 × 5½ (2.5cm × 14cm) and adhere it to the top edge of the card.
4. Place a scalloped sticker over the area where the patterned papers meet.
5. Embellish the card with buttons, stickers and a die-cut butterfly.
Beyond the Basics
To Start:
Create the basic card following all steps for The Basics. Cut a piece of yellow patterned paper (the same paper used on the front of the card) to 8½ × 5½ (21.6cm × 14cm) and adhere it to the interior of the card. Embellish the interior of the card with a sticker and buttons. Then...

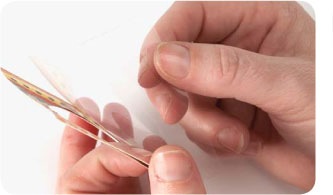
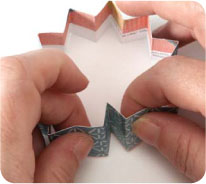
1 Cut a 4" (10.3cm) circle from yellow cardstock. Cut the circle into a ½" (1.3cm) wide spiral.

2 Cut a 1½" (3.8cm) circle out of the center of the spiral.
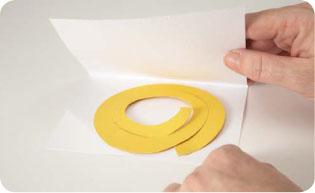
3 Adhere the outside end of the spiral to the bottom of the interior of the card (use an adhesive dot).
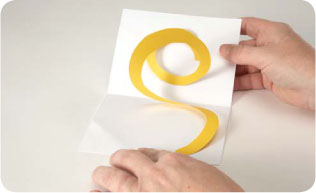
4 Adhere the inside end of the spiral to the top of the interior of the card. Place an adhesive dot on the end in the middle and simply close the card. This will adhere the spiral in the correct spot in the card.
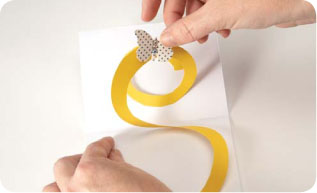
5 Embellish the open spiral with butterfly die cuts.
Sweet Tweet Birdie Card
By Sarah Hodgkinson
A sunny greeting with a sweet birdie will make any friend smile. To make the card just a bit more “tweet,” set your bird free, allowing him to flit about, spreading cheer.
WHAT YOU’LL NEED
Cardstock
paper trimmer
Patterned paper
Adhesive
Needle and thread
Pencil
Craft knife
Gem or brad
Sandpaper
Sewing machine
Foam adhesive
Button
Twine
Scalloped circle punch
Circle cutter
Quilling die (optional)

Materials List cardstock: Core’dinations, Jillibean Soup; patterned paper: Jillibean Soup; twine: Jillibean Soup; button: Creative Imaginations; punch: Stampin’ Up!; adhesive: foam adhesive; other tools: Imaginisce Hot Rocks, Provo Craft/Cuttlebug paper quilling die, Hot Off the Press bird template, Creative Memories circle cutting system, Core’dinations Sand It Gadget

The Basics
1. Create a 6 × 6 (15.2cm × 15.2cm) square card base from kraft cardstock.
2. Cut a piece of cloud patterned paper to 5½ × 5½" (14cm × 14cm), and adhere it to the card base.
3. From each of four different shades of green cardstock, cut a strip to 3⁄4 × 53⁄4 (2cm × 14cm). Hand cut fringe or use a paper quilling die to create “grass.” Adhere the pieces to the cards, layering one atop the next.
4. Sew a border with white thread 3⁄8 (1cm) in from the edge of the Kraft card base.
5. Using the templates on page 137, trace and cut out the bird and wing from patterned paper. Assemble the bird. Attach a black gem or brad for the bird’s eye.
6. Cut a half circle of orange cardstock for the bird’s chest. Trim the paper to fit, and lightly sand the edges.
7. Attach the bird to the card with foam adhesive.
8. Punch a scalloped circle from yellow cardstock. Thread a large yellow button with twine and adhere it to the scalloped circle. Adhere the circle to the card.
Beyond
the Basics
To Start:
Create a 6" × 6" (15.2cm × 15.2cm) card base out of Kraft cardstock. Then...

1 Cut a piece of patterned paper to 5½" × 5½" (14cm × 14cm), and cut a 3½" (9cm) circle from the center.

2 Cut a 3¼ (8.3cm) circle from the front of the Kraft card base.

3 Using the templates on page 137, trace two birds and wings, and cut the pieces out.

4 Adhere the two bird pieces together with a 7 (17.8cm) piece of twine sandwiched between them.
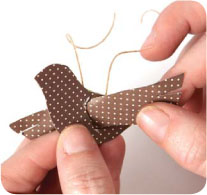
5 Slide the wings through the slots in the bird’s body.
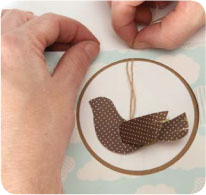
6 Adhere the twine between the card base and the patterned paper, centering the bird in the hole.
To Finish:
Embellish the card by following steps 3, 6 and 7 from The Basics, and add a black gem or brad for the bird’s eye.
Thinking of You
Slider Card
By Rae Barthel
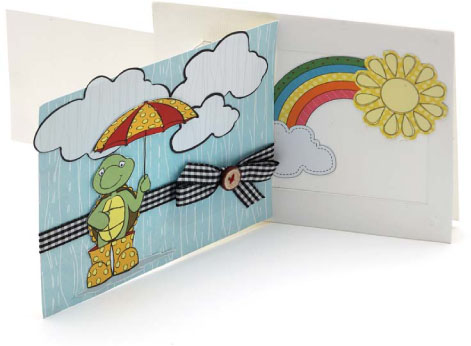
Without rain, there are no rainbows. This sweet card is perfect for sending a note of encouragement to a friend.
WHAT YOU’LL NEED
Cardstock
Paper trimmer
Patterned paper
Adhesive
Ribbon
Button
Pencil
Craft knife
Bone folder
Circle punch

Materials List cardstock: Bazzill Basics; patterned paper: Nikki Sivils Scrapbooker; buttons: Nikki Sivils Scrapbooker; ribbon: Papertrey Ink; pen: Sharpie; punch: EK Success

The Basics
1. Create a 4½ × 6 (11.4cm × 15.2cm) card base from white cardstock.
2. Cut a piece of blue patterned paper to 4 × 5½ (10.2cm × 14cm) and adhere it to the card base.
3. Wrap a gingham ribbon around the cover of the card and tie it into a bow. Embellish the center of the bow with a button.
4. Cut out clouds and a turtle from patterned paper and adhere the pieces to the card.
Beyond
the Basics
To Start:
Create a 6" × 4½" (15.2cm × 11.4cm) card base out of white cardstock and set it aside. (This piece will be your slider base.)Then...

1 On the back of the piece, draw a rectangle 1" (3cm) from the left, ¾" (2.5cm) from the top and bottom and ½" (1.3cm) from the right. Draw a line through the center of the rectangle. Cut along the top, right and bottom edges.
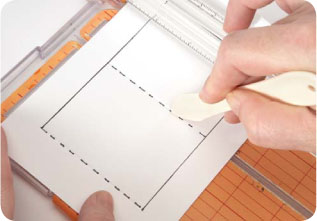
2 Score along the center and left lines.
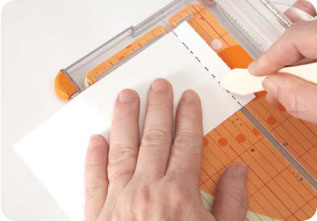
3 Cut a piece of white cardstock to 6" × 3" (15.2cm × 7.6cm). This will be the slider. Score ½" (1.3cm) from the right edge and fold.
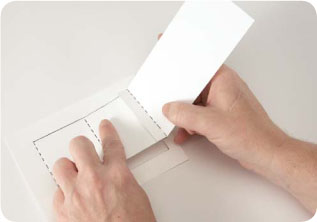
4 Adhere the ½ (1.3cm) tab of the slider into the open end of the slider base.

5 Using a circle punch, notch out a half circle on the left edge of the slider base.

6 Fold the slider tab on the far right toward the back of the card. Adhere the slider base to the card base, adhering only the top, bottom and right sides, and allowing the slider tab to slide through the opening on the left side.
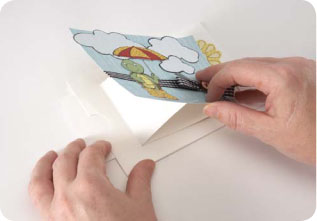
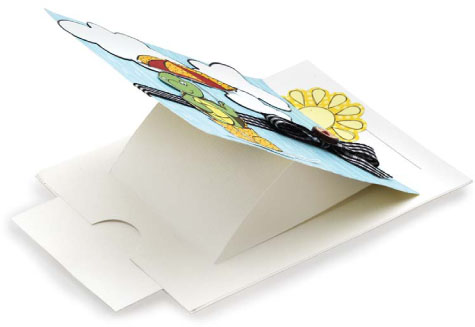
7 Create a patterned paper panel following steps 2, 3 and 4 from The Basics, and adhere this patterned paper panel to the top panel on the right.
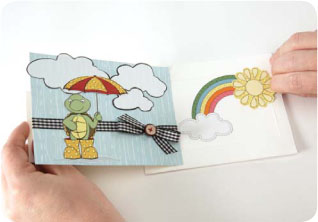
8 Pull on the slider tab to expose the empty panel underneath. Embellish with a rainbow and sun hand cut from patterned paper.
The Flower and
the Bee Card
By Kim Hughes
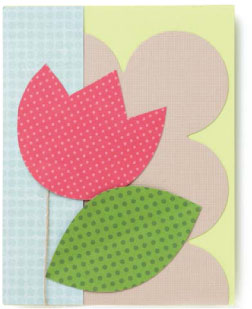
A bright and cheery tulip will brighten anyone’s day, but watch out—a bee may spring from inside the flower. Don’t fret, he just wants to wish you a great day!

Materials List cardstock: Bazzill Basics; patterned paper: Imaginisce, My Mind’s Eye, American Crafts, Echo Park Paper; stamp: Paper Smooches; ink: Memento by Tsukineko; wire: Craft Supply; twine: Creative Impressions
WHAT YOU’LL NEED
Cardstock
Paper trimmer
Border punch
Patterned paper
Adhesive
Twine
Tape
Pencil
Scissors or craft knife
Stamp
Ink pad
Wire
Adhesive dot
The Basics
1. Create a standard A2 card base (4¼ × 5½" [10.8cm × 14cm]) from yellow cardstock.
2. Cut a 4 × 5 (10.2cm × 12.7cm) piece of tan cardstock, scallop one edge and adhere it to the card.
3. Adhere a 11⁄2 × 5½ (3.8cm × 14cm) piece of blue patterned paper to the left edge of the card (covering part of the piece of tan cardstock).
4. Adhere a 3 (7.6cm) piece of twine to the card, securing with tape. (Wrap the bottom of the twine into the card.)
5. Cut a tulip (use the template on page 138) and a leaf from patterned paper. Adhere the pieces to the card as shown in the photo on the left. Bend the edges of the leaf away from the card for dimension.
Beyond the Basics
To Start:
Make the card as directed in The Basics, but do not adhere the tulip shape to the card quite yet. Instead...

1 Stamp and cut out a bee image. (I used black ink.)
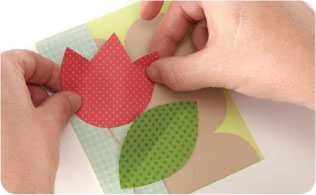
2 Create a pocket by adhering the tulip to the card along the edges only.

3 Coil a piece of wire (about 6" [15.2cm]) around a pencil and then press to flatten the coiled wire.

4 Adhere the bee to end of wire and then use n adhesive dot to adhere the wire inside the tulip pocket.
Flower Shaker Card
By Kimber McGray
A fun color combination makes the flower stand out on this quick and simple card.

Materials List cardstock: Jillibean Soup, Core’dinations; patterned paper: Jillibean Soup; twine: Jillibean Soup; punches: Stampin’ Up!, Marvy Uchida, EK Success; acetate: Avery; pearls: Queen & Co.; seed beads: Craft Supply; foam adhesive squares: 3L Scrapbook Adhesives
WHAT YOU’LL NEED
Cardstock
Paper trimmer
Corner rounder
Border punch
Patterned paper
Adhesive
Twine
Foam adhesive
Circle and flower punches
Self-adhesive pearls
Acetate
Scissors
Small beads or glitter

The Basics
1. Create a standard A2 card base (4¼ × 5½" [10.8cm × 14cm]) from Kraft cardstock.
2. Cut a piece of white cardstock to 5 × 3¾ (12.7cm × 9.5cm). Round the corners with a corner rounder.
3. Cut a strip of green cardstock to ½ × 5" (1.3cm × 12.7cm) and scallop one edge. Cut a piece of blue patterned paper to 1 × 5 (2.5cm × 12.7cm). Layer the green scalloped strip behind the blue paper and adhere the two together. Adhere this piece to the white cardstock.
4. Wrap a piece of twine around the white cardstock twice and tie it into a bow. Adhere the white cardstock panel to the front of the card base with foam adhesive.
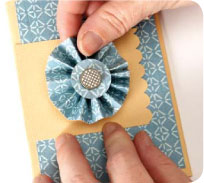
5. Punch a flower (or a scalloped circle) from orange patterned paper and a 1½ (3.8cm) circle from blue patterned paper. Layer the circle onto the flower and adhere the two together. Adhere the flower to the card with foam adhesive. Add a few red self-adhesive pearls to the center of the flower.
Beyond
the Basics
To Start:
Follow steps 1–4 of The Basics. Then...

1 Punch out a patterned paper circle with a 1½" (3.8cm) circle punch.

2 Use another paper punch (this one is a 2 [5cm] scalloped circle) to punch out a flower shape directly over the hole left in the patterned paper from step 1.

3 Adhere the punched flower to a piece of acetate and trim around the edges of the flower with scissors.

4 Place foam adhesive around the edges of the acetate window. Fill this piece with small beads or glitter.

5 Punch a 13⁄4 (4.5cm) circle from coordinating cardstock and adhere it to the back of the acetate window.
To Finish:
Use foam adhesive to adhere the shaker to the card.
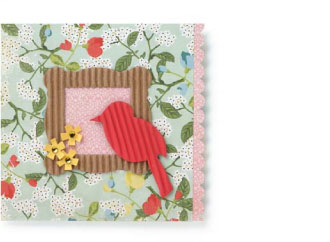
Birdhouse Card
By Kim Hughes
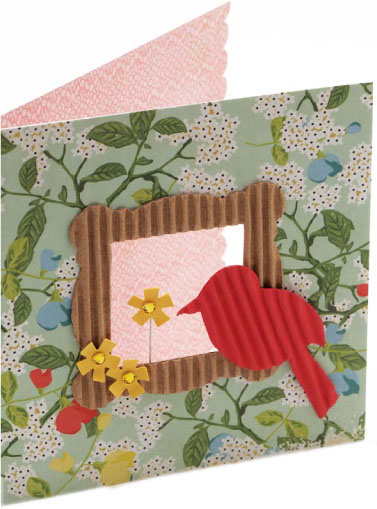
This is a great little card to send to a friend to let her know you are thinking of her.
Materials List cardstock: Bazzill Basics; patterned paper: Echo Park Paper, Crate Paper; corrugated shapes: Jillibean Soup; paint: Making Memories; punches: EK Success, Stampin’ Up!; gems: Queen & Co.
WHAT YOU’LL NEED
Cardstock
Paper trimmer
Patterned paper
Border punch
Adhesive
Corrugated die-cut frame and bird
Paint
Flower or asterisk punch
Self-adhesive gems
Glue
Pencil
Craft knife
Straight pin
The Basics
1. Create a 5 × 5 (12.7cm × 12.7cm) card base from white cardstock.
2. Cut a strip of pink patterned paper to 1" × 5" (2.5cm × 12.7cm) and scallop the edge. Adhere the strip to the right edge of the card, overhanging the card by about ¼" (6mm).
3. Cut a piece of floral patterned paper to 5" × 5" (12.7cm ×12.7cm) and adhere it over the card base, aligning it with the left edge of the card base. The ¼ (6mm) scalloped strip along the right edge of the card should be exposed.
4. Cut a piece of pink patterned paper to 2" × 2 (5cm × 5cm) and adhere it to the back of a die-cut corrugated frame. Adhere the window to the card front.
5. Paint a corrugated bird and, when dry, adhere it to the card.
6. Punch three flowers from yellow patterned paper (using an asterisk punch works well), embellish the flowers with adhesive-backed gems and adhere the flowers to the card with glue.
Beyond
the Basics
To Start:
Follow steps 1–3 of The Basics. Then...

1 Lay the die-cut window on the card.

2 Trace around the inside hole of the die-cut with a pencil. Cut out the hole with a craft knife, and adhere the die-cut window around the hole, creating a framed window.
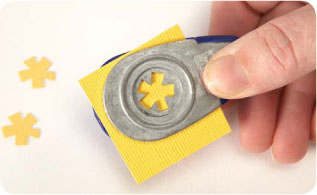
3 Punch three small flowers from yellow cardstock. (I love to use an asterisk punch for this.)
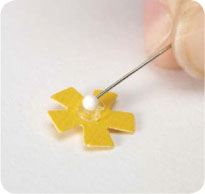
4 Adhere one of the punched flowers to the top of a straight pin with a glue dot.
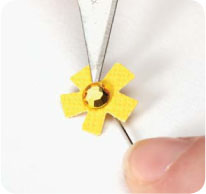
5 Embellish the fronts of the punched flowers with self-adhesive gems.

6 Insert into and/or adhere the flowers to the die-cut frame. Finish embellishing the card by adhering a die-cut bird.
Tri-Fold Flower Card
By Kimber McGray
Polka dots and butterflies never fail to brighten up even the gloomiest of days.

Materials List cardstock: Core’dinations; patterned paper: Studio Calico, Pebbles Inc.; punches: Stampin’ Up!, EK Success; brad: Pebbles Inc.

The Basics
1. Create a standard A2 card base (4¼ × 5½" [10.8cm × 14cm]) from cream cardstock.
2. Cut a piece of orange patterned paper to 3¾ × 5 (9.5cm × 12.7cm) and adhere it to the card.
3. Cut a piece of cream cardstock to 2½ × 3½" (6.4cm × 9cm). Scallop one end of the cardstock and adhere it to the card.
4. Cut out a few butterflies from patterned paper and adhere them to the card with foam adhesive.
5. Create the accordion flower embellishment by following steps 4–9 in Beyond the Basics.
6. Adhere the accordion flower to the front of the card.
WHAT YOU’LL NEED
Cardstock
Paper trimmer
Patterned paper
Adhesive
Border punch
Foam adhesive
Craft knife
Bone folder
Scoring board
Circle punch
Button or other embellishment
Beyond the Basics
1 Create a card base by cutting a piece of cardstock to 5½" × 8" (14cm × 20.3cm). Score 2" (5cm) from the edge on both of the 51⁄2" (14cm) sides.

2 Fold the flaps in.

3 Cut two pieces of patterned paper to 1¾" × 5" (4.5cm × 12.7cm). Adhere them to the card, lining them up with the opening. Cut a piece of cardstock to 3" × 2" (7.6cm × 5cm), scallop one of the short edges, and adhere it to the left side of the card so that it overlaps the right side of the card.

4 To create the accordion flower embellishment, cut a strip of patterned paper to 1" × 12" 2.5cm × 30.5cm). Score the paper at 1⁄2" (1.3cm) intervals.

5 Accordion fold the paper along the score lines.
6 Adhere the ends of the accordion together.

7 Press the accordion flower flat onto a table or other work surface with the back side facing up.
8 Punch a 11⁄2" (3.8cm) circle from cardstock and adhere it to the back of the accordion flower.

9 Add a small embellishment to the front of the flower.
10 Adhere the accordion flower embellishment to the cardstock flap on the front of the card.
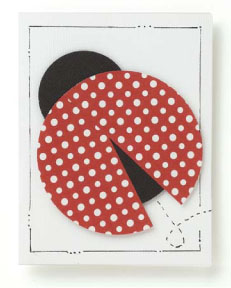
Hinged Ladybug Card
By Kimber McGray
It’s said that you will have good luck if a ladybug lands on you. Send your own bit of good luck with a sweet ladybug featured front and center.
WHAT YOU’LL NEED
Cardstock
Paper trimmer
Patterned paper
Circle cutter or punches
Black pen
Adhesive
Paper piercer or thumbtack
Brad
Bone folder

Materials List cardstock: Core’dinations; patterned paper: Jillibean Soup; brad: Making Memories; punches: Marvy Uchida, EK Success; pen: Zig; foam adhesive squares: 3L Scrapbook Adhesives
The Basics
1. Create a standard A2 card base (4¼ × 5½" [10.8cm × 14cm]) from white cardstock.
2. Hand draw a border around the perimeter of the card with a black pen.
3. Punch out and adhere a 3 (7.6cm) black cardstock circle over a 2 (5cm) black cardstock circle. Adhere the circles to the front of the card for the ladybug body.
4. Punch a 3½ (9cm) circle from polka dot patterned paper. Cut the circle in half and adhere the halves over the black ladybug body, opening and overlapping the wings slightly.
5. Draw a few dashed lines on the cardstock to show the path of the ladybug.
Beyond the Basics

1 Punch two circles from black cardstock, one 3" (7.6cm) and one 2" (5cm). Adhere the 3" (7.6cm) circle to the 2" (5cm) circle.

2 Punch a 3½" (9cm) circle from red patterned paper and cut the circle in half for the wings.

3 Lay the wings on the larger black circle so the ends overlap slightly, and pierce all the layers with a thumbtack.

4 Attach the wings to the body with a red brad.
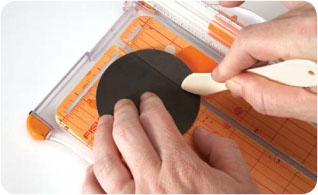
5 Punch another 3" (7.6cm) circle from black cardstock. Score ½" (1.3cm) from the edge, as shown.

6 Fold on the 1⁄2" (1.3cm) score line to create a tab. Adhere the tab to the back of ladybug (line it up with the other 3" [7.6cm] black circle) to create the card base.