7
ELEMENT G: BUILDING SITEWORK
INTRODUCTION
The site may be defined in many ways.
• The site is frequently regarded as real estate, a commodity that can be bought and sold, invested in, and developed.
• The site may be seen as a legal entity, an area of land geographically located, registered, and identified by coordinates within the survey grid.
• The site may be seen with respect to how it fits into a zoning pattern and for its potential use.
• The site may be seen as a plane, or surface, on which to build a building or facilities.
• The site may be regarded as the setting, foreground, or functional area for a building.
• Of course, many see their land, or site, as their possession, their private place of retreat, their domain and kingdom.
All of these common perceptions are true, yet they don’t capture the complete essence of site. Every site is a part of a larger continuous landscape, or region, and really can’t be contained by artificial or legal boundaries. As a biophysical entity, the land interacts with environmental systems such as sunlight, precipitation, and hydrology, wind, air temperature, and airborne particles. The site represents a dynamic interaction between the surface, the atmosphere above, and the earth below. The site, then, is not two-dimensional, but a three-dimensional entity. As a space of culture, the site is a place of human interaction. It serves social, psychological and experiential needs; accommodates behavior patterns, rituals, and movement; has a history; sits within a contextual land pattern; and establishes its own character and identity. In short, the site is a landscape—a complex idea with deep geographic, biological, and cultural meaning.
What, then, are the opportunities of the site? Of course, at a fundamental level, it must function in accordance with its program, incorporate elements of safety and security, and acknowledge regulatory issues.
Moving beyond that is the idea of the site as a generator of form. Orientation and aspect, topography, existing geological or other natural features, history and evidence of human use and occupation, views, edge conditions, and the site’s relationship to the surrounding landscape all have the potential to become form and compositional determinants for buildings and site development.
The site can also be a mediator between interdependent cultural and environmental systems and between the past, the present, and the future. Just as a good building can adapt to different uses and needs over time, a good site is flexible and adaptable to changing conditions. The site can mediate between the forces of human society and the forces of nature to facilitate a healthy coexistence.
The site should age gracefully through time. Its materials should be enriched and not deteriorated by the forces acting upon them, and the spaces should address issues of scale, proportion and light in timeless ways. The site is a dynamic, evolutionary process, and this should be revealed in design.
The site can also be a regenerative system; it should be able to cycle and transform energy and materials and should provide for continuous energy replacement. In this way, the site works with, not against, the forces of the environment. Psychological regeneration is also important. A site that continually redesigns itself in response to external stimuli becomes a monitor of change, a source of information, and an environment of delight. A well-designed site can be experienced in remarkably different ways depending on the time of day and the time of year.
With this in mind, the site ought to become a critical part of the building process from the early conceptual design phases through the construction, and on into the evolutionary phases of the project.
SITE PREPARATION
SITE EARTHWORK
SLOPE PROTECTION AND EROSION CONTROL
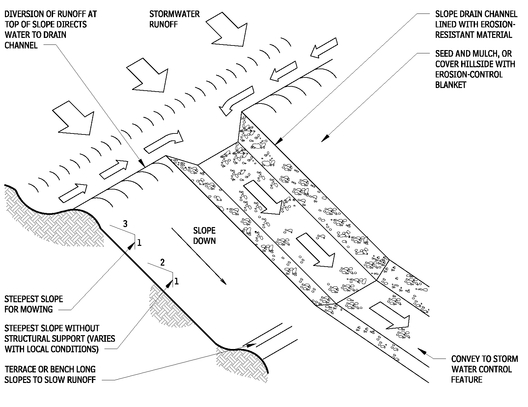
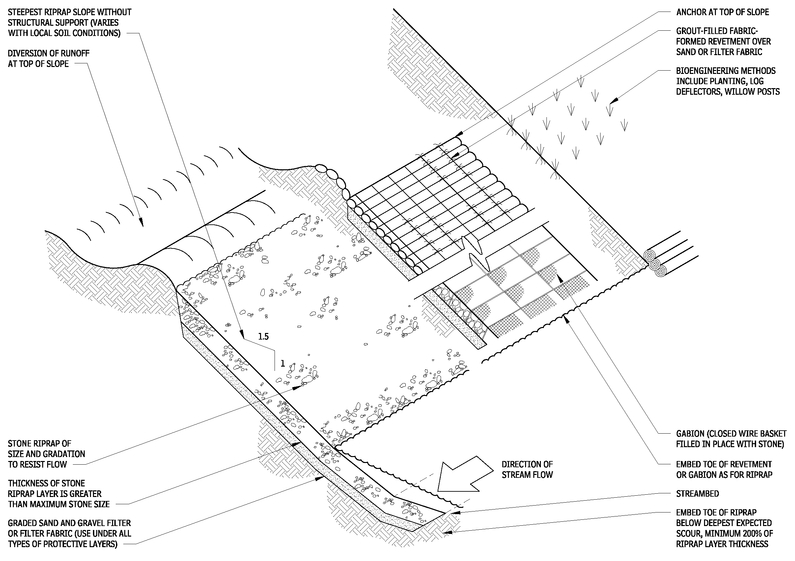
Slope protection and erosion control is required when steep slopes are subject to erosion from stormwater runoff or flowing streams. Erosion can damage the site and pollute waterways with sediment.
The need for mechanical stabilization can be reduced through careful site gradings that divert or slow the velocity of runoff and by avoiding disturbances to stable, natural streambanks. Check with regulatory agencies before planning to grade streambanks, wetlands, or floodplains.
Numerous proprietary products are available for streambank stabilization and erosion control, so consult manufacturers.
Follow these general design guidelines:
• Control erosion during construction with silt fences, straw bales, sediment ponds, and seeding and mulching. Adhere to local and state guidelines and regulations.
• Line channels with erosion-resistant material (sod, stone riprap, erosion-control blanket). Channel dimensions and lining should be designed for expected runoff.
• At the bottom of the slope drain channel, convey the flow to a storm sewer, detention pond, constructed wetland, or other control method that meets regulations.
GRADING AND EROSION CONTROL
7.1
Contributor:
James E. Sekela, PE, Pittsburgh, Pennsylvania.
STREAMBANK STABILIZATION
7.2
SITE IMPROVEMENTS
POROUS PAVEMENTS
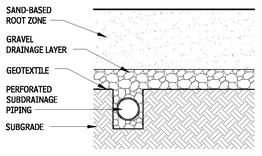
Porous pavements reduce or eliminate urban storm water problems at the source by changing the way urban structures are built and the way they operate hydrologically. They restore the landscape’s natural water-retaining function by bringing water back into contact with the underlying soil, or emulate it by filtering and storing water in the pavement structure. By combining pavement stormwater control functions into a single structure, they reduce costs, compared with dense pavements that require downstream storm water control facilities.
Properly applied porous pavements can also enlarge urban tree rooting space, reduce the urban heat island effect, reduce traffic noise, increase driving safety, and improve appearance. Therefore, their selection and implementation are integral parts of the multifaceted concerns of urban design, and all of their effects are considered together in evaluations of benefits and costs. As porous paving materials become increasingly used, their potential cumulative effect is great, because pavements are the most ubiquitous man-made structures—they occupy two-thirds of the constructed surfaces in urban watersheds.
This section briefly reviews the types of porous paving materials that are available and some provisions necessary in their installation. Considerably more scope and detail on this subject are covered in the book Porous Pavements, by Bruce K. Ferguson (Boca Raton, FL: CRC Press, 2005).
POROUS PAVEMENT CONSTRUCTION
To make a successful porous pavement, it must be selected right, designed right, installed right, and maintained right. Failures—clogging and structural degradation—result from neglecting one or more these steps. Construction of porous pavements is not more difficult than that of dense pavements, but it is different, and its different specifications and procedures must be strictly adhered to.
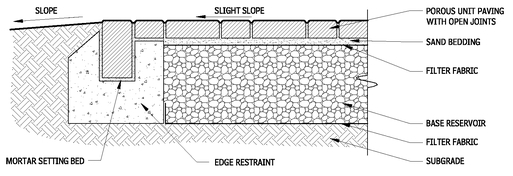
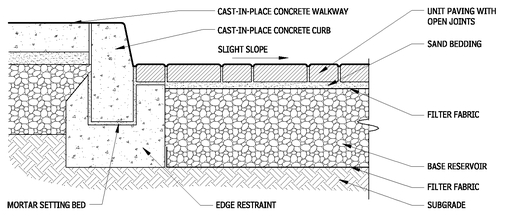
The dominant component in most porous paving materials is aggregate, such as crushed stone. It is crucial that this aggregate be “open-graded”—that is, have a narrow range of particle sizes. The void space between single-sized particles typically amounts to 30 to 40 percent of the aggregate’s volume; the aggregate’s permeability is commonly over 1000 in. per hour. As long as the particles are angular, open-graded aggregate obtains structural stability from particle-to-particle interlock.
To protect a pavement’s surface from sedimentary clogging, surface drainage should be away from the pavement edge in every possible direction, so that sediment is prevented from washing on and, conversely, being allowed to wash off. On the downhill side, large, numerous curb cuts should be added, if necessary. On the uphill side, a swale should be added, if necessary, to divert potentially sediment-laden runoff. These provisions limit most porous pavements to infiltrating the stormwater that falls directly upon the pavement, not runoff from surrounding earthen slopes.
Contributor:
James E. Sekela, PE, Pittsburgh, Pennsylvania.
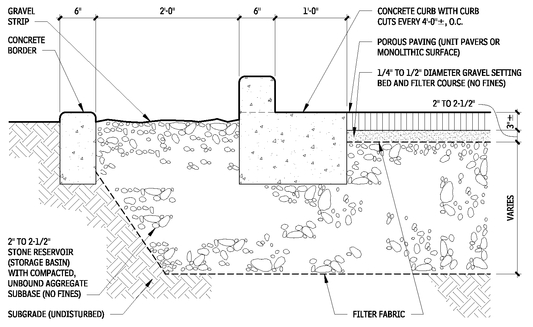
POROUS PAVEMENT CONSTRUCTION WITH FLUSH CURB
7.3
POROUS PAVEMENT CONSTRUCTION WITH RAISED CURB
7.4
Each porous paving material has its own advantages and disadvantages for specific applications, and its own requirements for design, construction, and maintenance. A development site should be analyzed in detail to distinguish pavement settings where different, optimally suited materials can be placed. In all pavements, areas can be distinguished with different needs for hydrology, appearance, subsurface tree rooting, and cost.
PAVEMENT SETTINGS: TYPES OF PAVEMENT SETTINGS THAT CAN BE DISTINGUISHED FOR SELECTING DIFFERENT APPROPRIATE PAVING MATERIALS
7.5
| TYPE OF AREA | DISTINGUISHED TYPE OF AREA |
|---|
| Universally accessible pedestrian routes requiring firm, smooth surface | General pedestrian routes |
| Turning lanes in parking lots requiring surface stability for braking and turning | Parking stalls |
| Heavily used parking stalls near the entrance of commercial buildings | Seldom-used parking stalls distant from entrances |
| Street traveling lanes requiring surface stability for braking and turning | Street parking lanes |
| Streets with swiftly, smoothly moving traffic requiring smooth, quiet surface | Streets with “calmed” traffic, where coarse texture and perceptible noise may be desirable |
| Steeply sloping pavements (>5%±) requiring stable surface and subsurface | Gently sloping pavements |
| Reliable turf maintenance routines | Unreliable maintenance routines |
ALTERNATIVE POROUS PAVING MATERIALS
There are a number of alternative porous paving materials, among them:
• Porous aggregate is unbound gravel, crushed stone, crushed recycled brick, or decomposed granite. In most regions, unbound aggregate is both the least expensive of all firm surfacing materials and the most permeable. It is suitable for very light traffic such as that in residential driveways, lightly used portions of parking lots, and lightly used walkways. Annual maintenance for weeding or to replace lost material may be necessary.
• Porous turf makes a “green” open space where transpiration actively cools urban heat islands. It is suitable for bearing very light traffic, such as that in parking spaces used once per week or during seasonal peak shopping periods. The rooting-zone soil should be sandy, to resist compaction. Porous turf must be regularly mowed, fertilized, and irrigated; and because maintenance must be scheduled, it should be used only where traffic can be controlled or predictably scheduled.
• Plastic geocells are latticelike products that hold aggregate or topsoil in their cells, inhibiting displacement and compaction. The surface permeability, temperature, and visual appearance are essentially that of the grass or aggregate fill.
• Open-jointed blocks and open-celled grids are units of concrete, brick or stone, with open joints or cells. Porous aggregate or turf in the openings gives the pavement its porosity and permeability. Many block products can bear remarkably heavy traffic, but absorbs water intended for turf and holds heat in warm climates.
• Porous concrete is portland cement concrete made with single-sized aggregate. A qualified installer is required. The durability of porous concrete in cold climates can be enhanced by air entrainment and polymer fiber reinforcing. Properly installed porous concrete can bear heavy traffic loads, and the surface is universally accessible by most measures.
• Porous asphalt is bituminous concrete made with single-sized aggregate. Polymer fibers and liquid polymer additive can reduce drainage of the binder down through the pores—without them, the binder would leave surface aggregate particles unbound while accumulating into a clogging layer inside the structure. Properly installed porous asphalt can bear heavy traffic loads, and the surface is universally accessible by most measures.
•
“Soft” paving materials include granular organic or recycled materials such as bark mulch, crushed shells, and rubber granules. They are suitable for very light traffic such as that in pedestrian walkways, residential driveways, equestrian ways, and very lightly used parking stalls. Materials with durable single-sized particles have the highest infiltration rates and are the least susceptible to displacement, crushing, and compaction.
CONSTRUCTION OF TRAFFIC-BEARING TURF
7.6
POROUS UNIT PAVING
7.7
| TYPE | TYPICAL SURFACE PATTERN |
|---|
| Unit Pavers with indentations (e.g., Uni Eco-Stone) | |
| Unit Pavers with spacers (e.g., SF-Rima) | |
| Unit Pavers laid in open-jointed pattern (e.g., brick) | |
| Open-celled grids (e.g., Turfstone) | |
| Widely spaced Unit Pavers (e.g., fieldstone) | |
Contibutor:
Bruce K. Ferguson, FASLA, University of Georgia, Athens, Georgia.
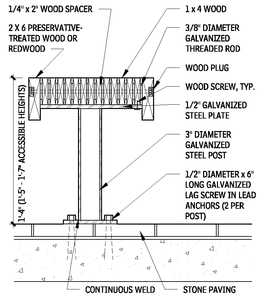
• Decks are surrogates for pavements. They are completely permeable to air and water as long as their decking components are perforated or spaced apart from each other. Their footings leave the soil below almost entirely free for infiltration and tree rooting. Decks are uniquely suited to sites with steep slopes or where native tree roots or ecosystem dynamics are to be very conscientiously protected. They are made from a variety of natural, manufactured, and recycled materials; hence, their durability varies with the material and its preservative treatment.).
PARKING LOTS
DESIGN CONSIDERATIONS FOR PARKING LOTS
Creating vital places is the job of those of who design, build, finance, and plan the built environment. Unfortunately, too often, as acres of asphalt attest, engineering standards are applied cavalierly; they are not used properly to help design the place. Even “just a parking lot” can be made into a place of delight.
Some strategies to employ that go beyond bare-bones engineering are:
• Parking courts: Like the forecourt of a grand English manor, a parking place can serve as the introduction to a building. It may be a formal garden, an entrance hall, or a place to display art.
• Multiple uses: For many of the hours in a year, even a busy parking lot stands empty or underused. Find and design for other activities such as youth basketball, or the summer yard of a garden store.
• Design for pedestrians: Make the pedestrian activities the highest priority in the placement, size, location, and other details of the site design. Virtually everyone who drives to a parking lot walks out of it.
• Reduce parking: Find a means for multiple uses to share a lot over the course of the day or week. Design so that people can park once and go to multiple destinations. Design so that the parking does not impede other modes of transport such as walking, bicycles, or buses.
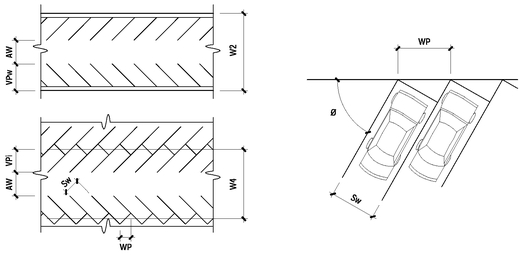
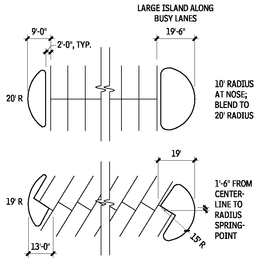
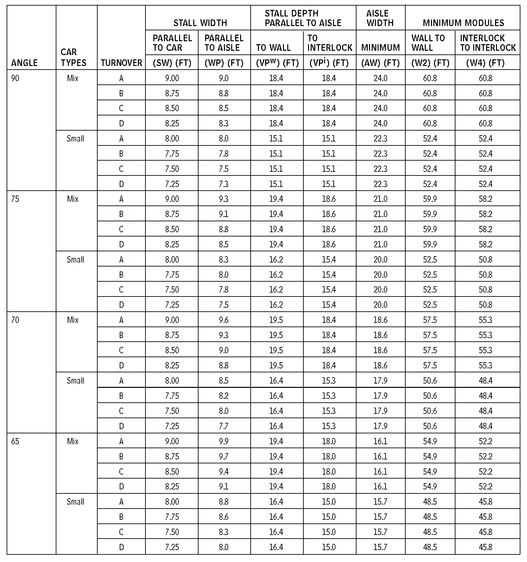
The tables and diagrams in this section provide the basic guidelines for the size and layout of stalls, grades in parking lots, the geometry of end islands, and the number of accessible stalls. For more detailed information on the design of access driveways, circulation patterns, calculating parking demand, safety, sustainability, and other aspects, refer to Parking Spaces: A Design, Implementation, and Use Manual for Architects, Planners, and Engineers, by Mark C. Childs (New York: McGraw-Hill, 1999).
SPACE LAYOUTS
7.8
END ISLANDS
7.9
Contributor:
Mark Childs, University of New Mexico, Albuquerque, New Mexico.
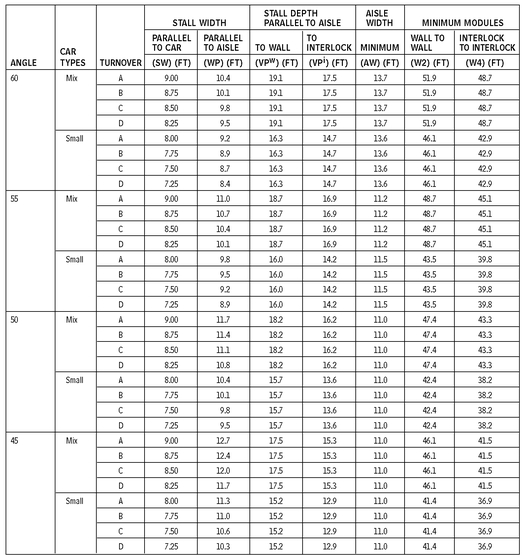
STALL AND MODULE DIMENSIONS
7.10
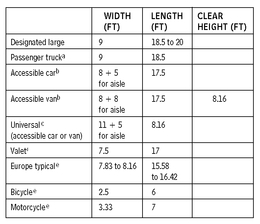
STALL DIMENSIONS FOR SPECIAL CONDITIONS
7.11
Sources: Adapted and recalculated from Parking, Robert D. Weant and Herberts Levinson, 1990, Eno Foundation; Parking Structures: Planning, Design, Construction, Maintenance and Repair, Anthony P. Chrest, Mary S. Smith, Sam Bhuyan, Chapman & Hall, 1996; Ricker, 1957.
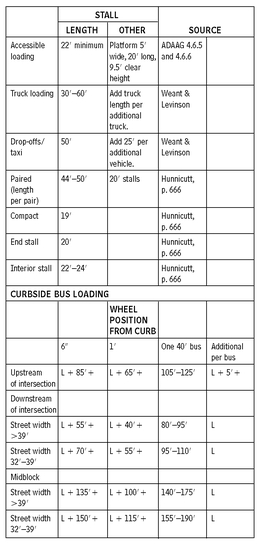
CURB PARKING
7.12
GRADES IN PARKING LOTS
7.13
| GRADE | CONDITION |
|---|
| 6% maximum | Continuous slope in parking lot |
| 12% maximum, 30’ long | Nonparking automobile ramps with pedestrians allowed |
| 15% maximum | Nonparking automobile ramps with signs banning pedestrians |
| > 6% change | A vertical curve transition is required; see Figure 7. |
| 1% minimum/2% rec. | Slope to drain asphalt |
| .5% minimum/2% rec. | Slope to drain concrete |
| 2% (1:50) maximum | Slope within accessible stalls in any direction |
| 5% | Accessible route running slope (2% cross slope) |
NOTES
7.10 a. Turnover categories: A = very high turnover, such as at a post office or convenience store; B = high turnover, such as at a general retail store; C = medium turnover, such as at airports or hospitals; D = low turnover, such as at an employee parking lot.
b. Figure 7.11 defines the dimensions used in this table
c. Stalls at angles between 90° and 60° are confusing as to whether the aisle is one-way or two-way. Do not use angles between 90° and 75°. Stalls at a 75° angle with two-way aisles are advocated by some because the right-hand side parking maneuver is easier into an angled stall; however, making a left-hand turn to park in a 75° stall is difficult. A minimum of 22 ft is necessary for two-way aisles, and 24 to 25 ft allows ample walking space and occasional left-hand parking. Stalls at angles between 45° and 0° (parallel parking) are not generally advisable because they are space-inefficient and confusing.
d. Stall stripes are often painted 6 to 10 in. shorter than the stall depth to encourage drivers to pull fully into the stall.
e. The table uses a minimum aisle width of 11 ft. This dimension is minimally sufficient to allow passage of cars and pedestrians. In high turnover or special situations such as lots primarily serving the elderly or children, a pedestrian walkway and/or a wider aisle should be provided.
7.11a. From Charles E. Dare, “Consideration of Special Purpose Vehicles in Parking Lot Design.” ITE Journal, May 1985.
b. (ATBCB) Architectrual and Transportation Barriers Compliance Board, Americans with Disabilities Act Accessibilities Guidelines for Buildings and Facilities; Final Guidelines (ADAAG). 36 CFR Part 1191, 1991.
c. (ATBCB) Architectural and Transportation Barriers Compliance Board, Bulletin #6: Parking, 1994.
d. From Robert H. Burrage and Edward G. Morgen, Parking (Eno Foundation for Highway Traffic Control, 1957), p. 242.
e. From James Hunnicutt, “Parking, Loading, and Terminal Facilities” in Transportation and Traffic Engineering Handbook (Prentice Hall, 1982, p.50).
f. From Robert Weant and Herbert Levinson, Parking (Eno Foundatiuon for Highway Traffic Control, 1990), p. 167.
7.12 a. Bus-loading statistics adapted from First name or initials Homburger and First name or initials Quinby, “Urban Transit,” in Transportation and Traffic Engineering Handbook, 2nd ed. (Prentice Hall, 1982). b. L = length of bus.
7.13 Adapted from Chrest, Smith & Bhuyan, 1996; ITE, 1982; and Untermann, 1984.
Contributors:
Mark Childs, University of New Mexico, Albuqueque, New Mexico.
REQUIRED NUMBER OF ACCESSIBLE STALLS
7.14
| GENERAL CASE |
|---|
| TOTAL IN PARKING LOT | REQUIRED MINIMUM NUMBER OF ACCESSIBLE SPACES |
| 1-25 | 1 |
| 26-50 | 2 |
| 51-75 | 3 |
| 76-100 | 4 |
| 101-150 | 5 |
| 151-200 | 6 |
| 201-300 | 7 |
| 301-400 | 8 |
| 401-500 | 9 |
| 501-1000 | 2% of total |
| 1001 and over | 20 + 1 per 100 over 1000 |
| Number of accessible spaces | Required minimum number of van-accessible spaces |
| 1-8 | 1 |
| 33 and over | 1 additional van-accessible per 8 accessible spaces |
| SPECIAL CASES |
|---|
| PLACE | REQUIREMENT |
| Medical outpatient units | 10% of total stalls in lots serving visitors and patients |
| Medical units that specialize in persons with mobility impairments | 20% of total stalls in lots serving visitors and patients |
| Valet parking | No stalls required; however, an accessible loading zone is required, and it is strongly recommended that self-park stalls be provided. |
| Residential | 1 for each accessible dwelling unit and 2% for all additional units. Guest, employee, and nonresident parking must comply with table. |
LOTS ACCESSIBLE TO THE MOBILITY IMPAIRED
Parking is a critical element of accessibility. In fact, the first federal court case that resulted in a civil penalty under Title III of the Americans with Disabilities Act (ADA) was for failure to make parking accessible.
The ADA is a civil rights law, meaning that the Department of Justice is charged with enforcing the law. People who believe they have been discriminated against may sue the property owner. The ADA Accessibility Guidelines for Buildings and Facilities (ADAAG) issued by the government are not building codes subject to state or local approval or variances.
The information in this section was compiled from publications of the United States Architectural and Transportation Barriers Compliance Board (United States Access Board) and other sources, as noted. Note, however, that the law and best practices continue to evolve, so designers are cautioned to review materials and conditions specific to the project at hand. Note that lots owned by government agencies generally follow Title II rules, which are usually more stringent than the Title III rules for privately owned lots discussed in this section.
REQUIRED NUMBER OF ACCESSIBLE STALLS
Whenever parking is supplied, no matter how the total amount is determined, a portion of the stalls must be accessible to people with mobility impairment (hereafter called accessible stalls). Local codes may exceed the federal requirement for required number of accessible stalls listed in Table 7.14; the more stringent rule governs. When a facility has more than one parking lot, the required number of stalls is determined lot by lot. In employee or contract lots, accessible stalls must be provided, but “accessible spaces may be used by persons without disabilities when they are not needed by (persons) with disabilities” (Bulletin #6: Parking, Architectural and Transportation Barriers Compliance Board, 1994). When the use of a facility—for example, a senior center—indicates that more accessible stalls are needed than are required according to Table 7.14, a study should be conducted to determine an adequate supply of accessible stalls.
LOCATION OF ACCESSIBLE STALLS
The location of accessible stalls must give mobility-impaired persons preferential treatment in terms of access, and must not discriminate against them in terms of amenities (e.g., if the general stalls have hail protection canopies, the accessible stalls must also). The shorthand rule is that accessible stalls should be located with the shortest possible route to the entrance(s). Relevant U.S. regulations include the following:
• “Accessible parking spaces serving a particular building shall be located on the shortest route of travel from adjacent parking to an accessible entrance. In parking facilities that do not serve a particular building, accessible parking shall be located on the shortest accessible route of travel to an accessible pedestrian entrance of the parking facility. In buildings with multiple accessible entrances with adjacent parking, accessible parking shall be dispersed and located closest to the accessible entrances.”
• “Accessible spaces can be provided in other lots or locations, or in the case of parking garages, on one level only when equal or greater access is provided in terms of proximity to an accessible entrance, cost and convenience. The minimum number of spaces must still be determined separately for each lot…”
VAN-ACCESSIBLE STALLS
Van-accessible stalls must be marked as such, but this does not restrict the stall to use by vans (Bulletin #6, Parking, Architectural and Transportation Barriers Compliance Board, 1994).
ACCESSIBLE STALL LAYOUT GUIDELINES
Design guidelines for the layout of parking stalls are as follows:
• Two accessible stalls may share an access aisle. However, this should be done only when the stalls are at 90° and allow both front-in and back-in parking.
• Curb ramps or other obstructions may not be within the stall’s access aisle, but may begin at the curb face when vehicles overhang a curb (Chrest, Smith & Bhuyan, 1996, p. 212).
• Car overhang may not obstruct the clear width of a sidewalk access route. Wheel stops and/or a reinforced sign post may help limit car overhang.
ACCESSIBLE SIGNAGE
Parking spaces that are to be accessible should be designated by signage indicating the spaces are reserved. Van-accessible spaces should have the words “van-accessible” printed below the universal symbol of accessibility. The ADAAG requires that the sign not be obscured by a car or parked van. Centering the sign on the access aisle may improve its visibility.
ACCESSIBLE EQUIPMENT
Equipment such as parking meters, automated teller machines, pay stations, and ticket dispensers must have accessible controls. Most such equipment is now designed with operating mechanisms that are considered accessible, so the designer’s major role is to place the controls at a proper level and to provide clear access to them.
Specifically, parking meters for accessible stalls should be placed at or near the head or foot of the parking space, to ensure that no obstruction occurs for the operation of a side lift or a passenger side transfer. The meter should be placed a maximum of 42 in. above the public sidewalk. The accessible stall should be a minimum of 30 in. by 48 in.
ACCESSIBILITY OF EXISTING LOTS
Existing lots must be made accessible when it is possible to do so. “ADAAG established minimum requirements for new construction or alterations. However, existing facilities not being altered may be subject to requirements for access. This requirement is addressed by regulations issued by the Department of Justice. Under these regulations, barrier removal must comply with ADAAG requirements to the extent that is readily achievable to do so. For example, when restriping a parking lot to provide accessible spaces, if it is not readily achievable to provide the full number of accessible spaces required by ADAAG, a lesser number may be provided. The requirement to remove barriers, however, remains a continuing obligation; what is not readily achievable at one point may become achievable in the future.”
When alternations are made (e.g., realigning striping or resurfacing, but not routine maintenance), whatever is altered must be made accessible unless technically infeasible and improvements to the path of travel to the lot must be made, up to a cost equal to 20 percent of the project budget.
PASSENGER LOADING ZONES
There must be at least one passenger loading zone for the mobility impaired whenever designated loading zones are provided. There must also be an access aisle at least 5 ft wide and 20 ft long adjacent and parallel to the vehicle pull-up space. A clear height of 9 ft-6 in. is required at the loading zone and along the vehicle route, to, from, and within the zone. The vehicle space and the access aisle must be level with surface slopes not exceeding 1:50 (2 percent) in all directions. Neither curb ramps nor street furniture may occupy the access aisle space.
PEDESTRIAN PAVING
DESIGN CONSIDERATIONS
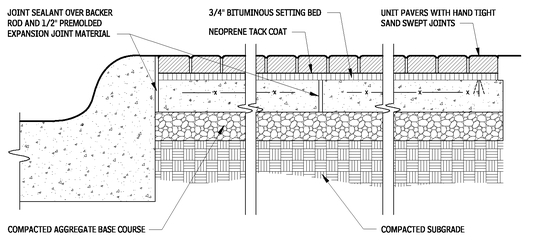
Additional design guidelines for working with unit paving systems include the following:
• Drainpipes may be omitted at well-drained areas.
• Provide positive outflow for drainpipes.
• Do not use unsatisfactory soil (expanding organic). Satisfactory soil must be compacted to 95 percent.
• Hand-tight paving joints are preferred over mortar joints.
However, when mortar joints are required, and freezing and thawing are frequent, use latex-modified mortar.
• Install concrete footing for edging 10 to 14 in. wide and 6 to 8 in. deep. It is preferable to place the bottom of the footing at freezing depth. If the freezing depth is deeper than the bottom of the footing, provide 4 in. of gravel below the footing.
• Interlocking pavers are available in concrete, hydraulically pressed concrete, asphalt, and brick in different weight classifications, compressive strengths, surface textures, finishes, and colors. Consult local suppliers for availability.
• Subject to the manufacturer’s recommendations and local code requirements, use interlocking concrete pavers in areas subject to heavy vehicle loads at speeds of 30 to 40 mph.
• Be aware that concrete interlocking unit paver sizes may be based on metric dimensions. When paver shape permits, use the herringbone pattern for paving that is subject to vehicular traffic.
• Continuous curb or other edge restraint is required to anchor pavers in applications subject to vehicular traffic.
Contributors:
Mark Childs, University of New Mexico, Albuquerque, New Mexico, from Parking Spaces: A Design, Implementation, and Use Manual for Architects, Planners, and Engineers (New York: McGraw-Hill, 1999).
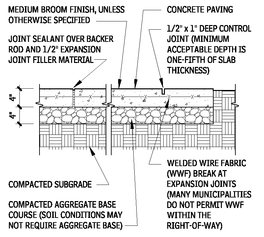
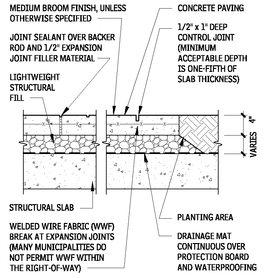
PEDESTRIAN CONCRETE WALK-ON GRADE
7.15
PEDESTRIAN CONCRETE WALK-ON STRUCTURE
7.16
BITUMINOUS WALK/BIKE PATH SECTION
7.17
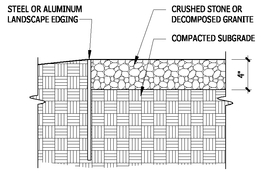
CRUSHED STONE PAVING
7.18
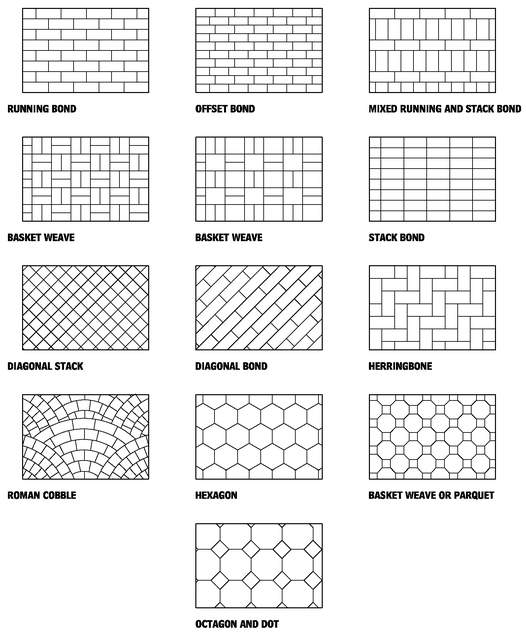
UNIT PAVER PATTERNS
7.19
NOTES
7.15 a. Install expansion joints with joint sealant when paving is adjacent to vertical faces, curbs, steps, any fixed object, or other rigid paving material, and at maximum 20 ft o.c., unless otherwise noted on plans.
b. Meet flush with adjacent hardscape finish grades.
7.16 a. Install expansion joints with joint sealant when paving is adjacent to vertical faces, curbs, steps, any fixed object, or other rigid paving material, and at maximum 20 ft o.c., unless otherwise noted on plans.
b. Meet flush with adjacent hardscape finish grades.
7.17 Detail usually requires an arborist’s input to detail connections from bed grid to finish grade.
Contributor:
Dennis Carmichael, EDAW, Inc., Alexandria, Virginia.
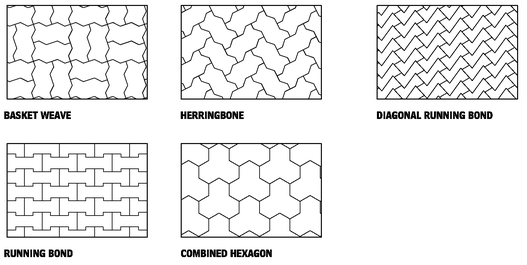
INTERLOCKING UNIT PAVER PATTERNS
7.20
UNIT PAVING
Unit paving assemblies are used principally for applications such as shopping plazas, building entrances, walkways, patios, residential driveways, and residential parking areas. But they may also be used for streets with heavy vehicular traffic and for industrial floors or other special conditions.
There are several types of unit pavers:
• Precast Concrete Unit Pavers
• Brick Unit Pavers
• Wood Pavers
• Recycled-Rubber Pavers
• Stone Pavers
• Porous Unit Pavers
PEDESTRIAN AND LIGHT-TRAFFIC BRICK PAVERS
Because of its more vulnerable exposure to weathering, and the constant stress of traffic, even light-traffic brick pavers must maintain higher compressive strength and lower porosity than face brick. ASTM C 902, “Standard Specification for Pedestrian and Light Traffic Paving Brick,” establishes the criteria for pedestrian and light-traffic brick pavers. Light-traffic refers to frequency or pavements that receive limited vehicular traffic at low speeds, such as driveways and arrival courts (light does not refer to the weight of a vehicle). An arrival court may normally receive automobile traffic, but the occasional moving van will not damage an ASTM C 902 paver. The classification of light-traffic brick pavers is dependent on its intended application and use. There are three weathering classes of pavers and three types of pavers, based on anticipated traffic and the required levels of resistance to abrasion by traffic.
CLASSES
• Class SX (severe exposure) should be specified where pavements may encounter freezing while saturated with water. In contract to face brick, class SX pavers must have a minimum average compressive strength of 8000 psi. An individual unit may not have strength below 7000 psi.
• Class MX (moderate exposure) may be called for in southern climates where freezing is not expected.
• Class NX (negligible exposure) is for interior use only.
TYPES
• Type I bricks are recommended where highly abrasive traffic is anticipated, such as in driveways or heavily concentrated pedestrian zones.
• Type II bricks are best suited for typical pedestrian environments such as public walkways.
• Type III bricks offer the least resistance to abrasion and should be used in low-traffic residential applications.
HEAVY VEHICULAR PAVING BRICK
Where vehicular traffic is greater in speed, volume, and weight, a stronger brick is naturally required. Brick in heavy-traffic situations not only must tolerate the added structural load, but is also subjected to greater abrasion and the tendency for both horizontal and twisting forces. ASTM C 1272, “Standard Specification for Heavy Vehicular Paving Brick,” establishes the standard. ASTM list two types and three application classifications for heavy vehicular paving brick.
TYPES
• Type R is intended for situations where a rigid or semirigid setting bed and base are provided (such as concrete or asphalt). With Type R pavers, the minimum average compressive strength is set at 8,000 psi, with the rigid setting bed and base contributing to the overall compressive strength of the cross section. Type R pavers carry a minimum thickness dimension of 2-1/4 in.
• Type F brick is stronger and better suited for use with a flexible base (such as compacted aggregate), along with an adequately compacted subgrade. Type F pavers are required to have a higher overall compressive strength than Type R pavers, with a minimum average of 10,000 psi. Type F pavers must have a thickness of no less than 2-5/8 in.
APPLICATIONS
• Application PS refers to heavy paving brick for general, all-purpose use. Where there is a greater concern for overall uniformity, including precision in dimension, degree of warping, and chipping, application PX should be specified.
• Application PA deals with paving bricks with specific visual characteristics, such as size and color.
Consult with a landscape architect or engineer for appropriate design guidelines.
PAVER SELECTION
Paver units are selected according to color, texture, abrasion resistance, and resistance to weathering. The texture of the unit affects slip resistance (the coarser the texture, the better the slip resistance). Abrasion resistance refers to the wear and tear an assembly is subjected to under normal use. According to ASTM C 902 (brick pavers) and ASTM C 936 (concrete pavers), an abrasion index classification determines the type of unit required for an intended exposure. A dense, hard-burned extruded brick with 8000 psi compressive strength that conforms to ASTM C 902, Class SX, Type 1 (water absorption of less than 5 percent, meets/exceeds ASTM C 67 freeze/thaw) resists both abrasion and weathering and is adequate for most heavy-traffic exterior applications. Molded brick with 4000 psi compressive strength that conforms to ASTM C 902, Class SX, Type 2, and may be adequate for most exterior pedestrian applications only. Some manufacturers recommend 8000 psi pavers for both vehicular and pedestrian applications. Consult the manufacturer to learn which products are suitable for use as pavers in a particular application.
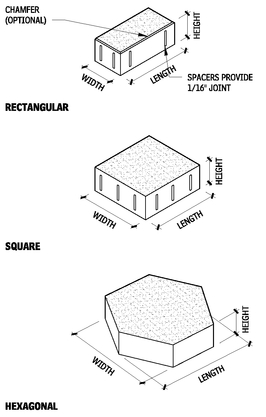
TYPICAL PAVER SHAPES
7.21
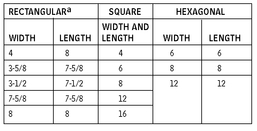
TYPICAL PAVER SIZES (IN.)b
7.22
For all light or heavy vehicular traffic applications, 3-1/8-in. paver thickness is recommended; 2-3/8-in. thickness is recommended for pedestrian applications. Assess potential traffic loads when planning unit paving installations. Heavy vehicular loads require a rigid or semirigid continuous base, whereas a flexible base and flexible paving are suitable for light vehicular loads (residential type). Use either base type for pedestrian traffic. Appropriate base courses for heavy traffic would include asphalt over roadbase (Class 6), concrete over Class 6 roadbase, and just Class 6 roadbase. When using only roadbase under heavy loads, it should be at least twice as thick as the recommended 6-in. roadbase for pedestrian traffic.
Choose a bond pattern based on expected traffic patterns—traffic should travel perpendicular to the long dimension of the paving unit. For vehicular areas, use a gravel subbase (minimum 6 in. of crushed gravel) compacted to 95 percent, and paver sizes 8 in. square or smaller. Consult a civil engineer to accurately define paver sizes, shapes, gravel depth, concrete base depth, and concrete reinforcement requirements.
NOTES
7.22 a. Check with manufacturers for availability of chamfers.
b. The height of pavers varies with the manufacturer and application, but is usually 1-1/4, 2-1/4, 2-5/8, or 2-3/4 in.
Contributor:
Dennis Carmichael, EDAW, Inc., Alexandria, Virginia.
PAVER PREPARATION
Proper subgrade preparation of areas to be paved is important. Here are relevant guidelines:
• Remove all vegetation and organic material, and consider the location of existing or proposed underground utilities and storm drainage, as well as user convenience.
• Plan for surface and subsurface drainage. Slope paving away from buildings, retaining walls, and so on, at 1/8 to 1/4 in. per foot. Rigid paving always requires adequate surface drainage, with the long dimension of the mortar joints running parallel to the direction of runoff. Flexible paving requires both surface and subsurface drainage.
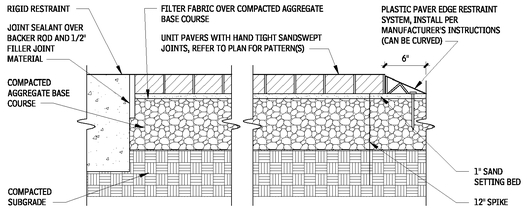
• Prevent horizontal movement of all types of mortarless unit paver assemblies—this is imperative. If the pavers are on an aggregate base, provide a rigid plastic edge restraint using spikes driven into the stone base designed for this purpose. A flush concrete curb works as well. If the paving system is over a concrete base, regardless of the setting bed (sand or bituminous), the pavers along the edge can be mortared to the base, but take care to ensure this method does not trap water which will seep into the setting bed. Another method is to secure an angle iron to the concrete base with anchor bolts, allowing for gaps on a regular basis to permit seepage. Cover vertical gaps with a small perforated metal sheet for bituminous setting beds, or filter fabric for sand beds, to prevent erosion.
In addition, be aware that chamfers on both clay and concrete pavers are required for heavy driving applications (e.g., public streets and parking lots). Chamfered edges avoid the splintering of edges that can occur.
There are three major types of unit paver joint material:
• Mortar
• Grout (portland cement and sand without hydrated lime)
• Dry mixture of grout
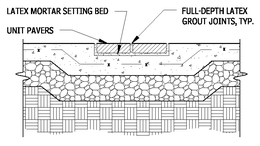
UNIT PAVER INLAY IN CONCRETE
7.23
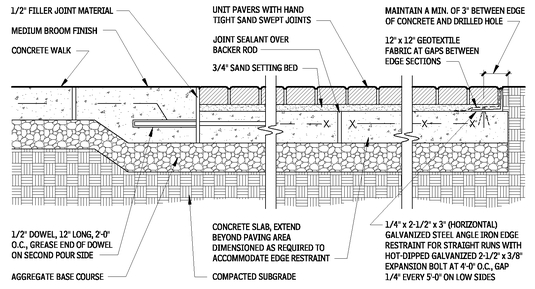
UNIT PAVERS ON SAND WITH CONCRETE BASE
7.24
UNIT PAVERS ON BITUMINOUS WITH CONCRETE BASE
7.25
UNIT PAVERS ON AGGREGATE BASE
7.26
NOTES
7.23 a. Install expansion joints with joint sealant at all building faces, curbs, walls, steps, or when adjacent to any fixed object and changes in paving material, and at maximum 20 ft o.c., if not otherwise shown on plans.
b. For curved conditions, use a manufactured angle-edge restraint with same-size expansion bolts at preset openings. No anchor may be greater than 6 in. from the gap or end of run. Spacing of gaps may increase depending on design of restraint. Recommend spacing of gaps should not exceed 5 ft o.c.
c. If the landscape edging is aluminum, paint the area that comes in contact with the concrete slab with bituminous paint.
d. Meet flush with adjacent finish grades.
7.24 a. For curved conditions, use a manufactured angle-edge restraint with same-size expansion bolts at preset openings. No anchor may be greater than 6 in. from the gap or end of run. Spacing of gaps may increase depending on design of restraint. Recommend spacing of gaps should not exceed 5 ft o.c.
b. If the landscape edging is aluminum, paint the area that comes in contact with the concrete slab with bituminous paint. Also, provide an insulating fiber washer.
c. Meet flush with adjacent hardscape finish grades.
d. Refer to drainage detail if unit pavers slope to restraint.
7.25 a. Install expansion joints with joint sealant at all building faces, curbs, walls, steps, or when adjacent to any fixed object and changes in paving material, and at maximum 20 ft o.c., if not otherwise shown on plans.
b. For curved conditions, use a manufactured angle-edge restraint with same-size expansion bolts at preset openings. No anchor may be greater than 6 in. from the gap or end of run. Spacing of gaps may increase depending on design of restraint. Recommend spacing of gaps should not exceed 5 ft o.c.
c. If the landscape edging is aluminum, paint the area that comes in contact with the concrete slab with bituminous paint.
d. Meet flush with adjacent finish grades.
7.26 a. The thickness of the aggregate base varies depending on soil conditions and loading.
b. Pedestrian areas are approximately 6 to 8 in.; vehicular areas are approximately 8 to 12 in.
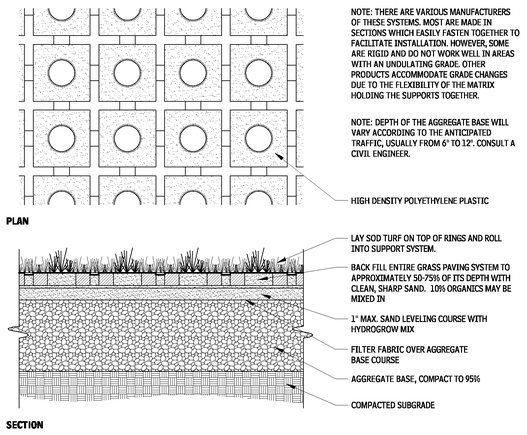
GRASS PAVING
GRASS PAVING SYSTEM
7.27
EXTERIOR STAIRS AND RAMPS
Throughout the centuries, stairs and ramps have been used to address elevation changes in the landscape. They can be heroic or modest, nuanced or straightforward, detailed or plain. They represent for designers opportunities to create delight, variety, viewpoints, and accents in the movement of people across a landscape. They are also zones for heightened access and safety consideration. This section leaves for the designer’s imagination the full potential of stairs and ramps as artistic design elements, and concentrates instead on access and safety design issues.
REGULATIONS
Stairs and ramps as components of the pedestrian walkway system are regulated for minimum design standards at federal, state, and local levels. With the Americans for Disabilities Act (ADA), the role of stairs and ramps in creating accessibility for all became a specific design focus. For designers, the first requirement is to thoroughly review the relevant jurisdiction’s accessibility and safety codes related to stairs and ramps. Any discrepancies between the information presented in this discussion and any regulation should always be resolved in the favor of the regulation.
There are differences in the design requirements between local, state, and federal accessibility and safety regulations. Identifying and determining the relevant regulations for a project requires research and discussion with the project client. Private and local government projects usually must adhere to local, state, and federal requirements. State and federal projects usually exempt themselves from application of regulations enacted by lower jurisdictional levels.
A review meeting early in the design process with the relevant building code enforcement group is advisable. Determining the applicable regulations with the client is a professional liability responsibility of the design professional.
EXTERIOR VERSUS INTERIOR DESIGN STANDARDS
Exterior stairs and ramps must deal with climatic issues that interior situations do not—obvious examples being rain and snow. In addition, the design and spatial variety of exterior landscape spaces make the location of stairs and ramps less predictable for pedestrians. Thus, in exterior design factors such as tread depth and slope, traction and detectable warning zones become important issues to consider. Directly applying interior stair and ramp standards to exterior locations is generally not a good practice.
EXTERIOR STAIR DETAILS
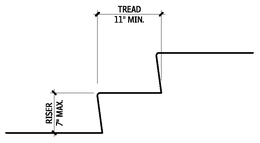
A rule of thumb for tread depths and riser heights for exterior stairs can be translated to this equation:
Height of two risers + depth of one tread = 26 inches
For exterior locations, a recommended range for risers is between 4 and 7 in., with recommended tread depth of 12 to 18 in.
Stairs in exterior locations require a slope on the tread to shed rain and snow melt. A generally recommended slope is a 2 percent slope from front to back of tread, or a 1/4-in. on a 12-in.-wide tread.
The leading edge of a step is called the step nose. Stairs nose details vary depending on the material used. Detailing of the stair nose is an important safety detail. The current accessibility standard is that step noses should have a radius of in., with no 1/2 overhang deeper than 1/2 in. on the step. The goal is to reduce the potential points where a person’s shoe could become trapped or tripped, such as a toe under a step overhang or a heel at a sharp nose edge.
RISER AND TREAD PROPORTIONAL DETAIL
7.28
| RISER HEIGHT (IN.) | TREAD DEPTH (IN.) |
|---|
| 4 | 18 |
| 4-1/2 | 17 |
| 5 | 16 |
| 5-1/5 | 15 |
| 6 | 14 |
| 6-1/2 | 13 |
| 7 | 12 |
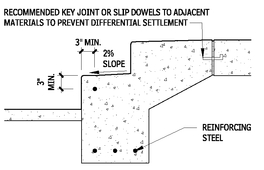
STAIR JOINT DETAIL
7.29
CONSTRUCTION OF EXTERIOR STAIRS
A construction concern for concrete stairs is the placement of reinforcing bars. Reinforcing steel should be placed a minimum of 3 in. back from any exposed surface of the step. Maintaining a minimum 3-in. clearance reduces the potential for breakup of the step due to differential freeze/thaw expansion between the reinforcing steel and the concrete. This is especially important in the stair nose zone. Adding slip dowels and keyed joints at the top of concrete stairs to adjacent concrete paving or subsurface layers is a good construction detail, to avoid differential settlement and tripping hazards. The bottom step footing on concrete stairs or concrete subsurface for stairs should extend down, at a minimum, to the local freeze depth.
Manufactured metal stair nosings are sometimes used in heavily trafficked locations to reduce the wear and tear on step noses. In climates with freezing temperatures, selecting a product and installation method that accounts for deferential freeze/thaw effects between the metal and the step material is important.
Metal stairs in exterior locations should be built with open-mesh metal grating or with embossed or raised patterning on the tread surface, to provide traction and the ability to release rain or snow quickly from the surface of the step. When open-mesh metal materials are used on steps, the rule of 1/4-in. maximum clear opening to provide safety for shoe heels is a good safety standard to follow.
Exterior raised steps made with wood, plastics or composites do not require a tread slope if there is a 1/4- to 1/2-in. gap between each wood member. This gap helps to release rain and snow buildup that can cause slipperiness.
NOTES
7.27 a. Voids may be filled with grass, ground cover, or gravel. b. Grass pavers may be used to control erosion.
c. Preformed lattice unit grids are used for storm runoff control, pathways, parking areas, and soil conservation.
Contributors:
Dennis Carmichael, FASLA, EDAW, Inc., Alexandria, Virginia; Jon Pearson, EDAW, Inc., Alexandria, Virginia; John Rowe, Pavestone Company, Dallas, Texas; Faith Okuma, Design Workshop, Santa Fe, New Mexico.
For timber steps that are laid on grade, selecting wood varieties and installation methods that resist moisture rot is important to achieve long-term durability. Cedar, redwood, and preservative treated woods are generally considered reliable selections for ground-laid timber steps. A gravel subsurface is often used in high-moisture environments to reduce the moisture buildup beneath ground-laid timber steps.
Stone, when used in ground-laid steps, should be selected for flat tops and be large enough so that they do not overturn when pressure is applied at the step nose. Lapping each stone step by approximately one-fourth to one-third of their tread depth helps to prevent this overturning. If laid with spacing between each stone step, each stone should be buried up to one-third the thickness of the stone, and be level on its top surface.
Gravel beds or designed structural soil mixes such as base course should be considered whenever high moisture content or poor structural soil conditions exist. A solid subsurface contributes to the long-term durability and stability of a set of steps.
EXTERIOR STAIR RUNS, WIDTHS, AND LANDINGS
Single steps should be avoided, as they create a tripping hazard because of their lack of visibility. Stairs and steps in general should be distinguished from surround paving by a difference in material, color, or pattern, to highlight and make them more prominent. In most jurisdictions, when there are more than three steps, handrails must be provided.
As a general rule, exterior stair landings should, at a minimum, match the width of the stairs and be a minimum of 3 ft deep. Exterior stairs when located at main entries or emergency exits of buildings should, at a minimum, be the width of the exiting doorways. This helps to maintain a safe emergency egress zone. Providing a landing at doorways and gates that are served by stairs makes using doorways safer and more convenient. The swing of the door should be accounted for in scaling the depth of a landing, to avoid having to be on a step to open or close a door or gate.
Installing intermediate stair landings where an elevation change of between 2.5 and 5 ft has been reached on a run of stairs creates a comfortable resting place for users. When longer runs of stairs are used consideration for larger landings with opportunities for sitting should be given. Landings should be built with a minimum 2 percent slope toward the downhill edge.
RAMPS
Accessible ramp slope standards initially were based on research using disabled adult males as the test population. This means that, perhaps, it is not the best standard for the elderly, children, or the frail. Thus, for the greatest universal access of a project, designers should target for the lowest ramp slope rate practical. Research based on the elderly and children is beginning to show that a better slope rate for those populations is 1:16 or lower. The 1:12 or 8.333 percent slope rate should be considered the maximum rate, not the goal.
As a practical cost consideration, any ramp that is flatter than 1:20 does not require handrails and, thus, can avoid that cost.
STREET RAMPS
There are two common locations for exterior ramps: at street corners and crossings, and where grade changes occur. The design of street ramps is highly regulated by local, state, and federal ordinances. This discussion does not provide street ramp standards because the design requirements are diverse and undergo frequent review and modification. Thus, for street ramp standards, the design professional is referred directly to the relevant ordinance determined by discussion with the relevant code enforcement agency and the client.
EXTERIOR RAMP DETAILS
The most important design feature of an exterior ramp is the surface of the ramp. Ensuring that it is not slick in wet weather is critical for safety. Follow these guidelines:
• On concrete ramps, the surface should be, at minimum, a medium broom finish, with the broom strokes being perpendicular to the flow of traffic.
RAMP SLOPE RATIOS
7.30
RAMP SECTION
7.31
• Stone clad ramp designs should consider honed or scored surfaces, and avoid any smooth, flat finish.
• Metal ramps designs should consider structural grille/grate panels or embossed or patterned metal, and avoid any smooth finish.
• Installing slip dowels or keyed joints at the tops and bottoms of ramps to adjacent paving helps to avoid differential movement that causes tripping hazards at the entries to the ramp.
RAMP WIDTHS AND LANDINGS
Design guidelines for ramp widths and landings are as follows:
• An accessible ramp should have a clearance between ramp handrails of at least 36 in., to allow a person in a wheelchair room for his or her hands to turn the wheels.
• A ramp landing should occur at a maximum of 30 ft. of run of a ramp. The ramp landing must be a minimum of 60 in. clear depth.
• If ramps change direction at landings, the minimum landing size must be 60 by 60 in.
• If an exterior doorway is located at a ramp landing, the landing must comply with safety and access requirements for the door.
STAIRS AND RAMPS HANDRAILS
As part of the accessible system, stair and ramp handrails are covered under access and safety regulations. Their placement, height, length, strength, and safety details fall under the design guidance of these regulations. Thus, familiarity with the relevant codes is paramount.
General requirements for all handrails are:
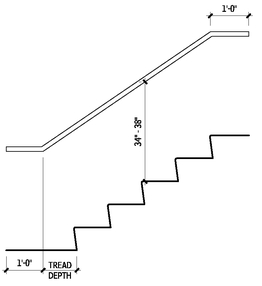
• The top of handrail to stair nose or ramp surface distance should be constant—a height between 34 to 38 in.
• The diameter or width of the handrail must be 1-1/4 to 1-1/2 in.
• Structurally, the handrail must be able to withstand 250 lb of downward pressure per inch.
• The ends of handrails should not be sharp at the ends.
General standards for stair handrails are:
• At the top of the stair run, the rail must be level for 12 in. before the first step nose.
• At the bottom of stair run, the rail must extend for one tread length at the same slope as over the majority of the stairs, then remain level for an additional 12 in.
General standards for ramp handrails are:
• At the top of the ramp, the rail must be level for 12 in. before the top of the ramp.
• At the bottom of the ramp, the rail must remain level for 12 in. beyond the end of the ramp.
STAIR RAIL DETAIL
7.32
Contributor:
Faith Okuma, Design Workshop, Santa Fe, New Mexico.
SITE DEVELOPMENT
RETAINING WALLS
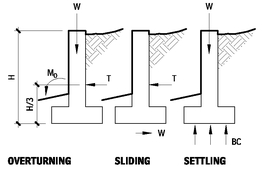
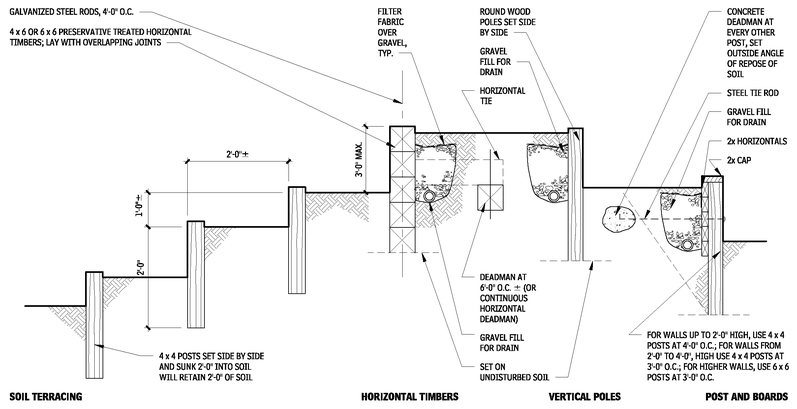
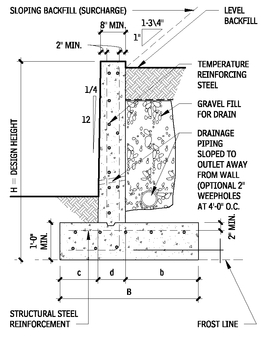
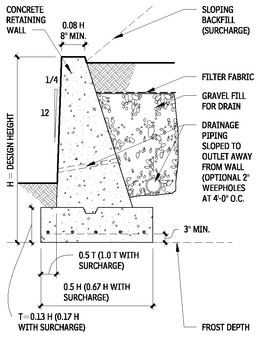
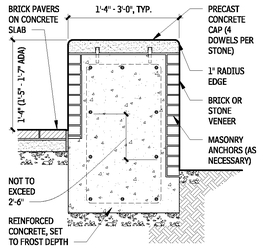
Retaining walls are designed and constructed to resist the thrust of the soil, which can cause the wall to fail by overturning, sliding, or settling. In stone walls, resistance to soil thrust can be helped by battering the stonework (i.e., recessing or sloping the masonry back in successive courses).
Garden-type retaining walls, usually no higher than 4 ft, are generlly made from small building units of stone, masonry, or wood. For higher walls, reinforced concrete is more commonly used. Terracing may be built with walls of wood, stone, brick, or concrete.
Walls less than 2 ft high do not require drains or weepholes. Preservative-treated wood is recommended for any design in which wood comes in contact with the ground. Redwood may be substituted if desired.
FORCES RESISTED BY RETAINING WALLS
7.33
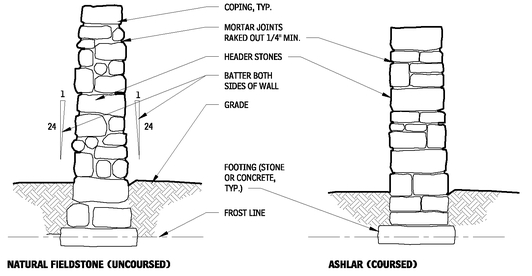
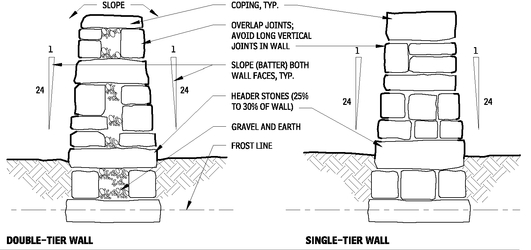
DRY-PLACED STONE RETAINING WALL
7.34
Stagger vertical joints from course to course 6 in. minimum horizontally. The thickness of the wall at any point should not be less than half the distance from that point to the top of the wall
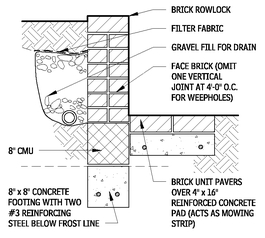
BRICK UNIT MASONRY RETAINING WALL
7.35
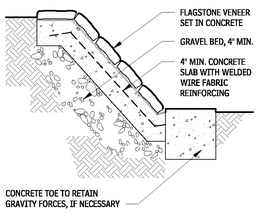
STONE BANK RETAINING WALL
7.36
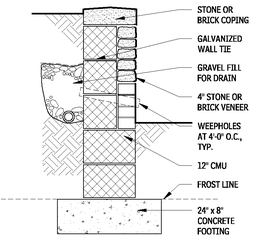
STONE/BRICK VENEER UNIT MASONRY RETAINING WALL
7.37
NOTES
7.33 a. H = height of wall, A = area of footing, W = composite weight of wall, T= lateral thrust of soil on wall, d = width of base of wall; M0 = overturning moment of a retaining wall; MR = resisting moment; W = lateral force on wall in psf; BC = bearing capacity of soil.
b. The overturning moment of a retaining wall (equal to T × H/3) is
resisted by the resisting moment of the wall. For symmetrical sections, the resisting moment equals W × d/2. Using a safety factor of 2, MR 2 × M0 (assume 33° angle of repose of soil).
c. The lateral (sliding) thrust of soil on a wall must be resisted. The resisting force is the weight of the wall multiplied by the coefficient of soil friction. Using a safety factor of 1.5, W 1.5T, where T = (w × H2)/2.
d. The bearing capacity of the soil must resist vertical forces (settling) —the weight of the wall plus any soil bearing on the base plus any vertical component of the soil thrust for a wall with any surcharge. Using a safety factor of 1.5, BC 1.5 W/A.
Contributors:
Dennis Wilkinson, Morrow Reardon Wilkinson Miller, Albuquerque, New Mexico; Donald Neubauer, PE, Neubauer Consulting Engineers, Potomac, Maryland.
TIMBER RETAINING WALL
7.38
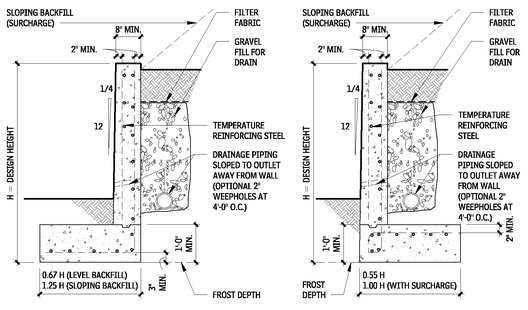
CAST-IN-PLACE CONCRETE RETAINING WALLS
When designing cast-in-place concrete retaining walls, keep these guidelines in mind:
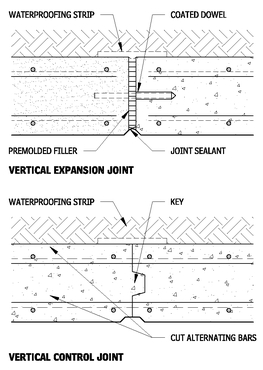
• Provide control and/or construction joints in concrete retaining walls approximately every 25 ft. Every fourth control and/or construction joint should be an expansion joint. Coated dowels should be used if average wall height on either side of a joint is different.
• Consult with a structural engineer for final design of all concrete retaining walls.
• Concrete keys may be required below retaining wall footing to prevent sliding in high walls and those built on moist clay.
L-TYPE RETAINING WALLS
7.39
RETAINING WALL JOINTS
7.40
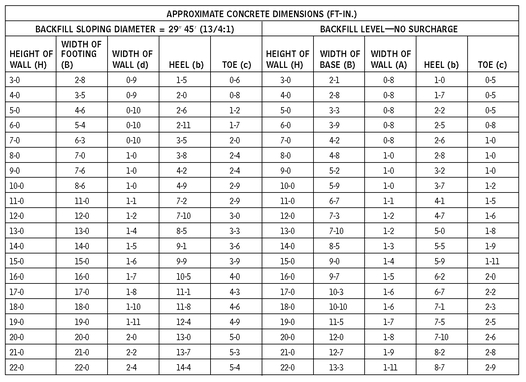
PRELIMINARY DIMENSIONS FOR CAST-IN-PLACE CONCRETE RETAINING WALLS
7.41
T-TYPE RETAINING WALL
7.42
GRAVITY RETAINING WALL
7.43
NOTE
7.43 T = the lateral thrust of the soil on the wall.
Contributor:
Donald Neubauer, PE, Neubauer Consulting Engineers, Potomac, Maryland.
MASONRY SITE STEPS
7.44
SITE SEATING
7.45
BRICK VENEER SEAT WALL
7.46
FREESTANDING STONE WALLS AND HEDGES
MORTARED STONE WALLS
7.47
DRY-PLACED STONE WALLS
7.48
NOTES
7.46 a. Provide handrails on both sides of all stairs along accessible routes.
b. Slope step surfaces so water will not accumulate on the walking surface.
c. These details are for reference only. Consult the applicable codes accessibility requirements.
Contributor:
Dennis Carmichael, FASLA, EDAW, Inc., Alexandria, Virginia.
LANDSCAPING
IRRIGATION
Irrigation system design considerations include the water supply, site conditions, climate, and plant material selection. The available volume of the water supply is measured in gallons per minute (gpm). The available pressure of the water supply is measured in pounds per square inch (psi). Water supply can be from a public or private utility system, or can be pumped from a well or pond. Selection of irrigation equipment and sizing of distribution piping is based on available volume and pressure of the water supply.
Site conditions that must be considered are topography, drainage, soil type, and solar exposure. Important climatic conditions include predominant wind direction, annual rainfall, and temperature variations. When irrigation systems are subject to freezing temperatures, precaution against damage to the system components from freezing must be built into the design.
Planting materials have different requirements for water. In fact, variations of turf grass may have vastly different watering needs. Plant water requirements include water lost by evaporation into the atmosphere from the soil and soil surface, and by transpiration, which is the water actually used by the plan. The combination of these is called evapotranspiration (E.T.).
Because turf grass has the highest rate of E.T. of any planting materials in the landscape, and because the E.T. of turf varies depending on the seasons, irrigation systems are designed to replace water lost at the highest level of E.T. for the turf grass in the landscape.
IRRIGATION SYSTEM COMPONENTS
There are a number of common irrigation system components, among them:
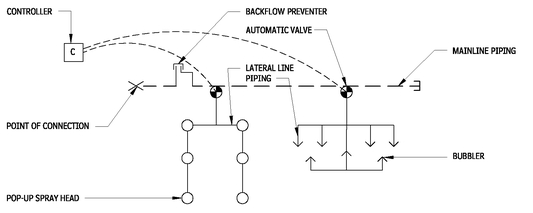
• Backflow preventer: Prevents water from the irrigation system from backflowing into the potable water supply.
• Controller: Acts as a timer that maintains status of the day of the week and time of the day in order to activate electric control valves at a specific day, time of day, and duration.
• Main line: The primary pipe supply line that distributes water from the point of connection of the source of supply to the electric control valves. Main line piping of sizes 2-1/2 in. in diameter and larger are typically class 200 PVC. Piping of sizes 2 in. and smaller are typically schedule 40 PVC.
• Electric control valve: Low-voltage solenoid-actuated valves that control the flow of water from the main line into the lateral line piping. Electric control valves are activated by the controller. Signals are sent from the controller to the valves through direct burial wires.
• Lateral line piping: The pipe supply line that distributes water from an electric control valve to a sprinkler head or a drip emitter. Depending on the application, lateral line piping can be schedule 40 PVC, class 200 PVC, or class 160 PVC. Lateral line piping for drip irrigation is typically polyethylene tube.
• Sprinkler head: A water distribution device attached to the lateral line piping. Rotary and impact sprinkler heads are used to irrigate large areas and can be spaced from 20 to 80 ft o.c. Pop-up spray sprinkler heads are used to irrigate smaller areas and can be spaced from 5 to 20 ft o.c. Sprinkler heads are used to irrigate turf grass or broad areas of low-growing shrubs or ground covers. For optimum efficiency, sprinkler heads are spaced to provide overlapping head-to-head coverage.
• Bubbler head: A water-distribution device used to irrigate shrubs and ground covers by placing water immediately adjacent to the plant, or by flooding a planting bed.
• Drip emitter: A water distribution device that distributes water very slowly, in increments measured in gallons per hour. Drip emitters are used to water individual plants.
COORDINATION CONSIDERATIONS
Check the contract to ascertain that an irrigation system is to be provided. On rare occasions, it is an option, which should have been determined when signing the contract.
An irrigation plan should show:
• Limits of irrigation
• Approximate limits of grass versus shrub and ground cover areas
• Point of connection (POC) for the water
• Controller location
• Grading plan
• Any out-of-the ordinary conditions (e.g., underground obstructions, areas over structure, isolated planting areas, tree pits, or pots) with a note clarifying whether these areas are or are not to be irrigated
Coordination with the plumbing engineer should occur near the start of the construction documents phase, mainly because the services needed to supply an irrigation system are the same as those for the domestic water system for a building. These include the location of the water meter and any calculations for the gallons per minute (gpm) and pounds per square inch (psi).
When working on a project that has a water meter room within the building, it is wise to let the plumbing engineer know (even as early as the design development phase) that a backflow preventer and an irrigation meter separate from the domestic water meter will be needed.
Ask the plumbing engineer to show the POC 2 ft beyond the outside face of the exterior wall, or vault at a depth of 18 in. below finish grade and with a cap. This is particularly important for commercial jobs where the water meter room is below grade and the exterior wall is likely cast-in-place concrete. If the irrigation main supply shows on the plumbing drawings, this will ensure the pipe is installed in the wall properly, with a waterstop, and has a tight seal around the pipe.
There is no need for the water and electrical power sources to be located near each other; they only have to meet at the remote control valves.
There needs to be a series of wires (one for each valve, plus a neutral wire) going through an exterior building wall 18 in. below grade or through the bottom of the pedestal, which has to be mounted on a concrete pad. These wires should always be enclosed in a “sleeve,” which is usually PVC. Once outside, the wires should remain encased in PVC pipe until they reach a main-line trench. From there they go off in all directions to the remote control valves, which should be buried under the pipe in the same trench.
IRRIGATION SYSTEM SCHEMATIC
7.49
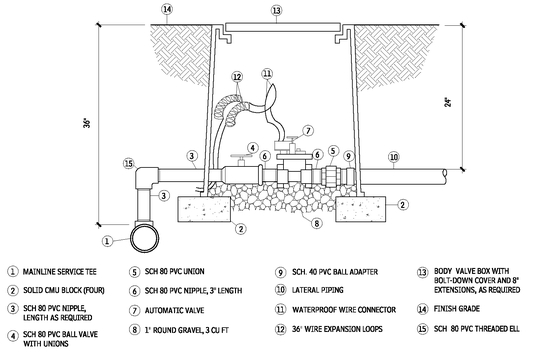
AUTOMATIC VALVE ASSEMBLY
7.50
NOTE
7.50 The contractor must install one automatic valve assembly per valve box.
Contributors:
Dennis Wilkinson, Morrow Reardon Wilkinson Miller, Albuquerque, New Mexico; John Pearson, EDAW, Inc., Alexandria, Virginia.
Irrigation sleeves should be installed prior to paving operations, but after final subgrade elevation has been established.
The controller is best located in a place out of view from the general public.
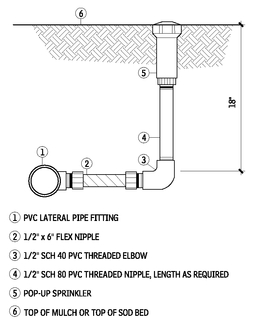
POP-UP SPRAY ASSEMBLY
7.51
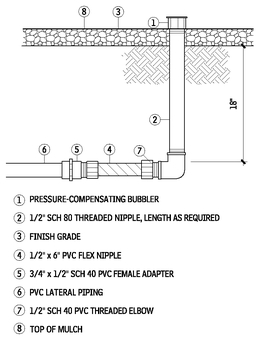
BUBBLER ASSEMBLY
7.52
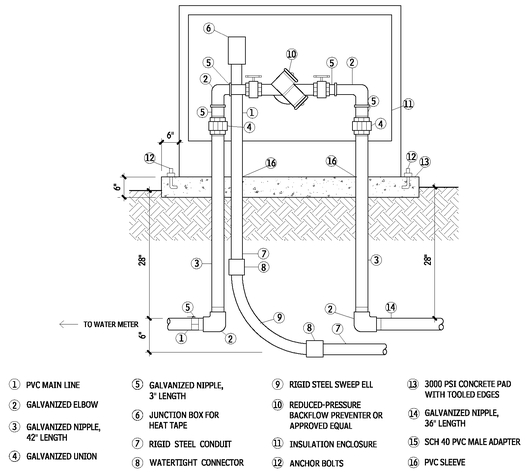
REDUCED PRESSURE BACKFLOW PREVENTER
7.53
PLANTING OF TREES AND SHRUBS
TREES PLANTS AND GROUND COVERS
The physical environment of the site, the design needs of the project, and the design character of the trees are all factors that must be considered in selecting trees and preparing a landscape plan for a building.
Soil conditions (acidity, porosity) at the site, the amount and intensity of sunlight and precipitation, and the seasonal temperature range in the area create the physical environment in which trees must be able to survive. In addition, it is essential to consider how the location and topography of the site will direct the wind, resulting in cold winds and cooling breezes that can affect the health of trees.
Trees can be used to address the design needs of a project by directing pedestrian or vehicle movement, framing vistas, screening objectionable views, and defining and shaping exterior space. Trees can also be used to modify the microclimate of a site and to help conserve building energy use from heating, cooling, and lighting systems.
The design character of the trees themselves plays a part in which species are best suited for a particular application. The shape of a tree can be columnar, conical, spherical, or spreading, and the resulting height and mass will change over time as the tree matures. Some trees grow quickly, and others more slowly, and their color and texture varies from coarse to medium to fine, affecting their character. The appearance of deciduous trees changes with the seasons, while the effect of an evergreen remains relatively constant.
Contributors:
Dennis Wilkinson, Morrow Reardon Wilkinson Miller, Albuquerque, New Mexico; John Pearson, EDAW, Inc., Alexandria, Virginia.
PHYSICAL CHARACTERISTICS OF TREES
7.54
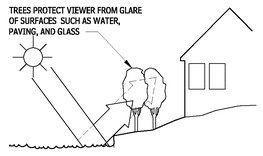
GLARE PROTECTION
7.55
The vertical angle of the sun changes seasonally; therefore, the area of a building subject to the glare of reflected sunlight varies. Plants of various heights can screen sun (and artificial light) glare from adjacent surfaces.
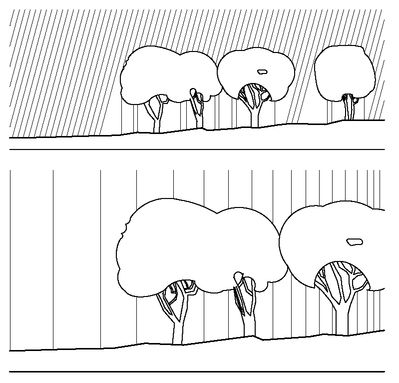
AIR FILTRATION
7.56
Large masses of plants physically and chemically filter and deodorize the air, reducing air pollution. Top: Particulate matter trapped on the leaves is washed to the ground during rainfall. Gaseous pollutants are assimilated by the leaves. Bottom: Fragrant plants can mechanically mask fumes and odors. Also, these pollutants are chemically metabolized in the photosynthetic process.
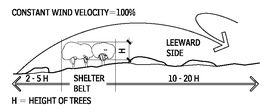
WIND PROTECTION
7.57
Shelter belt wind protection reduces evaporation at ground level, increases relative humidity, lowers the temperature in summer and reduces heat loss in winter, and reduces blowing dust and drifting snow. The amount of protection afforded is directly related to the height and density of the shelter belt.
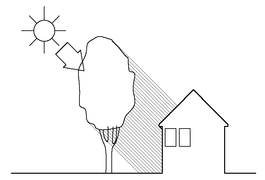
SHADE PROVISION
7.58
In summer, trees obstruct or filter the strong radiation from the sun, cooling and protecting the area beneath them. In winter, evergreen trees still have this effect, whereas deciduous trees, having lost their leaves, do not.
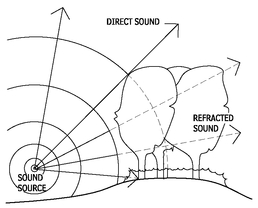
SOUND ATTENUATION
7.59
A combination of deciduous and evergreen trees and shrubs reduces sound more effectively than deciduous plants alone. Planting trees and shrubs on earth mounds increases the attenuating effects of a buffer belt.
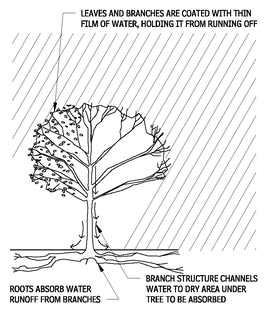
RUNOFF REDUCTION
7.60
Mature trees absorb or delay runoff from stormwater at a rate four to five times that of bare ground.
PLANTING DETAILS
Planting details for trees and shrubs, tips on soil improvement, and general design considerations are the topics addressed in this section.
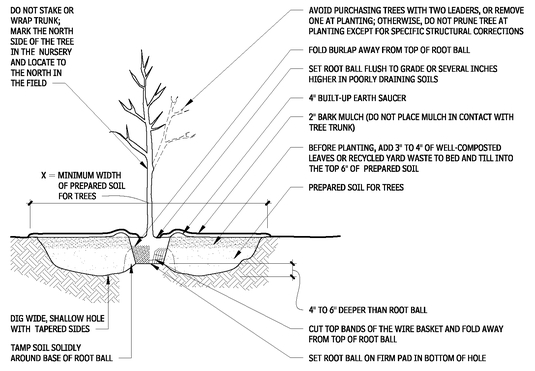
TREE PLANTING DETAILS
These three guidelines will aid in the successful planting of trees:
• For container-grown trees, use fingers or small hand tools to pull the roots out of the outer layer of potting soil; then cut or pull apart any roots circling the perimeter of the container. Incorporate commercially prepared mycorrhiza spores in the soil immediately around the root ball at rates specified by the manufacturer.
• During the design phase, confirm that water drains out of the soil; design alternative drainage systems as required.
• Thoroughly soak the tree root ball and adjacent prepared soil several times during the first month after planting, and regularly throughout the following two summers.
Contributor:
James Urban, ASLA, James Urban Landscape Architecture, Annapolis, Maryland.
Note that the planting process is similar for deciduous and evergreen trees.
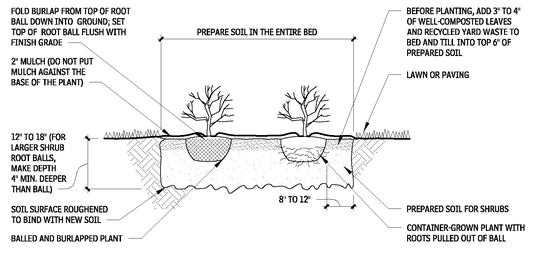
SHRUB PLANTING DETAILS
For successful shrub planting, follow these guidelines:
• For container-grown shrubs, use fingers or small hand tools to pull the roots out of the outer layer of potting soil; then cut or pull apart any roots that circle the perimeter of the container. Incorporate commercially prepared mycorrhiza spores in the soil immediately around the root ball at rates specified by the manufacturer.
• Confirm that water drains out of the soil during the design phase; design alternative drainage systems as required.
SOIL IMPROVEMENT
The quality of soil available for planting varies widely from site to site, especially after construction activity has occurred. The nature of construction results in compaction, filling, contamination, and grading of the original soil on a site, rapidly making it useless for planting. Previous human activity at a site can also affect the ability of the soil to support plants.
During the design phase, assumptions must be made regarding the probable condition of the soil after construction is complete. The health of existing or remaining soil determines what types of soil preparation will be required and the volume of soil to be prepared. Conditions will vary from location to location within a project, and details must be condition-specific. For large projects or extreme conditions, it is useful to consult an expert experienced in modifying planting soils at urban sites.
To ensure good soil health at a project site, follow these guidelines:
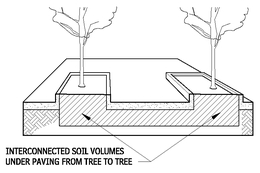
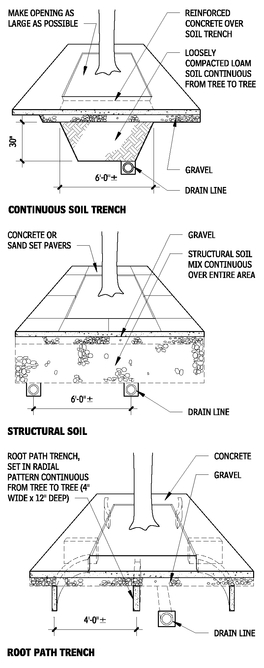
• Whenever possible, connect the soil improvement area from tree to tree.
• Always test soil for pH and nutrient levels, and adjust these as required.
• Loosen soil with a backhoe or other large coarse-tilling equipment, when possible. Tilling that produces large, coarse chunks of soil is preferable to tilling that results in fine grains uniform in texture.
• Make sure that the bottom of planting soil excavations is rough, to avoid matting of soil layers as new soil is added. It is preferable to till the first lift (2 to 3 in.) of planting soil into the subsoil.
CONSTRUCTION AROUND EXISTING TREES
Great care should be taken not to compact, cut, or fill the earth within the crown area of existing trees. Most tree roots are located in the top 6 to 18 in. of the soil, and often spread considerably farther than the drip line of the tree. Compaction can cause severe root damage and reduce the movement of water and air through the soil. To avoid compacting the earth, do not operate equipment or store materials within the crown spread.
TREE PLANTING DETAIL (BALLED AND BURLAPPED PLANTS)
7.61
SHRUB PLANTING DETAILS
7.62
GENERAL RANGE OF SOIL MODIFICATIONS AND VOLUMES FOR VARIOUS SOIL CONDITIONS
7.63
| POSTCONSTRUCTION SOIL CONDITION | MINIMUM WIDTH PREPARED SOIL FOR TREES | (X) TYPE OF PREPARATION |
|---|
| Good soil (not previously graded or compacted; topsoil layer intact) | 6’ or twice the width of the root ball, whichever is greater | Loosen the existing soils to the widths and depths shown in Figures 7.101 and 7.102. |
| Compacted soil (not previously graded; topsoil layer disturbed but not eliminated) bring | 15’ | Loosen the existing soils to the widths and depths shown in Figures 7.101 and 7.102; add composted organic matter to the organic content up to 5% dry weight. |
| Graded subsoils and clean fills with clay content between 5% and 35% | 20’ | Minimum treatment: loosen existing soil to widths and depths shown in Figures 7.101 and 7.102; add composted organic matter to bring organic content up to 5% dry weight. |
| 7.101 | | Optimum treatment: remove top 8-10” or the existing material, loosen existing soils to the widths and depths shown in Figures and 7.102; add 8”-10” of loam topsoil. |
| Poor-quality fills, heavy clay soils, soils contaminated with rubble ortoxic material | 20’ | Remove existing soils to the widths and depths shown in Figures 7.101 and 7.102; replace with loam topsoil. |
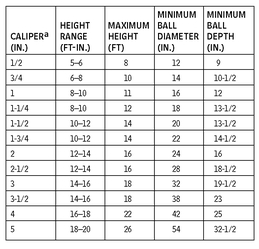
STANDARD ROOT BALL SIZES FOR NURSERY-GROWN SHADE TREES
7.64
NOTE
7.64a. Up to and including the 4-in. caliper size, the caliper measurement indicates the diameter of the trunk 6 in. above ground level. For larger sizes, the caliper measurement is taken 12 in. above ground level.
Contributors:
James Urban, ASLA, James Urban Landscape Architecture, Annapolis, Maryland; American Nursery & Landscape Association, Washington, DC.
Before construction begins, inject the soil within the crown area of nearby mature trees with commercially prepared kelp-based fertilizer and mycorrhiza fungus developed to invigorate tree roots. Prune tree roots at the edge of the root save area, as roots pulled during grading can snap or split well into the root save area. Rot and disease that enters dying roots in compacted or filled areas can move into the tree if root pruning has not been carried out. Install tree protection fencing and silt protection at the limits of construction activity near trees.
During construction, apply additional water in the canopy area to compensate for any root loss beyond the crown spread. Have all mature trees inspected by a certified arborist before construction begins, to identify any special problems. Remove all deadwood, and treat all trees for existing insect and disease problems. When possible, begin fertilization and problem treatments at least one full growing season before construction.
Removal of significant portions of the crown will affect the health of a tree by reducing its ability to photosynthesize in proportion to the mass of its trunk. Younger, healthier trees withstand construction impacts better than older trees.
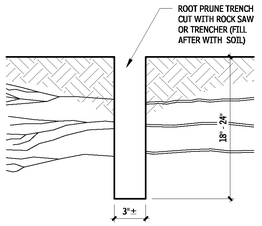
ROOT PRUNE TRENCH
7.65
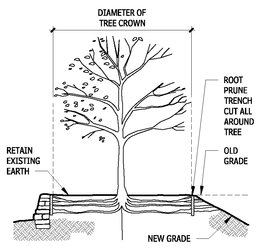
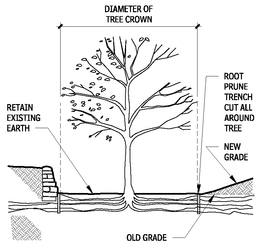
A root prune trench severs roots with a clean cut, protecting remaining roots from cracking, rot, and disease.
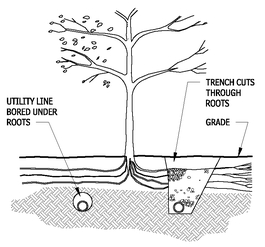
UNDERGROUND UTILITY LINE NEAR EXISTING TREES
7.66
Fewer roots are severed by tunneling under a tree than by digging a trench beside it.
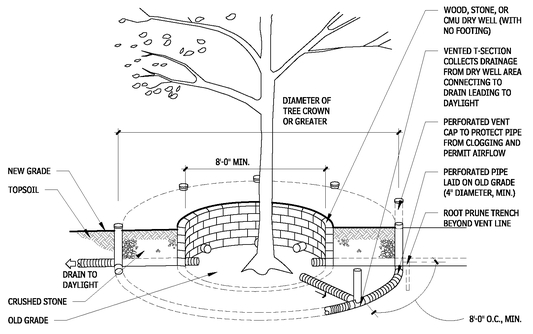
FILLING AROUND EXISTING TREE
7.67
TREE AND ROOT PROTECTION
7.68
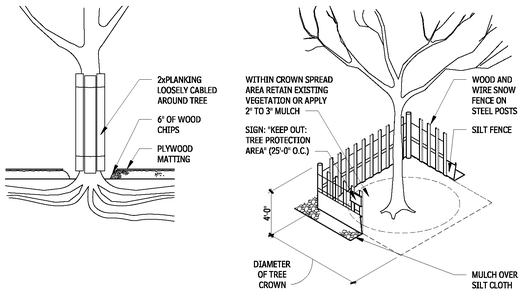
If construction operations must take place within the crown spread area, install 6 in. of wood chips on top of the soil to protect it. Use plywood matting over mulch in areas where equipment must operate. Protect the trunk of the tree with planking loosely cabled around the tree to reduce scarring by equipment. Remove planking, matting, and mulch as soon as operations are finished. A barrier such as that illustrated can keep construction equipment and personnel from compacting the soil around tree roots.
Contributors:
James Urban, ASLA, James Urban Landscape Architecture, Annapolis, Maryland; American Nursery & Landscape Association, Washington, DC.
CUTTING GRADE AROUND EXISTING TREE
7.69
FILLING GRADE AROUND EXISTING TREE
7.70
For more information, on these topics, refer to the American Standard for Nursery Stock, ANSI Z60.1, which contains a complete list of nursery standards for other types and sizes of trees and shrubs. Also see the International Society of Arboriculture’s “Principles and Practices of Planting Trees and Shrubs” (1997).
TREE PLANTING IN URBAN AREAS
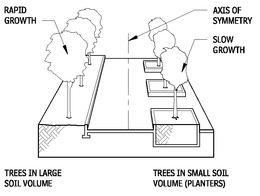
Traditional urban designs in which trees are regularly spaced in small openings within paved areas generally result in poor tree performance because such designs generally do not provide adequate soil for root growth, and ignore the fact that trees must significantly increase trunk size every year. Moreover, competition for space, both at ground level and below, is intense in urban areas.
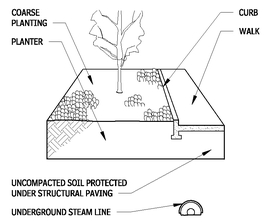
Although it is possible to design uncompacted soil volumes for trees under pavement, this is very expensive and the soil is never as efficient as that in open planting beds. Increasing trunk size can only be accommodated by using flexible materials that can change configuration over time. Urban designs that have flexible relationships between trees, paving, and planting beds and large areas of open planting soil offer the best opportunity for long-term tree health and lower maintenance costs.
Areas of dense urban development leave little room for tree roots to develop. Large areas of pavement, competition with foundations and utilities for space belowground, and extensive soil compaction and disruption limit the amount of soil available for trees. When the area of ground around the tree is open to the rain and sun is less than 400 to 500 sq ft per tree, the following design guidelines should be followed to encourage the growth of large healthy trees.
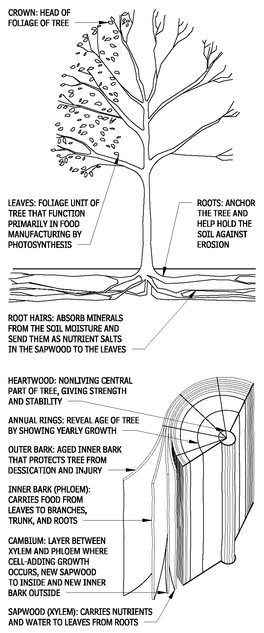
TREE STRUCTURE—PARTS AND GROWING CHARACTERISTICS
7.71
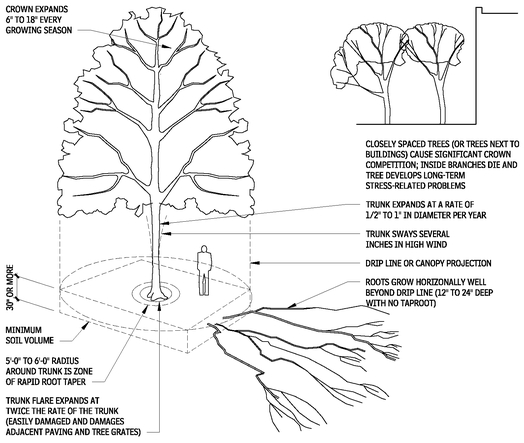
Five major parts of the tree structure must be accommodated in the design process:
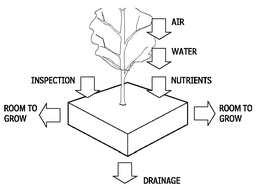
• Crown growth: The tree crown expands every growing season at a rate of 6 to 18 in. per year. Once the crown reaches a competing object such as a building or another tree canopy, the canopy growth in that area slows and then stops. Eventually the branches on that side of the tree die. As the canopy expansion potential is reduced, the overall growth rate and tree health are also reduced.
• Trunk growth: The tree trunk expands about 1/2 to 1 in. per year. As the tree increases in size, the lower branches die and the trunk lengthens. Tree trunks move considerably in the wind, especially during the early years of development, and are damaged by close objects.
• Trunk flare: At the point at which the trunk leaves the ground, most tree species develop a pronounced swelling or flare as the tree matures. This flare grows at more than twice the rate of the main trunk diameter and helps the tree remain structurally stable. Any hard object placed in this area, such as a tree grate or confining pavement, will either damage the tree or be moved by the tremendous force of this growth.
• Zone of rapid root taper: Tree roots begin to form in the trunk flare and divide several times in the immediate area around the trunk. In this area, about 5 to 6 ft away from the trunk, the roots rapidly taper from about 6 in. in diameter to about 2 in. Most damage to adjacent paving occurs in this area immediately around the tree. Keeping the zone of rapid taper free of obstructions is important to long-term tree health. Once a tree is established, the zone of rapid taper is generally less susceptible to compaction damage than the rest of the root zone.
• Root zone: Tree roots grow radially and horizontally from the trunk and occupy only the upper layers (12 to 24 in.) of the soil. Trees in all but the most well-drained soils do not have taproots. A relationship exists between the amount of tree canopy and the volume of root-supporting soil required (see Figure 7.71). This relationship is the most critical factor in determining long-term tree health. Root-supporting soil is generally defined as soil with adequate drainage, low compaction, and sufficient organic and nutrient components to support the tree. The root zone must be protected from compaction both during and after construction. Root zones that are connected from tree to tree generally produce healthier trees than isolated root zones.
Contributors:
James Urban, ASLA, James Urban Landscape Architecture, Annapolis, Maryland; American Nursery and Landscape Association, Washington, DC.
SOIL VOLUME FOR TREES
7.72
The ultimate tree size is defined by the projected size of the crown and the diameter of the tree at breast height. For example, a 16-in. diameter tree requires 1000 cu ft of soil.
SOIL MODIFICATIONS
To improve the soil’s ability to retain water and nutrients:
• Thoroughly till organic matter into the top 6 to 12 in. of most planting soils. (Do not add organic matter to soil more than 12 in. deep.) Use composted bark, recycled yard waste, peat moss, or municipal processed sewage sludge. All products should be composted to a dark color and be free of pieces with identifiable leaf or wood structure. Recycled material should be tested for pH and certified free of toxic material by the supplier. Avoid material with a pH higher than 7.5.
• Modify heavy clay or silt soils (more than 40 percent clay or silt) by adding composted pine bark (up to 30 percent by volume) and/or gypsum. Coarse sand may be used if enough is added to bring the sand content to more than 60 percent of the total mix.
• Improve drainage in heavy soils by planting on raised mounds or beds and including subsurface drainage lines.
• Modify extremely sandy soils (more than 85 percent sand) by adding organic matter and/or dry, shredded clay loam up to 30 percent of the total mix.
SOIL VOLUME—REQUIREMENTS FOR TREES
7.73
Soil volume provided for trees in urban areas must be sufficient for long-term maintenance.
SOIL VOLUME—INTERCONNECTION
7.74
The interconnection of soil volumes from tree to tree has been observed to improve the health and vigor of trees.
SOIL PROTECTION FROM COMPACTION AND DEGRADATION
7.75
Coarse plantings keep pedestrians out of planters. Curbs protect planters from pedestrians and deicing salts. Underground steam lines must be insulated or vented to protect planter soil.
VISUALLY SYMMETRICAL TREES
7.76
If visually symmetrical tree planting is required, symmetrical soil volumes are also required to produce trees of similar crown size.
SIDEWALK PLANTING OPTIONS
7.77
NOTES
7.77 a. Best design option: Planting trees between sidewalks and buildings causes the fewest conflicts between roots and paving by permitting rooting activity on adjacent property.
b. Acceptable design option: Planting between curbs and sidewalks in a continuous unpaved planting bed provides good soil levels for trees, but contributes to root/paving conflicts as trees mature.
c. Difficult design option: In highly developed areas with parking adjacent to the curb, planting in long narrow tree openings with an 18-in.wide walk along the curb accommodates pedestrians exiting cars. Root/paving conflicts are probable.
d. Most difficult (and most expensive) design option: Tree openings are undersized for future trunk/root development. Severe root/paving conflicts are very likely.
Contributor:
James Urban, ASLA, James Urban Landscape Architecture, Annapolis, Maryland.
PLAZA TREE PLANTING OPTIONS
7.78
TREE SOIL INTERCONNECTION OPTIONS UNDER PAVING
7.79
TREES PLANTED IN LAWNS
7.80
Young trees planted in lawn areas face substantial competition from the roots of grasses.
TREE GUARDS
7.81
Tree guards can protect young trees from trunk damage caused by bicycles. If made too small, however (less than 30 in. in diameter), they can damage the tree as it grows and are difficult to remove. The high cost and potential harm to trees outweigh the minor protection tree guards afford a trunk. They should be used only in areas with particularly high traffic.
NOTES
7.78 a. Best design option: Separate planting and walking areas. Avoid small disconnected soil volumes, to minimize too/paving conflicts.
b. Acceptable design option: Each tree has a smaller canopy with less yearly growth. More disease and insect problems are likely. Ground plantings are eliminated by shade, over time.
c. Difficult design option: Shading, slow tree growth, and poor health are problems. Root/paving conflicts are likely.
d. Most difficult (and most expensive) design option: Slow tree growth and severe root/paving conflicts are to be expected.
7.79 a. In urban areas where the pavement subgrade is compacted soil that is free from rubble, toxic, or poorly drained fills, a system of root paths can be installed to guide roots under the pavement, where they have room to grow. These roots grow deeper in the soil, causing fewer root/paving conflicts than roots left to exploit the normal minor weaknesses in paving and subgrades.
b. A root path trench is made by installing a length of strip drain material (a 12-in.-wide by 1-in.-thick plastic drain core wrapped in filter fabric) in a narrow trench and backfilling with loam topsoil. This allows air and water to flow more freely into the soil under the pavement. Install geotextile fabric and the gravel base material, then the paving.
c. Root paths cannot replace larger soil trenches or structural planting soil in areas in which existing soil conditions are extremely poor for root exploration.
Contributor:
James Urban, ASLA, James Urban Landscape Architecture, Annapolis, Maryland.
TREE BASE PROTECTION
7.82
Alternatives to tree grates (and guards) include softer, organic coverings that suit the purpose better, are less expensive, and require less maintenance over the life of the tree.
SELECTING PLANTS FOR ROOFTOP PLANTING
When choosing plants for a rooftop setting, consider the factors outlined here:
• Wind tolerance: Higher elevations and exposure to wind can cause defoliation and increase the transpiration rate of plants. High parapet walls with louvers can reduce wind velocity and provide shelter for plants.
• High evaporation rate: The drying effects of wind and sun on the soil in a planter reduce soil moisture rapidly. Irrigation, mulches, and moisture-holding soil additives (diatomaceous earth or organic matter) help reduce this moisture loss.
• Rapid soil temperature fluctuation: The variation in conduction capacity of planter materials results in a broad range of soil temperatures in planters of different materials. Cold or heat can cause severe root damage in certain plant species. Proper drainage helps alleviate this condition.
• Topsoil: Improve topsoil in planters to provide optimum growing conditions for the plants selected. A general formula calls for adding fertilizer (determined by soil testing) and one part peat moss to five parts sandy loam topsoil. More specific requirements for certain varieties of plants or grasses should be considered.
• Root capacity: Choose plant species carefully, considering their adaptation to the size of the plant bed. If species with shallow, fibrous roots are used instead of species with a coarse root system, consult with a nursery advisor. Consider the ultimate maturity of the plant species when sizing a planter.
ROOFTOP PLANTING DETAILS
There are five factors when designing rooftop plantings:
• Soil depth: Minimum soil depth in a planter varies with the plant type: for large trees, the soil should be 36 in. deep or 6 in. deeper than the root ball; for small trees, 30 in. deep; for shrubs, 24 in. deep; and for lawns, 12 in. deep (10 in. if irrigated).
• Soil volume: To determine sufficient soil volume, refer to the chart included in Figure 7.72, “Soil Volumes for Trees.”
• Soil weight: The saturated weight of normal soil mix ranges from 100 to 120 pcf, depending on soil type and compaction rate. Soils can be made lighter by adding expanded shale or perlite. Soils lighter than 80 pcf cannot provide structure adequate to support trees.
• Drainage fabric: Plastic drainage material should be a minimum of 1/2 in. thick. Most drainage material comes with a filter fabric attached, but the overlap joints provided are not wide enough for the unconsolidated soils found in planters. A second layer of woven filter fabric, delivered in rolls greater than 10 ft in width, should be installed. Tuck the fabric over the exposed top of the drainage material to keep soil out of the drainage layer.
• Insulation: Most planters do not require insulation; however, in colder climates planters with small soil volumes located over heated structures may require insulation. Consult local sources for a list of cold-hardy plants.
ROOFTOP PLANTER
7.83
Contributor:
James Urban, ASLA, James Urban Landscape Architecture, Annapolis, Maryland.
SITE CIVIL/MECHANICAL UTILITIES
SUBSURFACE DRAINAGE SYSTEMS
Subsurface drainage systems are very different engineering designs from surface drainage systems. Surface drainage systems intercept and collect stormwater runoff and convey it away from a building and site with the use of large inlets and storm drains. Subsurface drainage systems typically are smaller in size and capacity and designed to intercept the slower underground flows of a natural groundwater table, underground stream, or infiltration of soils from surface sources. Surface and subsurface systems typically require discharge either through a pumping station or by gravity drainage to an adequate outfall.
FOUNDATION DRAINAGE PIPING
7.84
SUBDRAINAGE PIPING
7.85
UNDERSLAB DRAINAGE
7.86
TYPICAL SUBDRAINAGE DETAIL
7.87
NOTES
7.84 a. Subdrainage is laid out to meet the needs of a site. A grid, parallel line, or random pattern at low points in the topography is used to collect subsurface water.
b. Depth and spacing of subsoil drainage pipes depend on soil conditions. Geotechnical design may be required to ensure effective operation of a subsoil drainage system.
7.87 a. The depth of subdrainage piping determines by how much subsurface water levels will be reduced.
b. When a perforated drain pipe is used, install it with the holes facing down.
c. When used to intercept hillside seepage, the bottom of a trench should be cut a minimum of 6 in. into underlying impervious material.
Contributor:
James Urban, ASLA, James Urban Landscape Architecture, Annapolis, Maryland; Joseph P. Mensch, PE, Wiles Mensch Corporation, Reston, Virginia; Kurt N. Pronske, PE, Restons, Virginia; Harold C. Munger, FAIA, Munger, Munger + Associates, Toledo, Ohio.
STORM DRAINAGE UTILITIES
Storm drainage utilities are designed to collect and dispose of rainfall runoff to prevent the flow of water from damaging building structures (through foundation leakage), site structures, and the surface grade (through erosion). The two basic types of surface drainage are the open system and the closed system.
• The open system, which utilizes a ditch/swale and culvert, is used in less densely populated, more open areas where the flow of water above grade can be accommodated fairly easily.
• The closed system, which utilizes pipes, an inlet/catch basin, and manholes, is used in more urban, populated areas, where land must be used efficiently and water brought below the surface quickly to avoid interference with human activity.
The two systems are commonly combined where terrain, human density, and land uses dictate.
A pervious or porous paving is often used for parking and other hard site surfaces. This drainage system allows water to percolate through the paved surface into the soil, similar to the way the land would naturally absorb water.
DESIGN CONSIDERATIONS FOR SURFACE DRAINAGE SYSTEMS
When designing surface drainage systems, follow these guidelines:
• Lay out all slopes, grates, swales, and other drainage features according to the ADA, without restricting accessible routes for persons with disabilities. Refer to applicable codes, standards, and regulations for accessibility requirements.
• Lay out grades so runoff can safely flow away from buildings. If drains become blocked, do not allow backed-up water to accumulate around the foundation.
• Keep in mind that an open system, or one in which water is kept on top of the surface as long as possible, is generally more economical than a closed system.
• Consider the effect of ice forming on the surface when determining slopes for vehicles and pedestrians.
• Consult local codes on such criteria as intensity and duration of rainstorms and allowable runoff for the locality.
Note that formulas given in this discussion are meant for approximation only. Consult a qualified engineer or landscape architect to design a site-specific system.
STORM DRAINAGE UTILITIES (IMPERVIOUS PAVING)
7.88
RUNOFF VELOCITY
7.89
| VELOCITIES (CHANNEL) | MINIMUM (FT/SEC) | MAXIMUM (FT/SEC) |
|---|
| Grass—athletic field | 0.5 | 2 |
| Walks—long | 0.5 | 12* |
| Walks—transverse | 1 | 4 |
| Streets—long | 0.5 | 20 |
| Parking | 1 | 5 |
| Channels—grass swale | 1 | 8 |
| Channels—paved swale | 0.5 | 12 |
CALCULATION OF RUNOFF
7.90
NOTES
7.89 For accessibility, 8.3 percent maximum.
7.90 Here is a simplified method for calculating the approximate runoff of areas less than 100 acres:
Q = C × I × A
Q = flow (cu ft/sec)
C = surface runoff value (see Table 7.91)
I = intensity (in./hr; obtain from weather services)
A = area of site (acres)
For example, assume the local code requires I = 5 in./hr:
Q = C × I × A
Q = 0.9 × 5 × 0.23
Q = 1.04 cu ft/sec
Q = approximate volume of water per second entering the
V-channel from the parking lot
Contributors:
Joseph P. Mensch, PE, Wiles Mensch Corporation, Reston, Virginia; Kurt N. Pronske, PE, Reston, Virginia; Harold C. Munger, FAIA, Munger Munger + Associates Architects, Toledo, Ohio; Pearse O’Doherty, ASLA, Graham Landscape Architecture, Annapolis, Maryland.
SURFACE RUNOFF VALUES (C)
7.91
| SURFACE | VALUE* |
|---|
| Roofs | 0.95-1.00 |
| Pavement | 0.90-1.00 |
| Roads | 0.30-0.90 |
| Bare soil—sand | 0.20-0.40 |
| Bare soil—clay | 0.30-0.75 |
| Grass | 0.15-0.60 |
| Commercial development | 0.60-0.75 |
| High-density residential development | 0.50-0.65 |
| Low-density residential development | 0.30-0.55 |
POROUS PAVING SYSTEMS
Porous paving materials, methods for sizing channels, and design considerations for porous paving systems are the topics of this section.
POROUS PAVING MATERIALS
The two principal types of porous paving are monolithic surfacing material and unit pavers.
• Monolithic porous paving is stone aggregate bound with asphalt or portland cement. The aggregate must be sorted to exclude the “fines” or sand-sized particles that normally fill the voids between larger pieces. Without the fines, water is able to run through the paving material. Generally, porous asphalt and concrete are both strong enough for parking and roadway surfaces and pedestrian uses.
• Precast concrete unit pavers, with shapes that allow water to flow through them, can also give surface stability for parking or driveways. Paver types are available for exposed placement, or for burial just below the surface. In the latter case, the soil-pea gravel or vegetation in the pavers is exposed and can help percolate precipitation into the ground.
To reduce runoff and increase water absorption, porous paving must be underlaid with a bed of unbound aggregate. The unbound aggregate acts as a structural support and forms a reservoir to hold precipitation until it can percolate into the soil. Use of porous paving may permit use of a significantly smaller and simpler storm drainage system.
METHOD FOR SIZING CHANNELS
Channels and pipes for handling water runoff may be sized by determining the flow of water (Q) with the formula Q = Va. V is the velocity of the runoff water in ft/sec as determined by the Manning formula, and a is the cross-sectional area of water given in square feet. For a given Q, adjust the channel or pipe shape, size, and/or slope to obtain the desired velocity (one that will not erode earth, grass ditches, or other features).
The Manning formula is V = 1.486/n × r 0.67 × S0.5, in which n = values relating to surface characteristics of channels (see Table 7.94), r = hydraulic radius (see Table 7.95), and S = slope (the drop in ft/length).
POROUS PAVING TYPES
7.92
SLOPES
7.93
n VALUES FOR MANNING FORMULA
7.94
| CHANNEL SURFACE | n |
|---|
| Cast iron | 0.012 |
| Corrugated steel | 0.032 |
| Clay tile | 0.014 |
| Cement grout | 0.013 |
| Concrete | 0.015 |
| Earth ditch | 0.023 |
| Cut rock channel | 0.033 |
| Winding channel | 0.025 |
HYDRAULIC PROPERTIES OF TYPICAL CHANNEL SECTIONS
7.95
NOTES
7.91 All values are approximate.
7.93 a. For accessibility, 8.3 percent maximum.
7.95 For freeboard (F), 0.3-0.5 ft is recommended.
Contributor:
Pearse O’Doherty, ASLA, Graham Landscape Architecture, Annapolis, Maryland.
For example, assume a 200-ft concrete V-channel for which
To check flow, follow these steps:
Use the formula for calculating runoff (Q = C × I × A) to determine the flow required for a site; compare it to the capacity of a channel sized according to the Manning formula to determine whether the channel design is satisfactory.
DESIGN CONSIDERATIONS FOR POROUS PAVING SYSTEMS
Design considerations for working with porous paving systems include the following:
• Soils around porous paving installations must have a minimum percolation rate of about 1/2 in./hr, and should not be more than about 30 percent clay. On sites where the slope is greater than 3 percent, terracing the paved areas allows the bottom of each reservoir to remain level.
• Proper specification and supervision are important in the installation of porous paving materials. Soil under the reservoir must not be unduly compacted during construction.
• Porous concrete can withstand heavier loads than porous asphalt. Because it does not soften in hot weather and may be more susceptible to freeze/thaw damage, it is better suited to warmer climates. Additives may be introduced to improve cold climate performance.
• Porous asphalt has good freeze/thaw resistance, but is best suited for areas in which traffic is limited, such as employee parking.
• While clogging of monolithic porous paving is generally not a problem, recommended maintenance may include use of a hydrovac once or twice a year, as well as the prompt removal of leaves and windblown sand.
• The reservoir below porous paving has no fixed depth but is designed according to the slope of the site, the soil percolation rate, and the size of the design storm. Consult a civil engineer or landscape architect.
RUNOFF CONTROL SYSTEMS
NATURAL WETLAND SYSTEMS
Wetlands naturally detain and filter water. Scattered throughout the United States, from tropical areas to tundra, they form in depressions in the landscape where the water table is near or at the surface of the soil. They may be as small as a tabletop or span tens of thousands of acres. There is no single, correct, ecologically sound definition for wetlands, primarily because of their diversity. These systems are an important part of the ecosystem because they produce food and timber, purify drinking water, absorb and store floodwater, suppress storm surges, and help maintain biodiversity. Water is supplied to a wetland either by surface sources (e.g., streams or rivers) or by groundwater.
The sensitivity of wetlands determines appropriate buffer distances between them and developed areas. Buffers, which may range from 30 to 300 ft or more, should respond to the effect runoff may have on the wetland ecosystem. (Consult a wetlands scientist to formulate buffer distances.)
In general, four wetland sensitivity issues should be taken into account:
•
Hydrology: The wetland’s source of water could be altered by development.
POROUS PAVING AND STONE RESERVOIR DETAIL
7.96
• Vegetation: The plant species in a wetland have different levels of hardiness.
• Ecological state: More pristine systems are more sensitive to development and runoff pollution.
• Animal species: Nesting birds, for example, need greater buffer distances than wintering waterfowl.
ON-SITE RUNOFF CONTROL MEASURES
Architects can use several on-site measures to control runoff in development projects. One of the most commonly used is a simple open storage area for runoff. The configuration of such open systems varies, depending on the desired level of pollutant treatment. Typically called storage ponds, retention basins, or (when made to resemble a natural environment) a constructed stormwater wetland , open systems generally operate more thoroughly with increased retention time.
Simple storage ponds are typically dry between storms after runoff has evaporated or infiltrated the groundwater. Dry ponds sometimes include a wet lower area for additional runoff retention. Wet ponds are permanently wet, allowing pollutants to settle to the bottom. Wet ponds that extend runoff retention time with control devices can remove a very high percentage of particulate pollutants.
Constructed stormwater wetlands (engineered, shallow marshlike areas) retain runoff for long periods, allowing pollutants to settle out of the water column and providing biological, chemical, and physical processes for breaking down pollutants. Wetland vegetation slows the velocity of stormwater, reducing erosion and allowing pollutants to settle. Many organic and inorganic compounds are removed from wetlands by the chemical processes of absorption, precipitation, and volatilization.
Constructed stormwater wetlands can also filter excess nutrients such as nitrogen and phosphorus contained in runoff from gardens and septic tanks. To correctly size a wetland used for stormwater runoff control, consider the total volume and velocity of water entering and leaving the system.
Potential advantages of using constructed stormwater wetlands are that they have relatively low capital and operating costs, offer consistent compliance with permit requirements, and greatly reduce operational and maintenance costs.
CROSS SECTION OF NATURAL FRESHWATER, NONTIDAL WETLANDS
7.97
Contributors:
Pearse O’Doherty, ASLA, Graham Landscape Architecture, Annapolis, Maryland; Carrie Fischer, “Design for Wetlands Preservation,” topic II.A.1 in Environmental Resource Guide (The American Institute of Architects, Washington, DC, 1992); Thomas Schueler, Metropolitan Washington Council of Governments, Washington, DC.
EFFECTIVENESS COMPARISON OF URBAN BEST MANAGEMENT PRACTICES (BMPS)a
7.98
STORMWATER WETLANDS
Stormwater wetlands can be defined as constructed systems explicitly designed to mitigate the effects of stormwater quality and quantity on urban development. They temporarily store stormwater runoff in shallow pools that create growing conditions suitable for emergent and riparian wetland plants. In combination, the runoff storage, complex microtopography, and emergent plants in the constructed wetland form an ideal matrix for the removal of urban pollutants.
Unlike natural wetlands, which often express the underlying groundwater level, stormwater wetlands are dominated by surface runoff. Storm water wetlands can best be described as semitidal, in that they have a hydroperiod characterized by a cyclic pattern of inundation and subsequent drawdown, occurring 15 to 30 times a year, depending on rainfall and the imperviousness of the contributing watershed.
Storm water wetlands usually fall into one of four basic designs:
• Shallow marsh system: The large surface area of a shallow marsh design demands a reliable groundwater supply or base flow to maintain sufficient water elevation to support emergent wetland plants. Shallow marsh systems take up a lot of space, requiring a sizable contributing watershed (often more than 25 acres) to support a shallow permanent pool.
• Pond/wetland system: A pond/wetland design utilizes two separate cells for stormwater treatment, a wet pond and a shallow marsh. The multiple functions of the latter are to trap sediments, reduce incoming runoff velocity, and remove pollutants. Pond/wetland systems consume less space than shallow marsh systems because the bulk of the treatment is provided by a deep pool rather than a shallow marsh.
• Extended detention wetland: In extended detention wetlands, extra runoff storage is created by temporarily detaining runoff above the shallow marsh. This extended detention feature enables the wetland to occupy less space, as temporary vertical storage partially substitutes for shallow marsh storage. A growing zone is created along the gentle side slopes of extended detention wetlands, from the normal pool level to the maximum extended detention water surface.
• Pocket wetlands: Pocket wetlands are adapted to serve small sites (from 1 to 10 acres). Because the drainage area is small, pocket wetlands usually do not have a reliable base flow, creating a widely fluctuating water level. In most cases, water levels in the wetland are supported by excavating down to the water table. In drier areas, a pocket wetland is supported only by storm water runoff, and during extended periods of dry weather it will have no shallow pool at all (only saturated soils). Due to their small size and fluctuating water levels, pocket wetlands often have low plant diversity and poor wildlife habitat value.
The selection of a particular wetland design usually depends on three factors:
• Available space
• Contributing watershed area
• Desired environmental function
However, storm water wetlands are not typically located within delineated natural wetland areas, which provide critical habitat and ecosystem services, and are protected under local, state, and federal statutes. It’s also important to point out that storm water wetlands should not be confused with constructed wetlands, which are used to mitigate the permitted loss of natural wetlands under wetland protection regulations. The primary goal of wetland mitigation is to replicate the species diversity and ecological function of the lost natural wetland, whereas the more limited goal of storm water wetlands is to maximize pollutant removal and create generic wetland habitat.
Storm water wetlands are also distinguished from natural wetlands that receive storm water runoff as a consequence of upstream development. Although not intended for stormwater treatment, wetlands influenced by stormwater are common in urban settings. Storm water runoff that becomes a major component of the water balance of a natural wetland can severely alter the functional and structural qualities of the wetland. The end result is a storm water-influenced natural wetland that is more characteristic of a storm water wetland than a natural one.
NOTES
7.98a. The variety of urban BMPs available to remove pollutants from urban runoff differs widely in performance, longevity, feasibility, cost, and environmental impact. As the matrix shows, stormwater wetlands are an attractive BMP choice at many development sites.
b.Based on current designs and prevailing maintenance practices.
Contributors:
Carrie Fischer, “Design for Wetlands Preservation,” topic II.A.1 in Environmental Resource Guide (Washington, DC: American Institute of Architects, 1992); Thomas Schueler, Metropolitan Washington Council of Governments, Washington, DC.
SHALLOW MARSH SYSTEM
7.99
Most of the shallow marsh system is 0 to 18 in. deep, a depth that creates favorable conditions for the growth of emergent wetland plants. A deeper forebay is located at the major inlet, and a deep micropool is situated near the outlet.
POND/WETLAND SYSTEM
7.100
The pond/wetland system consists of a deep pond that leads to a shallow wetland. The pond removes pollutants and reduces the space required for the system.
Contributors:
Carrie Fischer, “Design for Wetlands Preservation,” topic II.A.1 in Environmental Resource Guide (The American Institute of Architects, Washington, DC, 1992); Thomas Schueler, Metropolitan Washington Council of Governments, Washington, DC.
COMPARATIVE ATTRIBUTES OF FOUR STORMWATER WETLAND DESIGNS
7.101
EXTENDED DETENTION WETLAND
7.102
The water level in an extended detention wetland can increase by as much as 3 ft after a storm, returning to normal levels within 24 hours. As much as half the total treatment volume can be provided as extended detention storage, which helps protect downstream channels from erosion and reduces the space needed for the wetland.
NOTE
7.101 Q = coefficient of runoff
Contributors:
Carrie Fischer, “Design for Wetlands Preservation,” topic II.A.1 in Environmental Resource Guide (The American Institute of Architects, Washington, DC, 1992); Thomas Schueler, Metropolitan Washington Council of Governments, Washington, DC.
SITE ELECTRICAL UTILITIES
This section addresses site lighting as a component of site electrical utilities.
SITE LIGHTING
SITE LIGHTING DESIGN CONSIDERATIONS
Creating good design for site lighting is not just about picking the latest technology or the best fixture. It is about using lighting to convey the overall story of a project. The story may be one of safety in a casino parking lot or it may be one of excitement in an outdoor mall where visitors can gather with their families for an evening to have dinner and see a movie.
Site lighting design requirements vary from project to project, and so need to be defined with the individual project team prior to preparing a design. Site lighting requirements typically include lighting pedestrian pathways, landscaping, landscape features, water features, and architectural features such as statuary and adjacent public roadways, parking areas, and nearby facades.
Site lighting design, at its core, is about lighting the environment in a manner that responds to the desired function of the guests within the space. There may be multiple functions such as wayfinding, creating gathering spaces, interacting with the organic and built environments, and meeting security requirements, which all must be taken into account. The overall design intent of the space must allow for these functions to coexist seamlessly, or the guest experience will be negative.
As a part of the design preparation, designers will want to familiarize themselves with the landscape design and current foliage specifications on the project. Lighting fixtures can be used to highlight trees, accent shrubbery, and be mounted in trees to light the path below. It is important to know which trees are deciduous and which trees retain their canopies when making these determinations. It is also highly recommended that lighting designers work closely with the landscape architect to understand which trees will allow the attachment of lighting hardware and mounting straps.
Once the site lighting tasks and requirements have been determined, the designer can begin selecting fixtures, determining lamp types, and preparing the layout.
SITE LIGHTING REGULATIONS AND CODES
Other factors to consider when designing site lighting are local and national energy codes, any locality-specific dark-sky ordinances, and the current lighting levels in the surrounding and adjacent areas. The International Dark-Sky Association (IDA) is a nonprofit group whose mission is “to preserve and protect the nighttime environment and our heritage of dark skies through quality outdoor lighting.” This association (
www.darksky.org) has been an active voice in the creation of many of the local dark-sky ordinances.
Several calculation programs are available to help verify the illuminance levels are being met in the site lighting design. AGI32 (
www.agi32.com) is commonly used for site lighting studies, as is LumenMicro by Lighting Technologies (
www.lighting-technologies.com).
The most difficult part of creating a good lighting design is to meet all of the functional and code requirements of a site while mixing in the desired aesthetics of the project. Providing the right nighttime identity for a site is key to making any project a success.
SITE LIGHTING DOCUMENTATION
Required documentation for the lighting design submittal will vary from project to project, but the basic elements will remain the same. A minimum of suggested documentation would include:
• A layout depicting the design intent
• Fixture cut sheets and specifications showing fixtures desired on the project
• Mounting details showing any special integration requirements
RELATIONSHIP OF OUTDOOR LIGHTING TO SITE AND ARCHITECTURE
7.103
Contributors:
Lisa Passamonte Green, Visual Terrain, Van Nuys, California; Kim Lighting, City of Industry, Californai; Resource Lighting, Inc., Albuquerque, New Mexico.
AREA LIGHTING
Path lighting fixtures generally include pole/post lighting, bollards, and step lights. Pole lighting can be decorative to match the architecture, make a statement, or be purely functional. Pole, post, and bollard heights and spacing are determined by calculating the desired and/or required illuminance values, along with creating a layout that meets the aesthetic qualities as determined by the project design team. As a general rule, the minimum mounting height should be no less than one-half the maximum projection distance from a single fixture head.
When using poles, posts or bollards, designers should be prepared to coordinate anchor bolt details and the need for any additional foundations required to meet local wind-loading requirements. Project engineers should be consulted, as well as the fixture manufacturer, to confirm the product can meet the wind-loading requirements.
Mounting details should be customized for any site-specific requirements, and the specified manufacturer should be treated as a valuable resource for the information needed to complete this effort. It is also highly recommended that the Illuminating Engineering Society of North America (IESNA) be a key resource for all projects located within North America. The IESNA has compiled a series of recommended lighting requirements and illuminance values for many of the tasks involved in creating the site lighting. There is a variety of lighting illuminance levels, depending on the adjacent architecture. For example, a bank parking lot may require higher levels of illuminance, due to security issues, than those of a library parking lot on the same street.
Recommended reading such as the ED-100.8 Course Book can be found at
www.iesna.org.
SEE ALSO:
Area Lighting
Cast-in-Place Concrete Retaining Walls
Composites
Dry-Placed Stone
Earthwork
Erosion Control
Grading
Irrigation
Metal Grating
Metal Stair Nosings
Mulching
Preservative Treatment
Retention Basins
Seeding
Site Seating
Stone
Storm Drainage Utilities
Timber Retaining Wall
Trees
Underslab Drainage
Unit Masonry Retaining Wall
