Introduction and Overview
Back in the mid- to late 1990s, Apple Computer’s products and the Macintosh platform specifically were in the low single digits of personal computer market share. These systems were typically found only in small graphic design departments, creative firms, or schools. Driven by the excitement of the Internet, Information Technology departments were tasked with building and maintaining large homogeneous network computing environments that invariably used solutions developed by Microsoft. If you were a Mac technician, your skills were not in high demand, and I used to joke that being able to repair an Apple-branded PC was becoming a dark art.
Today, Apple’s platforms have seen a major resurgence, thanks to the iPhone’s “halo effect” of driving more customers to iPads and Apple Watches and back to the Mac. Due to the rise of cloud computing, web applications, mobile devices, and “bring your own device” (BYOD) policies, it is not uncommon to find many companies allowing Apple products onto corporate networks. Users expect that their Macs and iPads will integrate seamlessly with others that use Microsoft or Google platforms. This has presented some unique challenges for corporate Information Technology departments that must still keep their networks secure and costs in line with budget expectations while also supporting cross-platform computing environments.
If you are reading this book, then you are likely one of the many technology professionals who have been tasked with supporting some number of Apple devices and need a crash course in Mac and/or iOS system administration. In this book, you will find a comprehensive overview of both iOS (including iPadOS) and Macintosh Operating System (macOS) , strategies for managing Apple devices using Mobile Device Management (MDM), useful how-to guides for integrating with popular Microsoft solutions, and helpful tips for automating some of the more rigorous tasks of staging, deploying, or upgrading Apple hardware and software.
A Brief History of Apple Platforms
It is important to understand some of the history surrounding Apple’s current hardware and OS platforms as you may come into contact with some of these older products in your day-to-day interactions within the Apple ecosystem.
The Macintosh is Apple’s brand of desktop and laptop personal computers. The first Mac was shipped in 1984 and has been an iconic product for nearly 40 years. The Mac product line includes desktops like the iMac, Mac mini, and the Mac Pro as well as laptops like the MacBook Pro and MacBook Air.
The Mac’s internal hardware has changed significantly over the years. Initially based on the Motorola 68k processor architecture in the 1980s, it moved to the IBM PowerPC architecture in the 1990s and finally moved to the Intel architecture in the early 2000s. Today, all Macintosh systems are based on the same Intel processor specification as Windows-based PCs. Using Boot Camp or virtualization solutions, you can run Microsoft’s Windows 10 alongside macOS on any of Apple’s current Mac hardware.
The Macintosh Operating System (macOS) has also evolved since the 1980s. Mac OS versions 1.0–9.2 are now called Mac OS “Classic” and were originally written for Motorola and IBM architectures. Apple phased out support for this operating system and associated software in the early 2000s. In 1996, Apple purchased a small software company called NeXT, bringing business legend and Apple co-founder Steve Jobs back to the company. NeXT had an operating system based on Unix, called NeXTSTEP , that became the foundation for all of Apple’s future software platforms from macOS to iOS and beyond.
The next phase of Apple’s Mac operating system was called Mac OS X (10). Each version of Mac OS X from 10.0 to 10.8 was named after a species of cats: Snow Leopard (10.6), Lion (10.7), Mountain Lion (10.8), and so on. Eventually, Apple ran out of cats and began naming their operating systems after parts of California including Mavericks (10.9), Yosemite (10.10), El Capitan (10.11), Sierra (10.12), High Sierra (10.13), Mojave (10.14), and most recently Catalina (10.15).
Around the same time that Apple was changing from cats to California code names, they announced at WWDC 2014 that they were going to be bringing more features from iOS to the Mac. This became a larger paradigm shift as Apple encouraged system administrators to use Mobile Device Management (MDM) tools to manage macOS-based computers in a similar way that they managed mobile devices running iOS. The majority of this book will focus on these newer versions of macOS and the modern management concepts that Apple is asking administrators to embrace for the Mac platform.
While the Macintosh was the most iconic brand from Apple for many years, its most popular product (based on market share) is undoubtedly the iPhone. Released in 2007, the iPhone was a completely reimagined cell phone that used a multi-touch touchscreen and a graphical user interface that was based on the same technology used in Mac OS X. In 2010, Apple released the iPad tablet, which also featured a touchscreen display and ran the same operating system as the iPhone. Renamed iOS, the mobile operating system that started on the iPhone was now Apple’s second major consumer operating system and its most popular.
With the release of the newest iPhone product line in the summer of 2019, Apple is now on version 13 of the iOS. Apple has also designated a special version of iOS 13 for the iPad, now called iPadOS . I will explain the differences and optimizations found in iPadOS over standard iOS throughout the book.
Introduction to macOS
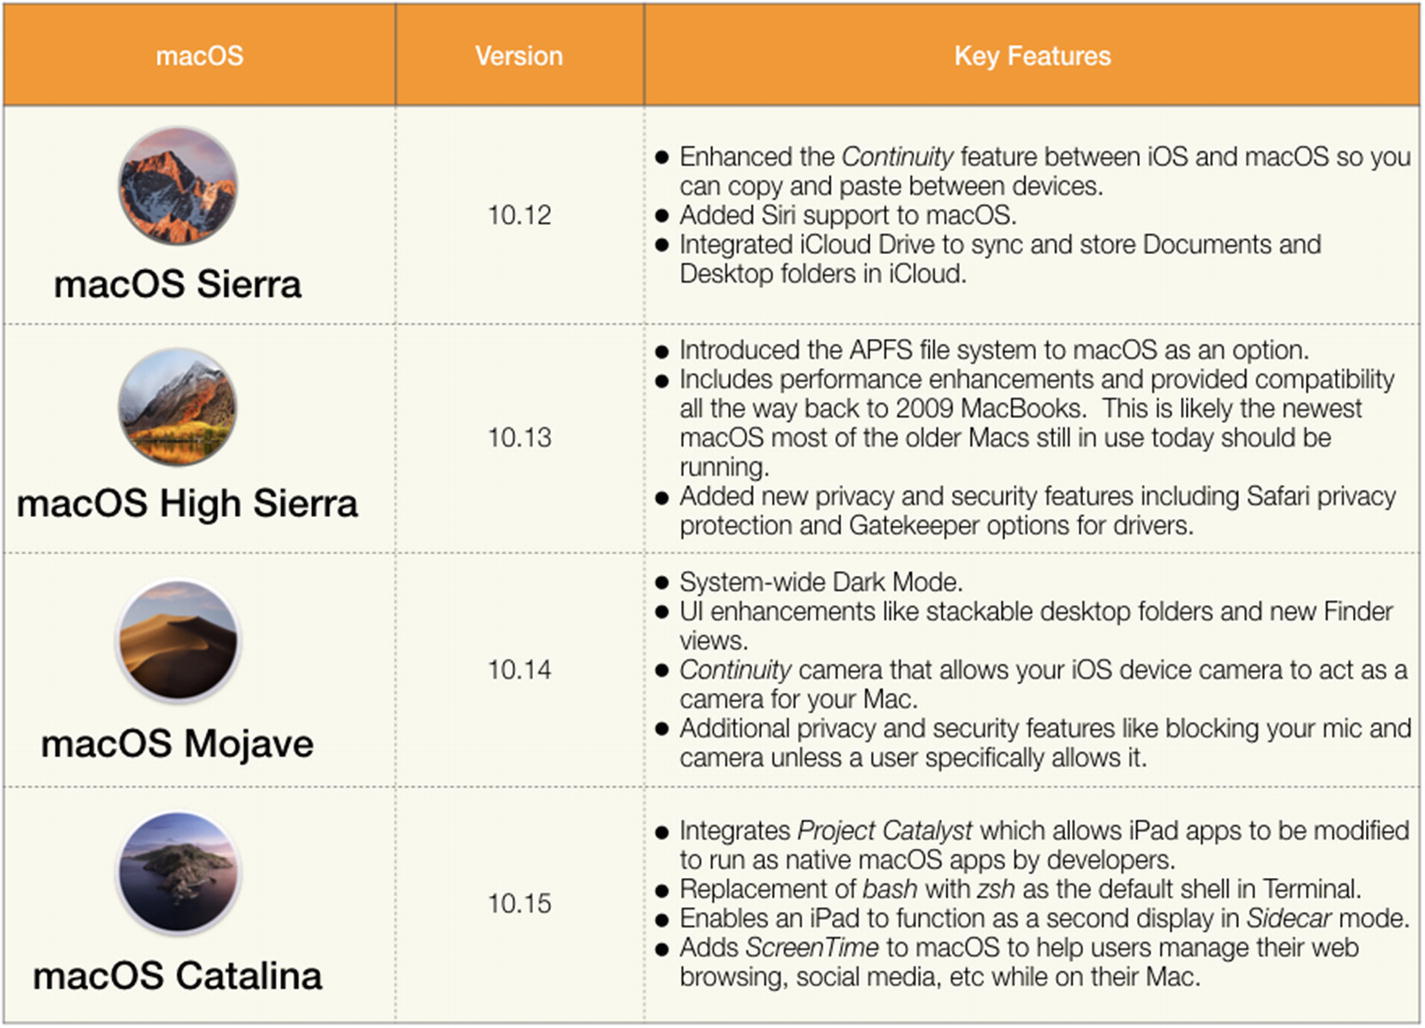
The four most recent versions of macOS as of this publication
Hardware Compatibility
It is very important to understand which of Apple’s hardware can support these operating systems. Many system administrators will want to standardize on a common OS version across their entire Mac fleet. Please note that while this is a worthy goal, depending on the mix of hardware you are supporting, you may need to manage across a couple of different versions of macOS. To make things a little more difficult, as Apple releases new hardware, they do not typically allow older versions of macOS to run on the newest Macs. For example, a brand-new 2019 Mac Pro will not run macOS High Sierra. In this case, you would need to also support Catalina, even if every other Mac in your organization is still on High Sierra.
Apple makes available a Knowledge Base (KB) article that you can use to check macOS compatibility against their various hardware models (https://support.apple.com/en-us/HT201686).
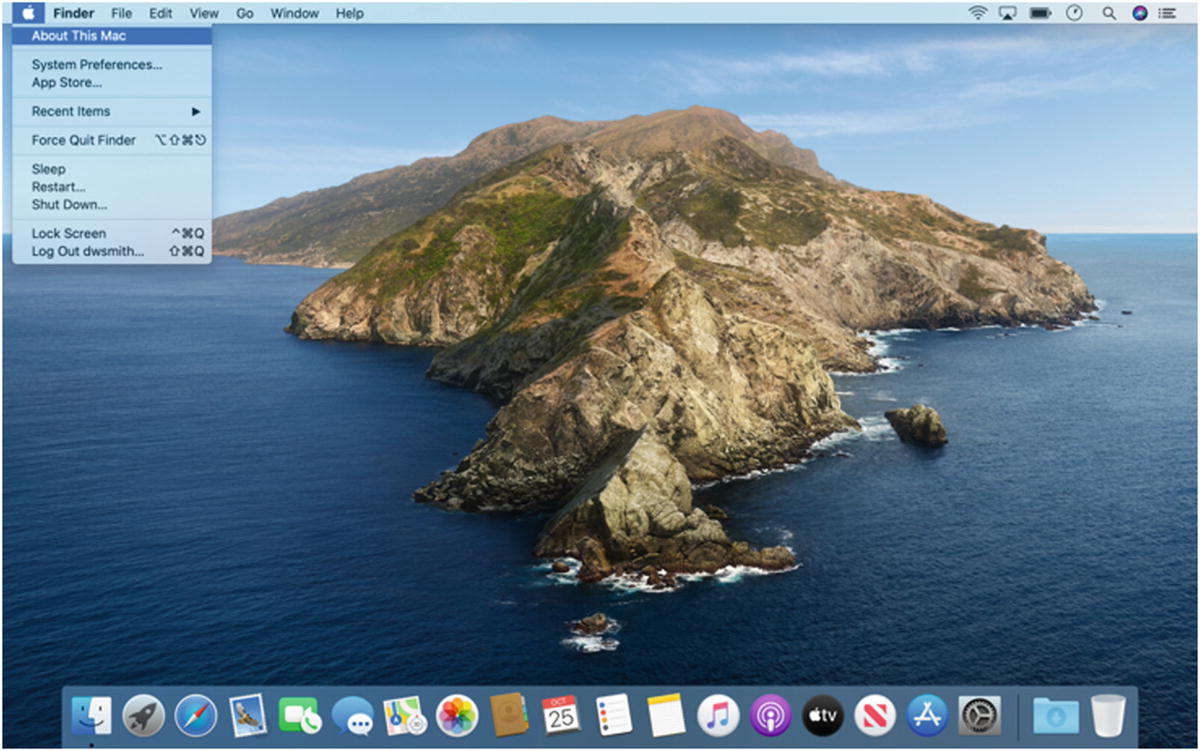
Selecting About This Mac from the Apple menu
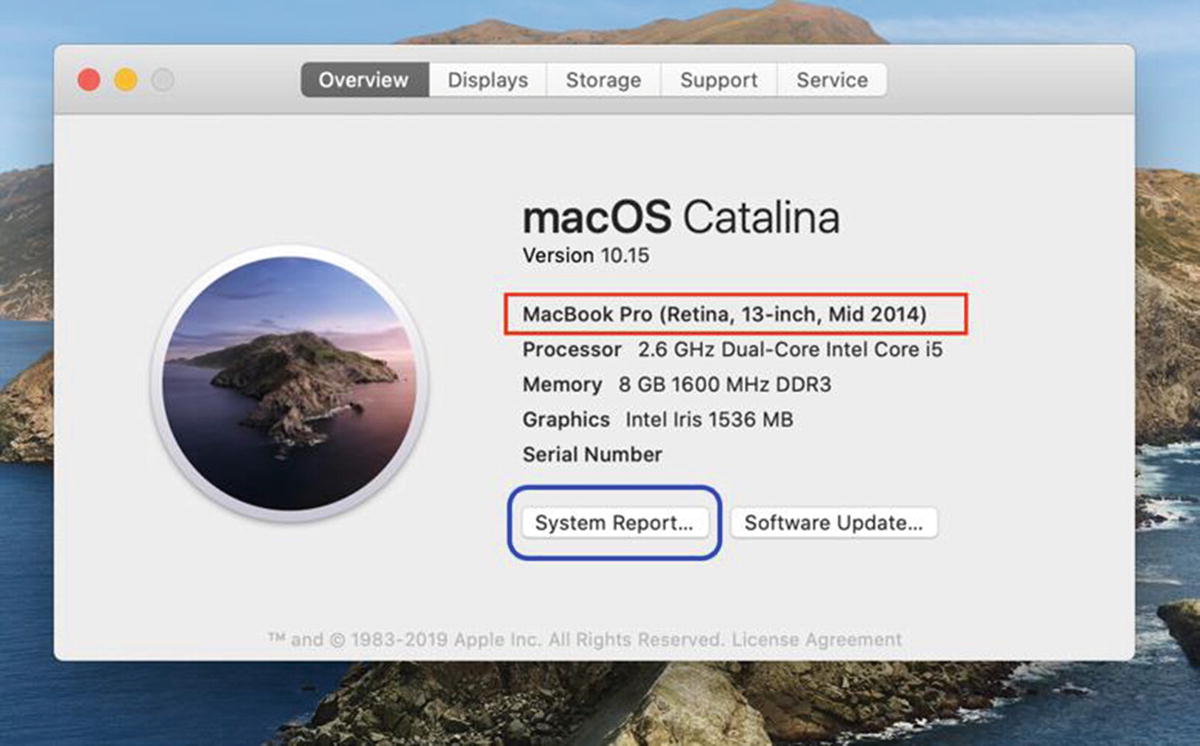
The About This Mac dialog box and System Report button
You can access About This Mac by selecting the option under the Apple menu. This will display the most basic information about your Mac’s hardware including which version of macOS you are running, the official name of the hardware model, the amount of RAM, the processor speed, the graphics card, and the serial number. If you need more in-depth information, you can click the System Report button to view more extensive hardware information.

System Report details all of the hardware components
If you are an experienced Windows system administrator, then you are familiar with Device Manager. System Report is very similar in that it shows all of the connected peripherals, onboard components, network information, and more.
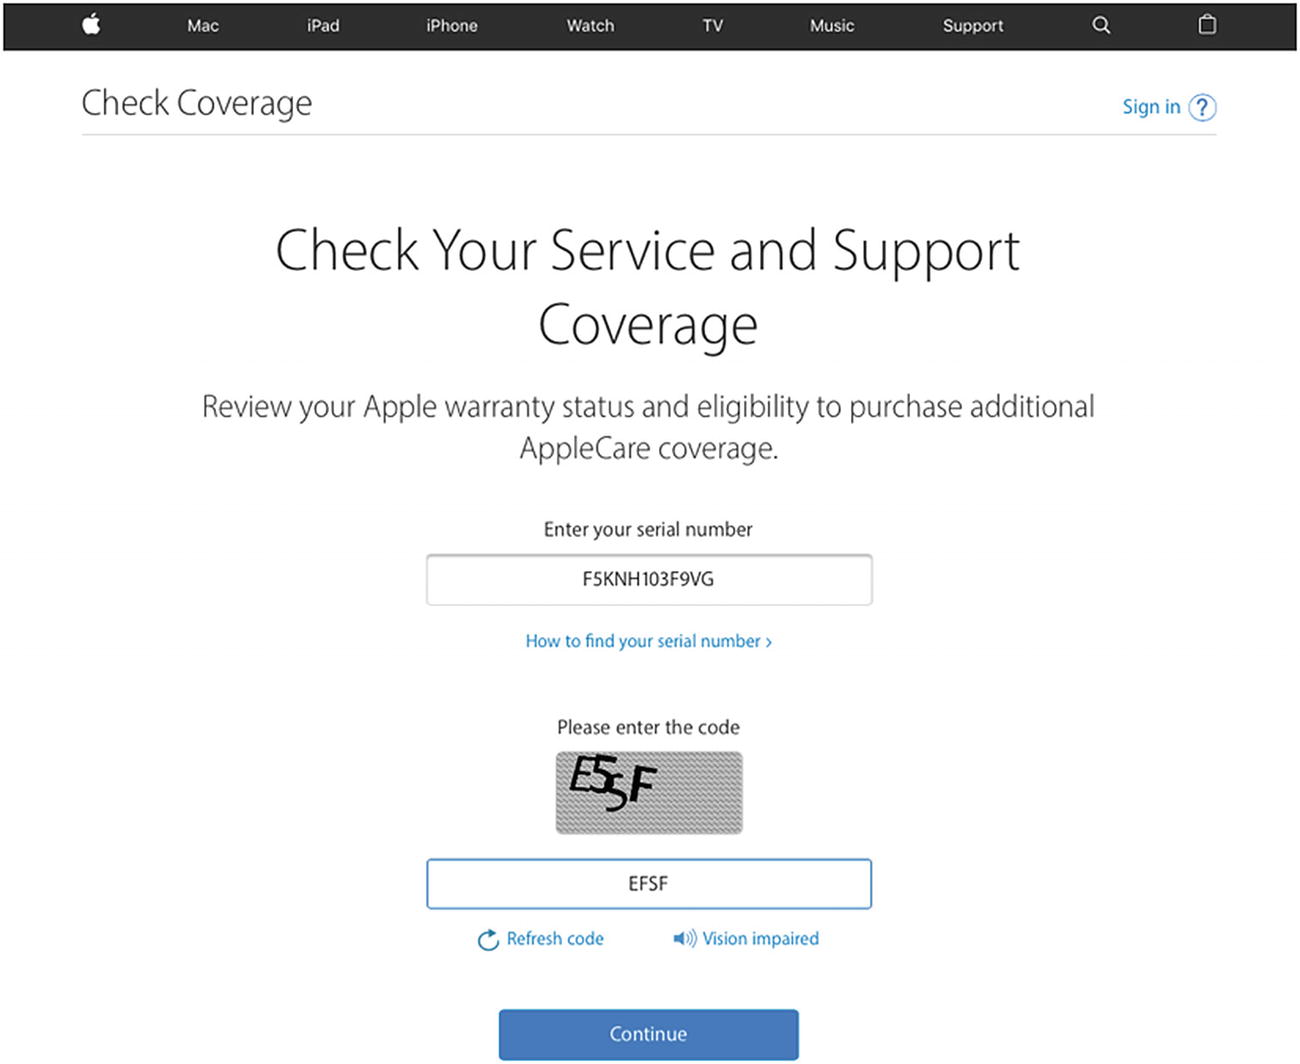
Enter your serial number and CAPTCHA code
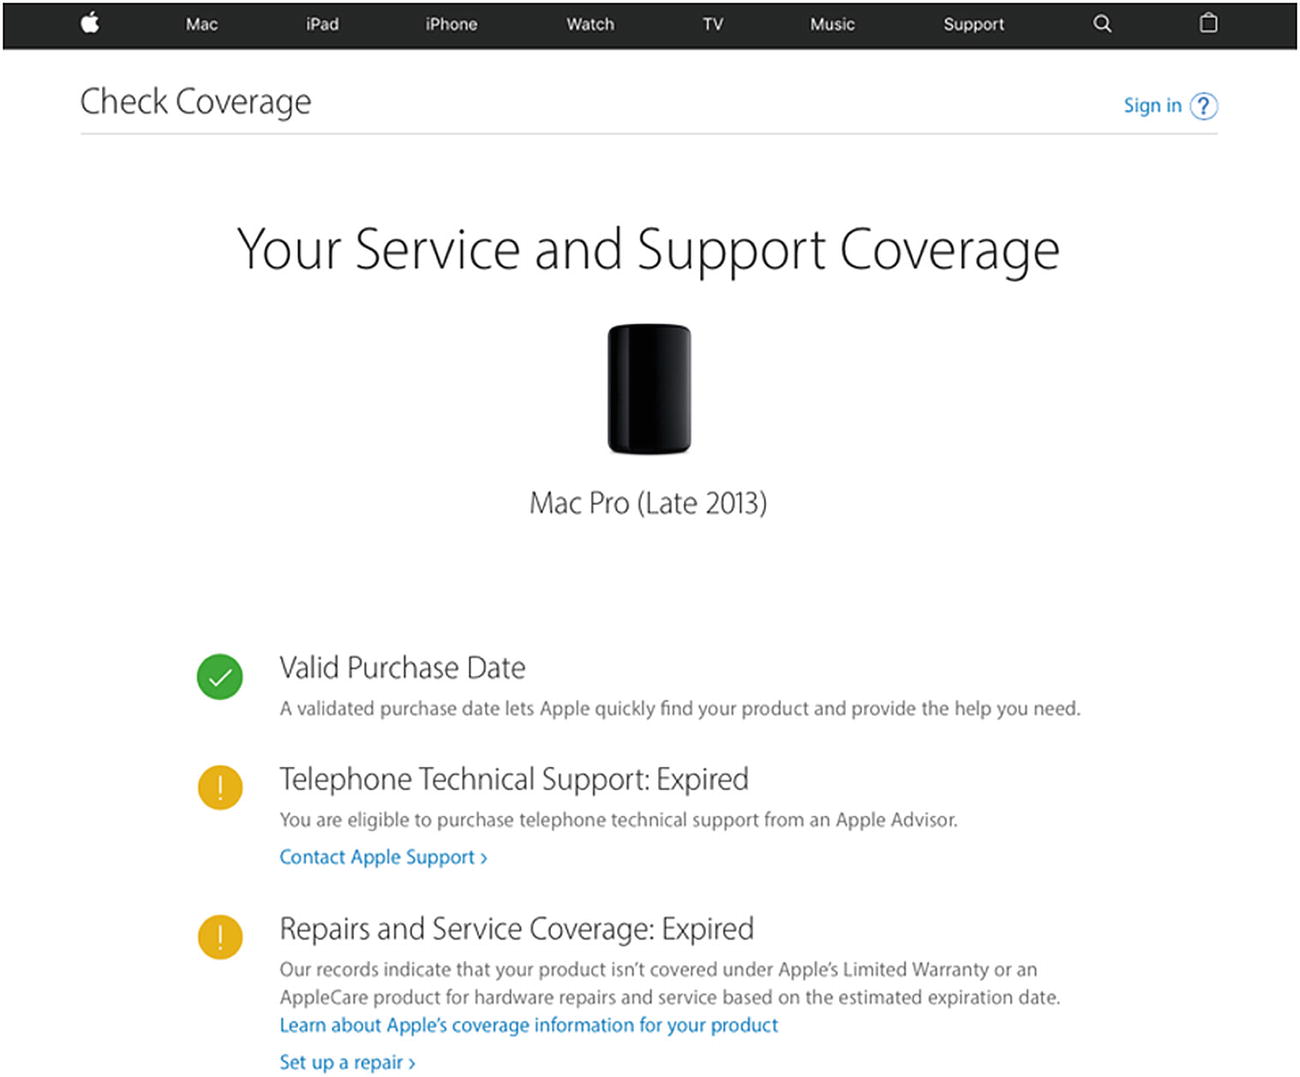
Model and warranty information
This site will also work with other Apple hardware including iPhones, iPads, and more.
macOS User Interface
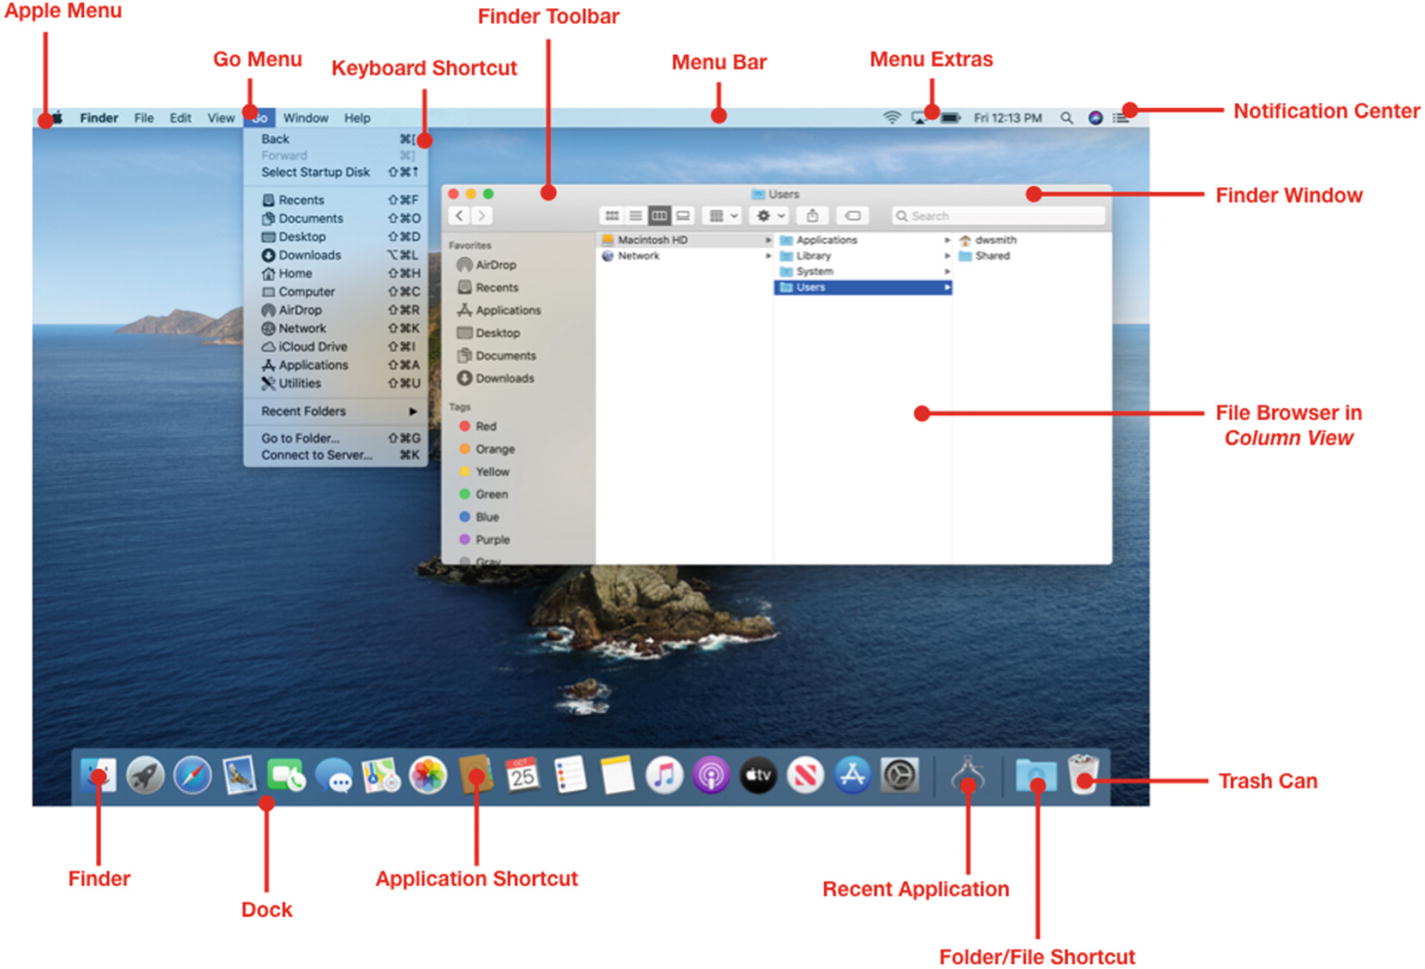
Common components of the macOS UI
Apple Menu: This is the catch-all menu for things like logging out, restarting, accessing System Preferences, and recent items.
Menu Bar: The menu bar in macOS sits above all applications and dynamically changes depending on which application is in the foreground. The foreground application will have its name displayed in a bold typeface to the right of the Apple menu.
Finder: The macOS GUI shell enabling common operating system functions and the file browser.
Go Menu: One of the more useful menus in the Finder. It includes shortcuts to many common local and network resources. Holding down the option key will provide access to the hidden user Library directory which is often used in client administration and troubleshooting.
Keyboard Shortcut: Whenever available, keyboard shortcuts are displayed next to the menu item.
Finder Toolbar: Every Finder window includes the name of the current directory, customizable shortcut buttons, and the traffic light–inspired close, minimize, and maximize buttons. The green button puts the foreground application into full-screen mode in more recent versions of the OS.
Menu Extras: Various applications and system utilities provide these icons for quick access to common features such as VPN, Wi-Fi, and volume control. Some of these can be rearranged or removed by holding down the command key and clicking and dragging the icon to move it or drag it off the menu.
Notification Center: Clicking this icon will slide out a shelf of various widgets that can be pinned here for quick access. Common widgets include Calculator, Weather, and Apple Music. Notifications from other applications such as Mail or Messages will also appear here. You can also toggle Do Not Disturb on/off, and Night Shift controls are also available to help limit exposure to blue light on Macs that support this feature.
Dock: The Dock contains all of the running applications, application shortcuts, minimized windows, and the Trash Can. It provides quick and easy access to switch between applications and files when multitasking. The Dock can be relocated, auto-hidden, or resized using the Dock System Preference.
Application Shortcut: A symbolic link to the actual application that resides in the /Applications folder. These shortcuts provide quick access to applications that are used most often. Drag an icon on or off the Dock to add or remove it.
Recent Applications: On by default in macOS Catalina, the Dock has a section devoted to storing the most recently used applications.
Folder/File Shortcut: Like application shortcuts, these are symbolic links to files or folders that are stored elsewhere on your hard drive. Use this when you need quick access to commonly used documents. Folders can be viewed as a stack, a grid, or a menu.
Trash Can: Dragging files or folders into the Trash Can will prepare them for deletion. You can empty the trash using the command under the Apple menu or control-clicking (holding the control key and clicking) or right-clicking the Trash Can and selecting Empty Trash.
File Browser: The Finder has three views—Icon, List, and Column views. These views help you navigate folders and files on your hard disk or other connected media.
Windows system administrators who are just becoming familiar with macOS may benefit from some of these interchangeable concepts.
Control Panel: In macOS, this is called System Preferences and is found under the Apple menu.
Right-Click: You can use the mouse and/or Trackpad System Preference to enable secondary-click. If you are using a one-button mouse, you can also hold the control key on the keyboard and click to mimic the right-click functionality. Figure 1-8 provides more information on the contextual menu options in the Finder.
Control Key: In macOS, the common control key commands like Ctrl+V for paste and Ctrl+C for copy will work but you must use the command key, which is the one to the left of the spacebar on the keyboard. Less often used but also interchangeable between Mac and Windows are the option and alt keys.
Task Manager: If you have a misbehaving application and need to end this task—in macOS this is called Force Quit. You can find this in the Apple menu or by pressing the keyboard combination of command+option+escape. This will bring up a list of currently running applications, and you can select one and force it to quit.
Windows Explorer: In macOS this would be the Finder. I personally prefer Column view or List view if you are used to Windows Explorer as those are also a hierarchical way to drill down into the directory structure.
Taskbar: In macOS the Taskbar is probably most similar to the Dock. One trick that I have used in the past is to make a folder shortcut to the /Applications folder in the Dock and choose to display it as a List. That does a nice job of mimicking the Start menu for quickly browsing all of your applications.
Properties: In macOS, this is called Get Info. Nearly everything that you would find in the Properties dialog box in Windows is displayed when you select any file or folder and choose Get Info from the File menu or the contextual menu.
Recycle Bin: The Trash Can in macOS. It functions nearly identically.
Shortcut: Symbolic links to files and applications in macOS are typically referred to as an alias.
Map Network Drive: Found under the Go menu, you can select Connect to Server, and that will allow you to browse the network for shared resources or enter a path to a specific resource. One thing to note in macOS is the back-slash (\) should be substituted with a forward-slash (/) when entering a full path.
Run: Use the Spotlight button in the Menu Extras area of the macOS menu bar and start typing to search files as well as applications to launch based on a few keystrokes.
Command Prompt: To open the command line interface on macOS, click the Go menu in the Finder and choose Utilities and then launch the Terminal application.
Print Screen: Creating a quick screenshot in macOS can be done by using the following keyboard combination: command+shift+3.
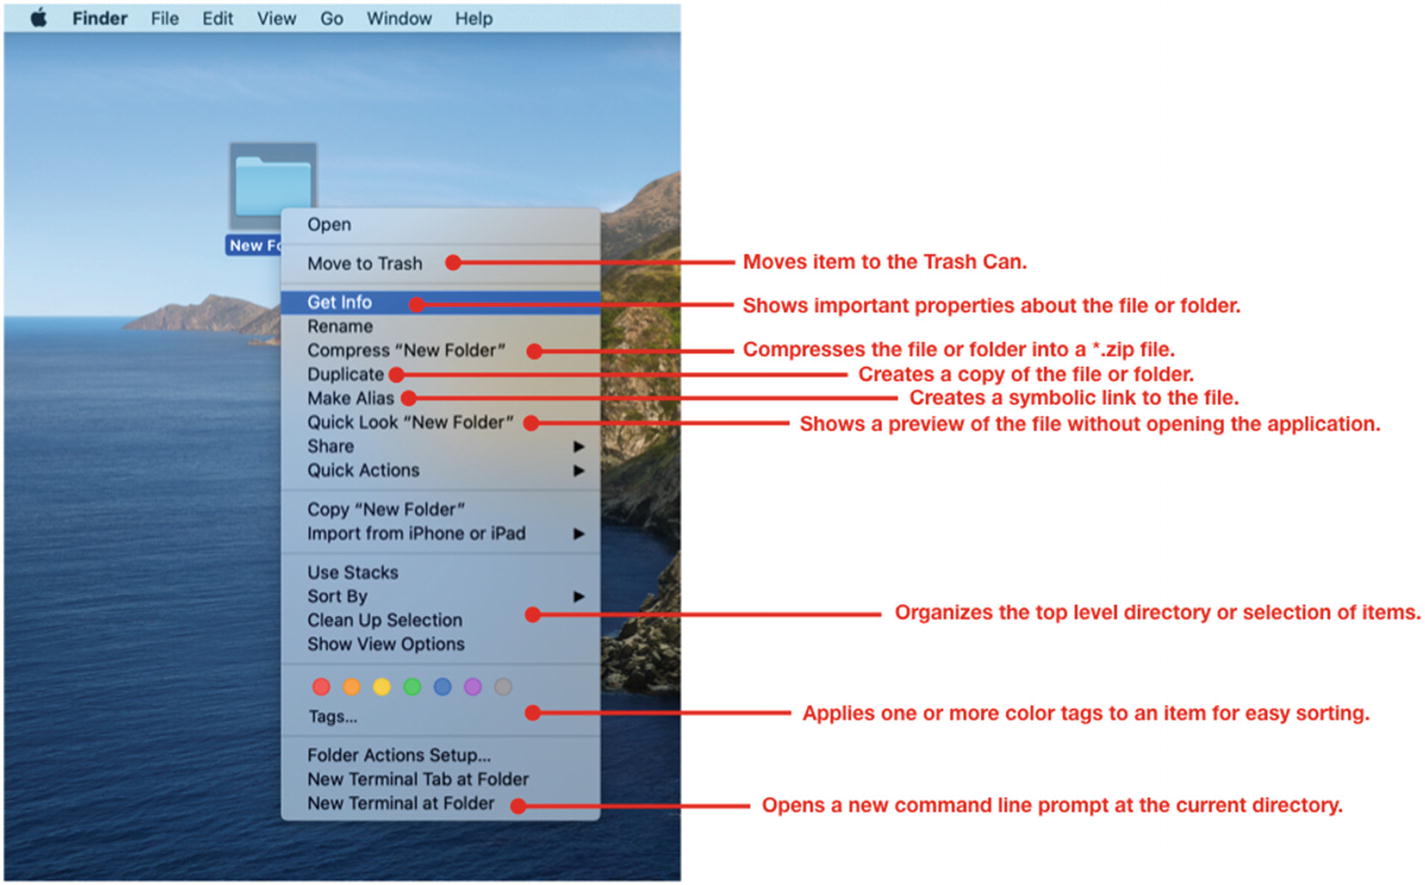
The macOS fully supports right-click functionality
Introduction to iOS
Like macOS, there are many versions of iOS , and a new one is released every year. This book is going to focus primarily on iOS 13. Apple also maintains an iOS compatibility guide for iPhone and iPad for the two most recent operating systems.
These can be found here:
To prolong the usable life of an iOS device, Apple will often make some features available to only the most recent hardware models. Please take special care to review the supported features in addition to the base operating system compatibility when planning an iOS upgrade to ensure that all of the required features are supported on the hardware your organization owns.
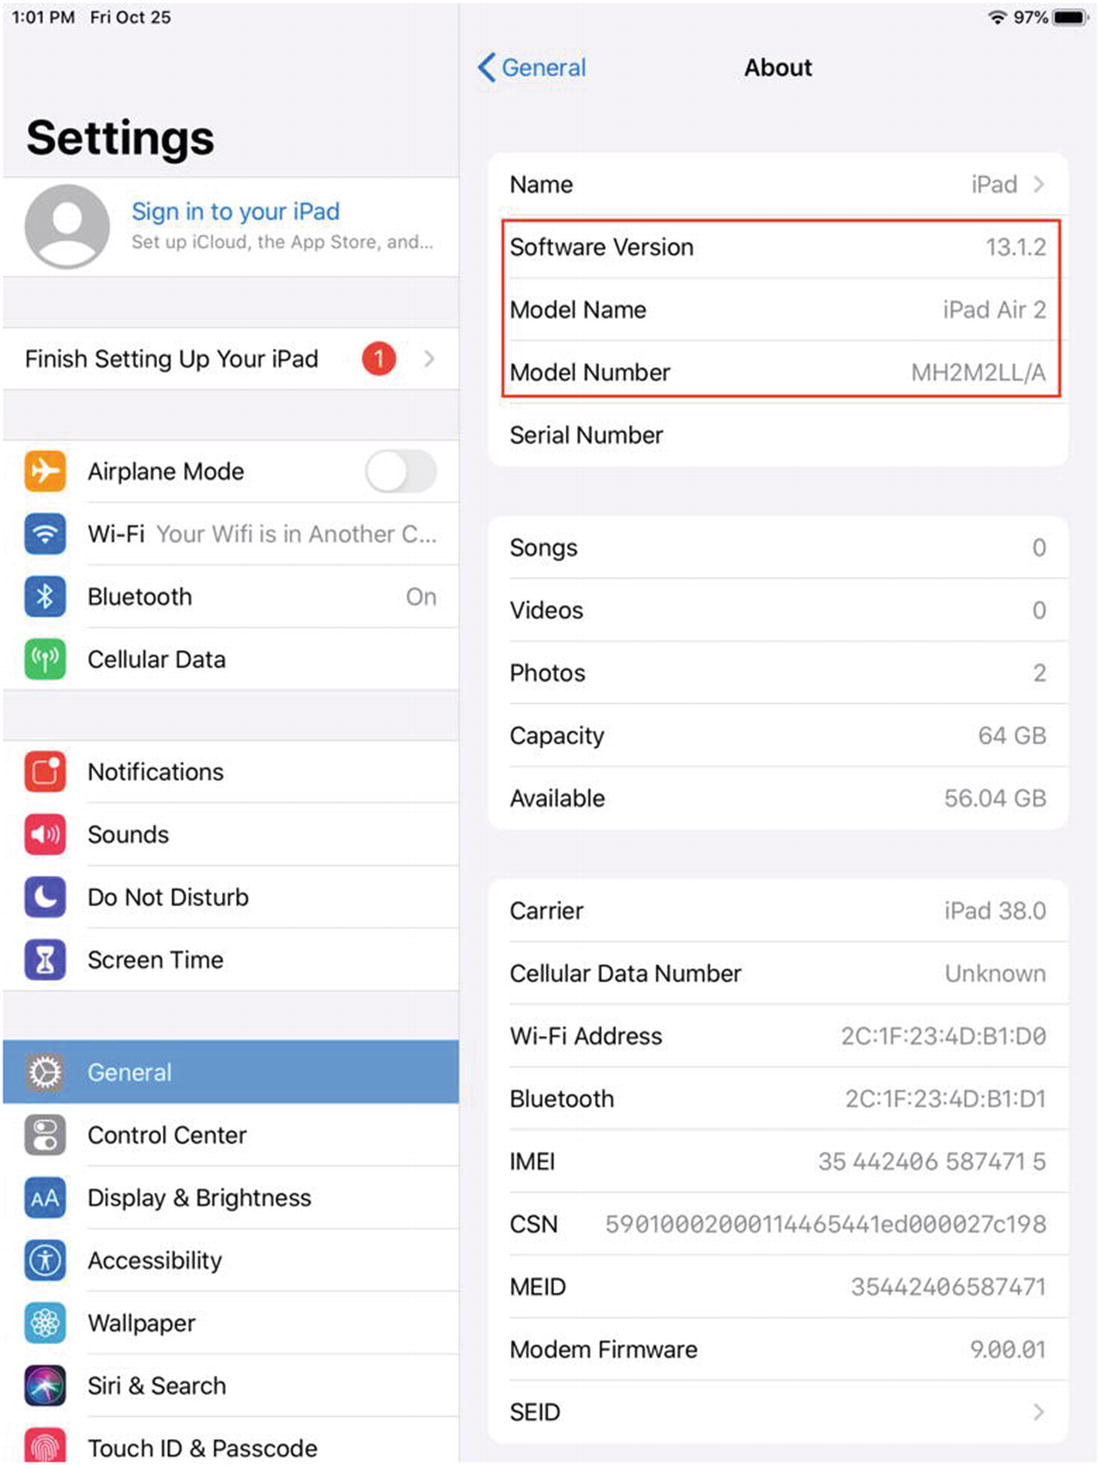
The About screen on an iOS device
iOS User Interface
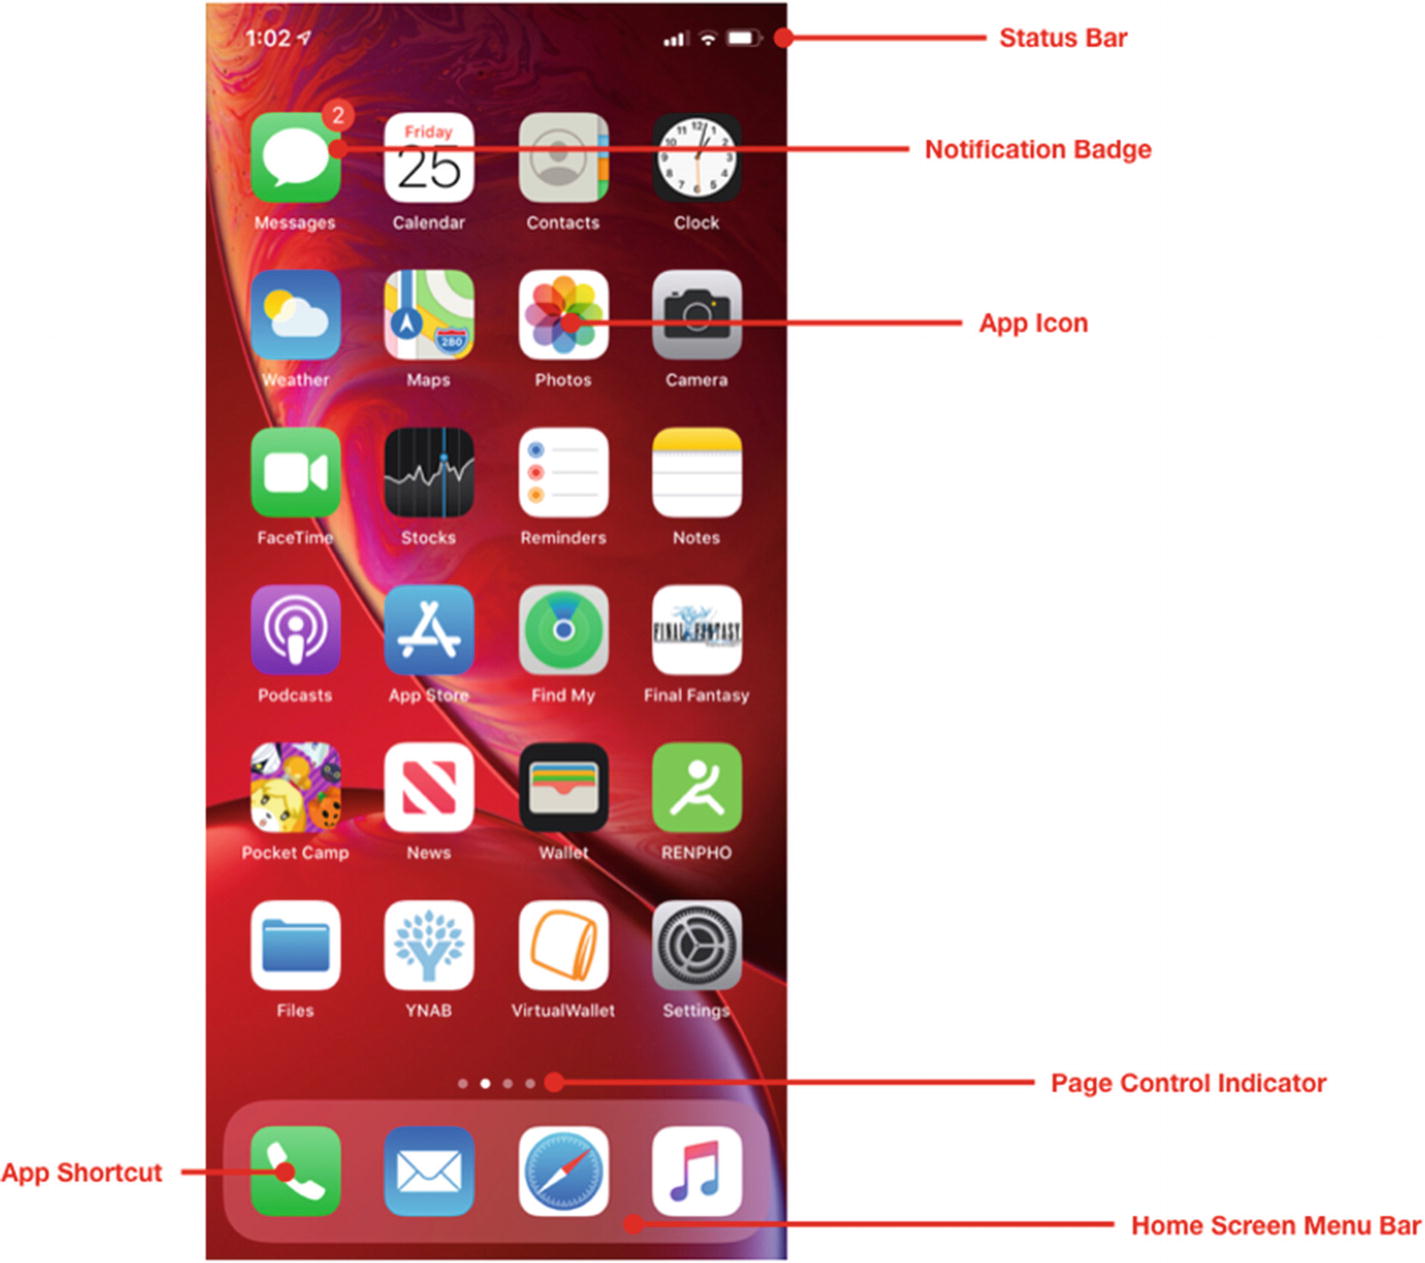
The iPhone Home Screen

The iPadOS Home Screen
Status Bar: The area at the top of the iOS device that includes the clock and network indicator.
Notification Badge: The badge is a red circle with a number indicating that the App needs attention.
App Icon: Tapping the App icon will launch that application or wake it from background mode.
Page Control Indicator: This indicates which navigation page you are on as you swipe from one screen to another. If you have multiple pages of icons, swiping the screen will navigate you to the next page.
App Shortcut: Your most commonly used Apps can be placed here for quick access.
Widget: Small applets that provide information about an App without having to open the entire thing, for example, the top news stories. In iPadOS this can be pinned to the Home Screen as seen in Figure 1-11.
Home Screen Menu Bar (iPhone Only): The location of App Shortcuts on the iPhone.
Dock (iPadOS Only): The location of App Shortcuts as well as recent applications and files; it provides more of a macOS look and feel on the iPad.
Recent Applications (iPadOS Only): Like in macOS, the iPad can now display the most recently used applications in the Dock.
Summary
Apple’s platforms have continued to change and evolve over the past several decades. Major changes in hardware architecture, operating system software, and device form factors have challenged our notion of what a computer should be. This book focuses primarily on the more recent macOS and iOS including macOS Catalina, iOS 13, and iPadOS.
Navigating these operating systems could be familiar but also intimidating to users of other systems. If you are new to Apple’s platforms, I recommend spending some time exploring both iOS and macOS before going onto the next chapter so that you gain a working knowledge of how to interact with these platforms from an end-user perspective.