While it is not mentioned much in Apple’s marketing materials, they do offer their own first-party Mobile Device Management (MDM) solution. Profile Manager is a service that is included with the macOS Server product. For small- to medium-sized macOS and iOS deployments, it does the job well enough that your organization may not need to purchase their own third-party MDM. Regardless of the choice of MDM, the concepts are universal, and we will be using Profile Manager in this chapter to explain the basic functions that are found in all commercial MDM solutions.
Introduction to Profile Manager
This chapter picks up where we left off in Chapters 7 and 8 . At this point, you should have your macOS Server configured with Profile Manager. It should be available on the public Internet with DEP and VPP configurations in place. Finally (and most importantly), your Profile Manager service is using a signed certificate from a trusted Certificate Authority.
You should also have at least two test devices assigned to your MDM server in Apple School Manager/Apple Business Manager—one Mac and one iOS device. With all of this in place, open the web browser of your choice from any computer and browse to https://yourdomain/profilemanager/. For example, in my case I’m going to https://579testing.com/profilemanager like we did at the end of Chapter 7 . Sign in with your server’s admin account to continue.
In a production environment, you will want to create a Standard user account on your server and sign in with that when using Profile Manager on the Web instead of the local Administrator account.
The Profile Manager User Interface

The Profile Manager UI
iOS Device Placeholder: This is a device that runs iOS but has not yet connected to your MDM and is not currently managed.
Mac Device Placeholder: This is a device that runs macOS but has not yet connected to your MDM and is not currently managed.
Placeholder Indicator: This indicator shows that the device record is simply a Placeholder. Once we have installed an Enrollment Profile on the device and it has checked in with the MDM, this message will disappear.
Add/Remove Placeholder: Allows you to manually create a Placeholder for any device based on serial number, UDID, IMEI, and MEID.
Search Devices Field: Allows you to search all of your devices for a specific one.
Device Information: A quick summary of the selected device including the name and serial number.
Device Configuration and Assignment Tabs: This is the section where we assign specific Configuration Profile payloads, Apps, and Books to the selected device.
Current User: Indicates the current user signed into the Profile Manager web site. Clicking this button reveals other account options including logoff.
Save/Revert Changes Buttons: Allow you to save and apply configuration changes or cancel changes you made.
Action Button: This button allows you to send a command to a managed device. A few of the more common actions include Clear Activation Lock, Fetch Device Location, Clear Passcode, Wipe, and Lock. The actions available to you will depend on the device type (iOS vs. macOS) and if it is supervised or not.
Device List Refresh Button: Profile Manager is always synchronizing in the background with VPP and DEP through Apple School Manager or Apple Business Manager. Clicking this button forces an immediate sync of data between services.
Add/Remove Enrollment Profile: These buttons allow you to create or remove custom Configuration Profiles that can be applied to a system manually to enroll them into your MDM.
Task Activity: Provides status on current tasks and provides a history of tasks that have been applied to devices.
Users or Groups: Manage device settings, profiles, and Apps on a per-user or per-group basis.
Devices or Device Groups: Manage device settings, profiles, and Apps on a per-device or per-device-group basis.
Apps and Books: The interface for adding or viewing VPP entitlements that you can apply to users, groups, or devices.
Enrollment Settings
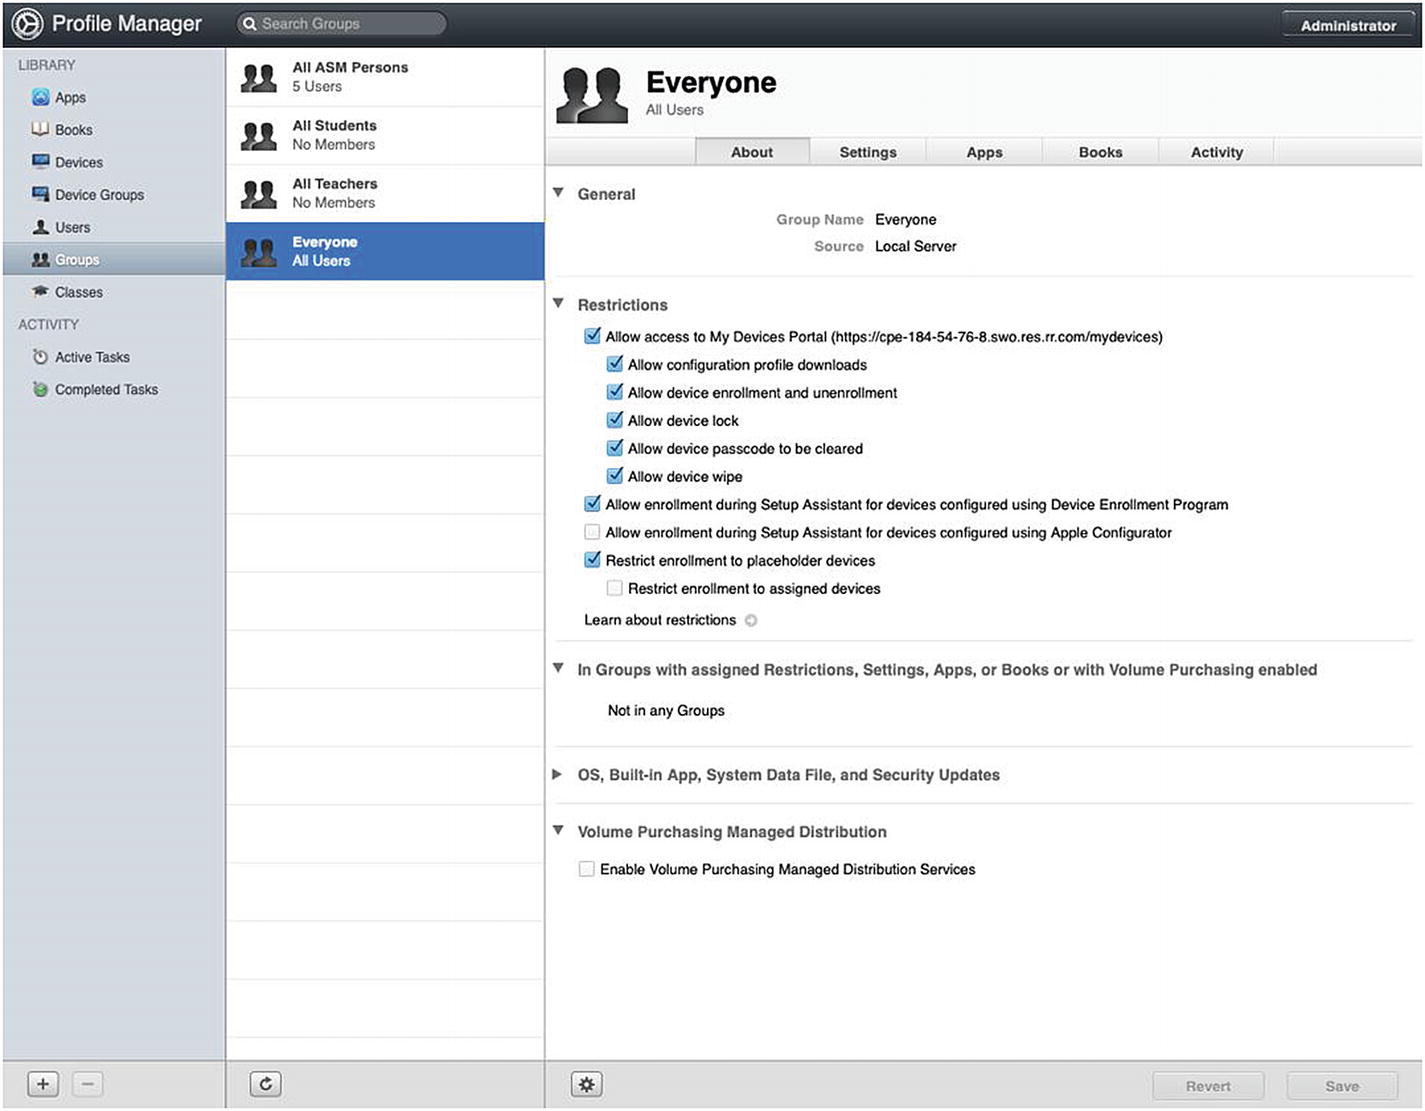
Enrollment settings for the Everyone group
I would also recommend checking the box next to Restrict enrollment to placeholder devices so that only devices that you have created Placeholders for are actually able to enroll. This will help with device organization and also keep rogue devices from appearing in your Devices list. Remember that your Profile Manager instance is available from the public Internet so random people could enroll themselves if this is unchecked.
MDM Enrollment
There are several ways that you can enroll devices into your MDM solution. The enrollment process basically consists of applying a Configuration Profile to a device that directs it to your specific MDM. There are a number of ways to do this, and which method you choose will determine the settings, options, and level of security available to you when managing that device. In this section, we will explore the four most common ways to do this and review the positives and negatives in each.
Device Enrollment Program (DEP) Integration with Setup Assistant
By far, the best option available for enrolling devices in MDM is by using DEP when devices are running through the Setup Assistant. Not only can you force enrollment in this manner but it happens each time the device is activated, meaning that even if it’s a device that is reset or restored, it is automatically managed again before the user can even sign into it. When devices are enrolled in this manner, the necessary trust certificates are also installed so the device will be configured to trust your MDM automatically. When the trust certificates are in place, we will not need to sign our Configuration Profiles when pushed through our MDM solution.
The main downside to this enrollment method is that you need to have either Apple School Manager or Apple Business Manager configured with your MDM and the devices must be in your DEP database. If you do have DEP integration configured with your MDM and you are purchasing your devices from Apple directly or through a participating Apple Authorized Reseller, then this is the option you should go with.
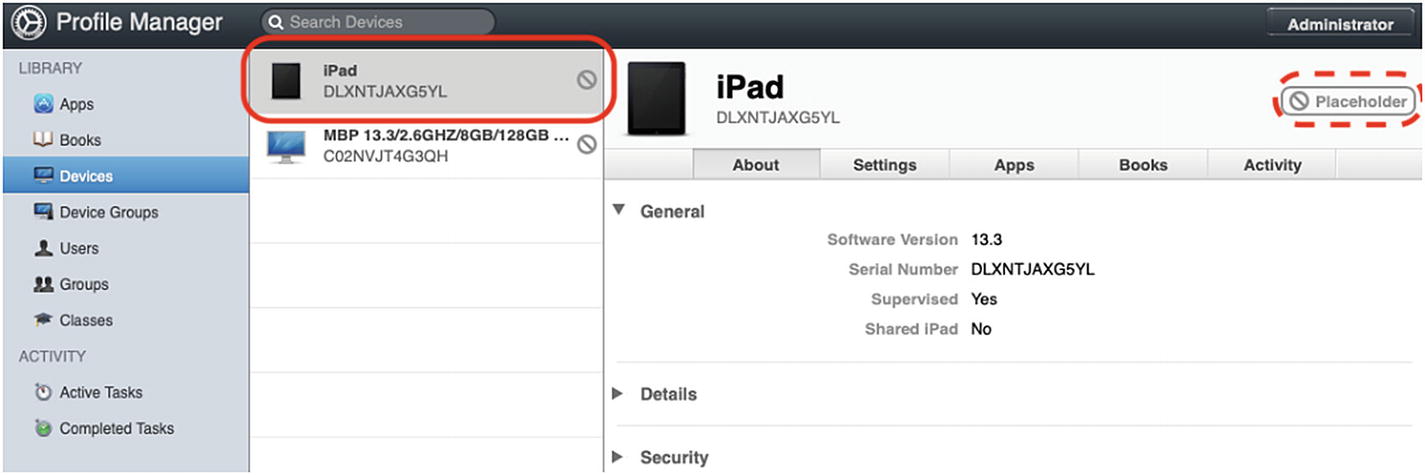
iPad placeholder created by DEP when we assigned the device to our MDM server in Apple School Manager
- 1.
The first step to enroll the device is to click the iPad placeholder in the Devices list and then click the Settings tab.
- 2.Scroll down to Enrollment Settings ➤ Enrollment during Setup Assistant as shown in Figure 9-4. Check the following boxes:
- i.
Prompt user to enroll device during Setup Assistant
- ii.
Do not allow user to skip enrollment step
- iii.
Supervise
- iv.
Allow pairing with a Mac (deprecated)
- i.
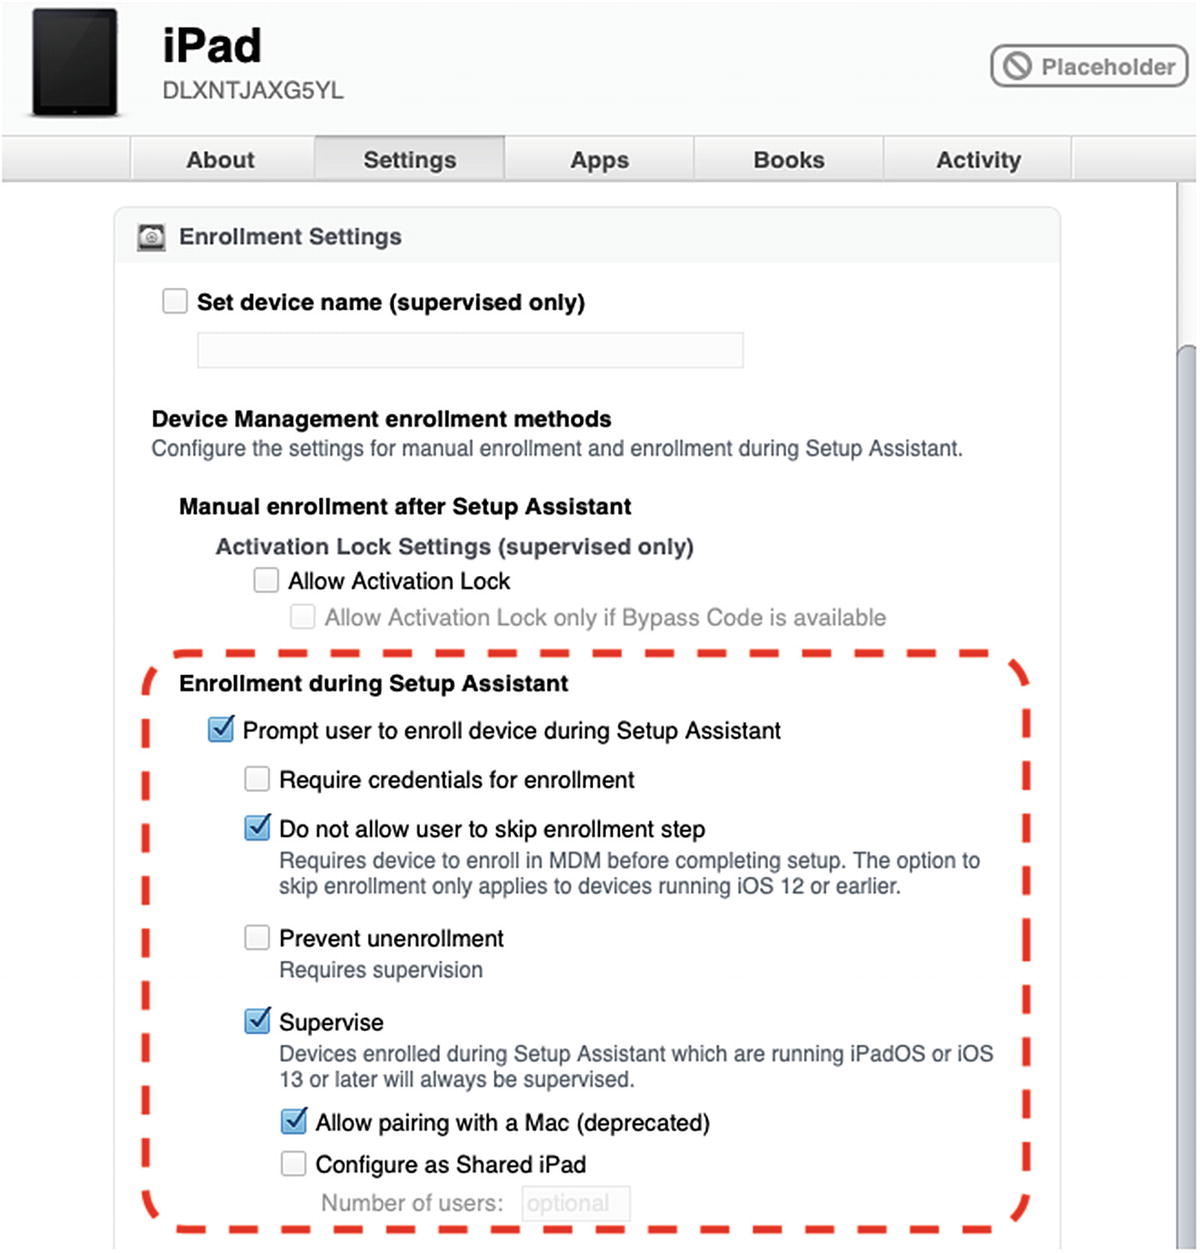
Enrollment during Setup Assistant settings
- 3.Next, scroll down a little further to the Setup Assistant Options section as shown in Figure 9-5. Uncheck everything except the following:
- i.
Passcode Lock
- ii.
Appearance
- iii.
New Feature Highlights
- iv.
Welcome
- i.
- 4.We will use this setting to test that enrollment worked by skipping all but the passcode lock setup, prompting for dark mode, the iPadOS feature demo, and the Welcome screen. Click the Save button in the bottom-right corner of the window.
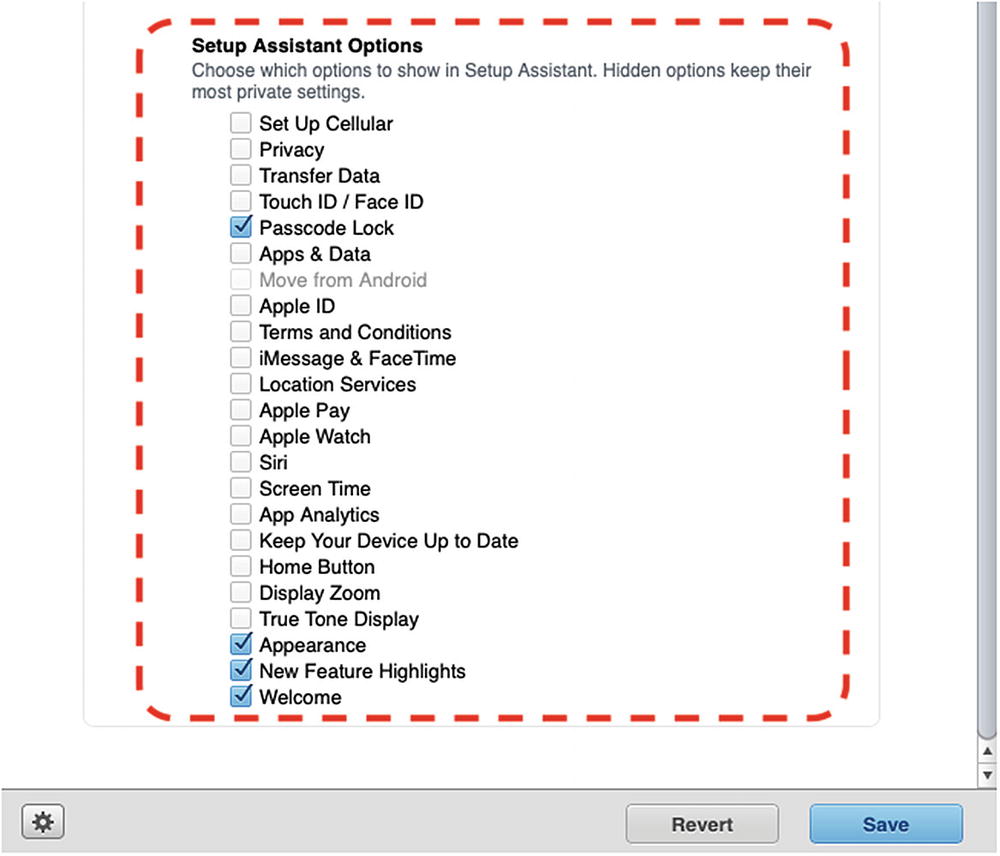 Figure 9-5
The Setup Assistant Options
- 5.You can click the Activity tab and confirm that the DEP Profile for the iPad was uploaded to Apple School Manager/Apple Business Manager so it is ready for enrollment during Setup Assistant as shown in Figure 9-6.
 Figure 9-6
Confirmation that our setting changes uploaded to ASM
- 6.
Next, grab the test iPad and make sure that it is running a fresh install of the operating system. If it has been activated already, use the Reset All Content & Settings option or restore it via iTunes/Finder before attempting to enroll it in MDM.
- 7.Power up the iPad and step through joining it to Wi-Fi and activating it. Once it gets past the initial activation step, it should prompt you to install the Configuration Profile as shown in Figure 9-7. If it does not show you this screen, please review these steps again, restore/reset the iOS device, and try again.
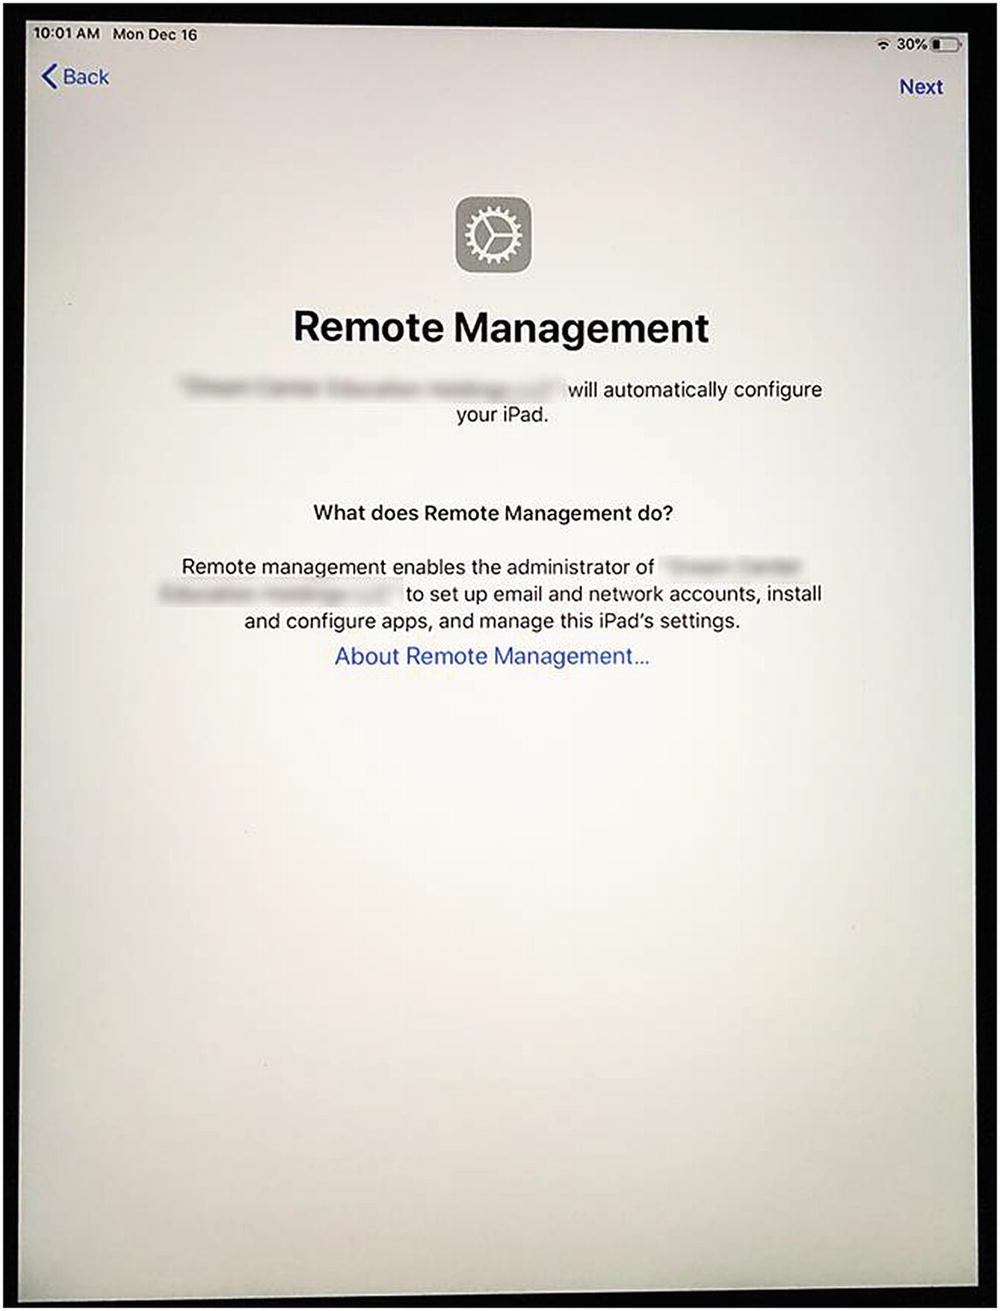 Figure 9-7
The Remote Management prompt on our test iPad
- 8.
Click Next to step through the configuration process. It will take a few minutes to configure and enroll the device in MDM. Then it should prompt you to set a passcode, select light or dark mode, tell you about iPadOS features, and then greet you with Welcome and the Get Started button to bring you to your Home Screen.
- 9.If you go back to Profile Manager, you will see that the Activity tab will state that the device was enrolled and the Placeholder label has been removed from my device as shown in Figure 9-8 indicating that it is now managed.
 Figure 9-8
The device enrollment confirmation and time/date stamp
- 10.You can also browse to Settings ➤ Remote Management and see that our “MyCompany” MDM Profile and certificates are installed as shown in Figure 9-9. Your users will also see your supervision identity in the top-left corner of the Settings window.
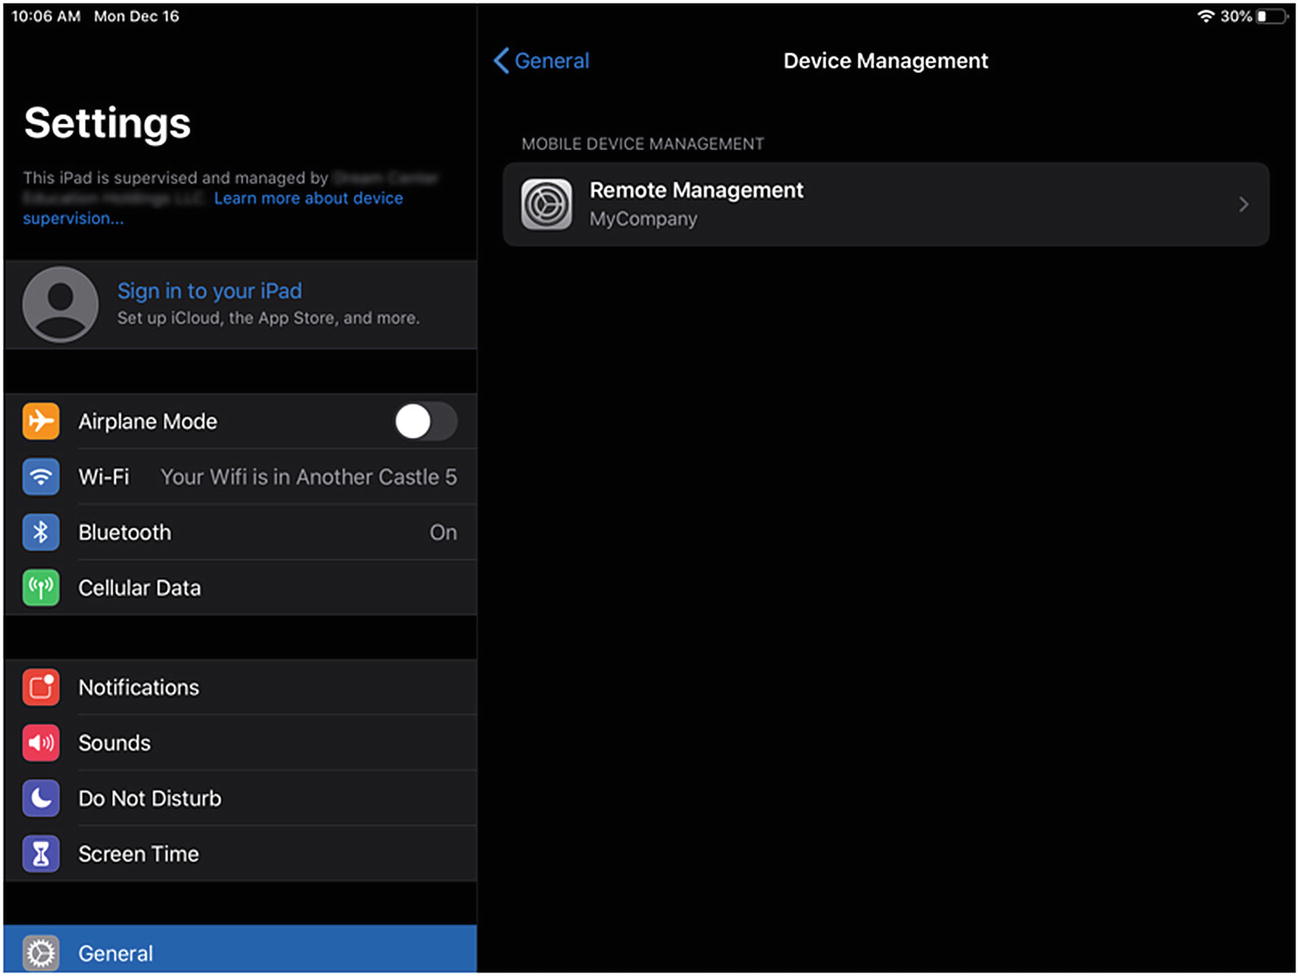 Figure 9-9
Our Management Profile is installed, and the device is supervised
One thing you will want to keep in mind if you are mass deploying iOS devices on a wireless network that uses Network Address Translation (NAT) is that Apple can restrict multiple over-the-air activations of iOS devices from the same public IP address if they happen in rapid succession. For example, in large organizations like schools where you may have tens or hundreds of devices activating at the same time, you may run into failed activation issues. I would recommend speaking with your organization’s Apple rep about whitelisting your public IP addresses to avoid this issue.
This process is very similar for macOS clients with the exception of a few unique Mac-only features. Explore the basic enrollment settings and configure your Test Mac to enroll during Setup Assistant and skip all but the Terms and Conditions prompt. You should be able to easily enroll your test Mac client into MDM using DEP. Give it a shot!
My Devices Portal
The next way to enroll your devices is to use the self-service My Devices Portal built into Profile Manager. There are a couple of caveats with the Device Portal Enrollment method. This is really meant to be used in “bring your own device” (BYOD) deployments, so your iOS devices will not be able to be supervised. In addition to that limitation, the MDM enrollment can be removed at any time by the end user without your knowledge. The main benefit of using the My Devices Portal is so that your organization’s users can enroll in MDM without needing to hand their device over to you (the IT department) for configuration.
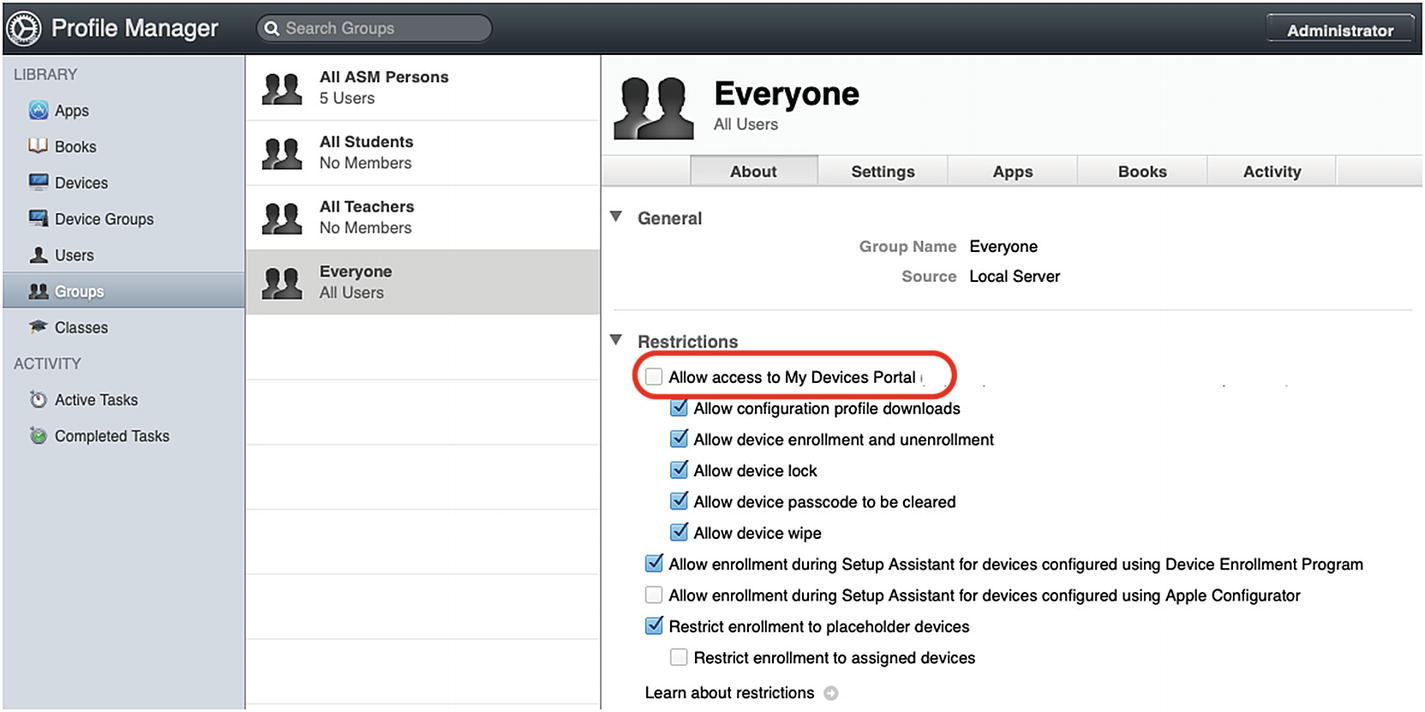
Uncheck the Allow access to My Devices Portal option
I would also recommend creating a new User Group called BYOD or Self Service and restricting access to the My Devices Portal to users that are members of that group. You should implement some kind of access management process like a web form or a trouble-ticket to your IT department whereby a user requests BYOD access and provides you with their device serial number so you can set up a Placeholder for the device and add the user to the BYOD group. That way you won’t have any rogue devices being added without your knowledge or consent.
If you are using Apple School Manager or Apple Business Manager, you should manage your Users and Groups using the management portal or configure Azure AD integration. Otherwise, you can use Users and Groups in the Server app to create these accounts.
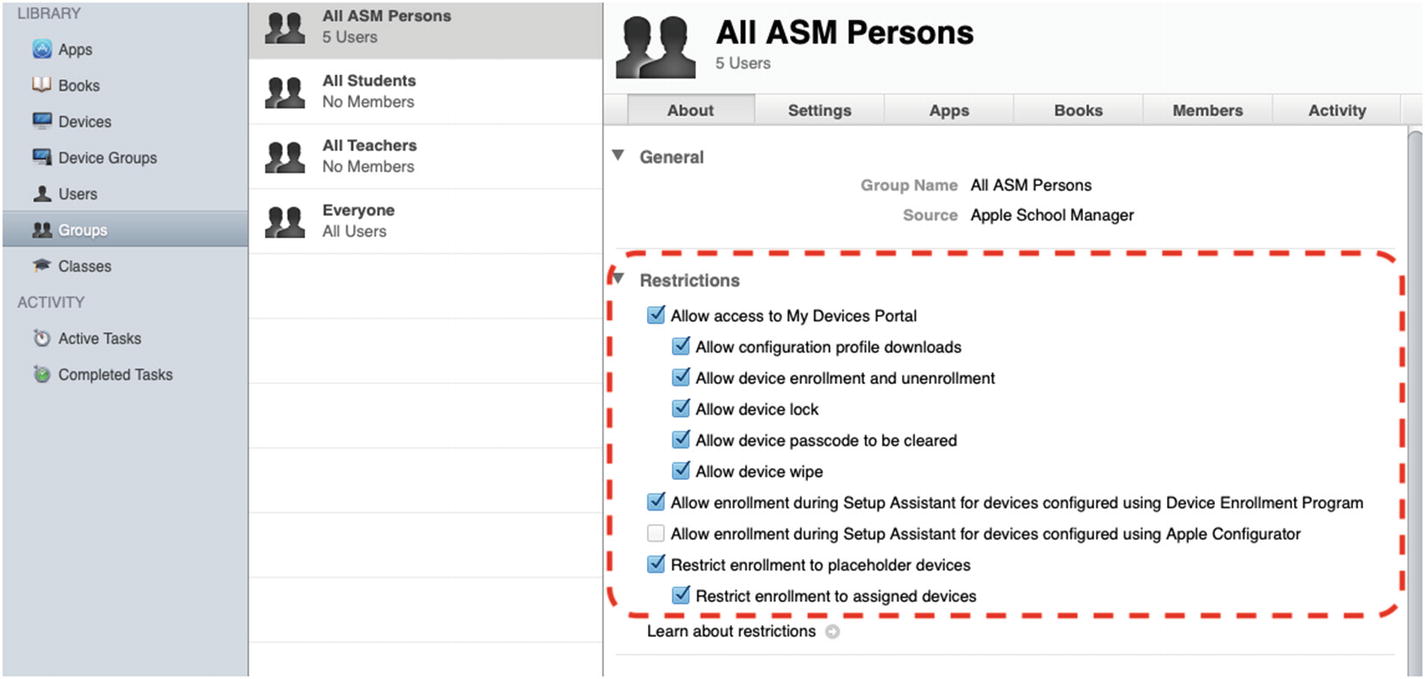
Configure the restrictions on your self-service group to allow for My Devices Portal access
For this example, I’m going to set up my personal iPhone as the placeholder and assign it to my user in Apple School Manager.
- 1.The first thing we need to do is configure a Placeholder for this iPhone. Click the Devices button in the sidebar and then click the + button and choose Add a Placeholder to create a new Placeholder as shown in Figure 9-12.
 Figure 9-12
Click the + button to define a new Placeholder
- 2.When prompted to create a new Placeholder, I will choose iOS as the Device Type, the Name of the Device, and the serial number or other unique identifier like UDID or MEID. Go ahead and enter the information for your device. When complete, you should have a placeholder device like the one I do in Figure 9-13.
 Figure 9-13
The placeholder I created for my personal device
- 3.Now that we have a placeholder device, we need to assign that device to our user. I have created a test user named Drew Smith in Apple School Manager. In Profile Manager, select Users in the sidebar, and then select your test user and click the Devices tab as shown in Figure 9-14. Click the + button ➤ Add Devices and then in the pop-up dialog box add the BYOD placeholder device to the user. Click the Done button, and then click the Save button to continue.
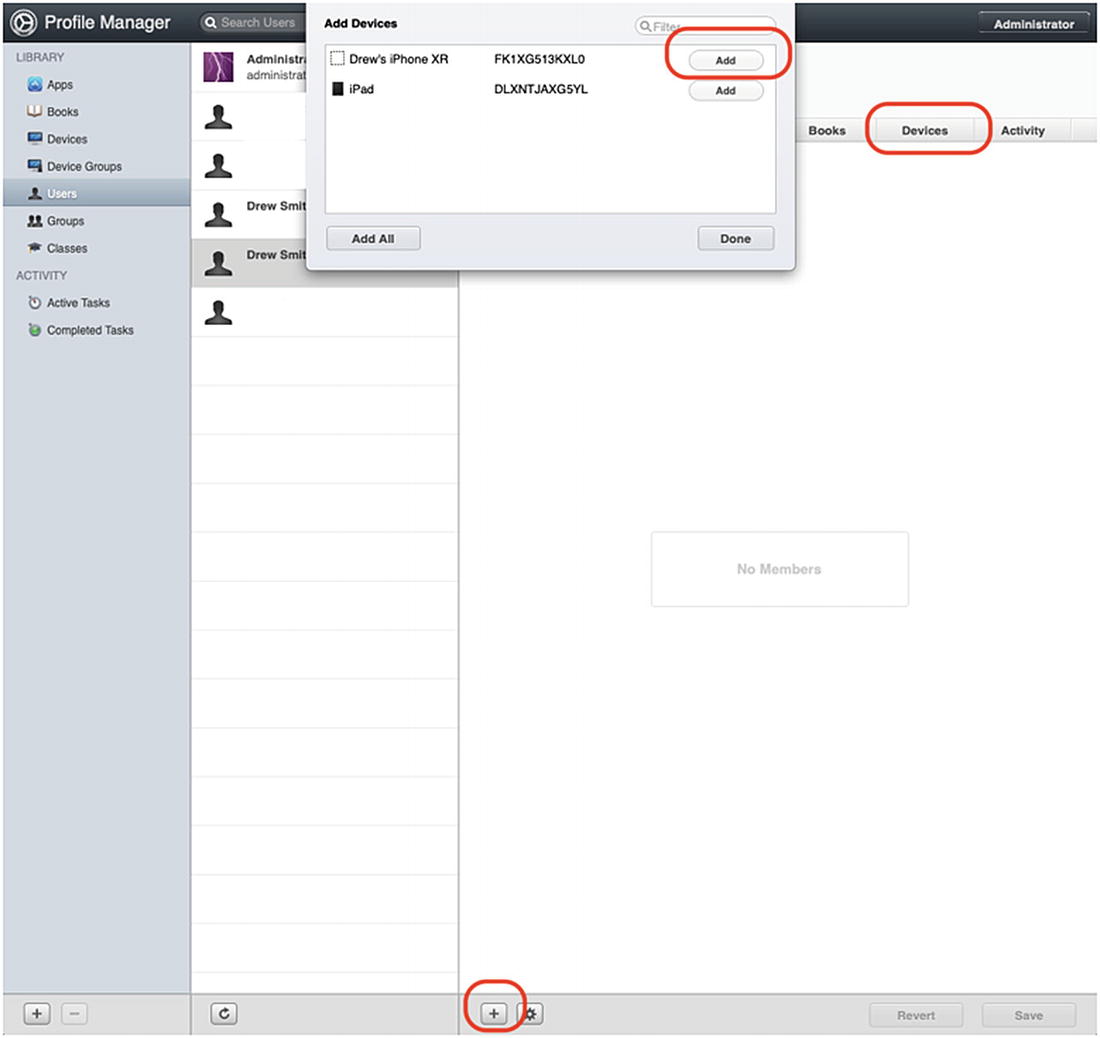 Figure 9-14
Add the placeholder device to the test user
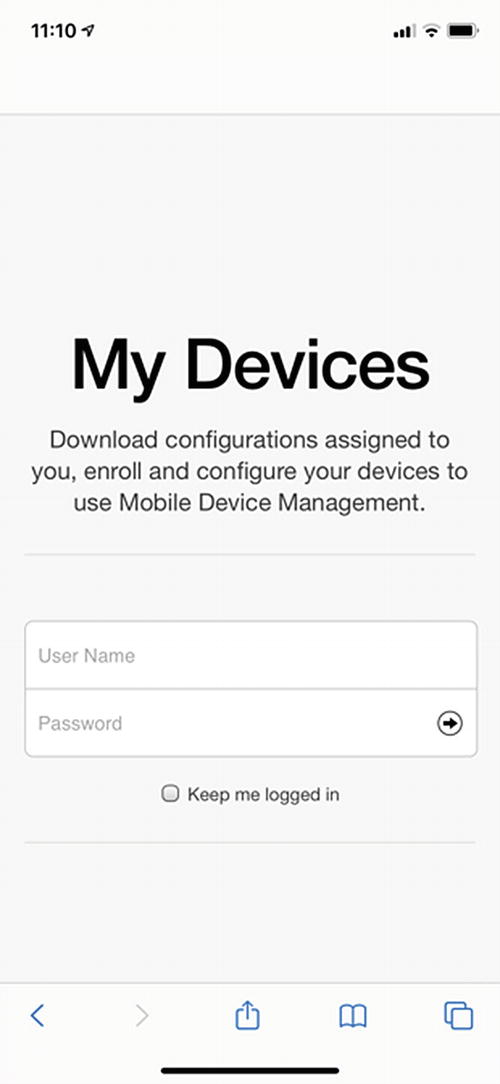
The My Devices Portal on my iPhone
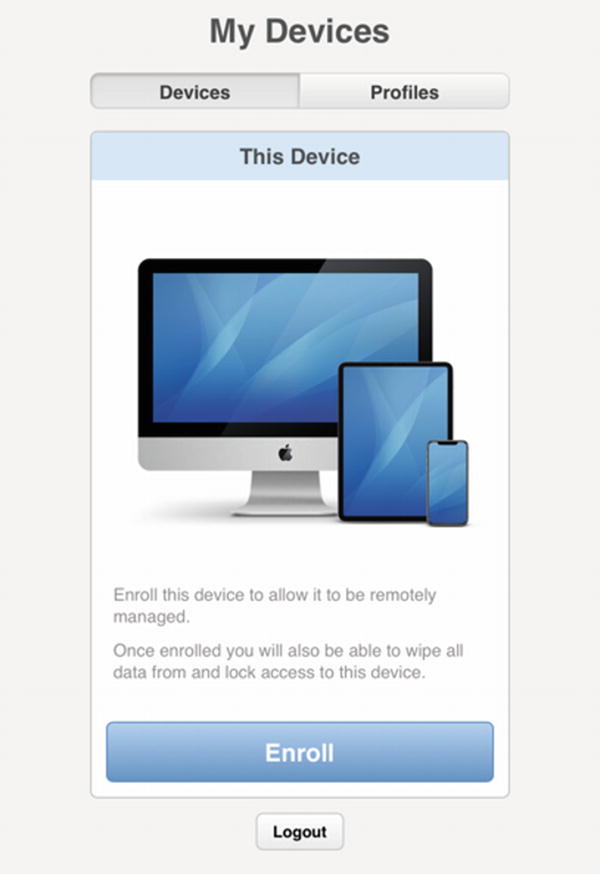
Click the Enroll button to download the Enrollment Profile
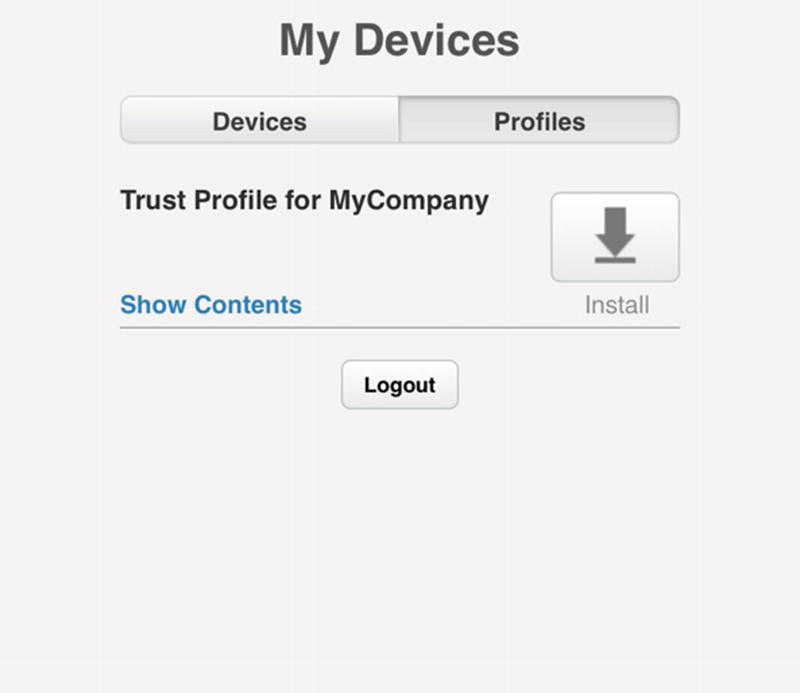
Download the Trust Profile for our MDM to the device
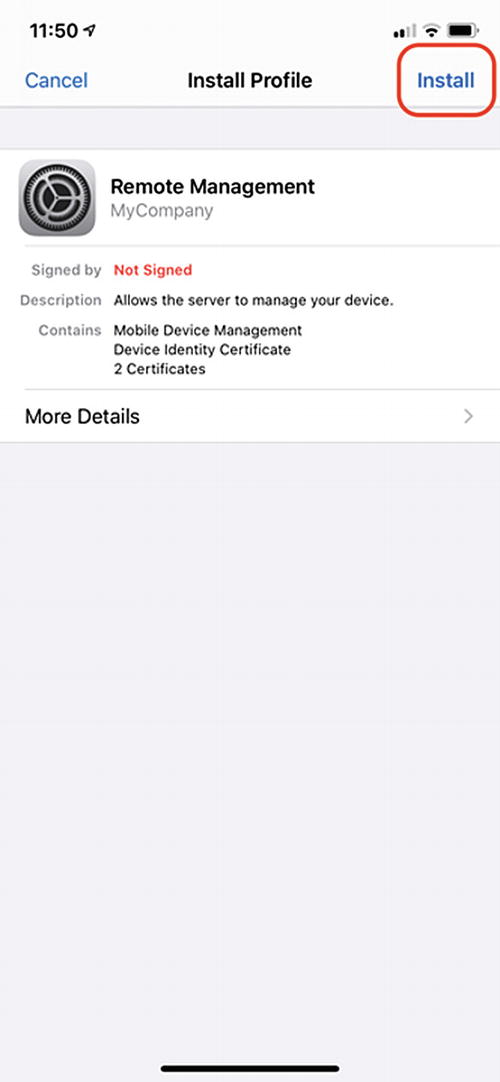
Install the Mobile Management Profile
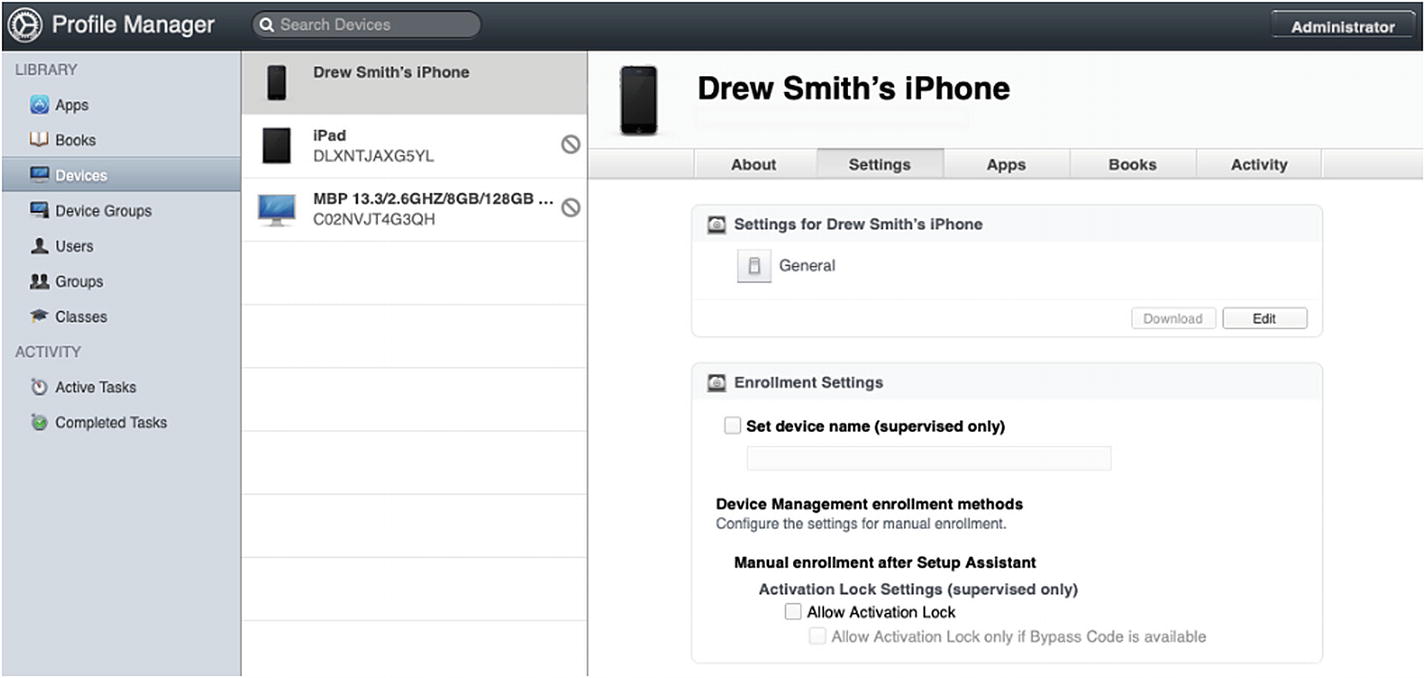
My iPhone is now enrolled in my MDM and can be managed
At this point, we can manage this device as long as the end user doesn’t remove the Management Profile. Please note that since this is not a supervised device, the ability to apply certain payloads will be restricted.
Before we move on, this is a good place to demonstrate how to unenroll a device using the Profile Manager console. There are a number of reasons why you may want to do this. For example, if this is a BYOD device and the user has left your organization, you will probably want to remove the device, especially if the user wasn’t savvy enough to remove the Management Profile when they left.
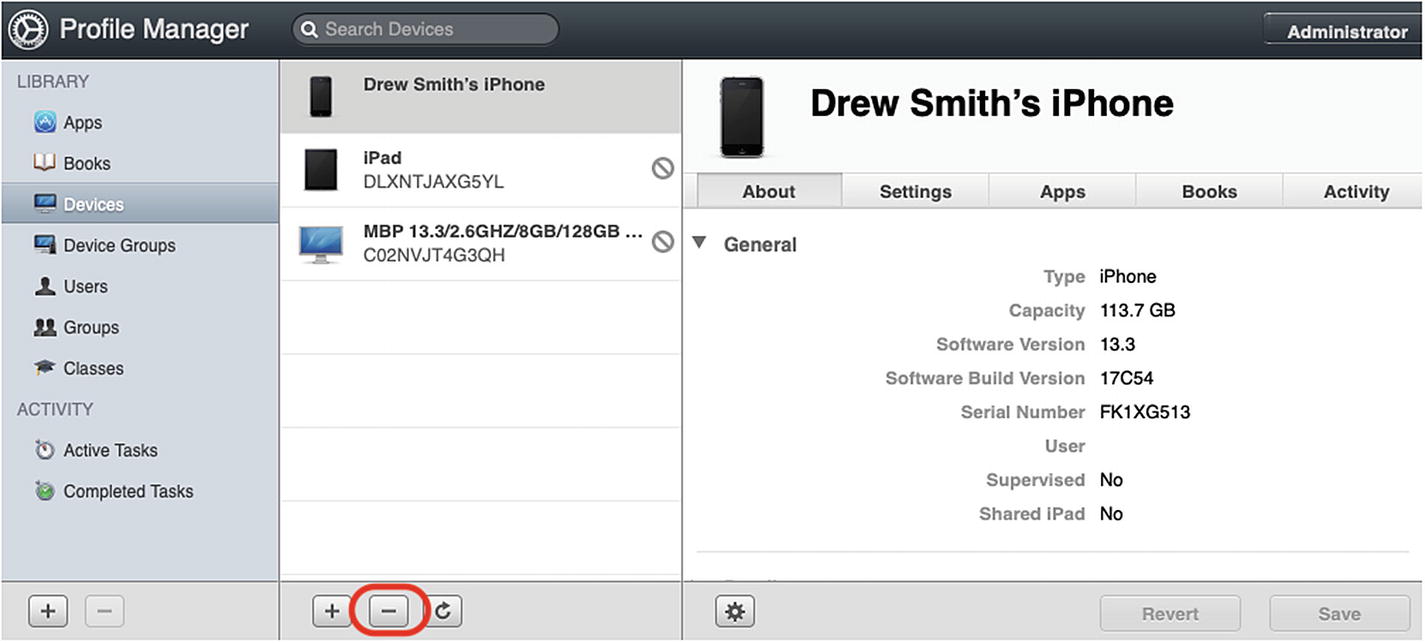
Unenrolling the device from Profile Manager
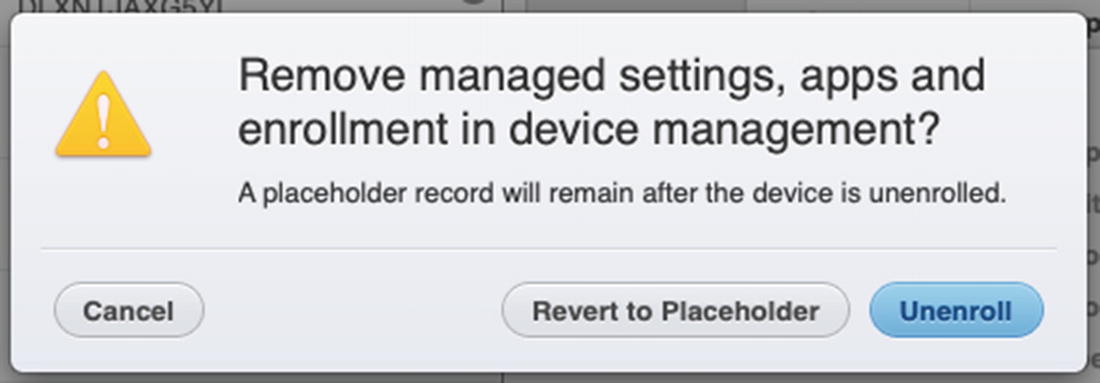
When prompted, choose to Unenroll if you don’t know if the user has removed the Management Profile themselves
After a few minutes, the device will return to the Placeholder label status, and you can confirm on the device directly via Settings app ➤ General that the Device Management Profile is now gone. Since this is a BYOD device, we can click the Placeholder device and then click the – button again and confirm that we want to remove the Placeholder as well.
Apple Configurator
The third way to enroll devices into MDM is through Apple Configurator. In Chapter 5, we skipped the MDM prompts with a promise we would cover those in a later chapter, and here we are. The main downsides to using Apple Configurator to enroll devices into MDM are that (a) it is limited to iOS devices and (b) you still have to physically touch every device. The nice thing about Apple Configurator is that if you are already physically touching every device, applying Blueprints, and so on, then adding MDM support to enable future over-the-air updates to the configuration is quick and easy.
We need to make a few setting tweaks so we can begin using Apple Configurator with our MDM.
- 1.
The first change we need to make is to select a supervision identity for use with Apple Configurator. Log in to your Mac server and open the Server application. Click the Profile Manager service from the sidebar and then click the Configure… button under Apple School Manager or Apple Business Manager, depending on your service.
- 2.Click the Supervision tab and then check the box next to Use Apple Configurator to configure enrolled devices. Next, select your signed trust certificate from the Supervision Identity drop-down menu as shown in Figure 9-22. Click the Done button to continue.
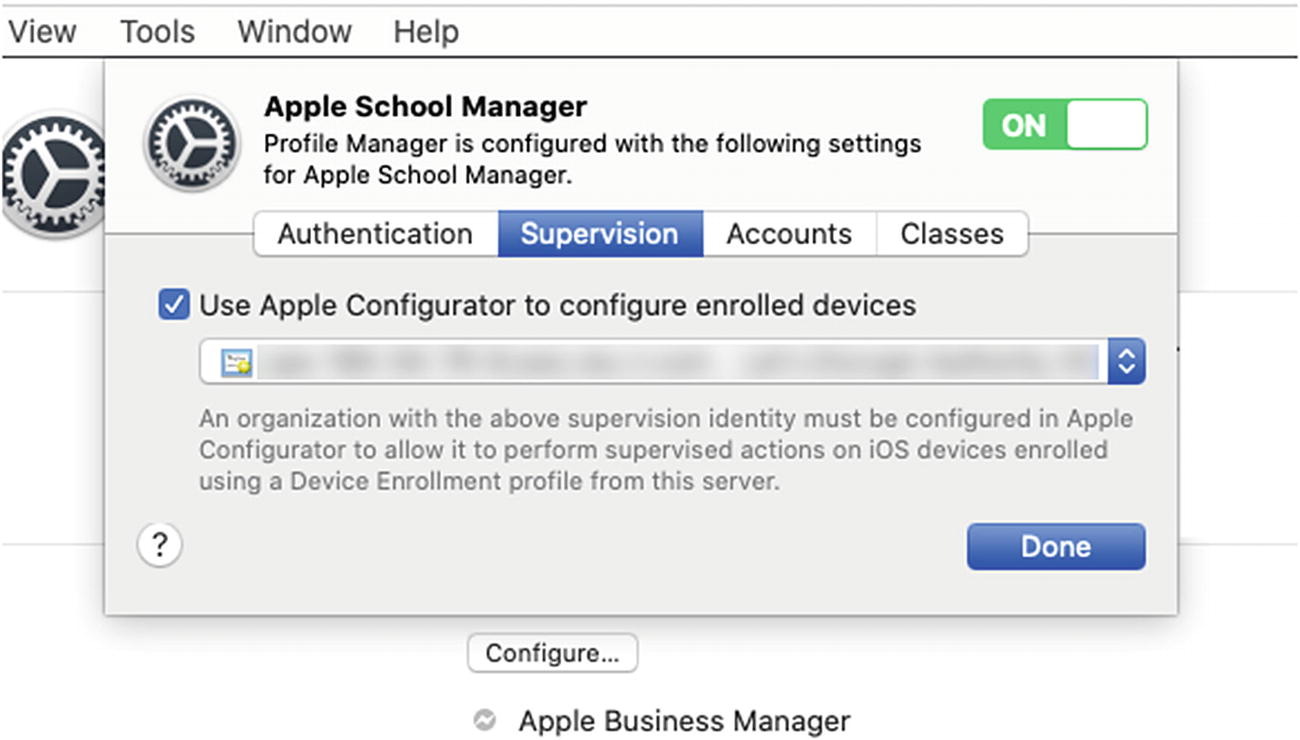 Figure 9-22
Configure the supervision identity for Apple Configurator MDM enrollment
- 3.Next, open Apple Configurator from the Applications folder on your Mac that you plan to use to configure devices. Select Preferences… from the Apple Configurator menu and then click the Servers tab as shown in Figure 9-23.
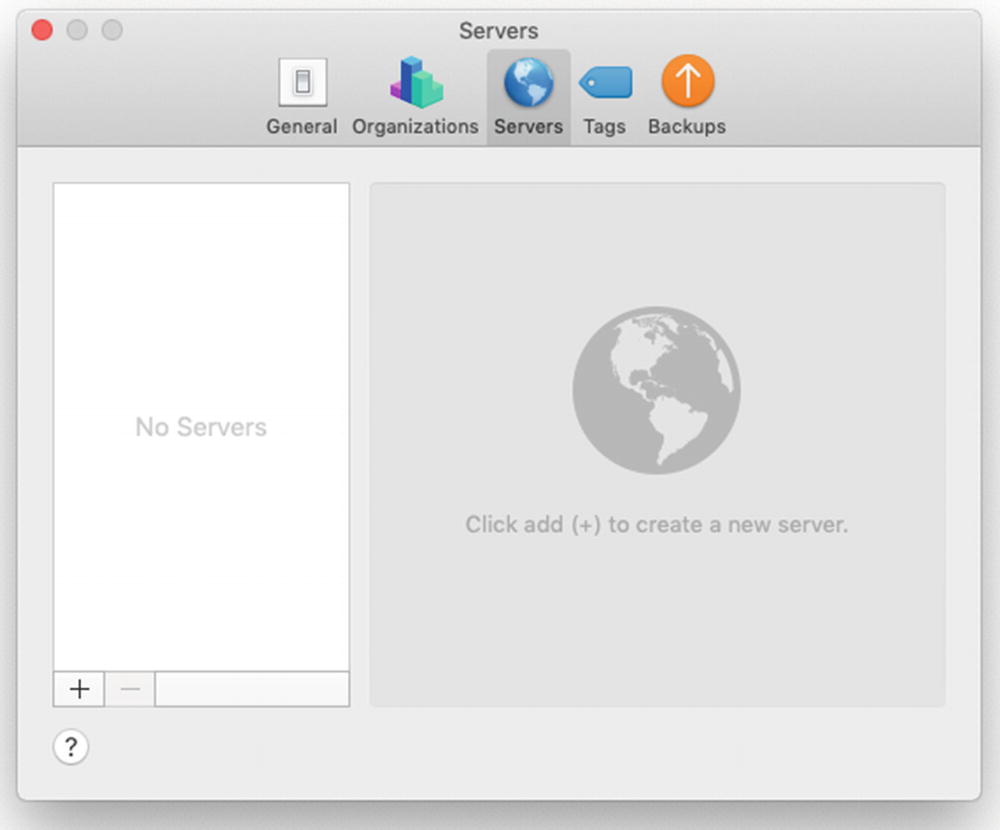 Figure 9-23
The Servers tab in the Apple Configurator preference pane
- 4.Click the + button to add a new MDM server to Apple Configurator. Name the server something descriptive and then edit the Host name or URL field to substitute “myserver.local” with the domain of your server. For example, mine is 579testing.com as shown in Figure 9-24. Be sure to leave the other part of the URL intact when you update the domain.
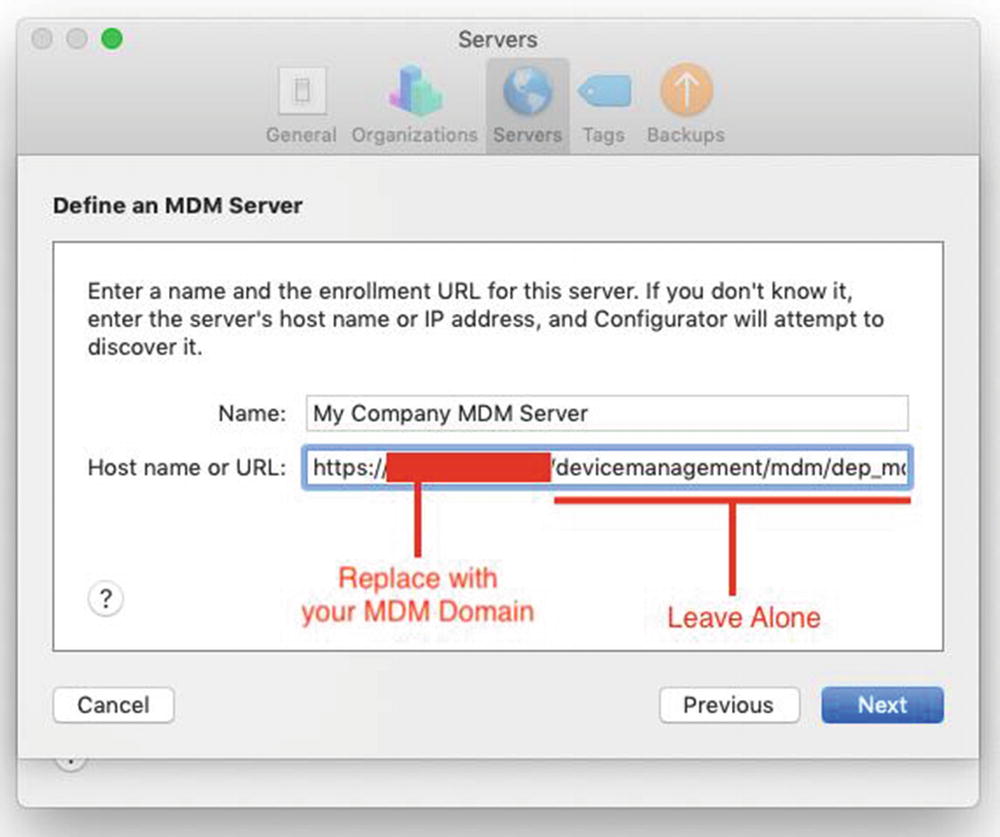 Figure 9-24
Edit the domain to point Apple Configurator to your MDM
- 5.
Click the Next button to complete the configuration.
- 6.
Next, let’s test our MDM configuration with another iOS device. Connect the test device to Apple Configurator using a USB cable. Once it appears, select it and click the Prepare button in the toolbar.
- 7.
In the Prepare Devices Assistant dialog box that appears, check the box next to Supervise devices and click the Next button to continue.
- 8.In the Enroll in MDM Server option, select our server from the pop-up menu as shown in Figure 9-25. Click Next to continue.
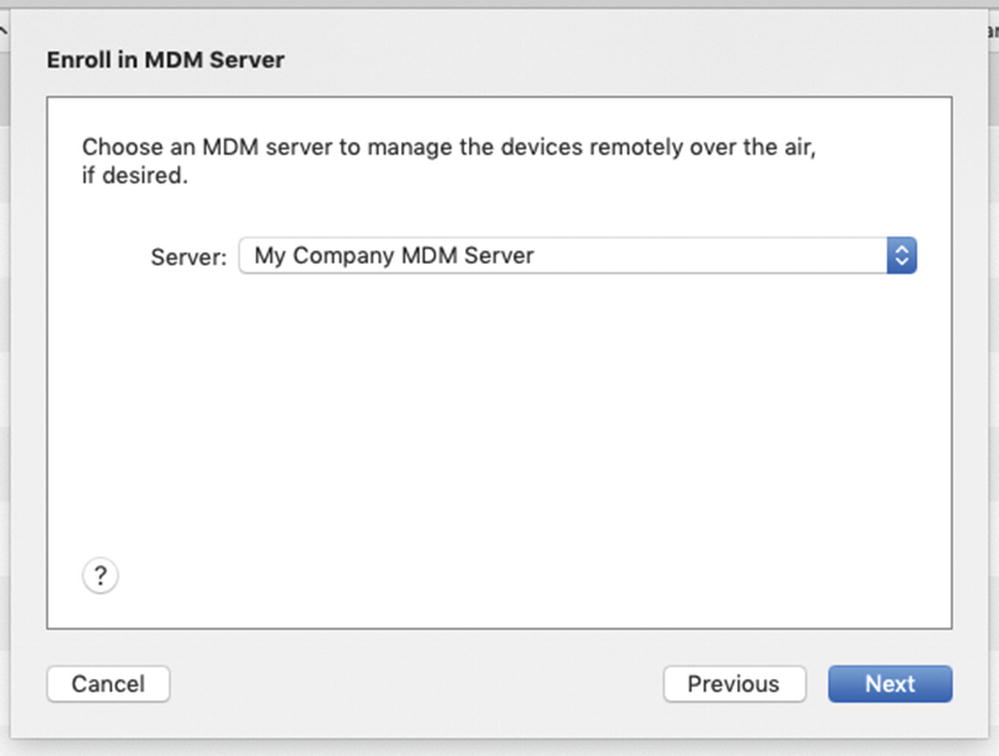 Figure 9-25
Select your MDM server when prompted
- 9.
When prompted, sign into DEP using your Apple School Manager/Apple Business Manager Administrator Apple ID and password.
- 10.
When prompted, select which iOS Setup Assistant screens you want to prompt the user with and then click the Prepare button.
Pro Tip If you are using the same test device that you used for DEP enrollment through Setup Assistant, you should remove that device from your MDM and delete the Placeholder before attempting to activate the device using Apple Configurator. Otherwise, when the device gets to the activation step, it will give you an error stating that you need to use DEP to activate and enroll the device in MDM.
Once it completes the preparation process, click through the iOS Setup Assistant on the device, and it should suppress the prompts that we selected for it. When you get to the Home Screen, open the Settings app and browse to General ➤ Device Management, and our Management Profile should be present. You can open Profile Manager and click Devices to ensure that our device is now available for additional management as well.
Do you see the Add to Device Enrollment Program checkbox in the Prepare Devices Assistant? This is a nice additional option that you can use to add any device that was purchased through an organization other than Apple or an Apple Authorized Reseller that supports DEP. When you check this box, it will add the device to the DEP database.
Manual Install or Using an Install Script
The last option is to manually create and download Enrollment Profiles and then interactively install them on your devices. For Macs, this can be done with a script using Apple Remote Desktop, and for iOS devices, you can host them on an internal web site or email them to end users. The main drawback to using this method is that it is the least automated, and in the case of macOS clients, using a script will result in additional interactivity to enable User Approved MDM.
- 1.The first thing we need to do is create our Enrollment Profile. Open Profile Manager and click the + button ➤ New Enrollment Profile. Name the Enrollment Profile, and for now we will uncheck the Placeholder requirement, as shown in Figure 9-26, so that any device we install this on gets added to our MDM.
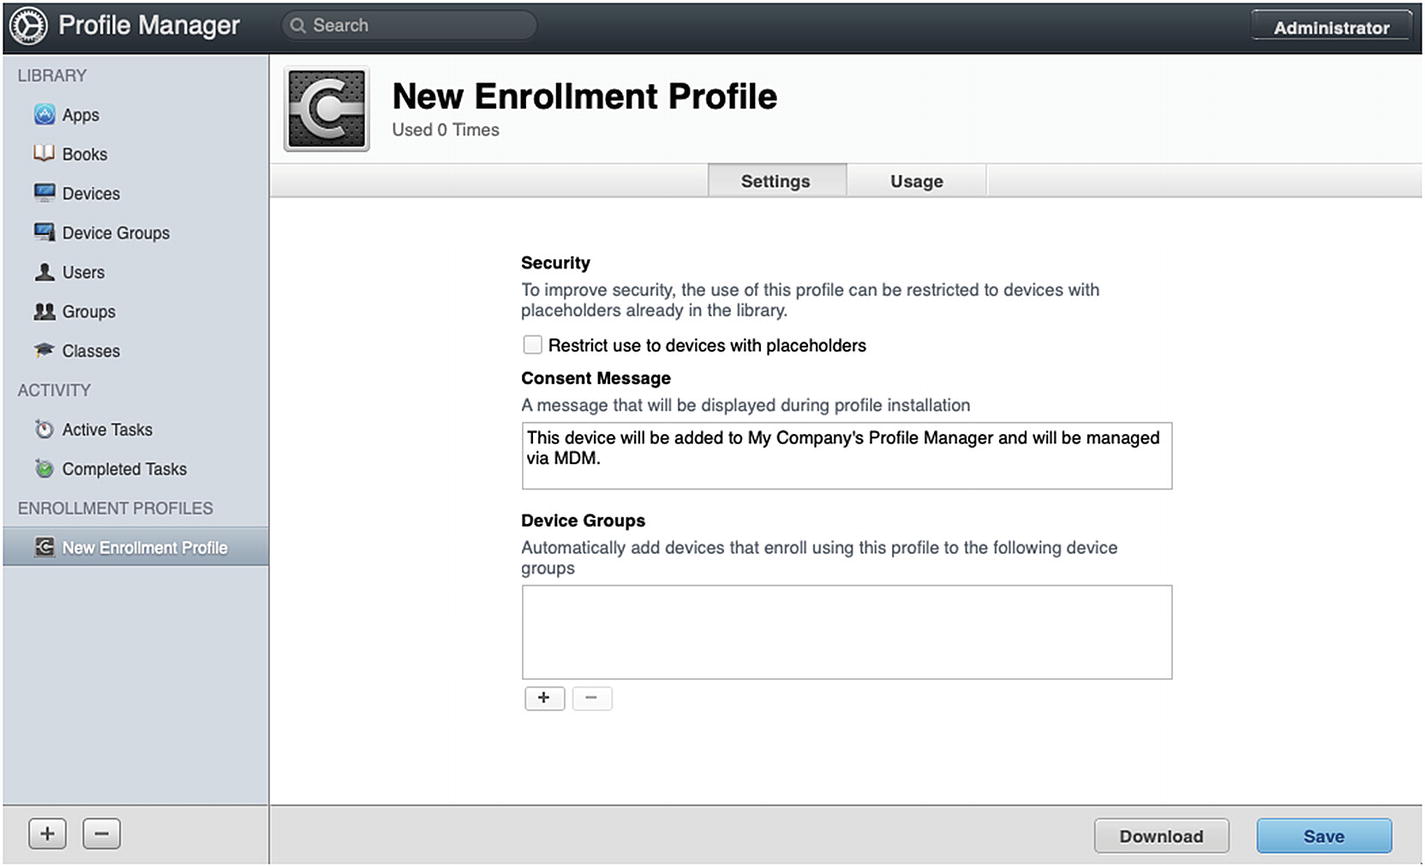 Figure 9-26
Creating a new Enrollment Profile
- 2.
Click the Save button and then click the Download button to download the Enrollment Profile. It will download a new *.mobileconfig profile to your Mac. If it attempts to install it, cancel and then move it out of the Downloads folder and onto the Desktop.
- 3.Next, we need to download a copy of the Trust Profile. Click the Logged In User button in the top-right corner of the Profile Manager window and choose Download Trust Profile as shown in Figure 9-27. Again if it attempts to install it, cancel and then drag the Trust Profile out of the Downloads folder and into the Desktop.
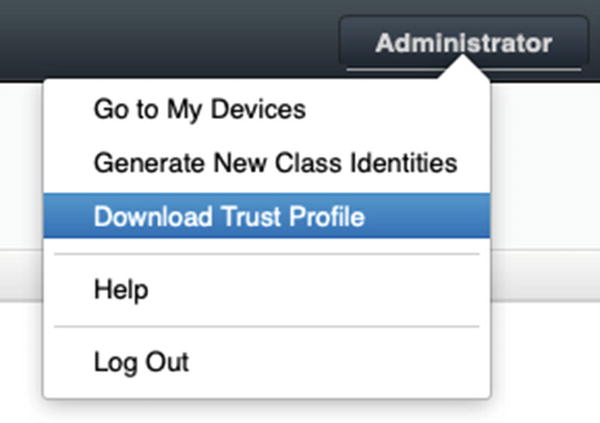 Figure 9-27
Download the Trust Profile. to your Desktop
- 4.
You should now have two *.mobileconfig files on your desktop. One is the Trust Profile so that devices we are adding will trust our MDM server, and the other is the Enrollment Profile that points our devices to our MDM server. This is essentially the same two files that get installed during self-service enrollment.
- 5.For this next step, you should have a test Mac that has been added to Apple Remote Desktop. We are going to write a script to install these two Profiles on that remote Mac. Go ahead and copy the two *.mobileconfig files to /tmp on the remote computer using the Copy command as shown in Figure 9-28.
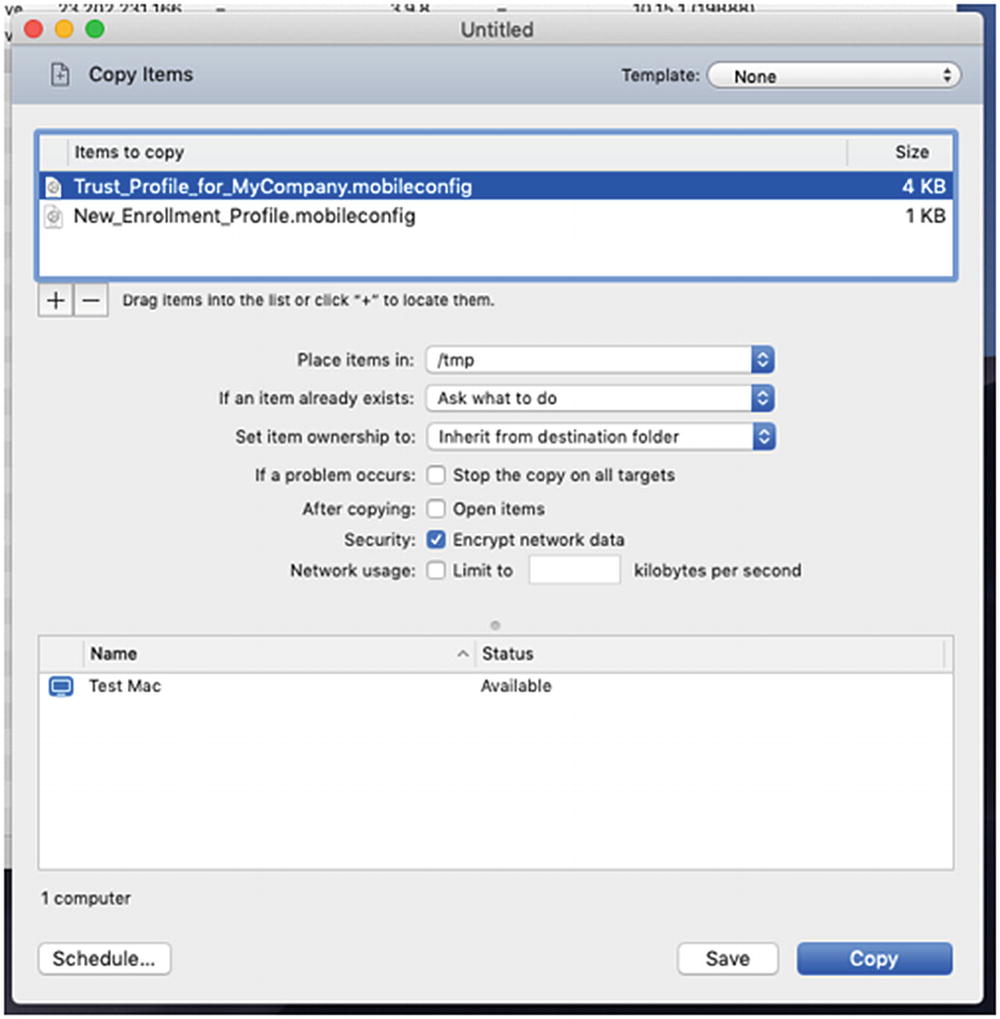 Figure 9-28
The Copy File dialog box in Apple Remote Desktop
- 6.Next, we can go ahead and choose to send a Unix command to the test Mac to install these Profiles. We are going to use the profiles command that is found in /usr/bin/. In the Unix window in ARD, enter the following command, specifying the name of the two *.mobileconfig files if they are named differently than mine:/usr/bin/profiles -I -F /tmp/Trust_Profile_for_MyCompany.mobileconfig/usr/bin/profiles -I -F /tmp/New_Enrollment_Profile.mobileconfigThe -I stands for install and the -F stands for file then followed by the path to the file to be installed. Your ARD Send Unix Command window should look like Figure 9-29.
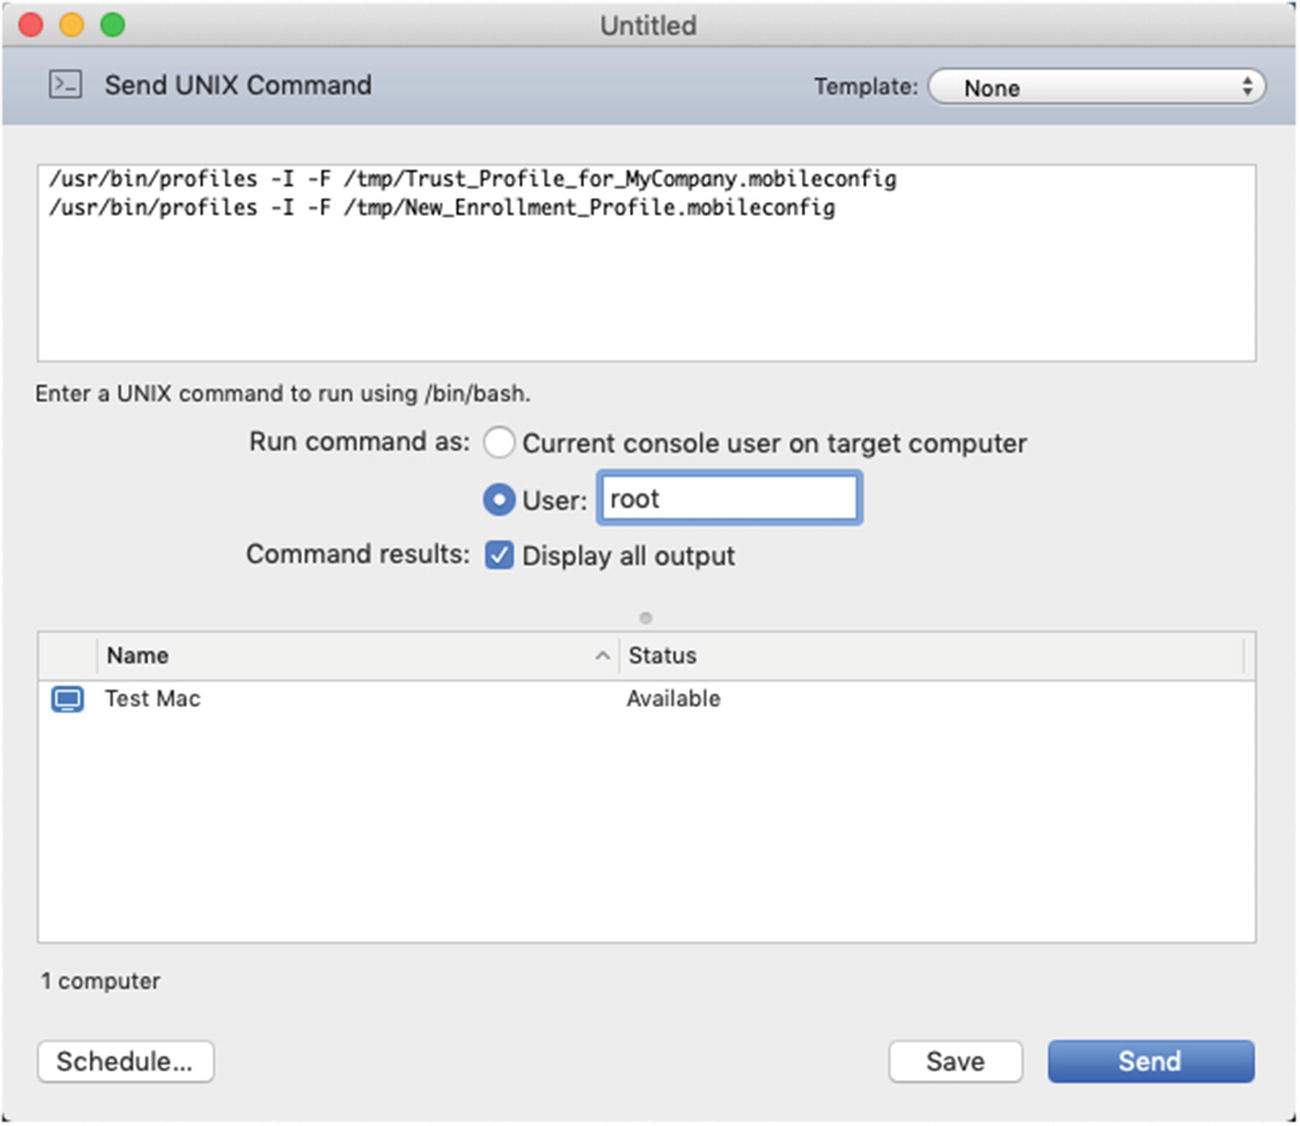 Figure 9-29
The Send Unix Command window in Apple Remote Desktop
- 7.
Send the command to the test Mac. We can save this as a template if we want to run it again in the future.
- 8.Next, let’s log in to the test Mac and see if the Profiles installed. If the script ran correctly, you should see a new Profiles System Preference. Click the Profiles System Preference, and you should see two Device Profiles as shown in Figure 9-30.
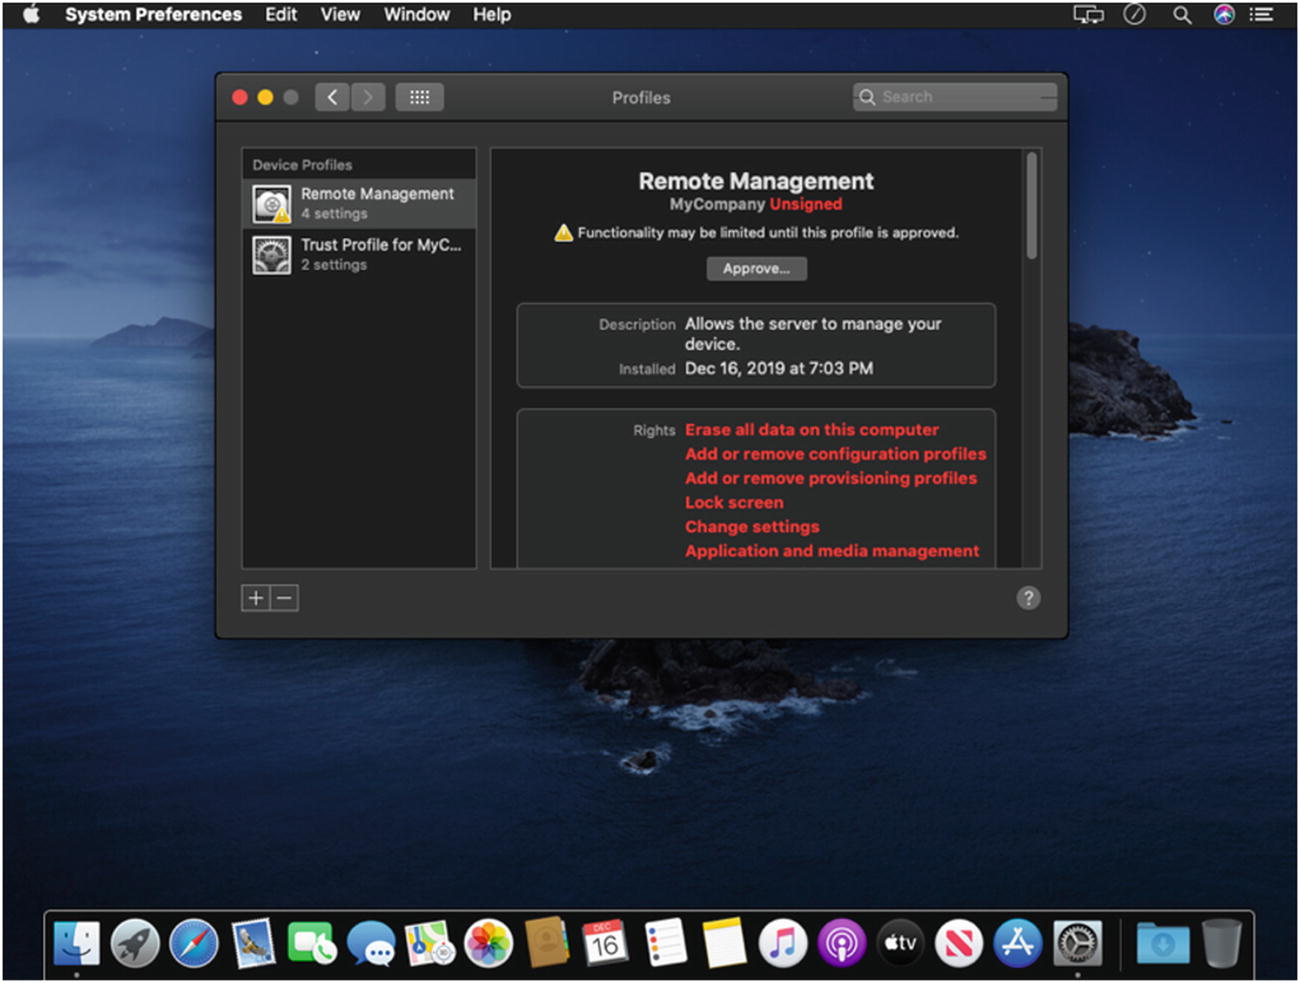 Figure 9-30
The newly installed Device Profiles
- 9.Go back to Profile Manager and look at the list of devices. You should have a new Mac listed in your Devices list like I do in Figure 9-31. This represents the Mac we just added using a script from Apple Remote Desktop.
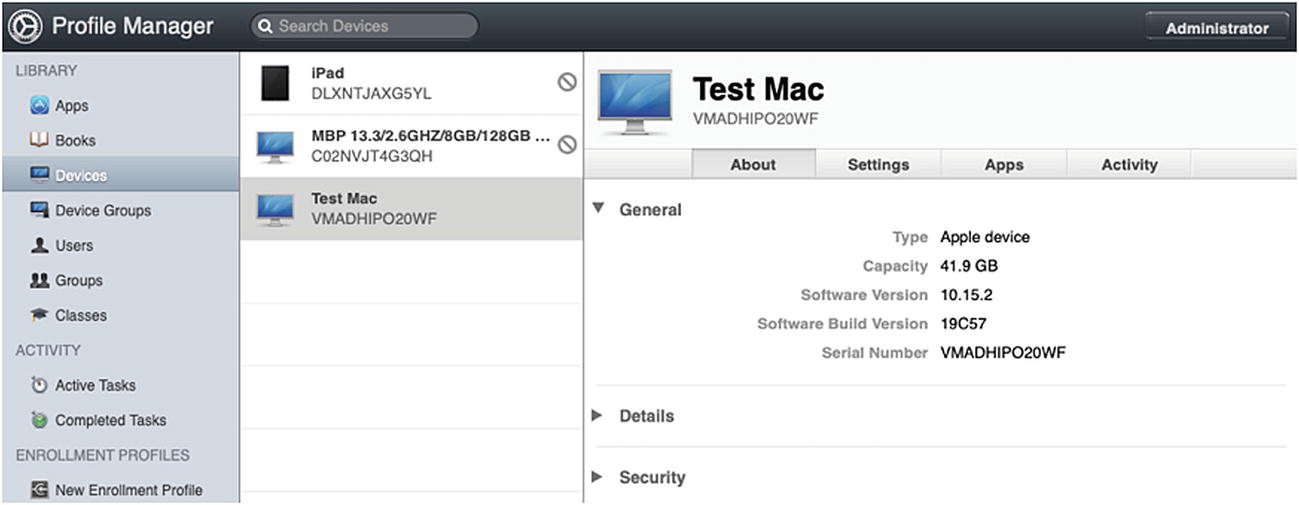 Figure 9-31
Our test Mac has been added to Profile Manager
- 10.
Now go back to the test Mac and browse back to the Profiles System Preference. Click the Remote Management Profile. Do you see how there is an alert that states “Functionality may be limited until this profile is approved.” This is referring to User Approved MDM (UAMDM). We discussed UAMDM briefly in Chapter 8. So, while this Mac is now listed in Profile Manager, there are some limitations to the types of payloads we can use until we convert this Mac to User Approved status.
- 11.There is only one way to convert this device to User Approved MDM, and that is clicking the Approve… button interactively directly on the device. There are no scripts that you can use to convert; you can try to Screen Share or use ARD’s remote control option to click the Approve… button, but Apple has it blocked. You will need to sit down at that specific machine and click the Approve… button. Click the Approve… button and confirm like I did in Figure 9-32.
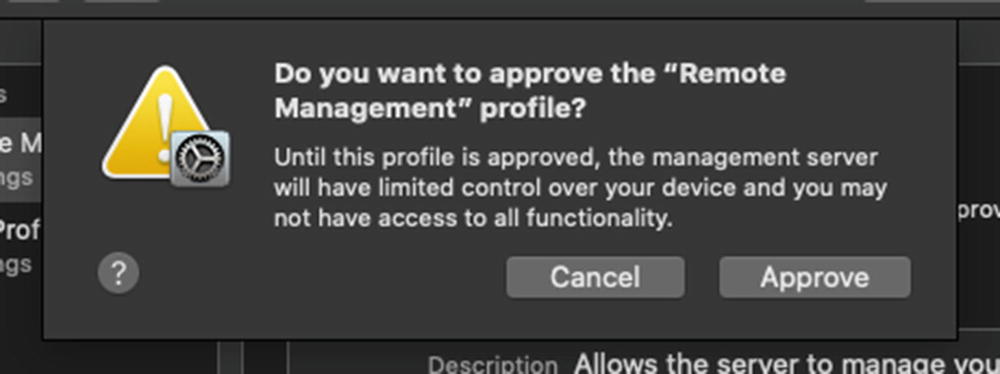 Figure 9-32
Click the Approve button to enable User Approved MDM
We have now configured MDM manually using a script on a test macOS client.
The only way to successfully enroll a macOS device into MDM and have it automatically configured as User Approved is through the DEP enrollment method. If you use DEP to push your Enrollment Profile during the Setup Assistant, the device will be User Approved without any additional interaction required.
iOS Management with Profile Manager
Now that we have had some experience with the various ways to enroll and remove enrollment from both macOS and iOS clients, let’s explore some of the management capabilities available to us in the Profile Manager console. In this section, we will focus on iOS capabilities and payloads. If you haven’t yet, go ahead and use your favorite method to enroll a test iOS device into Profile Manager and make sure it is supervised.
iOS Payloads
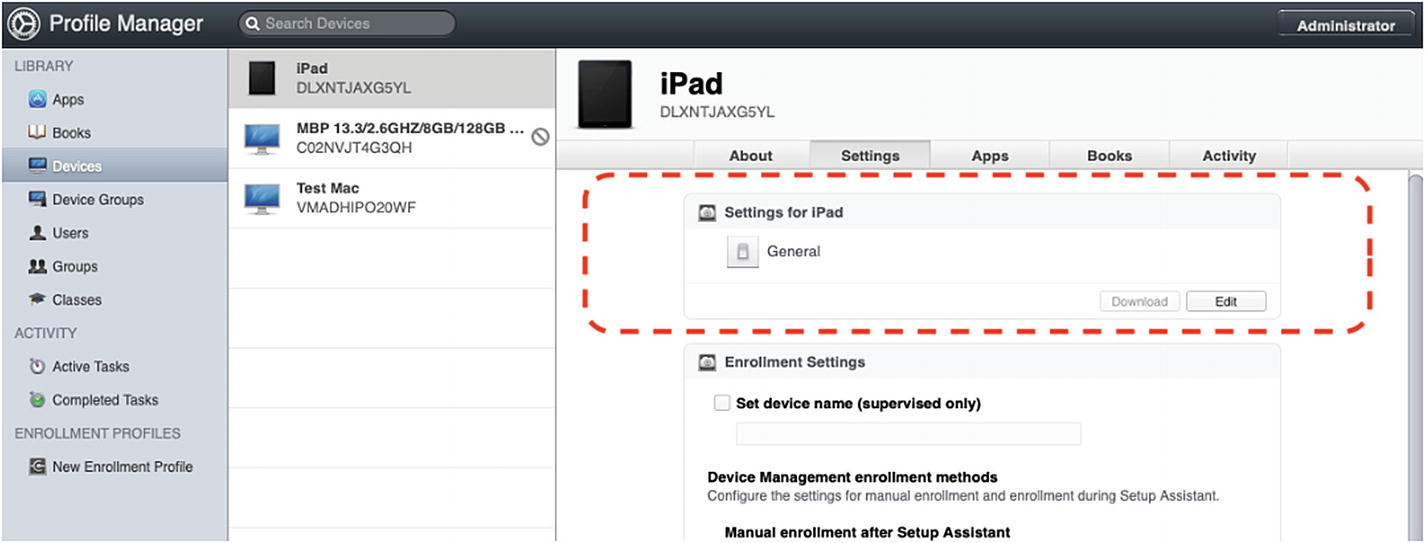
Click the Edit button to access the Configuration Profile settings for our test device
The Settings for iPad window will look very familiar to you from Apple Configurator. This is basically the same list of iOS-compatible payloads that we have used in previous chapters. Go ahead and configure the General payload as is required, making sure that Automatic Push is selected as the Profile Distribution Type. Next, we are going to configure a few payloads that change the visible configuration of the Home Screen for demonstration purposes.
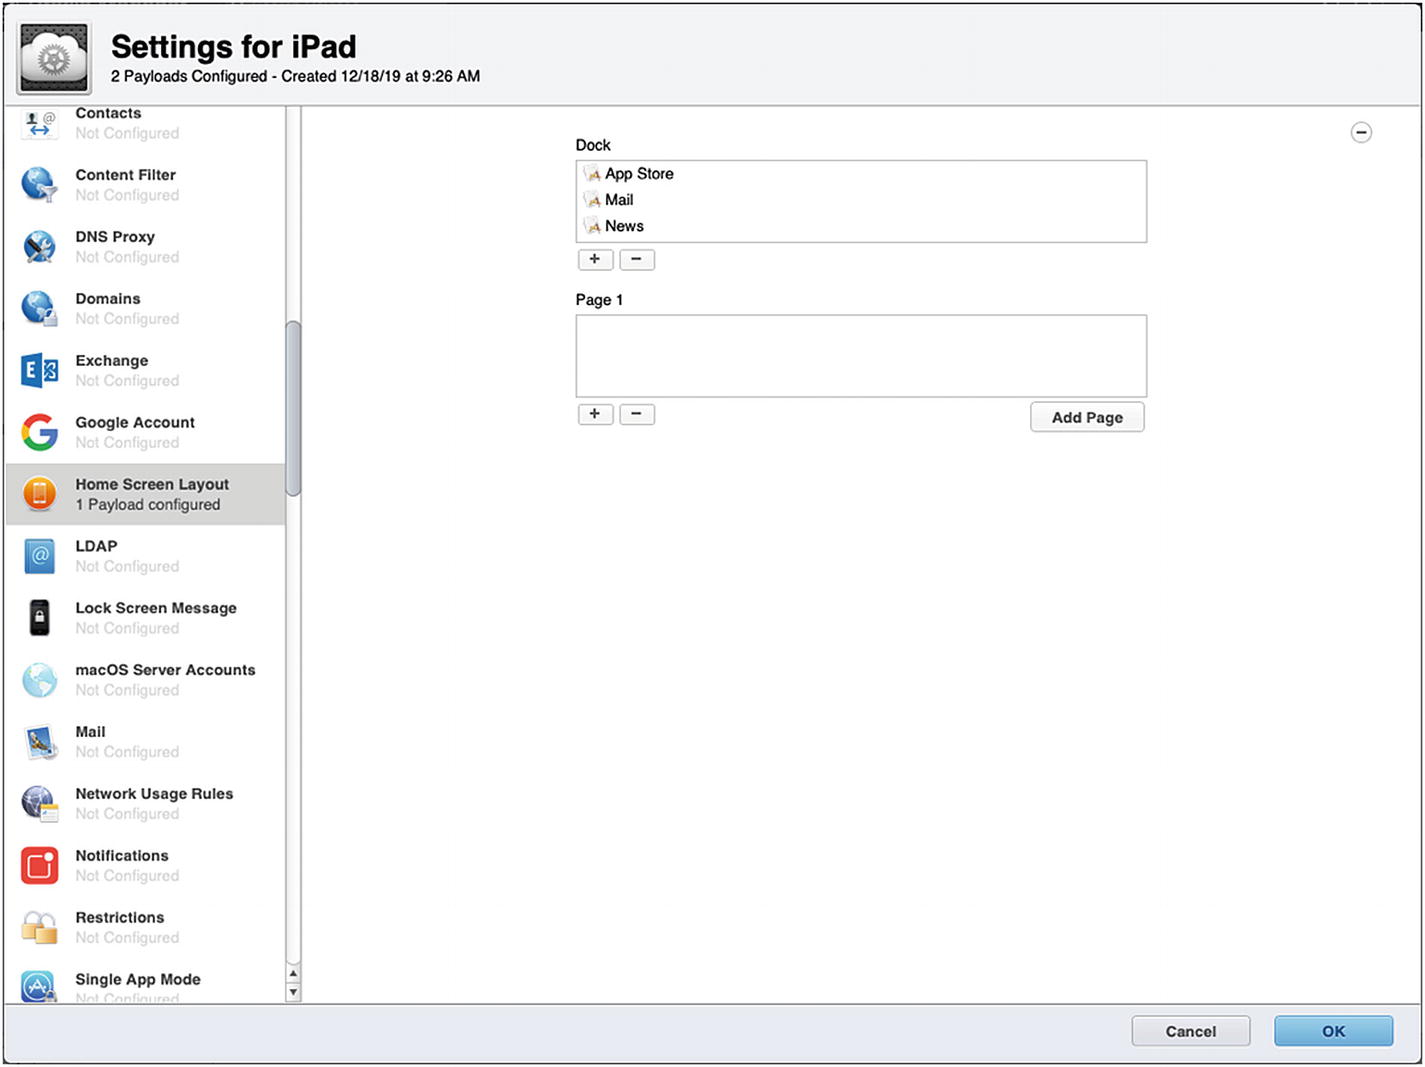
Configuring the Home Screen Layout payload
Next, click the Lock Screen Message payload. Click the Configure button and enter the lost message and asset tag info that you want to display on the lock screen. Finally, click Restrictions and then click Configure to customize these options.
Allow FaceTime (supervised only)
Allow iMessage (supervised only)
Allow Apple Music (supervised only)
Allow Radio (supervised only)
Allow removing Apps (supervised only)
Allow removing system Apps (supervised only)
Allow in-app purchase
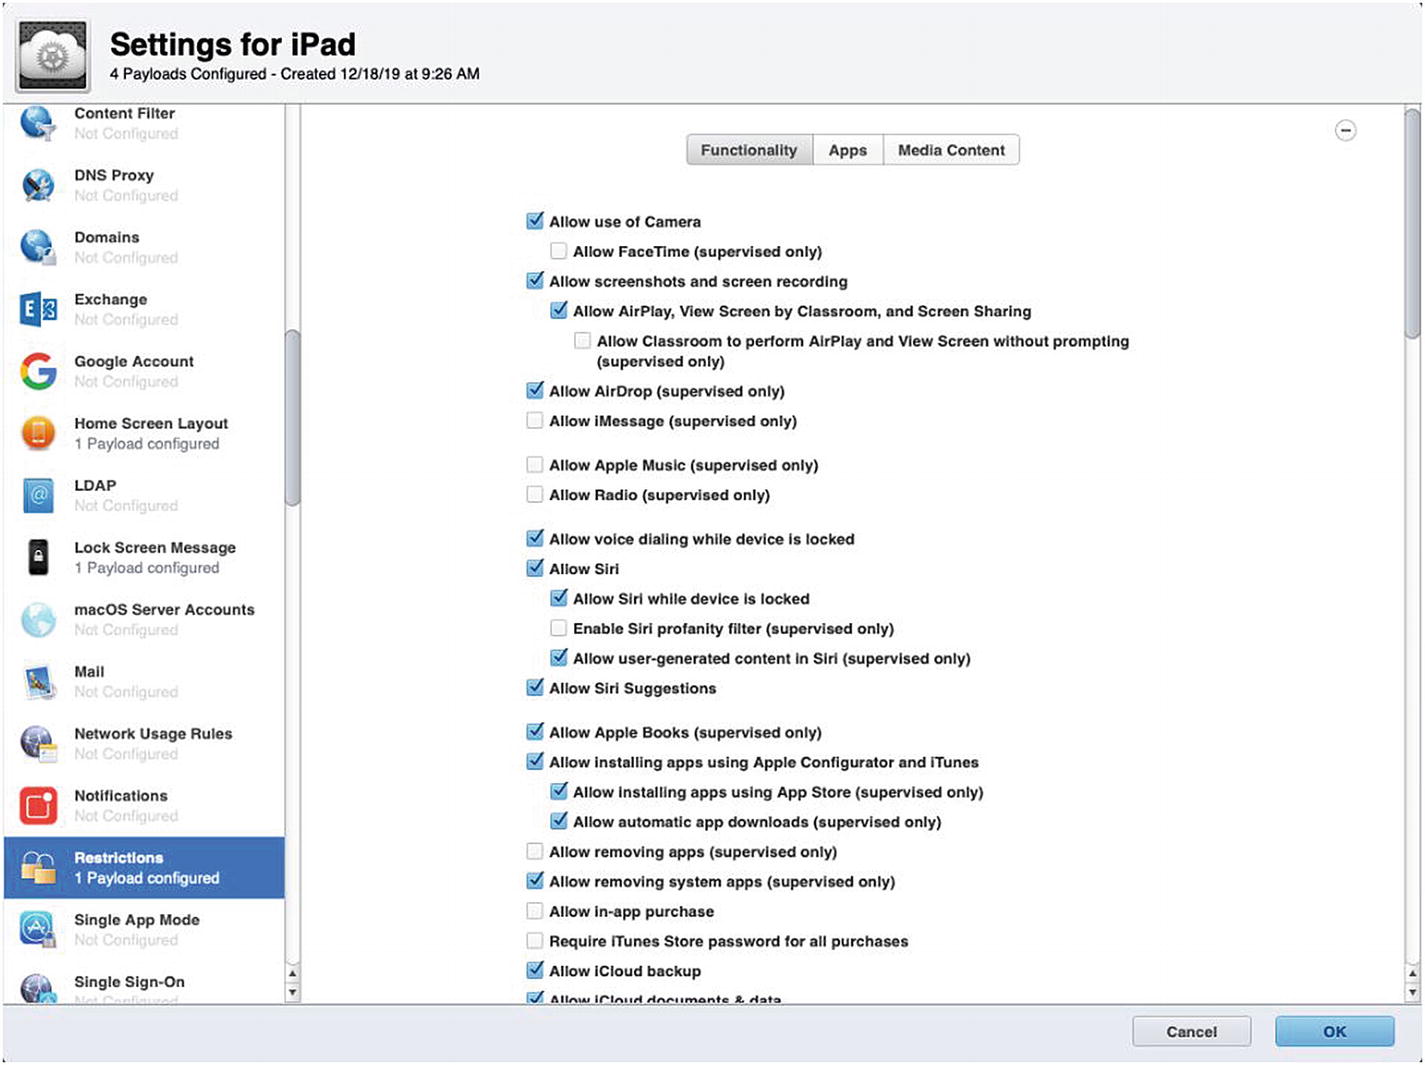
Configure the Restrictions payload
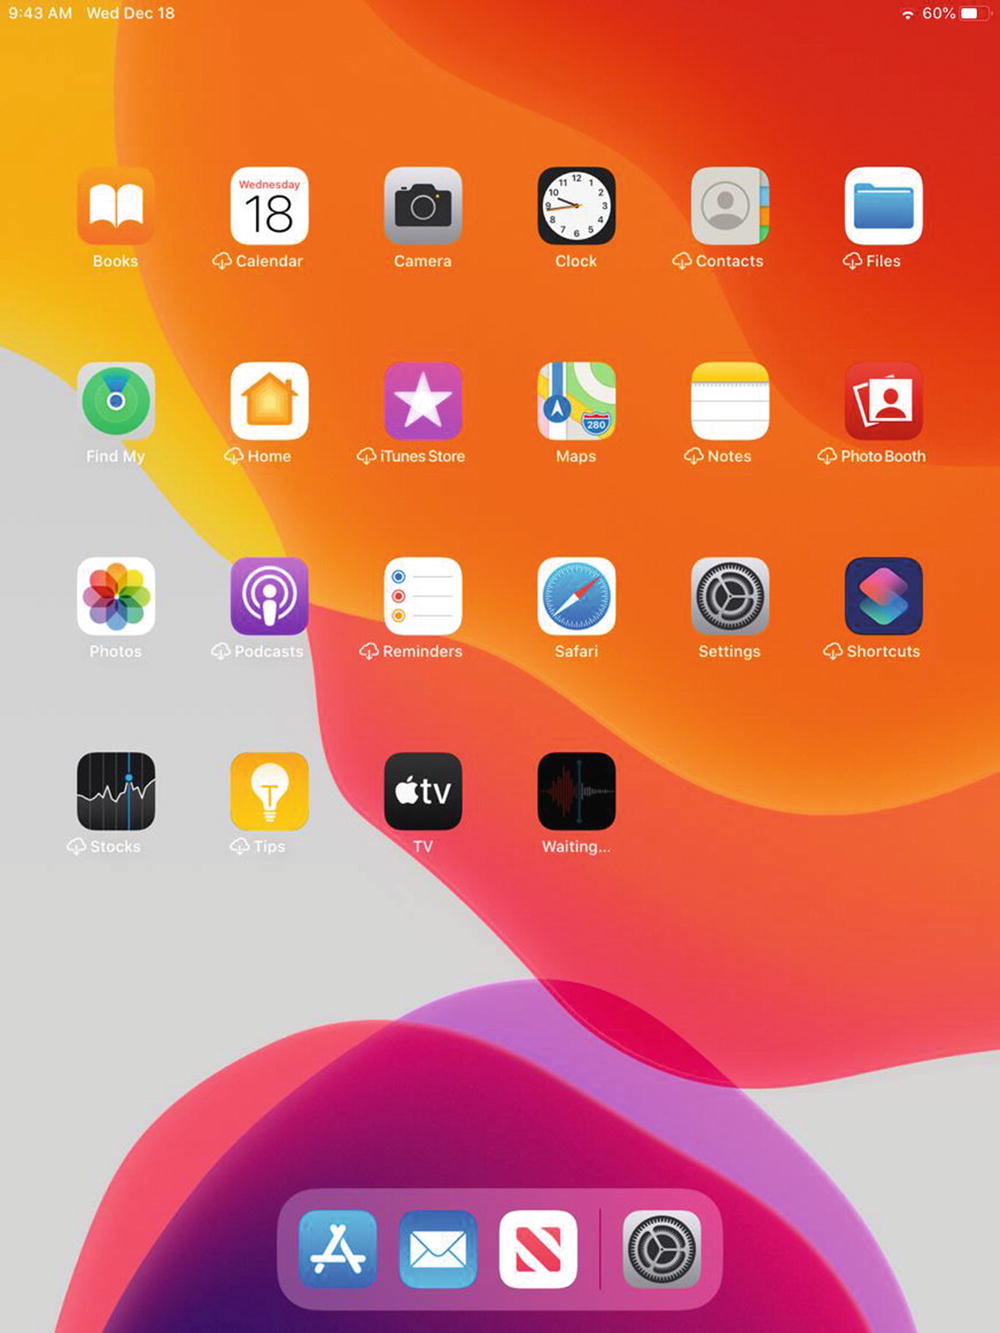
Our managed iPad with specified restrictions and settings
Exit to the lock screen, and you will see a message about contacting support and an asset tag number.
Next, let’s go back to Profile Manager and reverse some of these settings. Click the Edit button under the device’s Settings for iPad section. Click the – button under the Restrictions payload to remove it and then click OK to continue. Click the Save button to apply these changes over the air to the test iPad. After a few seconds, FaceTime and Messages Apps will return to the Home Screen, and you can now delete nearly any App that you want to. Delete the Stocks app just to be sure. Excellent!
This is very similar to how we configured and deployed payloads in Apple Configurator, but with the added benefit of being able to update the device in real time without it being connected to our Mac with a USB cable. This is the power of MDM. At this point, you can experiment with all kinds of iOS payloads and apply them or remove them from your test iOS device just to see how it reacts. There are a lot of really great options available to you, so I encourage you to take the time to try these out and see how they may fit into your overall deployment and management strategy.
iOS Remote Management
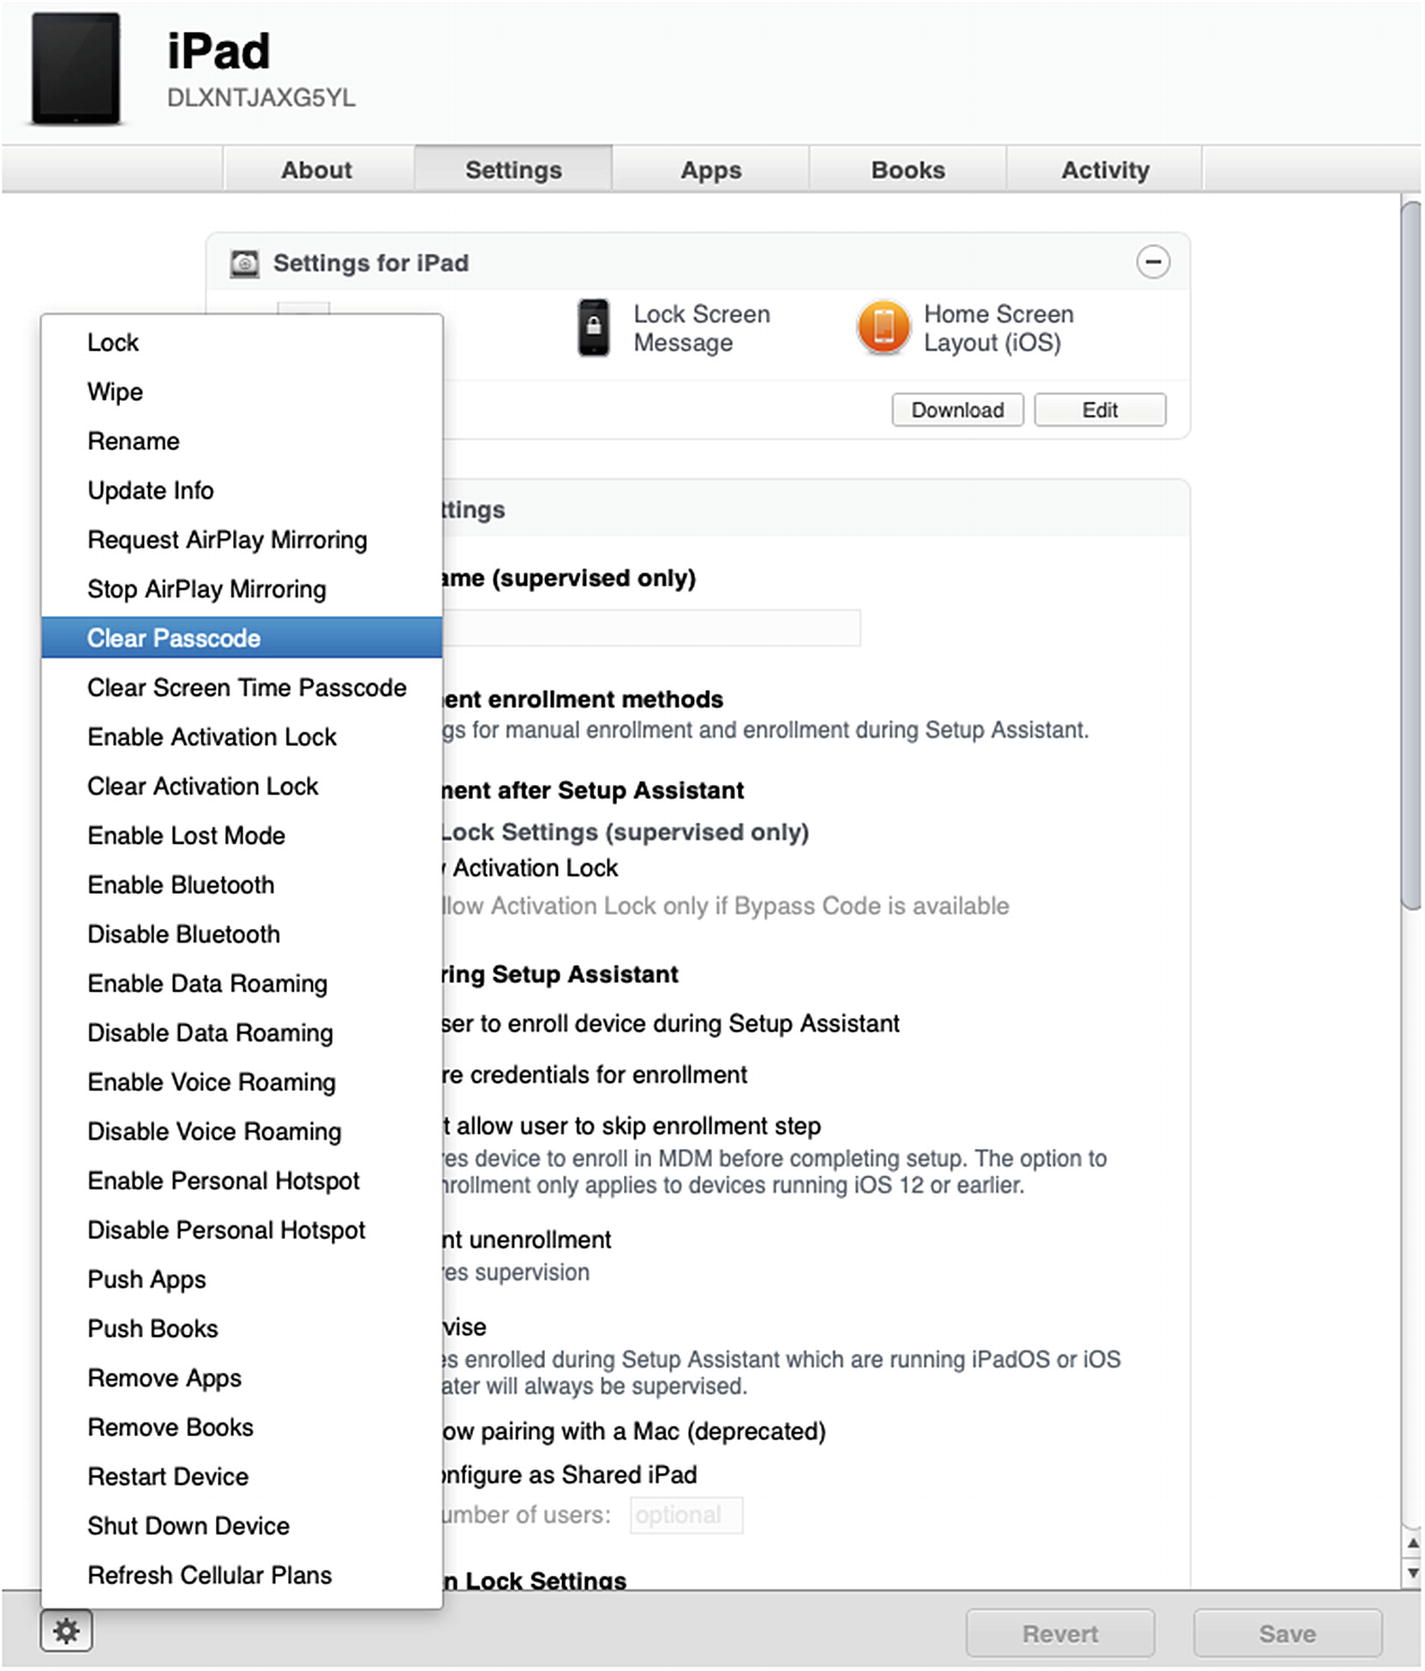
Sending the Clear Passcode command from the Actions submenu
Confirm when prompted. After a few seconds of activity, go back to your test iPad and presto! The iPad is unlocked. Not only does this make for a fun parlor trick, you can actually use this to get into managed devices where users have forgotten their passcodes or are no longer with the organization.
There are a number of different actions that you can experiment with: Restart, Shut Down, Wipe , and so on. As long as the device is connected to the Internet, it will respond to any remote management command.
macOS Management with Profile Manager
We’ve explored some payloads and actions that are available to iOS devices, but there are some unique options for macOS clients too. In this section, we will focus on macOS capabilities and payloads. If you haven’t done so yet, go ahead and use your favorite method to enroll a test Mac client into Profile Manager and make sure it is User Approved.
macOS Payloads
Like iOS devices, we can also configure specific macOS payloads as well. Browse to your managed test Mac in Profile Manager and click the Settings tab. Just like we did with the test iPad, click the Edit button under the Settings for Test Mac section. When the Configuration Profile window appears, you will notice that the settings are separated into sections that identify which OS the payloads apply to. You should be careful to only configure payloads that are specific to macOS or those that are for multiple OS types including macOS.

The Login Window payload settings

The TCC/PPPC settings in in the Security & Privacy payload
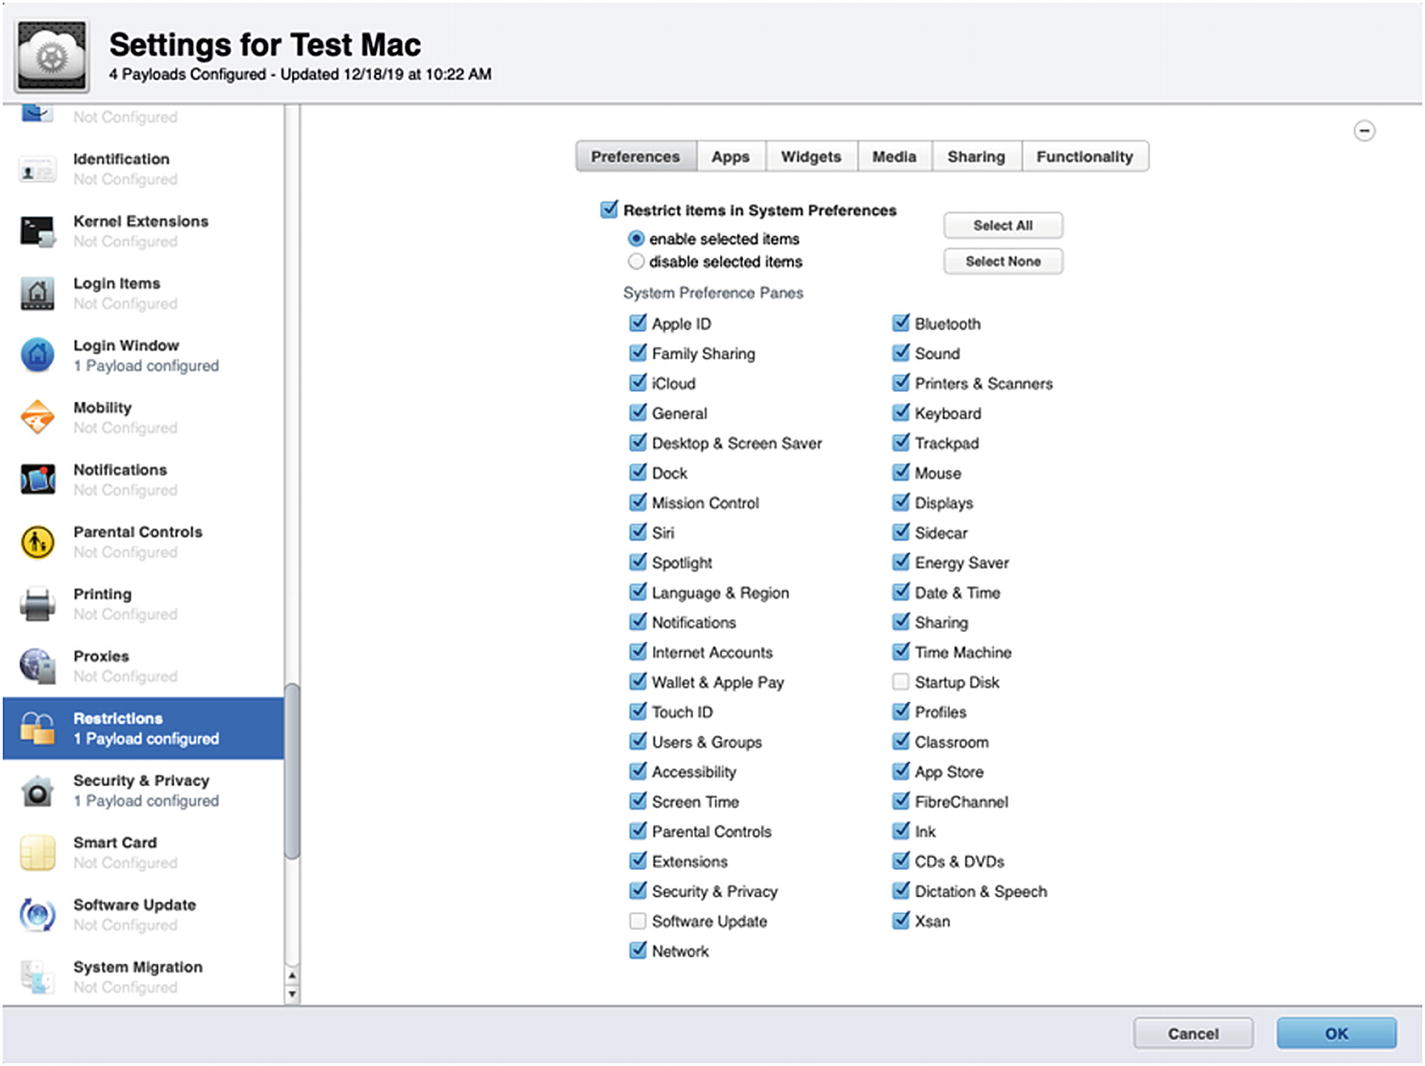
Disable access to specific System Preferences
Click OK to save the Settings for Test Mac and then click the Save button to apply them.
After a few minutes, let’s take a look at the macOS client we have been testing with and see what has changed. If you log out, you will see that the login window has changed to simple username and password fields; and clicking the clock in the top-right corner of the screen will allow you to toggle through the name of the computer, IP address, and so on. The ability to shut down the computer from the login window is also disabled, but you can still restart the computer if needed.

The disabled System Preference panes are grayed out
If you are going to restrict System Preferences using Profile Manager, there is one setting you are going to want to adjust in the Login Window payload to allow local Administrators to be able to access these disabled System Preferences. As shown in Figure 9-42, you should enable the Computer administrators may refresh or disable management setting under the Options tab. Once this is applied, when a local Administrator signs in, they should hold down the option key or the left shift key until the Mac prompts them with the dialog box shown in Figure 9-43. Choosing Disable Settings in this dialog box will re-enable all disabled System Preferences. This modifier key only works with user accounts that have Administrator access.
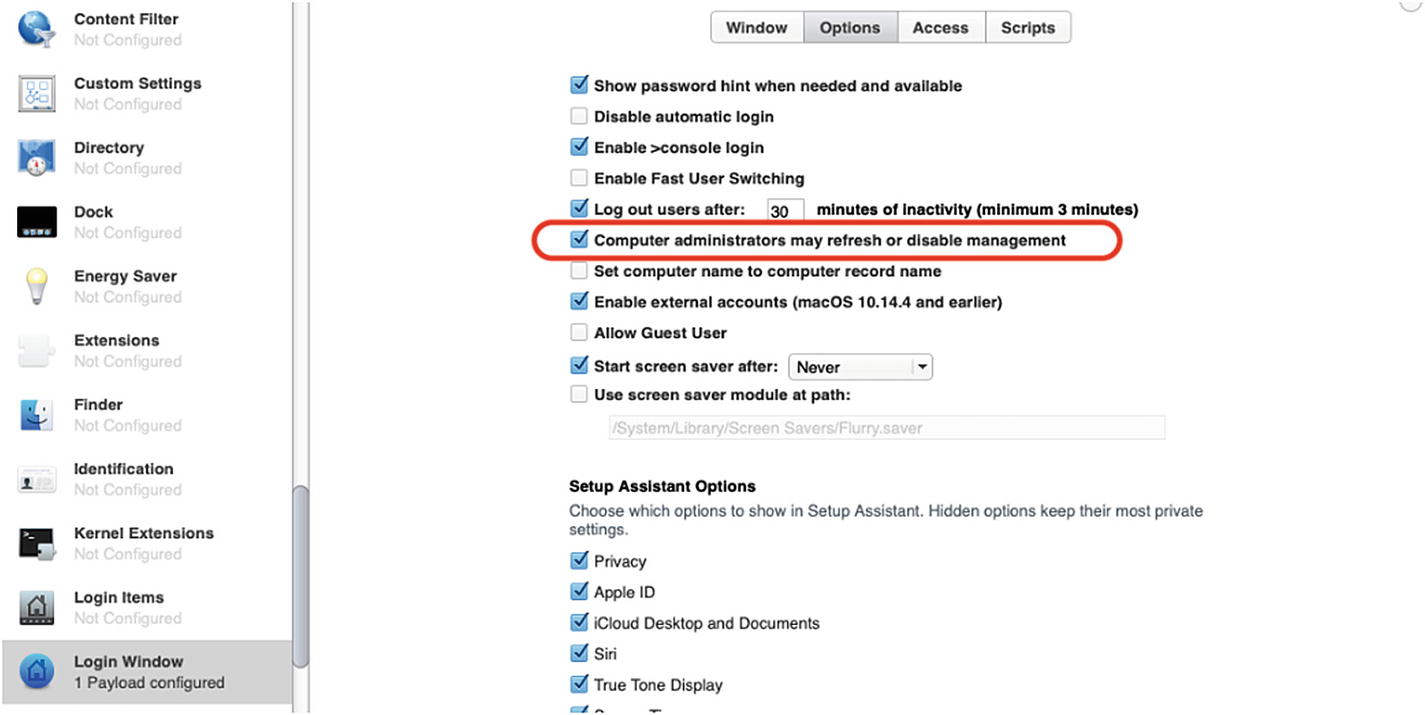
Ensure this setting is checked if you plan to disable any System Preferences with Profile Manager
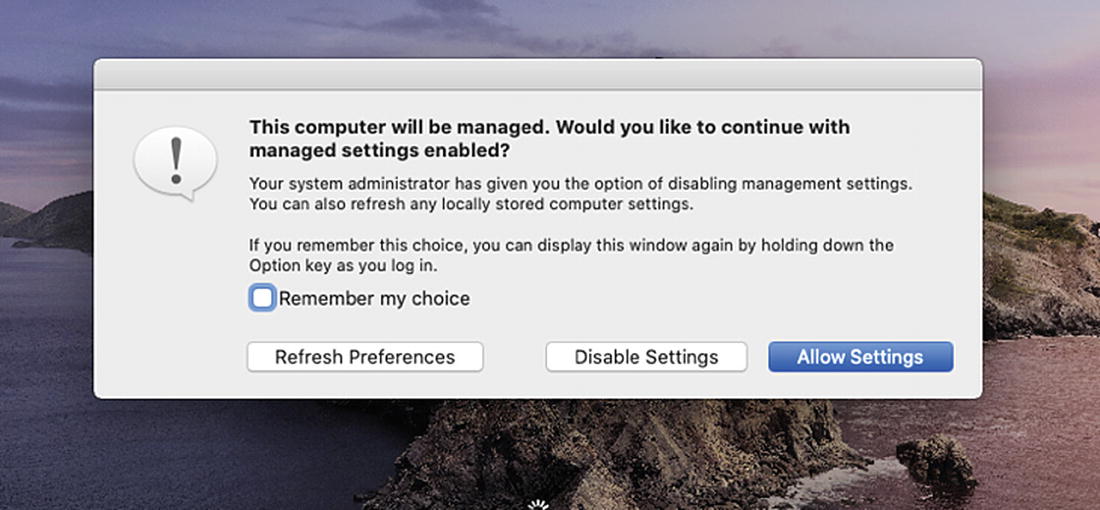
Select Disable Settings to re-enable the System Preferences
macOS Remote Management
Just like iOS, there are specific functions that you can invoke using the Actions menu. You can test this out by selecting your test Mac in Devices and then clicking the Action menu near the bottom of the Profile Manager window and selecting one of the functions. You can experiment with these, and you will notice that unlike Apple Remote Desktop, which also has these controls, your Mac doesn’t need to be connected to the local area network to respond to these commands. Because MDM is live on the public Internet, as long as a Mac has Internet access, it will execute.
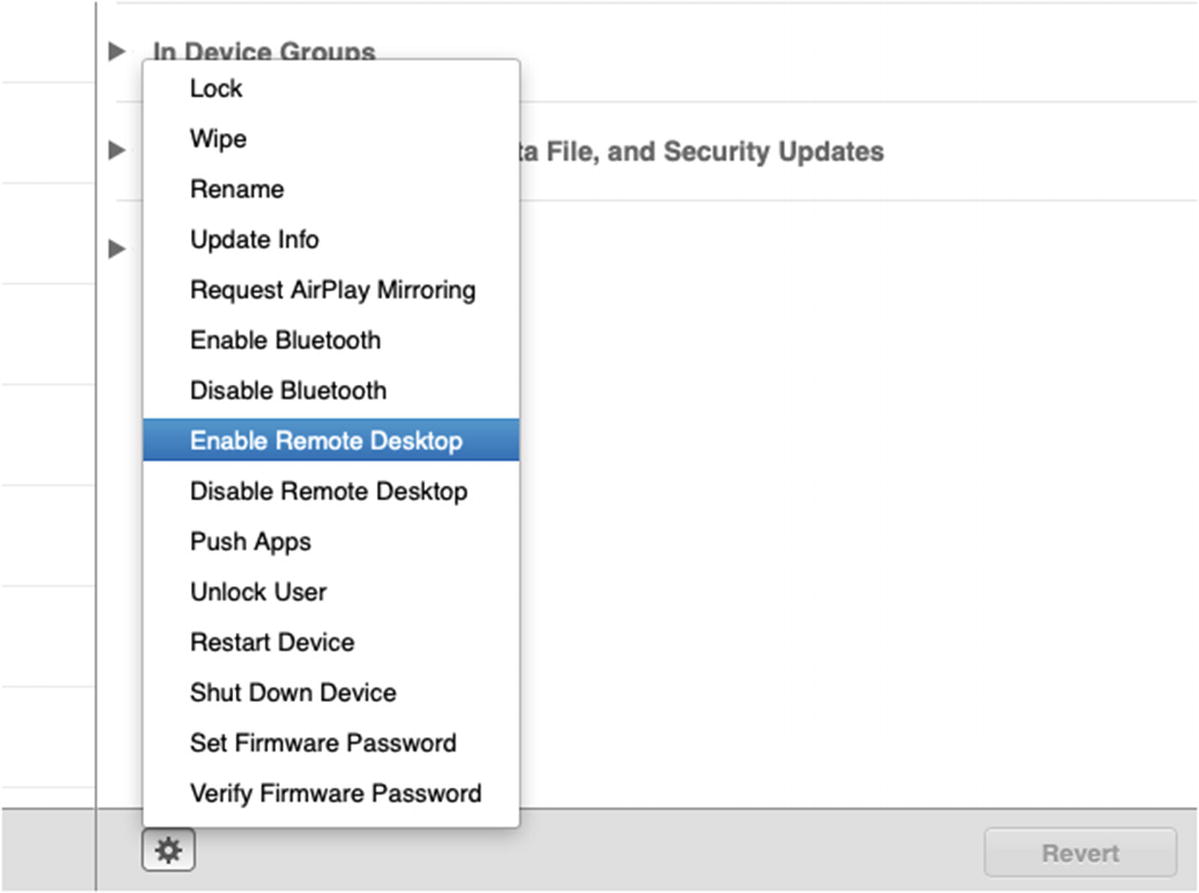
The list of actions available for macOS clients
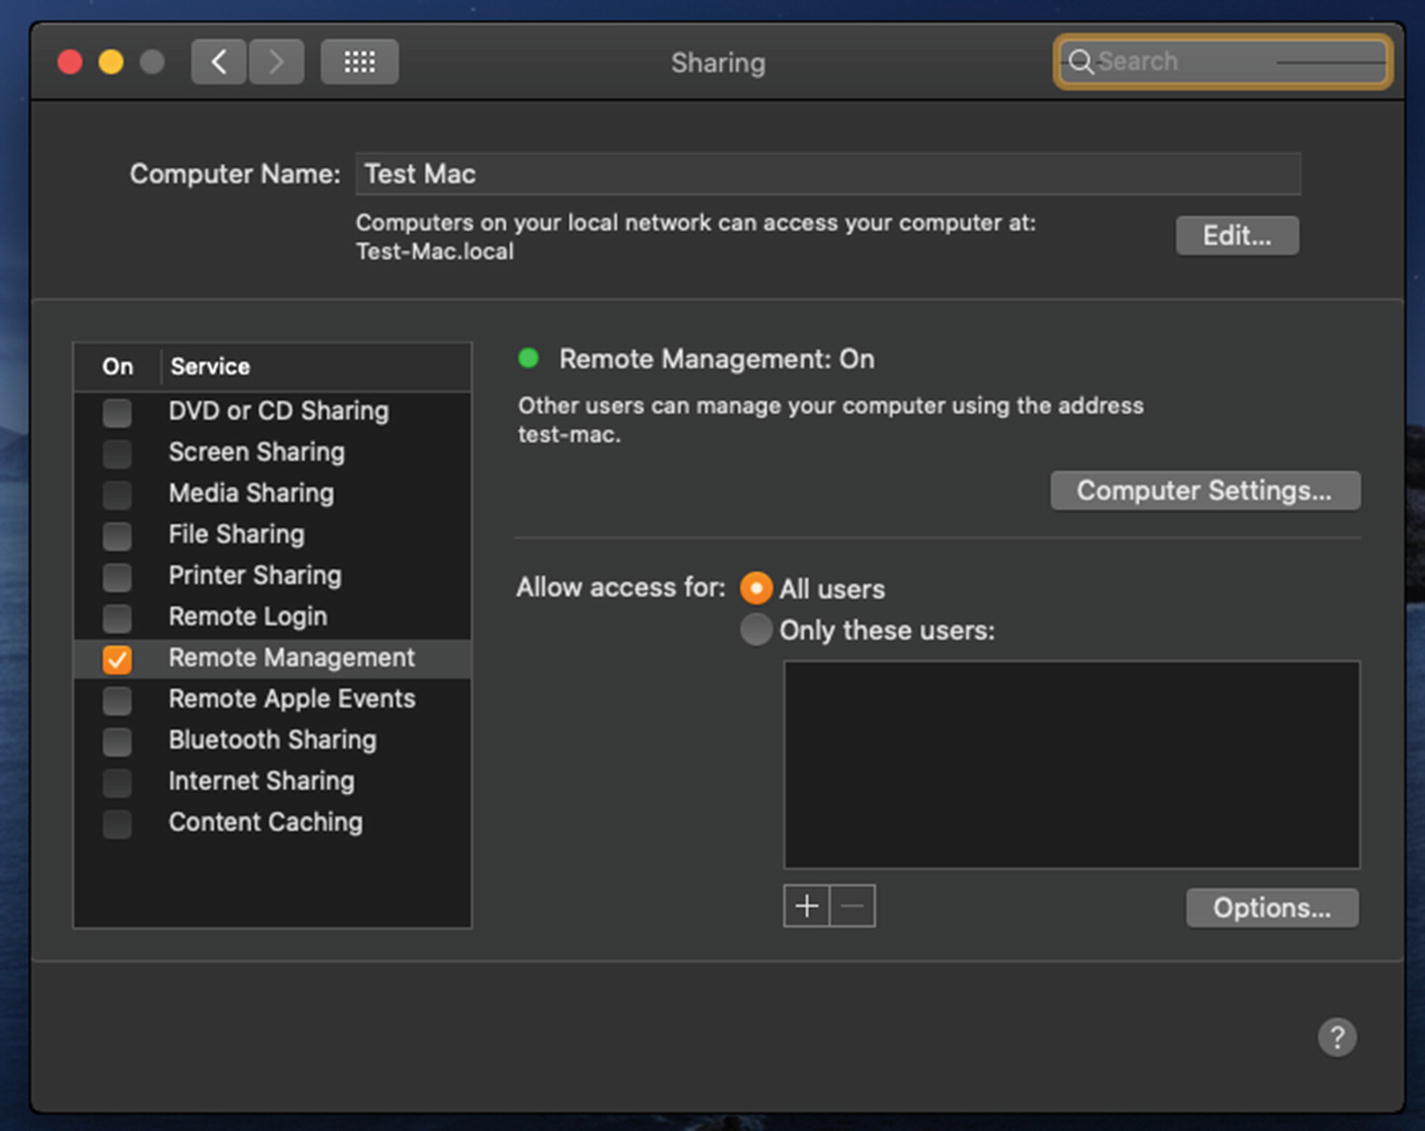
The Sharing System Preference after the Enable Remote Desktop action is executed
Now you can go into your Apple Remote Desktop console to add the device to your ARD computer list. If you are enrolling your macOS devices through DEP during Setup Assistant, once they are live in your MDM, you can turn on Apple Remote Desktop and then push various scripts and additional packages via ARD. This provides a complete end-to-end solution for staging systems remotely from activation through account creation and package installation.
Software Distribution with Profile Manager
In addition to managing devices, Profile Manager also works in conjunction with Volume Purchase Program (VPP) to enable remote installation of Apps from the App Store and Mac App Store.
Managed Distribution
Apple uses a concept called Managed Distribution to provide licenses to devices for Apps that are deployed via Profile Manager. The way that this works is that an organization purchases App Store credit, which is kind of like a really big iTunes Gift Card, and then uses that credit to redeem multiple licenses of Apps. For example, you can purchase ten copies of Angry Birds and then assign them to ten separate iPads, regardless of who is using them. Then a few months later, you can remove Angry Birds from four of the iPads and then install it on four other iPads. This way the organization can assign specific Apps to specific devices and then reassign them if the needs of their users change without purchasing additional licenses.
Redeeming Apps
The first thing we want to do when assigning our Apps is to redeem a pool of licenses. For the purposes of this exercise, instead of purchasing App Store credit, we can just pick a few free Apps to play around with. Open Profile Manager and click the Apps icon in the sidebar. In the lower-right corner of the screen, click the Get More Apps link. It should redirect you to Apple School Manager or Apple Business Manager. Go ahead and sign in with your institutional admin account.

The Apps and Books section of Apple School Manager
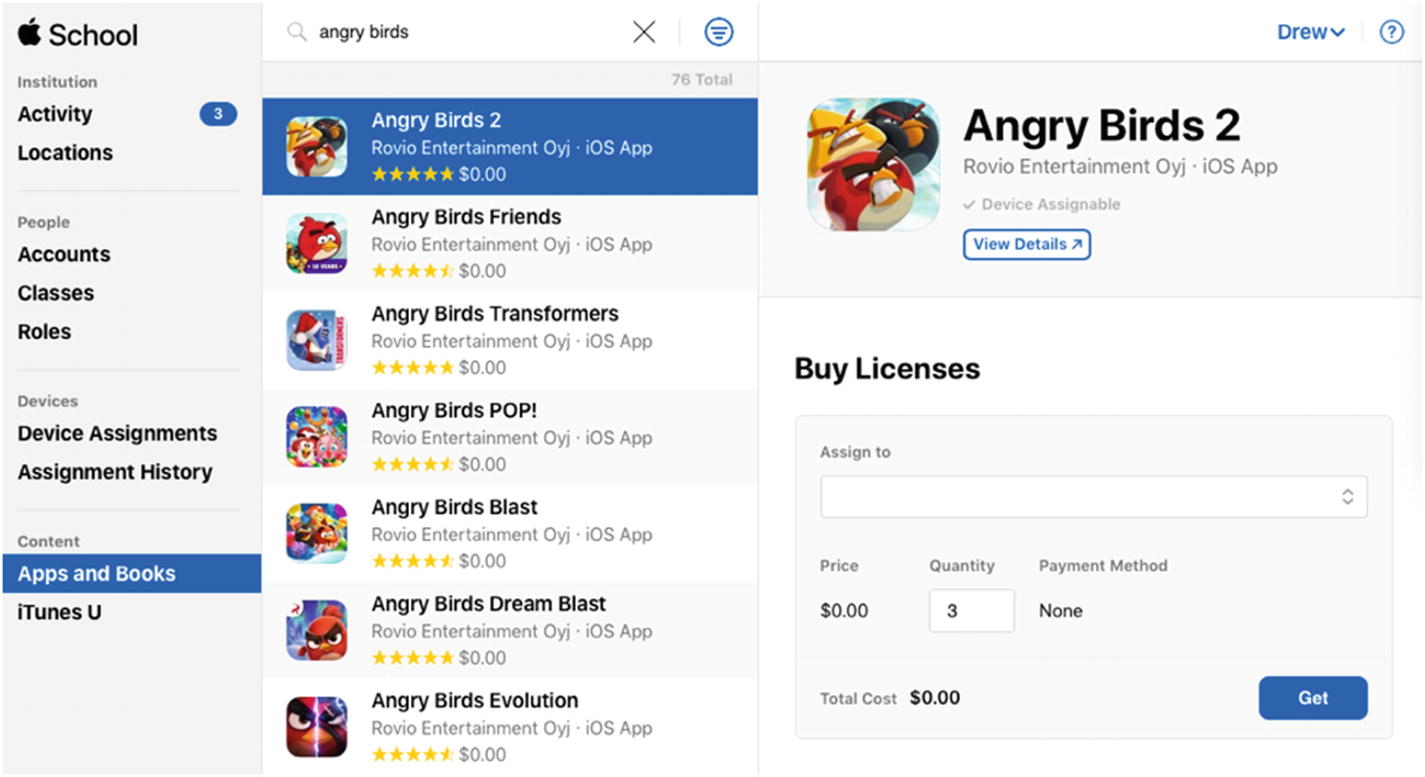
Enter a quantity and click the Get button to purchase the licenses
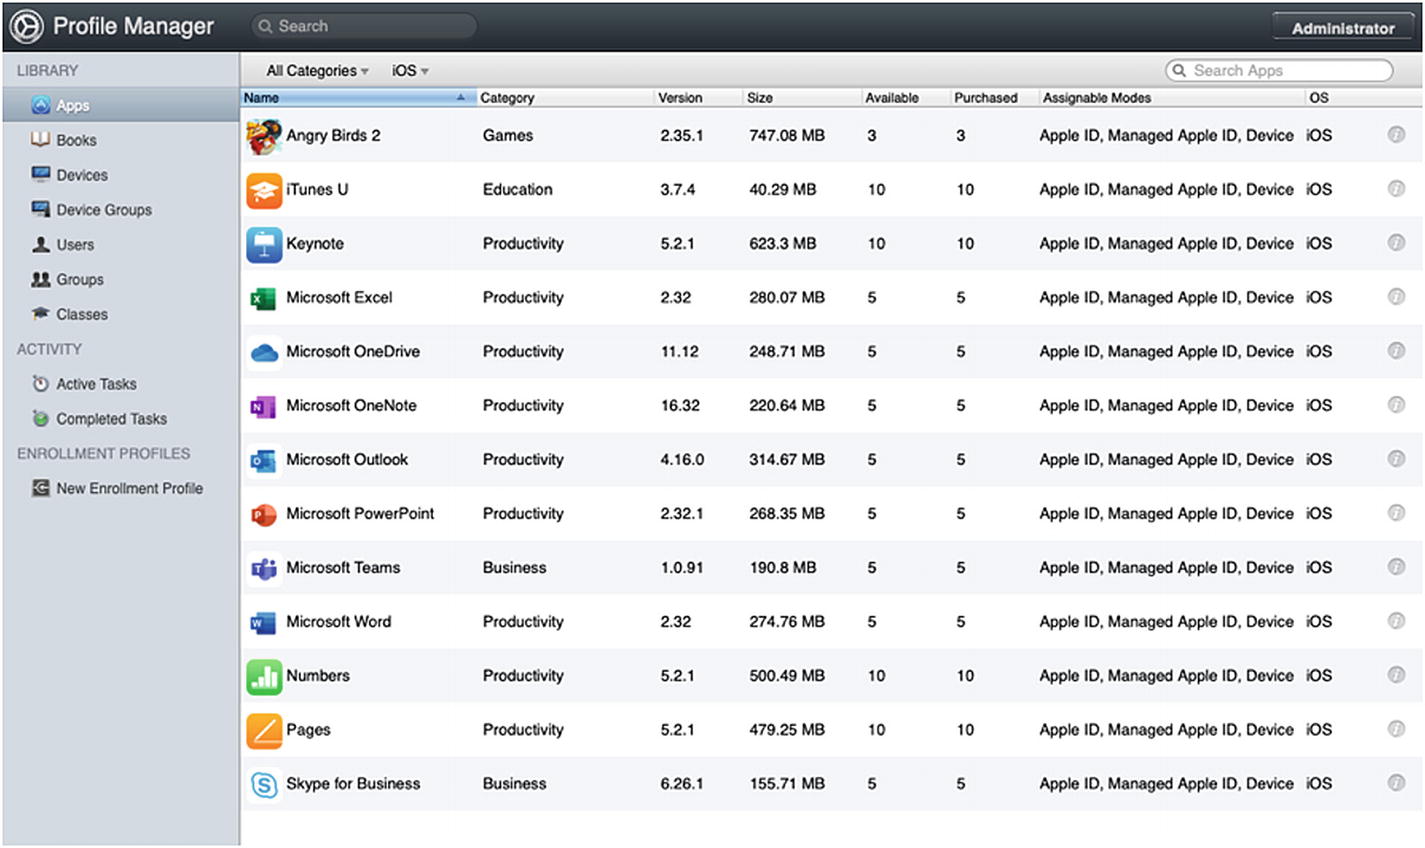
The Managed Distribution pool of Apps available to us in Profile Manager
Profile Manager and VPP/DEP synchronize pretty regularly, but if you are not the patient type, you can force a sync by clicking Devices and then clicking the refresh button next to the add/remove Placeholder buttons.
App Distribution
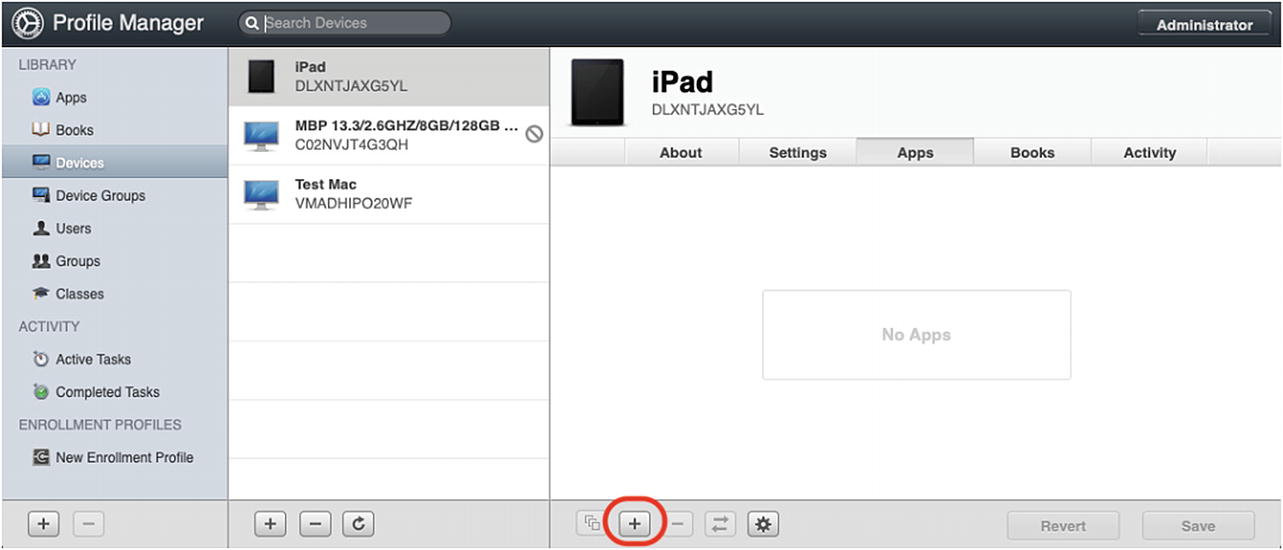
Assigning Apps to our test device
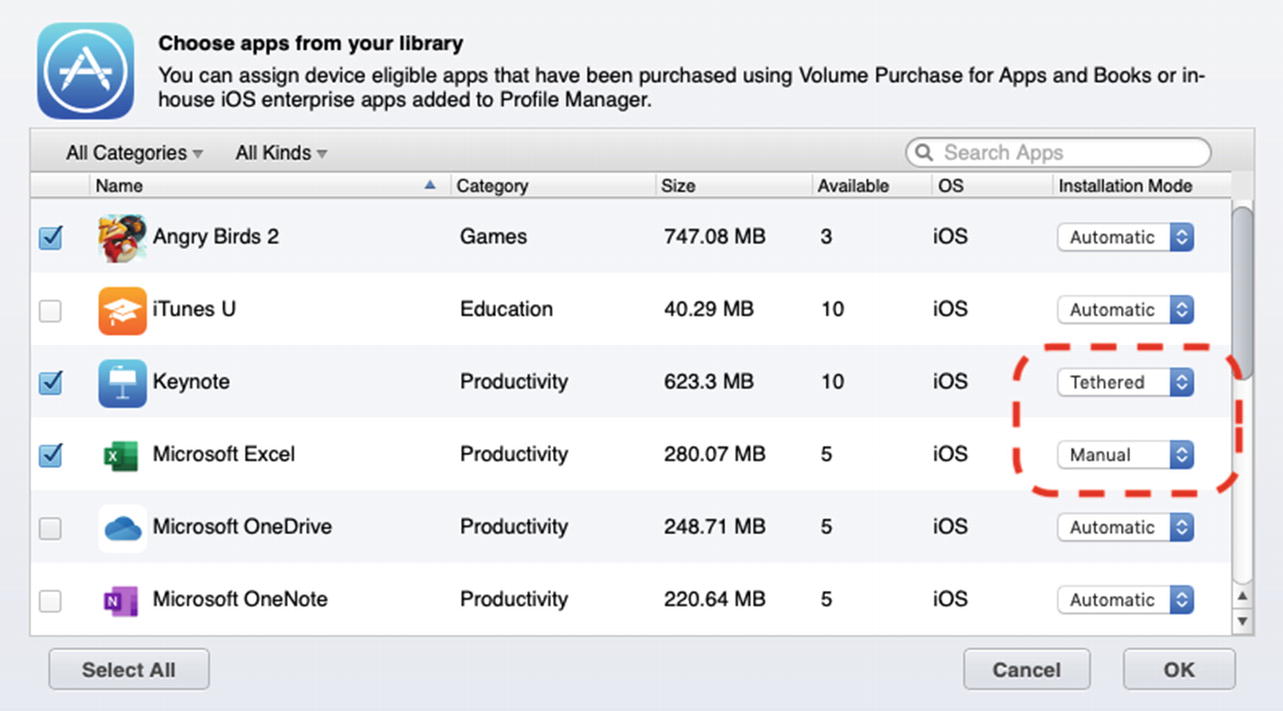
Select different Installation Mode options to see the differences between them
If you take a look at the test device, you will see Angry Birds 2 should be downloading and installing on the Home Screen. Depending on your Internet speed, this may take a few minutes. You will not see the other two because they are not set to Automatic. Because Excel was set to Manual, the user has to go to the App Store and download it manually unless they are prompted on the device to install at some point. Keynote will only download if we are using Tethered Content Caching , which we are not.
Tethering is a great feature for schools or businesses with a lot of devices and limited shared bandwidth. For large Apps like iMovie or GarageBand, it may be preferable to force the Apps to only install on the device if the device is on a subnet with a Mac configured with the content caching service running.
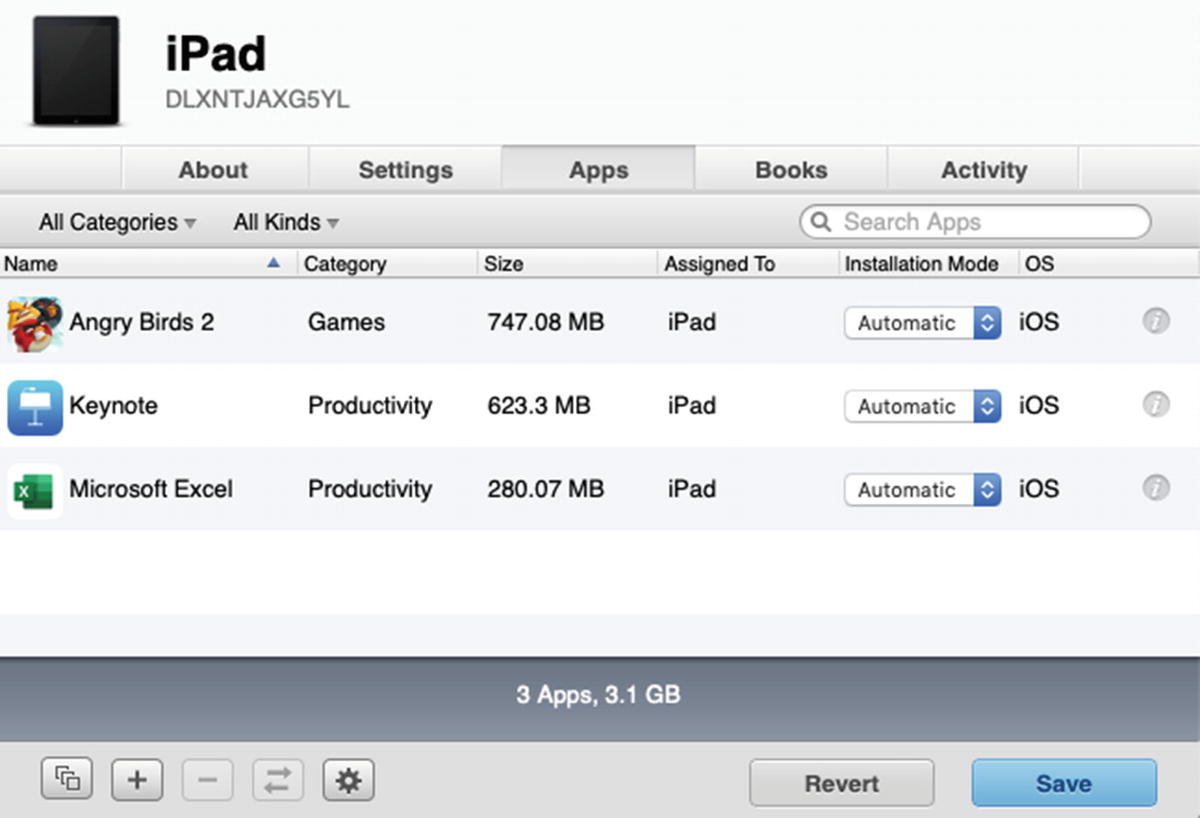
Update the installation mode to Automatic for all of the assigned Apps
As you might expect, assigning Books to the device is done in the exact same fashion. Another item of note is that while we have been applying Apps, Books, and Configuration Profiles to devices in this chapter, you can also apply these to specific users or groups of users as well. The only caveat with assigning Books is that unlike Apps, once you distribute a Book to a user, you cannot reclaim the license. If your organization creates custom iBooks Textbooks using the iBooks Author application, you can distribute those books using Profile Manager, but you can only assign them to users, not devices.
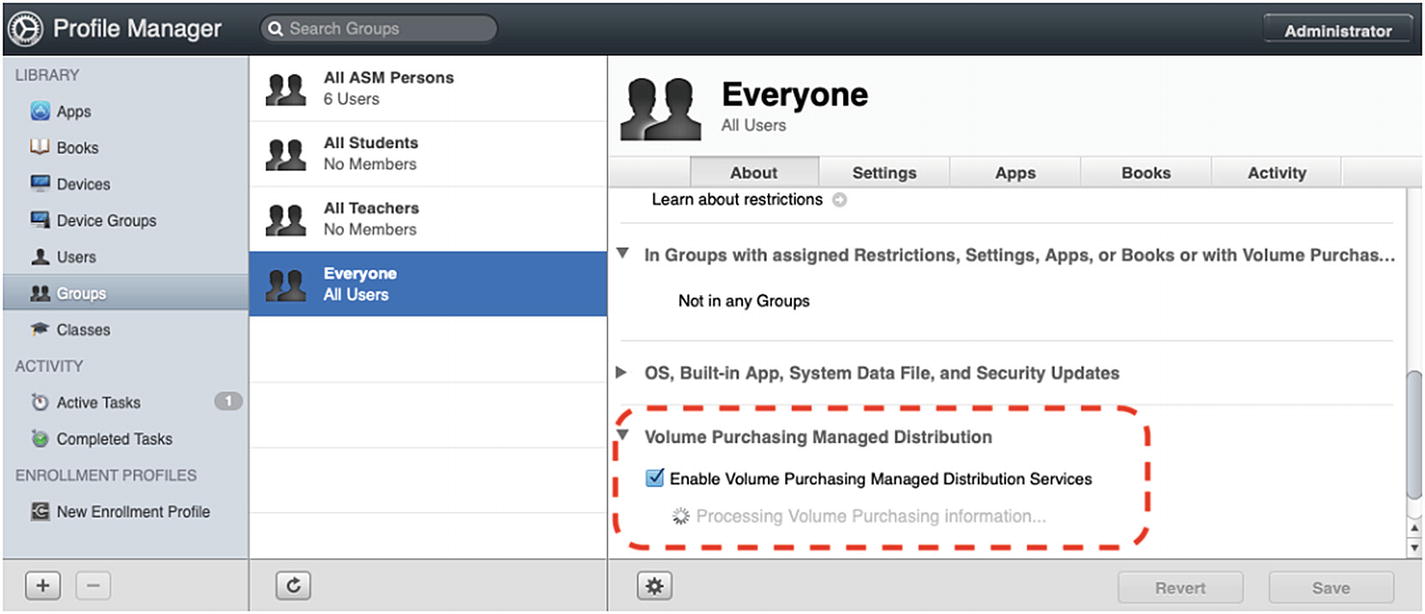
Enabling Volume Purchased Managed Distribution for Apple IDs outside of your organization
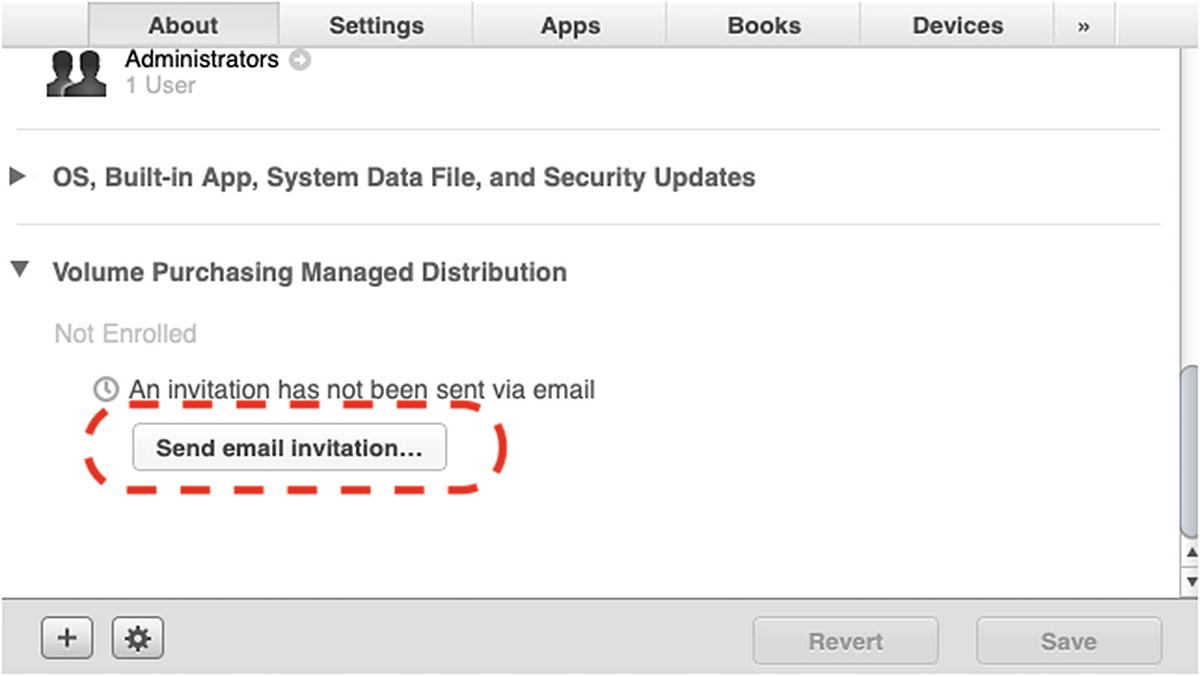
The Send email invitation… button
Distributing Apps and Books is relatively intuitive so spend some time testing this on a macOS client as well. The process is basically the same, but with applications from the Mac App Store instead of iOS Apps.
Summary
In this chapter, we covered a lot of the core functionality of Mobile Device Management with Profile Manager. There are so many useful payloads and features that macOS and iOS system administrators can use to make their life easier, and we barely scratched the surface! Take some time to experiment and become more familiar with the effects of the various payloads and commands available to you before you move onto the next chapter.