Sheep for Sheep Dogs
The best advice about training a sheep dog is to use trained sheep. “Naïve” sheep, ones that have never been herded, are tough for any but the more seasoned working dogs to handle.
Now I have a sheep and a cow, everybody bids me good-morrow.
— Ben Franklin
Before you buy sheep, make sure you want them. Try to spend some time with sheep, especially at lambing time, before you commit; this is for your sheep’s sake as much as your own. Make certain your way of life will mesh with keeping sheep. Keeping livestock is a huge commitment, with daily responsibilities. You can’t buy sheep, then turn them out and forget about them. Here are some questions to ponder before purchasing:
And most important: Sheep are extremely social creatures who need the companionship of other sheep; you can’t keep one sheep all alone.
Once you’re sure that sheep are for you, decide what you want from your sheep. Will you buy crossbreds (sheep with parents of two breeds) or purebreds; registered stock or not? Will you raise lambs or start with adults? How many do you need? How much money are you willing to spend to buy and maintain them? How far will you travel to visit farms and buy your sheep?
You will need:
And most important:
Let’s assume you’ve read chapter 3 and chosen a favorite breed. Let’s make it a popular breed such as Suffolk. Where are you going to find them?
The best, most reliable way to learn how to raise sheep in the area where you live is to discuss your needs with your County Extension agent. What works for sheep in Maine isn’t necessarily right in Oklahoma, Washington, or Mississippi. Agents are also your best source for reliable information about local feeds, mineral deficiencies, and effective deworming procedures, and their services are free. To locate County Extension offices in your area, visit the USDA Cooperative Extension System website.
Check for “sheep for sale” notices on bulletin boards at feed stores and veterinarian practices, or pin up a “Suffolk sheep wanted” sign of your own. Read the local classified ads, especially in pennysaver–type shoppers. Talk to veterinarians and County Extension agents in your buying area; they know who is raising sheep near your home.
Take in a sheep show. Visit information booths and chat with exhibitors between classes. All state and most county fairs host sheep shows. Breed associations sanction them, too; e-mail or call organizations for dates and times.
Join sheep-related e-mail groups. Such affiliations are a great way to find sheep and related supplies, and you’ll make new friends who just might own the sheep you want to buy.
Visit breeders’ websites. Type the name of the breed, “sheep,” and “sale” into the search box of your favorite search engine (e.g., Suffolk sheep sale). Qualify it further, if you like, by state (e.g., Suffolk sheep sale Ohio). If breeders’ websites don’t offer what you’re searching for, e-mail and ask if they have it. It they don’t, they may know someone who does.
Check out ads in sheep magazines such as Sheep!, The Banner Sheep Magazine, and Sheep Canada (see Resources).
If your chosen breed is a rare one, for example, Hog Island or Karakul sheep, log onto the American Livestock Breeds Conservancy website (see Resources) and click on Classifieds in the menu.
Finally, visit online sheep directories such as the United States Sheep Breeders Online Directory and visit registry websites to peruse their online member-breeder directories. Or, phone or e-mail organizations and ask them where to buy their breed of sheep in your area.
Beatrix Potter (1866–1943), author of The Tale of Peter Rabbit and dozens of other children’s classics, helped preserve Cumbria’s endangered Herdwick sheep when British farmers abandoned them in favor of more popular, improved breeds. When she died, she left 14 farms, 4,000 acres of land, and her large flock of prize-winning Herdwicks to the British National Trust.
Hardy, hill-dwelling Herdwick sheep have been grazing the steep, bleak Lake Country fells since at least the twelfth century ce. Herdwicks have pale blue-gray fleeces and white faces, but their most unusual feature is their “hefting“ instinct; they live their lives within a few miles of their unfenced birth places. When sold away from their homes, Herdwicks try desperately to return.
The first rule of sheep buying is to buy from individuals, not from sale barns. People send sick sheep, ornery rams, and problem breeders to the sale barn for their salvage value. In most cases you have no contact with the seller. Was the ewe you purchased vaccinated? Bred? If so, to what sort of ram and when is she due? She or her flock mates might have any of several catastrophic, slow-incubating diseases such as caseous lymphadenitis, hoof rot, or ovine progressive pneumonia (see chapter 7), things you definitely don’t want on your farm. And the sheer number of sheep and goats (goats carry most of the diseases that sheep do) passing through a sale barn leads to a natural buildup of disease organisms. Sheep who weren’t exposed to disease before they were sold through a sale barn are likely to be infected by day’s end.
If you do attend such sales, scrub your hands with plenty of soap the moment you get home and sanitize the clothing you wore. Do it before going near your own sheep or other livestock. Use one part household bleach to five parts plain water in a spray bottle to thoroughly spritz boots and shoes, and launder your other clothing in hot water and detergent. Hoof rot, soremouth, respiratory diseases, and caseous lymphadenitis can hitchhike home on your hands, clothing, and especially your shoes.
If you do buy sale barn sheep, quarantine them for at least 30 days.
When you bring sheep to your farm, be they new animals or those returning from a show or from being bred, plan to quarantine them away from your existing flock. House them in an easy-to-sanitize area at least 50 feet (15 m) from any other sheep or goats but within sight of other sheep; worm them, vaccinate them, trim their hooves, and keep them isolated for at least 30 days. Don’t forget to sanitize the conveyance you hauled them home in.
During that time, feed and care for your other sheep first, so you can scrub up after handling the quarantined sheep. Never go directly from quarantined animals to your other sheep. If you can prevent it, don’t allow dogs, cats, poultry, or other livestock to travel between one group and the other. When their time in quarantine is up, sanitize the isolation area and any equipment you’ve used on the quarantined sheep.
If you’re buying locally, tap into the local sheep grapevine. Ask who other sheep owners buy from, who they avoid, and why. After you’ve narrowed the field to a handful of producers selling your type of sheep, contact them and arrange to visit their farms.
Be courteous and arrive on time. If you have sheep or goats at home and the seller wants to sanitize your shoes, don’t be offended. In fact, consider biosecurity precautions a plus.
Look around. Sheep farms aren’t necessarily showplaces but they shouldn’t be trash dumps either. Are the sheep housed in safe, reasonably clean facilities? Are there droppings in the water tanks? Are they eating poor-quality hay? Are any sheep limping? Do they cough? Do you see runny eyes or noses? Are the sheep in good flesh, neither scrawny nor over-fat? In large herds, you’ll spot a few sheep who are skinnier or fatter than the norm, but the majority should be in average condition.
Ask about the seller’s vaccination and worming philosophies, particularly which vaccines and wormers he uses and why. How often does he vaccinate and deworm his sheep? Does he test for diseases like caseous lymphadenitis and ovine progressive pneumonia, and does he have documentation that he does? Are any of his sheep currently infected? What about hoof rot? Soremouth? If he’s had these problems in his herd, what did he do to control them?
Does he show you only the sheep you arranged to see or the entire flock? Try to see them all, especially sheep related to the ones you came to buy. If there are problems, you should know about them up front.
Ask why the sheep are for sale. Is he changing bloodlines? Downsizing? Switching breeds? If they’re culls, perhaps the trait he’s culling for doesn’t matter to you.
If you like what you see, ask to examine the sheep’s registration papers and their health, vaccination, worming, and production records.
The best advice about training a sheep dog is to use trained sheep. “Naïve” sheep, ones that have never been herded, are tough for any but the more seasoned working dogs to handle.
When buying registered sheep, carefully examine the paperwork to make sure you’re getting what you pay for. Papers are transferred after every sale, so they should be issued in the seller’s name. If they aren’t, he can’t sign a transfer slip, and the papers can’t be transferred to you.
Most registries stipulate that lambs be registered by their breeders. If you buy eligible but as yet unregistered lambs, ask for a fully filled out and signed registration application and a completed transfer slip conveying their ownership to you.
And be aware that unethical or unknowing breeders sometimes sell sheep that aren’t quite what they seem. Full-blood (100 percent) Dorpers, for example, are not the same as percentage Dorpers. Given two sheep of equal quality, the full-blood is worth a lot more money. Learn the jargon before you go shopping.
Production records should indicate a sheep’s birth status (single, twin, triplet, etc.) and particulars about her reproductive career. Ask about a ewe’s lambing habits. Has she had any birthing problems? Has she ever rejected a lamb? In prolific breeds, does she produce enough milk to feed all of her lambs or do they require supplementary bottle-feeding?
Ask about guarantees. Some producers give them, some don’t; if any sort of guarantee is extended, get it in writing.
Is the seller willing to work with you after the purchase, should questions or problems arise?
Above all, trust your intuition. If the seller makes you feel uneasy, thank him for his time and shop elsewhere. Given the many honest sellers in the sheep world, why deal with someone you don’t quite trust?
Choose individual sheep based on your particular needs, taking the following factors into consideration.
Always buy sound, healthy sheep. Chapter 7 explains how to tell sick sheep from healthy ones. Make no exceptions. If the sheep you have your heart set on has, for instance, foot rot, and you’ve never had foot rot on your farm, pass her by. Never knowingly buy expensive trouble.
Another important thing to do before buying sheep is to ask the organization that registers your breed of choice for a copy of their breed standard. This is a list of points to look for when evaluating that breed of sheep. Don’t omit this step.
If you want something rare, even if it’s only rare where you live, plan to devote time, energy, and travel to buying sheep. Otherwise, talk to shepherds in your area and see what breeds and types of sheep they raise. If you choose along the same lines you’ll never have to travel far for replacement sheep, stud service for your ewes, or knowledgeable advice.
We’ll talk more about rams in chapter 8 but it bears saying this now: if you don’t plan to breed sheep, don’t buy a ram. Rams can be sweet and charming, but they’re always unpredictable and it takes reinforced housing and fencing to contain them.
If you’re looking for pets, brush control, sheep for herding dog training, or lovely fleece-bearing sheep, think wethers. They aren’t preoccupied with lambs, heat cycles, or rut, making them pleasant sheep to have around.
If you’re looking for pets, think about starting with bottle lambs. Bottle lambs bond with the humans who raise them and the type of animals they find in their environment.
If you’re getting into breeding, start with experienced, middle-aged, bred ewes who can teach you the ropes. Your first lambing season will be scary enough, so don’t start with ewe lambs, who are just as confused as you are and more prone to birthing dystocia (lambing problems) than ewes in their prime.
In fact, I recommend starting with older ewes culled from large operations due to age. Many large-scale producers begin culling ewes at about 6 years of age. Ewes should be excused from the lambing pen when they’re about 10 years old, as lambing problems increase with age, but a healthy 6-year-old knows the ropes and has several productive years ahead of her. That’s how my own flock began, and that’s why this book is dedicated to that first remarkable sheep, Baasha.
Purebred sheep must be permanently identified before registries admit them to their flock books. This is especially so in breeds where individuals tend to look alike.
Think of two white sheep. You can tell them apart (“Hope has black speckles on the tips of her ears and she has a Roman nose, but Jacy’s always fatter than Hope and her facial profile is straight”), but what if something happens to you? If your executor just sees two white sheep and can’t match them with their registration papers, their pedigrees will be lost. All sheep should be positively identified in some physical way, even if they are just a couple of beloved pets.
In addition, the United States Department of Agriculture’s mandatory USDA Scrapie Program stipulates that every sheep who leaves your farm must be permanently identified with a program-approved ear tag. So unless your sheep never leave home, tags are a must.
The beauty of ear tags is that they’re easy to read from a distance and inexpensive to buy and apply. They come in metal and plastic in a wide range of types and sizes. Their main failing is that the numbers fade with age and the tags themselves are easily lost. For this reason, large-scale sheep producers sometimes tattoo and tag.
The USDA scrapie programs for sheep and goats are overseen on the state level, so you may not have a choice in the type of ear tags you use. If you do have a choice, however, avoid button-type plastic tags and metal tags; both tend to cause infections. Instead, choose small, two-piece plastic models that swivel; they’re less likely to snag on fencing or brush and tear the ear.
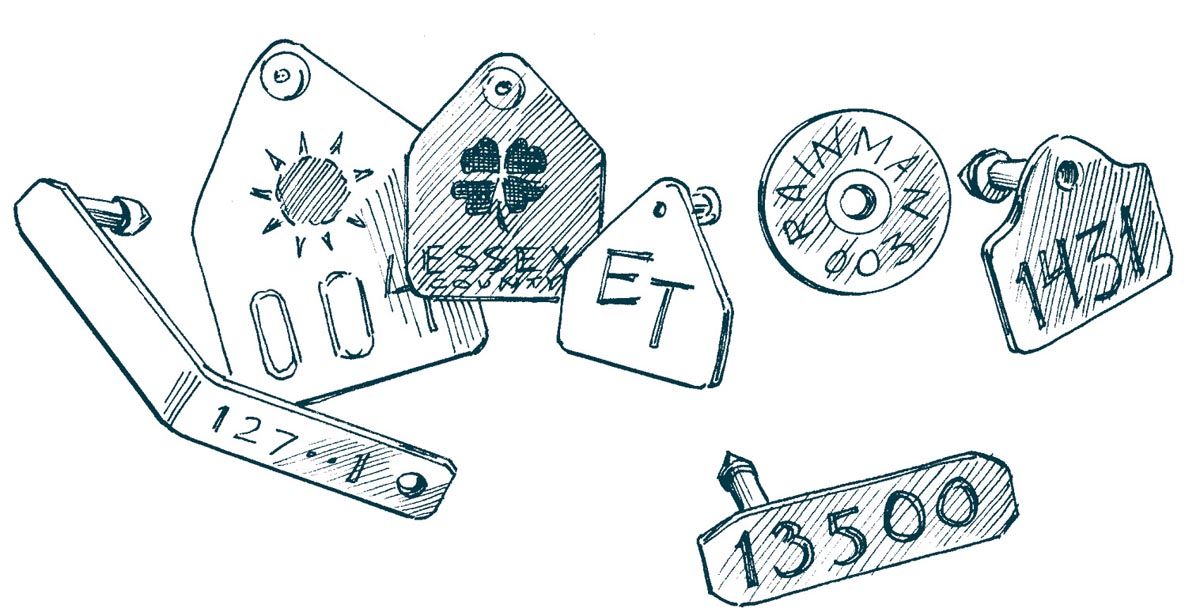
Different types of ear tags
Plastic tags can be purchased preprinted by companies like Premier1 or as blanks for you to fill in. When writing on blank tags, use a marking pen designed specifically for that purpose. Mark the tags the night before tagging to allow them to dry overnight.
Some colors are easier to read than others; when visibility is an issue, in descending order from most visible to least, choose yellow, white, orange, light green, black, pink, purple, gray, brown, red, medium or dark green, then blue.
Use colors and location to gather information at a glance. For instance, tag males in one ear, females in the other. Tag colors can indicate sex, sire, year of birth, commercial versus purebred animals, and so on.
Premier1 also prints individual tags to order; name-bearing ear tags are a very handy thing when farm sitters or others who are unfamiliar with your animals have to look after your sheep.
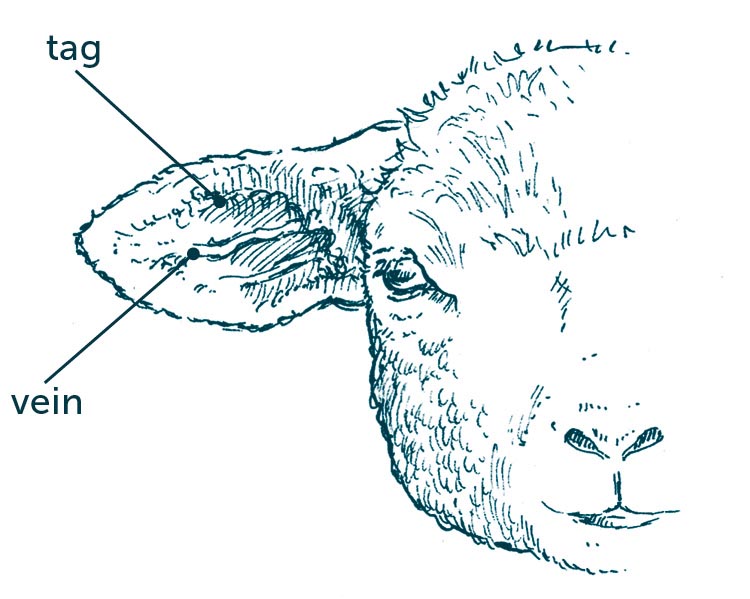
Tag placement on ear
To install an ear tag, place the sheep in a handling chute, on a fitting or milking stand, or halter and tie her where you can easily access her ears. If possible, recruit an assistant to help restrain the sheep. Clean the ear with alcohol and pat it dry. Place the tag in your tag applicator and apply antiseptic salve to the male (pointed) tip of the ear tag. Place the female side of the tag inside of the ear and the male part outside. When setting the tag, avoid blood vessels, ridges of cartilage, and any existing scar tissue, and insert it 1 to 2 inches (2.5 to 5 cm) from the skull where ear tissue is thicker and more difficult to tear. Press quickly and firmly, and it’s in. Keep an eye on the tag for a few weeks in case infection sets it (although it rarely does when using two-piece, swivel tags).
Plastic ear tags are more flexible, thus easier to install, if you keep them warm. When the temperature drops below freezing, it’s a good idea to stow tags in an inner coat pocket or in a small, covered container with a sealed bottle of hot water.
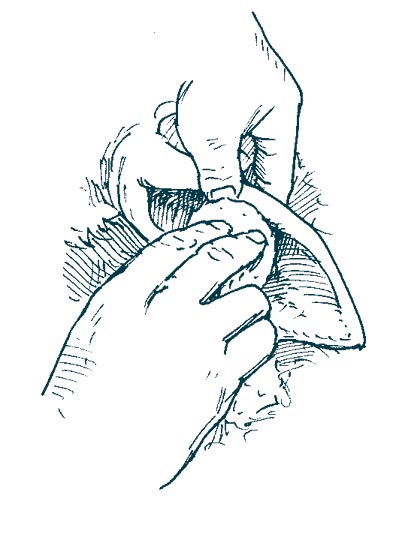
Sheep registered with some registries, such as the Icelandic Sheep Breeders of North America, must be ear-tattooed. Even when it isn’t required, tattooing is a good way to permanently identify your animals. If specific requirements are given, such as putting a scrapie tag in one ear and a herd identification tag in the other, make sure you put them in the correct ear; that is, the animal’s left and right, not yours as you are facing her.
Tattoo pliers come in .300, 5⁄16-inch, and 3⁄8-inch digit sizes. If you have a five-digit herd prefix (get this from your registry if you’re tattooing to their standards), make sure the set you choose accepts five digits (some don’t). Better pliers have a positive ear-release feature that pops back open after you’ve tattooed an ear.
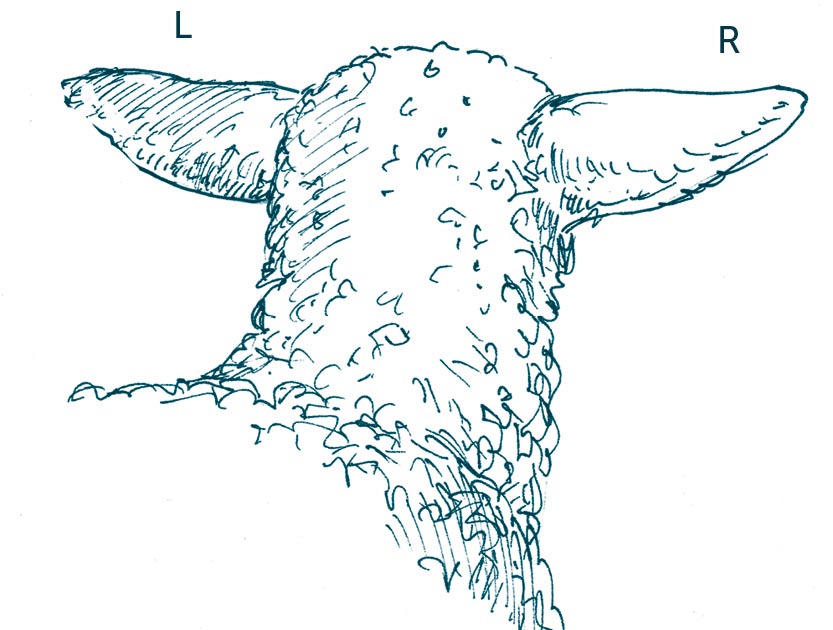
Left and right ears
Most tattoo kits come with a roll-on applicator of black ink, but throw it away and buy green paste ink instead. Green is better because it shows up well in dark ears, and paste is better because the roll-on kind tends to drip.
You’ll also need a soft toothbrush to scrub ink into newly applied tattoo piercings, disposable gloves, and alcohol and cotton balls or paper towels to clean the site before tattooing.

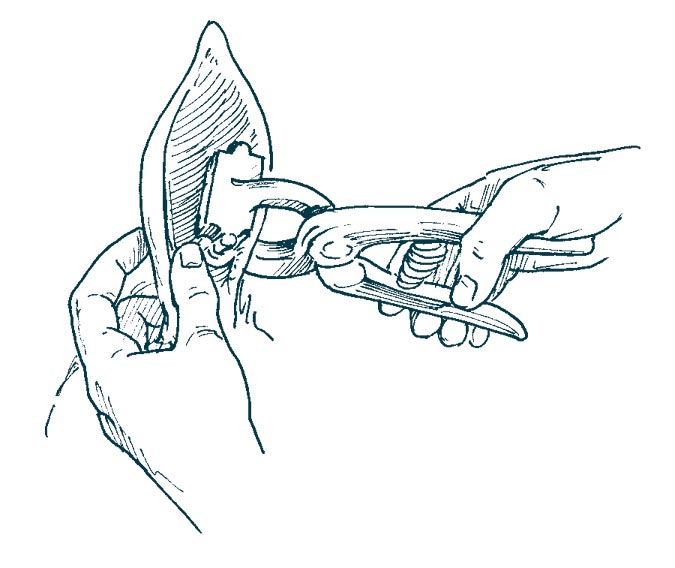
Testing the tattooing pliers
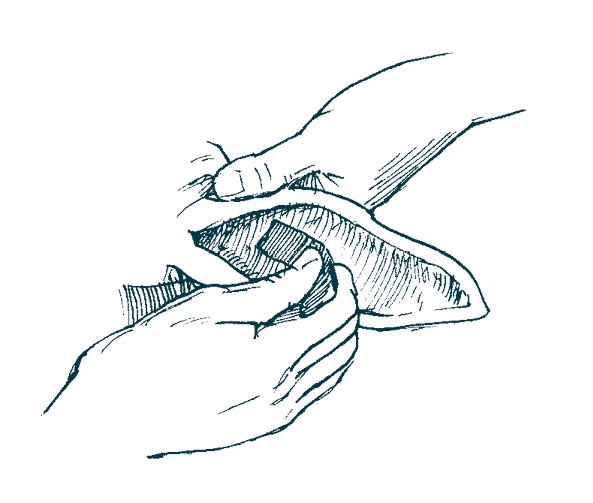
Cleaning the ear
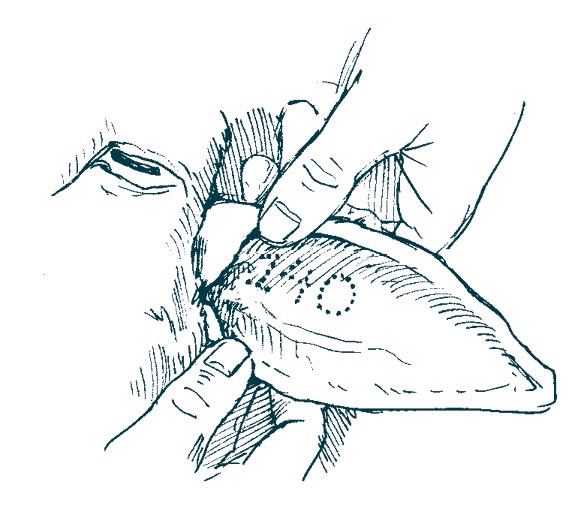
Applying the tattoo
If some of the punctures bleed, pinch a paper towel or cotton ball over the bleeder until it stops. Don’t apply ink until the bleeding stops because blood flow washes ink out of the holes.
Inking the tattoo
The finished tattoo
When ear tagging or tattooing, it never hurts to give the animal a shot of tetanus antitoxin. After you’ve done that, remove and disinfect the digits before moving on to another sheep. When you’ve finished, disinfect the equipment before storing it.
Microchips are tiny devices that are implanted under an animal’s skin. Based on radio frequency identification (RFID) technology, they contain no power source and are designed not to act until they are acted upon. Microchips are composed of three parts: a silicone chip, a coil inductor, and a capacitor. The silicone chip contains a unique identification number and the circuitry needed to relay that information to a handheld scanner; these components are contained in a biocompatible glass housing about the size of a large grain of rice. The chip is inserted using a syringe with a 12-gauge needle. The process appears to be nearly painless.
To read an implanted chip, the operator passes a microchip scanner over the implantation site. The scanner emits a low radio frequency that provides the power needed to transmit the microchip’s code and positively identify the animal. Unfortunately, until recently chips and scanners weren’t standardized and not every scanner can read every chip. The new Euro chips, however, can be read by newer scanners manufactured by all three major chip makers, AVID, Destron, and HomeAgain, making them a best choice for compatibility.
Earlier chips had a disquieting habit of migrating away from the injection site, but newer chips incorporate Bio-Bond materials that are fully compatible with animal tissue, making migration problems obsolete.
Chips have a 25-year life expectancy and cannot be altered or easily removed, making them a first-rate permanent means of positive identification. The downsides are that microchipping is comparatively expensive (about $20 to $30 per animal plus veterinary fees if you choose not to implant the chip yourself), and chips can’t be read without a scanner.
If you are adept at giving injections you can implant your own microchips, or a veterinarian can implant them for you. Each microchip comes in sterile packaging complete with a single-use, pre-loaded syringe and a package of stickers printed with the unique code programmed into the chip. These stickers can be affixed to registration papers and similar records, and the code recorded with appropriate registries and databases like the ones managed by AVID and HomeAgain.
Injection sites and methods vary from species to species; sheep are implanted subcutaneously in the manner of implanting dogs and cats, near the base of the ear or between the shoulder blades.

Microchip applicator and chip
Colored plastic neck chains or neck straps can be used to identify sheep according to age, ancestry, birth dates, productivity, and so on, and you can use them to lead tame sheep. To reduce the risk of collared animals hanging themselves on fencing, browse, or another sheep’s horns, choose lightweight plastic models that easily break in an emergency.
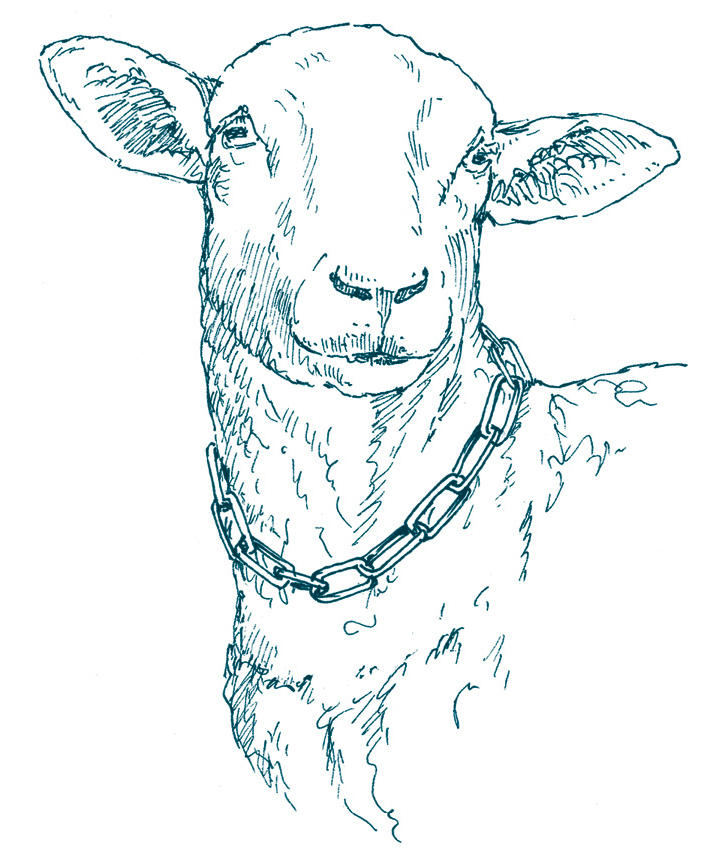
Plastic link collar
For very temporary markings use chalk or wax markers, paint brands (inexpensive numerical branding irons dipped in marking fluid), paint sticks, or aerosol spray paints designed for use on livestock. However, some of these products are not scourable, meaning they can’t be removed from shorn wool; read the label before you buy. It’s important.
Chalk or paint sticks, wax markers, and aerosol spray paints last about one, four, and up to six weeks, respectively. They’re easy to read from a distance and are great for marking animals in a flock as you vaccinate or worm them. Some producers use spray paint to mark ewes and their lambs with matching numbers. The first family is marked with a 1, the second with a 2, and so on; this has the added advantage of giving the producer the approximate age of each lamb at a glance.
Beginners, take note! These wonderful tips from a sheep book published in 1900 are as useful today as they were 100 years ago. You can’t go wrong following this advice.
— Henry Stewart, The Domestic Sheep; Its Culture and General Management (1900)