Chapter 2
Launching and Working with Apps
To do something useful with your computer, you need to work with an app, one that comes with Windows 8 or one that you install manually.
Understanding Windows 8 App Windows
Understanding Desktop App Windows
Understanding Dialog Box Controls
Explore the Windows Store
You can use the Windows Store to research and install new applications (apps) on your computer. The traditional methods for locating and installing new apps are to purchase an app from a retail store or to download an app from the Internet. The retail-store method is inconvenient and time-consuming, and the Internet method is potentially unsafe.
A better solution is to use the Windows Store, which is directly accessible from the Start screen. It is fast and efficient, and you always know that you are getting safe apps.
Explore the Windows Store
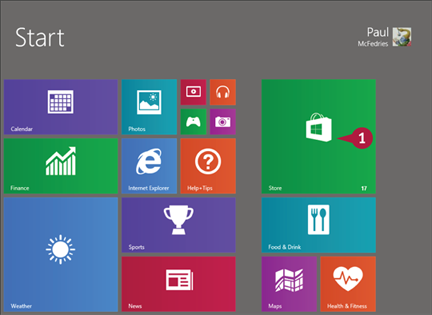
 On the Start screen, click Store.

 Right-click the screen.
A The Windows Store displays its category names.
 Click the category that you want to view.
The Windows Store displays the main categories in the category that you selected.

B Click Top paid to see a list of the most popular paid apps in the category.
C Click Top free to see a list of the most popular free apps in the category.
D Tap any tile to go directly to its app.
 Click See all.
The Windows Store displays the apps in the category.
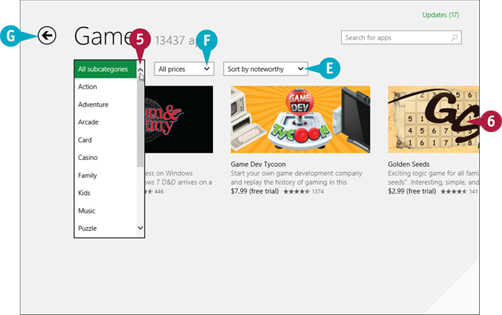
E Click this  to sort the apps.
F Click this  to filter the apps by price.
 Click this
  and then tap a subcategory.
 When you see the app you want, click it.
G To retrace your steps in the Windows Store, click the Back button ( ).
).
Install an App
If Windows 8 does not come with an app that you need, you can obtain the app and then install it on your computer. How you start the installation process depends on whether you obtained the app from the new Windows Store that comes with Windows 8.1 or you downloaded the app from the Internet. If you purchased the app from a retail store and received a physical copy of the software, you install the app using the CD or DVD disc that comes in the package.
Install an App
Install from the Windows Store

 On the Start screen, click Store.
Note: You need a Microsoft account to install from the Windows Store. See Chapter 1.
The Windows Store appears.

 Tap the app you want to install.
Note: See the section, “Explore the Windows Store,” to learn how to navigate the Windows Store.

If the app is not free, tap Buy, instead, and then tap Confirm.
Windows 8.1 installs the app.
Install a File Downloaded from the Internet

 On the Start screen, type downloads.
 Click Downloads.
Note: If you saved the downloaded file in a folder other than Downloads, use File Explorer to find the downloaded file. To view a file with File Explorer, see Chapter 10.
The Downloads folder appears.
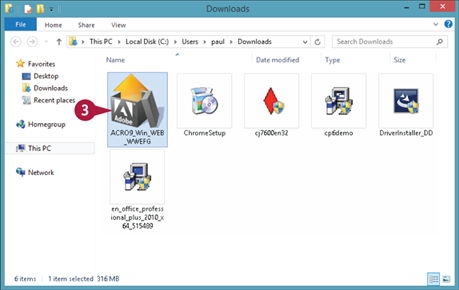
 Double-click the file.
The software's installation app begins.
Note: For compressed files, extract the files, and then double-click the setup file. See Chapter 10 for more information.
 Follow the installation instructions the app provides.
Start an App
To perform tasks of any kind in Windows 8.1, you can use one of the apps installed on your computer. The application you use depends on the task you want to perform. For example, if you want to surf the World Wide Web, you use a web browser application, such as the Internet Explorer app that comes with Windows 8.1.
Before you can use an application, however, you must first tell Windows which application you want to run. In Windows 8.1, you can run selected apps using either the Start screen or the Apps screen.
Start an App
Using the Start Screen

 Click the tile for the app you want to launch.
Note: If you have more apps installed than can fit on the main Start screen, scroll to the right and then click the app tile.

A If you launched a Windows 8 app, it takes over the entire screen.
To close a Windows 8 app, press  +
+ .
.
Using the Apps Screen

 Position the mouse pointer (
 ) anywhere on the Start screen.
 Click All apps (
 ).
).
The Apps screen appears.
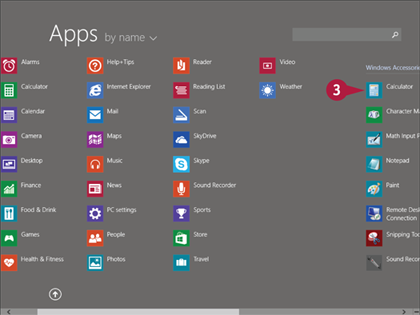
 Click the app you want to run.
Windows 8 launches the app.
Understanding Windows 8 App Windows
Windows 8 supports two very different types of apps: Windows 8 and Desktop. A Windows 8 app is a new type of program that is designed to work specifically with Windows 8. Windows 8 apps take up the entire screen when they are running, and they hide their program features until you need them.
By contrast, a Desktop app runs on the Windows 8 desktop and runs inside a window. This section focuses on Windows 8 apps; the next section covers Desktop apps.

The toolbar offers buttons, lists, and other items that offer easy access to common app commands and features. Some buttons are commands and some have lists from which you can make a choice. Note that not all Windows 8 apps come with a toolbar. Right-click the screen or press  +
+ to display the toolbar. If you are using a tablet, swipe down from the top edge of the screen to display the toolbar.
B Application Bar
The application bar contains icons that give you access to various app features and commands. Note that in some apps, the application bar appears at the top of the screen rather than at the bottom. You use the same techniques to display the application bar as you do for the toolbar.
C Settings
The app settings are commands that you can select to configure and customize the app. To display the settings, press  +
+ and then click a command, such as Settings. On a tablet, swipe in from the right edge of the screen to display the Charms menu, tap Settings, and then tap a command.
Understanding Desktop App Windows
When you start a Desktop application, it appears on the Windows 8 desktop in its own window. Each application has a unique window layout, but almost all application windows have a few features in common.
Note that in Windows 8, some Desktop apps come with a ribbon and some come with a menu bar and toolbar. Both types are shown in this section.

In a ribbon-style app, this part of the window gives you one-click access to a few commands.
B Ribbon
This appears only in ribbon-style apps, and it offers buttons that give you access to an app's features. Some buttons are commands and some are lists.
C Ribbon Tabs
Clicking a tab displays a different selection of related ribbon buttons.
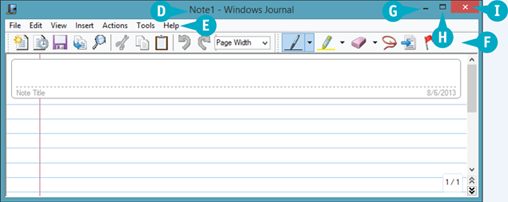
D Title Bar
The title bar displays the name of the app. In some apps, the title bar also displays the name of the open document. You can also use the title bar to move the window.
E Menu Bar
The menu bar contains the pull-down menus for the Desktop app. In some apps, you must press  to see the menu bar.
F Toolbar
Buttons that offer easy access to common app commands and features appear in the toolbar. Some buttons are commands, and some have lists.
G Minimize Button
Click the Minimize button ( ) to remove the window from the desktop and display only the window's taskbar button.
H Maximize Button
To enlarge the window either from the taskbar or so that it takes up the entire desktop, click the Maximize button ( ).
).
I Close Button
When you click the Close button ( ), the app shuts down.
Using a Ribbon
Many of the Windows 8 Desktop apps come with a ribbon, so you need to know how to use the ribbon to properly operate and control the app. The ribbon is the strip that lies just below the title bar. The ribbon gives you access to all or most of the app's features and options. These items are organized into various tabs, such as File and Home. Windows 8 apps that come with a ribbon include File Explorer, the desktop version of WordPad, and Paint.
Using a Ribbon
Execute Commands
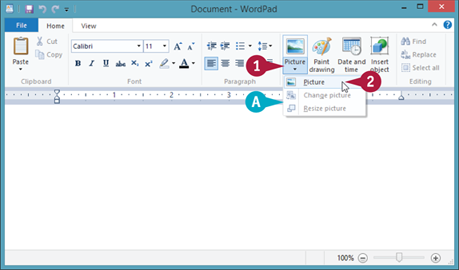
 Click the ribbon button that represents the command or list.
Note: If the ribbon button remains pressed after you click it, the button toggles a feature on and off, and the feature is now on. To turn the feature off, click the button to unpress it.
A The app executes the command or, as shown here, drops down the list.
 If a list appears, click the list item that represents the command.
The app runs the command.

 Click the tab name.
B The app displays the new set of buttons represented by the tab.
Access File-Related Commands

 Click the File tab.
C The app displays a menu of file-related commands.
 Click the command you want to run.
Hide and Display the Ribbon

 Click Minimize the Ribbon (
 ).
).
The app hides the ribbon and changes  to
to  .
.
To display the ribbon, click  .
.
Using a Pull-Down Menu
When you are ready to work with an app, use the pull-down menus to access the app's commands and features. Each item in the menu bar represents a pull-down menu, a collection of commands usually related to each other in some way. For example, the File menu commands usually deal with file-related tasks such as opening and closing documents. The items in a pull-down menu are either commands that execute some action in the app, or features that you turn on and off. If you do not see any menus, you can often display them by pressing the Alt button  .
.
Using a Pull-Down Menu

 Click the name of the menu you want to display.
A The app displays the menu.
You can also display a menu by pressing and holding  and pressing the underlined letter in the menu name.
 Click the command you want to run.
The app runs the command.
B If your command is in a submenu, click the submenu and then click the desired command.
Turn Features On and Off

 Click the name of the menu you want to display.
C The app displays the menu.
 Click the menu item.
Click a submenu if your command is not on the main menu.
Using a Toolbar
You can access many app commands faster by using the toolbar. Many apps come with a toolbar, which is a collection of buttons, lists, and other controls displayed in a strip, usually across the top of the app window, just below the menu bar.
Because the toolbar is always visible, you can always use it to select commands, which means that the toolbar often gives you one-click access to the app's most common features. This is faster than using the menu bar method, which often takes several clicks, depending on the command.
Using a Toolbar
Execute Commands

 Click the toolbar button that represents the command or list.
A The app executes the command or, as shown here, drops down the list.
 If a list appears, click the list item that represents the command.
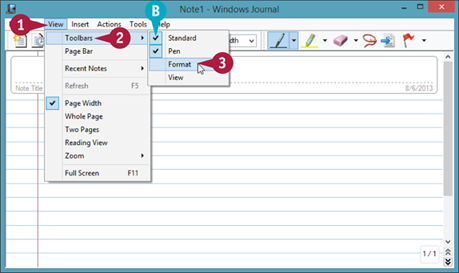
 Click View.
 Click Toolbars.
 Click a toolbar.
B If the toolbar is currently displayed (indicated by  in the View menu), the app hides the toolbar.
If the toolbar is currently hidden, the app displays the toolbar (indicated by  in the View menu).
Understanding Dialog Box Controls
You often interact with an app by selecting options or typing text using a dialog box, which is a small window that appears when an app has information for you, or needs you to provide information. For example, when you select the Print command to print a document, you use the Print dialog box to specify the number of copies that you want to print.
You provide that and other information by accessing various types of dialog controls. To provide information to an app quickly and accurately, you need to know what these dialog controls look like and how they work.

Clicking an option button turns on an app feature. When you click an option button, it changes from  to
to  .
.
B Check Box
Clicking a check box toggles an app feature on and off. If you are turning a feature on, the check box changes from  to
to  ; if you are turning the feature off, the check box changes from
  to
to  .
.
C Command Button
Clicking a command button executes the command that appears on the button face, such as OK, Apply, or Cancel.

D Tab
The various tabs in a dialog box display different sets of controls. You can choose from these settings in a dialog box to achieve a variety of results.
E Spin Button
The spin button ( ) enables you to choose a numeric value.

F List Box
A list box displays a relatively large number of choices, and you click the item you want. If you do not see the item you want, you can use the scroll bar to locate the item.
G Text Box
A text box enables you to enter typed text.
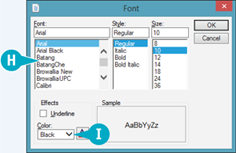
H Combo Box
The combo box combines both a text box and a list box. Either you can type the value you want into the text box, or you can use the list to click the value you want.
I Drop-Down List Box
A drop-down list box displays only the selected item from a list. You can open the list to select a different item.
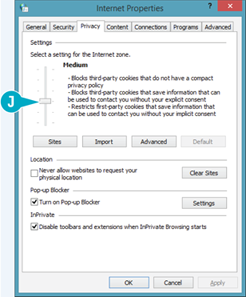
A slider enables you to choose from a range of values. Use your mouse to drag the slider bar ( ) down or to the left to choose lower values, or up or to the right to choose higher values.
Using Dialog Boxes
You need to know how to use each of the various dialog box controls to get the most out of any app. Many dialog box controls are straightforward. For example, you click an option button to select it; you click a check box to toggle it on and off; you click a tab to view its controls; and you click a command button to execute the command that appears on its face. Other dialog box controls are not so simple, and in this section, you learn how to use text boxes, spin buttons, list boxes, and combo boxes.
Using Dialog Boxes
Using a Text Box
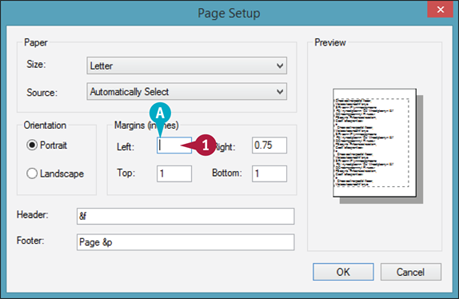
 Click inside the text box.
A A blinking, vertical bar (called a cursor or an insertion point) appears inside the text box.
 Use
Use  or
or  to delete any existing characters.
 Type your text.
Enter a Value with a Spin Button
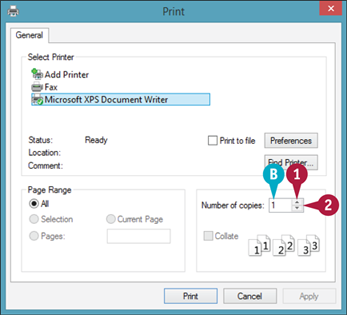
 Click the top arrow on the spin button (
 ) to increase the value.
 Click the bottom arrow on the spin button (
 ) to decrease the value.
B You can also type the value in the text box.
Select a List Box Item
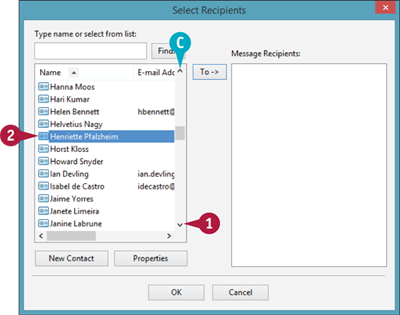
 If necessary, click the down arrow (
 ) to scroll down the list and bring the item you want to select into view.
Note: See the “Using Scroll Bars” section to learn how to use scroll bars.
 Click the item.
C You can click the up arrow ( ) to scroll back up through the list.
Select an Item Using a Combo Box

 Click the item in the list box to select it.
D You can also type the item name in the text box.
Select an Item from a Drop-Down List Box
 Click the drop-down arrow (
 ).
).
E The list appears.
 Click the item in the list that you want to select.
Using Scroll Bars
If the entire content of a document does not fit inside a window, you can see the rest of the document by using the window's scroll bars to move the contents into view. If the content is too long to fit inside the window, use the window's vertical scroll bar to move the content down or up as required. If the content is too wide to fit inside the window, use the horizontal scroll bar to move the content right or left as needed. Scroll bars also appear in many list boxes, so knowing how to work with scroll bars also helps you use dialog boxes.
Using Scroll Bars
Scroll Up or Down in a Window

 Click and drag the vertical scroll box down or up to scroll through a window.
You can also click the up arrow ( ) or down arrow (
 ).
).

A The content scrolls down or up.
Scroll Right or Left in a Window

 Click and drag the horizontal scroll box.
You can also click the right arrow ( ) or the left arrow (
 ).
).

B The content scrolls left or right.
Switch Between Running Apps
If you plan to run multiple applications at the same time, you need to know how to switch from one application to another with ease. In Windows 8, after you start one application, you do not need to close that application before you open another one. Windows 8 supports a feature called multitasking, which means running two or more applications at once. This is handy if you need to use several applications throughout the day. For example, you might keep your word processing application, your web browser, and your e-mail application open all day.
Switch Between Running Apps
Switch Windows 8 apps Using the Mouse

 Move the mouse pointer (
 ) to the top-left corner of the screen.
A Windows 8 displays the most recent app you used.
 Move the mouse pointer (
 ) down the left edge of the screen.
B Windows 8 displays a list of your running Windows 8 apps.
 Click the app you want to use.
Switch All Apps Using the Keyboard
 Press and hold
  and press
  .
.
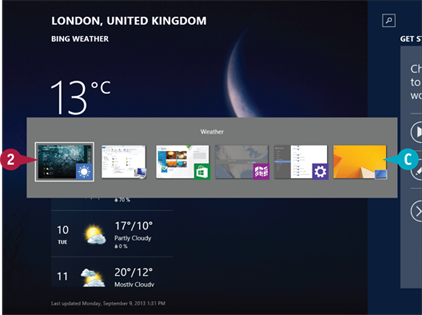
C Windows 8 displays thumbnail versions of the open apps.
 Press
Press  until the window in which you want to work is selected.
 Release
  .
.
Switch Desktop Apps Using the Taskbar
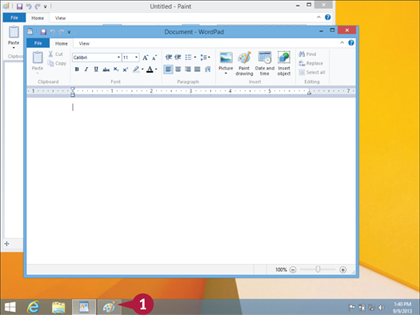
 Click the taskbar button of the app to which you want to switch.
Note: You can also switch to another window by clicking the window, even if it is the background.
Switch Desktop Apps Using the Keyboard
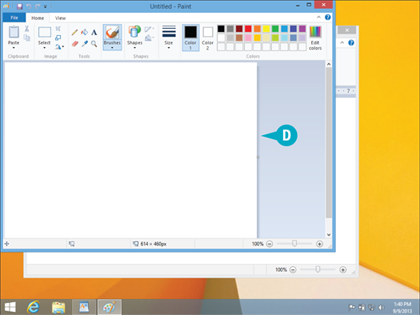
 Press and hold
  and press
  .
.
D Windows 8 brings the next Desktop app to the front.
 Press
Press  until you see the app you want to use.
 Release
  .
.
Update an App
You can ensure that you are using the latest version of an app by using the Windows Store to install an available update. After a software company releases an app, its programmers continue to work on it. They add new features, improve existing features, fix problems, and close security holes.
After fully testing these improvements and fixes, they place the new version of the app in the Windows Store, which alerts you that there is an update. You can then install the new version.
Update an App
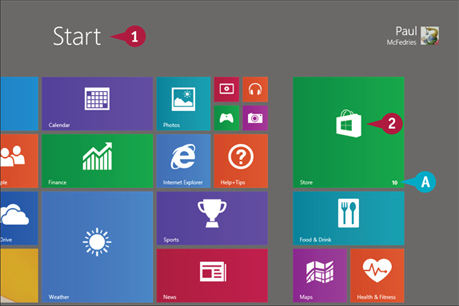
 Switch to the Start screen.
A If you have updated apps available, you see the number of updates here.
 Click Store.
The Windows Store app appears.

 Click Updates.
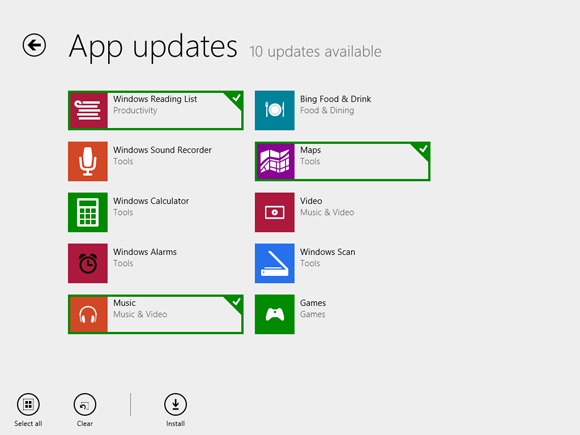
The Windows Store displays a list of the available updates.
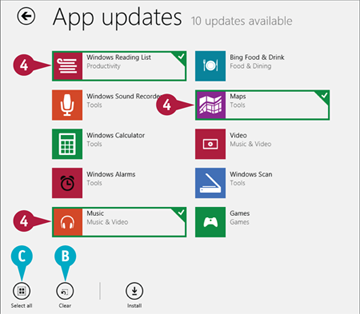
B If you want to update only some of the apps, click Clear.
C If you prefer to update all of the apps at once, click Select all and skip to step 5.
 Hold down
  and click each update that you want to install.

 Click Install.
Windows 8 installs the app updates.
Uninstall an App
If you have an app that you no longer use, you can free up some disk space and reduce clutter on the Start screen by uninstalling that app. When you install an app, the program stores its files on your computer's hard drive, and although most programs are quite small, many require hundreds of megabytes of disk space. Uninstalling an app you do not need frees up the disk space it uses and removes its tile (or tiles) from the Start screen (if it has any there) and the Apps screen.
Uninstall an App
Uninstall a Windows 8 app
 Use the Start screen or the Apps screen to locate the Windows 8 app you want to uninstall.
Note: To display the Apps screen, right-click an empty section of the Start screen and then click All apps.
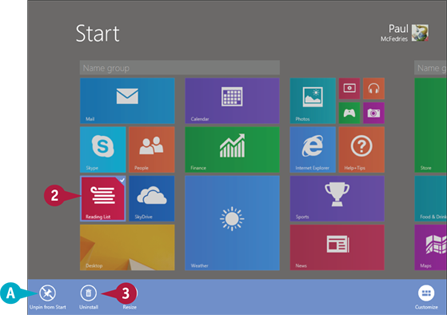
 Right-click the app.
A Windows 8 displays the application bar.
 Click Uninstall.
Windows 8 asks you to confirm.
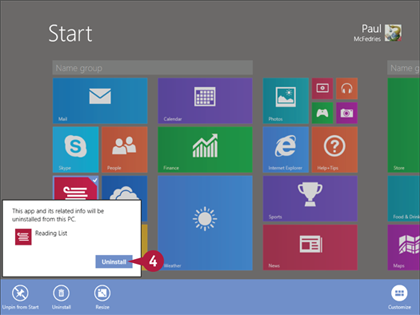
 Click Uninstall.
Windows 8 removes the app.
Uninstall a Desktop App

 On the Start screen, type uninstall.
 Click Programs and Features.
The Programs and Features window appears.

 Click the app you want to uninstall.
 Click Uninstall (or Uninstall/Change).
In most cases, the app asks you to confirm that you want to uninstall it.
 Click Yes.
The app's uninstall begins.
 Follow the instructions on the screen.
 to open the Search pane. Begin typing the name of the app. As you type, Windows displays a list of apps that match the characters. When you see the app that you want, click it to run the program.
 (or swipe left from the right edge of the screen) to display the Charms menu, click Settings, and then click Change PC settings to open the PC Settings app. Click Update & Recovery and then click Check now.