Chapter 9
If you are into movies, TV shows, or music, you will appreciate the Windows apps that help you play, organize, edit, and generally get the most out of your multimedia. This chapter gives you the details on all of the Windows media apps.
Import Videos from a Digital Camera
Import Videos from a Digital Camera
You can import videos from a digital camera and save them on your computer. If your camera stores the videos on a memory card, you can also use a memory card reader attached to your PC to upload the digital videos from the removable drive that Windows sets up when you insert the card.
To perform the import directly from your digital camera, you need a cable to connect your camera to your PC. Most digital cameras come with a USB cable. After you have the digital videos on your system, you can view them.
Import Videos from a Digital Camera
 Plug in your camera or memory storage card reader.
A notification appears.
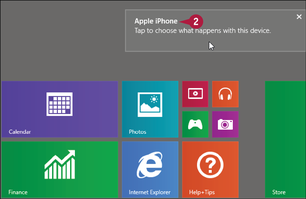
 Click the notification.
Windows displays a list of actions that you can perform.
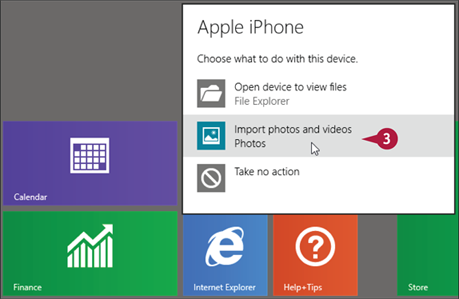
 Click Import photos and videos.
The Photos app loads and displays the videos that are on your camera.
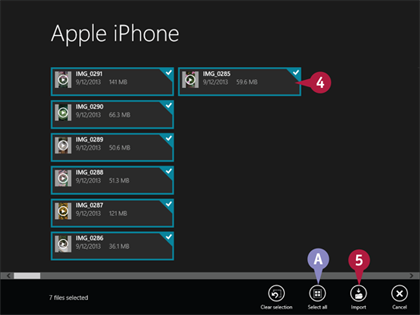
 Click each video that you want to import.
A You can click Select all if you want to import all the videos.
 Click Import.
Windows imports the videos.
When the import is complete, the Photos app displays your imported videos.
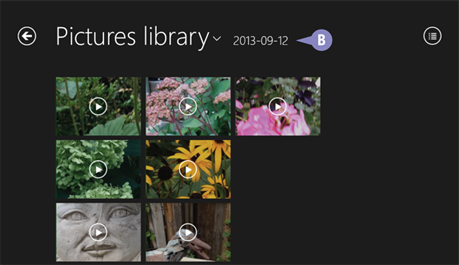
B The Photos app stores the imported photos in your Pictures library in a folder named after today's date.
TIPS
When I connect my video camera, why do I not see the notification?
If you have already imported photos or videos with the video camera, Windows 8.1 remembers your previous selection and automatically displays the Photos app's import screen. If this happens, you can skip steps 2 and 3.
How can I get my imported videos to appear in the Video app?
At the Start screen, click Video, press  +
+ , click Preferences, click Choose where we look for videos on this PC, click Add (
 ), click SkyDrive, click This PC, and then click Pictures. Click the folder that Photos created when you imported your videos, click Add this folder to Videos, and then click OK.
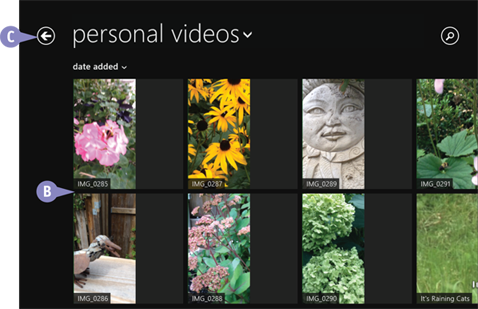
Navigate the Videos Library
Before you can work with your videos, you need to locate them on your PC. You do that by using the Video app to open the Videos library, which is a special folder designed specifically for storing digital videos, movies, and TV shows.
To get more out of the Videos library, you need to know the basic techniques for opening any videos that you have stored in it. If you are looking for commercial movies or TV shows, you can also use the Video app to buy or rent a movie or to buy a TV show episode.
Navigate the Videos Library
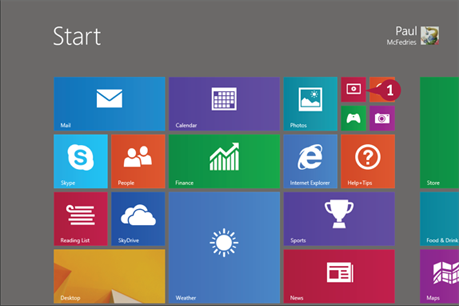
On the Start screen, click Video.
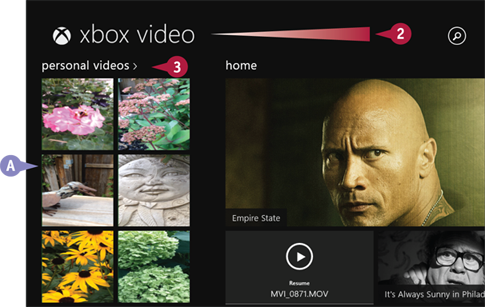
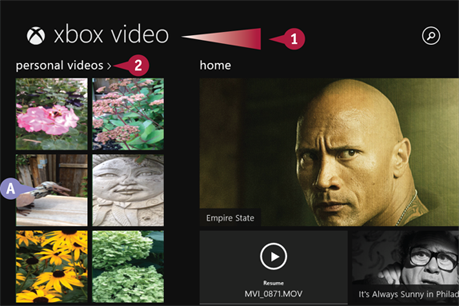
Scroll left until you see the personal videos section.
A The Video app displays a selection of the videos on your PC.
Click personal videos.
The Videos library appears.
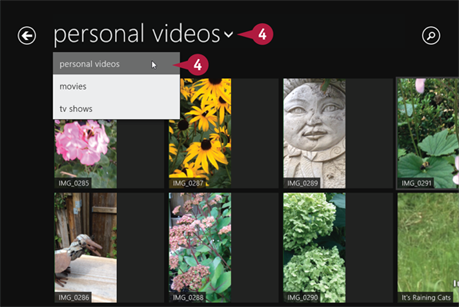
Click the personal videos  and then select a video type.
B The Video app displays the digital videos of that type that you have on your PC.
CYou can click Back ( ) to return to the previous section of the Video app.
TIPS
How can I get my Camera app videos to appear in the Video app?
Open the Video app, press +, click Preferences, click Choose where we look for videos on this PC, click Add (), click SkyDrive, click This PC, click Pictures, click Camera Roll, click Add this folder to Videos, and then click OK.
How do I get movies and TV shows?
You can use the Xbox Video Store to buy or rent movies or to buy TV show seasons or episodes. Return to the Main screen of the Video app; click a movie or TV section heading (such as new movies or featured TV shows); locate the movie, TV show season, or TV show episode; and then click either Buy or Rent.
Watch a Video
After you know how to use the Video app to navigate your Videos library, you can use the app to select and play a video that you have on your PC. The Video app plays the video full screen on your PC, so you get the best viewing experience. When you have the video playing, you can pause and restart the playback, and you can use a special tool called the scrubber to quickly fast-forward or rewind the video to the spot that you want.
Watch a Video
Start a Video
In the Video app, scroll left until you see the personal videos section.
A If you see the video that you want to watch, click it, and skip steps 2 and 3.
Click personal videos.
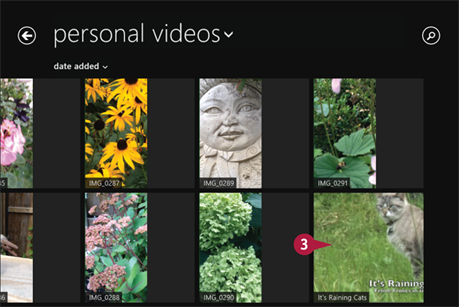
The Video app begins playing the video.
Control the Video Playback

Click the screen.
The Video app displays the playback controls.
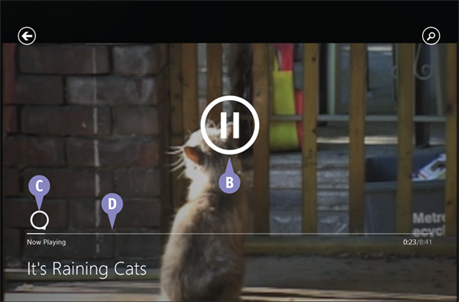
B Click the Pause button to stop and restart the playback.
C Click and drag the scrubber to rewind or fast-forward the video.
D Click the timeline to jump to that position in the video.
TIP
Is there a way to get the video to automatically start over from the beginning?
Yes, the Video app offers a Repeat feature that automatically restarts the current video from the beginning as soon as the video ends. To activate this feature, follow these steps:
Start the video playback.
Right-click the screen.
Click Playback options.
Click Repeat.
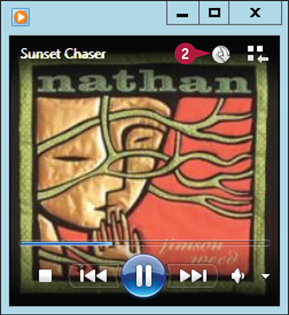
Play a Music CD
You can play music CDs in Windows Media Player. When you first insert an audio disc in your PC's optical drive (that is, a drive capable of reading CDs and DVDs), Windows asks what action you want to perform with audio CDs, and you can tell it to play them using Windows Media Player.
The CD appears in the Now Playing window. If you have an Internet connection, you will see the name of each track as well as other track data. You can control some playback options using the Now Playing window, but you can also switch to the Media Player library for more options.
Play a Music CD
Play a CD
Insert a music CD into your computer's optical drive.
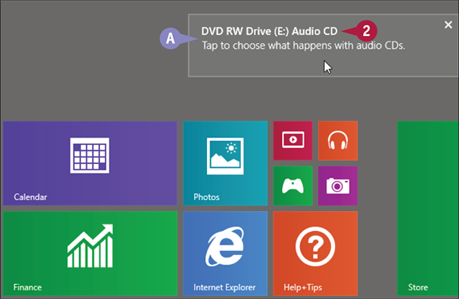
A Windows displays an audio CD notification.
Click the notification.
Windows displays a list of actions you can take when you insert an audio CD.
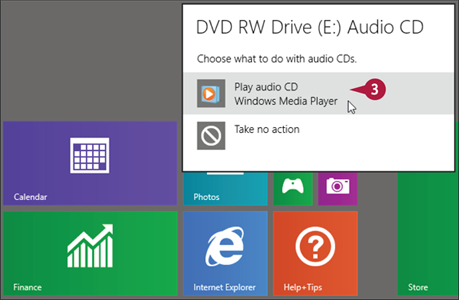
Click Play audio CD.
The Windows Media Player Now Playing window appears and begins playing the audio CD.
Skip a Track
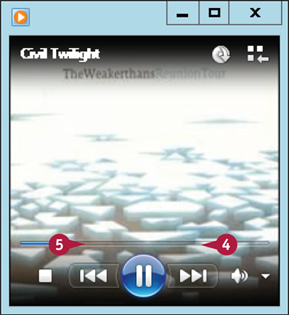
Click Next ( ) to skip to the next track.
Click Previous ( ) to skip to the previous track.
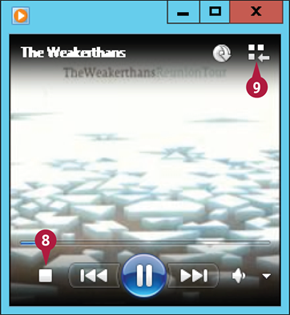
Pause and Resume Play
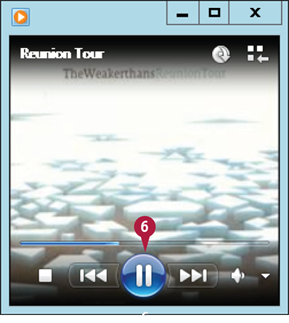
 Click Pause (
 ).
).
Windows Media Player pauses playback.
 Click Play (
 ).
).
Windows Media Player resumes playback where you left off.
Play a Music CD (continued)
You can use the playback buttons at the bottom of the Windows Media Player library to control how a CD plays. For example, you can easily switch from one song to another on the CD. You can also use the Repeat feature to tell Windows Media Player to start the CD over from the beginning after it has finished playing the CD. Windows Media Player also offers the Shuffle feature, which plays the CD's tracks in random order. If you want to learn how to import music from the CD to Windows Media Player, see the section, “Copy Tracks from a Music CD.”
Play a Music CD (continued)
 Click Stop (
 ).
).
Windows Media Player stops playback.
If you click Play () after clicking Stop (), the current song starts over again.
 Click Switch to Library (
 ) to open the Windows Media Player library window.
Play Another Song
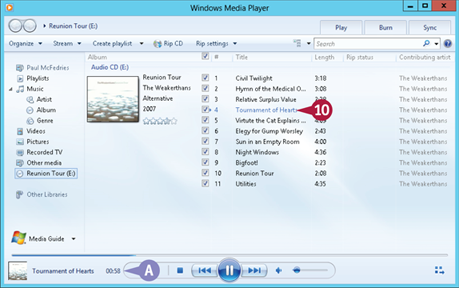
 In the details pane, double-click the song you want to play.
Windows Media Player begins playing the song.
A This area displays the current song title, the album title, and the song composer (if one is listed).
Repeat the CD
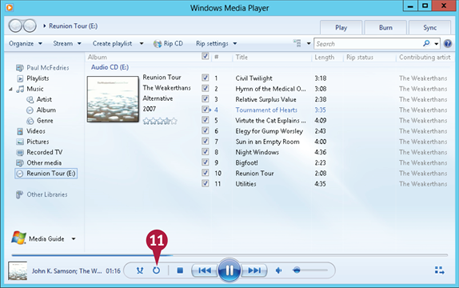
 Click Turn Repeat On (
 ).
).
Windows Media Player restarts the CD after the last track finishes playing.
Note: To turn on Repeat from the Now Playing window, press  +
+ .
.
Play Songs Randomly
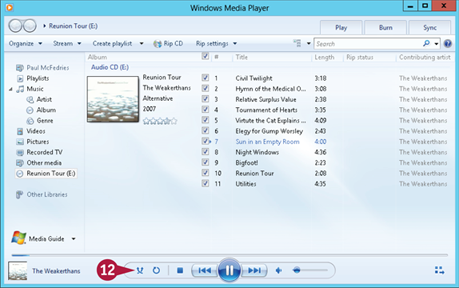
 Click Turn Shuffle On (
 ).
).
Windows Media Player shuffles the order of play.
Note: To turn on Shuffle from the Now Playing window, press + .
.
TIPS
Why does my details pane not list the song titles?
Windows Media Player tries to gather information about the album from the Internet. If it cannot ascertain song titles, it displays track numbers instead. To add your own titles, right-click each song title you want to change, click Edit, type your text, and press  .
.
Can I keep the Now Playing window in view at all times?
Yes. You can configure the Now Playing window so that it stays on top of any other window that you have open on your desktop. This enables you to control the playback no matter what other programs are running on your PC. Right-click the Now Playing window and then click Always show Now Playing on top.
Copy Tracks from a Music CD
You can add tracks from a music CD to the library in Windows Media Player. This enables you to listen to an album without having to put the CD into your optical drive each time. The process of adding tracks from a CD is called copying, or ripping, in Windows.
You can either rip an entire CD directly from the Now Playing window, or rip selected tracks using the library. You can also use the tracks to create your own playlists and to create your own custom CDs.
Copy Tracks from a Music CD
Rip an Entire CD Using the Now Playing Window
Insert a CD into your computer's optical drive.
The Now Playing window appears.
Click Rip CD ( ).
).
Windows Media Player begins ripping the entire CD.
Rip Selected Tracks Using the Library
Insert a CD into your computer's optical drive.
If the Now Playing window appears, click Switch to Library ().
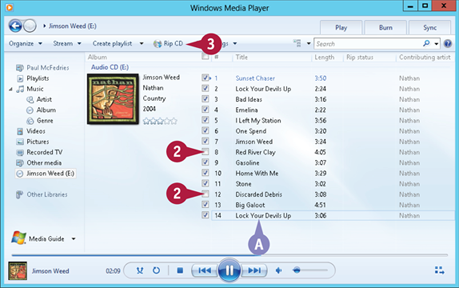
A Windows Media Player displays a list of the CD's tracks.
Click the CD tracks that you do not want to copy ( changes to
  ).
).
Click Rip CD.
Windows Media Player begins copying the track or tracks.
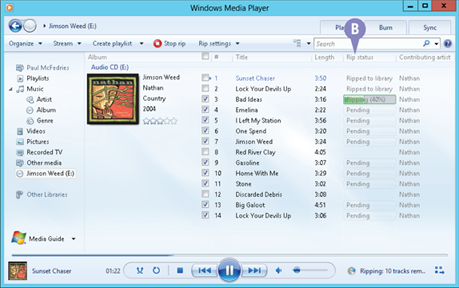
B The Rip Status column displays the copy progress.
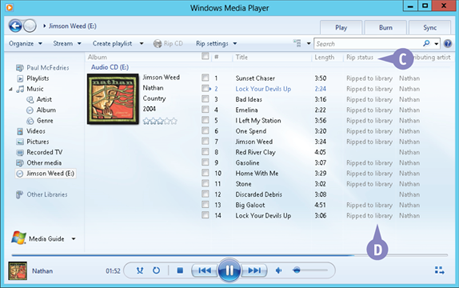
C After each file is copied, the Rip Status column displays a Ripped to library message.
D The copy is complete when all the tracks you selected display the Ripped to library status.
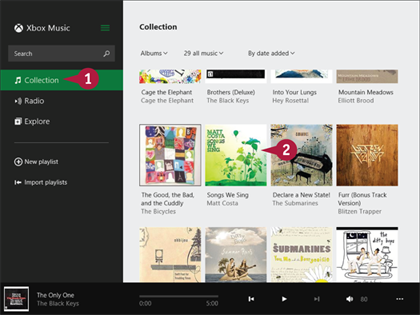
Navigate the Music Library
Before you can work with your songs and albums, you need to locate them on your PC. You do that by using the Music app to open the Windows Music library, which is a special folder designed specifically for storing digital music.
To get more out of the Music library, you need to know the basic techniques for opening any albums that you have stored in it. You can also use the Music app to purchase commercial albums or songs.
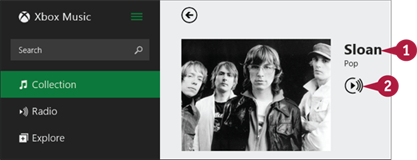
Navigate the Music Library
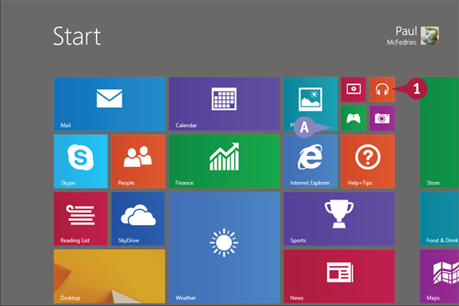
On the Start screen, click Music.
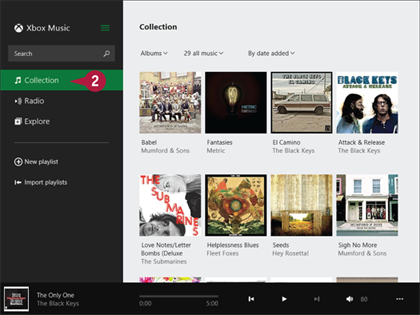
Click Collection.
The Music library appears.
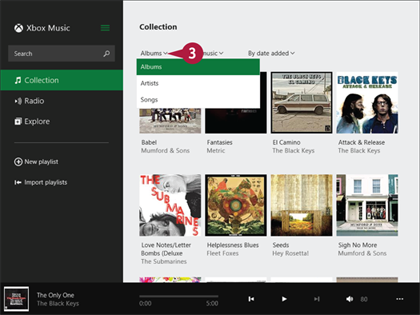
Click the down arrow () and then click a music category.

A The music in that category appears.
B You can click the down arrow () and then click a sort order for the category.
TIPS
What if a song that I want to play does not appear in the Music library?
If your song is outside of the Music library, the Music app does not see it. Press +, click Preferences, click Choose where we look for music on this PC, click Add (), click SkyDrive, click This PC, locate and click the folder that contains your music, then click Add this folder to Music.
You can use the Xbox Music Store to purchase albums. Either use the Search box to look for the artist or album title, or click Explore, click a section heading such as New Albums, and locate the album. Click the album and then click Buy album.
Play Music
If you want to listen to music while using your PC and your PC has either built-in or connected speakers, you can use the Music app to play tunes from your Music library. You can listen to all the songs on an album, all the songs from a particular artist, or individual songs.
The Music app offers several features for controlling the music playback. You can also play albums, artists, and songs in random order and play albums and artists repeatedly.
Play Music
Start Music
Use the Music app to display your music.
Note: See the preceding section, “Navigate the Music Library,” for details.
Click the item that contains the music you want to play.
The Music app opens the item and displays a list of songs.
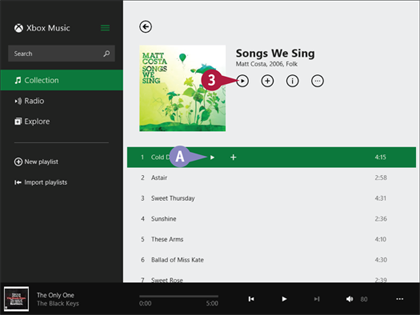
Click Play ( ).
).
A You can also click a song and then click Play ().
Control the Music Playback
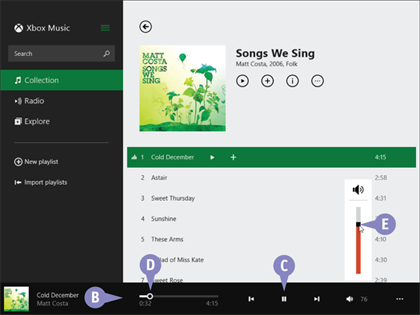
B When you play music, the Music app displays the playback controls.
C Click Pause ( ) to stop and restart the playback.
D Click and drag the scrubber to rewind or fast-forward the current song.
E To control the volume, click Volume ( ) and then click and drag the black square.
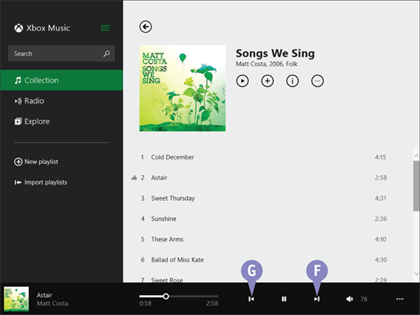
F Click Next ( ) to jump to the next song.
G Click Previous ( ) to return to the beginning of the current song. Click again to jump to the previous song.
TIPS
Is there a way to get an album to automatically start over from the beginning?
Yes, the Music app offers a Repeat feature that automatically restarts the current album from the beginning as soon as the album ends. To activate this feature, start playing the album, click More ( ), and then click Repeat.
How do I play an album or artist's songs randomly?
You need to activate the Shuffle feature, which plays the songs for the current album or artist in random order. To activate this feature, start playing the album or artist, click More (), and then click Shuffle.
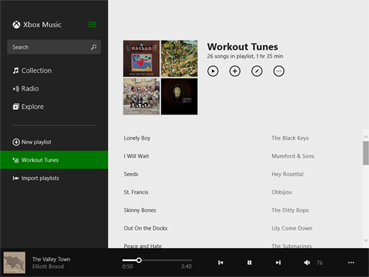
Create a Playlist
A playlist is a collection of songs that represents a subset of your total music collection. A playlist can include audio tracks you ripped from a music CD, songs downloaded from the Internet, or music purchased through the Xbox Music Store.
You can use the Music app to create customized playlists that include only the songs you want to hear. For example, you might want to create a playlist of upbeat or festive songs to play during a party or celebration. Similarly, you might want to create a playlist of your current favorite songs to play during a workout.
Create a Playlist
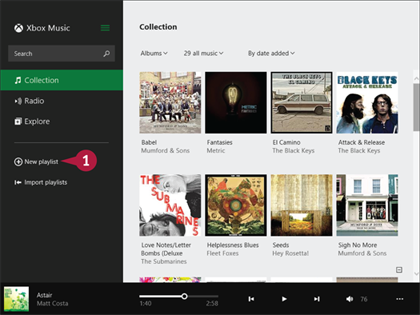
Click New playlist.
Music prompts you to name the new playlist.

Type a name for the new playlist.
Click Save.
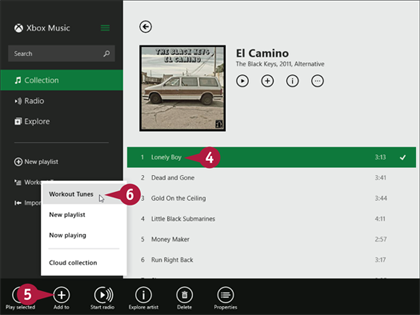
Right-click a song that you want to add to the playlist.
Click Add to.
Click the name of your playlist.
Music adds the song to the playlist.
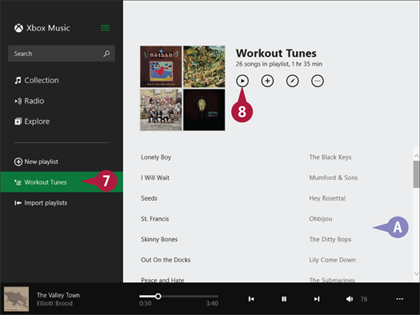
Click the playlist.
A Music displays a list of the songs you added.
Click Play () to listen to the playlist.
TIPS
How do I make changes to an existing playlist?
Click the playlist to open it. To change the playlist name, click Edit ( ), type the new playlist name, and then click Save. To change the song order, right-click a song and then click either Move up or Move down. To delete a song from the playlist, right-click the song and then click Remove from playlist.
Click the playlist to open it, click More ( ), and then click Delete. When Music asks you to confirm, click Delete.
Create a Radio Station
To help you discover new music, you can create a radio station that plays songs that are similar to a particular artist, album, or song. That is, given a particular artist, album, or song, you can base a new radio station on that item, and Music plays a constant stream of songs that are similar.
The songs you hear come from the Xbox Music service, so you will likely hear many tunes and artists that you are not familiar with. If you like a particular song, you can buy it.
Create a Radio Station
Based on a Song
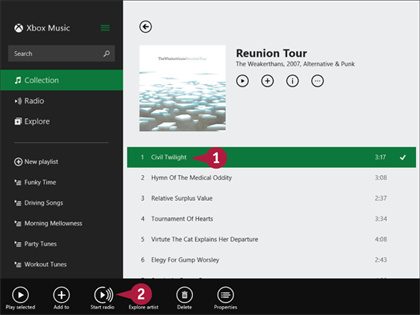
Right-click the song you want to use as the basis of your radio station.
Click Start radio.
Music creates and begins playing the radio station.
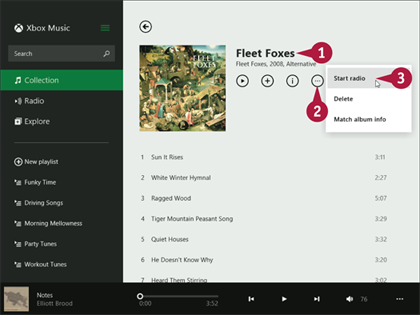
Open the album you want to use as the basis of your radio station.
Click More ().
Click Start radio.
Music creates and begins playing the radio station.
Based on an Artist
Open the artist you want to use as the basis of your radio station.
Click Start radio ( ).
).
Music creates and begins playing the radio station.
Based on Music in the Xbox Music Store

Click Radio.
Click Start a station.
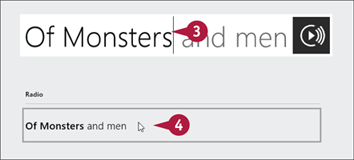
Type the name of an artist.
Click the artist.
Music creates and begins playing the radio station.
TIPS
Can I create a radio station based on an album that I do not own?
Yes. The easiest way to do this is to use the Search box to type the name of the album and then press . In the search results, right-click the album you want to use as the basis for your radio station and then click Start radio.
How do I remove a radio station I no longer use?
Click Radio to display your radio stations. Right-click the radio station you no longer need, and then click Delete. Music removes the radio station.