TUNE UP AND MOVE OUT
March—when my greenhouse is filled with a vast sea of plants—is my calm before the storm. It is controllable and cozy, but I know that those plants are not going to stop growing, and soon I will need to transplant them. This will take effort and determination, and the calm organization of the greenhouse will be disrupted. I can imagine the neat rows of shallots and broccoli, vibrant green against the dark black soil, and seeing those rows will reward the long days of seeding in the greenhouse. March is a wonderful point in the season, and when July hits I long for these quieter moments and the cooler weather when anything seemed possible. This is not to say that March lacks activity. This is the time to begin preparing your garden: tilling, seeding, and setting up irrigation among other things. It is time to move out.
PLAN
■ Update garden journal with spring weather and the challenges and successes of growing your own transplants
■ Finalize garden layout
PREPARE AND MAINTAIN
■ Turn compost if thawed
■ Incorporate finished compost into garden
■ Begin turning over soil and incorporating amendments as soon as weather permits
■ Test soil in vegetable garden
■ Erect fencing if needed to keep out rabbits and deer
SOW AND PLANT
EVERYONE
■ Pot-on transplants as needed after true leaves appear
ZONES 3 AND 4
■ Start seeds indoors: broccoli, Brussels sprouts, cabbage, cauliflower, celery, celeriac, kohlrabi, leeks, onions, and shallots
ZONES 5 AND 6
■ Start seeds indoors: basil, bok choy, broccoli, Brussels sprouts, cabbage, cauliflower, celery, celeriac, eggplant, fennel, kale, kohlrabi, lettuce, peppers, Swiss chard, and tomatoes
■ Direct sow (if soil is workable): beets and peas
■ Plant potatoes
■ Transplant (but be ready to cover): onions and shallots
ZONE 7
■ Start seeds indoors: basil, bok choy, cucumbers, lettuce, melons, summer squash, and winter squash
■ Direct sow: arugula, beets, carrots, fava beans, parsnips, peas, radishes, salad greens, and spinach
■ Plant potatoes
■ Transplant (but be ready to cover): broccoli, Brussels sprouts, cabbage, cauliflower, kale, kohlrabi, leeks, lettuce, onions, shallots, and Swiss chard
■ Plant perennials: asparagus, berry bushes, fruit trees, rhubarb, and strawberries
FROM HOOP HOUSE
Baby turnips Beet greens Frisée Kale Radicchio Salad greens Spinach Swiss chard
PERENNIAL AND OVERWINTERED
Asparagus Chives Green garlic Parsley (until it bolts) Scallions
Now that the snow has most likely finished falling and the ground has thawed (probably still not true for those of you further north) it is time to begin preparing the soil for planting. Any cover crops, leaves, and amendments have to be worked into the soil to make way for seeds and plants. The goal is a relatively smooth surface and consistency in the soil, although some chunks of soil and debris are fine. You can till by hand or with a rototiller, depending on the size of your garden. Turn the soil over at least a week before you begin planting to give it time to settle and begin absorbing the mixed-in materials. Within 1 or 2 weeks weeds will arrive, eager to compete with your germinating seeds or transplants. Before you plant, gently rake the surface of your beds to kill off young weeds, but don’t go too deep as that will just bring more weed seeds to the surface.
For hand tilling I recommend starting with a broadfork. Go deep and loosen up the soil but don’t turn it over. After that use a spade shovel or digging fork to gently incorporate cover crops, old mulch, and debris from last year. This can be slow and labor intensive so pace yourself and don’t rush. If you are interested in making raised beds, this can be a good time to that.
The goal of mechanical tilling is to loosen the soil as deeply as possible and mix it well at the same time. If you are breaking the ground for the first time in the spring, set the depth of the rototiller deep and go slowly. The tines don’t need to be moving fast in order to do this thoroughly. If you need to go through again after you’ve already tilled once, set your tines closer to the surface to reduce the amount of weed seeds you bring up and lessen the risk of compaction. If you have permanent beds, don’t worry about tilling the paths.
If you use a rototiller avoid overworking the soil. Too much tilling at the same depth will eventually create “hardpan” at the bottom of the tines. Plants can have a difficult time pushing roots through this hard surface so their growth will be inhibited. If you have that problem, use a broadfork to loosen the soil at that depth by pushing the forks all the way in and pulling back on the handles enough to open up the soil. Keep doing this until you have moved through the entire garden space. Too much mechanical tilling will also lead to loss of soil structure. When soil becomes pulverized it compacts more easily, doesn’t allow enough oxygen in, and can reduce the soil’s ability to absorb and retain moisture.
Planting
The action of putting plants into the garden is rewarding. In just a moment a bare strip of soil is transformed into a garden. I tend to feel a strong affection for the plants I labored to produce in the greenhouse, and I am sure you will feel the same way. Putting them out into the garden is akin to sending your children off to college—it is time for them to leave your coddling and make it on their own. Here are a few ways to make this transition easier on the plants, and ensure they have the ability to make it on their own.
Hardening off
The idea behind hardening off is to gradually expose your seedlings to full natural sun, cooler nighttime temperatures, and less frequent watering before you plant them in the garden. The sooner that you can start moving your plants outside, the sooner they will become accustomed to the not-so-protected outdoors, and this will strengthen the plants. About a week or so before you plan to transplant your seedlings, set them outside for 1 or 2 hours of direct sunlight. Increase their exposure by about 1 or 2 hours every day and start to cut back a bit on their watering. The main issue that can come up if you don’t harden off plants is the leaves becoming sunburned. This will show up as pale discoloration. The plants will recover from being sunburned but it will slow them down. If you are using good compost-based potting soil, hardening off seems to be less of an issue, as the plants are used to growing in soil, which helps them through the transition. To help minimize the shock of the final transition, transplant on an overcast, non-windy day, or right before a light rain.
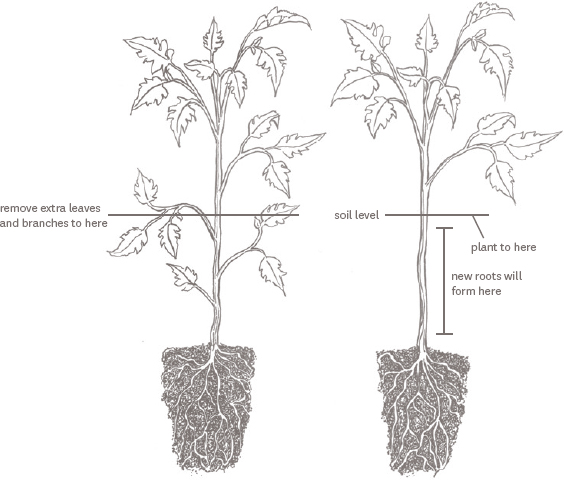
Plant tomatoes as deep as their first set of leaves (remove leaves before planting) to give them a well-rooted start.
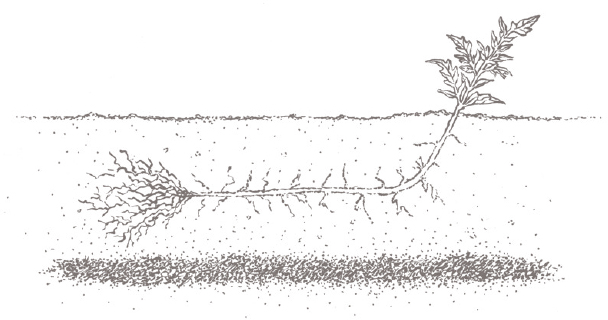
If you have a particularly tall or “leggy” plant, dig a trench and lay the plant horizontally, turning the top up at the end of the trench. Be sure to remove any leaves that will be buried.
I recommend soaking your plants in a tub of water (or any shallow container that can hold enough water to cover the pots) before transplanting. It can be advantageous to add a little fish and seaweed fertilizer to the water to provide nutrients and encourage the growth of beneficial bacteria around the roots. I also like to put some liquid amendments, specifically nitrogen, directly in the hole when I transplant. This gets the amendment right where the plant needs it, and avoids wastefully feeding the weeds between your rows of vegetables. My method is to dig the hole, add the liquid fertilizer mix and let it soak in, place the plant, and then backfill the hole with soil.
Planting depth
The planting hole should generally be a few inches deeper and wider than the roots of the plant. Annual vegetable plants are not usually too finicky about depth, so don’t overthink it, although certain plants will benefit from being planted deeper. For leeks and scallions, place plants halfway in the ground in order to achieve more of the preferable white part of the stem. Planting tomatoes deeply will give them a growing advantage because the plants will produce roots anywhere along the buried stem. Peppers should be planted similarly to tomatoes, although slightly less deep.

MINI HOOP HOUSE
This simple mini hoop house—a sheet of plastic secured over wire hoops—provides shelter for frost-sensitive crops in the spring and fall and protects plants from early-season pests. Note that this system is not sturdy enough to handle heavy snow and can be tricky to use when the ground is frozen. On days when the sun shines at all you will have to ventilate the plants by loosening one side of the plastic and folding it over; if it is windy, secure the loose plastic while it is open.
You can add a layer of Reemay (a lightweight polyester fabric) directly on top of the crops inside the hoop house to increase temperatures during the day and provide better frost protection at night. You can also use Reemay as a stand-alone row cover to protect against early-season pests.
YOU WILL NEED
9-gauge wire for hoops
4- or 6-foot-wide plastic
Garden staples, stakes, pegs, or bricks
STEPS
1 Cut pieces of wire 2 feet longer than the width of your plastic. This will give you extra length to push the wire far enough into the ground so the hoops remain sturdy. If your soil is really loose you may want the wire to be even longer to get down into firmer ground. The number of hoops depends on how long you want your bed to be.
2 Set the ends of the wire 4 feet apart and push each end 12 inches into the ground to form the hoops. Space hoops every few feet.
3 Unroll the plastic along the length of your bed. If your beds are going to remain fairly consistent in size, cut the plastic to fit the bed, leaving a little extra to secure the ends. If the length of your beds might change, just roll up the extra and leave it on the end.
4 Pull the material taut and secure the ends of the plastic with garden staples or pegs, or drive in a sturdy stake and tie the plastic to the stake. Now go back and secure the sides. Fold the plastic over 6 inches so you have a double layer, which will keep it from tearing, and use stakes, pegs, staples, bricks, stones, or small bags of sand to hold down the plastic. Although it will make the hoop house less accessible, an even more secure method is to bury the edges (helpful in especially windy areas). You could also bury just one side and secure the other with a peg or staple.