

The disadvantages of gardening under immovable glass structures are fairly obvious. The natural soil . . . can never be exposed to the sweetening influences of the weather. . . .
—JOHN WEATHERS, Commercial Gardening (1913)
The idea of protected cultivation during the colder months has fascinated gardeners since horticulture began. Gardens on south-facing slopes, gardens shielded from cold winter winds by a thick evergreen hedge, or gardens snuggled up against the sunny side of a rock wall to take advantage of the solar heat stored in the rocks are age-old ways of creating protected microclimates. Man’s first technological step beyond natural forces, attempting to cover the garden with a translucent layer, can be traced as far back as the time of Pompeii, where thin sheets of mica were used to sheath early greenhouses.
When I first became familiar with greenhouses and saw their incredible potential, I wanted to make them do even more. In order to optimize use I always wanted to get the next crop established before the present crop was finished. Growing transplants wasn’t enough: I knew I should be able to find additional methods for increasing the number of harvests per bed per year. The obvious solution was to make the greenhouses movable. If I could establish a winter-harvested crop, say, two months ahead of the time when it would need protection, and leave the warm-season crop growing two months longer, I would actually be getting the equivalent of fourteen months of greenhouse use every twelve months.
I like to refer to the movable greenhouse as “the best new gardening idea of the twenty-first century.” Actually, I should say, “rediscovered new idea” since, as I mentioned earlier, the first movable I have a record of (a large expensive glasshouse) was built in England at the end of the nineteenth century. What is new is applying the idea inexpensively to high tunnels. Commercial vegetable growers developed the first movable greenhouse in hopes of a better solution to greenhouse soil-sickness and the consequent build-up of pests and diseases. The options at the time—removing and replacing the soil to a depth of 16 inches or sterilizing with steam—both had their disadvantages in high costs and disruption of soil structure. Then the movable idea fell into disuse as chemicals began to be used to sterilize the soil. We have rediscovered mobile greenhouses because they have enormous potential for today’s organic greenhouse growers.
Size and Strength
We realize now that when we built our first 30-by-96-foot movable houses in 1996, we overengineered them. Never having moved houses of that scale before, we erred on the side of strength. Each rib is reinforced with a crossbar and truss support. Since the houses are 96 feet long and we wanted to ventilate without fans, we equipped them with continuous roof ventilation. Both the extra strength of the trusses and the roof vents were sound decisions and the houses work well, but they cost more than we think is necessary for a winter-harvest greenhouse. Based on that experience we have made different decisions vis-à-vis strength, ventilation, and mobility for new houses erected since.
Our new houses are only 48 feet long by 22 feet wide. Their length was partially dictated by the sites where we built them, but also because we planned on end-wall ventilation. Summer ventilation of a tunnel through the end walls in our climate is adequate as long as the length of the tunnel is no more than three times its width. Too much beyond that ratio and there will be a dead-air spot in the center of the house. A third reason for choosing to build shorter houses was to make them easier to move.
Each hoop of our new houses has a crossbar with a vertical support, but these are nowhere as brawny as the crossbar trusses of the first houses. This lighter construction is supplemented with diagonal braces at each corner of the house. We retained the crossbar on each hoop because we think it is necessary in a mobile house to keep the hoops from splaying when the house is moved. Also, the crossbars provide overhead structure so trellised crops such as tomatoes or cucumbers can be grown in the houses during the summer.
Making Greenhouses Move
I discussed a number of different options for making greenhouses mobile in The New Organic Grower, including a ball-caster design and various skid designs. We have used all of them at one time or another. With our rocky soil it was extremely difficult to drive posts for the ball-caster design. Thus, for our second 30-by-96-foot house, we bolted cedar 4×4s as skids to the underside of the angle-iron rail. They make good solid skids, but the resulting skid-to-soil friction is so high that our small tractor is not powerful enough to move the house. So, once a year, we hire the wrecker truck from our local garage (a wonderful, large, two-winch design with extended winch arms) to provide sufficient muscle to move the house. Since we wanted to continue with the skid design and still move the houses with our tractor, we decided on smaller houses and smoother skids. In our next design the 48-foot-long houses sat on 2-by-3-inch galvanized-pipe skids. The pipes were an off-the-shelf item used as support columns in the gutter-connect models from the same company that sold us the hoop houses. We didn’t have to weld uprights to these skids to attach the hoops, as we had to do on the first houses, because the company (see appendix C) also sells a hoop-holding base plate for use when attaching their hoops to concrete foundations. We were able to adapt these base plates for bolting to our skids. We connected three 16-foot lengths of galvanized pipe together to make a skid for a 48-foot greenhouse by milling 2-foot lengths of plastic decking (made from recycled plastic) to fit snugly inside each end of a pipe and then bolting one of the base plates across that seam to hold both pipes together.
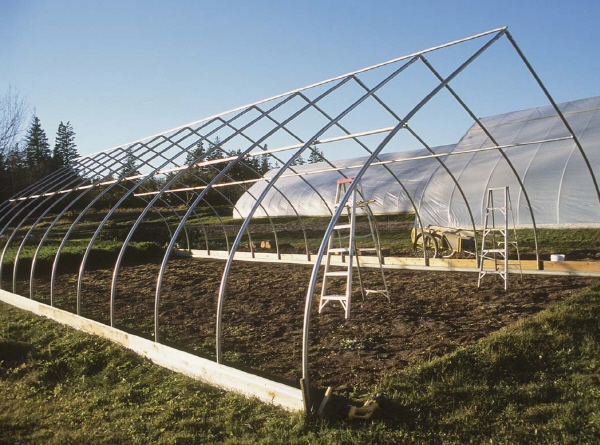
A 48-by-22-foot house on 2-by-3-inch galvanized-pipe skids.
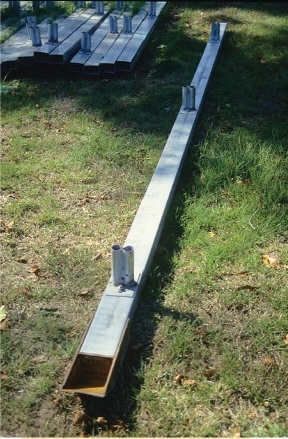
A temporary ski tip made of ¼ inch steel on the front of a skid for a sliding greenhouse.
When a heavy sled is towed across the ground its front edges tend to sink in, and that’s what these movable greenhouses do too. We deal with that in two ways. First, we had a pair of 16-inch-long “ski tips” made out of ¼-inch steel. On moving day, we fit these ski tips under the front of the skids. Second, we place a 12-inch-diameter, 12-inch-long section of round log about eight feet in front of each ski. The pulling cables, which are attached to the front of the house, run over the top of the rolling logs to provide some upward force.
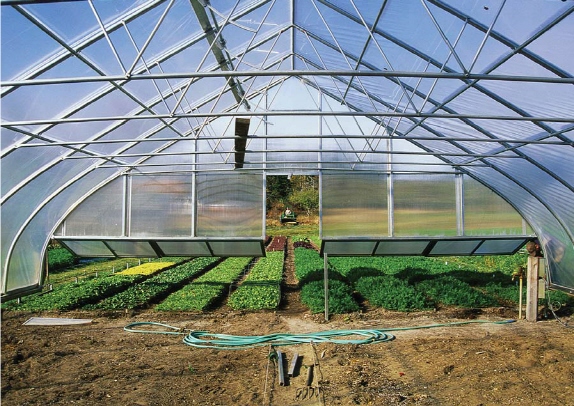
The view from inside as a greenhouse starts moving. The house will stop just before it reaches the water hydrant and electrical box.The hydrant and electrical box always remain covered by the greenhouse.
We pull with two cables, one on each side of the house. The cables extend straight out in the direction in which the house is to be moved to a pulley attached to a ground anchor at the spot where the house will stop, and then over to the front of the tractor. Since each side of the house is being pulled in a straight line the process goes very easily. When the house is in place it is secured to the ground by bolting the skids at each end to 45-inch-long, 4,000-pound-rated ground anchors that are screwed into the soil.
I have visited a grower in Georgia who took this sled idea and made it simpler and less expensive by fashioning runners out of lengths of angle iron instead of 2-by-3-inch galvanized pipe. The angle iron lays flat on the soil with the vertical edge on the outside of the greenhouse. The lengths of angle iron are attached, one to the next, with metal plates and bolts, so each runner spans the length of the greenhouse. A pair of holes are drilled every 4 feet into the vertical edge of the angle iron. A greenhouse hoop is placed upright between each pair of holes and bolted solidly to the angle-iron skid with a U-bolt that circles the hoop pipe and is inserted through the two holes and fastened in place. Diagonal braces give stability to the whole structure. It was ingenious and the least expensive sled design I have seen.
Our latest development is a 22-by-48-foot greenhouse on wheels that can be moved by two strong people—no tractor required. For this model we lay lengths of 2-inch-diameter round pipe on the ground under both sides of the greenhouse. We bolt a metal wheel to the bottom of each leg of the greenhouse hoops. The wheels, which have a curved flange, roll smoothly along the pipes. We used the same wheels as those on gates that roll on the horizontal-pipe crossbars of chain-link fences. Since the hoops of this mobile design receive no vertical support from the rails, we installed extra diagonal supports on the sides as well as in the superstructure. There is also horizontal cross bracing in the upper section of either end so the structure cannot rack as we are moving it.
A length of double wiggle-wire channel (see sidebar) runs along the bottom sides of this greenhouse to provide for attaching the plastic cover. Since this greenhouse sits on wheels there is a small gap between the bottom of the sides (below the wiggle-wire channel) and the ground, and this gap must be closed up in cold weather. To allow for this, when we skin the greenhouse with plastic we leave a 2-foot flange of plastic below the wiggle-wire channel along the bottom of both sides of the house. When a weather-tight seal is needed, we put sandbags in place to hold down the plastic flange (another alternative is to bury the flange in the soil). We fill each bag with 15 pounds of road gravel, which we eventually use to repair roads when the bags deteriorate. Filling the bags with soil dug from the field and later dumping the soil back in the field is another possibility.
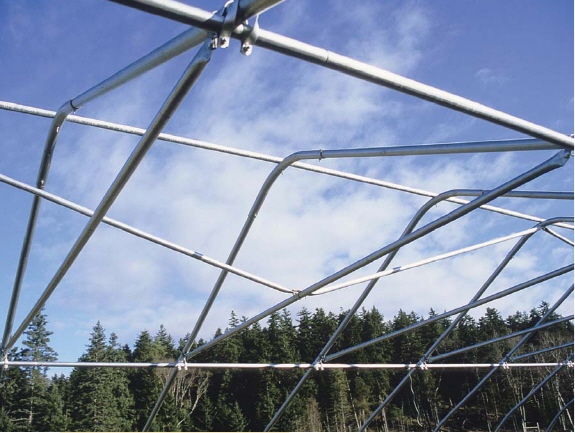
Diagonal supports in rolling greenhouse superstructure.
The 20-foot-long pipe rails are connected to each other with short lengths of a smaller-diameter pipe that fit inside. Although we move this house to four different sites during the course of a year, at the start we purchased only 100 feet of pipe rail for each side. This was enough to move the house from one site to an adjacent site. If we wished to move the house further, we had to pick up the lengths of pipe the house had rolled off and move them to the other end of the house. We have subsequently purchased the full length of pipe needed (200 feet per side) because we decided it would be easier to have the pipe rails in place for the five or six moves per year that we make with this house. This slightly greater expenditure eliminated what I call the “hassle factor.” We have put up with a lot of hassle factor over the years trying to keep costs as low as possible for our different technological innovations. In retrospect I think we often made a lot of extra work for ourselves that it might have been wiser to avoid. It is at least worth thinking about.
Since this house is moved as frequently as once a month and the four sites cover a 200-foot-long area (see plan below), we did not use the screw-in ground anchors described above to secure it in place. Instead, we secure this house at each of the four corners with a metal fence post driven solidly into the ground, at a slight angle to maximize the holding power of the plate at the bottom of the post. We bolt each fence post to a bracket that extends from each corner of the house. Whenever we need to move the house, we can quickly extract these fence posts with a T-post puller. I don’t believe the fence-post anchors are quite as secure as the screw-in anchors, but they are very easy to use and we haven’t had any problems thus far.
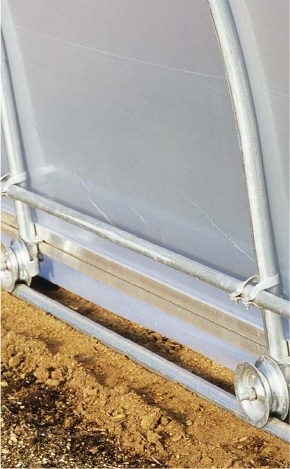
The wheels of our pipe rail-and-wheel design for a movable greenhouse.
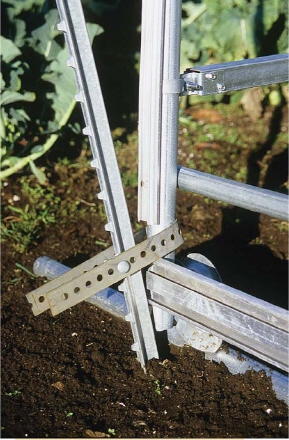
T-post anchor and homemade attaching bracket for securing the corners of a new rolling greenhouse design.
Ventilation
Once we’d designed the rolling hoop house, simpler ventilation was our next concern. The ridge vents in the larger houses were quite expensive. In most tunnel designs, roll-up sides provide ventilation. The concept is reasonably simple but we rejected it for winter-harvest houses in our climate because snow and ice would hinder the attaching or detaching of the pipe roller and the cold air would infiltrate the greenhouse at soil level, directly at the young plants.
We can envision a roll-up side design that might be successful. The rollable portion of the sidewalls would not extend down to ground level but, rather, would stop 2 or 3 feet above the ground. A separate piece of plastic would cover the lower part of each side of the greenhouse. An opening at that height would remain clear of snow unless very large amounts slid off the roof and accumulated on the ground beside the house. But a drop down side would make even more sense. The higher opening would prevent cold air from coming in directly across the plants.
End-Wall Ventilation Design—Sliding Houses
The end-wall design for our 22-by-48-foot sliding houses provides for both high and low ventilation. Each end wall has two 4-foot-wide-by-5-foot-tall access doors side by side in the center of the wall. The base of the doors is 16 inches above ground level. We open the doors for ventilation as needed. There is a permanent crossbar beneath the doors that extends from one side of the greenhouse to the other. The crossbar stiffens the end bows to keep the greenhouse ends from splaying in or out when we move it. We have to step over the crossbar whenever we go in or out of the greenhouse, which is awkward, but it’s a fair trade-off for the sturdy end-wall construction.
WIGGLE WIRE
There are a number of different styles of two-part clamping systems used to quickly attach the plastic cover around the perimeter of a hoop house. One part is bolted or screwed to the greenhouse frame, and the second part fits into the first to lock the plastic sheet in place. I think the simplest of all these styles (and the one I most enjoy working with) consists of a low U-shaped channel into which is inserted a zigzag-shaped length of wire to hold the plastic firmly against the inner surfaces of the channel. Depending on the manufacturer, this product goes by the name of wire-lock or spring lock or poly-lock or wiggle wire. The best designs have a channel deep enough so two or more zigzag wires can be inserted. That is useful either for extra holding power or so the same channel can secure both the end-wall plastic and the top-covering plastic.
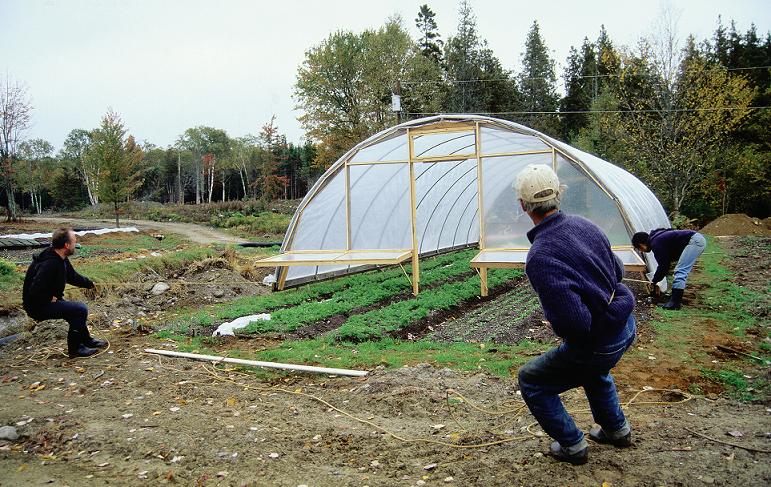
Friends help out with an early mobile-greenhouse design.
This design also provides a way to allow additional ventilation in the summer. A strip of plastic covers the space between the crossbar and the soil surface. We roll up the plastic strip when we move the greenhouse over standing crops, and we also open it like a roll-up side during the summer.
Improved End-Wall Design—Rolling Houses
By placing our most recent mobile-house design on wheels that run on rails, we opened up the possibility of an even better end-wall layout. As noted above, we install a crossbar horizontally across the ends of our sled models to ensure that the skids cannot splay either in or out as we move the house. Since this new house runs on rails, directional stability of the leading edge is assured and we no longer need the crossbar. That change allowed us to design a wide door for easier access and even better ventilation.
Our wheeled houses are constructed with a 12-foot-wide opening at both ends. There is also a narrow (2-foot wide) door for winter access between the large opening and the sidewall. The wide doorway is covered with a piece of plastic secured at the top and sides with wiggle-wire channel. The bottom edge is held down with sandbags. The plastic sheet for the door is attached to a pipe at both top and bottom so it is basically a roll-up (or roll-down) end.
For winter ventilation we unclip the wiggle wire across the top and upper sides of one or both ends and drop the plastic down to open as large an area as required. That way neither snow nor cold air can blow in across the crops at soil level. We close up the opening in the evening. For spring ventilation, once snow is no longer a problem, we roll up the door from the bottom during the day and then down at night just like a roll-up sidewall. In early spring when cold air drafting directly across the crops might be detrimental, we stretch a 2-foot-wide piece of plastic horizontally across the bottom of the door as an air barrier (as I suggested for a modified roll-up sidewall system above). When summer arrives, we roll up the doors at both ends entirely and tie them in place. This ensures good ventilation and allows easy access for harvesting or re-preparing the soil for a succession crop.
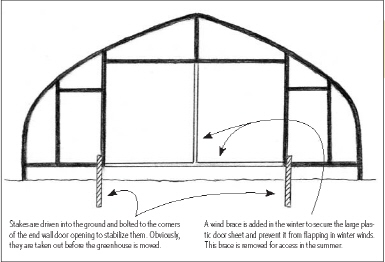
End-wall design for a rolling greenhouse.
We are extremely satisfied with our mobile houses and the benefits they offer. Growers who already have greenhouses that don’t move will find they can be made to move at a reasonable cost by adding wheels, pipe rails, and diagonal bracing. Or a static house can duplicate some of the benefits of a mobile house if it is uncovered in summer and then re-covered again at the proper time in the fall. The plastic could be rolled up and over starting at one side and left attached to the bottom of the other side. The roll should be covered with an opaque cover to protect it from sunlight. The plastic would then last twice as long without the stress of exposure to the summer sun.
Designing Rotations with Mobile Greenhouses
Our hope has always been that our small farm could supply the widest possible range of vegetables to our local customers by following a broad-based multiple-crop system for the longest possible season. Our mobile greenhouses have helped us achieve this by allowing us to devise multi-crop and multi-season rotations that we could not otherwise pursue. Here, I’ll describe some examples of two-, three-, and four-plot greenhouse rotations with suggestions for appropriate crops.
Two Plots, One Move
This scenario is the one with which we began and involves a pair of greenhouses, each one moving once during the year, from one plot to an adjoining plot. The two pairs of plots are adjacent to each other, and the two greenhouses are diagonally offset so they don’t shade each other. We move the greenhouses in the fall from a summer crop to a winter crop. We usually do this as late in the season as we dare. Our goal is to extend the summer crops’ season as long as possible but also to cover the winter salad crops before they suffer any cold damage.
Plot A1 has grown tomatoes sheltered by a greenhouse throughout the summer. On plot A2, which was uncovered during the summer, a summer crop of onions precedes spinach. On Plot B1, a crop of peas preceded winter carrots. Plot B2, was covered by a greenhouse, filled with arugula, pak choi, parsley, and flowers. Both the onions and peas will mature and be harvested early enough to allow sufficient time for soil preparation before the desired sowing dates of the spinach and carrots. We move the houses in the fall so they cover plots A2 and B1 for the winter.

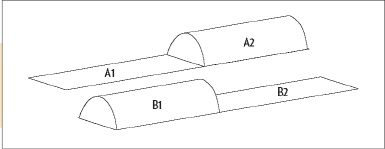
A pair of greenhouses, as described above, after being moved to their winter positions.
When the spinach is finished the following spring on plot A2, we’ll prepare the soil yet again and plant tomatoes there. And after the carrots are all dug from plot B1, we plant arugula and its companions there. After that, we’ll continue to rotate the crops around the plots, planting tomatoes and spinach in the B plots and carrots, arugula, and companions in the A plots. In this way, the same crop, say tomatoes or carrots, does not return to the same plot but once in four years.
Three Plots, Three Moves
In mid-October, we move the greenhouse from a summer crop of tomatoes (plot 1) to cover a fall crop of spinach (plot 2) for late November harvest. The house is moved again at the end of November to a third plot to protect leeks for midwinter harvesting. The leeks are hardy enough to deal with the outdoor temperatures until then. As the leeks are sold, each empty bed is re-prepared and sown to carrots starting on February 1. By mid-March when the last of the leeks are gone, the whole house has been planted in early carrots. (By May 1 the carrots no longer need protection, so we move the house back to plot 2, where the spinach grew the previous fall.) In mid-April, we had prepared the soil in this plot for tomatoes and covered it with a sheet of clear plastic to begin warming the soil. We allow a few days for the closed-up greenhouse to continue the soil warming and then set the tomatoes out under the greenhouse around May 5. Around the middle of May back in plot 1, where the tomatoes grew the previous year, we set out the new leek transplants. After harvesting the carrots from plot 3, we plant a summer crop of lettuce, after which we sow spinach in early September and so the cycle is ready to go around again.
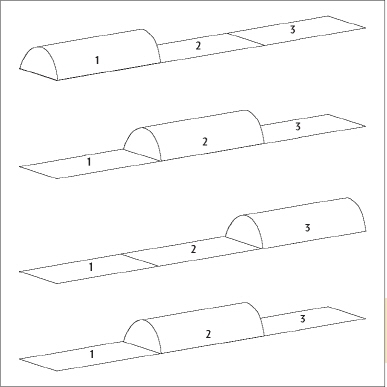
The three-plots, three-moves rotation.

The house spends the winter on plot 1 protecting an overwintered crop that is not hardy enough to survive out of doors in our climate (like late-August-planted onions or late-September-planted spinach). By March 25 the overwintered crop no longer needs protection, and the house is moved to plot 2 to begin warming the soil for an April 1 sowing of carrots and beets. By April 25 the young carrots and beets are safe out of doors, and the house is moved to plot 3 to begin warming the soil for a May 1 transplanting of zucchini and bush beans in alternating beds.
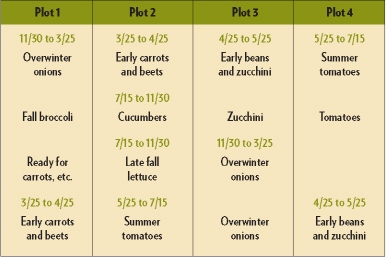
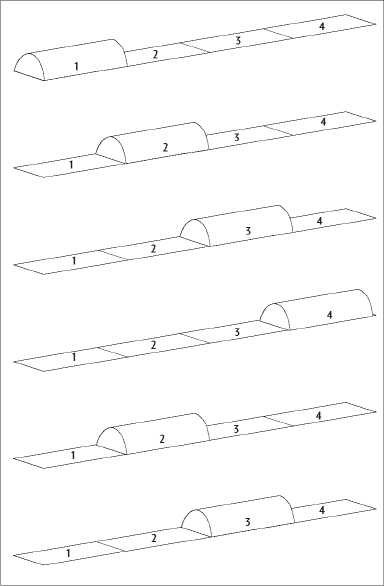
The four-plots, five-moves rotation.
Those crops are safe by late May when the house is hauled to plot 4 to cover summer tomatoes. By mid-July the early carrots and beets in plot 2 have been harvested, and the house is moved back there to cover cucumber transplants for a fall harvest. The vertically trained cucumbers will stay productive into October, at which point they are replaced by four-week-old lettuce transplants. Meanwhile a new crop of onions (for overwintering) has been planted in plot 3 in late August following removal of the early zucchini. The onions are hardy enough to remain uncovered until Thanksgiving when the lettuce is harvested, and the house is moved to plot 3 to cover the onions for the winter. Plot 1 is composted and fertilized in late fall so it will be ready for next spring’s early carrot and beet sowings on April 1. We also prepare the other uncovered plots in the fall if weather conditions permit.
Adding Up the Benefits
These examples show that farming with year-round use of greenhouses is a system for generalist producers. Generalists will derive the most benefits from the spatial, temporal, and biological relationships between crops that movable greenhouses help us exploit. (Although a specialist grower who produces at least four or five crops should also benefit by using mobile greenhouses.)
The three-plots, three-moves sequence is based on the progressive hardiness of tomatoes, carrots, and leeks. The four-plots, five-moves sequence is an even finer example of using progressive hardiness of crops to determine the timing and sequence of moving the mobile greenhouse. It also shows the tremendous yields that can result: 1,000 square feet of onions and scallions and the same square footage of early carrots and beets, early zucchini and beans, earlier tomatoes, late-fall cucumbers, and late lettuce—all this from the influence of one 1,000-square-foot greenhouse in one year. That is making very good use of the slight increase in capital investment to purchase a movable house compared to a static house. In addition, many of these crops are harvestable five weeks earlier and/or five weeks later than crops without the greenhouse protection, which increases the length of our sales season by two and a half months.