3
EVA Foam
Turning Floor Mats into Armor
In the last chapter, you saw the amazing things you can do with paper and Pepakura. In this chapter you’re going to learn how to turn humble garage floor mats into a convincing suit of armor. This is the part where you’re probably thinking something like, “I don’t want to make a suit of armor out of foam! I want to make it out of hammered steel or a space-age carbon fiber and Kevlar composite with ceramic backer plates so it’ll be rock hard and stop bullets. After all, it’s supposed to be armor.”
If that’s what you’re thinking, you haven’t given it nearly enough thought.
Making your costume armor out of hard materials adds several orders of magnitude to the level of fabrication difficulty. It also means using a whole bunch of specialized tools and making a much bigger mess in the process. Also, the unyielding parts bumping and grinding against each other as you walk will tear up the paintjob faster than you can say, “Ow, that pinches!” Finally, while it might sound cool to be able to say something like, “My futuristic galactic space marine armor is made out of actual steel,” you’re going to suffer some ironclad embarrassment when you pass out from exhaustion after lugging all the extra weight around in the sun at some event.
It’s better to fake it. Done right, it’ll be just as awesome to look at without all the extra pain and suffering, pinching, bleeding, heat exhaustion, paramedics, and hospital bills.
So how do we make rubber mats into amazingly convincing suits of armor? Well, it’s important to learn how to crawl before you can sprint down the runway on the way to a jetpack-clad takeoff. That’s why we’ll start with . . .
Sourcing: Where to Get Foam
Asking around for “EVA foam” at local stores will get a lot of confused responses. Instead, ask for it based on what it’s used for. The most common version of thicker EVA foam will be anti-fatigue floor mats, which can be found at most hardware stores and auto parts stores. They’ll be sold either in large rolls or in interlocking tiles ranging in thickness from ⅜″ to ⅝″ (about 1 cm). They’re available in a variety of colors, but most commonly are they’ll be some shade of gray. It will usually have one smooth side and a textured side designed to keep people from slipping on it.
Most of the time, a store will only have one or two types of foam floor mats. If the plan is to incorporate any of the textures into the finished piece, it’s a good idea to buy foam from more than one store to give you a variety of textures.
The other common version is often called craft foam or Foamies, and can be bought in most craft stores. It’s usually around ⅛″ (3 mm) thick and comes in all sorts of different colors.
Just a little bit of shopping around and you’ll find you have all sorts of choices in thickness, color, and texture available to you (Figure 3-1).
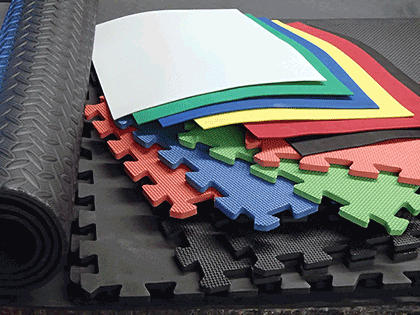
Figure 3-1: There’s a whole world of EVA foam just waiting to be discovered.
Now that you have yourself some foam, here are the other tools and materials you need:
- Cutting tools (e.g., box cutter, utility knife, a hot knife, and/or a scroll saw)
- Contact cement
- Paintable caulking
- Butcher paper
- Duct tape
- Aluminum foil
- Permanent marker
- Straight edge
- Sandpaper
- Heat gun
- Blowtorch
- Plasti Dip or Mod Podge
- Rotary tool (such as a Dremel)
- (Optional) Computer and printer
- (Optional) Blowtorch
Once you have your tools and materials, let the foam armorsmithing begin!
The Basics: Making Foam Obey Your Every Whim
Before we dive into the how-to of making foam armor, let’s look at some of the mandatory methodologies to master this material.
Cutting the Foam
Unless you plan to dress up as “Jigsaw, the Madman in the Interlocking Diamond-Plate Armor,” chances are good that the foam isn’t sold in the right shape. Instead, it’s time to do some cutting.
In most cases, this just calls for a very sharp knife, such as a box cutter or a utility knife with a fresh, sharp blade. To make a straight cut, start by pressing the tip of the blade all the way through the foam, then drawing it along the line to be cut at the shallowest angle possible (Figure 3-2).

Figure 3-2: Making a straight cut in foam
For curved cuts, it’s pretty much the same operation, but the blade is held at a steeper angle (Figure 3-3).
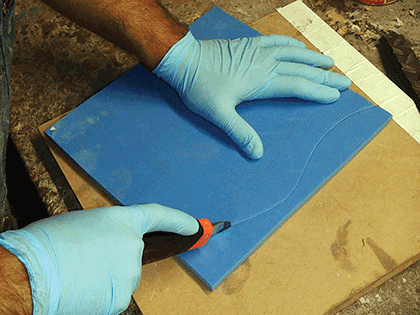
Figure 3-3: Cutting a curve

Figure 3-4: Smoothing the edges with a sanding block (left) or the rotary sanding drum (right)
A hot knife (a type of cutting tool with an electrically heated blade) can be a good idea, as well. Just remember to cut fast enough to avoid burning the foam and slow enough to avoid tearing it. The hot knife has the advantage of heat sealing the edges while it cuts, eliminating much of the porosity of the cut surface.
A band saw or scroll saw (Figure 3-5) can speed things up too. At the very least it’ll make things a bit easier on the fingers.
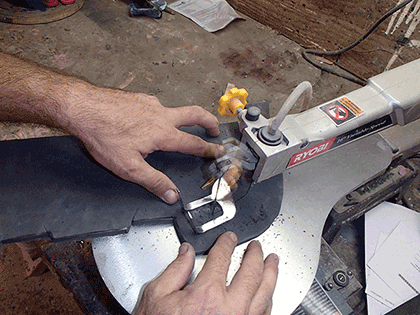
Figure 3-5: The scroll saw makes quick work of cutting foam.
Joining Seams
Once the parts are cut out, they’ll need to be glued together. There are a few preferred methods for doing so. The first, and most talked about, is contact cement. This is a readily available, air-dry adhesive that can be bought at just about any hardware store.
Before using contact cement, it’s a good idea to heat-seal the edges of the foam. This means using a blowtorch or heat gun to quickly melt the surface of the foam and eliminate the tiny pinholes that were created when cutting through the cellular structure of the foam. If the edges aren’t heat-sealed, they’ll soak up a lot of the glue and it’ll take multiple coats (and a lot more time) in order to get a good bond.
As always, READ THE INSTRUCTIONS on the glue before using it. Here’s the short version: use a brush to coat the two surfaces to be joined with contact cement, allow them to dry until tacky, then push them together and allow them to dry completely. This will result in a strong, reliable bond. The only real trick is making sure that the outer surfaces of the two parts meet up evenly in order to keep the seam nice and neat (Figure 3-6). The main drawback to contact cement is that it’s a bit slow to dry.
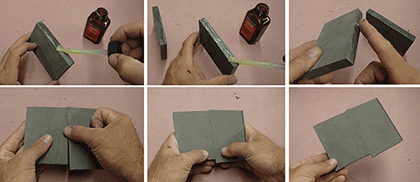
Figure 3-6: Joining two pieces with contact cement
The second option for sticking the foam together is to use a hot glue gun. This is a faster method, but has a few major drawbacks. The main one is that the glue will melt at high temperatures. This isn’t usually a problem, but out in the hot sun in a thick suit made of foam, the temperature inside can get pretty warm rather quickly. Eventually it may be warm enough to soften the glue just a little bit. When the glue gets softer, it gets weaker. Then the armor will start to come apart a little bit. Then it will look a little less awesome as it begins to slowly disintegrate. Again, it’s not usually a problem, but it’s something to be aware of.
The second problem with hot glue is that some brands are water soluble to some extent. It may seem like this wouldn’t be a problem unless the armor were for some sort of submarine scuba soldier, but water just happens to be one of the main ingredients in sweat. So once again, on that hot day . . .
The third (and biggest) problem with hot glue is that it can have a lot of bulk to it. While most adhesives are just a thin coating added onto the surfaces to be joined, hot glue is a blob of melted goo that gets put in between. When the parts are pressed together, all of that goo has to go somewhere, so be careful when squeezing parts together so it doesn’t leave an unsightly blob somewhere that’ll be visible. It’s not the end of the world, but it’s something to take into account when using it to put parts together.
Another option for adhesive is the same cyanoacrylate adhesive that worked so well when building Pepakura models. Often called super glue and available at any hardware store, hobby shop, or craft store, it cures quickly and the cure time can be made much faster with the use of an accelerator usually referred to as kicker. While it’s not a terrible option, its fast cure time can be a problem if the parts aren’t positioned perfectly on the first try, and it tends to be hard and brittle, which will become a problem if the parts will need to flex and bend a lot while being worn.
Whichever type of adhesive is chosen to construct the suit, it’s always a good idea to reinforce the seams with a little bit of fabric backing in order to help take the strain. We’ll cover this in more detail later.
Seams, Joints, or Whatever You Want to Call the Connections
The easiest way to stick two pieces of foam together is a butt joint, where the two pieces butt up against each other, as shown in Figure 3-7.
If the seam is supposed to correspond to a hard corner on the surface of the piece being made, it calls for a miter joint. To make a miter joint, start by cutting the edges of the parts at an angle, then joining them together, as shown in Figure 3-8.
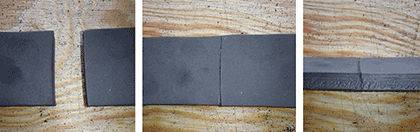
Figure 3-7: Butt joint. Stop giggling.
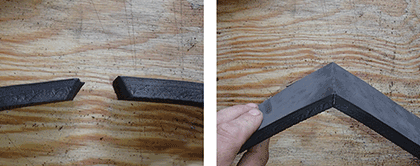
Figure 3-8: Viewed from end on, the angle-cut (or mitered) pieces join together to create a corner.
Finally, a lap joint is formed when two pieces are put together so they overlap instead of joining at the edges (Figure 3-9).

Figure 3-9: A lap joint is a good idea for pieces that have visible steps or variations in thickness.
Once the seams are joined, there will probably be a visible edge where the parts were glued together. While careful work can sometimes make them hard to spot, it’s often a good idea to do a little bit of filling and smoothing work in order to help hide the seams. While shopping for foam and sandpaper, pick up a small tube of caulking. Not just any caulking, though; make sure to buy flexible, paintable, sandable caulking. This can be used to fill in the tiny surface gap where the pieces come together.
To hide the seam, start by squeezing a bead of caulking along the length of the seam. Then, dip your fingertip into a cup of clean water. Use the wet fingertip to get the caulking as smooth as possible, then set the piece aside and allow the caulking to dry.
After the caulking has dried, sand the area lightly with medium- to fine-grit sandpaper to blend it in even further.
Corners, Bends, and Compound Curves
Suppose there’s a place where the foam needs to have a tight bend with a small radius, but there’s no need for a seam along that edge. The foam can be made to bend tightly by cutting out a groove in the back side and then bonding it together afterward. Start by bending the foam sheet in the opposite direction of the corner that will be needed, then cut off some of the inside with a knife, as shown in Figure 3-10.
After removing a slice of foam from what will be the inside of the rounded corner, coat the gap with adhesive and fold the foam back on itself. Once it cures, this will leave a rounded corner on the outside of the foam (Figure 3-11).
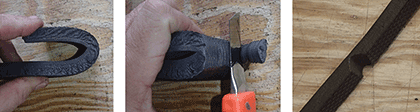
Figure 3-10: Cutting the inside out of what will become a rounded corner

Figure 3-11: After gluing the inside corner, the outside is left with a nicely rounded edge.
If the final shape needs to be a bigger, longer curve instead of a tight, rounded corner, it’s time to turn up the heat. Like any plastic or rubber material, EVA foam can be melted at relatively low temperatures. At temperatures slightly below melting, it can be deformed and reshaped to a limited extent and then, after it cools, it will retain this new shape.
To reshape the foam by hand, start by heating the foam with a heat gun. The idea is to increase the temperature of the piece without burning a hole in the surface along the way, so be sure to move the heat gun around while applying heat to the foam, and don’t forget to heat the sheet on both sides. Holding still for any length of time will potentially melt or burn a hole in the foam.
It really doesn’t take all that much heat before the foam will become warm enough to bend permanently, as shown in Figure 3-12.
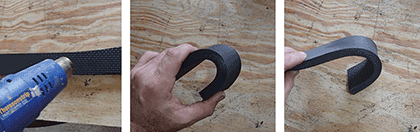
Figure 3-12: After you warm the strip with the heat gun and bend it by hand, it will keep its new shape when it cools.
Using carefully applied heat, and bare (or gloved) hands, it’s possible to get the foam to conform to almost any shape (Figure 3-13).
Compound curves can also be achieved in much the same way. Simply heat the surface of the foam and stretch it by hand or force it over whatever object is handy until it has the necessary shape (Figure 3-14).

Figure 3-13: No idea why anyone would want a piece of foam shaped like this, but here it is.
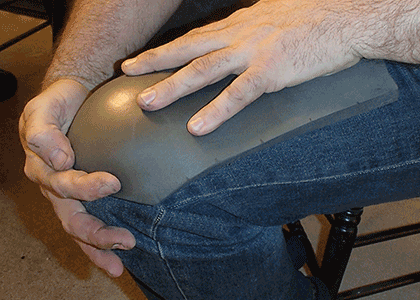
Figure 3-14: Pushing a bump into the heated foam by using a knee as a form
Patterning
There are basically three different ways to go about developing the patterns that you’ll use for making foam armor. First, you can hope that someone, somewhere on the Internet has already made the exact thing you’re trying to make and posted all of their patterns somewhere to be easily downloaded. Since that’s asking quite a lot, it’s not something that should be counted on. The next option is to use aluminum foil, duct tape, and some artful handiwork to develop patterns by hand. Finally, and just as good, a digital model and Pepakura can be used to generate paper templates that will then be traced onto the foam.
Making Patterns by Hand
Let’s start with something simple: the shin armor for the unnamed wolf warrior (Figure 3-24).

Figure 3-24: The armored greaves of . . . is the name Ethlwulf okay? No?
To get the shape, we just need to decide on a curve for the outer edges. Since the piece in question needs to be symmetrical, start with a piece of heavy cardstock that has been folded in half, draw the desired shape of the outside edge, then cut it along that line and unfold it, as shown in Figure 3-25.
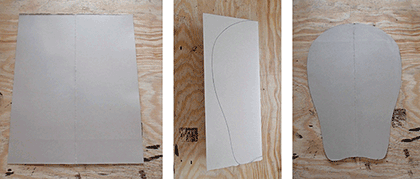
Figure 3-25: Making the template for the shin armor
This template can now be used to do a quick test-fit against the wearer before tracing it onto the foam. Once the shape is traced onto the foam, simply cut out the two pieces (Figure 3-26).

Figure 3-26: The parts traced onto the foam, then cut out with a knife before sanding the edges smooth
Once the foam pieces are cut out, all that’s left to do is cut a vertical groove into the backside along the centerline, then glue the groove shut to form a tightly rounded corner on the outside. Once that’s set up, use a bit of heat to curve the sides, as needed, to form a good fit (Figure 3-27).

Figure 3-27: Masking tape holds the pieces in position while you’re waiting for the glue to cure and the foam to cool.
That’s all that’s needed in order to get the general shape of the greaves. The next step will be to add trim and other details, but we’ll get to that later in this chapter.
For now, let’s step up our game a bit and make something a bit more complicated: the gauntlet for our still-unnamed wolf warrior (Figure 3-28).
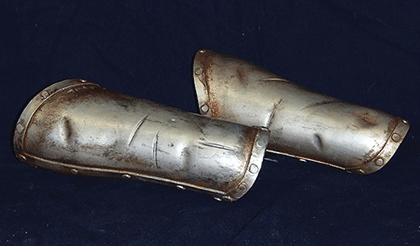
Figure 3-28: We could call her Mysandria . . .
To get your basic shapes worked out, start by gathering the following tools and materials:
- Aluminum foil or plastic wrap
- Duct tape
- Bandage shears or safety scissors
- Permanent marker
- The foam that the armor will be made of
Start by wrapping the body part to be fitted (Figure 3-29).
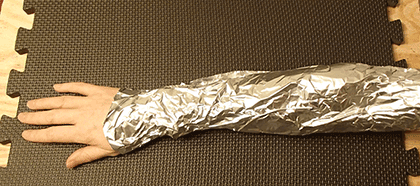
Figure 3-29: The forearm wrapped in foil to keep the tape from sticking
Cover the foil completely with one layer of duct tape (Figure 3-30).
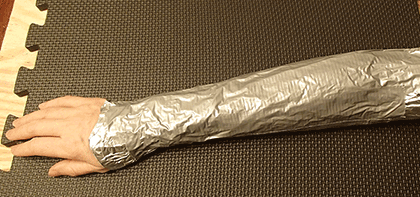
Figure 3-30: Tape covering the foil to keep it from deforming
Use a permanent marker to draw lines where the tape will be cut (Figure 3-31). Make a tick mark across the cut line every inch or two (2–4 cm). These will help to realign the parts on either side of the seam later.

Figure 3-31: The cut line with tick marks
Using the bandage shears in order to avoid damaging the body part underneath, cut the foil/tape mess along the cut line. Then cut notches in the edges where the tick marks were, as shown in Figure 3-32.

Figure 3-32: The template with alignment notches cut along the edges
This is almost the exact shape to cut out of the foam, but not quite yet. This shape fits perfectly around the forearm it was made on and that’s great. But it’s also just a thin layer of foil/tape weirdness. Unless the foam that the armor will be made of is just as thin, there will have to be some additional width added to the template in order to account for the girth added by the thickness of the foam. Also, since this one-piece gauntlet will need to slip on over the wearer’s hand, it’ll have to be made even bigger in order for that hand to fit through.
To determine the additional width, make a long strip out of foam and wrap it around the hand of the wearer it was sized for, as shown in Figure 3-33.
After marking the length of the foam strip, compare it to the width of the wrist area on the tape and foil template (Figure 3-34).

Figure 3-33: Foam strip wrapped around the hand

Figure 3-34: Huge difference
At this point, modify the foil template by widening it until the wrist area is the same width as the length of the foam strip that wrapped around the wrist. In this case, that means we’ll need to add almost 2″ (4.5 cm) by simply splitting the template and adding a bit more tape in the middle (Figure 3-35).
Now the template can be traced onto the foam, as shown in Figure 3-36.
Cut the parts out of the foam and fit them together with masking tape in order to ensure that there are no problems where the edges are supposed to connect to each other. This is also a good time to test-fit the parts to the wearer and make sure that nothing has gone wrong in the process of developing the template (Figure 3-37).
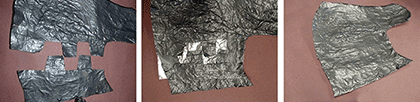
Figure 3-35: Widening the template

Figure 3-36: The template traced onto the foam

Figure 3-37: The test fitting
At this point, these taped together gauntlets look nothing like the reference image that we started with. Now it’s time to add some finesse by heating them up and bending them into shape. Specifically, we’ll start by adding a bit of convex shape to the area that will correspond to the back of the hand (Figure 3-38).

Figure 3-38: Heating, bending, and stretching to get the rounded shape for the back of the hand area
Then the same thing is done for the meaty area inside the forearm around the elbow (Figure 3-39).

Figure 3-39: More heating, bending, and stretching to get the rounded shape for the elbow area
After getting the bulbous areas shaped, it’s time to heat up the rest of the parts and put a bend in them so the seam can be glued. Use some strategically placed strips of masking tape to hold the seam closed until the glue has a chance to dry (Figure 3-40).
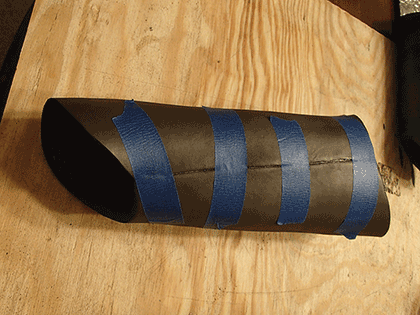
Figure 3-40: Masking tape to hold the seam while the glue dries
Now that we have the basic shape put together, all it needs is a few details and some battle damage—more about that later. First, let’s look at making an even more complicated shape: the breastplate (Figure 3-41).

Figure 3-41: Armored boobs are a staple of science fiction and fantasy character design.
For reasons that should be somewhat obvious, form-fitting female chest armor presents a unique set of challenges. There are compound curves and corners to deal with everywhere. Still, we’ll start by creating a foil-and-tape pattern in much the same way as we did for the gauntlets. In this case, we’ll start by wrapping foil over the chest of a duct-tape dummy, as shown in Figure 3-42.
After wrapping the chest tightly in foil, apply a single layer of duct tape (Figure 3-43). Again, the idea here is to reinforce the easily torn foil shape without adding any unnecessary thickness. If you use too much tape, you’ll cause distortion along the way.
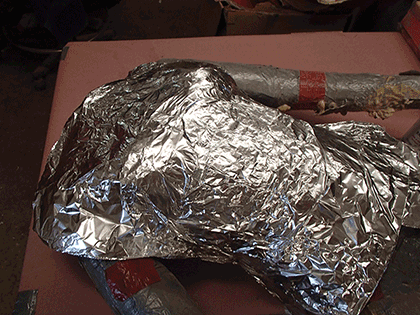
Figure 3-42: Duct-tape chest wrapped in foil

Figure 3-43: A single layer of duct tape laid over the foil with minimum overlap
Now’s the time to remove the foil-tape shape from the chest and cut it so that it lays flat. In this case, the piece will end up being built much like a bra, with a simple curve that conforms to the ribcage under the bust and a pair of cups that conform to the shape of the breasts. We can start by cutting off the bottom portion along the under-bust line, then separating the cups by splitting them right down the center of the sternum. This makes the pattern into three pieces, as shown in Figure 3-44. Start by drawing cut lines with a permanent marker. Include tick marks every inch or so (about every 2 cm). Then cut the pieces apart.
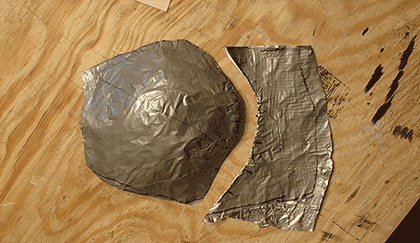
Figure 3-44: Separating the three separate pieces of the breastplate will be based off of just two patterns because symmetry is our friend.
Unless the model is some sort of mutant or plastic surgery addict, female breasts are almost always asymmetrical. In most cases, one will be ever so slightly larger than the other. This is normal. Typically, the larger one will correspond to the non-dominant hand (i.e., the left breast will be ever so slightly larger on a right-handed woman). For the final piece to be symmetrical, discard the template for the smaller, dominant side, and instead use the template for the larger, non-dominant side.
The piece that wraps along the ribcage should be fairly easy to flatten out without stretching or tearing it. Now is the time to determine the exact shape of the bottom edge of the breastplate, as shown in Figure 3-45. After trimming the foil/tape piece to the ideal shape, fold it in half to verify that it’s symmetrical. Then transfer the outline to a piece of paper that’s been folded in half. After cutting it out and unfolding it, the paper template will be just the right shape.

Figure 3-45: Making the symmetrical paper template based on the shape of the foil/tape pattern
Now it’s time to move on to the cup shape. Since a round cup shape will not want to lay flat, it will need to be cut in at least one place (Figure 3-46). These cuts are analogous to the darts that are used by seamstresses when making form-fitting garments without folds or gathers. For deeper or curvier shapes, more cuts may be needed.

Figure 3-46: A cut from the middle to the edge of the cup will allow it to lay flat.
After making enough cuts to get the foil/tape piece to lay flat, trace the design onto a piece of paper (Figure 3-47), making sure to transfer the locations of all of the tick marks. Then cut the template out, making notches along the edges where the tick marks were.

Figure 3-47: Creating a smooth paper template from the foil/tape version
Trace the paper templates onto the foam and cut out the pieces (Figure 3-48).

Figure 3-48: Cutting out the foam parts based on the paper templates
Before gluing anything together, start by heating the foam pieces with a heat gun and shaping them by hand. While the shape can be fine-tuned once the pieces are glued together, it’s best to get it as close as possible while they’re still separate in order to avoid messing up the glued seams. Start by bending the rib piece to roughly match the shape of the wearer’s ribcage, as shown in Figure 3-49.

Figure 3-49: The curved rib piece
Next, heat the cup piece and shape it over a knee or ball in order to get the proper curve to fit the wearer’s breast (Figure 3-50).
After the parts have been shaped, it’s just a matter of gluing the seams together (Figure 3-51).
For more complex shapes, it’s simply a matter of starting with templates like these and building mockups of the necessary pieces out of card stock. Then disassemble the cardstock mockup and use the pieces as templates for the build.
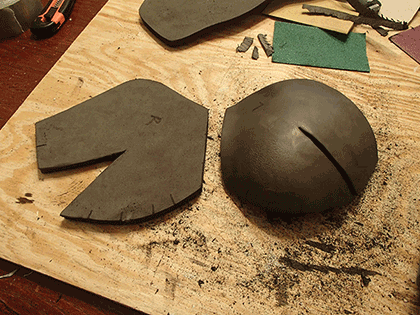
Figure 3-50: The shaped breast cup before gluing

Figure 3-51: Assembled base shape for the breastplate
Final Detailing
Now that the basic shape has been made, it’s time to bring it to life by adding all of the little details that made the character cool to begin with. These are the seams, rivets, dents, scratches, and raised panels that really make things real.
Seams and Panel Lines
To make a seam line that runs across a nice, smooth, single piece of foam, start by marking the line where the seam is going to be. Then use a sharp knife to barely cut into the surface of the foam. At this point, it’s probably not visible. Now use the heat gun to slightly cook the surface of the foam. As the foam is heated up, the surface will contract slightly, opening up the cut groove and making a very visible seam line, as shown in Figure 3-52.

Figure 3-52: Making a seam line that’s only skin deep
Dents and Scratches
There are two basic ways to add dents. The first is to grind into the foam with a file or coarse sandpaper. Then go back over the area with a heat gun or blowtorch in order to seal the surface and prep it for paint. This creates a thoroughly believable gouge in the surface (Figure 3-53).
The other option is to heat the tip of a metal tool and press it into the foam. Just be careful not to use too much heat or the foam will melt into a gooey mess.

Figure 3-53: Ground-in dents
For scratches, the best bet is to carve them in with a file, sand around the edges so they don’t look too manufactured, then heat the area to seal the surface before painting it. The end result is shown in Figure 3-54.

Figure 3-54: Scratches carved with a file and then heat-sealed
Raised and Layered Details
When it comes time to add small raised areas or layered details, there’s no better option than thin craft foam. It can be cut into strips to create trim or borders like those shown on the gauntlets in Figure 3-55, or the raised diamond pattern on the breastplate in Figure 3-56.

Figure 3-55: Gauntlet trimmed with a strip of craft foam
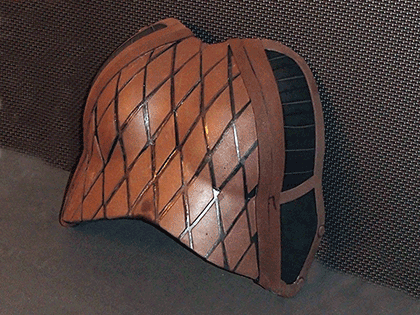
Figure 3-56: Raised breastplate pattern made of diamond shapes cut from sheets of craft foam and trimmed with strips of more foam
Rivets and Screw Heads
The best thing you can use to simulate the visible heads of fasteners, such as rivets and screws, is real rivets and screw heads. They’re readily available at any hardware store and, as an added bonus, they can be used to attach any necessary straps to the armor pieces.
If you don’t want to use real hardware, no problem. You can fake a rivet detail easily by using your rotary tool fitted with a sanding drum. Simply turn the speed up high, and touch the spinning end of the drum to the foam surface. The friction will melt a neat little circle into the surface of the foam that’ll look just like a rivet head (Figure 3-57).

Figure 3-57: Simulating a rivet head with the tip of a sanding drum on a rotary tool
Prepping for Paint
Look closely at the nice, smooth surface of the foam armor. Notice it’s not smooth at all. In fact, the entire surface is covered with countless tiny holes. What madness is this? It should come as no surprise that the foam is essentially just a bunch of rubber bubbles stuck together. This means that unless the surface is heat-sealed to melt these bubbles together, there will be at least a few holes visible on the surface.
But never fear. In their infinite wisdom, someone invented a spray-on rubber coating that makes an ideal primer for this surface: Plasti Dip rubber coating. Available in most hardware stores, it can be purchased in a wide variety of colors and dries to form a layer of soft, flexible rubber.
Sure, they may have intended for you to use it to add non-slip coatings to tool handles and whatnot, but deep down inside, they had costume and prop builders in mind.
To seal the outside of the foam, simply spray a couple of light coats onto the porous surface. It will absorb the paint, and the finished product will have a dull, gray-ish finish. If there are still areas that seem porous, allow the Plasti Dip to dry, and spray on another coat. Repeat, as necessary, until you’ve achieved the desired surface smoothness.
Another option for sealing the surface is to use Mod Podge. This is a commonly available product intended for use in decoupage. It also works in certain applications as a glue, finish, and (just what we’re after) a sealer. It can be brushed or rolled onto the surface and will provide a durable shell once dried. While it can often be tougher to get it to lay flat like Plasti Dip, brushing it on with a bristle brush can make for a great wood grain texture, as shown in Figure 3-58.

Figure 3-58: The wolf warrior’s shield coated in Mod Podge
Paint!
Once the surface is sealed, all that’s left to do is coat everything with color to hide the fact that it’s all made of foam rubber, as shown in Figure 3-59. The main consideration here is to use paint that’s a bit flexible. That way, it’ll give a little bit as the foam bends and moves instead of cracking and creasing as you walk around. Latex and acrylic paints are ideal for painting foam.
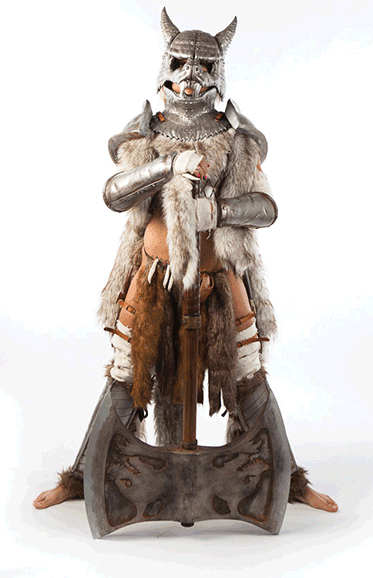
Figure 3-59: Fully painted, this lady’s armor really comes to life!
How was all of this done? More on that in Part V of this book.