14
Strapping and Padding
Hold Yourself Together!
Now that you’ve made all of the pieces and parts of your armor, it’s time to figure out how you’re going to wear it. After all, an awesome costume starts looking a lot less cool when pieces of it start falling off and you can’t move in it.
The actual method used to hold a suit of armor together will vary greatly depending on the design of the suit itself. But no matter what shape the armor is, the object at this point is to maximize range of motion, as shown in Figure 14-1.

Figure 14-1: The Vitruvian Hunter
When you’re in costume, you may not need the ability to run at a full sprint, dodge bullets, parry melee attacks, vault over low obstacles, and do a combat roll into a crouched fighting position, but if your armor is unwieldy and inflexible you’re probably not going to have much fun wearing it. With that in mind, let’s take a look at two absolutely vital elements of a suit of costume armor: padding and strapping.
Since everybody’s body is at least a little different and a lot of the details will vary depending on the design of your armor, there’s no best way to strap everything together. So this chapter will highlight a few key considerations, as well as show how the Hunter costume is held together.
Padding
If your armor is made of something heavy or rigid, common sense will tell you that it’s a good idea to pad the inside in order to make it more comfortable. But even if it’s made out of something light and flexible, adding padding will allow you to wear your armor comfortably without having it bounce all over the place. In addition to helping you avoid pinching and bruising, adding padding will keep everything snug and fitted. It’ll keep the thigh plates and shin plates in place so they won’t spin around, end up backward, and have you hobbling around the neighborhood on Halloween. It’ll also keep forearm pieces from sliding around and grinding into elbow pieces and scraping off the paint. Finally, if you’re not quite as bulky as the character you’re trying to replicate, it can add some much-needed mass so that you properly fill out the costume.
When you’re adding padding, work incrementally, building up a few sections at a time and testing the fit along the way until you feel comfortable that the piece is staying where you want it.
Padding Materials
There are two readily available options for costume armor padding: EVA foam and upholstery foam (Figure 14-2).
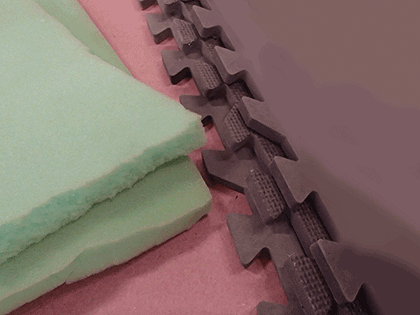
Figure 14-2: EVA Foam (right) and upholstery foam (left) are easy to find and easy to use.
EVA foam is the same foam as the floor mats that were used to make armor in Chapter 3. This is a good, firm option that will allow you to spread the pain of a heavy piece of armor rubbing against your person.
Upholstery foam is the green or yellow stuff you can pick up by the yard at your local fabric store. It’s available in various thicknesses and is much softer and lighter than EVA foam. It’s also typically more expensive than the foam floor mats. If you’re looking to pad something lightweight or add a lot of bulk without adding a lot of weight, upholstery foam is a great option.
Installing Padding
Once you’ve decided where to add padding, you’ll want to attach it as permanently as possible. One of the best options for this is a spray-on contact adhesive called Super 77 made by 3M. To use it, you simply spray the two surfaces you want to adhere together, allow them to air dry until they are both tacky, and stick them together. Figure 14-3 shows upholstery foam blocks being installed inside Hunter’s chest armor.
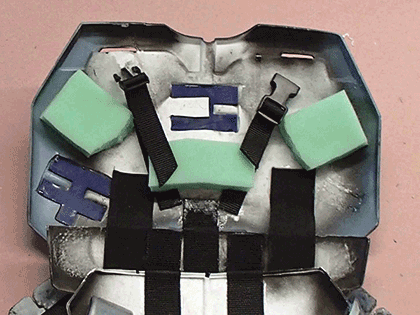
Figure 14-3: Gluing foam into Hunter’s chest
If you want a more temporary option, you can always use some black gaffer’s tape (or even black duct tape) to stick some foam in place inside the armor. If you decide to make changes later, you can simply peel it off and reposition the pads.
Armor Attachment Options
When choosing a method to attach your armor to your carcass, there are a lot of considerations. Is the armor made of lightweight vacformed or foam pieces? Is it a bunch of 10-pound slabs of Rondo-reinforced Pepakura? Is there a particular set of clothing that will always be worn underneath the armor? Does the design include visible straps, or will they have to be hidden somehow? All of these factors will come into play in the final design of the attachment system.
Here are just a few options, as well as their pros and cons . . .
Velcro to an Undersuit
If the armor is lightweight, you might just be able to get away with gluing Velcro patches to the inside of the armor pieces, then sewing matching patches of Velcro onto the undersuit.
This can be a great option because it’ll be easy to get the armor on and off in a hurry. The biggest drawback is that even the most reliable industrial-strength Velcro isn’t able to reliably support very much weight once the pieces start moving as you walk around. You’ll also have to make sure that your undersuit is made out of something that doesn’t stretch too much, or the armor will start to sag.
The main concern with using Velcro sewn directly onto your undersuit is that you are now stuck using that base garment for this suit of armor and only this suit of armor. If your armor is made of foam, there’s also a chance that the constant peeling action of removing the Velcro will start to tear up the foam armor from the inside.
Snaps to an Undersuit
Much more reliable than Velcro, snaps are great for holding your armor onto an undersuit. The challenge is finding a good way to attach the snaps to the armor parts. Gluing the snaps in place may seem like a good idea, but sooner or later the glue bond will fail and your pauldrons will fall off and go clattering across the floor.
If the armor is made out of sheet plastic, you can get away with mounting a snap to a piece of scrap plastic sheet, then solvent welding the scrap into place on the inside of the armor, as shown in Figure 14-4. This allows you to mechanically attach the snap, and then chemically bond it to the rest of the plastic.
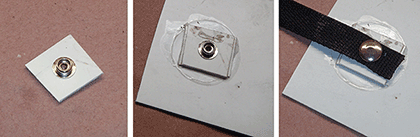
Figure 14-4: A good method of attaching snaps to vacformed armor without a visible attachment on the surface
If your armor design has places where you can get away with having practical nuts and bolts or rivets or screws visible on the surface, you can take advantage of them. Just be sure that your fasteners don’t interfere with the functionality of the snaps. If your armor is made from something thick and rigid, you can run a rivet through the snap right into the piece to be attached and it’ll hold itself in place.
Strap Harness So the Armor Holds Itself Together
If the costume you’re trying to match has visible straps and buckles as a part of the design, life is easy. If not, you can still get away with just having the armor strap itself together. All you’ll have to do is work out a good way to hide the straps or make them blend in.
Strapping Materials
If you do a bit of shopping, you can find countless options for costume straps. Here are just a few of the things you’re most likely going to need:
- Nylon webbing One of the most commonly available strapping materials in the world today, nylon webbing is strong and inexpensive, and it’s manufactured in a wide array of widths, thicknesses, and colors.
- Leather If you’re going to have visible straps that need to look like they’re made of leather, there’s no substitute for the real thing. While it can be had in small quantities at some arts and crafts stores, bigger pieces can be found at saddle shops or tanneries for better prices.
- Fabric If you need an odd shape and you don’t want it to be made out of leather, you may be just as well off using hemmed strips of any of the countless varieties of cloth available at your local fabric shop.
- Cotton and canvas webbing A natural alternative to nylon, it’s a little harder to find, but it comes in a wide array of colors.
- Elastic While all of the above are great options for straps that don’t stretch, sometimes you need something that will have a little bit of give. Elastic can be found in all sorts of widths and colors, and there are light- and heavy-duty options depending on how much stretch you need it to have.
- Velcro Invented in the 1940s by a Swiss engineer named de Mestral, the name Velcro is a blend of the French words velours (velvet) and crochet (hook). Nowadays, it can be found on everything from sneakers to spacesuits. You can buy it in different widths, colors, and strengths. While it may be tempting to use it for every strap attachment you need to make, you will have to allow for its limitations.
Buckles and Related Hardware
When you need a quick way to disconnect your straps that will still reliably hold your parts together, there are now countless options available in your local fabric shops or from numerous online retailers. Figure 14-5 shows some examples of fairly common plastic strap hardware. Most of these are available in metal, as well.
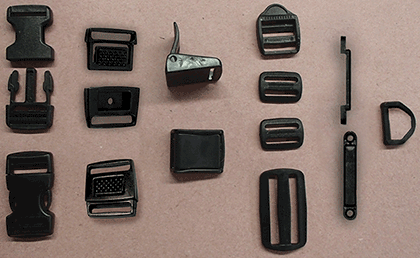
Figure 14-5: From left to right, parachute buckles, center release buckles, cam buckles, slide adjusters, footman loops, and a D-ring
- Parachute buckles Also known as side-release buckles, these are commonly found on luggage, sporting equipment, and tote bags. They’re two-part, black, plastic buckles that snap together and create a strong hold. Releasing them is a simple matter of squeezing the buttons on the sides together. They can be found in every color and width imaginable, and they can be flat or curved on the backside. There are also different versions that have adjustable connections for straps on one end or both ends.
- Center release buckles These are compact, lightweight buckles usually used in clothing. You’ll occasionally see them used on lightweight dog or cat collars or for other lightweight applications. Small, simple, and discreet, center-release buckles are a good option when you want to avoid the bulk of a side-release buckle.
- Cam buckles Commonly found on diving belts, cam buckles are great light-duty straps. They close with a positive lock and do not slip, making them ideal for applications where you want to be able to quickly adjust the tension on a strap without having to deal with lacing and unlacing a regular slide adjuster.
- Slide adjusters Strap adjusters are very versatile solutions to a lot of strapping problems. You’ll usually see them built into backpack shoulder straps. They are often used in light-duty utility tie-down straps. Simply lace the webbing through the locking bars, pull the strap tight, and it’s good to go.
- Footman Loops These are great pieces of hardware for anchoring a strap to a piece of armor. They are most commonly used on boats, fire trucks, attic doors, and old-fashioned luggage.
- D-rings These are used to attach the end of a strap to some other piece of hardware.
How to Attach Straps to Stuff
Once you have your straps and buckles, you’ll need to actually find a way to bind them to the other parts of your armor. You’re basically looking at two different options: mechanical or chemical.
Nuts, Bolts, Screws, and Rivets: The Mechanical Option
Whether your armor parts are made of foam, paper, or wrought iron, there’s no better way to attach your straps than to use an actual mechanical connection. If there are visible fastener details on the surface of your armor, you might as well put them to practical use and attach straps to them, as shown in Figure 14-6.
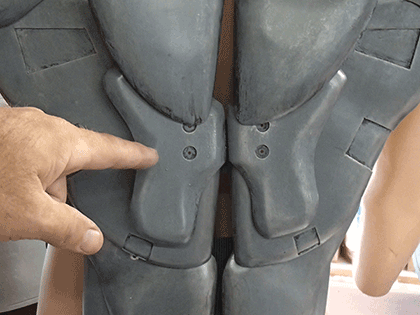
Figure 14-6: Visible rivet details on Hunter’s backside make for convenient places to attach straps as securely as possible.
Pop rivets come in handy for these kinds of applications. Just be sure to use washers wherever possible. This will increase the surface area that is captured by the rivets, making them harder to pull through the armor while trapping the straps in place securely, as shown in Figure 14-7.
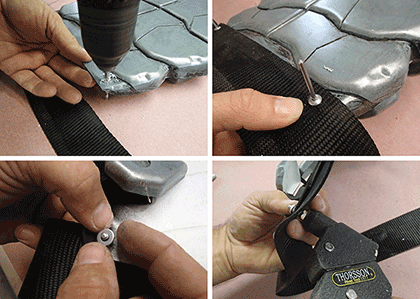
Figure 14-7: Installing a strap using a pop rivet and washer
If you are able to use regular nuts and bolts, just remember to cut off the extra on the inside so that it doesn’t dig into you while you’re walking around. That’s fun for nobody.
Finally, if your armor has some thickness to it or there’s a cast resin detail piece on the surface, you can use regular wood screws to attach straps to the inside of the armor. Again, it’s a good idea to use a washer to help trap the straps in place, as shown in Figure 14-9.
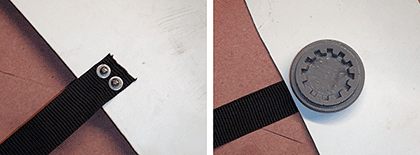
Figure 14-9: Small screws with washers (left) can be a great option for holding down straps when they can screw into a cast detail piece on the outside of thin plastic armor (right).
Glues and Goos: The Chemical Option
If there’s no easy way to attach the straps with hardware, you’ll just be stuck using some kind of glue. It’s rarely as reliable as a mechanical connection, but if you use the right kind of adhesive, there’s a good chance everything will work out just fine.
Gluing Straps to Styrene, ABS, and Other Sheet Plastics
Since Hunter’s armor is made mostly of vacformed styrene, the straps are simply glued in place using a cyanoacrylate adhesive (CA; i.e., Superglue), as shown in Figure 14-10. This provides a decent mechanical bond with the styrene as long as the surface to be glued is scuffed slightly with a piece of sandpaper first. It also has to soak into the nylon webbing in order to mechanically bond the fibers to the sheet plastic surface.
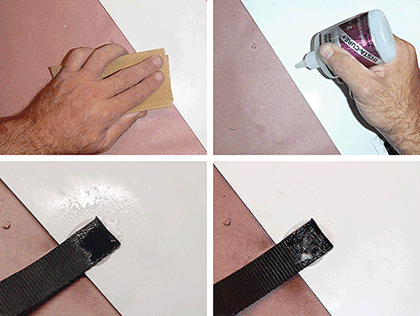
Figure 14-10: Gluing nylon straps to a styrene sheet with CA adhesive
Another effective option is to go ahead and rivet the strap onto a scrap of the same type of plastic sheet that your armor was made of, then solvent weld it into place, as shown in Figure 14-11. This way, you’ll have a nice mechanical bond to hold the strap onto the plastic, but you won’t need to have a visible fastener on the surface.

Figure 14-11: After riveting a piece of scrap plastic onto the end of a strap, that scrap can now be securely glued to the inside of the plastic armor using solvent adhesive.
Gluing Straps to Fiberglass and Rondo
If your costume is made out of reinforced Pepakura parts, you’re going to have to adhere the straps to the bare fiberglass or Rondo on the inside. There are a few ways to go about this. First, you can mix up a batch of the same material and just embed the strap right into the structure of the part. Just be sure to soak the webbing all the way through with the resin in order to ensure a strong mechanical bond.
Second, you can use a compatible epoxy adhesive to glue the straps into place. Just bear in mind that not all epoxies are created equal. As a general rule, the longer they take to cure, the stronger the resultant bond will be. You should also keep in mind that some brands are better than others and most offer different formulas that will work better or worse depending on the materials that you’re bonding together.
As with all things, give yourself enough time to experiment and find out what will work best for your specific application.
Gluing Straps to EVA Foam
Getting your straps to stick to EVA foam can be difficult. Ideally, you’ll want to give the inside surface a bit more tooth so that the glue has something to help it hold on. Just follow the six steps shown in Figure 14-12.
- Trace out the end of it on your armor piece with a permanent marker.
- Score the area with a sharp knife.
- Apply heat to open the scored lines and seal the surface.
- Apply hot glue to the scored area.
- Carefully place the strap and press firmly.
- Once that cools a bit, you can add a bit more hot glue around the outside of the strap to reinforce the bond.
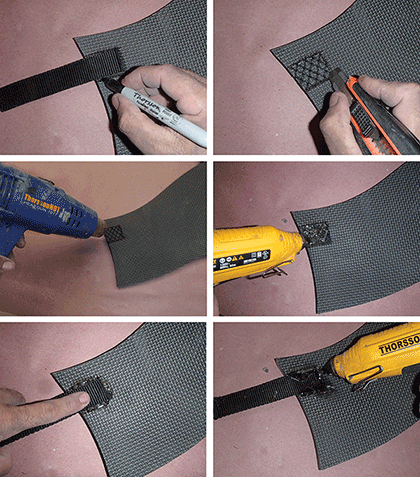
Figure 14-12: Gluing straps to EVA foam
If you need to attach Velcro to a piece of EVA foam, you may find that the hot glue doesn’t get much of a grip on the smooth backside of the Velcro. To work around this, just sew a piece of nylon webbing onto the backside of the Velcro. That’ll provide a surface that the hot glue can grab onto.
Design Considerations for Strapping Your Armor Together
If you’ve ever gone on a long backpacking trip, you’ll know that proper load distribution can be the difference between a comfortable stroll with some handy gear, and an agonizing forced march with a massive burden gnawing its way into your soul. If you hang everything off your shoulders from a couple of pieces of thin web strapping, you’re on the fast track toward discomfort, pain, suffering, and misery. First you’ll notice some mild pain in your shoulders where the straps dig in or chafe. Then, your spine will begin to ache as it hefts the bulk of the load. Finally, the soreness will linger long after you’ve taken off the armor, even after the pinched skin and tired muscles recover.
Instead, try to set up your strapping arrangement so that any heavy loads are carried mostly around the waist and hips.
Ideally, parts that need to hang on your body should be attached to the lowest possible point.
Hang your thigh armor so that most of the weight is supported at the waist—not the shoulders. While it might be tempting to run a pair of suspenders up to your shoulders to hold up the thighs, the better option is to attach them to a snug belt or load-bearing waist cincher of some sort.
Torso armor will often have no alternative but to hang from your shoulders. It’s still a good idea to minimize the weight that you mount to the chest and back armor. If at all possible, hang your shoulder and upper arm pieces from straps that run across your chest and back. This helps to minimize the weight at any one spot.
For any place where a strap applies weight to your body, use the widest possible straps you can get away with. Thinner straps will not spread the load, and eventually they’ll start to dig into your tender flesh and begin the agony you’ll be whining about for days afterward. At the same time, the wider the straps are, the more likely they will be to restrict your mobility. Wider straps are also a bit harder to adjust.
As a general rule, it’s often a good idea to use 1″ webbing wherever possible and 2″ webbing wherever weight is going to be applied to your body. Buckles and fittings are readily available in both sizes, and they are large enough to adjust while wearing gloves.
The Tricky Bits
Science fiction and fantasy armor is usually designed to look good. Sadly, the same awesome designs that you know and love often fail to allow for complete functionality of the joints. Video game designs are notorious for this, and now that computer animation has become so commonplace in movies, impractical armor designs are becoming more and more prevalent. After all, in the middle of an exciting, high-speed, flying fight scene, the audience isn’t too likely to notice when some of the pixels start to pass through each other in physically impossible ways.
Since the creators no longer have to take into account whether an actor can perform in his or her costume, it’s up to you to make their impossible vision into something that can actually move. You may have to compromise the appearance in favor of making something that’s actually wearable.
Here are a few things to look out for . . .
Tight Fits: Wrists, Ankles, and Necks
In order to keep characters looking proportionate, a lot of designers will make armor parts follow the general curves and shapes of the human body. This is usually a good thing. But most people’s hands are bigger than their wrists. So sooner or later you’ll find yourself trying to build something that looks just right and find out that you’ve got a pair of gauntlets with wrists so small that no human could ever squeeze his or her hand through.
If you’re the kind of person who has feet, you’ll run into this exact same problem when it comes time to make any kind of lower leg armor that wraps all the way around the ankle. It also turns out that most people’s heads are bigger than their necks. So if you’ve made a form-fitting helmet, it may well have a neck hole that’s too small to fit over the head it’s designed for.
There are four basic ways to deal with this. All four can be modified and used for forearms, shins, and helmets, but we’ll focus on gauntlets for now.

Figure 14-13: A gauntlet split along a visible seam with elastic and Velcro installed
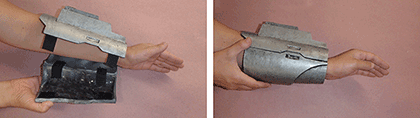
Figure 14-14: Sticking the two halves together around an arm
The first option is to find a good place where they can be split down their entire length. Ideally this will be a seam that’s visible in the design. After gluing in some strips of elastic to act as a hinge along one side, it’s just a matter of installing strips of Velcro along the edge of the seam on the open side (Figure 14-13).
To put it on, just slide an arm into the open gauntlet, hinge it closed, and push your arm against the inside in order to push the Velcro together (Figure 14-14).
After pressing the Velcro together, you’ll have a nice, snug wrist opening that’s too small for a hand to slide through (Figure 14-15).

Figure 14-15: The nice, snug gauntlet
There’s a second option for an even sturdier connection between the two halves. If you install a length of piano hinge to one side or the other, it will create a sort of clamshell assembly, as shown in Figure 14-16.

Figure 14-16: Hinged gauntlet
The open side can be fitted with Velcro, or better yet, another length of piano hinge with the pin removed. When it comes time to put the armor on, simply lay your arm into the gauntlet, hinge it closed, then stick the Velcro together or slide the pin back into the piano hinge, as shown in Figure 14-17.

Figure 14-17: Fastening the open side of the gauntlet with the hinge pin
The third option is to find a section where the armor has a visible seam where you can make a removable door panel, as shown in Figure 14-18.
Slide your hand through the gauntlet while the panel is removed, then just slip the part back into place. You can use magnets, Velcro, or elastic to hold the removable panel in place once your hand is through. Or, if you build the removable part to fit snugly into place, you can just rely on friction to hold it together.
The fourth option is to make the wrist opening so that it’s barely big enough to squeeze your bare hand through, then put on bulky gloves that will make your hands appear larger and keep the gauntlet from sliding down off your hand, as shown in Figure 14-19.
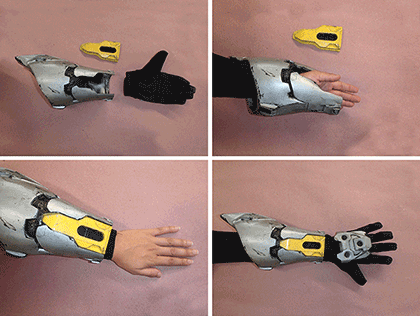
Figure 14-18: Hidden doorway
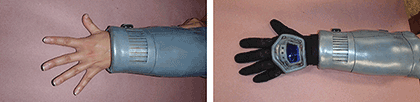
Figure 14-19: Gloves to fake larger hands? Why not?
Attaching Handplates
The simplest way to attach your armored handplates is simply to glue or rivet them directly onto whatever gloves will be worn with the costume.
If you want to make them removable so you can use the gloves with more than one costume (or, as in Hunter’s case, to change the batteries in any embedded electronics), it’s time to get a bit more creative. The easiest thing is to just run a single strap that will cross the palm of your hand and keep the handplate snug on the back of your hand. If this doesn’t keep things properly placed, you can use two straps, one around the wrist and one around the palm. This is what was used for Hunter’s handplates, as shown in Figure 14-20.
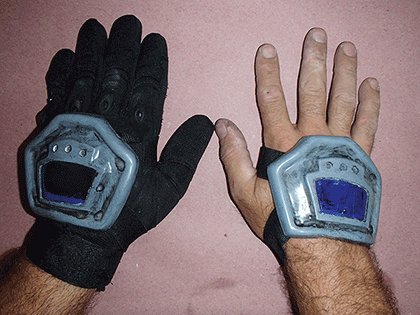
Figure 14-20: Hunter’s handplates are held in place over the gloves with two straps of elastic.
If you want something more subtle to hold the handplate in place than a big, wide strap of elastic across the palm, you can also get away with having a strap around the wrist and a small loop of thinner elastic or cord that will go around one or more fingers.
Attaching Shoe Covers
Once again, the simplest way to attach an armor plate to your shoes is to glue or (better yet) rivet them directly onto the shoes you’ll wear with the costume.
If you need to make them removable in order to get the shoes on and off, you can install a set of straps that will go around the sole of the shoe under the arch of the foot, as shown in Figure 14-21.
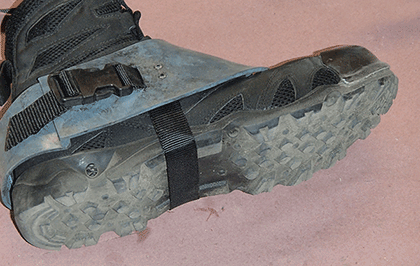
Figure 14-21: Stirrup-style straps keep Hunter’s foot armor in place.
Knees and Elbows
For armor with separate plates on the knees and elbows, you can usually just have a simple strap on the inside of the joint in order to keep things in place. If you slide your arm or leg into these pieces, all you need is a snug-fitting piece of elastic. If you’ll need to make them more adjustable and detachable, you can use Velcro to make them removable, adjustable, and much more comfortable, as shown in Figure 14-22.
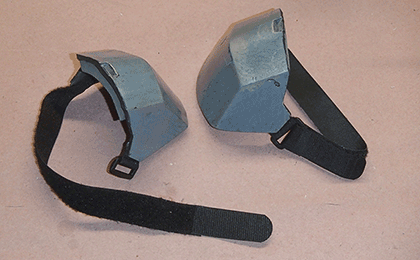
Figure 14-22: Velcro: the way to go for comfy knees.
Hips and Shoulders
When it comes to designing a strap harness that allows for maximum mobility, most of your headaches will be found in the areas of the hips and shoulders, where the body’s ball-and-socket joints have a much wider range of motion than you find in the hinge joints of the knees and elbows. The best way to allow for this movement is to use a single strap to keep each shoulder or thigh piece from falling down, and another around the arm or leg to hold it down.
Take a look at Hunter’s shoulder armor in Figure 14-23. There’s a single strap attaching the very lightweight shoulder armor to the strap that connects the chest and back. In order to keep the shoulder from flapping around in the wind, a single piece of elastic is permanently attached inside the front of the shoulder and wraps around the wearer’s upper arm. Velcro holds the elastic in place at the back of the shoulder in order to make it easier to get the armor on and off.

Figure 14-23: A single strap holds Hunter’s shoulder up while a strip of elastic holds it down.
Since Hunter’s thigh armor wraps all the way around his legs, they’re only going to need straps to hold them up. In Figure 14-24 you can see the parachute buckles installed on top of the thighs. These will clip onto the straps that hold the thigh armor up. Capturing these straps under the belt should allow the hips to move without causing the thigh armor to rotate around on the wearer's leg. If they were simply plates that sat on one side of his thighs, they’d also need straps to hold them around the thighs, just like the shoulder plates.
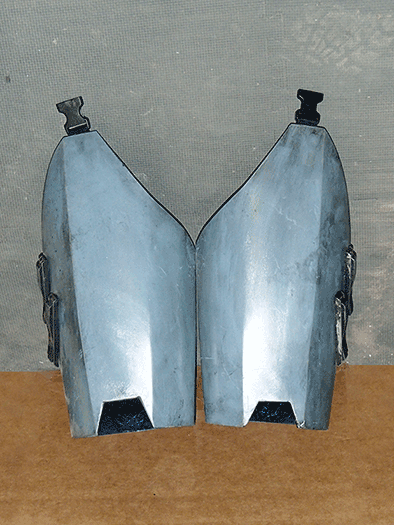
Figure 14-24: Parachute buckles installed at the top of Hunter's thigh armor.
Buttplates, Codpieces, and Anything Else That’ll Keep You from Using the Bathroom in a Hurry
When you’re working out a way to strap your armor together, you need to take a bit of time to consider how you’re going to answer the call of nature. This can be the difference between having fun in your costume all day, and suddenly having to do an emergency load of laundry.
In Hunter’s case, there’s no groin armor, so it’s easy. But if your character does have a hard plate covering their delicate bits, you’ll want to attach it with snaps or Velcro so it can be removed without getting out of the entire ensemble. Also, if there’s a plate that hangs down in the front or back, it’s a good idea to run a “thong strap” connecting them through your legs from front to back so they don’t flop around if you’re moving in a hurry. A knight in shining armor tends to be a bit less dashing if his codpiece is flopping around and smacking him in the junk when he walks.
Odds and Ends: A Few More Strapping Tips
- Once you’ve figured out the correct length for your straps, cut off the extra, but not all of it. A few extra inches will allow you to retain some adjustability, but cut too much and you’ll have useless little pennants start poking out when you move. Add some slides, as shown in Figure 14-25, in order to keep everything neatly tucked in place.
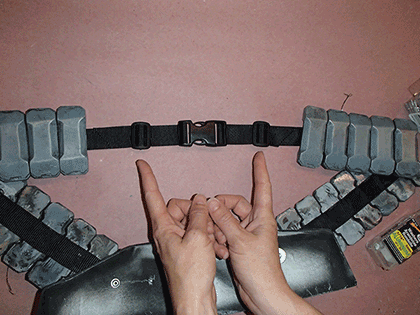
Figure 14-25: Slides are a key part of keeping straps in place.
- When you cut your straps to length, they’ll want to fray. If you’re using nylon webbing, you can heat-seal the edges by holding them near an open flame (such as a cigarette lighter) for a second or two. If you’re going to be doing a lot of this kind of work, consider investing in a hot cutter like the one in Figure 14-26.
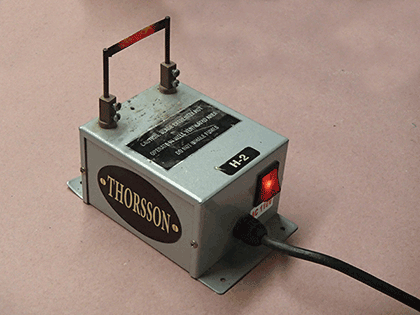
Figure 14-26: A hot cutter uses an electrically heated blade to simultaneously cut and seal synthetic straps and rope.
- Buy in bulk. A 5′ roll of 1″ webbing will cost a few dollars at the local fabric store. The same material can be had for a few cents per foot on websites like strapworks.com. With prices like that, you might as well get some extra. You’ll use it sooner or later.
- Try to permanently strap together as many pieces as you can. Strapping multiple pieces together into sub-assemblies will make it easier to get in and out of your armor, as well as making the whole ensemble stronger in the process. In Hunter’s case, the chest and abdomen are strapped together into one large piece, while the back and shoulders are combined into another integrated piece, which is shown in Figure 14-27. Once the back assembly is buckled to the chest assembly, this whole arrangement can be donned much like a shirt.
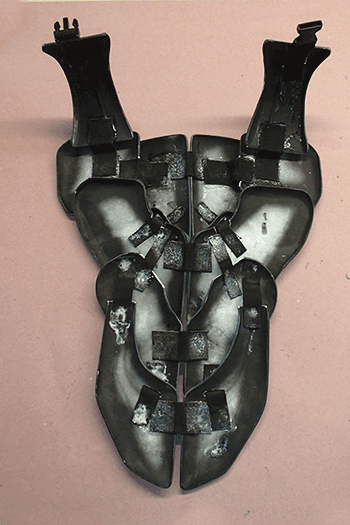
Figure 14-27: By permanently attaching all of these parts, it’s also harder to lose an important piece.
- Experiment. What works for someone else may or may not work for you. Don’t be afraid to revisit your plans and rearrange your straps after you’ve had a chance to try your rigging in action.