Automate Backup and Syncing
Anyone who has followed my writing for Macworld, TidBITS, or Take Control over the last decade is undoubtedly aware of my passionate insistence on good backups. I’ve written several books and lots of articles on the topic (including Take Control of Backing Up Your Mac), and I preach about the importance of backups at every opportunity.
In this book, I’m not going to try to convince you to back up your Mac; I’ll take for granted that you already know that’s a good idea. Instead, I want to focus on automating backups. Believe it or not, there are still people who back up important files by dragging them to another disk once a day. Still others use backup software to do the job, but they back up only when they remember to run that software.
My feeling is that if you don’t have hands-off backups, you’re doing it wrong. Backups should happen all by themselves—whether once a week or multiple times an hour—without any intervention. Not only does it require extra effort to launch a backup app and click a button, it’s an interruption—one you might put off if you’re too busy, or forget about at a crucial moment right before losing data!
In this chapter, I talk about three backup scenarios—using Time Machine, using a third-party tool that creates versioned backups, and creating bootable duplicates. You may not use all of these methods, but whichever one(s) you use, they should be automated.
I also talk briefly about automating syncing files between Macs. Although that doesn’t count as backup in my book, many of the same assumptions apply—and you may even be able to use the same software for both backups and syncing.
Run Backups Automatically with Time Machine
Time Machine is the backup capability that Apple built into OS X. It’s not necessarily the best backup tool, but it’s reasonably good. Most importantly, it’s extremely easy to set up, making it the path of least resistance for many users.
Time Machine ordinarily runs once an hour, backing up whatever has changed or been added since the previous hourly run. This happens in the background, with barely any visible clue. So, if you’ve set up Time Machine already, and you’ve kept the default options, there’s nothing more to see here—move along to the next topic.
If you haven’t already set up Time Machine and would like to—or if you configured it but turned off automatic backups—keep reading.
Configure Time Machine
To activate Time Machine, all you need to do is tell it what destination to use:
- Open the Time Machine pane of System Preferences.
- Click Select Backup Disk.
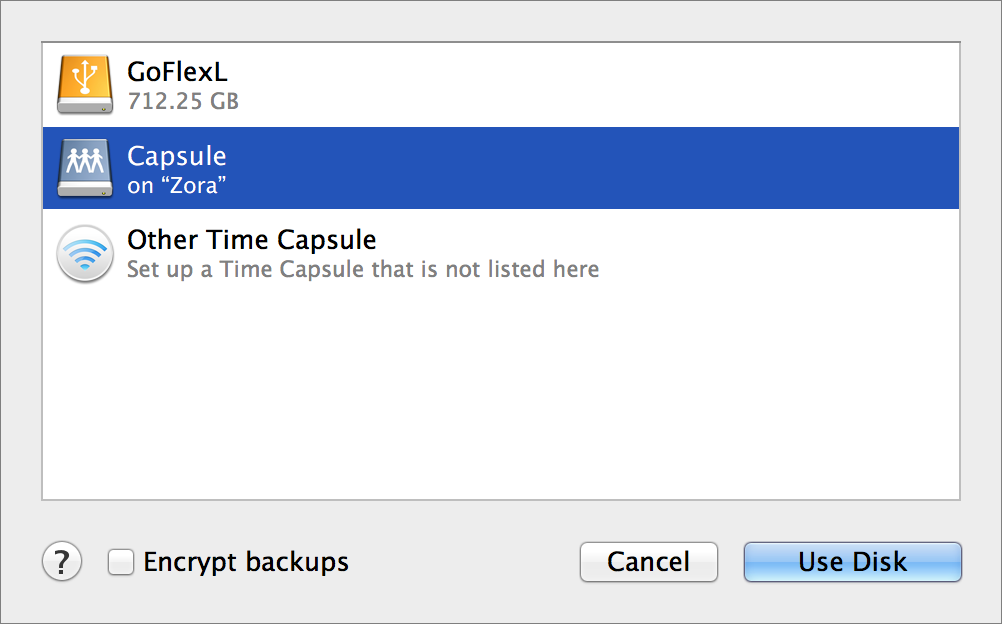
A dialog appears (Figure 28), listing all volumes eligible to be a destination disk (including external hard drives and Time Capsules) and the amount of free space on each.

Figure 28: Available local and network volumes appear in this window; select the one you want to use and click Use Disk.
- Select a volume, and click Use Disk. (If you’re using a Time Capsule for the very first time, select Set Up Other Time Capsule, click Open AirPort Utility, and follow the instructions.)
In the Time Machine preference pane, the master switch automatically moves from Off to On, and a timer begins a 2-minute countdown before your first backup begins. (You may prefer to turn it off until you’ve excluded files from Time Machine, which I talk about next.)
At any point, you can flip that switch On or Off. When it’s off, that means only that Time Machine doesn’t run automatically; you can still run it manually, at any time, by clicking and holding (or right-clicking) on the Time Machine Dock icon and choosing Back Up Now, or by choosing Back Up Now from the Time Machine  menu in the main menu bar. (If you don’t see the Time Machine
  menu, you can enable it with the Show Time Machine in Menu Bar checkbox in the Time Machine system preference pane.) You can turn off Time Machine temporarily if need be, but please don’t leave it off. Remember, backups are most valuable when they’re automatic!
During each of Time Machine’s hourly runs, it backs up only the files that have changed since its previous run (except files you’ve excluded, as I discuss next). If an application stores its data as a package (that is, a folder that looks like a file in the Finder), Time Machine backs up only changed items within the package. (Among many others, iPhoto, GarageBand, and DEVONthink use packages for their data.) However, be aware that Time Machine won’t back up iPhoto or Aperture while the application is running.
Restore Data with Time Machine
Once you have Time Machine set up and running, it normally does its thing silently in the background, without intruding on your work. And you can continue ignoring it until the time comes when you need to restore something—a missing file or folder, or a previous version of a file you still have.
If you notice that a file or folder is missing, or that you’ve accidentally changed it and need an older version, follow these steps to retrieve an item from your Time Machine backup:
- In the Finder, make sure the window that contains the item you want to restore (or the one that used to contain it, if it’s been deleted) is frontmost—you can verify this by clicking anywhere in the window.
- Click the Time Machine icon in the Dock or choose Enter Time Machine from the Time Machine
 menu.
menu.
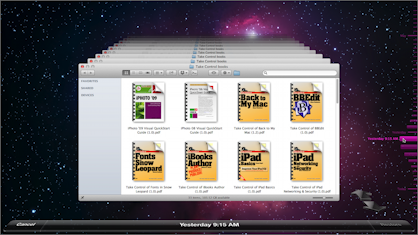
The frontmost window moves to the center of the screen, and the screen’s background changes to the starry “time warp” display, with copies of the window receding into the background (Figure 29).

Figure 29: Go “back in time” to a previous version of your data.
- To locate the file or folder you want, do one of the following:
- Near the bottom right corner of the screen, click the back arrow (the one pointing toward the center of the screen, or backward in time). Time Machine zooms back to the most recent backup in which that window’s contents were different. Keep clicking to continue zooming back through previous versions of that window; click the forward arrow to move forward in time.
- Use the controls along the right edge of the screen to jump to a particular backup. As you hover over the small horizontal lines, they zoom in to display the date and (for recent backups) time of the corresponding backup. Click any of these lines to jump right to that version of the window. As you zoom backward or forward in time, the date and time of the backup you’re currently viewing is shown at the bottom of the screen in the middle.
- Once you’ve selected the item you want to restore, decide whether you want to restore it to its original location or somewhere else:
- To restore to the original location, click the Restore button in the lower right of the screen. Time Machine immediately restores the selected item, and returns you to the Finder. (Time Machine may prompt you to enter an administrator password.) You can use this procedure even if you want to restore an older version of a file but keep the current version. After you click Restore and the Finder reappears, you’ll see an alert asking whether you want to replace the existing file, keep both copies, or keep the original (thus canceling the restoration).
- To restore to a different location from the original, right-click (or Control-click) the item and choose Restore “File Name” To from the contextual menu, navigate to the desired destination, and click Choose. If you decide against restoring any files, instead click the Cancel button in the lower left corner of the screen or press Esc.
Create Hands-off Versioned Backups
Whether or not you use Time Machine, you may use another product to create versioned backups (that is, backups that store multiple versions of each file). Dozens of apps can do this, including apps that back up data to the cloud, apps that back up data to local devices, and apps that do both.
In any case, I simply want to emphasize that if you use any such app, you should be certain it’s configured to perform backups without any manual effort.
Some apps back up files as soon as they change, or at least within an hour or so—these include Backblaze, CrashPlan, DollyDrive, GoodSync, Memeo Premium Backup for Mac, NTI Shadow, Syncovery Professional Edition, Synchronize Pro X, and Synk. As long as that’s the case—and you haven’t disabled automatic backups—you should be in good shape.
But many backup apps, especially those that have been around for many years, run only on a schedule that you determine. Some apps can run as often as once per minute; others can run no more frequently than once per day. Apps that require scheduling include ChronoSync, Prosoft Data Backup, Intego Personal Backup X6, and QRecall, among others.
Follow the instructions that came with your backup app to schedule backups. You can choose what frequency works best for you, which should take into account how actively you modify files and how much of an impact the backup app has on your system when it runs. For me, once an hour is too infrequent, but even if you use your Mac only casually, I suggest scheduling backups to run at least once a day.
Schedule Bootable Duplicates
Along with versioned backups, bootable duplicates are a key pillar of a complete backup plan. They let you get back to work quickly in the event of a hard drive failure, give you a useful troubleshooting tool, and make upgrading to a new version of OS X safer.
You can’t make a bootable duplicate by copying files in the Finder; you need a special utility. Lots of programs can do this, but I want to talk about two—SuperDuper and Carbon Copy Cloner—that focus on just this one task but do it easily, effectively, and on a schedule (I recommend once a week at the very least—once a day is even better).
Set Ownership on the Destination Volume
Before setting up your backup software to create a bootable duplicate, check to see that the destination volume does not ignore ownership; if it does, your duplicate will not be bootable. To check this, select the destination volume’s icon in the Finder and choose File > Get Info. In the Sharing & Permissions portion of the window, make sure the checkbox labeled Ignore Ownership On This Volume is deselected.
Create a Duplicate with SuperDuper
SuperDuper has a well-deserved reputation for its ease of use and reliability. The software costs $27.95; a free version lets you create duplicates but not update them incrementally.
To create a duplicate with SuperDuper, follow these steps:
- Launch SuperDuper.
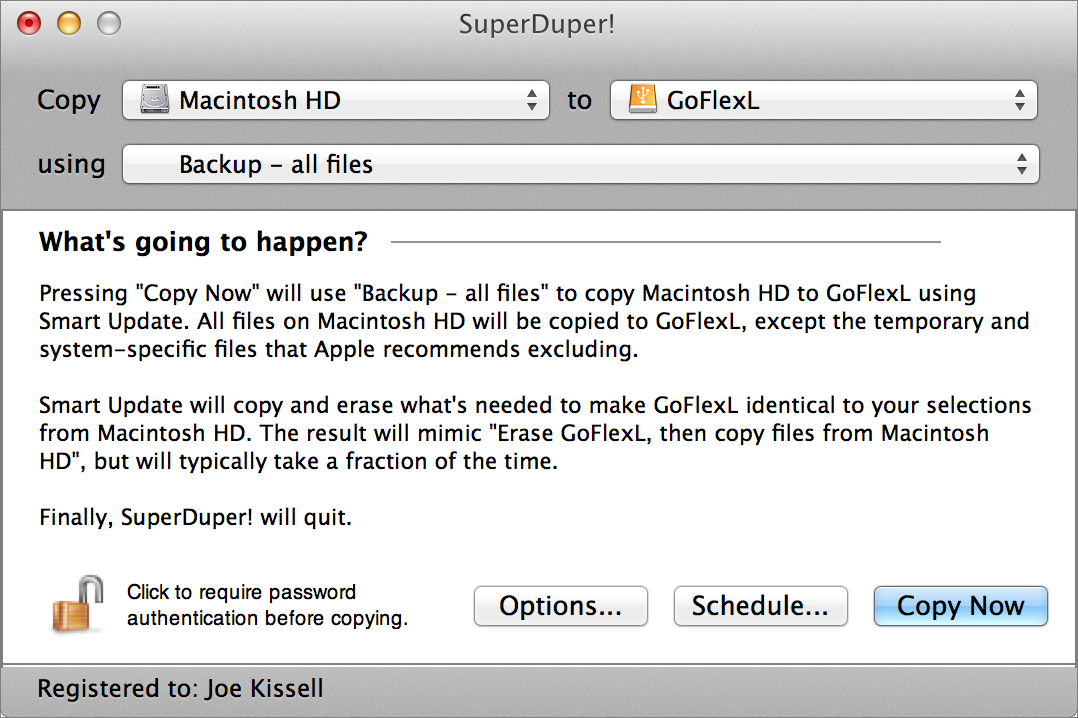
- You’ll see two pop-up menus at the top of the window that appears (Figure 30); choose the source (your internal disk) from the one on the left and the destination (the disk or partition set aside for duplicates on your external disk) from the one on the right.

Figure 30: The SuperDuper window asks you for just a few pieces of information, and explains what will happen in plain English.
- From the Using pop-up menu, choose Backup - All Files.
- Click Options. In the General view, from the During Copy pop-up menu, choose Smart Update Destination from Source. Click OK.
- To schedule this duplicate to occur on a schedule, click Schedule. Select the day(s), week(s), and time to run the schedule—I recommend at least one day per week but preferably once a day, at a time when you aren’t actively using the Mac. Click OK.
Immediately or on the schedule you selected, SuperDuper duplicates your internal drive to your external drive.
Create a Duplicate with Carbon Copy Cloner
Carbon Copy Cloner was one of the first tools available for creating a bootable duplicate of an OS X volume, and it has undergone numerous revisions since then. It was once freeware, but now costs $39.95.
Although it was originally designed only for creating bootable duplicates, Carbon Copy Cloner has gradually added more features; it now also optionally creates versioned backups. In fact, in the course of creating a bootable duplicate, it can move any outdated or deleted files safely aside on the destination disk—meaning the duplicate actually contains extra data, but that’s fine because the archived versions of old files won’t prevent booting or normal operation. Carbon Copy Cloner now has several other safety features too, which can protect you from the consequences of accidental file deletion.
In the instructions that follow, I deliberately avoid most of these safety features, and instead show you how to create a standard, run-of-the-mill duplicate that’s a true clone of the source volume. Consult the documentation that comes with Carbon Copy Cloner to learn about other ways of using the software to back up your disk.
To create a duplicate with Carbon Copy Cloner, follow these steps:
- Launch Carbon Copy Cloner.
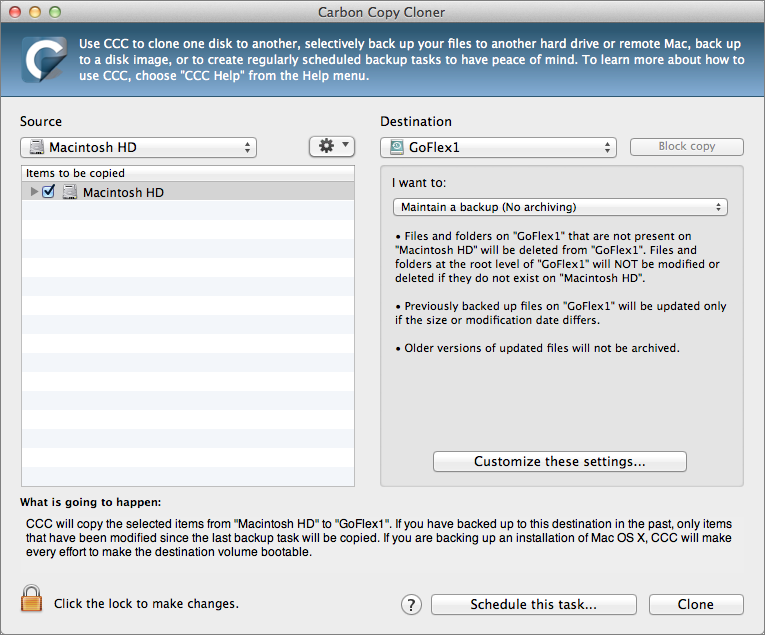
- In Carbon Copy Cloner (Figure 31), Choose your internal disk from the Source pop-up menu on the left and the disk or partition set aside for duplicates on your external disk from the Destination pop-up menu on the right.

Figure 31: Unlike SuperDuper, Carbon Copy Cloner labels its plain-English explanation ”What is going to happen” instead of “What’s going to happen?”. Completely different.
- From the Handling of Data Already on the Destination pop-up menu, choose Delete Anything That Doesn’t Exist on the Source.
- Click Clone, enter your administrator password, and click OK to make an immediate duplicate. Then wait—it’ll take a while.
After the initial duplicate is finished, continue with the following steps to set up a scheduled update:
- Click Schedule This Task. Select when you want the task to run; I suggest choosing On a Weekly Basis (if not more frequent) from the Run This Task pop-up menu, and selecting a day and time when your Mac won’t be busy.
- Click Save; you can then quit Carbon Copy Cloner.
At the scheduled times, Carbon Copy Cloner updates your duplicate.
Automate Mac-to-Mac Syncing
Do you use two or more Macs regularly? If not, skip ahead to the next chapter. But if you do, you may find it useful to keep some or all of the data in sync between Macs. I can say from experience that it’s far better to automate this process than to do it manually!
I suggest thinking through two main questions:
First, is it desirable (or even possible) to keep all your personal files in sync between two Macs?
If you have a Mac Pro with 4 TB of storage and a MacBook Air with 128 GB, the answer is clearly no. Even if all your Macs have enough space for all your files, you may not need or want to have all of them everywhere. So, if the answer to this question is no, you’ll have to figure out which subset of files to keep in sync. All things being equal, it’s easiest if you can segregate all those files into a single folder or a small number of folders.
You’ll notice, by the way, that I said personal files. You should never, ever try to sync all files between two Macs—in particular, stay far away from the top-level /System, /Library, and /Application folders, as well as any hidden folders. Attempting to sync any of those can lead to serious data corruption, including an inability to boot your Mac. So whatever you choose to sync, make sure it’s not part of OS X itself.
Second, is it desirable (or even possible) to use a cloud service to sync files between your Macs?
I’ll use Dropbox as an example. If it turned out that you had 80 GB of data you wanted to keep in sync between two (or more) Macs, you could purchase 100 GB of storage from Dropbox for $99 a year. Install Dropbox on your Macs, make sure all the files you want to sync are in your Dropbox folder, wait for that initial upload to finish, and…you’re done. You never have to run sync software or take any other manual action; file changes propagate almost instantly. As a bonus, the files in your Dropbox are also available on your mobile devices, and can be shared easily with others.
What’s true of Dropbox is also true of numerous competing services—Amazon Cloud Drive, Bitcasa, Box, Google Drive, Microsoft OneDrive, SpiderOak, SugarSync, and many more. They each have their own features, benefits, and pricing, and you may prefer one over the others for any number of reasons. But they all can perform the essential task of syncing the contents of one or more folders across Macs, automatically.
Of course, you may not want to sync files via the cloud, due to privacy concerns, cost issues, available bandwidth, or the sheer volume of data. If that’s the case, you might want to consider sync software such as:
- BitTorrent Sync: Although the BitTorrent file sharing protocol has been around for a long time, BitTorrent Sync is a relatively new app that functions much like Dropbox, but without the cloud storage. You tell it which folders you want to sync on each of your Macs, and syncing happens quickly, in the background, whenever files change. An iOS app is available too. And, BitTorrent Sync is free!
- ChronoSync: This powerful and flexible app can sync files between folders, volumes, or Macs in almost any way you can think of—one-way, bidirectionally, with or without filters, and so on. (For Mac-to-Mac syncing, you may want the add-on ChronoAgent app on one of the Macs.) You can set up syncing to happen as frequently as once a minute.
- Synk: Synk Standard and Synk Pro are also highly capable sync tools, and unlike ChronoSync, they run continuously without an explicit schedule, updating files whenever they change. Synk Pro also offers N-way synchronization (where you can sync three or more Macs to each other in a single operation). I used Synk for years, but it has become increasingly flaky and hasn’t been updated since 2011, so I’m hesitant to trust it until I see evidence that the developer is paying attention to it.