Preparation Part I
Before you get out in the field with your camera, it’s essential that you spend some time on preparation. The idea here is to make life smooth and easy on the road, so that the adventures are reserved for the place, the people, and your experiences, not the disappointments of missing excellent photo opportunities because you were in the wrong place at the wrong time, your battery packed up, or you ran out of memory cards.
Being Prepared
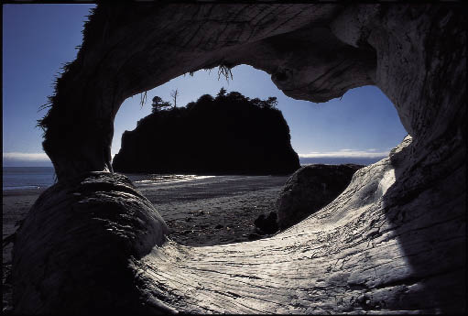
Careful preparation can show you what to expect when you arrive at a location, but it wont tell you everything. In this shoot, I knew the rocky island was there, but not the driftwood which forms a perfect frame.
Over the course of this chapter we’ll look at how best to prepare for your trip, whether it’s a day’s hike in the mountains or an extended travel adventure.
It really pays to find out as much as you can about what you are setting off to photograph, whether it’s a place, people, or an event. This doesn’t mean that you have to burden yourself with a reference library, but at least cover all the basic information sources, such as guidebooks and anything you can find on the Internet. Researching what you intend, or are likely to want, to photograph will help you assess what equipment you are likely to need and also provide you with the opportunity to read about the experiences of other photographers who have undertaken similar trips. Any helpful hints and tips you can unearth in advance of your travels will help enormously once you’re on the road.
There are many ways of traveling with a view to taking photographs. Some travelers like to fix a schedule down to the precise minute, never deviating from their perfect plan. At the opposite extreme are those who steadfastly refuse to commit themselves to anything, determined to follow the whim of the moment. And in between are infinite shades of traveling style. Of course, one of the advantages of planning is that you know in advance exactly which arrangements you absolutely do have to make right now, and which don’t matter. If you travel high season anywhere, you have less flexibility than if you are going somewhere unpopular or out of season.
Today, most photographers—whether amateur or professional—who need to travel light when out in the field use digital photography equipment. As so much digital equipment is very specific and cannot be interchanged with that from other manufacturers don’t rely on being able to acquire the right bits and pieces on the road. One basic assumption you should make as part of your preparation is that you must have everything that you will need for the camera with you before you leave. It’s essential to consider memory cards and spare batteries, plus any other equipment that you can carry easily and which will help get the shots you want, such as filters or additional lenses. Remember to also include any item of equipment that you personally cannot do without.
Location, location
Many years ago, while I was being briefed for a book assignment at Time-Life, the Art Director, Lou Klein, gave me a piece of advice in his usual didactic way. “Photography,” he said, “is about being in the right place at the right time.” Yes, it sounds obvious, but what good advice, because it lays out the priorities. He didn’t mention composition, lighting, sense of timing, or any of that, simply because these skills were taken for granted. Of course you had to know how to make a good picture, but the most important thing was to put yourself in the best position to shoot, that advice applies as much to the amateur photographer as it does to the professional.
 Maps are the key, whether topographical, street, plans, or even aerial photographs, all of which are available in surprising abundance for most destinations. Having a map makes everything quicker and avoids wasting time and getting lost. I rely heavily on them, whether it’s a street map for city shooting or a topographical map for trekking and landscapes.
If you’re keen on landscapes, for example, a topographical map will not only show you where you’re likely to capture a good view (it may even show you recognized “viewpoints”), but you’ll also be able to work out from the map the direction in which the sun will rise and set—essential if you want to be in position and prepared in advance for either one or other solar event.
Equally, a street map used in conjunction with a good city guide book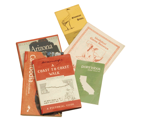 will help you to find the sights you want to photograph so that you can plan your route efficiently. You’ll also be able to assess how close you are to other sights and sounds of the city that might have greater appeal to any non-photographers on the trip!
There are many different series of guidebooks, and the value of all these is principally in their coverage of practicalities, including internal travel, hotels, and restaurants. For a visual briefing look to illustrated books and back-issues of magazines such as National Geographic and GEO, as these will give you a better idea of the local photo opportunities.

Using Maps
It is always a good idea to have a map and compass handy wherever you plan to walk. It can be a lifesaver if you are trekking somewhere you haven’t been before.
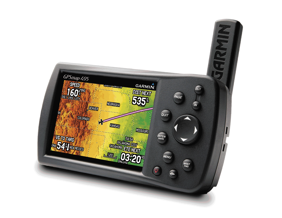
Global Positioning System
Now that GPS receivers are small and accurate, they are becoming part of the standard equipment for serious travelers.

Postcards
For a quick preview of the local sights, take a look at the postcard rack at the airport or hotel lobby. Even though you may not be tempted to shoot a similar view, the local photographers know what is where.
Setting your own goals
Although a professional photographer is under constant pressure to deliver good pictures, one distinct benefit is that professional photography is always focused—there is an aim, which usually begins with a brief from a client. As a keen amateur or aspiring professional it’s possible to replicate this focus by assigning yourself certain goals. Self-assignment is not just as an exercise, but an important outlet for your imagination and a way of directing your efforts. The aim might be to show a certain aspect of a location, an event, a ceremony, an activity, a cultural feature—the possibilities are endless. Nevertheless, it is important to set this out in advance, because this in turn has to be fleshed out into a shotlist.

Room with a view
Always keep an eye open for unusual viewpoints. This was one of several shots I took at the Lake Palace hotel, occupying its own island in the middle of Lake Pichola, Udaipur, one of the most picturesque cities of Rajasthan.
A shotlist is self-defining, but usually begins with jotted notes from your research into the place you plan to visit. In practice, shotlists are dynamic rather than static. They get added to and subtracted from as you continue to photograph. You can follow a shotlist methodically or use it simply as an occasional reminder, depending on how you like to work and the type of vacation or traveling you’ve embarked on. Certain images that seem a good idea in advance may turn out to be impractical, unachievable, or simply not so strong after all. Other possibilities will suggest themselves on the spot.
There is then the matter of treatment and style. Thinking about these at the start can help add depth to your photography and inject originality. There are some low-level practical considerations, such as the following:
•Which focal lengths of lens to concentrate on, for the character they give.
•What natural lighting conditions to look for.
•Shooting at different scales, from distant to close (long views to close-up details).
•Whether to stress the continuity of images or variety.
The higher-level aspects of treatment and style are more difficult to pin down, being dependent on a photographer’s ability and creativity. Nevertheless, it helps to develop and follow your own way of choosing, composing, and lighting images.
Fairy lights
This night-time view of Lake Palace hotel was shot using a tripod and a long exposure to make the most of the beautiful lighting.

On the waterfront
A different viewpoint of Lake Palace hotel from the waters of Lake Pichola.
Camera choices
There are three basic types of digital camera available today, all of which are suitable for photography in the field (I exclude backs for medium- and large-format cameras). They are:
•Compacts
•Fixed-lens (prosumer) SLR-like models
•Digital SLRs
Each has its advantages and disadvantages, and the right equipment depends ultimately on the use you intend to make of the finished images.
Although there are now some compact cameras that boast a resolution of 14+ megapixels—comparable to many digital SLRs—because of their relatively small sensors when compared with a digital SLR, image quality, particularly in low light and/or with a high ISO setting, is unlikley to be sufficiently good enough for general print publication. So if you’re hoping to sell your images to a stock agency a compact camera is unlikely to provide you with acceptable results. However, for a web blog, for example, or as a personal record for friends and family, most compact cameras are capable of producing perfectly acceptable results.
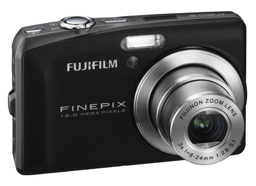
Compact Camera
Many modern compact cameras boast high resolution figures, in excess of 10 megapixels.
Fixed-lens prosumer models are, in relation to digital SLRs, light and compact, considerable advantages for traveling. The better models, particularly those with larger-sized sensors, can produce excellent images which wouldn’t look out of place ina magazine or book. However, a prosumer camera won’t produce consistently high-quality images that would satisfy a picture agency.

Superzoom Camera
Fixed-lens, prosumer “superzoom” cameras combine high-resolution sensors with zoom lenses that go from wide-angle to ultra-telephoto, so there’s no need to carry around a heavy bag full of lenses.
Digital SLRs (DSLRs) tend to be more rugged, accept a wide range of lenses, and, particularly those that feature full-frame (35mm) sensors, will provide superb image quality. If your intention is to get your images published as widely as possible, then a DSLR (with a selection of good quality lenses) is your best option. Weight is, nevertheless, an important consideration when traveling, so think about what you’re going to do with your images and weigh up the pros and cons of each camera type.

Entry Level DSLR
An “entry-level” digital SLR will typically feature an APS-C-sized sensor (22 x 15 mm) with a resolution of between 10 and 15 megapixels, and is capable of producing excellent results, even in low light.

Professional DSLR
An increasing number of pro-spec digital SLRs feature a full-frame (35 mm) sensor and a resolution of over 20 megapixels. The image quality of such cameras is comparable to that of a medium-format film camera.