Preparation Part II
DSLR travel kit
Weighing 26lb (12kg), this is no lightweight configuration, and was assembled specifically for a serious hike in the hills. If the trek involves overnight camping for two or three days, the number of spare batteries and memory cards will have to be worked out very carefully from your own experience of how you shoot. Needless to say, halfway up Helvellyn or on a trans-Himalayan pass is not the place to run out of either of these. Although specifically a trekking backpack, by dispensing with a few items, such as the walking pole, water bottle, guides, maps, and knife, you have a DSLR kit that would cover pretty much most photographic opportunities.

•Lightweight walking pole: Pole can be fitted, as here, with a small ball-and-socket head, so that it doubles as a monopod. Useful as a support after exertion, when your hands are likely to be less steady than usual.
•180mm lens: A useful telephoto lens that gives a little less than 3x magnification over standard.
•300mm lens: For a long telephoto, this is a good compromise between light-gathering power (f4) and weight (nearly 3lb, or 1.3kg).
•105mm lens: A medium telephoto macro lens, for nature close-ups as well as general scenic views.
•Lightweight binoculars
•Tripod & strap: Extra weight, but important if you intend to shoot at speeds slower than 1/30 sec. This model is light, but expensive—carbon fiber with a magnesium alloy ball head, weighing 3.5lb (1.6kg).
•SLR: Your SLR camera will determine which lenses and accessories you can use.
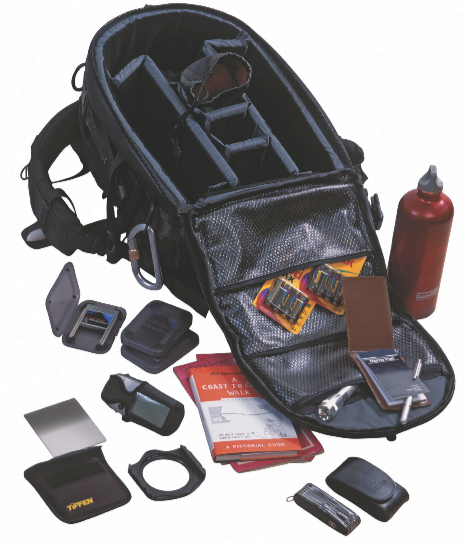
•Backpack: The camera versions like this are annoyingly more expensive than regular backpacks, but they do the job well, with compartments, adequate padding, and room for awkward items like a tripod.
•Karabiner: A climbing accessory that doubles for securing the backpack.
•Spare batteries: According to experience, but more than anticipated.
•Filter holder and grad: Neutral grad filter for darkening skies, needs a holder which allows it to be moved up and down, and rotated. Adaptor rings for fitting to various lens diameters.
•Wainwright and map: Trekking guide and map. In this case, for a walk across England from the Lake District, the famous hand-drawn, hand-written Wainwright Coast to Coast.
•Swiss army knife: All-in-one emergency small tool.
•Torch: Lightweight, rugged, twist-top operated.
•Small notebook and pen
•Spare memory cards: Number and capacity based on experience. This camera uses high-capacity CompactFlash cards.
Camera accessories
One accessory that you should seriously consider taking with you when in the field is a tripod. Most photographers have mixed feelings about tripods. On the one hand they are undeniably useful in adding to the range of images you can get on a trip, such as night-time views, as well as enabling you to obtain sharp images even at slow shutter speeds. On the other hand, they weigh extra, are not much fun, and slow down the pace of shooting. How much more pleasant and looser to simply walk and shoot hand-held.
Travel for even a few days, however, increases the chance that you may need a tripod, and most photographers planning a long trip will at least take a tripod along, even if it stays in the vehicle or hotel room for most of the time. Make sure you choose a model that can comfortably support your camera with the zoom set to its longest focal length (or with the longest lens you have if using a DSLR). Cost enters the equation for travel, because strong, light materials are available and they are always more expensive.

Finally, there are good impromptu alternatives to tripods, depending on how slow a shutter speed you need. To hold the camera more steadily, a rolled-up cloth or soft camera bag on a solid surface (such as a wall) works very well—if you press down on the camera or lens as you shoot, you may be able to use shutter speeds as slow as one second.
There’s a huge array of other camera accessories available today, some of which are shown on these pages. It’s very tempting to talk yourself into thinking that you’ll need everything you can possibly imagine when on the road, but do bear in mind that you may end up carrying your equipment for long periods of time over lengthy distances so only take those accessories that are essential for your photography.
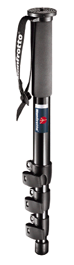
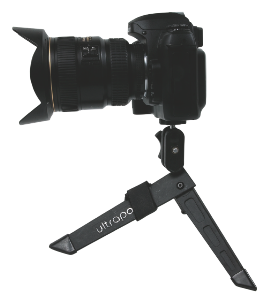
Monopod
A single adjustable pole can improve the shutter speed at which you shoot by about a factor of two, and there are numerous monopods available for just this purpose. If you are trekking, look for a walking pole that is fitted with a 3⁄8 in (9 mm) screw that will accept a small tripod head: two items in one cuts down on your packing and the weight you’re carrying.
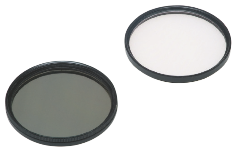
Polarizing filter
Circular variety. Gives reflection-reducing and sky-darkening effects that are difficult to replicate by any post-shooting digital filter.
UV filter
Colorless. Serves the double function of reducing UV and protecting the delicate front surface of the lens.
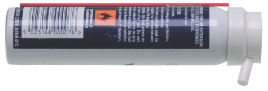
Compressed Air
Not for the sensor but for the outside of equipment.

USB Cable
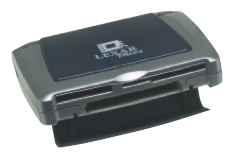
Card Reader
Mini-tripod
Surprisingly useful, being light enough to carry without noticing. What it lacks is elevation, but there are often surfaces to give height, such as a vehicle roof. One good technique is to press the mini-tripod against a vertical surface, such as a wall.
Protecting your camera
There are three extreme environmental conditions that could adversely affect your camera’s operation—cold, heat and dust, and water. Let’s take a look at each one in turn. The operating conditions for most digital cameras and media is 32˚F to 104˚F (0˚C to 40˚C). Below freezing, there is an increasing risk of failure, and in intense cold (-68˚F/-20˚C and below), metal, and some plastics can become more brittle and subject to cracking if knocked hard. More immediately obvious is that metal will stick to the skin—very painful to remove—so use gloves when handling and exercise caution when holding close to your cheek and nose. In any case, expose the camera to the full cold only when shooting. For the rest of the time keep it well wrapped in a padded waterproof bag or else carry it on a strap against your chest underneath a front-zippered parka.
Batteries deliver less power at low temperatures and will need to be replaced more frequently. Allow for this in the number of batteries you carry, and prepare to recharge more frequently than usual. Carry spare batteries in a warm place, such as your pants’ pocket.
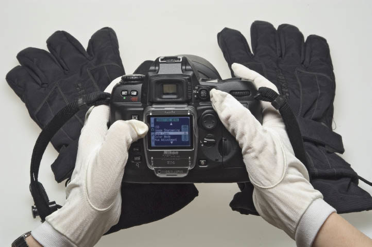
Silk inner gloves
One solution when handling extremely cold equipment is to wear silk inner gloves, which are efficient for short periods when the outer pair is removed.
Extreme heat can also cause failure in the camera, media, and batteries. Very high temperatures are less noticeable in dry air as the body feels less discomfort than when conditions are humid, so monitor the equipment particularly carefully in arid, desert locations, and do not expose cameras to direct sun. As with cold weather, it is always best to keep the camera in a bag until you need to shoot.

Reflective foil
As a rule, you should never leave equipment exposed to direct sunlight in hot conditions. If, for any reason, this is unavoidable, keep it covered with something highly reflective, such as foil or a space blanket.
The second great problem with dry heat is dust, sand, and grit, more common than in humid conditions and more likely to be airborne. Particles can penetrate joints and will cause abrasive damage to moving parts (even though there are fewer mechanical movements in a digital camera than in a traditional film model), and are very difficult to remove. A special problem for digital cameras is the danger of particles settling on the sensor, which will cause artifacts on every shot. Try to avoid changing lenses in such conditions, but if you must, try to find a sheltered place in which to do so, and expose the camera to the air only when shooting. In obviously dusty conditions, such as a duststorm or in a vehicle being driven on an unpaved road, place everything in a large plastic bag and tie it up.
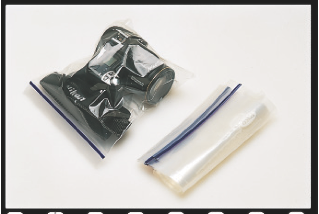
Finally, water in all its forms, from condensation to a complete dunking, is particularly damaging to cameras and lenses. A few drops of rain are harmless, but the amount of water penetration depends on the build quality of the camera. The priority is to keep cameras dry, which means at least under cover in wet conditions. If you know in advance that this will be difficult, investigate whether a waterproof housing is available for your particular camera. Depending on the design of the camera, it might also be possible to rig up impromptu waterproofing with a clear plastic bag and rubber bands.
By the sea, saltwater and salt spray (the latter common in windy weather) bring the added risk of corrosion. Wipe the camera frequently with a clean, dry cloth, and at the end of the day go over all surfaces again, using a damp cloth first. If you drop a camera in water, retrieve it immediately, shake it, open everything that can be opened, wipe off what water you can, then use a blowdryer gently to dry the inaccessible areas.
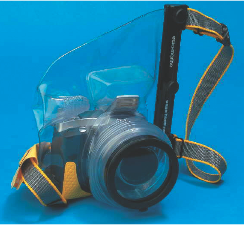
Flexible case
This sealed plastic container is flexible enough to allow use of the camera, with a special clear lenspiece, but sturdy enough to make it waterproof.

Space blanket
Light and compact, a space blanket in metalized polyester is deal for wrapping equipment. Also useful for people.
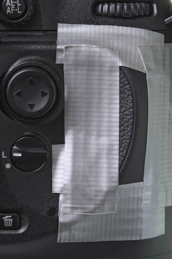
Tape over the cracks
One part of a digital camera that is always susceptible to dust and sand is the memory card compartment. Consider using duct tape or insulating tape to seal this.