On The Road Part II
Forward digital planning
The digital solutions to obstructed views on the previous pages are just one example of an essential difference between digital and traditional film cameras: with digital the photography does not end with the capture of the image. The final image is whatever you decide it should be. Post-production is the term used for the work performed on images after shooting to turn them into their final form. Think of it as an extension to shooting.
Indeed, taking full advantage of the freedom and flexibility offered by digital capture calls for a different approach to photography itself. And, as with traveling and travel photography, the principle is forward planning: shooting now with a view to what can be done later. I’m not suggesting that alteration and manipulation should be standard, but there are already several established possibilities, with new ones waiting to be discovered. The established routes include digital removal of unwanted objects, as we’ve just seen, and also conversion to black-and-white and panoramas, both of which are dealt with on the next pages.
Other possibilities suggest themselves. For example, photographing the identical scene under different lighting conditions provides interesting material for subtle digital manipulation. With just a pair of shot versions, sunlit and cloudy, you can create any combination of the two. Superimpose one over the other in perfect register, as two layers in an image-editing program, and use a paintbrush or eraser to create the effect of a burst of sunlight illuminating just a part of the subject.
The same technique is useful for handling a high range of brightness, such as on a bright cloudy day when a correctly exposed landscape leaves the sky washed out and white. In this case a second exposure, a few stops darker, to record sky detail, can later be combined with the first shot.
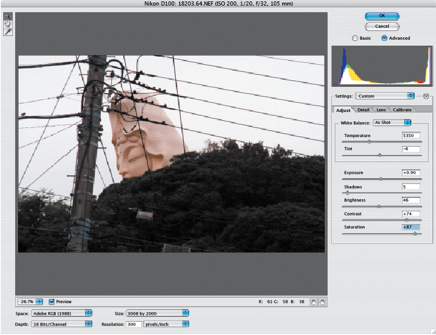
1. Managing difficult contrast: Part of digital shooting is knowing what can be done later—and preparing for that work. Here, the juxtaposition of a huge religious monument and tilting power cables in Japan was appealing, but the weather and lighting were unhelpful. But I knew that this could be dealt with provided that I shot in Raw format and avoided overexposure.

2. Raw brights: The Raw image was processed a first time to keep detail in the highlights.

3. Raw darks: The same Raw image was processed again, this time to keep detail in the shadow areas. The shadow image was then pasted onto the highlight image in a new layer.
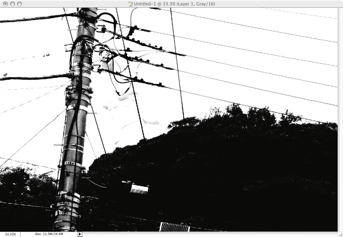
4. L.A.B levels: The light version was then converted to Lab mode, the Lightness channel given extreme contrast by adjusting Levels, and this turned into a selection—in effect a highlight mask.
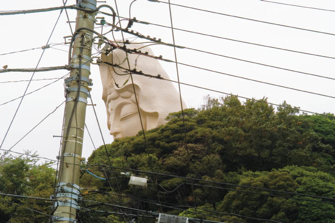
5. Composite: After loading the highlight-mask selection into the upper, brighter layer, the Delete button was hit, creating a composite that preserves all the important tones and colors.
Switching to black and white
Most digital cameras offer the option of shooting in monochrome, and although most camera owners ignore this setting, it has exciting possibilities. Black-and-white photography is by no means a reduced version of full color. In terms of composition, lighting, and graphic texture it works in a substantially different way, and switching from color to monochrome calls for rethinking your visual approach.
By restricting the means of recording images to a range from white through grays to black, it gives special importance to the modulation of tones. This in turn gives stronger meaning to shape and line. With the image constructed entirely in grayscale, the viewer’s eye pays more attention to texture, too. Black-and-white is capable of great subtlety. As a rule, scenes in which the main visual interest is in pattern, texture, silhouettes, or the contrast between different shapes, are candidates for thinking in black-and-white.
However, even if you have shot in color, you can still convert the image to mono-chrome by discarding color information. Better still, having the resource of all three color channels—red (R), green (G), and blue (B)—allows you to control the tonal values of an image with precision.
Automatic desaturation
The default methods of removing color inPhotoshop are to choose either Grayscale from Image>Mode or Desaturate from Image>Adjustments. They have essentially the same result, which is to assign equal values of red, green, and blue to each pixel, and therefore offer little in the way of control.
More evocative in monochrome
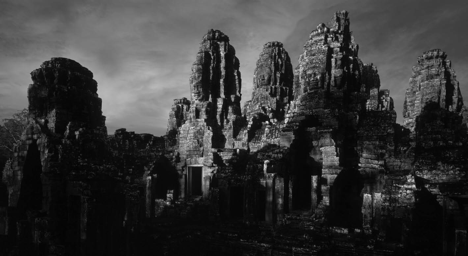
The rich complexity of shadows and the texture of carved stone at the temple of Bayon in Cambodia carry more weight without the distraction of color. Here, black-and-white allows the eye to savor tonal variety and subtle differences in the surfaces of the ruined monument.
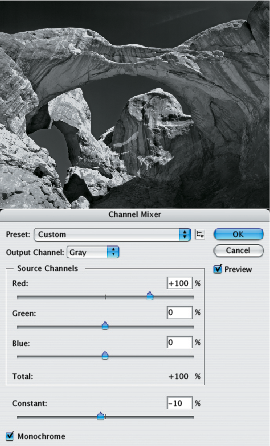
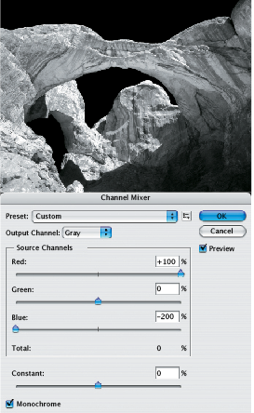
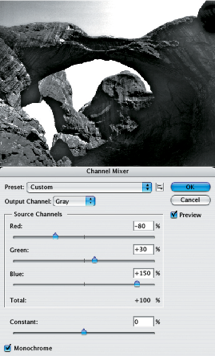
Channel mixer
By checking the Monochrome box of the Channel Mixer, you can adjust the channels and experiment with the tones of each element of the scene.
Dark red
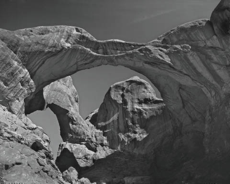
A high red value, and low blue one (comparable to using a dark red filter on the lens) darkens the sky and achieves an almost infrared effect.
Strong blue
The high blue value cancels out blue in the image, with the result that the sky is made paler. In contrast, the yellow tones in the rocks become richer.
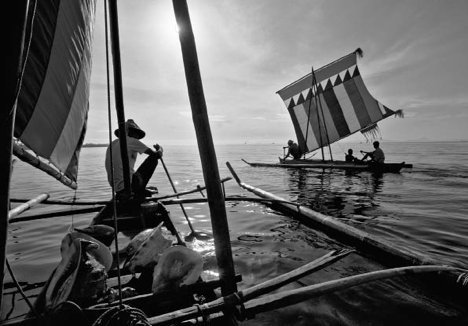
Shell fisherman
A highly atmospheric shot of a shell fisherman in the Philippines, scanned from a color transparency and converted digitally to black and white.
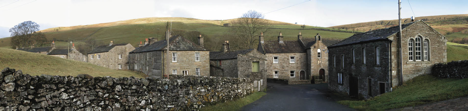
Panoramas
The term panorama is used for wide horizontal, mostly landscape, views. The long format, trimmed top and bottom, gives the eye a chance to roam around the picture. Just as in real life, you don’t take in everything at a single glance. Instead, you discover different things within the picture, even if this takes only a few seconds.
A panoramic frame is surprisingly easy to use for composition. Even if the scene itself doesn’t seem to be so horizontal, the frame can act like a storyboard, with things going on in different parts. It even works to have the frame “divided” into panel-like areas. It usually helps if you can include plenty of detail or events in the frame, so that the eye has every opportunity to explore.
What makes it so relevant to digital photography is the software available to join a strip of separate images into one seamless, almost endless view. This has proved so popular that digital camera manufacturers now routinely include a so-called “stitching” program on the software that usually accompanies the camara. There are also specialist stitcher programs that simplify the precedure and offer advanced features. The one used here is Stitcher, but most stitching software works in the same way.
The sequence is simple. Begin with an overlapping horizontal of images shot from the same spot. The overlap should be at least one-third between each pair of frames. The stitching software needs to know this in order to find common points in neighboring images, to merge them. Select the images to be merged and the software will automatically create the panorama.
Leveling the sequence
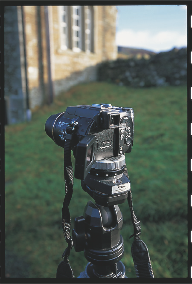
The best results for a single-strip panorama are when the camera is perfectly level. If not, you will lose some of the assembled image when cropping into a rectangle. Ideally, use a panoramic head featuring a level on a tripod, but it is also perfectly acceptable (and much easier) to shoot by hand. Keep the horizon at the same height in each frame.

Shooting sequence
A sequence of five overlapping frames was taken. An overlap between each of about 40% helps the stitcher software to find enough corresponding points.
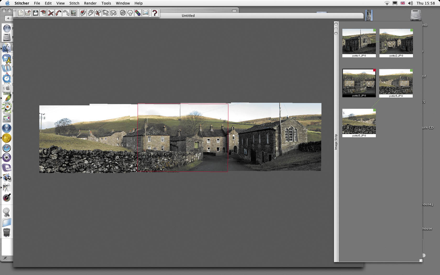
Stitching
The images are loaded in order into the stitching program. This warps each to fit the others, then equalizes the tones for a smooth blend. Finally, it renders the panorama as a TIFF or JPEG file.
Cultural restrictions
Generally speaking, too much is made of differences in behavior between cultures. Crass is crass in most societies. As a rule, polite behavior works universally, and is no bad thing to exercise all the time.
However, photography, by its very nature, can be intrusive. Bear this in mind when in a different culture, as doing something which may be just acceptable in your own society—a slight breach of politeness that is nevertheless recoverable with a smile—may go too far elsewhere.
You will be forgiven minor cultural gaffes unless you have already managed to annoy people in other ways. Major ones should be obvious, but are outlined here in any case. The principal exception to all of this is in countries that are undergoing some periodic upheaval in their society, politics, or economy. A wave of religious fundamentalism, for example, may last just a few years, but during that time many people are likely to be highly sensitized to behavior that does not comply.
Customs
•Footwear indoors: In many Buddhist countries, Japan (where the custom is only partly related to Buddhism), and some tribal societies, shoes should be removed before entering houses, places of worship, and some other interiors.
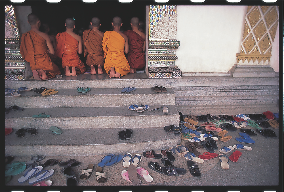
Footwear
Many asian countries have deeply ingrained custom of removing shoes in religious places and even in homes.
Social issues
•Poverty: Scenes of people living in poverty reflect badly on the government. In some countries you may encounter objections.

•Ethnicity: Some countries have internal racial problems, and this includes tribal conflict and minority peoples. Some minority people even quarantine themselves from outsiders, for example the Hopi in the southwestern USA.
•Dress: Traditional dress, while actively celebrated at festivals and parades, may in some countries at some times be considered a sign of “backwardness.” It is also, of course, connected to ethnicity problems and to religion.
•Gender: In some societies with unequal rights between genders, you may encounter problems photographing women. Always ask beforehand.
Religion
•Christian: Few restrictions in mainstream Christianity, although sects tend by their nature to isolate themselves (Mennonites, for example). As with any religion, if you want to photograph inside a place of worship during prayers, mass, or any ceremony, ask first.
•Muslim: Generally restrictive for photographs, in some places extremely so. Much depends on the country (Indonesia, for example, tends to be more relaxed than Pakistan), but it is wise to start from the assumption that photography may be banned in the interiors of mosques. Ask and you may be pleasantly surprised. In strict Muslim societies where women are veiled or otherwise shrouded, it is a good idea not to photograph them.
•Hindu: As Hinduism is not a single unified religion, restrictions depend on the deity worshipped. In general, inner sanctuaries prohibit photography.
•Jewish: The stricter sects will not want to be photographed.
•Sikh: In general Sikhs welcome non-Sikh visitors, and there may be only a few places where photography is prohibited.
•Buddhist: As one of the world’s most tolerant faiths, Buddhist sites are almost all open to photography.
•Shinto: This Japanese faith places restrictions on entry and photography to the inner sanctuaries at the principal shrine, Isé. Otherwise, generally open.
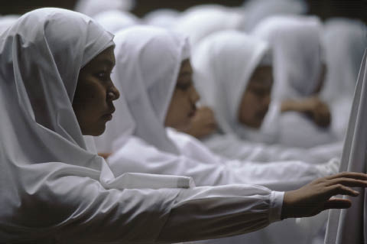
Muslim school
Girls in an Islamic school in Singapore. Religion and dress can together be a sensitive issue—again, it is essential to clear permission first.
A few tips:
• If in doubt, watch what other people do first. (Isn’t that what your mother taught you at the dining table?)
• Smile a lot.
• Don’t draw unnecessary attention to yourself.
• If you think you’ve really made a faux pas, move away.
• Don’t display anger. Vent any of your frustrations later.
• Display good manners.
• Be polite and friendly.
•Learn a little of the language.
Editing your images
Editing photographs, by which here is meant the selection process of images to keep and images to throw out, has always been an integral part of the creative process. With film it was usually reserved for the return home, but now, digitally, images are available for viewing immediately, so that at the end of a day you can valuably review what you did.
Given an adequate viewing system, you can sit at the end of a day in a hotel room, and examine your images. By doing this you have an overview of the trip as it progresses, as well as valuable feedback on successes. It does, however, need a computer. If you travel with a laptop, good. Otherwise, on-the-road editing is one more factor to consider.

You can perform an immediate edit with the camera as long as the images are still on the memory card, but on a long trip you will have to download these—onto the hard drive of a laptop or a portable storage device. Some portable storage models allow viewing on a small screen, which is useful, but not particularly convenient for editing, which really needs images to be viewed side by side in groups.
The software for editing digital images is classified according to the sophistication of its features. Browsers are generally restricted to doing just that—viewing the stored images. All the camera manufacturers supply a browser to display images downloaded from the camera.
A step up from browsers are image management programs. These are able to order images in a variety of ways and provide the means to search and find images. As your collection increases, an image database becomes essential.
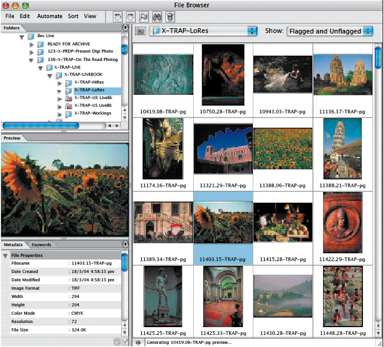
File browser
This is Photoshop’s File Browser. It displays thumbnails of any folder of image files, and any relevant information you choose, like size or resolution.
Digital rejects
One problem with on-the-spot editing is that it’s actually too easy to throw images away. Until you reach the point of having no room whatsoever for storage, I recommend as a precaution that when you discard images during editing you place them in a special Rejects folder rather than fully delete them. You can revisit the folder later and delete then.
Basic editing procedure
Irrespective of where you do this, photo-editing invokes certain skills and sensibilities. Here are some basic things to think about:
• Throw out all technically incompetent shots (wrong exposure, blur, shake, etc.). By “throw out” I mean, of course, put in a Reject folder (see above).
• Discard images that are awkward, in the sense of a clumsy arrangement or moment, such as someone blinking.
• Group sequences and very similar images of the same subject.
• Mark or flag in some way (depending on your editing software) the best one or two images in each of the sequences, and the best among all the other images. These images are the “selects.”
• If your editing software allows several folders or cataloges containing copies of the same image, open some with themes relevant to the trip, for example “People,” “Landscapes,” “Colors,” “Markets.” Place copies of appropriate images in these.
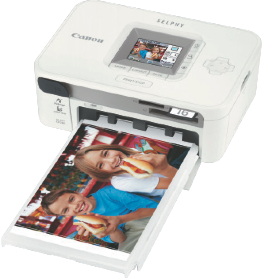
Portable printer
A valuable, unique tool for shooting in situations where goodwill is paramount, a portable digital printer makes it possible, at relatively low running costs, to supply the people around you with instant mementoes. In this sense, the portable printer can take the place of Polaroid prints. The only major drawback, as for Polaroids, is that once seen, everyone wants a print! This Canon CD-100 uses dye-sublimation, thermal transfer technology to produce 300 dpi 10 x 15cm digital photo prints with a protective coating. It can be powered by a rechargeable battery and with a car adaptor kit.

Browser procedure
In your browser of choice, use flagging/tagging to mark selects and other groups of images. These can then be displayed on their own either in the same folder or as copies in secondary folders dedicated to particular groupings.
Notes and captions
Why bother to keep notes? Surely this interrupts the creative flow of the shooting, besides being something of a chore. The answer lies in the nature of travel photography. Most travel photography is heavy on content—the what, who, and where of it all—and in traveling to new destinations there is always a lot to discover and learn. The name of this temple, the location of a hidden beach, the date and significance of a special ceremony: there is likely to be a constant stream of facts accompanying your photographs, and the details are normally available there and then. Noting them on the spot, either in a notebook or with a small tape recorder, will save a lot of trouble later trying to retrieve information that you have forgotten.
Photograph the label
In situations where objects are labeled, the easiest way to record the information is to take a shot of the label. Do this immediately after or before the main photograph, but be consistent as to which, particularly when shooting a series of objects, such as plants as in this example at a nursery.

Keywords
If you want other people to be able to search through your library of pictures, for instance if you are selling them as stock photography, you will certainly have to anticipate how they might search. The answer lies in using keywords. These are words describing some aspect of an image; when someone enters a word in the search box of the database, the program will look for images that have the same word attached. The more varied yet apposite the set of keywords attached to each photograph, the better the chance of matching the searcher’s request. The trick is in imagining what other people might look for, beyond the obvious description.
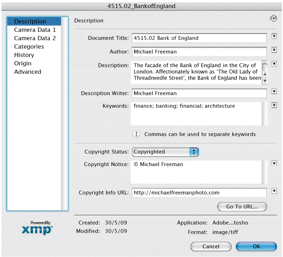
Captioning
For little extra effort, a caption can be attached to a digital image so that it stays with it and is always accessible. In the example below, essential information is entered into File Info in Photoshop, but the procedure is similar for other image-editing programs. The windows have many entry fields, but the three most important for photographers are the copyright, the caption, and keywords. All this information can be extracted by image-management programs and other databases.
IPTC Metadata
Lengthy caption entries, including keywords and copyright notice, are accessible in Photoshop under File>File Info… Clicking Advanced allows descriptions to be saved and appended—useful if you have a number of images needing the same caption.